Coulometrix Metiri COUMET60100SB User manual
Metiri™ Scientific COUMET60100SB
Metiri™ Hobbyist COUMET60100HB
Smart Energy Meter
Users Manual for Firmware ver: 0.8.8
QUICK PRODUCT EXPLAINATION
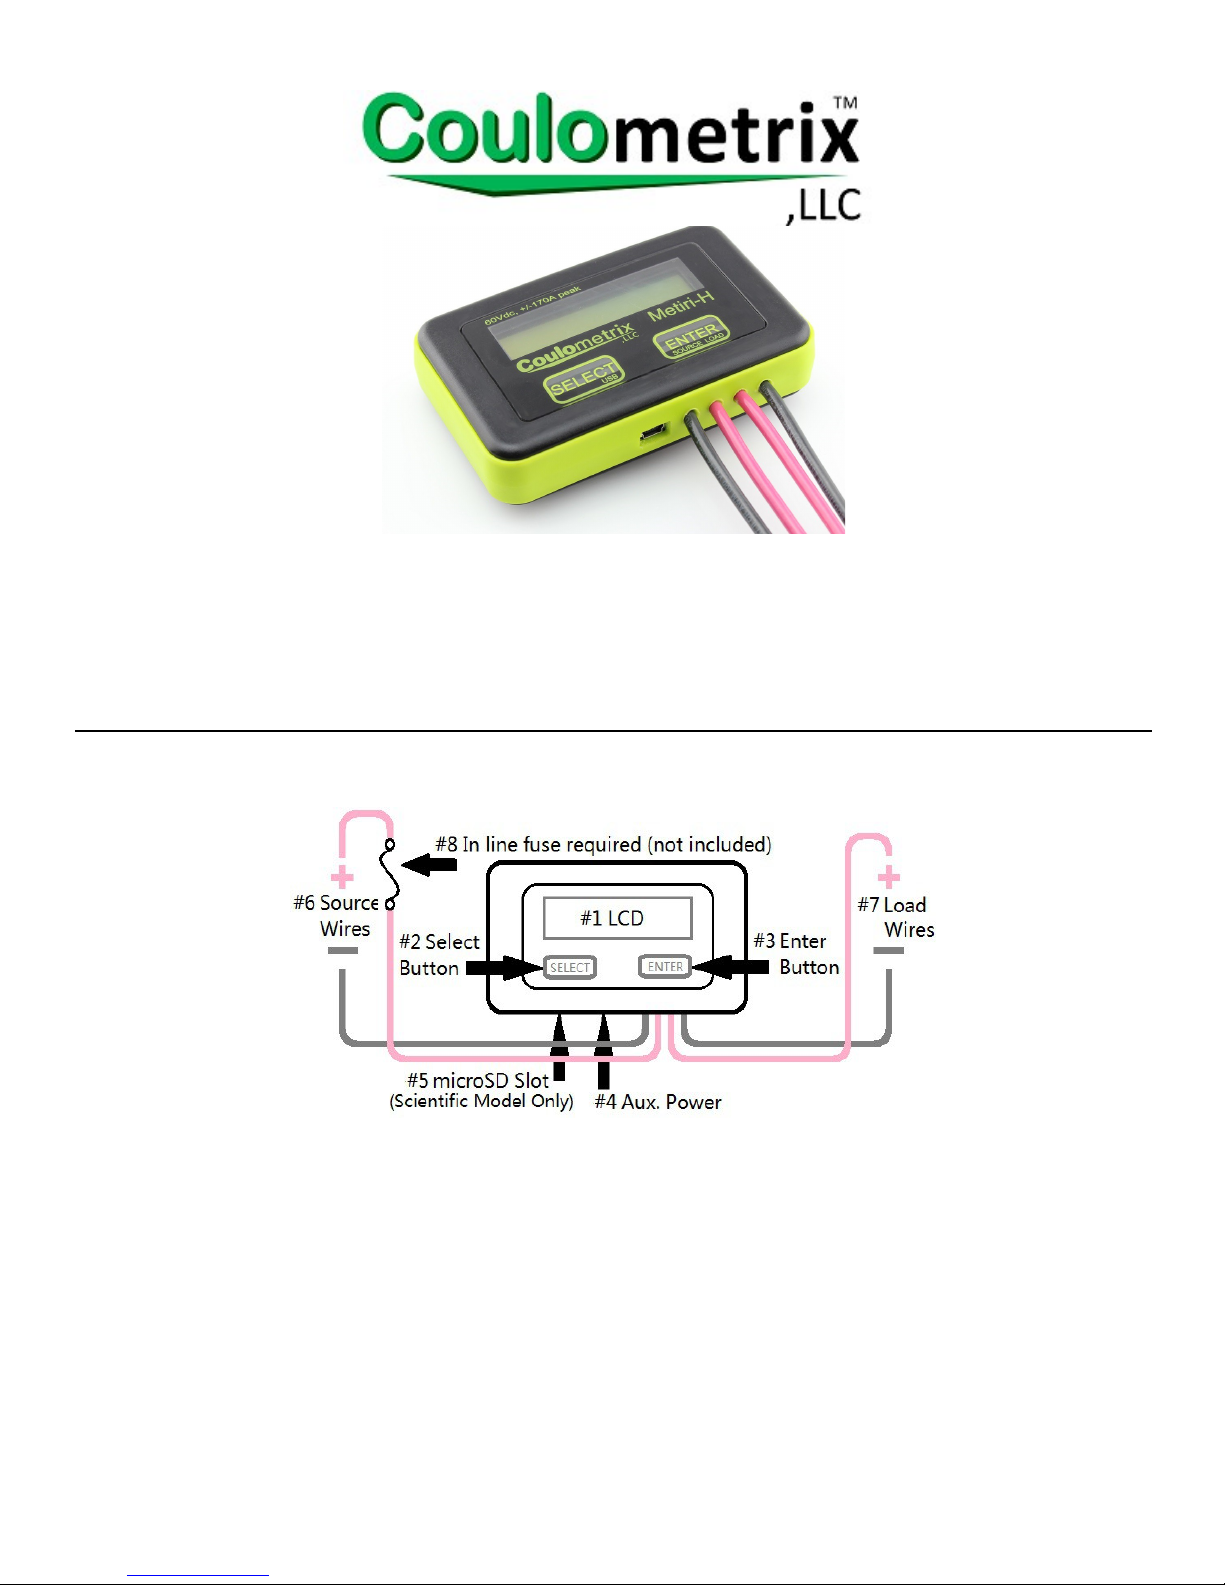
1. LCD: Back-lit primary display.
2. Select Button: ouch sensitive button with LED touch indicator. Press to scroll through data options or Smart
Graph.
3. Enter Button: ouch sensitive button with LED touch indicator. Press to return to the main screen. If on the
main screen, will scroll through set-up options.
4. Aux. Power: Female socket for device auxilliary power, 5.0Vdc +/-10%. Compatable with USB mini-B Plug.
5. MicroSD Slot Scientific Model Only): Card slot for recording of measured values. Can accept standard
microSD flash memory formated with FA 32. Metiri™-S will automatically detect card, create a CVS file, and
start writing measured data.
6. Source Wires: Connect to power source or battery up to +60Vdc. Current flowing from Source to Load is
considered positive current. Forward continuous current should never exceed 70 amperes.
7. Load Wires: Connect to power load or battery up to +60Vdc. Current flowing from Load to Source is
considered negative current. Negative continuous current should never exceed 70 amperes.
8. In Line Fuse Sold Separately): he Metiri™ products do not provide protection against too much current
flowing through it. A fuse installed in series with the positive Source Wire is required. Current flowing through
the Metiri™ product should never exceed the current specified in the Safe Operating Area graph.
www.GlobalTestSupply.com
Find Quality Products Online at: sales@GlobalTestSupply.com
TECHNICAL SPECIFICATION
Model Number COUME 60100HB COUME 60100SB
Maximum Operating Values
Voltage Operation Range +5.5Vdc to +60.0Vdc +6.5Vdc to +60.0Vdc
...with Aux Power Supply 0.0Vdc to +60.0Vdc 0.0Vdc to +60.0Vdc
Maximum DC Current +/-70Adc sustained +/-70Adc sustained
Maximum Peak Current +/-170A for less than 3 seconds +/-170A for less than 3 seconds
Input Current from Source or Load 28mA +/-10% 8mA to 149mA*
...with Aux Power Supply <1mA <1mA
Measurement Capabilities
Voltage Detection Resolution 10mV 10mV
Current Detection Resolution 100mA 100mA
Current Measurement Accuracy +/-1% from 2A ~ 170A** +/-1% from 2A ~ 170A**
Sample Resolution 8Hz (every 125mSec) 8Hz (every 125mSec)
Clock Resolution +/-2% +/-0.5%
Max Energy Recordable Value +/-2,147,483,648 Joules (watt
seconds)
+/-2,147,483,648 Joules (watt
seconds)
Max Clock Recordable Value 65,536 days 65,536 days
Recording Capability
MicroSD Card Size Capability n/a FA 32, up to 128GB
SELEC or EN ER Screen imeout 10 seconds 10 seconds
* Device current depends on source voltage. Higher the voltage, the lower the current.
** Current accuracy depends on proper calibration.
PRODUCT OPERATION
Connections: he Metiri™ Smart Energy Meter product line is an inline voltage, current, and energy measurement
device with all of the features and tools a solar enthusiast, RC hobbyist, or Scientific community would love.
he Metiri™ Smart Energy meter is in series with a pair of pure copper 10 AWG wires, one RED and one BLACK in
color. he RED wire is the positive or power wire and the BLACK wire is the return or ground wire. Metiri™ measures
voltage between these wires and uses a low side resistive shunt for monitoring current. he two exposed wires closer
to the USB connector should be connected to a power source or battery, and the two exposed wires farthest from the
USB connector should be connected to a power load or battery.
CAUTION: Do not place a negative voltage or reverse the voltage polarity of the wires or damage to the Metiri™, and
your system, might occur.
WARNING: Always install and in line fuse rated for no more than 200A in series with the Metiri™ Smart Power Meter
Device Power: he Metiri™ Smart Energy Meter will get the power it needs to run from the wires it is measuring and
requires a minnimum voltage accross those wires to function. If a voltage is desired to be measured that is lower than
the minimum voltage, auxilliary power will be needed. he Metiri™ products provide an auxillary power input using a
readily available mini USB connector. Simply plug in a mini USB cable into Metiri™, and the other end into any USB
power source, and Metiri™ will shut down its internal regulator, running off of the USB power only.
Device Measurement: When opperating Metiri™ from the Auxilary USB, the Source or Load cables should not be left
unconnected (otherwise known as high impedance) or leakage will cause incorrect measurements to occur.
In order to take accurate current measurements, it is important to understand that the minimum current resolution is a
percentage of the maximum current the unit is designed to read. he higher the current capability desired, the lower
the sense resistance needed to keep from overheating and thus less signal to noise.
Safe Operating Current: he Metiri™ products are fully bi-directional and will record current flowing in either
direction. his makes the Metiri™ products perfect for monitoring energy flowing in and out of a system battery bank.
he Metiri™ products attempt to interfear as little as possible with current moving through it. herefore the user is
www.GlobalTestSupply.com
Find Quality Products Online at: sales@GlobalTestSupply.com
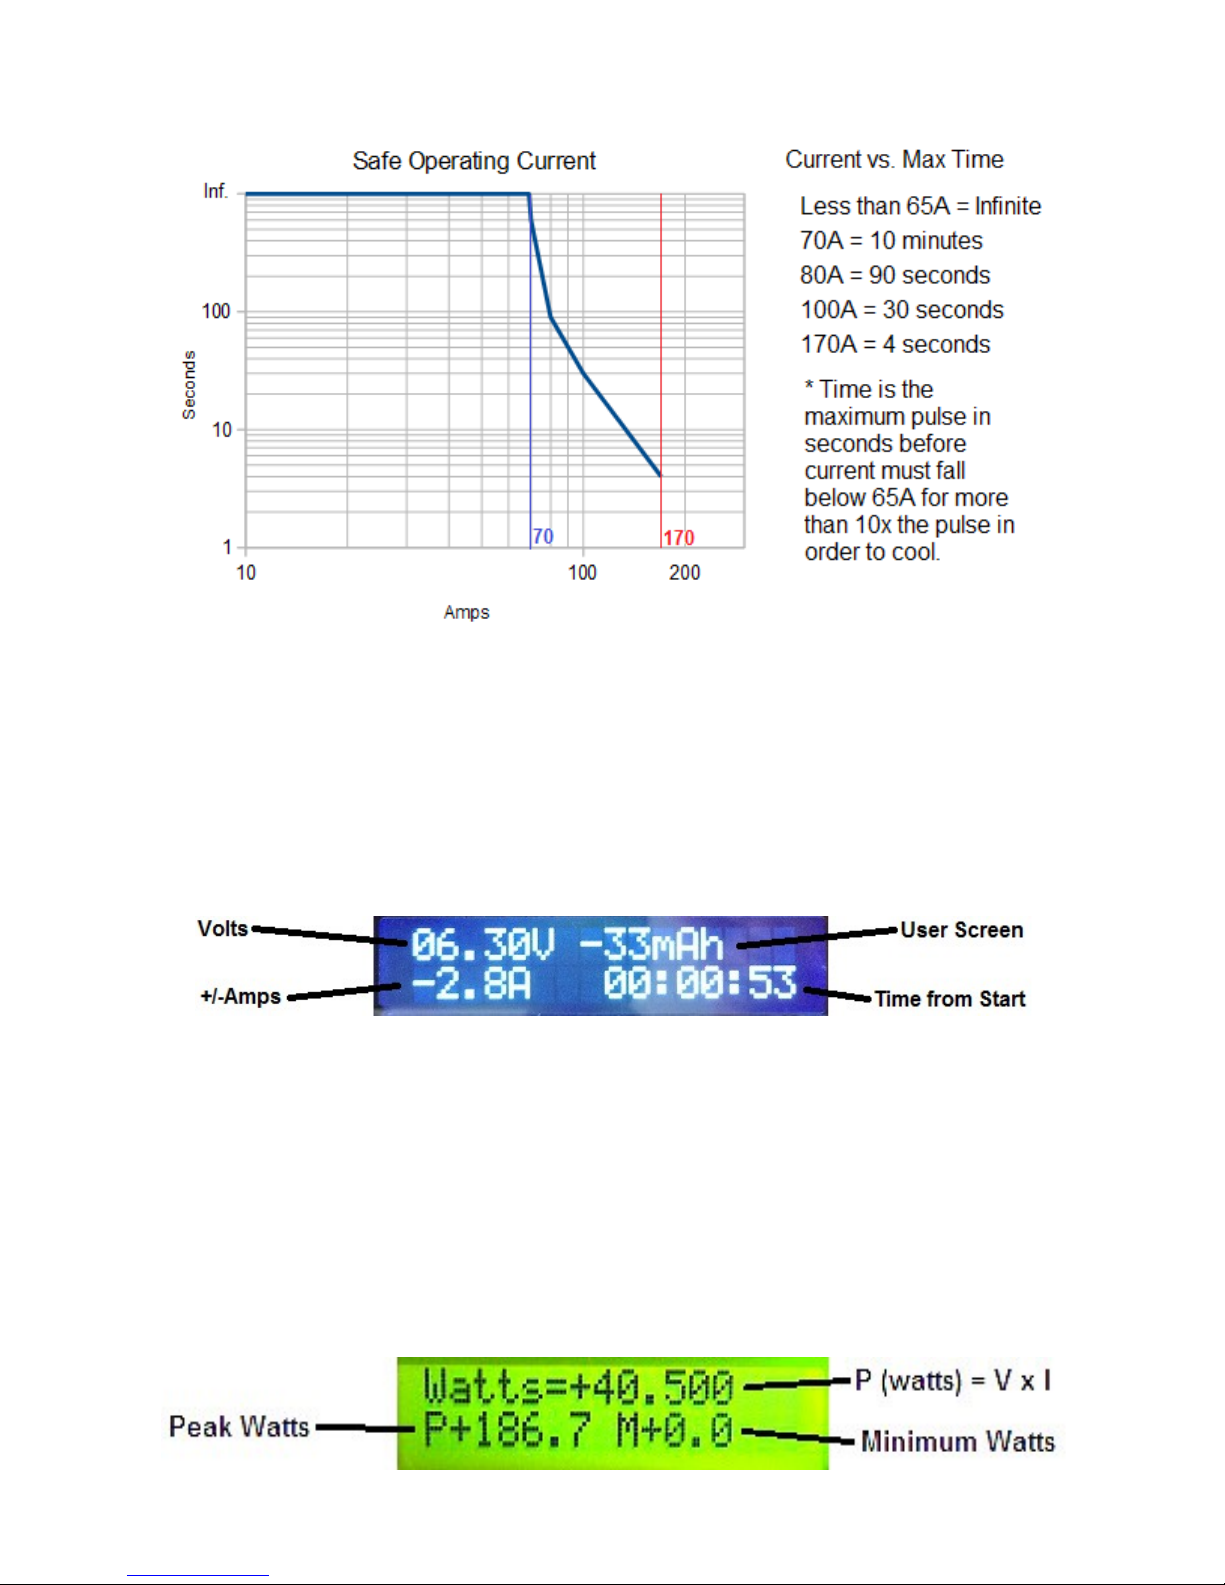
responsible for ensuring the current through the Metiri™ Smart Energy Meter does not exceed the Safe Operating
Current shown in the graph below.
If the Metiri Smart Energy Meter detects current exceeding the safe DC current level of 70A, the LCD will begin to flash
rapidly, warning the user. Allowing the current to exceed this value for sustained periods of time can result excessive
heat to the device and the wires connected.
DANGER: Opperating at currents above 50Adc can cause the Metiri wires, or the unit itself, to get extreamly hot.
You should never hold the Metiri Smart Energy meter by the wires with your bare hands or allow the wires to come in
contact with anything flamable.
HOME SCREEN
he default display is the screen shown when the Metiri™ starts up or if the EN ER button is touched in any other
SELEC screen. his is also the screen the Metiri™ will return to after 10 seconds of inactivity in any screen except
when scrolling through the Smart Energy Graph screen.
All measured values presented are in real time and updated at the same rate as the sample rate. he top right of the
display is programmable and is set in the Set Home screen. he bottom right of the display will show the time since
start in the format HH:MM:SS. If more than 24 hours pass, the time will roll over to 00:00:00 and will automatically
switch back and fourth from time to number of days passed.
For each day passed, Metiri™ will start a new data array for the Smart Energy Graph and will also start a new CVS file
for recording of measured data, if applicable.
SELECT SCREENS
Watts Screen: ouching SELEC when on the Home screen will display power in watts on top. Bottom left will
display peak watts (P) and bottom right will display minnimum watts (M) recorded. he LCD will return to the Home
Screen after ten seconds or if the EN ER button is touched.
Home Screen
www.GlobalTestSupply.com
Find Quality Products Online at: sales@GlobalTestSupply.com
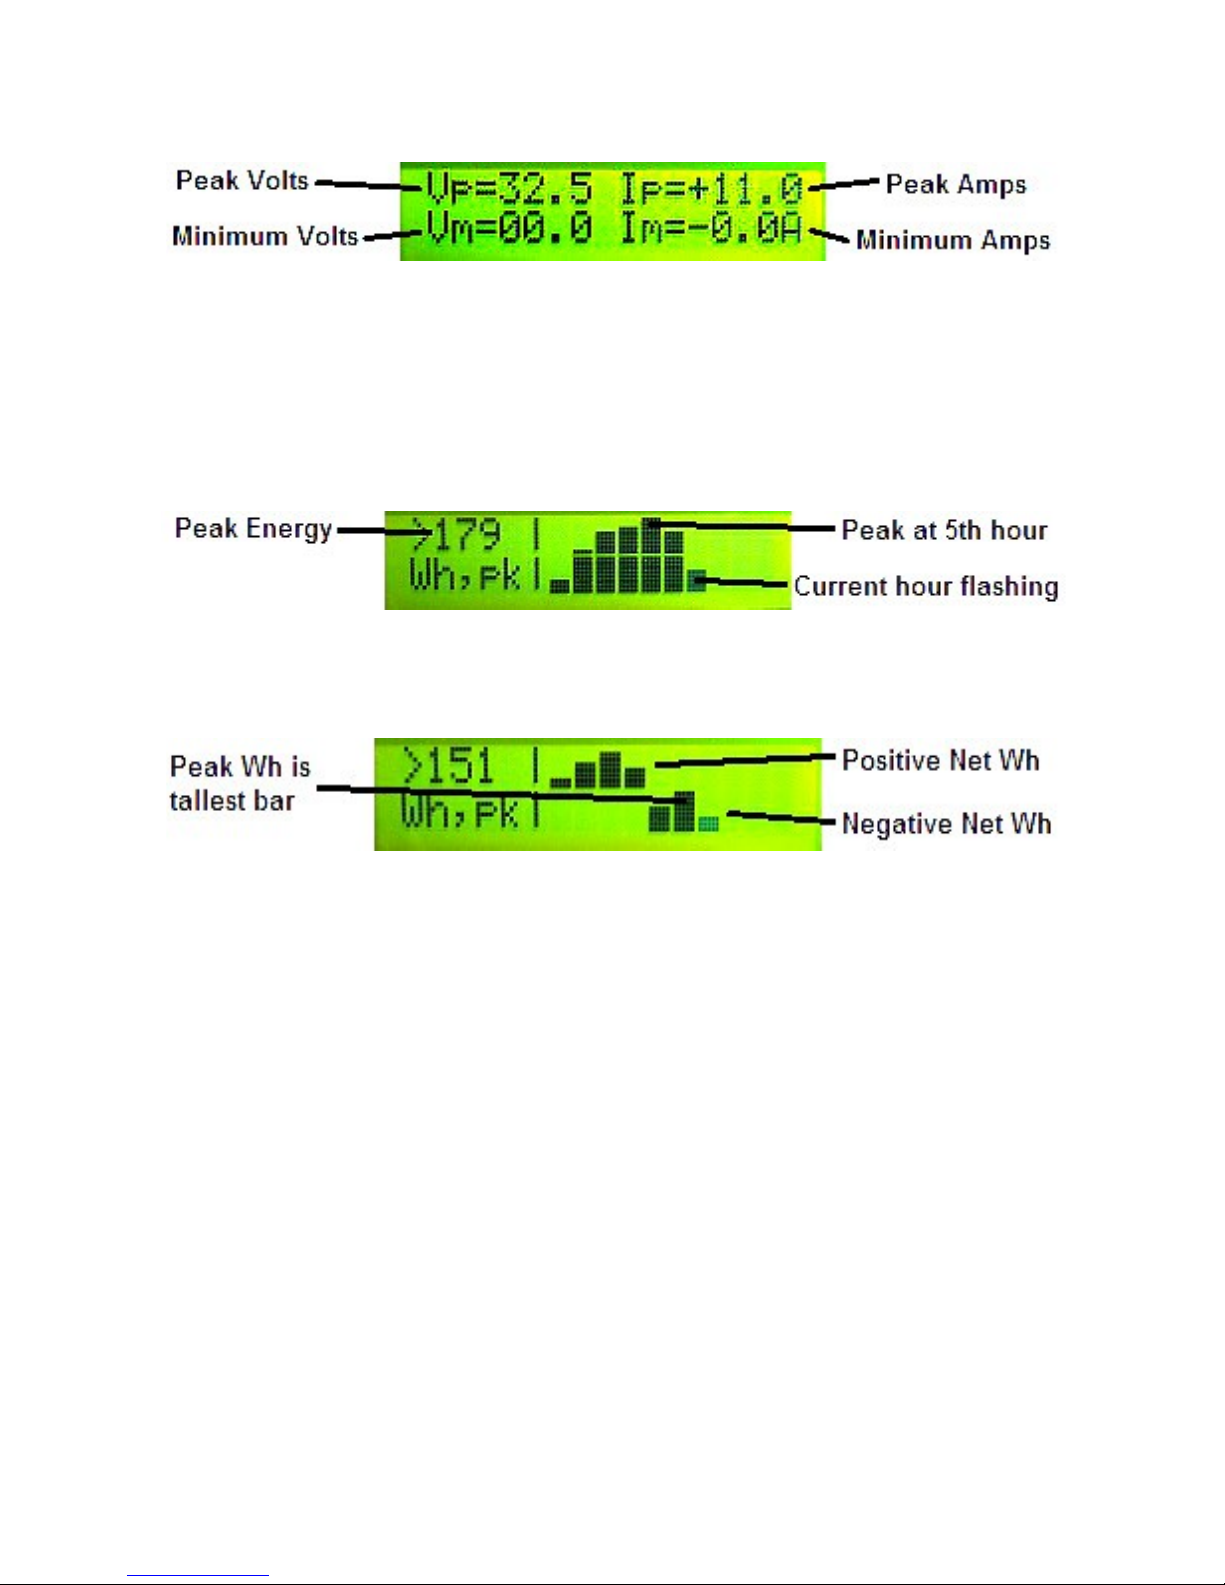
Min & Max Values: ouching SELEC when on the Watts screen will display peak (Vp & Ip) and minimum (Vm & Im)
current and voltage values recorded. he LCD will return to the Home Screen after ten seconds or if the EN ER button
is touched.
Smart Graph: ouching SELEC when on the Min & Max Values screen will start the Metiri™ Smart Graph program.
he LCD will return to the Home Screen after ten seconds unless the SELEC button is touched again. ouching the
SELEC button again will scroll the Smart Graph data to the left of the LCD, and will stay there until the EN ER button
is touch, returning the Smart Graph to the first hour.
he purpose of the Metiri™ Smart Graph program is to organize energy recorded over time in a way that is quick and
easy to understand. he program will organize energy measured into 24 bars by the hour recorded, with the current
hour flashing. he hour with the most energy will be represented as the highest bar (16 pixel rows high) with its value
printed on the left side of the screen, and all other hour's energy will be drawn relative to that highest bar. ( 16 x
<Current Energy Hour> / <Peak Energy Hour> = # of pixel rows ).
If the energy measured goes negative at any time, the Metiri™ SmartGraph will change so that the top 8 pixel rows of
the graph represent positive energy recorded, and the bottom 8 bars represent negative energy recorded. he hour
with the most absolute energy will be shows as a full bar (8 pixel rows) and all other hour's energy will be drawn
relative to that highest bar. ( 8 x <Current Energy Hour> / <Peak Energy Hour> = # of pixel rows ).
ENTER SCREENS
Set Home Screen: ouching the EN ER button when on the Home screen will present the user with the units
currently programmed for the Home screen. ouching SELEC will change the units to be displayed and will save this
setting to the User Memory. ouching EN ER after making a selection will return to the Home screen. After 10
seconds of inactivity, the LCD will return to the Home screen. he choices are as follows.
1. Show Joules: One Joule (J) is equal to one watt for one second.
2. Show Watt Hours: A Watt Hour (Wh) is one watt for 3,600 seconds.
3. Show Amp Hours: An Amp Hour (Ah) is one Ampere for 3,600 seconds.
4. Show Coulombs: A Coulomb (Q) is one Ampere for one second.
5. Show Watts: A Watt (W) is one Volt multiplied by one Ampere.
6. Rotate Values: his will rotate through all the values every four seconds.
Reset All Values: ouching the EN ER button when on the Set Home screen will ask if the user wishes to clear all
values. ouch SELEC to reset all recorded values or touch EN ER to continue to the next screen. After 10 seconds of
inactivity, the LCD will return to the Home screen.
All time, voltage, current, and energy values incluing the Metiri™ Smart Graph data will be cleared. Data saved to the
microSD card, calibration data, and device settings are not affected by this reset.
Eject SD Card Scientific model only): ouching the EN ER button when on the Reset All Values screen will ask if
the user wishes to safely eject the microSD card. ouch SELEC to eject the SD card or touch EN ER to continue to the
next screen. After 10 seconds of inactivity, the LCD will return to the Home screen.
he Metiri™-S will save all remaining data, close out the open CVS file, and unmount the card. he card cannot be
accessed again until it is removed and a new card inserted. he microSD card is not physically ejected, and will have
to be manually removed by grasping the edge of the card and pulling straight out.
www.GlobalTestSupply.com
Find Quality Products Online at: sales@GlobalTestSupply.com

SD Write Time Scientific Model Only): ouching the EN ER button when on the Eject SD Ca d screen will ask
the user the time desired in between data being saved to the microSD card. ouch SELEC will change the time
between saves, or touch EN ER to continue to the next screen. After 10 seconds of inactivity, the LCD will return to
the Home screen.
If a properly formatted microSD card with enough space is inserted, the Metiri™-S will automatically save recorded
data in a CVS file at time intervals set by this screen. he value chosen is written to non-volitile memory and choices
range from 125 milliseconds to 4 minutes between saves.
NO E: Setting the SD Write ime to 125mSec can result in very large data files as each data entry is 64 bytes.
Positive Current/Voltage-B Calibration: oucing the EN ER button when on the Reset All Values (or SD W ite
Time for Metiri-S) screen will prompt the user to begin the Positive Cu ent/Voltage-B Calib ation program.
Connect a DC voltage or current through Metiri™ as instructed on the LCD and touch SELEC to confirm for each step,
or touch EN ER to cancel. he initial screen will return to the Home screen after 10 seconds of inactivity. Once
calibration has begin, the screen will stay until calibration is complete or until the EN ER button is pressed to cancel
calibration.
S EP 1: Connect the Auxillary USB power for calibration. Connect a calibrated power source to the SOURCE wire
side and a load to the LOAD wire side capable of 9.0 Amperes and 12 volts.
S EP 2: ouch the EN ER button until you see the Positive Current/Voltage-B Calibration screen shown below. If the
negative current calibration is desired, touch EN ER once more and instructions for Negative Current/Voltage-A
Calibration will show.
S EP 3: Connect +12 volts to the SOURCE wires, make sure there is no current flowing through Metiri, and touch
SELEC to save the Voltage-B and zero current OFFSE Value. NOTE: no voltage is needed beyond this point, only
current.
S EP 4: Increase the current so that exactly 4.0 Amperes is flowing through the Metiri Smart Energy Meter. ouch
SELEC to save this value.
S EP 5: Increase the current so that exactly 9.0 Amperes is flowing through the Metiri Smart Energy Meter. ouch
SELEC to save this value. ouching SELEC at this point will save all calibration values. If a mistake is made,
simply touch EN ER to delete the saved values and try again.
S EP 6: Calibration is complete. he calibration results will be printed on the second line of the LCD and will be
saved to non-volitile memory. he values printed represent the current detected in 100mA values starting with the
zero current OFFSE , then the 9A reading, and finally the 4A reading. hese values are for reference only and do
not need to be remembered.
In order to ensure proper current and voltage measurement, both the positive current and negative calibration should
be done togeather. It is very important that calibration be done with a low noise power supply and load. Remember
that the EN ER button can be touched to cancel the calibration routine anytime before S EP 6 is reached.
Negative Current/Voltage-A Calibration: oucing the EN ER button when on the Positive Cu ent/Voltage-B
Calib ation screen will prompt the user to begin the Negative Cu ent/Voltage-A Calib ation program. Connect a
www.GlobalTestSupply.com
Find Quality Products Online at: sales@GlobalTestSupply.com

DC voltage or current through Metiri™ as instructed on the LCD and touch SELEC to confirm for each step, or touch
EN ER to cancel. he initial screen will return to the home screen after 10 seconds of inactivity. Once calibration has
begin, the screen will stay until calibration is complete or until the EN ER button is pressed to cancel calibration.
he steps to complete the Negative Current Calibration program are identical to the Positive Current Calibration
program except that the power supply needs to be connected to the LOAD wires, and the load needs to be connected
to the SOURCE wires so that current is flowing backwards. Remember that the EN ER button can be touched to cancel
the calibration routine anytime before S EP 6 is reached.
Clear User Calibration: oucing the EN ER button when on the Negative Current/Voltage-A Calibration screen will
prompt the user with an option to clear all user calibration data, and restore factory calibration. ouch SELEC and all
user data will be cleared from memory, calibration data will be loaded from factory memory, and will return to the
home screen. ouch EN ER and you will be returned to the Home screen without any action taken.
DATA LOGGING ON SD CARD Scientific Model Only)
Inserting a microSD card: When a microSD card is inserted, or when Metiri™-S starts with a card already inserted,
the Metiri™-S will automatically detect and start the mounting proceedure. he mounting proceedure checks to see if
the inserted microSD card can be used by checking the following:
1. Is the Card Formatted? he microSD card must be formatted using the FA 32 filesystem before it can be used.
he Metiri™-S will not attempt to format an unformatted microSD card.
2. Is there enough space available? he microSD card must have enough free space to equal a full days worth of
data to be used. he number of bytes needed is equal to 5,529.6KB divided by the SD Write ime in seconds.
For example, if the SD Write ime is set to 1 minute in between saves, the amount of space needed is
5,529.6KB / 60 seconds = 92.16KB. If the SD Write ime is set to 125mSec, then the amount of space needed
is 5,529.6KB / 0.125 seconds = 44,236.8KB or 43.2MB.
3. Is there an available CSV name? he Metiri™-S saves measured data in CSV (Comma Seporated Values)
format named using 8.3 filenames. he Metiri™-S names files according to the current day proceeded by the
letter 'M' followed by two letters starting at 'AA'. If that filename is already taken, then the prefix letters will
be incremented to 'AB' and so on until a free filename is found. If all 676 combinations of prefix letters are
used using the same date code, then the microSD card cannot not be used. (EXAMPLE: On day 13, the
Metiri™-S will look for filename M00013AA.CSV and if it does not exist, will create a new CVS file with that
name. If the file already exists, then a new file named M00013AB.CSV will be created) Data will only be
saved in the root space, so if all available files names are taken, simply moving the old files to a folder will
solve this issue.
If all three checks pass, then the Metiri™-S will attempt to mount the SD Card and start recording measured data to
the new file created.
SD Error Codes: If an error is encountered trying to use a microSD card, the Metiri™-S will display an error message
on the LCD and stop trying to use the card. he user should remove the card and take care of the issue or insert a
new card. he following is a list of error mesages and their meaning.
1. SD CARD ERROR: his message occurs if Metiri™ is unable to read the card or if the physical connection is
not reliable. he user should change to a different microSD card.
2. SD NOT FORMATTED: If this message comes up the microSD card either not formatted using FA 32, or
something is preventing the Metiri™-S from interfacing with the card. It is suggested to use a card that has
been formatted to FA 32, be between 2GB and 128GB in size, and not be too old.
3. SD MOUNT ERROR: he Metiri™ has recognized the card as formatted correctly but has failed to mount the
file system. his usually happens if the file system is corrupt or accessing the card returns too many read
errors. he user should try reformatting the microSD card or use another.
4. NOT ENOUGH SPACE: he microSD works correctly and has been mounted, however not enough space is
available to start a new measurement record. he user should delete or move files off of the microSD card to
make more space available.
5. SD FILE ERROR: he SD card is mounted and has plenty of space, but the Metiri™ cannot find an available
file name that can be used to record data into. he user should move old Metiri™ CVS files to another folder
before the card can be used.
www.GlobalTestSupply.com
Find Quality Products Online at: sales@GlobalTestSupply.com

6. OPEN FAILURE: Metiri™ encountered an error attempting to start a new file, or open an existing file. his is
usually caused by the card locked to read only or something in the file system is preventing Metiri™ from
writing to the SD card. he error will need to be corrected before the microSD card can be used.
7. WRITE FAILURE: Metiri™ received back a different value for the number bytes that should have been written
to the card. Metiri™ will stop using the SD card to prevent corrupting existing data. he card should be
removed and repaired using a CHKDSK or similar utility.
Removing an SD Card Data: Metiri™ needs to unmount the microSD card and close out the file being used for
recording of data before the card should be physically removed. his is accomplished by touching the EN ER button
twice so the user is prompted with, "Eje t SD Card?". ouching SELEC will cause the current file to be closed, and
card to be unmounted. When the user is prompted with, "SD CARD EJECT, Ready to remove" the microSD card
can be removed.
o remove the microSD card, grasp the edge of the card firmly and pull straight out. he Metiri™ does not use a card
ejection mechanism to ensure the card does not accedentially fall out during use.
Removing the microSD card before unmounting it can cause data curruption. If this happens, Metiri™ will force the file
system to be unmounted and prompt the user, "SD CARD REMOVED, NOT UNMOUNTED".
Notice Summery: he following rules should always be obeyed when using the Metiri Smart Energy Meter.
1. Working with electricity can be dangerous. Always use the Metiri Smart Energy Meter with an inline fuse and
consult a professional before using this device.
2. Never exceed 70A for any sustained length of time. If 70A is exceeded, the Safe Operating Current time
should be used as a reference to the safe time at higher current.
3. he Safe Operating Current can vary according to temperature, humidity, and altitude. Saftey testing was
performed in a 25°C ambient environment, at less than 15% humidity and an altitude of 6,200 feet.
emperatures or humidity levels higher than the stated values will decrease the Safe Operating Current levels
and time.
4. Never touch the wires when operating the unit. hey may be hot and can cause burns to exposed skin or
material.
5. Do not allow the unit to be exposed to the elements. Direct sunlight or exposure to rain and moisture can
damage the unit.
6. he Metiri-H and Metiri-S models are not waterproof. If the Metiri units gets wet, do not use. If you notice the
unit is wet while in use, do not touch it! Electrical shock hazard may exist.
7. he Metiri can read alternating current (forward or reverse current flow) as long as voltage always stays
negative. A negative voltage from the positive (RED) to negative (BLACK) wires can damage the unit.
8. Metiri-H and Metiri-S units were designed to record very large DC currents, so accuracy at very low currents is
not guaranteed.
Equations, Acronyms, and Facts to Remember: It is important to understand the difference between units of
energy or charge when trying to track energy flow. A Joule is a derived unit of energy in the International System of
Units and is equal to one watt (1 volt * 1 Amp = 1 Watt) for one second (1 watt x 1 second = 1 Joule).
EXAMPLE: Consider a 12V battery connected to an inverter needing 100 watts of constant power for an off-grid AC
solution for one hour. he amount of energy needed is simply (Power x Seconds = Joules or Ws) 100Wh or 360,000Ws
or 360,000 Joules. he inverter will always require 100 watts regardless of the battery voltage, therefore as the
battery voltage starts to drop the amount of current needed to equal 100 watts goes up. (P = V x I so I = P / V) Using
Ah to measure energy, makes this very difficult as voltage will constantly be changing.
•Volts = Current in Amperes x Resistance in ohms (V=I*R)
•Power = Volts x Current (P=V*I)
•Coulombs = Volts x Capacitance in Farads = Current x ime in seconds (Q=V*C=I* )
•Energy in Joules = Power x ime in seconds (J=P* )
•1 Joule (J) = 1 Watt Second
•3,600,000 Joules (J) = 3,600,000 Watt Seconds (Ws) = 1,000 Watt Hours (Wh) = 1 Kilowatt Hour (1KWh)
•Electrons are negativly charged. So when you plug a load into a battery, current is actually flowing from
negative (Ground) to Positive.
•Metiri in Latin means to measure or estimate.
www.GlobalTestSupply.com
Find Quality Products Online at: sales@GlobalTestSupply.com
This manual suits for next models
1
Table of contents
Other Coulometrix Measuring Instrument manuals


