Cousin Biotech INTRASPINE User manual

Page 1 / 52
INTRASPINE®
DEVICE FOR THE INTER SPINOUS SPACE WITH LAMINAR SUPPORT
en
Instructions for use
Page
2
fr
Notice d’instructions
Page
6
de
Gebrauchsanweisung
Seite
10
it
Istruzioni per l’uso
Pagina
14
es
Instrucciones de uso
Página
18
pt
Instruções de uso
Página
22
ελ
Οδηγίες χρήσης
σελίδα
26
pl
Instrukcja obsługi
Strona
30
cs
Návod k použití
Strana
35
sl
Navodila za uporabo
Stran
39
ru
Инструкция по применению
Страница
43
kr
사용 지침
페이지
48
Ancillaires
Implants &
Prothèses d’essais
COUSIN BIOTECH
8, rue de l’Abbé Bonpain
59117 Wervicq-Sud -
FRANCE
Tél. : +33 (0) 3 20 14 41 20
Fax : +33 (0) 3 20 14 40 13
www.cousin-biotech.com
Made in France
Date de marquage CE: mars 2007
NOT130 / 210901
Version du 01/09/2021
This release is the last update of the instructions of use and replace the previous edition

Page 2 / 52
Instructions for use en
IntraSPINE®
DEVICE FOR THE INTER-SPINOUS SPACE WITH LAMINAR SUPPORT
SINGLE USE STERILE PRODUCT
DESCRIPTION
The IntraSPINE®prosthesis is an interlaminar medical device that comprises a dimethyl siloxane (silicon) wedge (available in several sizes) adapted to the
intervertebral space and a ligament in polyethylene terephtalate.
The wedge is covered with woven polyethylene terephtalate with an area covered by sheeting on the front face in the medullary zone.
Tension is applied to the ligament by a titanium loop (TA6V).
MATERIALS
IntraSPINE®prosthesis: Dimethyl siloxane, Polyethylene terephthalate, Titanium.
IntraSPINE®ancillaries and trial protheses: Stainless steel, Acetal copolymer, Dimethyl siloxane.
Non-human and non-animal origin –Non-resorbable.
INDICATIONS
The IntraSPINE®prosthesis is recommended in the lumbar spine and sacral area (from L1 to S1 levels) in the following cases:
- Arthropathic facet-syndrome
- Foraminal stenosis
- Degenerative discopathy
- Intervertebral ligament insufficiency
PERFORMANCE
The IntraSPINE®prosthesis is an elastic support device with a cushioning effect. Its interlaminar implantation enables it to be close to the centre of rotation,
thereby producing the cushioning effect and providing tension on the interspinous ligamentary structures due to the elasticity of the supra-spinous wedge.
The principal function of the ligaments surrounding the upper and lower vertebrae in relation to the area receiving the prosthesis is to assist the posterior
ligament during flexion.
IntraSPINE®has been validated for a long term implantation in the human body.
CONTRAINDICATIONS
1) Do not use the prosthesis in the following cases:
- Allergy to one of the components
- Growing child
- Infected site
- Pregnant woman
2) Factors likely to compromise successful implantation:
- Severe osteoporosis
- Major deformations of the spinal column
- Local bone tumors
- Systemic or metabolic disorders
- Infectious diseases
- Obesity
- Drug addictions
- Intense physical activity, for example competitive sports or hard labor
- Surgery at more than 2 levels with IntraSPINE Prosthesis
UNDESIRABLE SECONDARY EFFECTS
1) Complications likely related to the device:
- Infection of the prosthesis
- Device breakage (rupture of the ligament, fixed wing breakage, knitting tearing)
- Uncrimping of the needle
- Device loosening permanent elongation of the ligament
- Device migration displacement of the wedge
- Spondylolisthesis to the dynamically stabilized segment
- Persistent or worsening pain attributed to the dynamically stabilized level and required revision surgery with interbody fusion at that level
- Spinous process fractures intraoperative post-operative or during device removal (removal due to infection) and can be associated with dislocation of the
implant
- Late reoperation due to absence of recovery
- Wrong level implantation, inappropriate or inaccurate positioning (posterior or wrong level)
- Seroma/swelling around the device
- Inflammatory reaction, allergy, foreign body reaction
- In certain cases the medical instrument had to be removed and pedicle screw fusion had to be performed.
2) Complications unlikely to be related to the device, but related to surgery or to the patient’s conditions:
- Pseudomeningocele, fistula, dural tear, persistent CSF leakage, meningitis
- Loss of neurological function,
- Cauda equina syndrome, neuropathy, neurological deficits, arachnoiditis, and/or muscle loss, compression around nerves and/or pain
- Urinary retention or loss of bladder control or other types of urological system compromise
- Fracture, Bone loss or decrease in bone density
- Herniated nucleus pulposus, disc disruption or degeneration at, above, or below the level of surgery: Adjacent segment degeneration
- Non-union or pseudarthrosis, delayed union. Mal-union,
- Cessation of any potential growth of the operated portion of the spine
- Loss of or increase in spinal mobility or function
- Hemorrhage, hematoma, edema, embolism, stroke, excessive bleeding, phlebitis, wound necrosis, wound dehiscence, wound infection, damage to blood
vessels, or other types of cardiovascular system compromise
- Development of respiratory problems
MRI SAFETY:
The implants are composed of non-ferromagnetic materials and present a geometry not likely to generate induced current. Moreover, as they are fixed to
tissues, they are unlikely to be mobilised. A priori they can be considered compatible with an MRI scan. Their safety, in particular in terms of heating and
migration of the implant, has been evaluated through bibliographic data by comparison with data available on devices with similar composition, shape and
use. This evaluation concluded a conditional compatibility for MRI scan up to 1.5 Tesla.
As a precautionary measure, it is recommended MRI scans be avoided within 48 hours of the implant placement, and to inform the person in charge of the
scan of the recent implant placement, if such examination is essential.
It should be noted that devices presenting a high contrast with the biological environment can generate “artifacts” that must be taken into account for the
perfect execution and interpretation of imaging exams.
For this purpose, the patient who has this implant must be advised to warn the health professionals concerned (radiologists and radiology operators) in as far
as possible about the presence of this implant before these exams.
POSTOPERATIVE PRECAUTIONS
The patient must be informed of the postoperative cares and of precautions.
The use of a brace could be necessary but is not mandatory. This decision is the surgeon one.

Page 3 / 52
PRECAUTIONS FOR USE
Before usage, verify the integrity of the prosthesis, trial prostheses, ancillaries and packaging.
Do not use in the event of deterioration of the prosthesis and/or the labels, and/or the trial prostheses and/or the ancillaries and/or the packaging.
Do not use if the prosthesis has exceeded its use-by date.
Unpacking and manipulation of the implant must be carried out following asepsis standards in order to guarantee the sterility.
When opening the carton box, the surgeon has to make sure that the lot number, the model and the size of the prosthesis are equal to the data on the label of
the inner pouch. Otherwise the use of the prosthesis is strictly prohibited.
Prevent the prosthesis, the trial prostheses and ancillaries from coming in to contact with objects that may alter their surface.
Operation conditions: Temperature from +32°C up to 42°C. Implants should be resistant to biologic fluids and the discharge of body tissues, which they contact
during use. Therefore, the IntraSPINE® prosthesis has been validated for a long term implantation and, currently, Cousin Biotech has 10 years of feedback
concerning these products.
The IntraSPINE® prosthesis, trial prostheses and ancillaries must only be used by a qualified surgeon who is trained in spinal surgery and to the surgical
technique of IntraSPINE®. The information contained in this notice is necessary but not sufficient to control the surgical technique.
The IntraSPINE®is made with soft materials; any contact with harder ones may alter its mechanical behaviour and lifetime. It is mandatory to avoid contact with
other materials.
The prescription of the device is decided on by the surgeon, the only person qualified to do so.
Topping off is not contra-indicated but special attention is required. IntraSPINE® is made with soft materials; any contact with harder ones may alter its
mechanical behaviour and lifetime. It is mandatory to avoid contact with other materials.
Use of the system of COUSIN BIOTECH ancillaries and specific trial prostheses is required for implantation of the IntraSPINE® prosthesis.
Implants must be handled and stored with great care, in a dry place, protected from sunlight and at room temperature.
Transportation: Transportation of the devices should be done in the closed vehicles in accordance with the rules for those transport vehicles. There
are no special transportation requirements for the device.
IMPORTANT : DO NOT REUSE AND DO NOT RESTERILISE THE INTRASPINE® PROSTHESIS
As indicated on the product labelling, the prosthesis is designed for single use. It should in no event by reused and/or resterilized (potential risks
include but are not limited to: loss of product sterility, risk of infection, loss of effectiveness, relapse).
WARNING ABOUT ANCILLARIES AND TRIAL PROSTHESES
The IntraSPINE®ancillaries are Class I medical devices, intended for temporary use and are re-usable.
The IntraSPINE®trial prostheses are Class IIa medical devices, intended for temporary use and are re-usable.
Unlike the IntraSPINE® prosthesis, ancillaries and trial prostheses (included with the instrument kit/set)
are furnished unsterile.
KITACINTRA / RCBININTRU
Before first use
Ancillaries and trial prostheses must be:
-Cleaned in the appropriate way
-Sterilised in an autoclave
DECONTAMINATION AND CLEANING OF ANCILLARIES
Decontamination and cleaning are performed under the responsibility of the healthcare centers.
The following prescribed methods and materials must be used to reduce the risk of transmission of UTA, (French health ministry - DGS/R13/2011/449
dated 01/12/2011).
This step has to take place before the first utilization and immediately after the utilization to avoid adhesion of particles or dry secretion to the
instruments
The detachable instruments have to be dismantled
Products advised for the cleaning
- an enzymatic detergent neutral
- Or products adapted for the cleaning (neutral or soft alkaline) of chirurgical instruments in compliance with the regulations in effect.
- Warning: Don’t use corrosive factor or caustic cleaning product
2 process are possible

Page 4 / 52
A- Chart Automated cleaning in a disinfector washer with manual Pre-cleaning:
Step
Step
Description
Step Instruction
Accessories
Duration
Cleaning Steps
1
Contamination
Removal
Rinse product room temperature running tap water
removing any visible organic material with assistance
of a soft bristle brush
-Tap water
-Soft bristle brush
(Do not utilize
metal cleaning
brushes)
Until all visible soi
lis removed
2
Pre-soak
Prepare a detergent solution at ambient temperature
(15-25°C / 59-77°F).
Afterwards lumina, threads, joints and gaps of the
instruments have to be flushed with a water jet pistol
for a minimum time of 10 seconds for each position.
-Detergent
-Water jet pistol
Until product is
visually clean
3
Ultrasonic
cleaning
Clean the instrument in the ultrasonic tray including the
solution.
Be careful every unclench connector or screws
and bolts by the vibrations will be reassure.
-Ultrasonic tray
Minimum duration
10 minutes, this
duration can vary
according product
4
Soak
Soak the instrument in tap water during 30 seconds.
After, ultrasonic treatment the lumina, threads, joints
and gaps of the instrument have to be flushed again
with a water jet pistol for a minimum time of 10
seconds for each position.
-Reserve osmosis
water
Minimum 30
seconds of soak
5
Automated
Washer
Place entire disassembled device into the automated
washer
-Automated Washer
-Disassembled
Device
Minimum total
cycle time: 39
minutes
Instructions of cleaning in washer / disinfector
Cycles parameters
Time
Minimum temperature
Type of detergent/water
Pre-cleaning
2 minutes
<45°C / <113°F
Tap water
Cleaning
5 minutes
55°C / 131°F
Detergent
Draining
2 minutes
<45°C / <113°F
Tap water
Thermic draining
5 minutes
90°C / 194°F
Reserve osmosis water
Drying
25 minutes
> 70°C / > 158°F
Not applicable
Finishing
Steps
6
Final Rinse
Rinse carefully with distilled water
-Distilled water
Minimum 1 minute
7
Final Drying
Dry devise utilizing medical quality filtered air
-Medical quality
filtered air
Until product is
visually dry
8
Tidying
The instruments have to be placed in the right
position inside the trays as described on the position
map fixed on the tray for the sterilization.
B- Chart Just manual cleaning :
Step
Step
Description
Step Instruction
Accessories
Duration
Cleaning Steps
1
Contamination
Removal
Rinse product room temperature running tap water
removing any visible organic material with assistance
of a soft bristle brush
-Tap water
-Soft bristle brush
(Do not utilize
metal cleaning
brushes)
Until all visible soi
lis removed
2
Drying
Dry the device utilizing a dry non-shedding wipe.
Medical quality filtered air may be utilized if available
-Non-schedding wipe
-Medical quality
filtered compressed
air
Until product is
visually dry
Disinfection Steps
3
Disinfection
Application
Prepare a low-foaming neutral enzymatic detergent
solution, using tap water (15-25°C / 59-77°F).
Soak the instrument in the open position (if possible)
during minimum 1 minute.
During the immersion, actuate mobile parts of the
instrument minimum 3 times (if possible),so that the
detergent can access all parts of the instrument.
-Detergent
Minimum duration
1 minute, this
duration can vary
according product
4
Drying
After the soaking time, take out the instrument and
wipe it with a disposable cloth. Then, place the
instrument in a new bath of enzymatic detergent
solution using warm tap water.
-Disposable cloth
-Detergent
Until product is
visually dry
5
Manual
Disinfection
Brush all surface of the instrument using a soft brush
for 2 minutes.
Adjust brushing time if needed.
Actuate mobile parts of the instrument 3 times (when
applicable) and use a syringe to access all difficult
areas. Use a volume of 60 mL of the detergent
solution.
-Soft bristle brush
-Detergent
-Syringe
Manual cleaning
time duration is
complete when the
device’s surface,
joints, and crevices
have been
manually cleaned
6
Rinse and
finition
Soak the instrument in reverse osmosis water for 1
minute.
Use a syringe and 60mL of reverse osmosis water to
access all difficult areas.
Repeat soaking 2 additional times using fresh water
-Reserve osmosis
water
-Syringe
Minimum 1 minute

Page 5 / 52
7
Final Rinse
Rinse carefully with distilled water
-Distilled water
Minimum 1 minute
8
Final Drying
Dry devise utilizing medical quality filtered air
-Medical quality
filtered air
Until product is
visually dry
9
Tidying
The instruments have to be placed in the right
position inside the trays as described on the position
map fixed on the tray for the sterilization.
Note: In case of suspection of Creutzfeld-Jakob Disease (CJD), incinerate the ancillaries and the fixation pliers
In case of no respect of the instructions mentioned above, the healthcare center will have to apply a validated equivalent cleaning process for which
it will be fully responsible.
STERILIZATION OF ANCILLAIRES
Sterilization is performed under the responsibility of the healthcare centers.
The following prescribed methods and materials must be used to reduce the risk of transmission of UTA, (French health ministry - DGS/R13/2011/449
dated 01/12/2011).
1- The sterilization in autoclave is to make in a specific container (fenced basket, Tray, Plastic tray placed in a peelable pouches autoclavable).
NB: It isn’t recommended to realize the sterilization with peelables pouches autoclavable without a container Ancillaries can pierce the films
components the pouches.
2-A sterilization BY AUTOCLAVE is advised following this protocol:
Steam sterilization parameters
Values
Values
Cycle Type
Pre-vacuum
Pre-vacuum
Set Point Temperature
134°C / 273°F
132°C / 269.6°F
Cycle Time
Minimum 3 minutes
Minimum 4 minutes
Dry Time
Minimum 20 minutes
Minimum 20 minutes
Cool Time (inside and outside the autoclave chambers)
Minimum 40 minutes
Minimum 40 minutes
3 -Remark: After each cycle of cleaning/sterilization, insure of all the good working of the ancillaries: verify the integrality and the correct operation, of
the locking systems (clipping, prehension) without excessive play.
4- If the ancillaries utilization is different, after sterilization stock them in a tray on a peelable pouches.
In case of no respect of the instructions mentioned above, the healthcare center will have to apply a validated equivalent sterilization process for
which it will be fully responsible.
STORAGE PRECAUTIONS
Ancillaries and trial prostheses must be stored in their dedicated container or equivalent packaging to prevent any deterioration.
Keep in a dry place away from sunlight, at room temperature, in its original packaging.
EXPLANTATION AND DISPOSAL OF DEVICES
Explantation and handling should be carried out in accordance with ISO 12891-1:2015 “Implants for surgery – Retrieval and analysis of surgical implants” Part
1: “Retrieval and Handling”. Any explanted device must be returned for analysis as per the current protocol. This protocol is available from COUSIN BIOTECH
on request. It is important to note that any implant that has not been cleaned and disinfected prior to dispatch must be placed in a sealed package. Explanted
medical devices must be disposed of in accordance with local regulations governing the disposal of infectious hazardous waste. The disposal of non-implanted
devices is not subject to specific recommendations. The second paragraph covers information requests or complaints.
INFORMATION REQUESTS AND COMPLAINTS
In accordance with its quality policy, COUSIN BIOTECH is committed to producing and supplying high-quality medical devices. However, if health
professionals (client, user, prescriber, etc.) wish to lodge a complaint or report dissatisfaction with a given product in terms of quality, safety or
performance, they must inform COUSIN BIOTECH as soon as possible. In the event of implant failure or if the implant is implicated in serious adverse
effects experienced by the patient, the health centre must follow the legal procedures in the country in question, and inform COUSIN BIOTECH without
delay. The reference, batch number, reference contact details and a comprehensive description of the incident or complaint must be stated in all
correspondence. Brochures, documentation and surgical techniques are available on request from COUSIN BIOTECH and its distributors.
Summary

Page 6 / 52
Notice d’instructions fr
IntraSPINE®
DISPOSITIF POUR L’ESPACE INTER-EPINEUX AVEC APPUI LAMAIRE
PRODUIT STERILE A USAGE UNIQUE
DESCRIPTION
La prothèse IntraSPINE®est un dispositif médical inter-lamaire constitué d’une cale en diméthyle siloxane (silicone) (disponible en plusieurs tailles)
adaptée au niveau inter vertébral et d’un ligament en polyéthylène téréphtalate.
La cale est recouverte d’un tricot de polyéthylène téréphtalate avec une zone recouverte d’un sheeting sur la face avant dans la zone médullaire.
Le ligament sera mis en tension par une boucle en titane (TA6V).
MATERIAUX
Prothèse IntraSPINE®: Diméthyle siloxane, Polyéthylène téréphtalate, Titane.
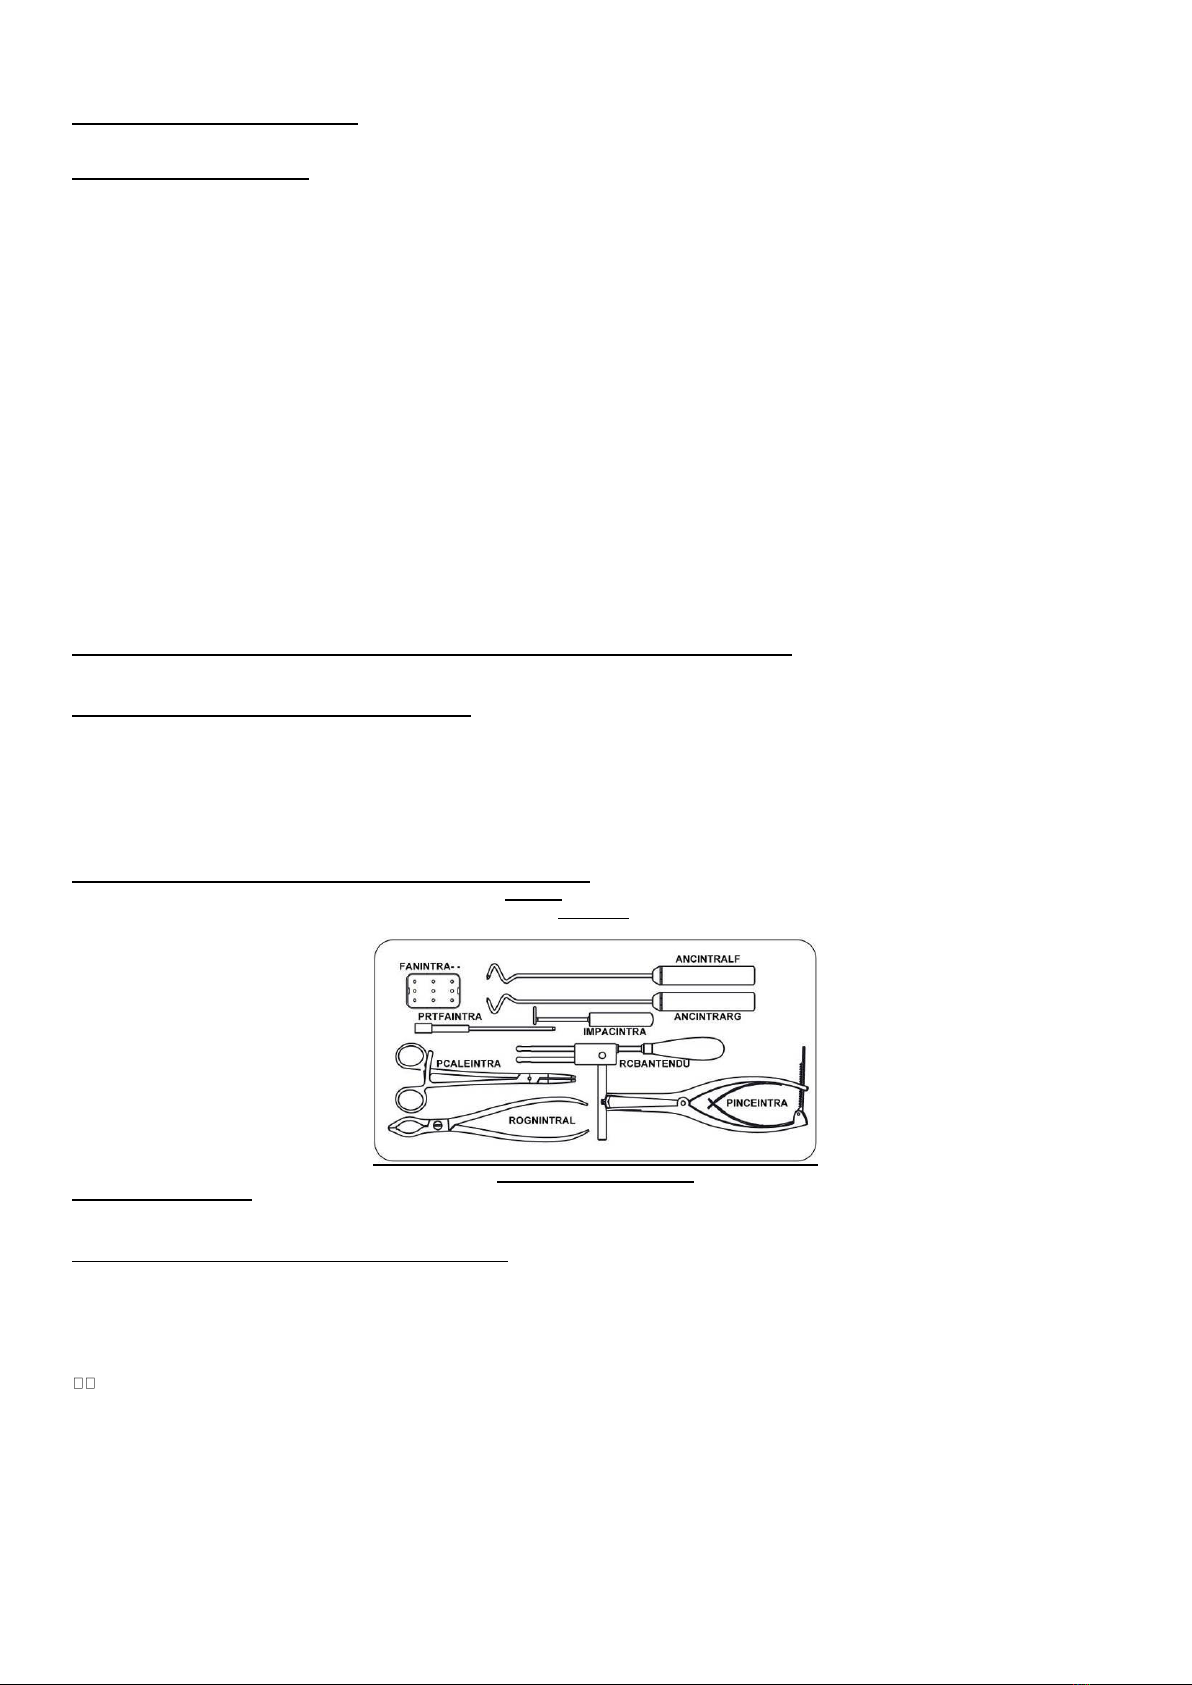
Ancillaire et prothèse d’essais IntraSPINE®: Acier inoxydable, Copolymère d’acétal, Diméthyle siloxane
Origine ni humaine, ni animale –Non résorbable.
INDICATIONS
L’utilisation de la prothèse IntraSPINE®est recommandée dans la colonne vertébrale lombaire et la région sacro-iliaque (de L1 à S1) dans les cas suivants :
- Arthropathie des facettes articulaires
- Sténose foraminale
- Discopathie dégénérative
- Insuffisance ligamentaire inter spinale
PERFORMANCES
La prothèse IntraSPINE®est un dispositif de support élastique avec effet amortissant. Son implantation en site inter lamaire lui permet d’être proche
du centre de rotation développant ainsi l’effet amortissant et la remise en tension des structures disco ligamenteuse grâce à la souplesse du sur-
épineux. Le ligament entourant les épineuses sus et sous jacentes au niveau instrumenté aura pour fonction principale l’aide au ligament postérieur
lors de la flexion.La prothèse IntraSPINE®a été approuvée en vue d’une implantation à long terme dans l’organisme humain.
CONTRE-INDICATIONS
1) Ne pas implanter dans les cas suivants :
- Allergie à l'un des composants
-Enfant en croissance
- Site infecté
-Femme enceinte
2) Facteurs susceptibles de compromettre le succès de l’implantation :
- Ostéoporose sévère
- Déformations importantes du rachis
- Tumeurs osseuses locales
- Troubles systémiques ou métaboliques
- Maladies infectieuses
- Obésité
- Addiction aux drogues
- Activité physique intense, par exemple pratique de sports de compétition ou travail pénible
- Chirurgie à plus de 2 niveaux avec la prothèse IntraSPINE
EFFETS SECONDAIRES INDESIRABLES
1) Complications susceptibles d’être liées au dispositif :
-Infection de la prothèse,
-casse du dispositif (rupture du ligament, rupture de l’aile fixe, déchirure du tricot)
-dessertissage de l’aiguille
-défectuosité du dispositif, élongation permanente du ligament
-migration du dispositif, déplacement de la cale
-spondylolisthésis du segment stabilisé de manière dynamique,
-douleurs persistantes ou qui s’aggravent attribuées au niveau de stabilisation dynamique et nécessité d’une intervention chirurgicale de reprise avec
fusion intersomatique à ce niveau ;
-fractures de l’apophyse épineuse : peropératoire, post-opératoire ou lors du retrait du dispositif (en raison d’une infection), peuvent être associées à
une dislocation de l’implant ;
-Nouvelle opération en raison de l’absence de guérison ,
-position inapproprié, erreur de niveau d’implantation (postérieur au mauvais niveau)
-sérome/gonflement autour du dispositif
-réactions inflammatoires, allergie, réaction à un corp étranger
-dans certains cas, le dispositif médical a dû être retiré et une fusion par vis pédiculaire a dû être réalisée.
2) Complications peu probablement liées au dispositif, mais en lien avec la chirurgie ou l’état du patient :
- Pseudo-méningocèle, fistule, déchirure durale, fuite persistante de LCR, méningite
- Perte des fonctions neurologiques,
- Syndrome de la queue de cheval, neuropathie, déficits neurologiques, arachnoïdite, et/ou perte musculaire, compression autour des nerfs et/ou douleurs
- Rétention urinaire ou perte de contrôle de la vessie ou autres types de troubles du système urologique
- Fracture, perte osseuse ou diminution de la densité osseuse
- Hernie du nucleus pulposus, perturbation ou dégénérescence discale au niveau, au-dessus ou en dessous du point chirurgical : dégénérescence du
segment adjacent
- Absence de fusion ou pseudarthrose, fusion retardée. Cal vicieux,
- Cessation de toute croissance potentielle de la partie opérée de la colonne vertébrale
- Perte ou augmentation de la mobilité ou de la fonction de la colonne vertébrale
- Hémorragie, hématome, œdème, embolie, accident vasculaire cérébral, saignement excessif, phlébite, nécrose des plaies, déhiscence des plaies, infection
des plaies, lésions aux vaisseaux sanguins ou autres types de troubles du système cardiovasculaire
- Développement de problèmes respiratoires
SECURITE IRM
Les implants sont composés de matériaux non ferromagnétiques et présentent une forme géométrique non susceptible de générer du courant induit. De plus,
comme ils sont fixés sur des tissus, il est peu probable qu'ils soient mobilisés. A priori, ils peuvent être considérés compatibles avec une IRM. Leur innocuité,
en particulier en termes de chauffage et de migration des implants, a été évaluée en comparant les données bibliographiques aux données disponibles sur
des dispositifs ayant une composition, une forme et une utilisation similaires. Cette évaluation a conclu à une compatibilité conditionnelle pour l'IRM jusqu'à
1,5 Tesla.
Par mesure de précaution, il est recommandé d'éviter les IRM dans les 48 h suivant le placement de l'implant et d'informer la personne en charge de la
scanographie du placement récent de l'implant, si un tel examen est requis.
Il convient de noter que les dispositifs qui présentent un contraste élevé avec l'environnement biologique peuvent générer des « artefacts » qui doivent être
pris en compte pour l'exécution et l'interprétation parfaites des examens d'imagerie.

Page 7 / 52
A cette fin, il doit être recommandé au patient porteur de cet implant d'avertir autant que possible les professionnels de santé concernés (radiologues et
opérateurs de radiologie) de la présence de cet implant avant ces examens.
PRÉCAUTIONS POST-OPÉRATOIRES
Le patient doit être informé des soins et des précautions post-opératoires à observer.
L’utilisation d’un appareil orthopédique pourrait être nécessaire mais n’est pas obligatoire. Cette décision ne peut être prise que par le chirurgien ;
PRECAUTIONS D’UTILISATION
Avant toute utilisation, vérifier l’intégrité de la prothèse, des prothèses d’essai, des ancillaires et de l’emballage.
Ne pas utiliser en cas de détérioration de la prothèse et/ou des prothèses d’essai, et/ou des ancillaires, et/ou des étiquettes, et/ou de l’emballage.
Ne pas utiliser si la prothèse est périmée.
Le déballage et la manipulation de l’implant doivent être effectués conformément aux normes d’asepsie, afin d’en garantir la stérilité.
A l’ouverture de la boîte cartonnée, le chirurgien doit vérifier que le numéro du lot, le modèle et la taille de la prothèse sont identiques aux données
figurant sur l’étiquette de la pochette intérieure. Dans le cas contraire, l’utilisation de la prothèse est strictement interdite.
Eviter que la prothèse, les prothèses d’essai et les ancillaires soient en contact avec des objets pouvant altérer la surface.
Conditions d’utilisation : température comprise entre +32 °C et 42 C. Les implants doivent résister aux liquides biologiques et aux sécrétions des
tissus avec lesquels ils entrent en contact lors de leur utilisation. La prothèse IntraSPINE®a donc été approuvée pour une implantation à long terme
et Cousin Biotech dispose à ce jour de 10 années de recul en ce qui concerne ces produits.
La prothèse IntraSPINE®, les prothèses d’essai et leurs ancillaires ne doivent être utilisés que par un chirurgien qualifié en matière de chirurgie
rachidienne et formé à la technique chirurgicale propre à IntraSPINE®.
Les informations contenues dans la présente notice sont nécessaires mais ne suffisent pas à maîtriser cette technique.
IntraSPINE®est composé de matériaux souples, tout contact avec des matériaux plus résistants peut modifier son comportement mécanique et sa durée de
vie. Il est obligatoire d'éviter tout contact avec d'autres matériaux.
La prescription est laissée au chirurgien, seule personne habilitée à le faire.
Le « topping off » n'est pas contre-indiqué, mais une attention particulière est requise. IntraSPINE®est composé de matériaux souples, tout contact avec des
matériaux plus résistants peut modifier son comportement mécanique et sa durée de vie. Il est obligatoire d'éviter tout contact avec d'autres matériaux.
Chaque prothèse, chaque prothèse d’essai et chaque ancillaire IntraSPINE®fait partie d’un système et ne doit être utilisé qu’avec les éléments
correspondant au système COUSIN BIOTECH d’origine.
Les implants doivent être manipulés et conservés avec précaution dans un endroit sec, à l’abri de la lumière et à température ambiante.
Transport : le transport des dispositifs doit se faire dans des véhicules clos, conformément aux directives desdits véhicules de transport. Aucune
exigence spécifique de transport pour ce dispositif.
IMPORTANT : NE PAS REUTILISER ET NE PAS RESTERILISER LA PROTHESE INTRASPINE®
Conformément à l'étiquetage de ce produit, la prothèse est à usage unique. Elle ne doit en aucun cas être réutilisée et/ou restérilisée (risques
potentiels incluent mais ne se limitent pas à: perte de stérilité du produit, risque d'infection, perte d'efficacité du produit, récidive).
EXPLANTATION ET ÉLIMINATION DES DISPOSITIFS
Il convient d’observer les recommandations suivantes lors de l’explantation et de la manipulation des dispositifs : ISO 12891-1:2015 « Implants
chirurgicaux. Retrait et analyse des implants chirurgicaux. » Partie 1 : « Retrait et manipulation ».
Tout dispositif explanté doit être retourné en vue d’une analyse, conformément au protocole en vigueur. Ce protocole est disponible sur demande
auprès de COUSIN BIOTECH. Il est important de noter que tout implant ne devant pas être nettoyé ni désinfecté avant expédition devra se trouver
dans un emballage scellé.
L’élimination du dispositif médical explanté doit être effectuée conformément aux normes du pays concerné en matière d’élimination des déchets
infectieux.
L’élimination d’un dispositif non-implanté n’est soumise à aucune recommandation spécifique.
AVERTISSEMENT SUR LES ANCILLAIRES ET PROTHESES D’ESSAI
Les ancillaires IntraSPINE®sont des dispositifs médicaux de Classe I, destinés à un usage temporaire et réutilisables.
Les prothèses d’essai IntraSPINE®sont des dispositifs médicaux de Classe IIa, destinés à un usage temporaire et réutilisables.
Contrairement à l’implant IntraSPINE®, les ancillaires et prothèses d’essai du kit sont fournis non stériles.
KITACINTRA / RCBININTRU
Avant première utilisation
-Procéder au nettoyage adapté des ancillaires et prothèses d’essai IntraSPINE®
-Stériliser les ancillaires et prothèses d’essai à l’autoclave
DECONTAMINATION ET NETTOYAGE DES ANCILLAIRES
La décontamination et le nettoyage sont réalisés sous la responsabilité des centres de soins de santé.
La méthode prescrite et les matières suivantes doivent être utilisées pour réduire le risque de transmission des ATNC, (Ministère de la santé français
- DGS/R13/2011/449 du 01/12/2011).
Cette étape doit avoir lieu à la première utilisation et immédiatement après utilisation afin d’éviter que des particules ou sécrétions desséchées
n’adhèrent aux instruments.
Les instruments démontables doivent être démontés
Produits préconisés pour le nettoyage
- un détergent enzymatique neutre
- Ou des produits de nettoyage adaptés (neutre ou alcalin doux) aux instruments chirurgicaux conforme aux réglementations en vigueur.
- Attention : Ne pas utiliser d’agents corrosifs ou des produits de nettoyage caustiques

Page 8 / 52
2 procédés sont possibles :
A- Procédure nettoyage automatique en laveur désinfecteur avec pré nettoyage manuel :
Etapes
Description de
l’étape
Instructions à suivre à cette étape
Accessoires
Durée
Etapes de nettoyage
1
Elimination des
contaminations
Rincer le produit à l’eau du robinet à température
ambiante en retirant toute substance organique
visible à l’aide d’une brosse à poils doux
-Eau du robinet
-Brosse à poils doux
(ne pas utiliser de
brosses de
nettoyage
métalliques)
Jusqu’à élimination
de toutes souillures
visibles
2
Pré-trempage
Préparer une solution de détergent à température
ambiante (15-25°C).
Ensuite, les lumières, filetages, joints et ouvertures
des instruments doivent être nettoyés à grandes eaux
avec un pistolet à jet d’eau pendant une durée
minimum de 10 secondes pour chaque position.
-Détergent
-Pistolet à jet d’eau
Jusqu’à ce que le
produit soit propre
visuellement
3
Nettoyage
ultrason
Nettoyer l’instrument dans un bac ultrasons
contenant cette solution.
Veiller à ce que tous les raccords ou visseries
desserrés par les vibrations soient resserrés.
-Bac ultrason
Durée minimale 10
minutes, cette
durée peut varier
selon le produit.
4
Trempage
Tremper l’instrument dans de l’eau osmosée.
Après, le traitement par ultrasons les lumières,
filetages, joints et ouvertures des instruments doivent
encore être nettoyés à grandes eaux avec un pistolet
à jet d’eau pendant une durée minimum de 10
secondes pour chaque position.
-Eau osmosée
Au moins 30
secondes de
trempage
5
Laveur
automatique
Placer le dispositif entier démonté dans un laveur
automatique
-Laveur automatique
-Dispositif démonté
Durée du cycle total
minimum : 39
minutes
Instructions de nettoyage en laveur désinfecteur
Paramètres des cycles
Temps
Température minimale
Type de détergent/eau
Pré-nettoyage
2 minutes
<45°C
Eau du robinet
Nettoyage
5 minutes
55°C
Détergent
Rinçage
2 minutes
<45°C
Eau du robinet
Rinçage thermique
5 minutes
90°C
Eau osmosée
Séchage
25 minutes
> 70°C
Non applicable
Etapes de finiton
6
Rinçage final
Rincer soigneusement avec de l’eau distillée
-Eau distillé
Au moins 1 minute
7
Séchage final
Sécher à l’air comprimé filtré de qualité médicale
-Air comprimé filtré
de qualité médicale
Jusqu'à ce que le
produit soit sec
visuellement
8
Rangement
Les instruments doivent être placés dans la bonne
position dans les conteneurs comme décrit sur la
carte de positionnement fixée sur le conteneur de
stérilisation
B- Procédure nettoyage manuel seul :
Etapes
Description de
l’étape
Instructions à suivre à cette étape
Accessoires
Durée
Etapes de nettoyage
1
Elimination des
contaminations
Rincer le produit à l’eau du robinet à température
ambiante en retirant toute substance organique
visible à l’aide d’une brosse à poils doux
-Eau du robinet
-Brosse à poils doux
(ne pas utiliser de
brosses de
nettoyage
métalliques)
Jusqu’à élimination
de toutes souillures
visibles
2
Séchage
Sécher le dispositif à l’aide d’un chiffon sec et non
pelucheux. Il est aussi possible d’utiliser de l’air filtré
de qualité médicale
-Chiffon non
pelucheux
-Air comprimé filtré de
qualité médicale
Jusqu’à ce que le
produit soit sec
visuellement
Etapes de désinfection
3
Application de
la désinfection
Préparer une solution de détergent à température
ambiante en utilisant de l’eau du robinet (15-25°C).
Tremper les instruments en position ouverte (si
applicable). Pendant l'immersion, actionnez les
parties mobiles des temps de l'instrument 3 fois pour
que le détergent puisse avoir accès à toutes les
parties de l'instrument.
-Détergent
Durée minimale 1
minute, cette durée
peut varier selon le
produit.
4
Séchage
Une fois le trempage terminé, enlevez l’instrument et
essuyez-le avec un tissu jetable. Placez alors
l’instrument dans un nouveau bain de détergent en
utilisant de l’eau du robinet à température ambiante
-Tissu jetable
-Détergent
Jusqu’à ce que le
produit soit sec
visuellement
5
Désinfection
manuelle
Brossez toute la surface de l'instrument utilisant une
brosse douce. Ajustez le temps de brossage si
nécessaire. Actionnez les parties mobiles de
l'instrument 3 fois (si applicable) et utilisez une
seringue pour avoir accès à toutes les zones difficiles
d’accès. Utilisez un volume de 60 ml de la solution de
détergent.
-Brosse à poils doux
-Détergent
-Seringue
Le nettoyage
manuel est terminé
lorsque la surface
du dispositif, les
articulations et les
creux ont bien été
nettoyés à la main

Page 9 / 52
6
Rinçage et
finition
Trempez l'instrument dans de l'eau d'osmosée
pendant 1 minute.
Utilisez une seringue et 60 ml d'eau osmosée pour
avoir accès à toutes les zones difficiles d’accès.
Répétez le trempage deux fois supplémentaires en
utilisant de l'eau douce.
-Eau osmosée
-Seringue
Au moins 1 minute
7
Rinçage final
Rincer soigneusement avec de l’eau distillée
-Eau distillé
Au moins 1 minute
8
Séchage final
Sécher à l’air comprimé filtré de qualité médicale
-Air comprimé filtré de
qualité médicale
Jusqu'à ce que le
produit soit sec
visuellement
9
Rangement
Les instruments doivent être placés dans la bonne
position dans les conteneurs comme décrit sur la
carte de positionnement fixée sur le conteneur de
stérilisation
Note : En cas de suspicion de maladie de Creutzfeld-Jakob (MCJ), incinérer l’ancillaire et la pince de fixation
En cas de non-respect des instructions mentionnées au-dessus, le centre de soins de santé devra appliquer un procédé de nettoyage équivalent
validé dont il sera entièrement responsable.
STERILISATION DES ANCILLAIRES
La stérilisation est réalisée sous la responsabilité des centres de soins de santé.
La méthode prescrite et les matières suivantes doivent être utilisées pour réduire le risque de transmission des ATNC, (Ministère de la santé français
- DGS/R13/2011/449 du 01/12/2011).
1- La stérilisation en autoclave est à réaliser dans un conteneur spécifique (Panier grillagé, Plateau, Plateau plastique placé dans un sachet pelable
autoclavable).
NB : Il n'est pas recommandé de réaliser la stérilisation dans des sachets pelables autoclavables sans la présence d'un conteneur les ancillaires
pourraient perforer les films constituant les sachets.
2-Une stérilisation PAR AUTOCLAVE est préconisée selon le protocole suivant :
Paramètres de stérilisation à la vapeur
Valeurs
Valeurs
Type de cycle
Vide préalable
Vide préalable
Température de consigne
134°C
132°C
Temps du cycle complet
3 minutes minimum
4 minutes minimum
Temps de séchage
20 minutes minimum
20 minutes minimum
Temps de refroidissement (à l'intérieur et à l'extérieur
des chambres d'autoclave)
40 minutes minimum
40 minutes minimum
3 - Remarque : Après chaque cycle de nettoyage/stérilisation, s’assurer de l’intégrité et du bon fonctionnement des ancillaires : vérifier l’assemblage
et le bon fonctionnement des mécanismes, des systèmes de verrouillage (clippage, préhension) sans jeu excessif.
4- Si l’utilisation des ancillaires est différée, les stocker après stérilisation sur un plateau dans un sachet pelable
En cas de non-respect des instructions mentionnées au-dessus, le centre de soins de santé devra appliquer un procédé de nettoyage équivalent
validé dont il sera entièrement responsable.
PRECAUTIONS DE STOCKAGE
Les ancillaires et prothèses d’essai doivent être entreposés dans leur conteneur prévu à cet effet ou dans un emballage équivalent afin d’éviter toute
détérioration.
A conserver dans un endroit sec, à l'abri de la lumière, et à température ambiante, dans son emballage.
EXPLANTATION ET ELIMINATION DES DISPOSITIFS
Il convient d’observer les recommandations suivantes lors de l’explantation et de la manipulation des dispositifs : ISO 12891-1:2015 « Implants
chirurgicaux. Retrait et analyse des implants chirurgicaux. » Partie 1 : « Retrait et manipulation ». Tout dispositif explanté doit être retourné en vue
d’une analyse, conformément au protocole en vigueur. Ce protocole est disponible sur demande auprès de COUSIN BIOTECH. Il est important de
noter que tout implant ne devant pas être nettoyé ni désinfecté avant expédition devra se trouver dans un emballage scellé. L’élimination du dispositif
médical explanté doit être effectuée conformément aux normes du pays concerné en matière d’élimination des déchets infectieux. L’élimination d’un
dispositif non implanté n’est soumise à aucune recommandation spécifique. Le deuxième paragraphe concerne les demandes d’informations et les
réclamations.
DEMANDES D’INFORMATIONS ET RECLAMATIONS
Conformément à sa politique qualité, COUSIN BIOTECH s’engage à tout mettre en œuvre pour produire et fournir un dispositif médical de qualité.
Si, toutefois, un professionnel de santé (client, utilisateur, prescripteur…) avait une réclamation ou un motif d’insatisfaction concernant un produit, en
termes de qualité, de sécurité ou de performances, il devrait en informer COUSIN BIOTECH dans les plus brefs délais. En cas de dysfonctionnement
d’un implant ou si celui-ci a contribué à provoquer un effet indésirable grave pour le patient, le centre de soins devra suivre les procédures légales
en vigueur dans son pays et en informer COUSIN BIOTECH dans les plus brefs délais. Pour toute correspondance, merci de préciser la référence,
le numéro de lot, les coordonnées d’un référent, ainsi qu’une description exhaustive de l’incident ou de la réclamation. Les brochures, documentations
et la technique opératoire sont disponibles sur simple demande auprès de COUSIN BIOTECH et de ses distributeurs.
Sommaire

Page 10 / 52
Gebrauchsanweisung de
IntraSPINE®
VORRICHTUNG FÜR DEN INTERSPINALES RAUM MIT LAMINARER STÜTZFUNKTION
STERILES PRODUKT ZUR EINMALIGEN ANWENDUNG
BESCHREIBUNG
Die IntraSPINE®-Prothese ist eine medizinische Vorrichtung für den interlaminaren Einsatz, bestehend aus einem an die Zwischenwirbelebene
angepassten Kissen aus Dimethylsiloxan (Silikon) (in mehreren Größen erhältlich) und einem Band aus Polyethylenterephtalat.
Das Kissen ist mit einem Gewebe aus Polyethylenterephtalat überzogen, das auf der vorderen Seite in der Medullärzone mit einem Sheeting
abgedeckt ist.
Das Band wird mithilfe einer Titanschleife unter Spannung gesetzt (TA6V).
MATERIAL
IntraSPINE®-Prothese: Dimethylsiloxan, Polyethylenterephtalat, Titan.
Zubehör und IntraSPINE®-Versuchsprothese: Edelstahl, Acetalcopolymer, Dimethylsiloxan .
Produkt weder menschlichen noch tierischen Ursprungs –Nicht resorbierbar
INDIKATIONEN
Die IntraSPINE®Prothese wird in den folgenden Fällen im Lendenwirbelsäulen- und Sakralbereich (Wirbel L1 bis S1) empfohlen:
- Facettensyndrome
- Foramenstenose
- Degenerative Bandscheibenerkrankung
- Insuffizienz des interspinalen Bandapparats
LEISTUNGEN
Die IntraSPINE®-Prothese ist eine elastische Stützvorrichtung mit stoßdämpfender Wirkung. Durch die interlaminare Lage gelangt die Prothese in die
Nähe des Rotationszentrums. Auf diese Weise entwickelt sie Dank der Flexibilität des Dornfortsatzbandes stoßdämpfende Wirkung und sorgt für eine
verbesserte Spannung der Bandscheiben/Bänder-Struktur.
Die wichtigste Funktion des Bandes, das auf funktioneller Ebene die darüber und darunter liegenden Dornfortsätze umschließt, ist die Unterstützung
des hinteren Bandes bei der Beugung.
IntraSPINE®wurde für eine langzeitige Implantation im menschlichen Körper validiert.
KONTRAINDIKATIONEN
1) In folgenden Fällen nicht implantieren:
- Allergie gegen einen der Bestandteile
- Kind im Wachstum
- Bestehende Infektion
- Schwangerschaft
2) Faktoren die den Erfolg der Implantation beeinflussen können:
- Schwere Osteoporose
- Bedeutende Verformung der Wirbelsäule
- Lokale Knochentumore
- Systemische oder Stoffwechselstörungen
- Infektionskrankheiten
- Übergewicht
- Drogenabhängigkeit
- Intensive körperliche Betätigung, Beispielsweise Wettkampfsport oder anstrengende Arbeiten
- Operationen an mehr als 2 Wirbeln mit einer IntraSPINE Prothese
NEBENWIRKUNGEN
1) Komplikationen, die wahrscheinlich auf das Produkt zurückzuführen sind:
- Infektion der Prothese,
- Bruch des Implantats (Bänderriss, Lockerung, Starrflügelbruch)
- Entkräuseln der Nadel
- Lösen der Vorrichtung, permanente Bänderdehnung,
- Gerätemigration, Verlagerung des Keils,
- Spondylolisthese im Verhältnis zum dynamisch stabilisierten Segment,
- anhaltende Schmerzen anhaltende oder sich verschlimmernde Schmerzen, die dem dynamisch stabilisierten Bereich zuzuschreiben sind
Attribuable, und erforderliche Revisionschirurgie mit interkorporeller Fusion in diesem Bereich;
- Dornfortsatzbrüche: Intraoperativ, postoperativ oder während der Entfernung des Produktes (wegen Infektion), die mit einer Verlagerung des
Implantats in Verbindung gebracht werden können;
-Verzögerte Nachoperation wegen ausbleibender Genesung;
- falsche Positionierung, falsche Implantationshöhe
- Serom, Schwellungen um das Implantat herum
- entzündliche Reaktionen, Allergie, Fremdkörperreaktion
- In einigen Fällen musste das medizinische Instrument entfernt und eine Fusion der Pedikelschraube durchgeführt werden.
2) Komplikationen, die eher nicht auf das Medizinprodukt zurückzuführen sind, sondern auf eine Operation oder den Zustand des Patienten:
- Pseudomeningozele, Fisteln, Durariss, persistierendes Entweichen von Liquor cerebrospinalis, Meningitis.
- Verlust der neurologischen Funktionen,
- Cauda-equina-Syndrom, Neuropathien, neurologische Defizite, Arachnoïditis und/oder Muskelschwund, Kompression um die Nerven und/oder Schmerzen
- Harnretention oder Verlust der Blasenkontrolle bzw. andere Arten von urologischen Systemschädigungen
- Frakturen, Knochenverlust oder Rückgang der Knochendichte
- Nucleus pulposus-Prolaps, Bandscheibenschäden oder -degeneration auf, über oder unter dem Operationsniveau: Degeneration der angrenzenden
Segmente
- Nicht-Zusammenwachsen oder Pseudarthrose, verzögertes Zusammenwachsen. Fehlerhaftes Zusammenwachsen,
- Ende des potenziellen Wachstums des operierten Teils der Wirbelsäule
- Verlust oder Erhöhung der Beweglichkeit oder Funktion der Wirbelsäule
- Blutungen, Hämatome, Ödeme, Embolien, Schlaganfälle, übermäßige Blutungen, Phlebitis, Wundnekrosen, Wund Dehiszenz, Wundinfektionen, Schäden an
Blutgefäßen oder andere Arten von Schäden des Herz-Kreislauf-Systems
- Entstehung von Atemwegsproblemen,

Page 11 / 52
MR-Sicherheit
Die Implantate bestehen aus nicht ferromagnetischen Materialien und weisen eine Geometrie auf, die keinen Induktionsstrom erzeugt. Zudem ist es
unwahrscheinlich, dass sie mobilisiert werden können, da sie an Gewebe befestigt sind. Sie können a priori als kompatibel mit MRT-Aufnahmen angesehen
werden. Ihre Sicherheit, insbesondere im Hinblick auf die Erwärmung und Migration des Implantats, wurde anhand bibliografischer Daten im Vergleich zu den
Daten von Produkten mit ähnlicher Zusammensetzung, Form und Verwendung bewertet. Diese Bewertung ergab eine bedingte Kompatibilität für MRT-
Aufnahmen bis zu 1,5 Tesla. Als Vorsichtsmaßnahme wird empfohlen, Kernspintomografien innerhalb der ersten 48 Stunden nach der Implantation zu
vermeiden und den MRT-Verantwortlichen über die vor kurzem erfolgte Implantation zu informieren, falls eine MRT-Untersuchung unerlässlich ist.
Es ist zu beachten, dass die Implantate einen hohen Kontrast zur biologischen Umgebung aufweisen und „Artefakte“ erzeugen können, die für eine
ordnungsgemäße Durchführung und Interpretation von bildgebenden Untersuchungen berücksichtigt werden müssen.
Deshalb sollte Patienten, die dieses Implantat tragen, empfohlen werden, das jeweilige medizinische Personal (Radiologen und Bediener von radiologischen
Geräten) vor den Untersuchungen möglichst über das Vorhandensein des Implantats zu informieren.
POSTOPERATIVE VORSICHTSMASSNAHMEN
Der Patient muss von den postoperativen Nachsorge- und Vorsichtsmaßnahmen unterrichtet werden.
Die Verwendung einer Stütze kann erforderlich sein, ist jedoch nicht vorgeschrieben. Die Entscheidung obliegt dem Chirurgen.
VORSICHTSMAßNAHMEN BEI DER VERWENDUNG
Prüfen Sie vor jedem Einsatz die Unversehrtheit der Prothese, der Versuchsprothesen, des Zubehörs und der Verpackung.
Verwenden Sie das Produkt NICHT im Fall einer Beschädigung der Prothese, der Etiketten, der Versuchsprothesen, der Zubehörteile bzw. der
Verpackung.
Die Prothese nicht nach dem Ablaufdatum benutzen.
Das Auspacken und die Handhabung des Implantats muss unter Beachtung der aseptischen Standards erfolgen, um die Keimfreiheit zu gewährleisten.
Bei Öffnen des Kartons hat der Chirurg sicherzustellen, dass die Losnummer, das Modell und die Größe der Prothese mit den Angaben auf dem
Etikett des inneren Beutels übereinstimmen. Anderenfalls ist die Verwendung der Prothese streng verboten.
Vermeiden Sie den Kontakt mit Gegenständen, die die Oberfläche der Prothese, der Versuchsprothesen und der Zubehörteile beschädigen könnten.
Einsatzbedingungen: Temperatur zwischen +32°C und 42°C. Implantate müssen biologischen Flüssigkeiten und der Absonderung von
Körpergeweben, mit denen sie bei der Verwendung in Kontakt treten, standhalten. Die IntraSPINE®-Prothese wurde für eine langzeitige Implantation
validiert. Heute verfügt Cousin Biotech über 10 Jahre Feedback bezüglich dieses Produktes.
Die IntraSPINE®-Prothese, Probeprothesen und Nebenaggregate dürfen nur durch einen qualifizierten Chirurgen, der für die Wirbelsäulenchirurgie
und die Operationstechnik von IntraSPINE®ausgebildet ist, implantiert werden. Die in dieser Gebrauchsanweisung enthaltenen Informationen sind
erforderlich, jedoch nicht ausreichend, um die Operationstechnik zu beherrschen.
Die Verordnung liegt im Ermessen des Chirurgen, der einzigen dazu befugten Person.
Das IntraSPINE®Implantat ist aus weichen Materialien gefertigt. Der Kontakt mit härteren Materialien kann sein mechanisches Verhalten und seine
Lebensdauer verändern. Der Kontakt mit anderen Materialien sollte in jedem Fall vermieden werden.
Für die Implantation der IntraSPINE®-Prothese ist die Verwendung des COUSIN BIOTECH-Systems mit dem Zubehör und der Versuchsprothese
erforderlich.
Das Auffüllen ist nicht kontraindiziert, sollte jedoch mit besonderer Aufmerksamkeit erfolgen. Das IntraSPINE®Implantat ist aus weichen Materialien gefertigt.
Der Kontakt mit härteren Materialien kann sein mechanisches Verhalten und seine Lebensdauer verändern. Der Kontakt mit anderen Materialien sollte in jedem
Fall vermieden werden.
Implantate müssen mit großer Sorgfalt gehandhabt und vor sonnenlicht geschützt an einem trockenen Ort bei Raumtemperatur gelagert werden.
Transport: Der Transport der Vorrichtungen hat in geschlossenen Fahrzeugen gemäß den für derartige Transportfahrzeuge geltenden Vorschriften
zu erfolgen. Es bestehen keine besonderen Transportbedingungen für die Vorrichtung.
WICHTIG: DIE INTRASPINE®-PROTHESE NICHT WIEDERVERWENDEN UND NICHT RESTERILISIEREN
Gemäß der Kennzeichnung des Produkts ist das Implantat zum einmaligen Gebrauch bestimmt. Es dürft auf keinen Fall wiederverwendet und/oder
neu sterilisiert werden (zu den möglichen Risiken zählen unter anderem: Verlust der Sterilität des Produkts, Risiko von Infektionen, Verlust der
Wirksamkeit des Produkts, Rezidiv
WARNHINWEIS ZU ZUBEHÖRTEILEN UND VERSUCHSPROTHESEN
Die IntraSPINE®-Zubehörteile sind medizinische Vorrichtungen der Klasse I für einen zeitweiligen Einsatz und wiederverwendbar.
Die IntraSPINE®-Versuchsprothese ist eine medizinische Vorrichtung der Klasse IIa für einen zeitweiligen Einsatz und wiederverwendbar.
Im Gegensatz zu der Prothese IntraSPINE® werden das Zubehör und die Testprothesen (im Instrumentenset enthalten) nicht steril geliefert.
KITACINTRA / RCBININTRU
Vor der ersten Verwendung
Das Zubehör und die Testprothesen müssen:
-Angemessen gereinigt werden
-Im Dampfsterilisator sterilisiert werden
DEKONTAMINIERUNG UND REINIGUNG DER HILFSINSTRUMENTE
Die Reinigung und Dekontaminierung unterliegen der Verantwortung der Gesundheitseinrichtungen.
Es müssen das vorgeschriebene Verfahren und die folgenden Materialien angewendet werden, um das Übertragungsrisiko von NCTA zu verringern,
(Französisches Gesundheitsministerium - DGS/R13/2011/449 vom 01/12/2011).
Dieser Schritt sollte bei der ersten Benutzung und sofort nach Gebrauch erfolgen, um das Anhaften von getrockneten Partikeln oder Sekreten an
den Instrumenten zu verhindern.
Die demontierbaren Instrumente müssen demontiert werden
Empfohlene Produkte zur Reinigung
- ein neutrales enzymatisches Reinigungsmittel
- Oder Reinigungsprodukte, die für chirurgische Instrumente geeignet sind (neutral oder mild alkalisch) und den geltenden Vorschriften
entsprechen.
- Vorsicht: Verwenden Sie keine korrodierenden Substanzen oder stark alkalischen Reinigungsmittel
2 Vorgehensweisen sind möglich:
A- Automatische Reinigung im Reinigungs- und Desinfektionsgerät mit manueller Vorreinigung:

Page 12 / 52
Schritte
Beschreibung des
Schritts
Anweisungen für diesen Schritt
Zubehör
Dauer
Reinigungsschritte
1
Entfernung von
Verunreinigungen
Spülen Sie das Produkt mit Leitungswasser
bei Raumtemperatur und entfernen Sie alle
sichtbaren organischen Substanzen mit einer
weichen Bürste.
-Leitungswasser
-Weiche Borstenbürste
(keine
Drahtreinigungsbürsten
verwenden),
bis alle sichtbaren
Verunreinigungen
entfernt sind.
2
Vorweichen
Bereiten Sie eine Reinigungslösung bei
Raumtemperatur (15-25°C) vor.
Die Hohlräume, Gewinde, Verbindungen und
Öffnungen der Instrumente müssen unter
fließendem Wasser mit einer Spritzpistole
mindestens 10 Sekunden lang in jeder Position
gereinigt werden.
-Reinigungsmittel
-Wasserstrahlpistole
Bis das Produkt
optisch sauber ist.
3
Ultraschallreinigung
Reinigen Sie das Gerät in einem
Ultraschallbad mit dieser Lösung.
Stellen Sie sicher, dass alle durch
Vibrationen gelösten Verbindungen oder
Schrauben wieder angezogen werden.
-Ultraschallbad
Mindestdauer 10
Minuten, diese
Dauer kann je
nach Produkt
variieren.
4
Einweichen
Weichen Sie das Gerät in Osmosewasser ein.
Nach der Ultraschallbehandlung müssen die
Hohlräume, Gewinde, Verbindungen und
Öffnungen der Instrumente nochmals unter
fließendem Wasser mit einer Spritzpistole
mindestens 10 Sekunden lang in jeder
Position gereinigt werden.
-Osmosewasser
Mindestens 30
Sekunden
Einweichzeit
5
Automatische
Waschanlage
Legen Sie das gesamte demontierte Gerät in
eine automatische Spülmaschine.
-Automatische
Spülmaschine
-Demontiertes Gerät
Mindestdauer des
Gesamtzyklus: 39
Minuten
Hinweise zur Reinigung im Spül- und Desinfektionsgerät
Zyklus-Parameter
Zeit
Mindesttemperatur
Art des Reinigungsmittels/des
Wassers
Vorreinigung
2 Minuten
<45°C
Leitungswasser
Reinigung
5 Minuten
55°C
Reinigungsmittel
Spülen
2 Minuten
<45°C
Leitungswasser
Thermisches Spülen
5 Minuten
90°C
Osmosewasser
Trocknung
25 Minuten
> 70°C
Nicht zutreffend
Abschließende
Schritte
6
Schlussspülung
Gründlich mit destilliertem Wasser abspülen
-Destilliertes Wasser
Mindestens 1
Minute
7
Endtrocknung
Trocknen mit gefilterter medizinischer Druckluft
-Gefilterte
medizinische
Druckluft
Bis das Produkt
optisch trocken ist.
8
Lagerung
Nach dem Reinigungsvorgang müssen die
Instrumente in der richtigen Position in die
Behälter geräumt werden, so wie es auf der an dem
Sterilisationsbehälter befestigten
Positionierungskarte beschrieben ist.
B- Nur manuelle Reinigung:
Schritte
Beschreibung
des Schritts
Anweisungen für diesen Schritt
Zubehör
Dauer
Reinigungsschritt
e
1
Entfernung von
Verunreinigungen
Spülen Sie das Produkt mit Leitungswasser bei
Raumtemperatur und entfernen Sie alle
sichtbaren organischen Substanzen mit einer
weichen Bürste.
-Leitungswasser
-Weiche Borstenbürste
(keine
Drahtreinigungsbürsten
verwenden),
bis alle sichtbaren
Verunreinigungen
entfernt sind.
2
Trocknung
Trocknen Sie das Gerät mit einem trockenen,
fusselfreien Tuch. Es kann auch gefilterte
medizinische Luft verwendet werden.
-Nicht flauschiges Tuch
-Gefilterte medizinische
Druckluft
Bis das Produkt
optisch trocken ist.
Desinfektionsschritte
3
Anwendung der
Desinfektion
Mit Leitungswasser (15-25°C) eine
Reinigungsmittellösung bei Raumtemperatur
zubereiten.
Instrumente in geöffneter Stellung (falls
zutreffend) eintauchen. Während des
Eintauchens die beweglichen Teile des
Gerätes dreimal betätigen, damit das
Reinigungsmittel alle Teile des Gerätes
erreicht.
-Reinigungsmittel
Mindestdauer 1
Minute, die Dauer
kann je nach
Produkt variieren.
4
Trocknung
Nach dem Eintauchen das Gerät entnehmen
und mit einem Einwegtuch abwischen.
Anschließend das Gerät in ein neues
Reinigungslösung geben, die mit
Leitungswasser bei Raumtemperatur
hergestellt wurde.
-Einwegtuch
-Reinigungsmittel
Bis das Produkt
optisch trocken ist.
5
Manuelle
Desinfektion
Bearbeiten Sie die gesamte Oberfläche des
Instruments mit einer weichen Bürste.
-Weiche Borstenbürste
-Reinigungsmittel
Die manuelle
Reinigung ist

Page 13 / 52
Verlängern Sie nötigenfalls die Zeit der
Reinigung mit der Bürste. Betätigen Sie die
beweglichen Teile (falls zutreffend) des
Gerätes 3 Mal, und verwenden Sie eine
Spritze, um alle schwer zugänglichen Teile des
Gerätes zu erreichen. Verwenden Sie 60 ml
der Reinigungslösung.
-Spritze
abgeschlossen,
wenn die
Oberfläche des
Gerätes, die Fugen
und Hohlräume
von Hand sorgfältig
gereinigt wurden.
6
Spülen und
abschließende
Bearbeitung
Das Gerät 1 Minute in Osmosewasser
einweichen.
Verwenden Sie eine Spritze und 60 ml
Osmosewasser, um alle schwer zugänglichen
Stellen zu erreichen.
Wiederholen Sie das Einweichen zweimal mit
frischem Wasser.
-Osmosewasser
-Spritze
Mindestens 1
Minute
Desinfektionsschritt
e
7
Schlussspülung
Gründlich mit destilliertem Wasser abspülen
-Destilliertes Wasser
Mindestens 1
Minute
8
Endtrocknung
Trocknen mit gefilterter medizinischer
Druckluft
-Gefilterte medizinische
Druckluft
Bis das Produkt
optisch trocken ist.
9
Lagerung
Nach dem Reinigungsvorgang müssen die
Instrumente in der richtigen Position in die
Behälter geräumt werden, so wie es auf der an
dem Sterilisationsbehälter befestigten
Positionierungskarte beschrieben ist.
Hinweis: Bei Verdacht auf Creutzfeldt-Jakob-Krankheit (CJK) die Hilfs- und Fixierklammer verbrennen.
Falls die vorstehend genanten Anweisungen nicht befolgt werden, muss die Gesundheitseinrichtung einen gleichwertigen und validierten
Reinigungsprozess durchführen, für den sie in vollem Umfang verantwortlich ist.
STERILISATION DER HILFSINSTRUMENTE
Die Sterilisation erfolgt unter der Verantwortung der Gesundheitseinrichtungen.
Es müssen das vorgeschriebene Verfahren und die folgenden Materialien angewendet werden, um das Übertragungsrisiko von NCTA zu verringern,
(Französisches Gesundheitsministerium - DGS/R13/2011/449 vom 01/12/2011).
1- Die Sterilisation im Autoklaven erfolgt in einem spezifischen Behälter (Siebkorb, Tablett, Kunststoffschale in einem autoklavierbaren
Aufreißbeutel).
NB: Es wird nicht empfohlen. die Sterilisation in autoklavierbaren Aufreißbeuteln durchzuführen, ohne dass ein Behälter vorhanden ist, das das
Zubehör die Kunststoffhülle der Beutel perforieren könnte.
2-Eine Sterilisation PER AUTOKLAV wird gemäß dem folgenden Protokoll empfohlen:
Parameter für die Dampfsterilisation
Werte
Werte
Zyklustyp
Vorheriges Vakuum
Vorheriges Vakuum
Solltemperatur
134°C
132°C
Volle Zykluszeit
Mindestens 3 Minuten
Mindestens 4 Minuten
Trocknungszeit
Mindestens 20 Minuten
Kühlzeit (innerhalb und außerhalb der Autoklavkammern)
Mindestens 40 Minuten
3 - Anmerkung: Nach jedem Reinigungs-/Sterilisationszyklus die Integrität und den ordnungsgemäßen Betrieb der Instrumente sicherstellen:
Montage und einwandfreie Funktion der Mechanismen und Verriegelungssysteme (Clipping, Greifen) ohne übermäßiges Spiel prüfen.
4- Wenn sich der Gebrauch der Instrumente verzögert, lagern Sie sie nach der Sterilisation in einem Aufreißbeutel auf einem Tablett.
Falls die vorstehend genanten Anweisungen nicht befolgt werden, muss die Gesundheitseinrichtung einen gleichwertigen und validierten
Reinigungsprozess durchführen, für den sie in vollem Umfang verantwortlich ist.
VORSICHTSMAßNAHMEN BEI DER LAGERUNG
Die Zubehörteile und Versuchsprothesen müssen in einem für diesen Zweck in ihrem vorgesehenen Behälter oder in einer Verpackung gelagert
werden, um jegliche Beschädigung zu vermeiden.
An einem trockenen, vor Sonnenlicht geschützt Ort und bei Zimmertemperatur in der Originalverpackung aufbewahren.
"ENTNAHME UND ENTSORGUNG VON IMPLANTATEN"
Die Entnahme und die Handhabung sind gemäß der ISO-Norm 12891-1:2015 "Chirurgische Implantate - Entnahme und Analyse von chirurgischen
Implantaten" - Teil 1: "Entnahme und Handhabung" erfolgen. Alle entnommenen Implantate müssen entsprechend des aktuellen Protokolls zur
Analyse zurückgesendet werden. Das Protokoll ist auf Anfrage bei COUSIN BIOTECH erhältlich. Es ist wichtig, dass alle Implantate, die vor dem
Versand nicht gereinigt und desinfiziert wurden, in einer versiegelten Verpackung enthalten sein müssen. Die Entsorgung von entnommenen
medizinischen Implantaten muss gemäß den in dem Land der Entsorgung geltenden Vorschriften zur Entsorgung von infektiösen gefährlichen
Abfällen zu erfolgen. Die Entsorgung von nicht-implantierten Implantaten unterliegt keinen speziellen Empfehlungen. Der zweite Abschnitt befasst
sich mit den die Informationsanfragen oder mit Reklamationen.
"ANFORDERUNG VON INFORMATIONEN UND REKLAMATIONEN"
Entsprechend seiner Qualitätssicherungspolitik verpflichtet sich COUSIN BIOTECH, alle erforderlichen Massnahmen zu ergreifen, um qualitativ
hochwertige Medizinprodukte herzustellen und zu liefern. Sollte das Gesundheitspersonal (Kunde, Nutzer, verschreibender Arzt…) jedoch aufgrund
der Qualität, Sicherheit oder der Produktleistung Reklamationen vorbringen oder mit dem Produkt nicht zufrieden sein, müssen sie COUSIN
BIOTECH unverzüglich darüber im Falle eines Defekts des Implantats oder im Falle von schwerwiegenden unerwünschten Nebenwirkungen für
den Patienten muss die Gesundheitseinrichtung die entsprechenden, in ihrem Land geltenden rechtlichen Schritte befolgen und COUSIN BIOTECH
unverzüglich informieren. Bitte geben Sie in Ihrer Korrespondenz die Referenz, die Chargennummer und die Koordinaten der Referenz an und
fügen Sie eine verständliche Beschreibung des Vorfalls oder des Reklamationsgrunds bei. Broschüren, Dokumentationen und Operationstechniken
sind auf Anfrage bei COUSIN BIOTECH und seinen Vertriebshändlern erhältlich.
Zusammenfassung

Page 14 / 52
Istruzioni per l'uso it
IntraSPINE®
DISPOSITIVO PER LO SPAZIO INTERSPINOSO A SOSTEGNO LAMINARE
PRODOTTO STERILE MONOUSO
DESCRIZIONE
La protesi IntraSPINE®è un dispositivo medicale interlaminare costituito da uno spessore in dimetilsilossano (silicone) (disponibile in diverse misure)
adatto al livello intervertebrale e da un legamento in polietilene tereftalato.
Lo spessore è ricoperto da una pellicola di polietilene tereftalato con un'area protetta da un rivestimento sulla parte anteriore nella zona midollare.
Il legamento è posto in tensione da una anello in titanio (TA6V).
MATERIALI
Protesi IntraSPINE®: dimetilsilossano, polietilene tereftalato, titanio.
Ausilio e protesi di prova IntraSPINE®: acciaio inossidabile, copolimero di acetale, dimetilsilossano .
Origine non umana né animale - Non riassorbibile.
INDICAZIONI
La protesi IntraSPINE®è raccomandata nella zona lombare della colonna vertebrale e sacrale (dal livello L1 al livello S1), nei seguenti casi:
- Sindrome delle faccette articolari da artropatia
- Stenosi foraminale
- Discopatia degenerativa
- Insufficienza legamentosa interspinosa
PRESTAZIONI
La protesi IntraSPINE®è un dispositivo di sostegno elastico ad azione ammortizzante. L'impianto in sede interlaminare, in prossimità del centro di
rotazione, favorisce l'azione ammortizzante e la rimessa in tensione delle strutture disco-legamentose grazie all'elasticità del legamento sovraspinoso.
Il legamento posto in corrispondenza delle spinose vertebrali a contatto con l'area interessata dall'impianto (sopra e sotto) funge principalmente da
ausilio al legamento posteriore in fase di flessione.
IntraSPINE®è stata approvata per l’impianto a lungo termine nel corpo umano.
CONTROINDICAZIONI
1) Non impiantare nei casi seguenti:
- Allergia a un componente
- Bambini in fase di crescita
- Infezione locale
- Gravidanza
2) Fattori suscettibili di compromettere il buon esito dell'impianto:
- Osteoporosi grave
- Gravi deformazioni del rachide
- Tumori ossei locali
- Disturbi sistemici o metabolici
- Malattie infettive
- Obesità
- Tossicodipendenza
- Intensa attività fisica (ad esempio, sport a livello agonistico o lavori fisicamente impegnativi)
- Intervento chirurgico a più di 2 livelli con la protesi IntraSPINE
EFFETTI SECONDARI INDESIDERATI
1) Complicanze che potrebbero insorgere a causa del dispositivo:
-Infezione della protesi,
-Rottura del dispositivo (rottura del legamento, allentamento, rottura dell’ala fissa)
-Distacco dell’ago
-Allentamento del dispositivo, Allungamento permanente del legamento
-Migrazione del dispositivo, spostamento dello stesso
-Spondilolistesi al segmento dinamicamente stabilizzato,
-Dolore persistente o peggiorato attribuito al livello dinamicamente stabilizzato e intervento di revisione richiesto con la fusione intersomatica a quel
livello.
-Fratture del processo spinoso: interoperatoria, postoperatoria o durante la rimozione del dispositivo (rimozione a causa di infezione) e possono
essere associate allo spostamento dell’impianto.
-Reintervento tardivo a causa dell’assenza di recupero.
-Impianto di livello errato, posizionamento inappropriato (livello posteriore o errato)
-Sieroma, rigonfiamento attorno al dispositivo
-Reazioni infiammatorie, reazione allergica, reazione al Corpo estraneo
In taluni casi si è dovuto procedere alla rimozione dello strumento medico e all'esecuzione della fusione della vite pedicolare.
2) Complicanze poco probabilmente correlate al dispositivo, ma correlate all’intervento chirurgico o alle condizioni del paziente:
- Pseudomeningocele, fistola, lacerazione durale, persistenti perdite di CSF, meningite
- Perdita della funzione neurologica
- Sindrome di cauda equina, neuropatia, deficit neurologici, aracnoidite e/o perdita muscolare, compressione intorno ai nervi e/o dolore
- Ritenzione urinaria o perdita di controllo della vescica o altri tipi di compromissione del sistema urologico
- Frattura, perdita ossea o diminuzione della densità ossea
- Ernia del nucleo polposo, alterazione o degenerazione del disco in corrispondenza, sopra o sotto il livello dell’intervento chirurgico: degenerazione del
segmento adiacente
- Mancata unione o pseudartrosi, unione ritardata, malunione
- Cessazione di qualsiasi potenziale di crescita della porzione operata della colonna vertebrale
- Perdita o aumento della mobilità o della funzione spinale
- Emorragia, ematoma, edema, embolia, ictus, emorragia eccessiva, flebite, necrosi delle ferite, deiscenza delle ferite, infezione delle ferite, danni ai vasi
sanguigni o altri tipi di compromissione del sistema cardiovascolare
- Sviluppo di problemi respiratori
Sicurezza RM
Gli impianti sono composti da materiali non ferromagnetici e presentano una geometria non suscettibile di generare corrente indotta. Inoltre, poiché sono fissati
ai tessuti, è improbabile che vengano mobilizzati. A priori possono essere considerati compatibili con la RM. La loro sicurezza, in particolare in termini di
riscaldamento e di migrazione dell’impianto, è stata valutata attraverso dati bibliografici posti a confronto con i dati disponibili su dispositivi simili per
composizione, forma e utilizzo. Questa valutazione ha stabilito una compatibilità condizionata per la RM fino a 1,5 Tesla. Come misura precauzionale, si
raccomanda di evitare di effettuare scansioni di RM entro le 48 ore dall’inserimento dell’impianto e di informare la persona responsabile della scansione del
recente inserimento dell’impianto, se tale esame è essenziale.
Va notato che i dispositivi che presentano un elevato contrasto con l’ambiente biologico possono generare “artefatti” che devono essere presi in considerazione
per la perfetta esecuzione e interpretazione degli esami di imaging.

Page 15 / 52
A tal fine, si raccomanda al paziente che ha questo impianto di avvertire il prima possibile gli operatori sanitari interessati (radiologi e operatori radiologici) della
presenza di questo impianto prima di tali esami.
PRECAUZIONI POSTOPERATORIE
Il paziente dovrà essere informato sulle cure e le precauzioni postoperatorie.
Potrebbe essere necessario ma non obbligatorio l’uso di un’unità posturale. La decisione spetta al chirurgo.
PRECAUZIONI PER L'USO
Prima di ogni utilizzo, verificare l'integrità della protesi, delle protesi di prova, dei dispositivi ausiliari e della confezione.
Non utilizzare in caso di deterioramento della protesi e/o delle protesi di prova, e/o delle etichette, e/o dei dispostivi ausiliari e/o della confezione.
Non utilizzare se la protesi risulta obsoleta.
L’apertura e la manipolazione dell’impianto dovrà essere eseguita in conformità agli standard di asepsi, per garantire la sterilità.
Quando si apre la scatola di cartone, il chirurgo dovrà assicurarsi che il numero di lotto, il modello e le dimensioni della protesi siano uguali a quelle
indicate nell'etichetta della borsa interna. Altrimenti l’uso della protesi è rigorosamente proibito.
Evitare che la protesi, le protesi di prova e i dispositivi ausiliari vengano a contatto con oggetti che possano danneggiarne la superficie.
Condizioni operative: temperatura tra +32°C a 42°C. Gli impianti dovranno essere resistenti ai fluidi biologici e al rilascio di tessuti corporei, con i quali
vengono a contatto durante l’uso. Pertanto la protesi IntraSPINE®è stata approvata per un impianto a lungo termine e attualmente Cousin Biotech
dispone di 10 anni di riscontri su tali prodotti.
La protesi IntraSPINE®, le protesi di prova e gli strumenti ancillari dovranno essere utilizzati da chirurghi qualificati formati alla chirurgia spinale e alla
tecnica chirurgica IntraSPINE®. Le informazioni contenute in queste istruzioni sono necessarie ma non sufficienti per controllare la tecnica chirurgica.
IntraSPINE®è realizzata con materiali morbidi; qualsiasi contatto con materiali più duri può alterarne il comportamento meccanico e la durata. È obbligatorio
evitare il contatto con altri materiali.
La prescrizione della protesi è prerogativa del personale medico, il solo in grado di valutarne l'opportunità.
Il topping off non è controindicato, ma è necessaria una particolare attenzione. IntraSPINE®è realizzata con materiali morbidi; qualsiasi contatto con materiali
più duri può alterarne il comportamento meccanico e la durata. È obbligatorio evitare il contatto con altri materiali.
L'utilizzo dei dispositivi ausiliari e della protesi di prova COUSIN BIOTECH è propedeutico all'impianto della protesi IntraSPINE®.
Gli impianti devono essere maneggiati e conservati con estrema cura, in un luogo asciutto, protetti dalla luce solar e a temperatura ambiente.
Trasporto: il trasporto dei dispositivi dovrà essere effettuato in veicoli chiusi in conformità alle norme relative a tali veicoli da trasporto. Non vi sono
requisiti di trasporto speciale per il dispositivo.
IMPORTANTE: NON RIUTILIZZARE E NON RISTERILIZZARE LA PROTESI INTRASPINE®
Conformemente all’etichettatura di questo prodotto, la protesi è monouso. In nessun caso devono essere riutilizzati e/o risterilizzati. I potenziali rischi
includono, ma non si limitano: perdita di sterilità del prodotto, rischio di infezione, perdita di efficacia del prodotto, recidiva.
AVVERTENZA PER L'UTILIZZO DEI DISPOSITIVI AUSILIARI E DELLE PROTESI DI PROVA
I dispositivi ausiliari IntraSPINE®sono dispostivi medicali di Classe I, riutilizzabili e destinati a un uso temporaneo.
Le protesi di prova IntraSPINE®sono dispostivi medicali di Classe IIa, riutilizzabili e destinati a un uso temporaneo.
Diversamente dalla protesi IntraSPINE® la strumentazione e le protesi di prova (consegnate nel kit di strumenti), sono consegnate non sterili.
KITACINTRA / RCBININTRU
Al primo utilizzo
La strumentazione e le protesi di prova devono essere:
-pulite in maniera adeguata
-sterilizzate in autoclave
DECONTAMINAZIONE E Pulizia degli ACCESSORI
La decontaminazione e la pulizia vengono realizzate sotto la responsabilità dei centri di assistenza sanitaria.
Occorre utilizzare il metodo prescritto e i seguenti materiali per ridurre il rischio di trasmissione degli ATNC, (Ministero della sanità francese -
DGS/R13/2011/449 del 01/12/2011).
Eseguire questo passaggio al primo utilizzo e immediatamente dopo l'uso per evitare che particelle o secrezioni, seccandosi, aderiscano agli
strumenti.
Smontare gli strumenti smontabili
Prodotti consigliati per la pulizia
- un detergente enzimatico neutro
- O prodotti di pulizia idonei (neutri o leggermente alcalini) per gli strumenti chirurgici in conformità con la normativa vigente.
- Attenzione: Non utilizzare agenti corrosivi o detergenti caustici.
È possibile utilizzare 2 procedure:

Page 16 / 52
Procedura di lavaggio automatica in termodisinfettore con prelavaggio automatico:
_Passaggi
Descrizione
del
passaggio
Istruzioni da
seguire in questo
passaggio
Accessori
Durata
Fasi di pulizia
1
Eliminazione dei
contaminanti
Risciacquare il prodotto con acqua di
rubinetto a temperatura ambiente rimuovendo
il materiale organico visibile con una spazzola
morbida
-Acqua di rubinetto
-Spazzola morbida
(non utilizzare
spazzole
metalliche)
Fino ad
eliminazione dello
sporco visibile
2
Pre-immersione
Preparare una soluzione di detergente a
temperatura ambiente (15-25°C).
In seguito occorre lavare le luci, le filettature,
le guarnizioni e aperture degli strumenti con
abbondante acqua e con pistola a getto
d'acqua per almeno 10 secondi per ogni
posizione.
-Detergente
-Pistola a getto
d'acqua
Finché il prodotto
non risulta
visivamente pulito
3
Pulizia a
ultrasuoni
Pulire lo strumento in una vasca ad ultrasuoni
contenente la soluzione
Non dimenticare di serrare nuovamente
tutti i raccordi e la viteria allentati dalle
vibrazioni.
-Vasca a ultrasuoni
Durata minima 10
minuti, questa
durata può variare
in base al prodotto
Fasi di pulizia
4
Immersione
Immergere lo strumento in acqua
osmotizzata.
Dopo il trattamento tramite ultrasuoni, le luci,
le filettature, le guarnizioni e aperture degli
strumenti devono ancora essere lavate con
abbondante acqua, con pistole a getto
d'acqua per almeno 10 secondi per ogni
posizione.
-Acqua osmotizzata
Immersione di
almeno 30
secondi
5
Termodisinfettore
automatico
Collocare l'intero dispositivo smontato in un
termodisinfettore
-Termodisinfettore
automatico
-Dispositivo
smontato
Durata minima
dell'intero ciclo: 39
minuti
Istruzioni di pulizia nel termodisinfettore
Parametri dei cicli
Tempo
Temperatura minima
Tipo di detergente/acqua
Pre-pulizia
2 minuti
<45°C
Acqua di rubinetto
Pulizia
5 minuti
55°C
Detergente
Risciacquo
2 minuti
<45°C
Acqua di rubinetto
Risciacquo termico
5 minuti
90°C
Acqua osmotizzata
Asciugatura
25 minuti
> 70°C
Non applicabile
Passaggi di finitura
6
Risciacquo
finale
Risciacquare con cura con acqua distillata
-Acqua distillata
Almeno 1 minuto
7
Asciugatura
finale
Asciugare con aria compressa filtrata di qualità
medica
-Aria compressa
filtrata di qualità
medica
Finché il prodotto
non risulta
visivamente asciutto
8
Conservazione
Gli strumenti devono essere sistemati nella
posizione giusta nei contenitori come descritto sulla
scheda di posizionamento fissata sul contenitore
di sterilizzazione
A- Procedura di pulizia esclusivamente manuale:
_Passaggi
Descrizione
del
passaggio
Istruzioni da
seguire per il
passaggio
Accessori
Durata
Fasi di pulizia
1
Eliminazione
dei
contaminanti
Risciacquare il prodotto con acqua di rubinetto
a temperatura ambiente rimuovendo il
materiale organico visibile con una spazzola
morbida
-Acqua di rubinetto
-Spazzola morbida
(non utilizzare
spazzole
metalliche)
Fino ad
eliminazione dello
sporco visibile
2
Asciugatura
Asciugare il dispositivo con un panno asciutto
che non lascia pelucchi. È inoltre possibile
utilizzare aria filtrata di qualità medica
-Panno che non
lascia pelucchi
-Aria compressa
filtrata di qualità
medica
Finché il prodotto
non risulta
visivamente
asciutto
Passaggi di disinfezione
3
Disinfezione
Preparare una soluzione di detergente a
temperatura ambiente utilizzando acqua di
rubinetto (15-25°C).
Immergere gli strumenti in posizione aperta (se
applicabile). Durante l'immersione, azionare la
parti mobili dello strumento 3 volte affinché il
detergente possa entrare a contatto con tutte le
parti dello stesso.
-Detergente
Durata minima 1
minuto, tale durata
può variare in
base al prodotto.
4
Asciugatura
Al termine dell'immersione, prelevare lo
strumento e asciugarlo con un panno usa e
getta. Immergere lo strumento in un nuovo
bagno detergente utilizzando acqua di rubinetto
a temperatura ambiente
-Panno usa e getta
-Detergente
Finché il prodotto
non risulta
visivamente
asciutto
5
Disinfezione
manuale
Spazzolare tutta la superficie dello strumento
utilizzando una spazzola morbida. Regolare il
-Spazzola a pelo
morbido
La pulizia manuale
è terminata

Page 17 / 52
tempo di spazzolatura se necessario. Azionare
le parti mobili dello strumento 3 volte (se
applicabile) e utilizzare una siringa per
accedere a tutte le zone difficili da raggiungere.
Utilizzare un volume di 60 ml di soluzione
detergente.
-Detergente
-Siringa
quando la
superficie del
dispositivo, gli
snodi e le parti
concave sono
state ben pulite a
mano
6
Risciacquo e
finitura
Immergere lo strumento in acqua osmotizzata
per un minuto.
Utilizzare una siringa e 60 ml di acqua
osmotizzata per avere accesso a tutte le zone
difficili da raggiungere.
Ripetere l'immersione altre due volte utilizzando
acqua semplice.
-Acqua osmotizzata
-Siringa
Almeno 1 minuto
7
Risciacquo
finale
Risciacquare con cura con acqua distillata
-Acqua distillata
Almeno 1 minuto
8
Asciugatura
finale
Asciugare con aria compressa filtrata di qualità
medica
-Aria compressa
filtrata di qualità
medica
Finché il prodotto
non risulta
visivamente
asciutto
9
Conservazione
Gli strumenti devono essere sistemati nella
posizione giusta nei contenitori come descritto
sulla scheda di posizionamento fissata sul
contenitore di sterilizzazione
Nota: In caso di sospetta malattia di Creutzfeld-Jakob (MCJ), incenerire l'ancillare e la pinza di fissaggio.
In caso di inosservanza delle suddette istruzioni, il centro di assistenza sanitaria dovrà applicare una procedura di pulizia equivalente e convalidata
che sarà posta sotto la sua esclusiva responsabilità.
STERILIZZAZIONE degli ACCESSORI
La sterilizzazione avviene sotto la responsabilità dei centri di assistenza sanitaria.
Occorre utilizzare il seguente metodo e i materiali prescritti per ridurre il rischio di trasmissione degli ATNC, (Ministero francese della sanità -
DGS/R13/2011/449 del 01/12/2011)
1- La sterilizzazione in autoclave va realizzata in un contenitore specifico (cesto metallico, vassoio in plastica, vassoio in plastica posto in sacchetto
autoclavabile apribile con pellicola).
NB: Si sconsiglia di realizzare la sterilizzazione in sacchetti autoclavabili apribili con pellicola senza utilizzare un contenitore gli ausiliare
potrebbero perforare le pellicole dei sacchetti.
2-Una sterilizzazione IN AUTOCLAVE può essere eseguita in base al protocollo seguente:
Parametri di sterilizzazione a vapore
Valori
Valori
Tipo di ciclo
Vuoto previo
Vuoto previo
Temperatura di setpoint
134°C
132°C
Tempo di ciclo completo
3 minuti minimo
4 minuti minimo
Tempo di asciugatura
20 minuti minimo
20 minuti minimo
Tempo di raffreddamento (all'interno e all'esterno delle
camere dell'autoclave)
40 minuti minimo
40 minuti minimo
3 - Nota: Dopo ciascun ciclo di pulizia/sterilizzazione, assicurarsi dell'integrità e del corretto funzionamento degli ausiliari: verificare l'assemblaggio e
il corretto posizionamento dei meccanismi, dei sistemi di bloccaggio (pinze, presa) senza gioco eccessivo.
4- Se l'utilizzo degli ausiliari è differito, riporli dopo la sterilizzazione in un sacchetto apribile con pellicola.
In caso di inosservanza delle suddette istruzioni, il centro di assistenza sanitaria dovrà applicare una procedura di sterilizzazione equivalente e
convalidata che sarà posta sotto la sua esclusiva responsabilità.
PRECAUZIONI PER LA CONSERVAZIONE
I dispositivi ausiliari e le protesi di prova devono essere riposti nell'apposita confezione o su recipiente o in un contenitore equivalente per evitare
qualsiasi rischio di danneggiamento.
Conservare in luogo asciutto, al riparo dalla luce solar e a temperatura ambiente, nella confezione originale.
ESPIANTO E SMALTIMENTO DI DISPOSITIVI
L'espianto e il trattamento devono avvenire secondo le raccomandazioni della norma ISO 12891-1:2015 "Impianti per chirurgia –Recupero e analisi
di impianti chirurgici" Parte 1: "Recupero e trattamento". Qualsiasi dispositivo espiantato deve essere restituito per essere analizzato in base
all'attuale protocollo. Questo protocollo è disponibile su richiesta presso COUSIN BIOTECH. È importante tener presente che qualsiasi impianto
che non sia stato pulito e disinfettato prima della spedizione deve essere imballato in una confezione sigillata. L'eliminazione del dispositivo medico
espiantato deve essere effettuata secondo le norme in uso nel paese per lo smaltimento dei rifiuti pericolosi infettivi. L'eliminazione di un dispositivo
non impiantato non è soggetta a raccomandazioni specifiche. Il secondo paragrafo si applica ai casi di richiesta di informazioni o reclami.
RICHIESTA DI INFORMAZIONI E RECLAMI
Conformemente alla sua politica sulla qualità, cousin biotech si impegna a fare tutto il possibile per produrre e fornire dispositivi medici di ottima
qualità. Tuttavia, se un professionista sanitario (cliente, utente, prescrittore...) ha un reclamo o un motivo di insoddisfazione in relazione a un prodotto
e alla sua qualità, sicurezza o prestazione, deve informare tempestivamente COUSIN BIOTECH. In caso di malfunzionamento di un impianto o se
questo ha provocato nel paziente gravi effetti avversi, la struttura sanitaria deve seguire le procedure legali vigenti nel suo paese e informare
immediatamente COUSIN BIOTECH. Per qualsiasi comunicazione si prega di specificare il riferimento, il numero di lotto, gli estremi di un referente
e una descrizione particolareggiata dell'incidente o del reclamo. Gli opuscoli, la documentazione e la tecnica chirurgica sono disponibili su richiesta
presso COUSIN BIOTECH e i suoi distributori.
Sommario

Page 18 / 52
Instrucciones de uso es
IntraSPINE®
DISPOSITIVO PARA EL ESPACIO INTERSPINOSO CON SOPORTE LAMINAR
PRODUCTO ESTÉRIL DE UN SOLO USO
DESCRIPCION
La prótesis IntraSPINE®es un dispositivo médico interlaminar compuesto por una cuña de dimetil siloxano (silicona) (disponible en varios tamaños)
adaptada al nivel intervertebral y por un ligamento de polietileno tereflalato.
La cuña está recubierta por una malla de polietileno tereflalato con una zona recubierta por una lámina en la cara anterior de la zona medular.
La tensión del ligamento se logrará mediante un bucle de titanio (TA6V).
MATERIALES
Prótesis IntraSPINE®: dimetil siloxano, polietileno tereflalato, titanio.
Elemento auxiliar y prótesis de prueba IntraSPINE®: acero inoxidable, copolímero de acetal, dimetil siloxano .
Origen no humano ni animal. No reabsorbible.
INDICACIONES
La prótesis IntraSPINE®se recomienda para su uso en la columna lumbar y la zona sacra (niveles L1 a S1) en los siguientes casos:
- Síndrome de la faceta articular
- Estenosis foraminal
- Discopatía degenerativa
- Insuficiencia del ligamento interespinoso
FUNCIONAMIENTO
La prótesis IntraSPINE®es un dispositivo de soporte elástico con efecto amortiguador. Su implantación en una zona interlaminar le permite estar
cerca del centro de rotación, desarrollando de este modo el efecto amortiguador y la recuperación de la tensión de las estructuras de disco
ligamentoso gracias a la flexibilidad de la zona superior a la espina del omóplato.
El ligamento que envuelve las espinas subyacentes y suprayacentes a nivel instrumental tendrá como función principal ayudar al ligamento posterior
durante la flexión..
IntraSPINE®ha sido validada para su implantación a largo plazo en el cuerpo humano.
CONTRAINDICACIONES
1) No lo implante en los casos siguientes:
- Alergia a alguno de los componentes
- Niño en edad de crecimiento
- Zona infectada
- Mujer embarazada
2) Factores susceptibles de poner en peligro el éxito de la implantación:
- Osteoporosis grave
- Deformaciones importantes de la columna vertebral
- Tumores óseos locales
- Trastornos sistémicos o metabólicos
- Enfermedades infecciosas
- Obesidad
- Drogadicción
- Actividad física intensa, por ejemplo, práctica de deportes de competición o trabajo que requiera esfuerzo físico elevado
- Cirugía en más de 2 niveles con la prótesis IntraSPINE
EFECTOS SECUNDARIOS INDESEABLES
1) Complicaciones presumiblemente relacionadas con el dispositivo:
-Infección de la prótesis,
-Rottura del dispositivo (rottura del legamento, resquebrajamiento del brazo fijo),
-Desenredo de la aguja
-Relajación del dispositivo, elongación del ligamento
-Migración de dispositivos desplazamiento de la cuña
-Espondiolistesis hacia el segmento dinámicamente estabilizado,
-Dolor persistente o que empeora atribuido al nivel dinámicamente estabilizado y revisión de cirugía necesaria con fusión intercorporal en ese nivel;
-Fracturas de la apófisis espinosa: intraoperatoria, postoperatoria o durante extracción del dispositivo (extracción debido a infección) y se puede
asociar a la dislocación del implante;
-Reintervención tardía debido a ausencia de recuperación;
-Colocación incorrecta, implantación en el nivel incorrecto (nivel posterior incorrecto)
-Seroma/ hinchazón alrededor del dispositivo
-Reacción inflamatoria, alergia, reacción a un cuerpo extraño
-En ciertos casos ha sido necesario extraer el instrumento médico y realizar la fusión de los tornillos pediculares.
2) Complicaciones con poca probabilidad de estar relacionadas con el dispositivo, pero sí con la intervención quirúrgica o las enfermedades del
paciente:
- Seudomeningocele, fístula, desgarro dural, pérdida crónica de LCR, meningitis
- Pérdida de la función neurológica
- Síndrome de la cola de caballo, neuropatía, deficiencias neurológicas, aracnoiditis y/o pérdida muscular, compresión alrededor de los nervios y/o
dolor
- Retención de orina o pérdida del control de la vejiga u otros tipos de alteraciones del aparato urinario
- Fractura, descalcificación o disminución de la densidad ósea
- Hernia del núcleo pulposo, trastorno o degeneración del disco en el nivel de la intervención quirúrgica o por encima o por debajo de él: degeneración
del segmento adyacente
- Seudoarticulación o seudoartrosis, retraso de la consolidación. Consolidación defectuosa.
- Cese de todo posible crecimiento de la porción operada de la columna vertebral
- Pérdida o aumento de la movilidad o la función vertebrales
- Hemorragia, hematoma, edema, embolia, derrame cerebral, hemorragia excesiva, flebitis, necrosis de la herida, dehiscencia de la herida, infección
de la herida, daño en los vasos sanguíneos u otros tipos de alteraciones del sistema cardiovascular
- Desarrollo de problemas respiratorios
SEGURIDAD PARA IRM:
Los implantes están compuestos por materiales no ferromagnéticos y presentan una geometría que no es susceptible de generar corriente inducida. Además,
al fijarse en los tejidos es poco probable que se muevan. A priori pueden considerarse compatibles con una IRM. Su seguridad, especialmente en referencia
al calentamiento y migración del implante, se ha evaluado a través de los datos bibliográficos mediante comparación con los datos disponibles sobre aparatos
con una composición, una forma y un uso similares. Tras esta evaluación se dedujo una compatibilidad parcial para IRM de hasta 1,5 teslas. Como medida de

Page 19 / 52
precaución, se recomienda evitar la aplicación de IRM en las 48 horas posteriores a la colocación del implante e informar a la persona encargada de la
resonancia de la reciente colocación del implante, si dicha resonancia es imprescindible.
Debe tenerse en cuenta que los aparatos que presentan un alto contraste con el entorno biológico pueden generar “artefactos” que han de ser tenidos en
cuenta para una ejecución y una interpretación adecuadas de las exploraciones por obtención de imágenes.
Para ello, se debe recomendar al paciente al que se haya colocado este implante que advierta en la medida de lo posible a los profesionales sanitarios
correspondientes (radiólogos y operarios de radiología) de la existencia de este implante antes de las exploraciones.
PRECAUCIONES POSTOPERATORIAS
El paciente debe ser informado de los cuidados y las precauciones postoperatorios.
El uso de faja podría ser necesario pero no es obligatorio. Esta decisión la toma el cirujano.
PRECAUCIONES DE USO
Antes de su uso, verifique la integridad de la prótesis, las prótesis de prueba, los elementos auxiliares y el envase.
No utilice el dispositivo en caso de deterioro de la prótesis, de la etiqueta, las prótesis de prueba, los elementos auxiliares y/o el envase.
No utilice la prótesis si ya ha caducado.
El desembalaje y la manipulación del implante se deben realizar de acuerdo con las normas de asepsia para garantizar la esterilidad.
A la hora de abrir la caja de cartón, el cirujano debe asegurarse de que el número de lote, el modelo y el tamaño de la prótesis corresponden con los
datos de la etiqueta de la bolsa interior. De lo contrario, queda estrictamente prohibido el uso de la prótesis.
Evite que la prótesis, las prótesis de prueba y los elementos auxiliares entren en contacto con objetos que puedan alterar la superficie.
Condiciones de uso: Temperatura de +32 °C hasta un máximo de 42 °C. Los implantes deberían ser resistentes a los fluidos biológicos y a la
liberación de tejidos corporales, con los que están en contacto durante el uso. Por lo tanto, la prótesis IntraSPINE®ha sido validada para su
implantación a largo plazo y, actualmente, Cousin Biotech posee 10 años de experiencia con respecto a estos productos.
Solo los cirujanos cualificados, con la debida formación en cirugía de la columna y en la técnica quirúrgica de IntraSPINE®, pueden utilizar la prótesis
IntraSPINE®, las prótesis de prueba y los elementos auxiliares. La información contenida en estas advertencias es necesaria, pero no suficiente,
para controlar la técnica quirúrgica.
Cada prótesis, prótesis de prueba y elemento auxiliar IntraSPINE® forma parte de un sistema y sólo debe utilizarse con los elementos
correspondientes del sistema COUSIN BIOTECH original.
IntraSPINE® está fabricado con materiales blandos. Cualquier contacto con materiales más duros puede alterar su comportamiento mecánico y su
durabilidad. Es obligatorio evitar el contacto con otros materiales.
El cirujano es la única persona cualificada para prescribir el dispositivo.
El remate (topping off) no está contraindicado, pero requiere una atención especial. IntraSPINE® está fabricado con materiales blandos. Cualquier
contacto con materiales más duros puede alterar su comportamiento mecánico y su durabilidad. Es obligatorio evitar el contacto con otros materiales.
El uso del sistema del elemento auxiliar y la prótesis de prueba COUSIN BIOTECH específico es necesario para la implantación de la prótesis
IntraSPINE®.
La manipulación y el almacenamiento de los implantes se deben realizar con sumo cuidado, en un lugar seguro, protegidos contra la luz solar y a
temperatura ambiente
Transporte: El transporte de los dispositivos se debe realizar en vehículos cerrados, de acuerdo con las normas de dichos vehículos de transporte.
El dispositivo no requiere medidas especiales de transporte.
IMPORTANTE: NO REUTILICE NI VUELVA A ESTERILIZAR LA PRÓTESIS INTRASPINE®
Conforme al etiquetado de este producto, la prótesis es para un solo uso. En ningún caso deben volver a utilizarse y/o esterilizarse (los riesgos
potenciales incluyen, sin limitarse a ello: pérdida de la esterilidad del producto, riesgo de infección, pérdida de la eficacia del producto, recaída).
AVISO SOBRE LOS ELEMENTOS AUXILIARES Y LAS PRÓTESIS DE PRUEBA
Los elementos auxiliares IntraSPINE® son dispositivos médicos de Clase I, destinados a un uso temporal y reutilizables.
Las prótesis de prueba IntraSPINE® son dispositivos médicos de Clase IIa, destinados a un uso temporal y reutilizables.
Al contrario que la prótesis IntraSPINE®, los complementos y prótesis de prueba (suministrados en el kit de instrumentos) se suministran no estériles.
KITACINTRA / RCBININTRU
Antes de utilizarlos por primera vez
Los complementos y las prótesis de prueba deben:
- Limpiarse de forma apropiada
- Esterilizarse con autoclave
DESCONTAMINACION Y LIMPIEZA DE LOS SISTEMAS AUXILIARES
La descontaminación y limpieza se realizan bajo la responsabilidad de los centros de sanitarios.
El método prescrito y los siguientes materiales deben usarse para reducir el riesgo de transmisión de ATNC, (Ministerio de sanidad francés -
DGS/R13/2011/449 del 01/12/2011).
Esta fase debe producirse durante el primer uso e inmediatamente después del uso para evitar que se adhieran partículas o secreciones
residuales a los instrumentos.
Los instrumentos desmontables deben desmontarse
Productos recomendados para la limpieza
- un detergente enzimático neutro
- O productos de limpieza adaptados (neutro o alcalino suave) a los instrumentos quirúrgicos de acuerdo con las reglamentaciones
vigentes.
- Atención: No usar agentes corrosivos ni productos de limpieza cáusticos
Existen 2 procedimientos posibles:
Procedimiento de limpieza automática en sistema de lavado y desinfección con limpieza previa manual:
Fases
Descripción de
la fase
Instrucciones para esta fase
Accesorios
Duración

Page 20 / 52
Fases de limpieza
1
Eliminación de
las
contaminaciones
Enjuagar el producto con agua del grifo a
temperatura ambiente y eliminar cualquier sustancia
orgánica visible con un cepillo de cerdas suaves.
-Agua del grifo
-Cepillo de cerdas
suaves (no usar
cepillos de limpieza
metálicos)
Hasta eliminar toda
la suciedad visible
2
Inmersión previa
Preparar una solución de detergente a temperatura
ambiente (15 - 25 °C).
A continuación, las luces, roscas, juntas y aberturas de
los instrumentos deben limpiarse con una pistola de
chorro de agua abundante durante al menos 10
segundos para cada posición.
-Detergente
-Pistola de chorro de
agua
Hasta que el
producto esté
visualmente limpio
3
Limpieza con
ultrasonido
Limpiar el instrumento en una cuba de ultrasonido
con esta solución.
Procure apretar todos los racores o tornillería que
pudieran haberse aflojado por las vibraciones.
-Cuba de ultrasonido
Duración mínima 10
minutos; esta
duración puede
variar según el
producto.
Fases de limpieza
4
Inmersión
Sumergir el instrumento en agua osmotizada.
Después del tratamiento por ultrasonido de las luces,
roscas, juntas y aberturas de los instrumentos, deben
limpiarse otra vez con una pistola de chorro de agua
abundante durante al menos 10 segundos para cada
posición.
-Agua osmotizada
Al menos 30
segundos de
inmersión
5
Lavadora
automática
Colocar el dispositivo completo desmontado en una
lavadora automática
-Lavadora automática
-Dispositivo
desmontado
Duración del ciclo
total mínima: 39
minutos
Instrucciones de limpieza en sistema de lavado y desinfección
Parámetros de los ciclos
Tiempos
Temperatura mínima
Tipo de detergente/agua
Limpieza previa
2 minutos
< 45 °C
Agua del grifo
Limpieza
5 minutos
55 °C
Detergente
Enjuague
2 minutos
< 45 °C
Agua del grifo
Enjuague térmico
5 minutos
90°C
Agua osmotizada
Secado
25 minutos
> 70 °C
No aplicable
Fases de
acabado
6
Enjuague final
Enjuagar con cuidado con agua destilada
-Agua destilada
Al menos 1 minuto
7
Secado final
Secar con aire comprimido filtrado de calidad
médica
-Aire comprimido
filtrado de calidad
médica
Hasta que el
producto esté
visualmente seco
8
Guardado
Los instrumentos deben colocarse en la posición
correcta en los contenedores tal y como se
describe en el plano de posicionamiento fijado al
contenedor de esterilización.
A- Procedimiento de limpieza manual exclusiva:
Fases
Descripción de
la fase
Instrucciones para esta fase
Accesorios
Duración
Fases de limpieza
1
Eliminación de
las
contaminaciones
Enjuagar el producto con agua del grifo a
temperatura ambiente y eliminar cualquier sustancia
orgánica visible con un cepillo de cerdas suaves.
-Agua del grifo
-Cepillo de cerdas
suaves (no usar
cepillos de
limpiezsa
metálicos)
Hasta eliminar toda
la suciedad visible
2
Secado
Secar el dispositivo con un trapo seco que no
desprenda pelusa. Es posible usar aire filtrado de
calidad médica
-Trapo sin pelusas
-Aire comprimido
filtrado de calidad
médica
Hasta que el
producto esté
visualmente seco
Fases de desinfección
3
Aplicación de la
desinfección
Preparar una solución de detergente a temperatura
ambiente con agua del grifo (15 - 25 °C).
Sumergir los instrumentos en posición abierta (si
procede). Durante la inmersión, accione las partes
móviles de los tiempos del instrumento 3 veces para
que el detergente pueda acceder a todas las partes
del instrumento.
-Detergente
Duración mínima 1
minuto; esta
duración puede
variar según el
producto.
4
Secado
Cuando haya terminado la inmersión, saque el
instrumento y séquelo con un tejido desechable.
Coloque el instrumento en otra baño de detergente
con agua del grifo a temperatura ambiente.
-Tejido desechable
-Detergente
Hasta que el
producto esté
visualmente seco
5
Desinfección
manual
Cepille toda la superficie con un cepillo suave. Ajuste
el tiempo de cepillado si es necesario. Accione las
partes móviles del instrumento 3 veces (si procede)
y use una jeringa para acceder a las zonas de difícil
acceso. Use un volumen de 60 ml de la solución de
detergente.
-Cepillo de cerdas
suaves
-Detergente
-Jeringa
La limpieza manual
habrá terminado
cuando la
superficie del
dispositivo, las
articulaciones y las
cavidades se hayan
limpiado
correctamente a
mano.
6
Enjuague y
acabado
Sumerja el instrumento en agua osmotizada durante
1 minuto.
-Agua osmotizada
-Jeringa
Al menos 1 minuto
Table of contents
Languages:
Popular Medical Equipment manuals by other brands

Apex Medical
Apex Medical 9S-007200 instruction manual

Chattanooga
Chattanooga Intelect Mobile 2 Ultrasound user manual

medi
medi Stabimed manual

Woodpecker
Woodpecker Fi-G instruction manual

LifeGuard Lift
LifeGuard Lift LifeGuard Power Lift Series owner's manual

FujiFilm
FujiFilm FCR CAPSULA X Service manual