Covalue DR7800S User manual

Instruction Manual
DR7800S DR7810S DR7600S DR7610S DR7500S DR7510S
DMR/FM Portable Radio
ThankyouforpurchasingaCOVALUEtwo‐wayradio.Thissimpletouseradioadoptsthelatest
advancesintechnology,providingreliablecommunicationintoday’sdemandingcommunication
environment.
NoticetotheUser:
·Pleasereadthisinstructionmanualbeforeoperatingthisradio.
·It’sprohibitedtousetheradioorchargeitatanyareawithapotentiallyexplosiveatmosphere
(wheretheaircontainsgas,dustandsmog,etc.),aswellaswhiletakingonfuel,orwhile
parkingatagasolineservicestation;oranyareawhereradiocommunicationisprohibited
(suchasahospitaloraairport.)
·It’sprohibitedtooperatetheradiowithoutpermissioninareaswherethegovernmentlaws
prohibitradiocommunication.
·Pleasedon'texposetheradiotodirectsunlightforalongtime;don'tplacetheradionearany
heatingdevices,either.
·Pleasedon'tputtheradioinextremelydusty,moisthumidareasorunstablesurfaces.
·Onlyqualifiedpersonal,withpropertoolsandinstrumentsareallowedtoserviceandrepair
theradios,donotdisassembletheradiobyyourselftoavoiddamages.
FCCWarning:
Any Changes or modifications not expressly approved by the party responsible for
compliance could void the user’s authority to operate the equipment.
Note: This equipment has been tested and found to comply with the limits for a Class
ice, pursuant to part 15 of the FCC Rules.B digital dev
This device complies with part 15 of the FCC Rules. Operation is subject to the
following two conditions: (1) This device may not cause harmful interference , and (2)
this device must accept any interference received , including interference that may
cause undesired operation .
These limits are designed to provide reasonable protection against harmful interference
in a residential installation. This equipment generates uses and can radiate radio
frequency energy and, if not installed and used in accordance with the instructions, may
cause harmful interference to radio communications. However, there is no guarantee
that interference will not occur in a particular installation. If this equipment does cause
harmful interference to radio or television reception, which can be determined by turning
the equipment off and on, the user is encouraged to try to correct the interference by
one or more of the following measures:

—Reorient or relocate the receiving antenna.
—Increase the separation between the equipment and receiver .
—Connect the equipment into an outlet on a circuit different from that to which the
receiver is connected .
—Consult the dealer or an experienced radio / TV technician for help.
ISEDCwarning:
NOTICE: This radio is intended for use in occupational/controlled conditions where users
have full knowledge of their exposure and can exercise control over their exposure to
meet the occupational limits in FCC/ISEDC and International standards. This radio device
is not authorized for general population consumer use.
RF Exposure Requirements:
. To control your exposure and ensure compliance with the occupational/controlled
environmental exposure limits, always adhere to the following procedures.
Guidelines:
Do not remove the RF Exposure Label from the device.
User awareness instructions should accompany device when transferred to other
users.
Do not use this device if the operational requirements described herein are not met.
Operating Instructions:
Transmit no more than the rated duty factor of 50% of the time. To transmit (talk), push
the Push-To-Talk (PTT) key. To receive calls, release the PTT key. Transmitting 50% of
the time, or less, is important because the radio generates measurable RF energy only
when transmitting (in terms of measuring for standards compliance).
Keep the radio unit at least 2.5 cm away from the face. Keeping the radio at the proper
distance is important as RF exposure decreases with distance from the antenna. The
antenna should be kept away from the face and eyes.
When worn on the body, always place the radio in a COVALUE approved holder,
holster, case, or body harness or by use of the correct clip for this product. Use of
non-approved accessories may result in exposure levels which exceed the FCC's
occupational/controlled environmental RF exposure limits.
Use of non-approved antennas, batteries, and accessories causes the radio to exceed
the FCC RF exposure guidelines.

Respectez toujours les procédures suivantes pour contrôler votre exposition et vous
assurer de la conformité avec les limites d'exposition professionnelle en milieu de travail /
environnementales contrôlées.
Des lignes directrices: Ne retirez pas l'étiquette d'exposition RF de l'appareil. Les
instructions de sensibilisation des utilisateurs doivent accompagner l'appareil lors de son
transfert à d'autres utilisateurs. N'utilisez pas cet appareil si les exigences opérationnelles
décrites ici ne sont pas satisfaites.Mode d'emploi: Ne transmettez pas plus que le facteur
de droit nominal de 50% du temps. Pour transmettre (parler), appuyez sur la touche
Push-To-Talk (PTT). Pour recevoir des appels, relâchez la touche PTT. La transmission
de 50% du temps, ou moins, est importante car la radio génère une énergie RF
mesurable uniquement lors de la transmission (en termes de mesure pour la conformité
aux normes). Maintenez l'unité radio à au moins 2,5 cm du visage.Le maintien de la radio
à la distance appropriée est important car l'exposition aux radiofréquences diminue avec
la distance del'antenne. L'antenne doit être éloignée du visage et des yeux. Lorsqu'il est
porté sur le corps, placez toujours la radio dans un support, un étui, un étui ou un harnais
de sécurité approuvé par COVALUE ou utilisez le clip approprié pour ce produit.
L'utilisation d'accessoires non approuvés peut engendrer des niveaux d'exposition
supérieurs aux limites d'exposition aux RF professionnelles / environnementales
contrôlées de la FCC. L'utilisation d'antennes, de piles et d'accessoires non approuvés a
pour conséquence que la radio dépasse les consignes d'exposition RF de la FCC.
SHENZHENCOVALUECOMMUNICATIONSCO.,LTD.
Any changes or modifications not expressly approved by the party responsible for
compliance could void the user’s authority to operate the equipment.
This device complies with Innovation, Science and Economic Development Canada
licence-exempt RSS standard (s). Operation is subject to the following two conditions:
(1) this device may not cause interference, and (2) this device must accept any
interference,including interference that may cause undesired operation of the device.
Tout changement ou modification non expressément approuvé par la partie responsable
de la conformité pourrait annuler l'autorité de l'utilisateur à faire fonctionner l'équipement.
Cet appareil est conforme aux normes RSS exemptes de licence d'Innovation, Sciences
et Développement économique Canada. Le fonctionnement est soumis aux deux
conditions suivantes :(1) cet appareil ne doit pas causer d'interférences, et (2) cet appareil
doit accepter toute interférence, y compris les interférences pouvant entraîner un
fonctionnement indésirable de l'appareil.
PROFESSIONALDIGITALTWO‐WAYRADIO
DR7800SSERIESDR7800S/7810S/7600S/7610S/7500S/7510S
DIGITALPORTABLERADIOS
QUICKREFERENCEGUIDE
DR7800SSERIES
DigitalPortableRadios
QuickReferenceGuide
NOTE:RefertoUserGuideformoredetailsonyour
radio'soperations/features.
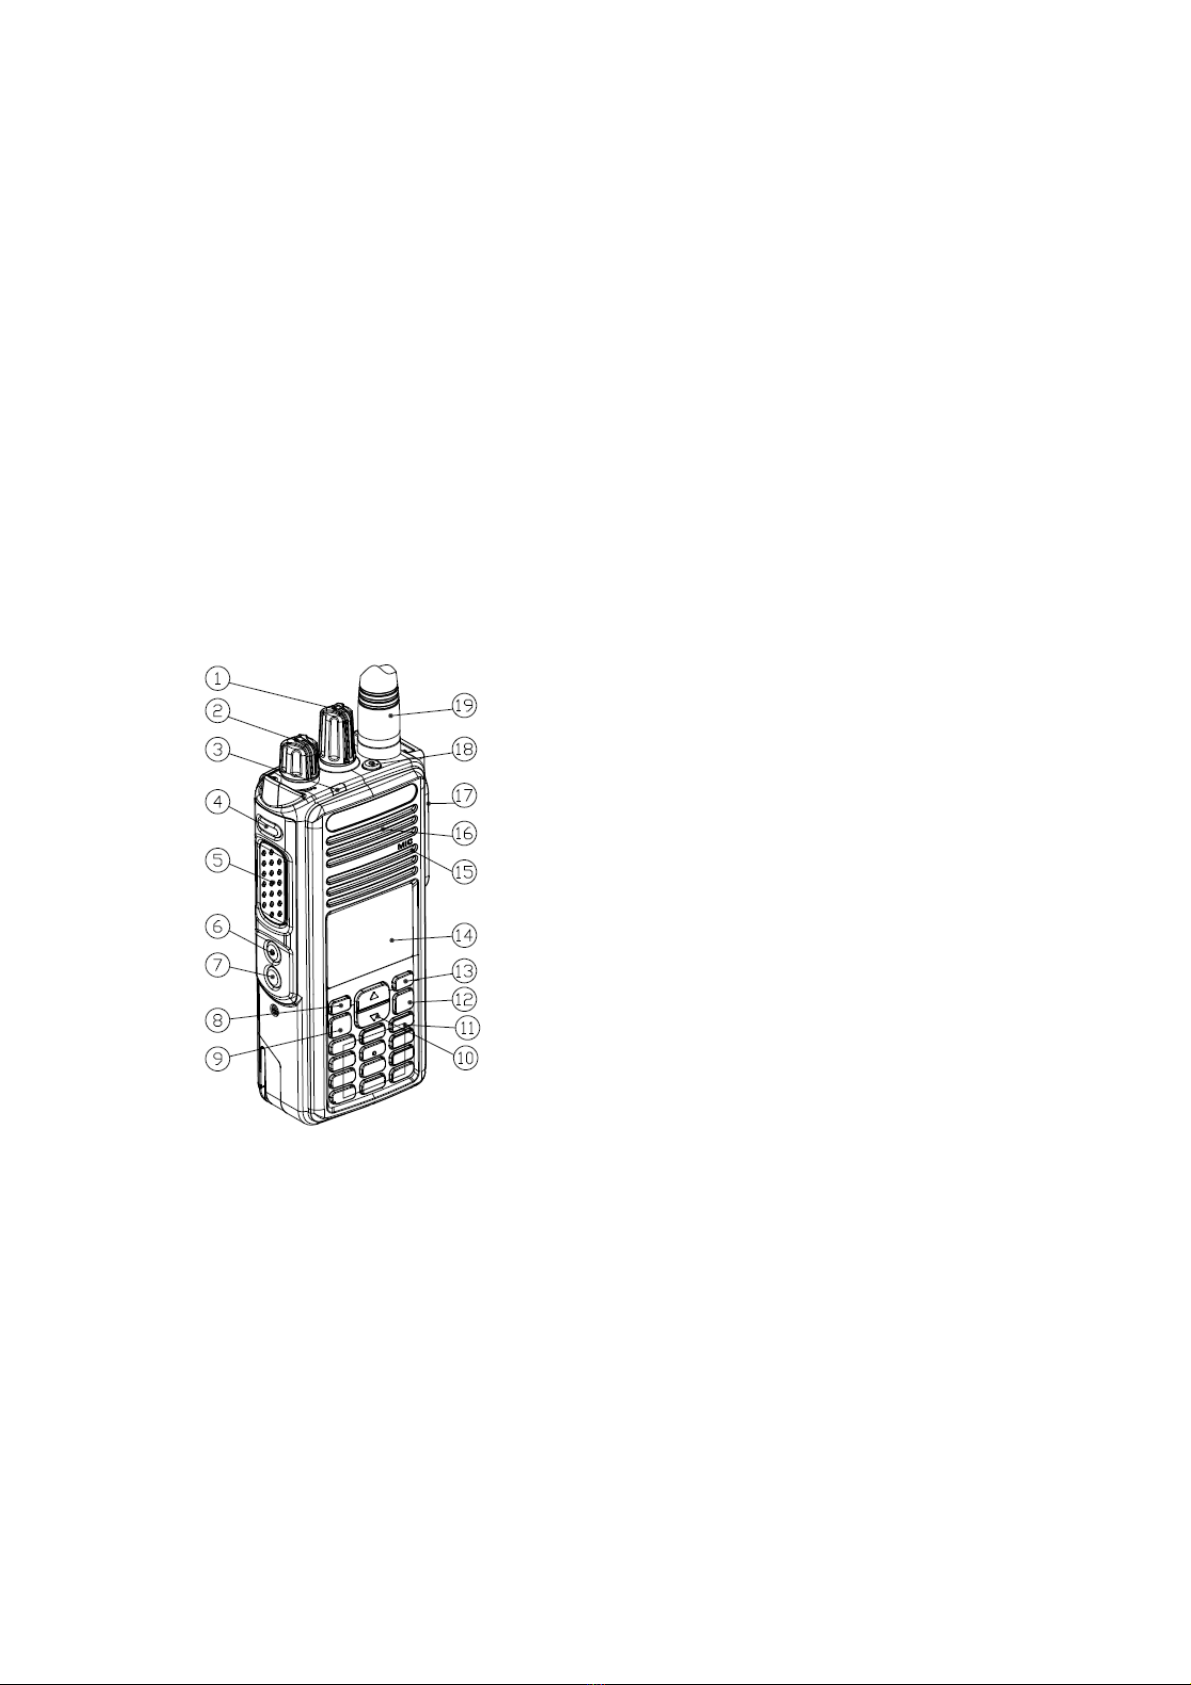
RadioControls
FullKeypadRadio
LimitedKeypadRadio

Non‐KeypadRadio
Recordyourradio’sprogrammablebuttonfunctionsinthe
blanksprovided.SPrepresentsshortpress,LPrepresents
longpress.
①ChannelSelectorKnob

②On/Off/VolumeControlKnob
③LEDIndicator
④SideButton1(Programmable)
SP:__________LP:___________
⑤Push‐to‐Talk(PTT)Button
⑥SideButton2(Programmable)
SP:____________LP:___________
⑦SideButton3(Programmable)
SP:___________LP:___________
⑧FrontButtonP1(Programmable)
SP:___________LP:___________
⑨OK/MenuButton
⑩2‐WayNavigationButton
○
11 Keypad
○
12 Return/HomeButton
○
13 .FrontButtonP2(Programmable)
SP:___________LP:___________
○
14 .Display
○
15 .Microphone
○
16 .Speaker
○
17 .UniversalConnectorforAccessories
○
18 .EmergencyButton(Programmable)
○
19 .Antenna
DisplayIcons
Thefollowingaretheiconsthatappearontheradio’s
display.
NoSignal
RSSI
ReceivedSignalStrengthIndicator(RSSI)
Thenumberofbarsdisplayedrepresentstheradiosignalstrength.Fourbarsindicatethestron‐
gestsignal.Thisiconisonlydisplayedwhilereceiving.
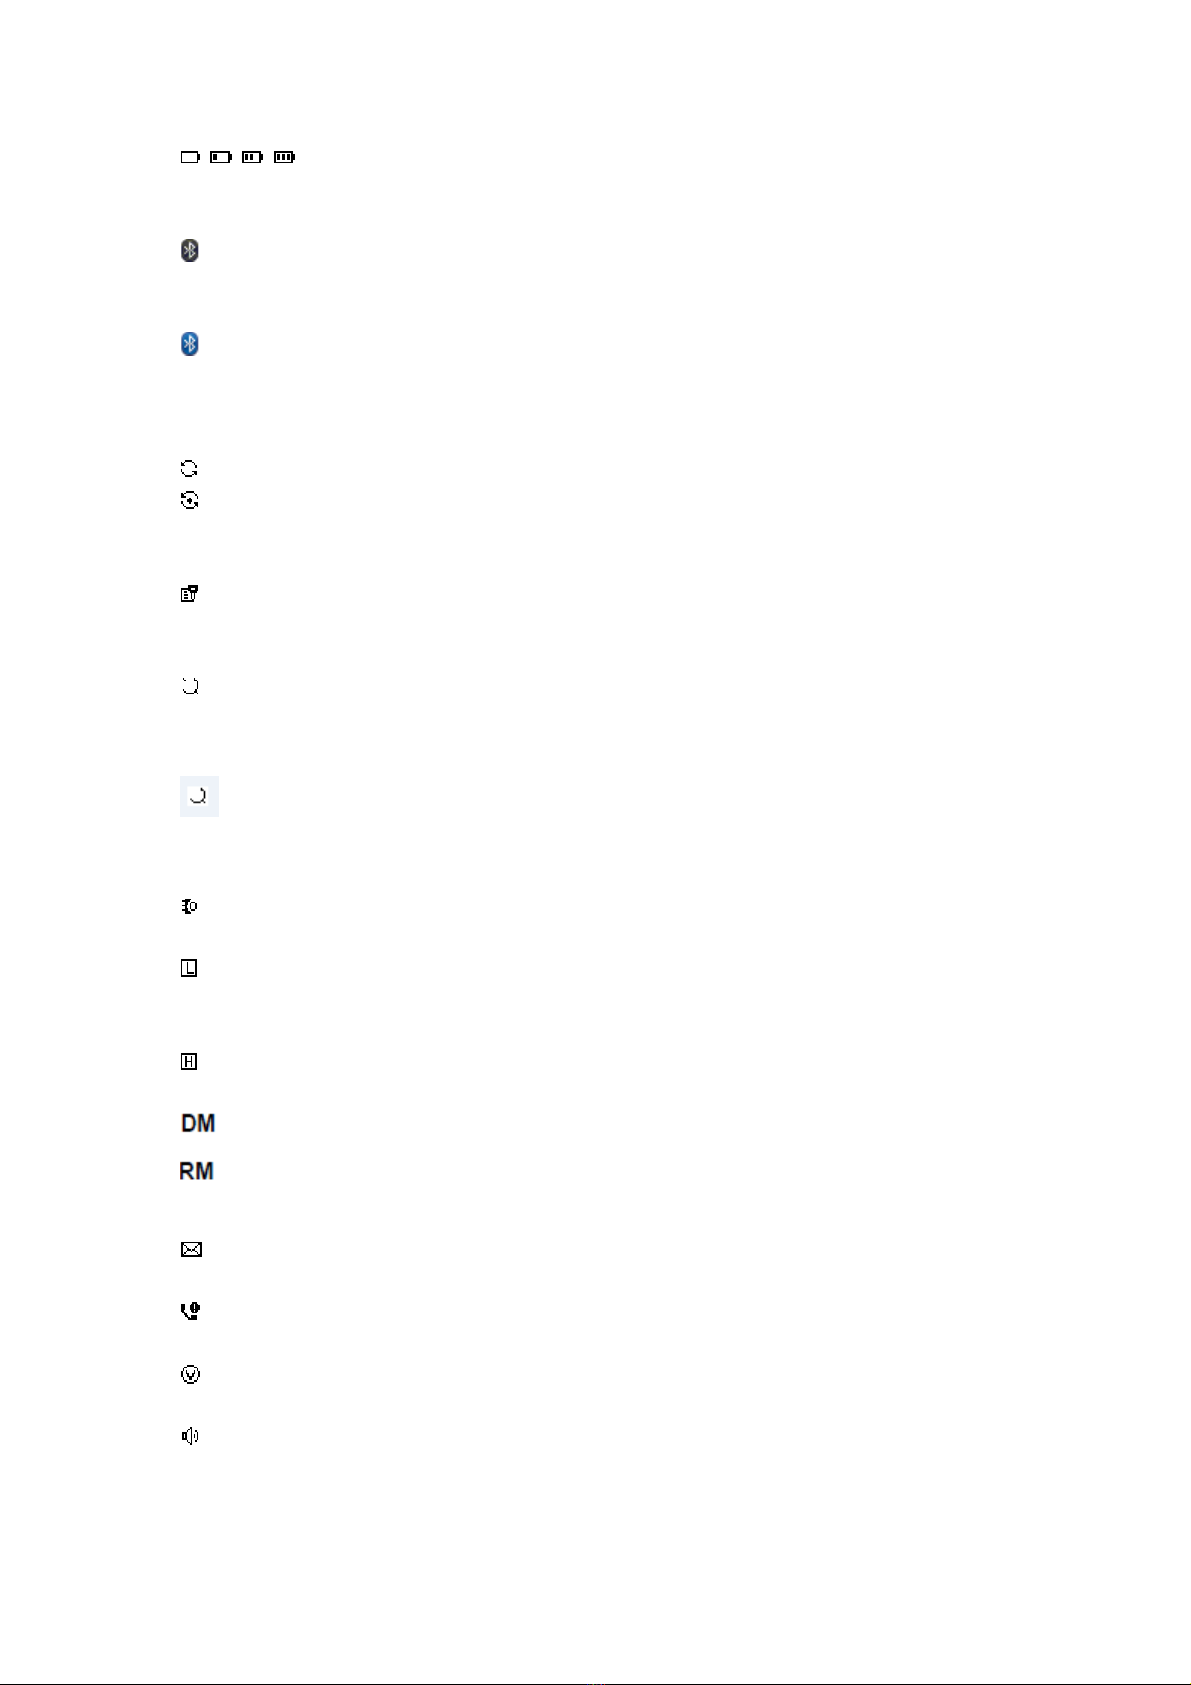
Battery
Thenumberofbars(0–3)shownindicatesthechargeremaininginthebattery.
Bluetooth
TheBluetoothfeatureisenabledbutthereisnoremoteBluetoothdeviceconnected.
BluetoothConnected
TheBluetoothfeatureisenabled.TheiconstayslitwhenoneormoreremoteBluetoothdevices
areconnected.
Scanning
Scanlandon
Scanfeatureisenabled.
EncryptionEnable
ThePrivacyfeatureisenabled.
GPSAvailable
TheGPSfeatureisenabled.Theiconstayslitwhenapositionfixisavailable.
GPSNotAvailable/OutofRange
TheGPSfeatureisenabled.Theiconstayslitwhenapositionfixisavailable.
AccessoriesConnected
PowerLevel
RadioissetatLowpower.
RadioissetatHighpower.
:DirectMode(TalkaroundMode)
:RepeaterMode
:UnreadMessage
:MissedCall
:VOXEnable
:SpeakerOpen
■ CallIcons

Thefollowingiconsappearduringacall,andintheContactslisttoindicateIDtype.
PrivateCall
IndicatesaPrivateCallinprogress.IntheContactslist,itindicatesasubscriberalias(name)orID
(number).
GroupCall/AllCall
IndicatesaGroupCallorAllCallinprogress.IntheContactslist,itindicatesagroupalias(name)
orID(number).
■ BluetoothDeviceFoundList
BluetoothAudioDevice
Bluetooth‐enabledaudiodevice,suchasaheadset.
■ SentItemsIcons
Thefollowingiconsappearatthetoprightcorneroftheradio’sdisplayintheSentItemsfolder.
SentSuccessfully
SendFailed
•ThetextmessagetoasubscriberaliasorIDispendingtransmission,followedbywaitingfor
acknowledgement.
Or•ThetextmessagetoagroupaliasorIDispendingtransmission.
■ SwitchInputMethod:
Longpress#keytoswitchinputmethodbetween,
Lowercase
Uppercase
Digit
■ LEDIndicator
Blinkingred–Radioisatlowbatterycondition
SolidOrange–Poweringup
Solidgreen–Radioisreceiving,ordetectingactivityovertheair.
SolidRED–Radioistransmitting
BlinkingOrang–Radioisscanning,orinselectivecall,oremergencystate
■PoweringUpandTurningOfftheRadio
RotatetheOn/Off/VolumeControlKnobclockwiseuntilyouhearaclick.Youseeawelcome
messageorwelcomeimage.
TheLEDlightsupsolidorangeandtheHomescreenlightsupifthebacklightsettingissettoturn
onautomatically.
Toturnofftheradio,rotatethisknobcounterclockwiseuntilyouhearaclick.Youseeabrief
PoweringDownontheradio’sdisplay.

■ AdjustingtheVolume
Toincreasethevolume,turntheOn/OffVolumeControlKnobclockwise.
Todecreasethevolume,turnthisknobcounterclockwise.
■AccessingtheRadiofromPassword
1.Poweruptheradio.
2.Youhearacontinuoustone.
3.Enteryourcurrentsix‐digitpasswordwiththeradio’skeypad.Thedisplayshows******.
PressOKtoproceed.
Youhearapositiveindicatortoneforeverydigitpressed.Presstoremovetheeach*on
thedisplay.
4.Ifthepasswordiscorrect:
Yourradioproceedstopowerup.SeePoweringUpandTurningOfftheRadiopart
OR
Ifthepasswordisincorrect:
ThedisplayshowsPasswordInputError.RepeatStep3.
■ SelectingaZone
Azoneisagroupofchannels.Thefullkeypadandlimitedkeypadradiosupportsupto2000
channelsand250zones,withamaximumof160channelsperzone.
Usethefollowingproceduretoselectazone.
□FullKeypadRadio
PresstheprogrammedZonebuttonandproceedtoStep2.
OR
Followtheprocedurebelow.
1.OKtoaccessthemenu.
2.or toZoneandpress toselect.
3.Thecurrentzoneisdisplayedandindicatedbya⊙.
□LimitedKeypadRadio
PresstheprogrammedZonebuttonandproceedtoStep2.
1.OKtoaccessthemenu.
2.or toZoneandpress toselect.
3.Thecurrentzoneisdisplayedandindicatedbya⊙.
□ Non‐KeypadRadio
Thenon‐keypadradiosupportsupto32channelsand2zones,withamaximumof16channels
perzone.
1.PresstheprogrammedZonebutton.
2.Youhearapositiveindicatortone,indicatingtheradiohasswitchedfromZone1toZone2.

OR
Youhearanegativeindicatortone,indicatingtheradiohasswitchedfromZone2toZone1.
■ SelectingaChannel
Oncetherequiredzoneisdisplayed(ifyouhavemultiplezonesinyourradio),turnthe
programmedChannelSelectorKnobtoselectthechannel.
■MakingaGroupCall
1.TurntheChannelSelectorKnobtoselectthechannelwiththeactivegroupaliasorID.
2.Holdtheradiovertically1to2inches(2.5to5.0cm)fromyourmouth.
3.PressthePTTbuttontomakethecall.TheLEDlightsupsolidred.TheGroupCalliconappears.
Thefirsttextlineshowsthegroupcallalias.
4.WaitfortheTalkPermitTonetofinish(ifenabled)andspeakclearlyintothemicrophone.
OR
WaitforthePTTSidetonetofinish(ifenabled)andspeakclearlyintothemicrophone.
5.ReleasethePTTbuttontolisten.Whenthetargetradioresponds,theLEDlightsupgreen.You
seetheGroupCallicon,thegroupaliasorID,andtransmittingradioaliasorIDonyourdisplay.
6.IftheChannelFreeIndicationfeatureisenabled,youwillhearashortalerttonethemoment
thetargetradioreleasesthePTTbutton,indicatingthechannelisfreeforyoutorespond.Press
thePTTbuttontorespond.
OR
Ifthereisnovoiceactivityforapredeterminedperiodoftime,thecallends.
7.Radioreturnstothescreenyouwereonpriortoinitiatingthecall.
■MakingaPrivateCall
1.TurntheChannelSelectorKnobtoselectthechannelwiththeactivesubscriberaliasorID.
2.Holdtheradiovertically1to2inches(2.5to5.0cm)fromyourmouth.
3.PressthePTTbuttontomakethecall.TheLEDlightsupred.ThePrivateCalliconappears.The
firsttextlineshowsthesubscriberalias.Thesecondtextlinedisplaysthecallstatus.
4.WaitfortheTalkPermitTonetofinish(ifenabled)andspeakclearlyintothemicrophone.
5.ReleasethePTTbuttontolisten.Whenthetargetradioresponds,theLEDlightsupgreen.
6.IftheChannelFreeIndicationfeatureisenabled,youwillhearashortalerttonethemoment
thetargetradioreleasesthePTTbutton,indicatingthechannelisfreeforyoutorespond.Press
thePTTbuttontorespond.
OR
Ifthereisnovoiceactivityforapredeterminedperiodoftime,thecallends.
7.Youhearashorttone.ThedisplayshowsCallEnded.
■ ScanningChannels
PresstheprogrammedScanbuttontoturnscanonoroff.
Duringscan,theLEDblinksorangeandthescaniconisdisplayed.
■ MakingaCallAlert
□ FullKeypadRadioandLimitedKeypadRadio

PresstheprogrammedOneTouch AccessbuttonandproceedtoStep5.
OR
Followtheprocedurebelow.
1.toaccessthemenu.
2.or toContactsandpresstoselect.
3.or totherequiredsubscriberaliasorIDandpress toselect.
OR
or toManualDialandpress toselect.
EnterthesubscriberIDyouwanttopageandpress.
NOTE
:
NotapplicableforLimitedKeypadRadio
4.or toCallAlertandpress toselect.
5.ThedisplayshowsCallAlertandthesubscriberaliasorID,indicatingthattheCallAlerthas
beensent.
6.TheLEDlightsupsolidredwhenyourradioissendingtheCallAlert.
7.IftheCallAlertacknowledgementisreceived,thedisplayshowspositivemininotice.
OR
IftheCallAlertacknowledgementisnotreceived,thedisplayshowsnegativemininotice.
□Non‐KeypadRadio
1.PresstheprogrammedOneTouch AccessbuttontomakeaCallAlerttothepredefinedID.
2.TheLEDlightsupsolidredwhenyourradioissendingtheCallAlert.
3.IftheCallAlertacknowledgementisreceived,twochirpssound.
OR
IftheCallAlertacknowledgementisnotreceived,alow‐pitchedtonesounds.
■ SendingaQuickText Message
□ FullKeypadRadio
PresstheprogrammedText MessagebuttonandproceedtoStep3.
OR
PresstheprogrammedOneTouc hAccessbuttontosendapredefinedQuickTex tmessagetoa
predefinedaliasorIDandproceedtoStep6.
OR
Followtheprocedurebelow.
1.toaccessthemenu.
2.or toMessagesandpress toselect.
3.or toQuickTex tandpress toselect.

4. or totherequiredQuickTex tandpress toselect.
5.Ablinkingcursorappears.
Usethekeypadtoeditthemessage,ifrequired.
Press tomovetotheleft.
Press tomovetotheright.
Pressthe*DELkeytodeleteanyunwantedcharacters.
Pressthe#keytoinputonespacetotheright.
6. Pressoncemessageiscomposed.
7.or totherequiredaliasorIDandpress toselect.
OR
or toManualDialandpress toselect.
KeyinthesubscriberaliasorIDandpress.
OR
toeditthemessage.
againtodiscardthemessageorsaveittotheDraftsfolder.
8.Thedisplayshowstransitionalmininotice,confirmingyourmessageisbeingsent.
9.Ifthemessageissent,atonesoundsandthedisplayshowspositivemininotice.
OR
Ifthemessageisnotsent,alowtonesoundsandthedisplayshowsnegativemininotice.
□ LimitedKeypadRadio
PresstheprogrammedText MessagebuttonandproceedtoStep3.
OR
Followtheprocedurebelow.
1.toaccessthemenu.
2.or toMessagesandpress toselect.
3.or toQuickTextandpress toselect.
4.or totherequiredQuickTextandpress toselect.
5.or totherequiredaliasorIDandpress toselect.
Thedisplayshowstransitionalmininotice,confirmingyourmessageisbeingsent.
6.Ifthemessageissent,atonesoundsandthedisplayshowspositivemininotice.
OR

Ifthemessageisnotsent,alowtonesoundsandthedisplayshowsnegativemininotice.
□ Non‐KeypadRadio
YoucansendQuickTextmessages,programmedbyyourdealer,viatheprogrammablebutton.
1.PresstheprogrammedOneTo uchAccessbuttontosendapredefinedQuickTex tmessagetoa
predefinedID.
2.TheLEDlightsupsolidred.
3.Twochirpsindicatethatthemessageissentsuccessfully.
OR
Alow‐pitchedtoneindicatesthatthemessagecannotbesent.
■ SendinganEmergencyAlarm
NOTE:IfyourradioissettoSilent,itwillnotdisplayanyaudioorvisualindicatorsduring
Emergencymode.
1.PresstheprogrammedEmergencyOnbutton.
2.ThedisplayshowsTxAlarmandthedestinationalias.
TheLEDblinksredandtheEmergencyiconappears.
OR
ThedisplayshowsTxTelegra mandthedestinationalias.TheLEDblinksredandtheEmergency
iconappears.
3.WhenanEmergencyAlarmacknowledgmentisreceived,theEmergencytonesoundsandthe
LEDlightsoff.ThedisplayshowsAlarmSent.
OR
IfyourradiodoesnotreceiveanEmergencyAlarmacknowledgement,andafterallretrieshave
beenexhausted,atonesoundsandthedisplayshowsAlarmFailed.
4.RadioexitstheEmergencyAlarmmodeandreturnstotheHomescreen.
■ Privacy
PresstheprogrammedPrivacybuttontotoggleprivacyonoroff.
■ FindingandConnectingtoaBluetoothDevice
NOTE:DonotturnoffyourBluetooth‐enableddeviceorpressduringthefindingand
connectingoperationasthiscancelstheoperation.
Apincodemayberequiredtobeprogrammedinyourradiobeforeitcanpairwithsomedevices.
Contactyourdealerformoreinformation.
□FullKeypadRadio
□LimitedKeypadRadio
1.TurnonyourBluetooth‐enableddeviceandplaceitinpairingmode.Refertorespective
Bluetooth‐enableddevice’susermanual.
2.Onyourradio,presstoaccessthemenu.
3.or toBluetoothandpress toselect.

4. or toMyDevicesandpress toselect.
Ifyoucouldnotsee“MyDevices”,youcouldturnon“BTSwitch”togetit.
5.or totherequireddeviceandpress toselect.
OR
or toSearchDevicestolocateavailabledevices.
or totherequireddeviceandpress toselect.
6. or toConnectandpress toselect.DisplayshowsConnectingto<device>.
YourBluetooth‐enableddevicemayrequireadditionalstepstocompletethepairing.Referto
respectiveBluetooth‐enableddevice’susermanual.
7.Ifsuccessful,theradiodisplayshows<Device>Connected.Atonesoundsand√appears
besidetheconnecteddevice.TheBluetoothConnectediconappearsonthestatusbar.
OR
Ifunsuccessful,theradiodisplayshowsConnectingFailed.
□Non‐KeypadRadio
1.TurnonyourBluetooth‐enableddeviceandplaceitinpairingmode.Refertorespective
Bluetooth‐enableddevice’susermanual.
2.Onyourradio,presstheprogrammedBluetoothConnectbutton.
3.AtonesoundsandLEDblinksorange.
4.YourBluetooth‐enableddevicemayrequireadditionalstepstocompletethepairing.Referto
respectiveBluetooth‐enableddevice’susermanual.
5.Ifsuccessful,apositivetonesounds.
OR
Ifunsuccessful,anegativeindicatortonesounds.
This manual suits for next models
5
Table of contents
Other Covalue Portable Radio manuals


