covington 464WBS User manual

12019.01
Covington Engineering designs machines with safety in mind. Please read our Safety Demands Sheet carefully
and follow for your safety and the safety of others.
ELECTRICAL
Have your licensed electrician electrically ground your machines and equipment (against electrical shock) by
complying with federal, state, and local laws. Locate electrical and in-line switch or switches so operator can
immediately shut them off in an emergency.
DO NOT allow more than one person to operate a machine, unless you have a switch for each person, which is
wired so that any one of the switches will stop the machine in an emergency.
Keep children, visitors, and pets away from electrical devices and machinery.
DO NOT work in wet environments where electricity is present.
DO NOT plug into electricity until the motor switch is off and the proper voltage is supplied.
DO NOT leave motors running when not in use.
DO NOT wear jewelry or rings around electricity.
Keep all electrical cords away from moisture, rain, and moving parts.
Periodically check all cords for worn or frayed spots and replace or repair to code if needed.
Thermally protected motors will stop if overloaded. When they cool, they will start automatically without warning.
If the motor stops, shut the switch off for your protection.
715 West Colton Avenue
Redlands, CA 92374
Toll Free: (877) 793-6636
Phone: (909) 793-6636
www.covington-engineering.com
Owner’s Manual For
Vertical Sanders
464WBS - 466WBS - 760WBS - 761WBS - 764WBS
(Also applies to 220V, 50Hz International Models)
Packet Contents:
• Safety Demands
• Instructions
• Schematic
Important Safety Demands For Sanders

22019.01
USER SAFETY PRECAUTIONS
To avoid injury, protect yourself and others using the following guidelines. These are not exhaustive so please use
discretion and take every safety precaution when operating machinery.
1. Wear tight clothing. Loose clothes can be drawn into machinery.
2. Wear closed-toe shoes.
3. Wear safety goggles to protect your eyes from ying particles.
4. Loose hair is very dangerous because it can easily get caught in moving parts. Use a net or cap that will secure
your hair inside so it is not exposed to the machinery.
5. Keep your hands and ngers away from “danger spots” or “pinch points” where they might be injured.
6. Keep children, visitors, and pets away from machinery.
7. Use a respirator to protect yourself from particle inhalation.
8. Take off loose jewelry before using machines.
9. Be sure that all moving parts are shielded and all guards are in place before operating any equipment.
CHEMICAL
California Proposition 65 Warning -- For more information: www.P65Warnings.ca.gov
WARNING: Some of our products contain chemicals known to the State of California to cause
cancer and birth defects or other reproductive harm.
Very few people are allergic to lapidary and glass chemicals such as polishes, grits, abrasives, sawing solutions,
etc. If you show signs of rash or allergies of any kind when using any of the products, determine which one it is
and stop using it. Check with your doctor.
Keep all chemicals away from children and pets; never eat or drink these chemicals.
Keep all lapidary chemicals, grits, and glass sediment out of your sewer drains or they may clog.
DO NOT allow liquids to get on oors. You could slip and fall.
MECHANICAL
IMPORTANT: NEVER MODIFY COVINGTON MACHINES – This will void all warranties and can be
very dangerous.
PINCH POINTS – Pinch points on machines can be varied and numerous. These include but are not limited to
areas with blades, belts, wheels, pulleys, discs, arbors, bearings, shafts, and other moving parts. This list is not
exhaustive so please use discretion and take every safety precaution when operating equipment or performing
maintenance. Specic pinch points on Covington’s vertical sanders also include the area behind the belt, between
the drums, as well as in front of the belt between the tool rest and the belt. Keep your ngers away from these
areas and do not wear loose clothes or hanging/dangling items near this machine as they can get caught and cause
severe injury.
Keep rags and foreign objects away from machines.
Be sure that all guards and/or covers are in place before running machines. Do not run your sander without the
belt guard securely attached to your machine.

32019.01
INTRODUCTION
Covington’s Vertical Belt Sanders are designed for convenience
and versatility. These multi-purpose machines are among our most
popular sellers. Vertical sanders allow artists to create softer edges
on their pieces by using the space above the rigid backing plate, or
long ats by utilizing the backing plate behind the belt. Whether
you’re working glass or gemstones, Covington Sanders will take
you through deburring, shaping, cleaning, sharpening, smoothing,
and polishing your workpieces. These versatile units are an excellent
choice for beginners and professionals alike.
DESCRIPTION
Covington sanders are constructed of a heavy cast aluminum upright
and a base tank. Both bearings are shielded, double neoprene-sealed,
and greased for the life of the bearing. Each sander comes equipped with a 220g silicon carbide sanding belt. We
recommend purchasing a belt kit (one of each grit + an extra 100g) with your sander in order to experiment
with all of the grits. All Covington sanders come equipped with a backing plate and a brass valve for water hook-
up. Model numbers 464WBS and 466WBS accept 3” x 24” sand belts. Models 760WBS, 761WBS, and 764WBS
accept our 3” x 41-1/2” sand belts. We recommend purchasing a plumbing kit to make water hook-up easy.
SET UP
Safety: Before plugging in your unit, read the rst section of this packet labeled
Important Safety Demands for Sanders.
• Place your sander on a sturdy workbench or a Covington Sander Stand. If you
are using a sander stand, you will need to secure your sander to the stand using
the screws supplied with the purchase of the stand (see image 2 for proper
installation of screws). The stand can be anchored to the oor using lag-bolts
from your local hardware store (these are not provided with the purchase of the
stand).
• If you are using your sander for wet applications (ie. grinding glass or gemstones) you will need to hook up
your brass valve to a water supply. We also recommend replacing the plug on the front of your sander with
a drain kit. This allows you to have a “fresh water in - dirty water away” system that keeps your unit clean
and prevents cross-contamination issues. Your sander does not come with plumbing supplies for water hook
up or drainage. If you purchased a plumbing kit, everything you need will be included in the plumbing kit
box. You may also choose to hook up directly to a house water supply. The following installation instructions
will only apply to the hook-up of the tubing to the sander and will not cover
connection to your house water supply since that can vary widely.
• Your Covington Vertical Sander comes with a brass valve like the one pictured
in image 3. This style of valve accepts 1/4” O.D. tubing. In order to make your
valve water-tight, you will also need a brass insert (A) like the one sticking out
of the end of the tubing. To connect the tube to your valve, you must remove
the nut (B) and ferrule (C) from the valve (D), slide the nut onto the tube rst,
slide the ferrule onto the tube second, and slide the insert into the tube. Press
the tubing into the valve, push the nut up to the threads, and tighten the nut
Instructions For Vertical Sanders
Image 1
Image 2
Image 3

42019.01
back onto the valve using a 1/2” wrench. The insert allows the ferrule to collapse onto the insert which creates
a seal and prevents leaking. If you purchased a plumbing kit, the tubing and insert are both included. A small
amount of water is sufcient to keep the belt wet. If water is splashing all over the place, it is likely that you
are using too much water. There is a spray nozzle and a small piece of felt on the underside of the hood. The
spray nozzle sprays the water across the surface of the belt. The felt attaches to the spray nozzle and helps
distribute the water evenly across the face of the belt. The felt does not need to fully lay against the belt to
be effective. If you nd that the belt wants to grab the felt, you can press the felt up into the hood (while
the sander is turned OFF). The felt will still distribute the water evenly while
preventing the belt from grabbing it.
• If you purchased a pump or a plumbing kit, installation of the pump is easy.
You will need a bucket to place the pump into for your fresh water supply. The
other end of the 1/4” tubing simply presses into place in the quick connect
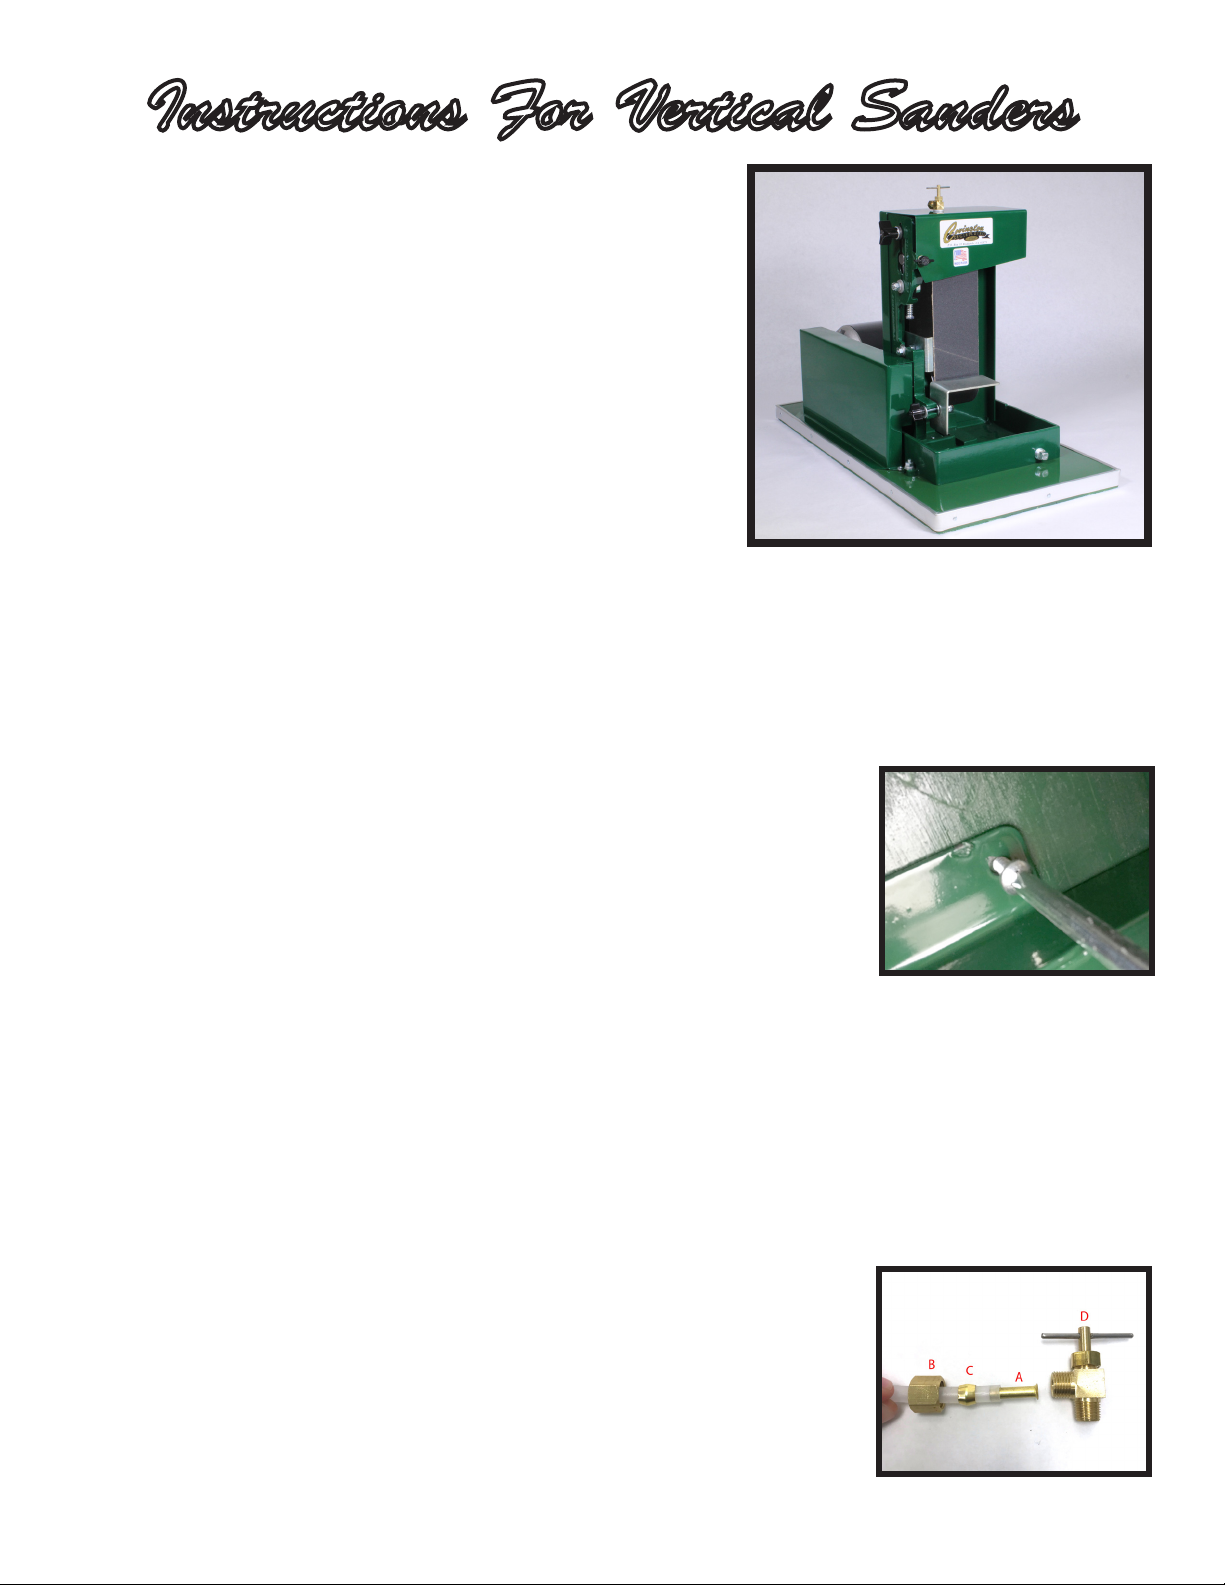
tting attached to the pump (see image 4). Should you need to attach the foot to
your pump, gently remove the front plate on your pump and slide the foot plate
into place (image 5). Replace the front plate on the front of your pump. This
prevents large pieces of debris from being sucked into the pump and clogging
it. This pump is a submersible pump and is designed to be placed directly into
a bucket of water. Once you plug the pump into an electrical supply, the pump
will begin running. These pumps have a straight cord as a safety feature. A
switch cannot be installed on the pump because it would eliminate the water-
tight aspect of the cord and can cause severe electrical shock to the user.
• If you purchased a drain kit or a plumbing kit, you will need the 7/16” wrench
that came with your unit and a 1/4” nut driver or a phillips head screw driver to
attach the drain kit. It is best to disassemble the drain kit before trying to attach
it to your sander. To attach the drain kit, you will need to remove the plug (see
the silver plug in image 1) on the front of your sander using the 7/16” wrench.
You’ll need to turn the plug counter-clockwise (remember, lefty-loosey) to get
it to unscrew. It may take a little effort to remove the plug from the casting pan.
Once the plug is removed, screw the brass pipe nipple into place on the front
of your unit. Make sure the brass is securely tightened to prevent any leaking
from this part of your unit. Once your brass is securely attached to the sander
base, slide the hose clamp over the tubing, and then slide the tubing over the
brass insert. Push the tubing as close up to the pan as you can. Make sure the
hose clamp is fully seated around the brass insert before tightening it down
onto the tubing with your 1/4” nut driver or phillips head screw driver. Once the hose clamp is secure, your
drain kit is ready to go. Put the end of the drain kit into an empty bucket to collect the dirty water. We never
recommend recirculating your water supply because this can cause contamination issues with your sander.
MAINTENANCE
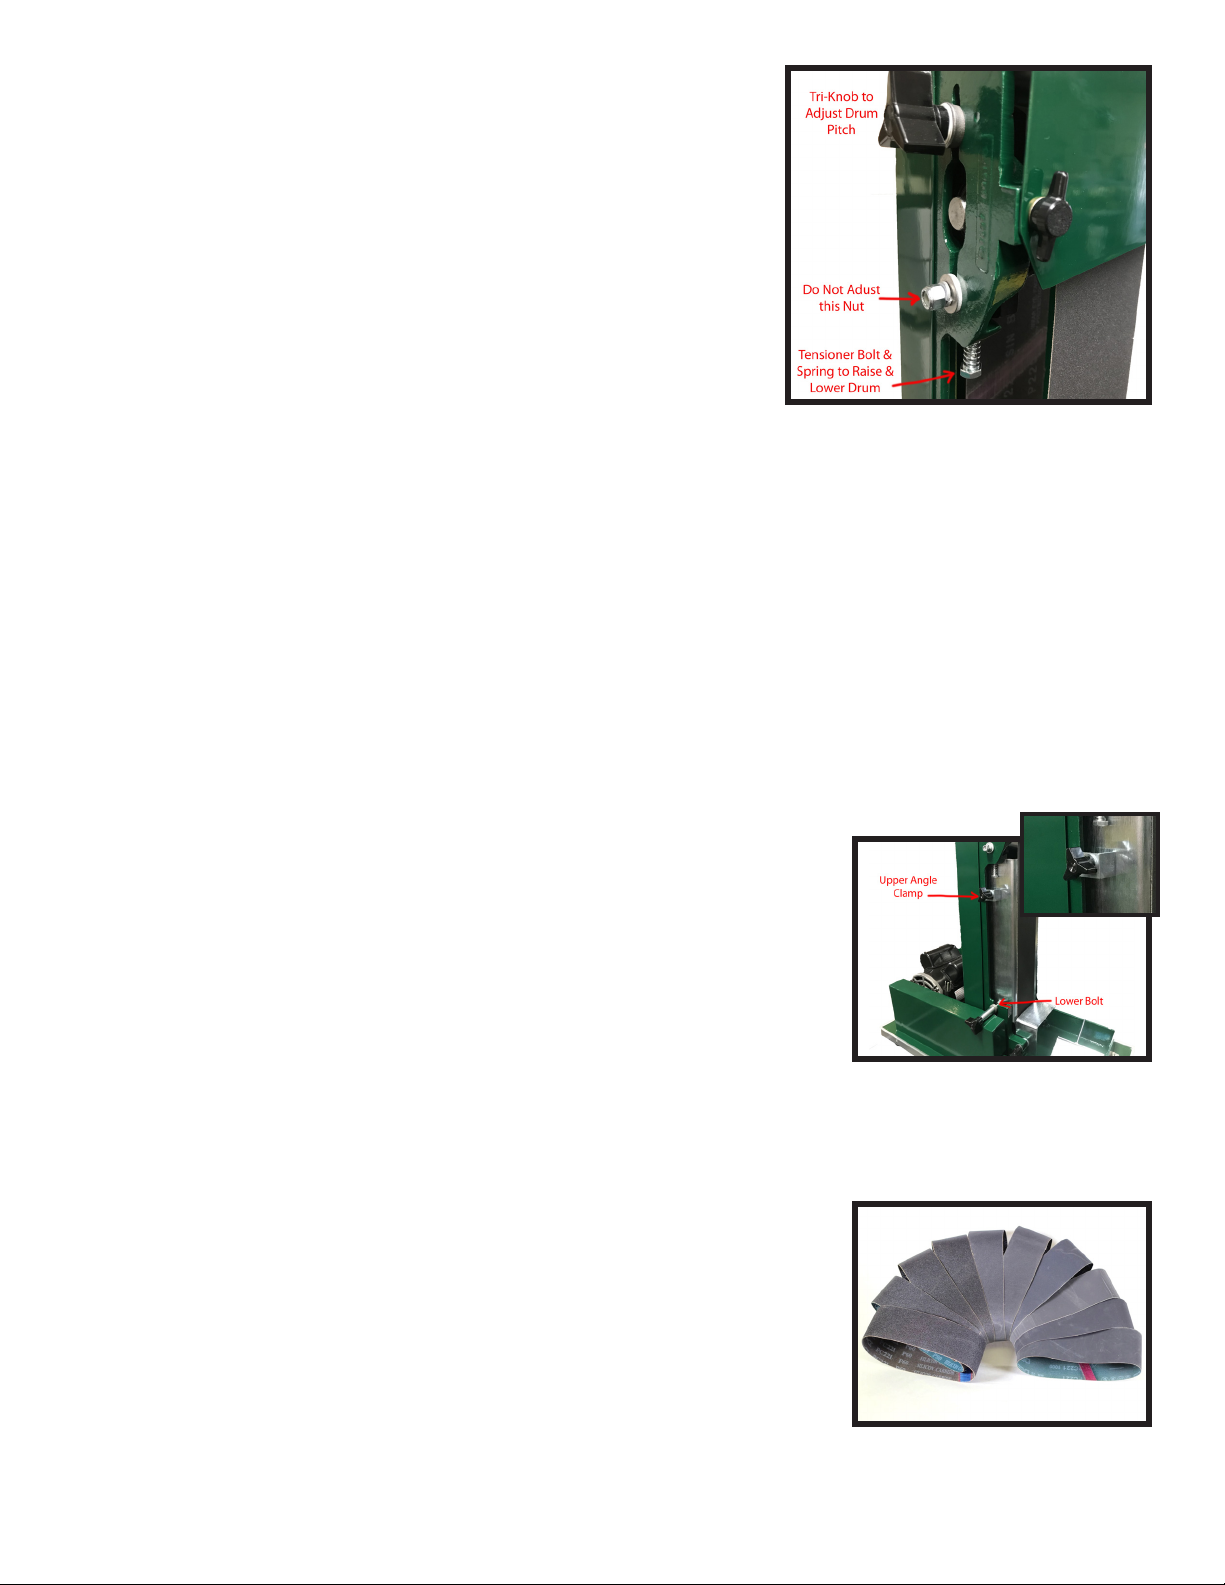
• Replacing Your Belt: The upper sander arbor works on a pivot. At the top of the arbor there is a tri-knob that
controls the tilt of the drum and at the bottom there is a lock-nut and spring. Never tighten the nylon lock-nut
because this can cause severe damage to your casting or your arbor because of the pivot point (see image 7).
Below the arbor, there is a bolt that is also attached to a spring. This bolt moves the arbor up and down within
the upright casting. It is easiest to remove your belt while the machine is running. When you are ready to make
a belt change, hold the switch in your right hand and put your left hand on the tri-knob. While the machine
is ON, slowly turn your tri-knob towards the back (counter-clockwise) to loosen the upper part of the arbor.
The belt will immediately begin to run off of the drums to the open section of the machine. As soon as the belt
is loose and slapping (approximately 1/2 way off the drums), turn the machine OFF. With the machine OFF,
Image 4
Image 5
Image 6

52019.01
take off the loose belt and place the replacement belt around the two
drums. It is best if you can slide the belt on as far as possible before
tightening the tri-knob. Once the belt is in place, tighten the tri-knob
by turning it towards the front of the machine (clockwise). Once the
belt is relatively snug, hold the switch cord in your right hand and
place your left hand on the knob. Turn the machine ON and continue
to make adjustments using the tri-knob until the belt is tracking and
centered over both drums. If the belt is too tight, you may have to
loosen the tensioner bolt to drop the arbor drum down. This is often
the case with new belts that haven’t had a chance to stretch out on
the machine. If your belt is making a high pitched hum or a knocking
sound it is probably too tight. This can be adjusted by loosening the
tensioner belt and loosening the tri-knob so the belt doesn’t run to the
left and into the upright casting.
• Belt Adjustments - Belt Tracking: If you nd that your belt is not tracking properly it is likely that the
belt has stretched and you need to use the tensioner bolt to raise the arbor up. The tensioner bolt is the one
on the underside of the arbor that has the large spring attached to it. Using the 7/16” wrench that came with
your sander, tighten the bolt up by turning the head of the bolt clockwise (right). This will raise the arbor up.
You will nd that small adjustments on this bolt will have big results. Once you have tightened the bolt, you
will begin to notice the belt wanting to drive off the drums to the right hand side. You will probably have to
tighten up the tri-knob to bring the belt back in alignment after you have raised the tensioner bolt. Adjusting
the tensioner bolt will resolve problems like the belt running too far to the left and into the upright casting. If
the belt moves every time you press something against it you probably need to adjust your tensioner bolt. This
means the belt is too loose and the drum needs to be raised up. You will nd that belts that run wet will stretch
more and faster than belts that are used in a dry application.
• 13” High Back Plate: This plate is included with the 761WBS model only
but available for purchase for model 760WBS. Remove your 4” backing
plate by unscrewing the tri-knob (you will use the same tri-knob, spacer and
washer on the 13” plate). Once the parts are loose, you can simply pull the
4” back plate out. Attach the 13” plate by holding it vertically behind the belt
with the lower bolt in the bolt slot. The side of the plate should be touching
the casting. Slide the 1/4” thick washer then the spacer onto the lower bolt
and secure with the tri-knob. Slide the angle clamp onto the upper bolt. Add
the washer and tighten the tri-knob. Position the front face of the back plate
evenly behind the belt and tighten both tri-knobs.
PROCEDURE
• Sanding: As a general rule, 80g grinds twice as fast as 220g; 220g grinds
twice as fast as 400g; and 400g grinds twice as fast as 800g. If the material
being sanded is medium to soft, some sanding steps can be omitted. We
recommend purchasing a Silicon Carbide Belt Kit (1 of each grit included
+ an extra 100g) with the purchase of your machine. This allows you to test
out the belts and gure out which ones work best for your processes. Once
you have determined which grits are perfect for you, you can buy those belts
in bulk for a discounted price! When you purchase 10 or more belts (mix
and match grits) you can save 10%. When you buy 50+ you can save 20%.
• Diamond Belts: Diamond belts are a bigger investment cost-wise, but will last signicantly longer than the
Image 7 -
Click on the Above Image to open an
Instructional Video
Belt Kit
Backing Plate Assembly Diagram
Clamp Detail

62019.01
silicon carbide, as diamond belts will not wear down as quickly. For beginners, we recommend starting with
the silicon carbide belts because of the cost savings. Once you have your process down, replace the grits you
use the most with diamond to reduce frequent belt changes.
• Polishing: The polishing operation removes minimal surface material; some materials require both pre-polish
and polish steps. Pre-polish usually consist of 600g or ner silicon carbide or in the case of glass 2F or 4F
pumice powder applied to a cork belt. An excellent general-purpose polishing compound is optical grade
cerium oxide on a felt belt. Covington’s felt belts are made out of wool and will shrink if not used and stored
properly. Should you decide to polish with a felt belt, it is very important to make it the last process of the
day on your machine. We recommend turning off your water valve and using a spray bottle or a similar
device to keep the belt moist and charged with polishing compound. The valve can cause the belt to become
oversaturated with water and can wash the expensive polishing compounds off of the belt. When you are done
with your belt, let the machine run for a few extra minutes to wring out any extra water. We never recommend
washing the polishing compounds from your belt. Let your felt belt dry on the machine overnight. In the
morning, check to make sure it is completely dry (any moisture will cause it to mold), and then turn your
machine on with the felt belt on to stretch the belt back out to proper size. You can now take the felt belt off of
your machine and store it properly in a clean dry container such as a paper bag or cardboard box that will wick
any residual moisture away from the belt. A sealed plastic container is not ideal since it will hold moisture and
can cause the belt to mold.
• Belt Creeping: If the belt moves to one side when sanding, the belt may be too loose or you may be grinding
above the backing plate. If you are needing to use the softer belt area above the backing plate, you may notice
more belt creeping than when you use the backing plate. To keep the belt centered over your drums, press hard
against the soft belt area and guide the belt with your piece. Make a belt tension adjustment by tightening or
loosening the vertical bolt with spring (see belt adjustment above).
• Wear Out: A well-used belt will leave a ner nish than when the belt was new. A well-worn ne grit belt
may be used as a pre-polish belt. Sanding belts do not lose their usefulness until the belt backing wears out.
Material
Ty p e
Belt
Material
Belt Mesh
or Polish
Notes
Glass Felt Cerium I tried this combination and had great results!
**We recommend logging your trials using a chart like the one below. This helps you track
and repeat effective processes.

72019.01
This manual suits for next models
4
Table of contents
Other covington Sander manuals
Popular Sander manuals by other brands

Chicago Electric
Chicago Electric 43424 Assembly and Assembly and operating instructions

Black & Decker
Black & Decker KA88 Original instructions

Rupes
Rupes ER123TE Operating and maintenance instructions

Power Craft
Power Craft PBS-950N User guide & warranty

jobmate
jobmate 054-7236-0 instruction manual

MaxPro PROFESSIONAL
MaxPro PROFESSIONAL MPBS900/533V manual