Coyote CCX3 User manual

Built‐inModels
ForOutdoorUseOnly
IMPORTANT:ReadthelightinginstructiononPage20beforefirsttimeuse!
Toinstallerorpersonassemblinggrill:Leavethismanualwithgrillforfuturereference.
Toconsumer:Keepthismanualforfuturereference.
COYOTEOUTDOORLIVING,INC.
www.coyoteoutdoor.com
CoyoteStainlessSteelGasGrill
Use&CareManual
ForLiquidPropaneandNaturalGasModels
Coyote 34" CCX3 Coyote 36" CCX4
Coyote 36" CSX36 / CSLX36 Coyote 42" CSLX42NG
Conforms to ANSI STD Z21.58b-2012
Certified to CSA STD 1.6b-2012
Outdoor Cooking Gas Appliance
4004477
PUT SERIES NO. LABEL HERE

Welcome&Congratulations
Congratulationsonyourpurchaseofanewgrill!Weareveryproudofourproductandweare
completelycommittedtoprovidingyouwiththebestservicepossible.Yoursatisfactionisour#1
priority.
Pleasereadthismanualcarefullytounderstandalltheinstructionsabouthowtoinstall,operate
andmaintainforoptimumperformanceandlongevity.
Weknowyou’llenjoyyournewgrillandthankyouforchoosingourproduct.Wehopeyouconsider
usforfuturepurchases.
Pleasereadandsavetheinstructions
ThisManualprovidesspecificoperatinginstructionsforyourmodel.Useyourgrillonlyas
instructedinthismanual.Theseinstructionsarenotmeanttocovereverypossibleconditionand
situationthatmayoccur.Commonsenseandcautionmustbepracticedwheninstalling,
operatingandmaintaininganyappliance.

1
TableofContents
SafetyInstructions…............................2
GrillModels.......................................4
LocatingtheGrill...............................5
GasRequirements............................8
UsingYourBurners&Grilling............14
LightingYourGrill............................…19
OperationandFeatures.................….21
Care&Maintenance...........................22
TroubleshootingYourGrill..........……26
LimitedWarranty..........................…...28
PartsListings................................…..30
SafetySymbols
•WARNING
IFYOUSMELLGAS:
1. Shutoffgastotheappliance.
2. Extinguishanyopenflame.
3. OpenLid.
4. Ifodorcontinues,keepawayfromthe
applianceandimmediatelycallyourgassupplier
oryourfiredepartment.
•WARNING
WARNING:
1.DONOTstoreorusegasolineorother
flammableliquidsorvaporsinthevicinityof
thisoranyotherappliance.
2.AnLPcylindernotconnectedforuseshallnot
bestoredinthevicinityofthisoranyother
appliance.
•WARNING
DANGERindicatesanimminently
hazardoussituationwhich,ifnotavoided,
willresultindeathorseriousinjury.
•CAUTION
CAUTIONindicatesapotentially
hazardoussituationwhich,ifnotavoided,
mayresultinminorormoderatepersonal
injury,orpropertydamage.•WARNING
FOROUTDOORUSEONLY:
NEVERoperategrillinenclosedareas,asthis
couldleadtogasaccumulatingfromaleak,
causinganexplosionoracarbonmonoxide
buildupwhichcouldresultininjuryordeath.
DONOTuseyourgrillingarages,breezeways,
shedsoranyenclosedarea.NOTFORUSEBY
CHILDREN.Iftheseinstructionsareignored,a
hazardousfireorexplosioncouldresultin
physicalinjury,deathorpropertydamage!
•WARNING
WARNINGindicatesapotentially
hazardoussituationwhich,ifnotavoided,
couldresultindeathorseriousinjury.

2
WARNING:Improperinstallation,adjustment,alteration,serviceormaintenancecancauseinjuryor
propertydamage.Readtheinstallation,operatingandmaintenanceinstructionsthoroughlybefore
installingorservicingthisequipment.
GeneralSafetyInstructions
1. ForHouseholdOutdoorUseOnly–DONOTuseindoorsorinanytypeofenclosedareasuchasagarage,
shedorbreezeway.Keepclearoftreesandshrubs.Thegrillsarenotintendedforinstallationinoron
recreationalvehicles,portabletrailers,boatsoranyothermovinginstallation.Notforcommercialuse.
2. Theareasurroundingyournewgrillshouldbekeptcleanandfreefromflammableliquidsandother
combustiblematerialssuchasmops,ragsorbrooms,aswellassolvents,cleaningfluids,andgasoline.
3. Toreducetheriskofseriousorfatalinjuryfrombreathingtoxicfumesandfromexplosionandfireasa
resultofleakinggas,useonlyoutdoorsinanopenareawithgoodventilation.Donotobstructtheflowof
combustionandventilationair.
4. Neverusethegrillinwindyconditions.Iflocatedinaconsistentlywindyarea(oceanfront,mountaintop,
etc.)awindbreakwillberequired.Alwaysadheretothespecifiedclearanceslisted.
5. Donotleavethegrillunattendedwhilecooking.
6. Donotusenaturalgasinaunitdesignedforliquidpropanegasorviceversa.
7. Donotusefuelsuchascharcoalbriquettesinagasgrill.
8. Keepchildrenandpetsawayfromhotgrill.DONOTallowchildrentouseorplaynearthegrill.
9. Neverattempttorepairorreplaceanypartofthegrillyourselfunlessspecificallyrecommendedinthis
manual.Allotherservicesshouldbeperformedbyaqualifiedservicetechnician.
10. Neverleanoveranopengrill.Donotplaceclothingorotherflammablematerialonornearthegrill.Do
notwearloose‐fittingclothesorlongsleeveswhileusingthegrillassomefabricscanbehighlyflammable.
11. HaveanABCfireextinguisheraccessible.Neverattempttoextinguishagreasefirewithwaterorother
liquids.
12. Neverusealuminumfoiltolinethegrillracksorthedriptrays,thiscanalterairflowforproper
combustionandalsobuildupheatinthecontrolareacausingtheknobsandignitertomelt.
13. Whenusingthegrill,donottouchthegrillrack,burnergrate,orimmediatesurroundingsastheseareas
becomeextremelyhotandcancauseburns.Alwaysuseacoveredhandwhenopeningthegrillhoodand
onlydososlowlytoallowheatandsteamtoescape.
14. DONOTallowgreaseorotherhotmaterialdrippingfromthegrillontovalve,hoseorregulator,turnoff
gassupplyimmediately.Afterthegrillhascooled,determinethecauseandcorrectit.Aftercleaningthe
valve,hoseandregulator,performaleaktestbeforecontinuinguse.
15. Donotheatanyunopenedglassormetalcontaineroffoodonthegrill.Pressuremaybuildupandcause
thecontainertoburst,possiblyresultinginseriouspersonalinjuryordamagetothegrill.
16. Keepanyelectricalsupplycordsawayfromwaterorheatedsurfaces.Electricalcordsshouldbeplaced
awayfromwalkwaystoavoidtrippinghazard.
17. Keepgassupplylinesasshortaspossible.
18. Nevermovethegrillwhenhot.
19. DONOTusewhileundertheinfluenceofdrugsoralcohol.
20. DONOTstoreasparegascylinderunderornearyourgrill.
21. DONOTgrillwithoutthedriptrayinplace,hotgreasecouldleakdownwardandproduceafireoran
Safety Instructions

3
explosion.Driptrayshouldbepushedallthewaytotheracklocatedjustunderthegrill.
22. Greaseisextremelyflammable.Lethotgreasecooldownbeforeattemptingtohandleordisposeofit.
Thedriptrayshouldbecleanedandfreeofgreaseonaregularbasis.
23. Intheeventthataburnergoesout,turnburnerknobstothefullOFFposition,fullyopenthegrillhood
andletitairout.Donotattempttousethegrilluntilthegashashadtimetodissipate.
24. Donotusegrilluntilleakcheckhasbeenmade.
25. Turnoffthecylindervalvewhenyourgrillisnotinuse.
26. Ensurethecontrolknobsareinthe“OFF”positionwhennotinuse.
27. UseonlyaGroundFaultInterrupter(GFI)protectedcircuitwiththisoutdoorcookinggasappliance.
CALIFORNIAPROPOSITION65‐WARNING:Theburningofgascookingfuelsgeneratessomebyproductswhich
areonthelistofsubstanceswhichareknownbytheStateofCaliforniatocausecancerorreproductiveharm.
Californialawrequiresbusinessestowarncustomersofpotentialexposuretosuchsubstances.Tominimize
exposuretothesesubstances,alwaysoperatethisunitaccordingtotheUseandCareManual,ensuringyou
providegoodventilationwhencookingwithgas.

4
Whetheryouareinneedofaslimmer3Burnergrillforyourpatio,orareinneedofalarger42”grill,thatcan
entertainandbringstyletoanysizeparty,Coyotehasthegrillforyou!
ModelNo.ProductSize
(inch/mm)
BTU/HR
(Main/Back)
Burner(s)Rotisserie
Motor
Hood
Light
CCX334"(863)60,000/None3SUSburners NoYes
CCX436"(902)80,000/None4SUSburnersNoYes
CSX36/CSLX3636"(902)80,000/15,0003SUSburners,1sear
and1backburner
YesYes
CSLX4242"(1067)100,000/15,0004SUSburners,1sear
and1backburner
YesYes
Grill Models
Coyote 34" CCX3 Coyote 36" CCX4
Coyote 36" CSX36 / CSLX36 Coyote 42" CSLX42NG

5
Checkyourlocalbuildingcodesforthepropermethodofinstallation.Intheabsenceoflocalcodes,thisunit
shouldbeinstalledinaccordancewiththeNationalFuelGasCodeNo.Z223.1‐1998USAorCAN/CGA‐B149.1/.2
NaturalGas/PropaneCode(Canada)latesteditionortheNationalElectricalCodeANSI/NFPANo.70orthe
CanadianElectricalCodeCSAC22.1,1990orlatestversion.
- Beforeinstallingbuilt‐ingrillsinenclosures,copyallproductinformationsuchasmodelnumber,serial
numberandtypeofgrill(e.g.naturalgasorLP)andstoreinformationinasafeplace.
- Ifthegrillisinstalledbyaprofessionalinstallerortechnician,besurethatheshowsyouwhereyourgas
supplyshut‐offislocated.Allgaslinesmusthaveashut‐offthatisreadilyandeasilyaccessible.Ifyou
smellgas,checkforgasleaksimmediately.Checkonlywithasoapandwatersolution.Nevercheckforgas
leakswithanopenflame.
Notice:WestronglyrecommendprofessionalinstallationandhookupoftheGasBBQgrill.Theseinstructionswill
provideyouwiththemeasurementsnecessaryforyouoryourbuildertoconstructamasonrystructuretohouse
youroutdoorgasgrill.
IMPORTANT:Gasfittings,regulator,andinstallersuppliedshut‐offvalvesmustbeeasilyaccessible.
LOCATIONOFYOURGRILL:
Locatethegrillonlyinawellventilatedarea.Neverlocatethegrillinabuilding,garage,breezeway,shedor
othersuchenclosedareaswithoutanapprovedventilationsystem.Duringheavyuse,thegrillwillproducealot
ofsmoke.Ensurethereisadequateareaforittodissipate.
VentilationRequirementsforProperOperationofyourCoyoteGrill
•Ventilationforagasgrillisabsolutelymandatorytoensurethatyourgrillperformsasintendedandto
ensurethesafetyofyouandyourfamily.TheventsthatarerequiredtohonoraCoyotewarranty,not
onlyensurethatanyheatthatistrappedinsideyourgrillfromenvironmentalfactors(suchaswind)
escapebuttheyalsoallowanygasthathasleakedfromatankorconnection,toescapebeforea
buildupofsuchgascanoccurandpossiblyignite.
•Asimplewaytothinkofwhatisoccurringinsideyourgrillisthatwhenyourburnersareon,theyare
emittingaflamethatcreatestheheattocookyourfood.Thisheatmustexhaustfromthegrill,
otherwiseyouwouldeventuallyhaveaunitthatwouldnotonlybuildupimmenseheatbutalso
immensepressure.Thiscouldcauseseveredamagetonotonlythegrillbutanyoperatorsorproperty
nearby.Withthatsaid,ifyouhavewindcomingintothebackofyourunit,theproblemwillnotbe
withthewindhittingyourflamesandcausingthemtopushtheflamedownward.Theproblem
actuallylieswiththewindactingasablockfortheexhaust,whichismainlyoutthebackofthehood
(abovetherearpanelbutbelowthetopofthehood).Thisblockageofexhaustiswhatstartsthe
problems.
•Iftheislandisventilatedproperly(withaminimumof2ventsforcrossventilationandatleast20sqin
oneachvent)thenanyheatthatistrappedinsideduetowindshouldbeabletodissipateoutofthe
islandvents.However,iftheislandisnotventilatedproperlyandthewindiscomingfromtheback,
thentheheatwilltrytoescapethroughtheeasiestexit,whichwillmostlikelybethroughthebottom
ofthegrillandfrontcontrolpanel.Thiscancausethecontrolpanelandknobstogethottothetouch
andpossiblyevenburnyourfingers,nottomentionthatitcanmeltallrubbergasketsonthevalves
Locating the Grill

6
anddamagetheignitionsystemtowhereitwillneedfullreplacement.
•Ventilationandthevariableofyourmostcommonwinddirectionmustalwaysbeconsideredwhen
planningyouroutdoorcookingisland.Justthesameasyouwouldplanthelayoutandmeasureyour
indoorkitchen,youmustalsodothesamefortheoutdoorsbutyoucannotforgetaboutMother
Natureandtheeffectsshecanhaveonyouroutdoorcookingequipment.
oCoyoteWindGuards:Ifyoudorunintoasituationwhereyouwillhavewindcomingintothe
backoftheunit,Coyotedoessell"WindGuards"thathelpkeepyourgrilllfromoverheating
duetonoexhaustoccuringoutthebackofthegrill.OurWindGuardsshouldneverbe
consideredasaguaranteedsolutiontothisproblem.Theyareonlyintendedtohelpthewind
divertupandoverthetopofthegrill.Ifthewindisstrong,thenyoucanstillhaveproblems
withtheheatbeingtrappedinthehood.OurWindGuardscanbepurchasedthroughanyof
ourauthorizeddealers.
Clearance:
•TONON‐COMBUSTIBLECONSTRUCTION:Fornon‐combustiblematerial,Coyotegrillscanbeplaced
directlyon,oradjacenttothenon‐combustiblematerial.ThehoodonaCoyotegrillpivotsmainlyon
thebody.Ifyouhaveawallorpartitionbehindtheunitthatwouldblockventilation,thenaminimum
of7"clearancefromthebackofthegrilltothewallisneededforthepurposeofventilation.Ifyoudo
nothaveawallorpartitionblockingtheventilationoftheunit,thenyouonlyneedanextra2"behind
theunitforthehoodtoopenfully.Ifyouwishtousetherotisserieoption,youwillwanttomakesure
thatyouleaveadequatespace(atleast6")oneachsideofthegrillsothatthemotorandrotisserie
spithandlewillhaveroomonthecounter,astheseextendpasttheoveralldimensionsofthegrill
body.
•CLEARANCETOCOMBUSTIBLECONSTRUCTION:Forcombustibleconstruction,youmusthaveatleast
24"clearancetoanycombustiblematerial(inanydirection)foraCoyoteWarrantytobeupheldand
forthesafetyofthehomeowner.YoucanNOTlocatethegrillunderanycombustiblematerialwithout
anapprovedventilationsystemdirectlylocatedabovetheunit.
•INSULATEDJACKETSANDCOMBUSTIBLECONSTRUCTION:Ifyoumustusecombustiblematerialtobuild
yourgrillislandANDyouaregoingtobewithin24"ofthegrillwiththiscombustiblematerial,thenyou
mustusetheappropriateCoyoteInsulatedJacket.Theinsulatedjacketwillactasabarriertoprotect
yourgrillislandfromtheheatandfireofyourCoyotegrill.Ifaninsulatedjacketisnotusedina
combustiblematerialisland,thewarrantyontheCoyotegrillwillbevoidedimmediatelyandsafety
cannotbeensured.
ForBuilt‐inInstallations
Abuilt‐ingrillisdesignedforeasyinstallationintomasonryenclosures.Fornon‐combustibleapplications,the
grilldropsintotheopening(asshownincut‐outdetaildrawing‐Fig.A)andhangsfromthegrillbodyitself.A
bottomdeckisnotrequiredtosupportthegrillfromthebottom.Itisalsorequiredthat:
•Twoventilationholes,ofatleast20sqinchesinsize,mustbepresenttohelpreleaseanygasfroma
leak.
AsPropaneisheavierthanair,locateyourventsatthetankvalveheightorlower
•Thecountershouldbeflatandlevelinreferencetothefloor.
LPTANKSTORAGEMUSTBEISOLATEDINASEPARATECOMPARTMENTFROMTHATOFTHEGRILLANDITMUST
BEVENTEDASWELL.(RECOMMENDBOTTOMVENTSFORLP)

7
CutoutDimensionsFigureA
ModelCutoutDimensionsOverallDimensionsTotalBTURatings
ElectricalOutlets
Needed(110V)
Grills
Heigh
tWidthDepthHeight WidthDepthLPNG
Rotisseri
e
Light
s
CCX311"31"201/2"221/2" 34"233/4" 60,000 60,000NoQty1
CCX411"321/2" 201/2"221/2" 351/2" 233/4" 80,000 80,000NoQty1
CSX3611"321/2" 201/2"221/2" 351/2" 233/4" 95,000 95,000Qty1Qty1
CSLX3611"321/2" 201/2"221/2" 351/2" 233/4" 95,000 95,000Qty1Qty2
CSLX4211"391/2" 201/2"221/2" 42"233/4"
115,00
0
115,00
0Qty1Qty2

8
IMPORTANT:Beforeconnectinggrilltogassource,makesureBBQGrillcontrolknobsareinthe“OFF”
position.
•Verifythetypeofgassupplytobeused,eithernaturalorLP,andmakesurethemarkingonthe
applianceratinglabelagreeswiththatofthesupply.
•AllpipesealantsmustbeanapprovedtypeandresistanttotheactionsofLPgas.Neverusepipe
sealantonflarefittings.
•Theinstallationofthisappliancemustconformwithlocalcodesor,intheabsenceoflocalcodes,with
eitherNationalFuelGasCode,ANSIZ223.1/NFPA54,NaturalGasandPropaneInstallationCode,CSA
B149.1,orPropaneStorageandHandlingCode,B149.2,ortheStandardforRecreationalVehicles,ANSI
A119.2/NFPA1192M,andCSAZ240RVSeries,RecreationalVehicleCode,asapplicable.
WARNING:GasvalvesarepresetatthefactorytooperateonLPornaturalgas.Ifyouwishtoconvert,besure
tocontactyourgrilldealerFIRST!
ThispropanegasgrillisdesignedtooperateonpropanegasONLY,atapressureregulatedat11”(279.4mm)
watercolumn(W.C.)whenequippedwiththecorrectpropaneorificesonthevalvesandapropaneregulator
onthesupplylineregulatedattheresidentialmeter.TheLPgasgrillisdesignedtobeusedwithastandard20
lbsgascylinderandmustbeconstructedandmarkedinaccordancewithspecificationsoftheUSDepartment
ofTransportationforpropanegascylinders.
Alwayskeepcylindersecurelyfastenedinanuprightposition.Neverconnectanunregulatedpropanegas
cylindertothegrill.
Donotsubjectpropanecylinderstoexcessiveheat.
CAUTION:NeverstoreaLPgascylinderinsideabuildingorinthevicinityofanygas‐burningappliance.
CylinderSpecifications
- AnyL.P.gassupplycylinderusedwiththisgrillmustbeapproximately12inchesdiameterand18inches
high.Themaximumfuelcapacityis80%andisapproximately20poundsofpropane.
- TheL.P.cylindermusthaveashut‐offvalve(seepicture)terminatinginaType1L.P.
- AType1compatiblecylinderwithaType1cylindervalvehasaback‐checkvalvewhichdoesnotpermit
WARNING: Never attach an unregulated gas line to the appliance. Connection to an
unregulated gas line can cause excessive heat or fire.
NOTE: Always have a qualified service technician perform difficult conversions
or modifications.
LP Gas Hook-up
Gas Requirements

9
gasflow,untilapositivesealhasbeenobtained.
- Thecylindermustbearrangedforvaporwithdrawal.Itmustalsoincludea
collartoprotectthecylindervalve.Asafetyreliefdevicehavingdirect
communicationwiththevaporspaceofcylindermustbeprovided.Thiswill
expelhighpressuregasifthecylinderisoverfilledoroverheatedwhich
couldresultinfireorexplosion.
- AllL.P.gascylindersusedwiththisapplianceshallbeconstructedand
markedinaccordancewiththespecificationsforL.P.gascylindersoftheU.
S.DepartmentofTransportation(DOT)ortheNationalStandardofCanada,
CAN/CSA‐B339,Cylinders,SpheresandTubesforTransportationof
DangerousGoods;andCommission,asapplicable;andshallbeprovided
withalistedoverfillingpreventiondevice.
- ReadlabelsontheL.P.GasSupplyCylinder.
- Newcylindersarealwaysshippedemptyforsafety.
- AllowonlyqualifiedL.P.gasdealerstofillorrepairyourL.P.gassupplycylinder.
- Informthegasdealerifitisaneworusedcylindertobefilled.
- Afterfilling,havethegasdealercheckforleaksandtoseethatthereliefvalveremainsfreetofunction.
HoseandRegulator(Comesstandardwiththegrill)
TheType1connectionsystemhasthefollowingfeatures:
- Thesystemwillnotallowgastoflowuntilapositiveconnectionhas
beenmade.
NOTE:Thecylindercontrolvalvemustbeturnedoffbeforeany
connectionismadeorremoved.
- Thesystemhasathermalelementthatwillshutofftheflowofgasin
theeventofafire.
- Thesystemhasaflowlimitingdevicewhich,whenactivated,willlimit
theflowofgasto10cubicfeetperhour.
- NEVERusegrillwithoutleaktestingthisconnection.
LP(Propane)GasSupplyConnection
1. Thetankvalveshouldbeinthe“OFF”position.Ifnot,turntheknob
clockwiseuntilitstops.
2. Makesureallburnervalvesareinthe“OFF”position.
3. Alwaysconnectthegassupplyregulatorasfollows:
Inserttheregulatorinletintothetankvalveandturnthecouplingnut
clockwiseuntilthecouplertightensup(seepicture).Donotovertightenthe
coupler.Turnthemaintankvalveonandturntheburnercontrolvalveson
theunittothe“HIGH”positionforabout20secondstoallowtheairinthe
systemtopurgebeforeattemptingtolighttheburners.
10
Pre‐OperationLeakTesting
DANGER
1. Donotinsertanytoolintothevalveoutletorsafetyreliefvalve.Youmaydamagethevalveandcausea
leak.Leakingpropanemayresultinexplosion,fire,severepersonalinjury,ordeath.
2. Ifaleakisdetectedatanytimeoryoucannotstopagasleak,immediatelyclosepipelinevalveandcallLP
gassupplieroryoufiredepartment!
3. Checkallgassupplyfittingsbeforeeachuseandeachtimethegassupplycylinderisconnectedtothe
regulator.Haveaqualifiedservicetechnicianleaktestthegrillanytimeapartofthegassystemis
replaced.
WARNING
Neverattempttoattachthisgrilltotheself‐containedLPgassystem.Donotusegrilluntilleaktesting.
BeforeTesting
DONOTsmokewhileleaktesting.Extinguishallopenflames.Neverleaktestwithanopenflame.Mixa
solutionofequalpartsmilddetergentorliquidsoapandwater.
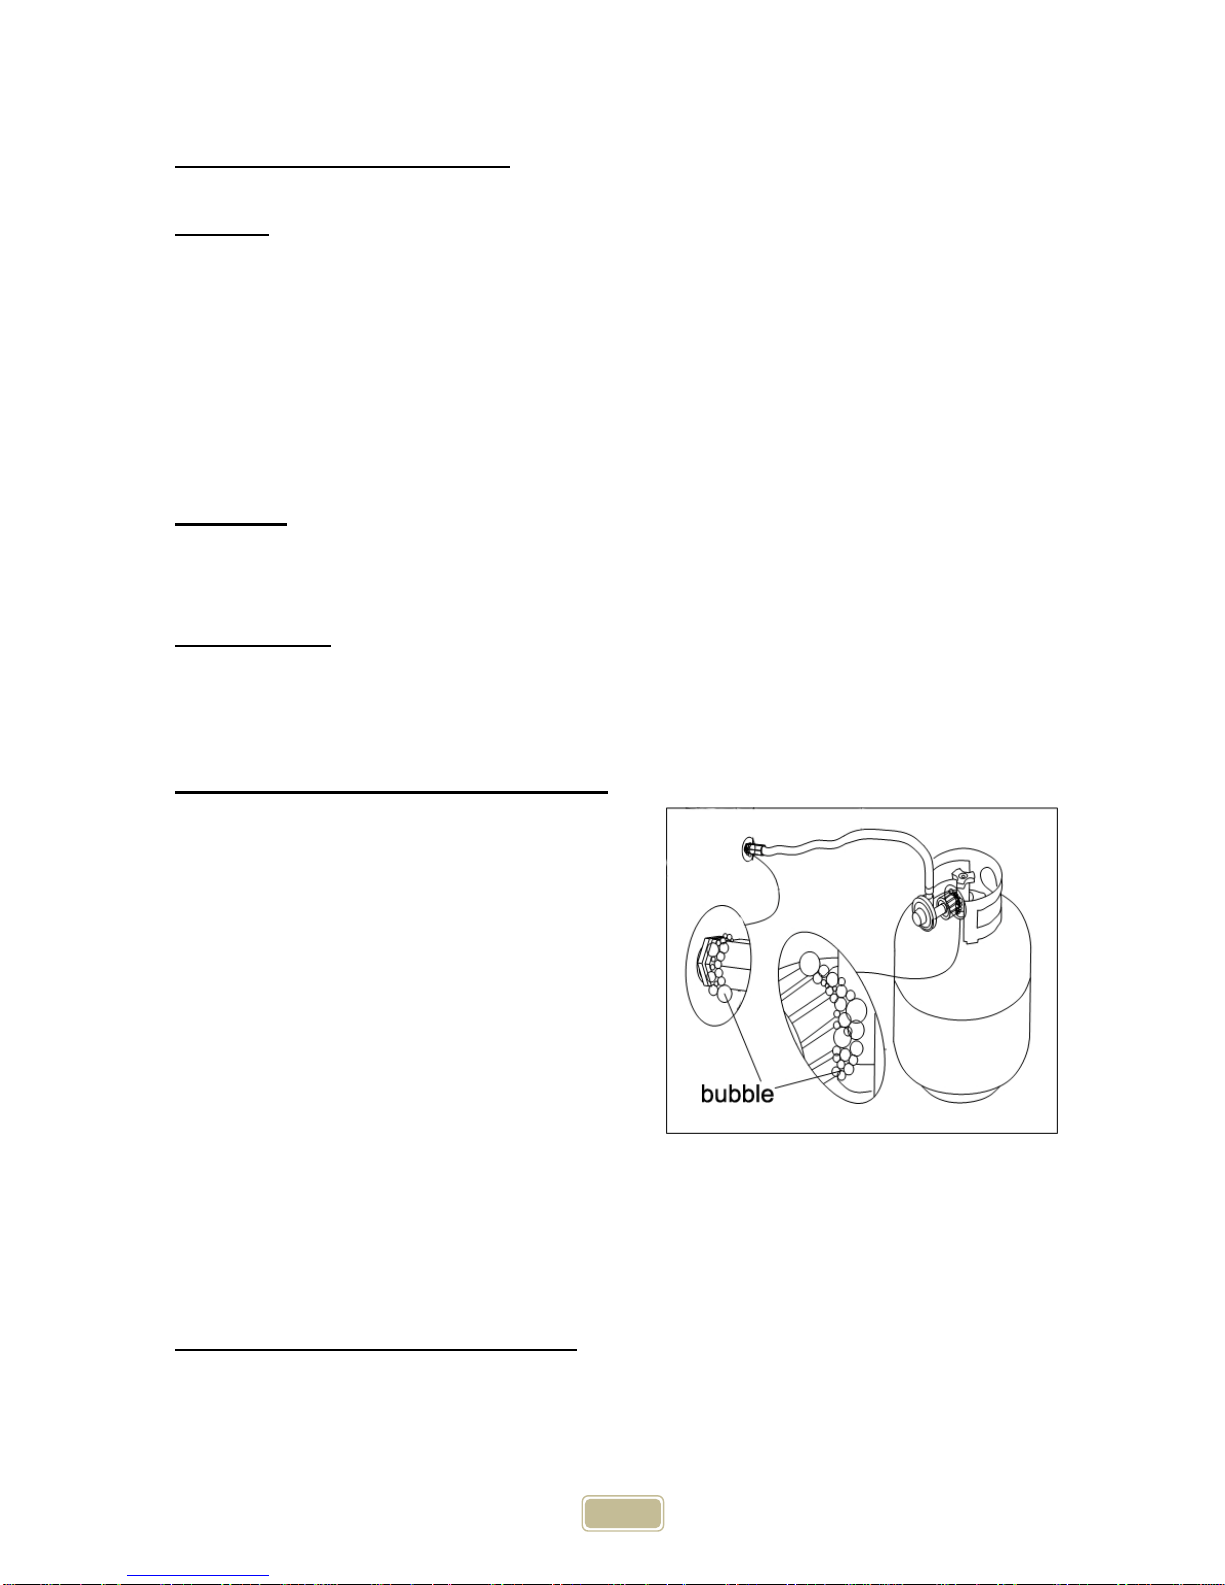
LeakTestingValves,HoseandRegulator
1.TurnallgrillcontrolknobstoOFF.
2.BesurehoseistightlyconnectedtoLPtank.
3.CompletelyopenLPtankvalvebyturningcylindervalve
knobcounterclockwise(righttoleft).Ifyouheararushing
sound,turngasoffimmediately.Thereisamajorleakat
theconnection.Correctbeforeproceedingbycalling
franchiserforreplacementparts.
4.Brushsoapysolutionontoareaswherebubblesare
showninLPtank(seepicture).
5.If“growing”bubblesappear,thereisaleak.CloseLP
tankvalveimmediatelyandretightenconnections.Ifleads
cannotbestoppeddonottrytorepair.Callfranchiserfor
replacement.
6.AlwayscloseLPtankvalveafterperformingleaktestbyturningcylindervalveknobclockwise.
NOTE:Whenleaktestingthisappliance,makesuretotestandtightenalllooseconnections,includingtheside
burner.Aslightleakinthesystemcanresultinalowflame,orahazardouscondition.
LPGasSupplyCylinderDisconnection
1. Turntheburnervalvesoff.
2. Turnthetankvalveoff.(Turnclockwisetostop).
3. Detachtheregulatorassemblyfromthetankvalvebyturningthequickcouplingnutcounterclockwise.

11
LPTankRemoval,TransportandStorage
- TurnOFFallcontrolknobsandLPtankvalve.Turncouplingnutcounterclockwisebyhandonly‐donot
usetoolstodisconnect.LiftLPtankwireupwardoffofLPtankcollar,thenliftLPtankupandoffof
supportbracket.InstallsafetycapontoLPtankvalve.Alwaysusecapandstrapsuppliedwithvalve.
Failuretousesafetycapasdirectedmayresultinserious
personalinjuryand/orpropertydamage.
- AdisconnectedLPtankinstorageorbeingtransportedmusthave
asafetycapinstalled
(asshown).DonotstoreanLPtankinenclosedspacessuchasa
carport,garage,porch,coveredpatioorotherbuilding.Never
leaveaLPtankinsideavehiclewhichmaybecomeoverheatedby
thesun.
- DonotstoreLPtankinanareawherechildrenplay.
LPTankFilling
- Useonlylicensedandexperienceddealers.
- LPdealermustpurgedtankbeforefilling.
- DealershouldNEVERfillLPtankmorethan80%ofLPtankvolume.Volumeofpropaneintankwillvaryby
temperature.
- Afrostyregulatorindicatesgasoverfill.ImmediatelycloseLPtankvalveandcalllocalLPgasdealerfor
assistance.
- Donotreleaseliquidpropane(LP)gasintotheatmosphere.Thisisahazardouspractice.
- ToremovegasfromLPtank,contactanLPdealerorcallalocalfiredepartmentforassistance.Checkthe
telephonedirectoryunder“Gascompanies”fornearestcertifiedLPdealers.
LPTankExchange
- ExchangeyourType1cylinderwithOPDsafetyfeature‐equippedONLY.
- AlwayskeepnewandexchangedLPtanksinuprightpositionduringuse,transitorstorage.Leaktestnew
andexchangedLPtanksBEFOREconnectingtogrill.
LargeCapacityPropaneTanksandHomes:
•LP(LiquidPropane)CoyoteGrillscanbeinstalledintopropanefueledhouses.Meaningthatifyour
entirehouseisplumbedforpropaneandyouhaveanexteriorconnectionforsuchuse,thena
standardLPgrillfromCoyotewillmeetyourneeds,regardlessofthesize.Anyappliancecanbe
installedifinstalledproperly!ThatistheCoyoteway!
oCoyotedoesnotsupplyanygasfittingsorlines,otherthantheregulatorneededwithinthe
grillbox
oAllCoyoteLPGrillscomewitha20lbtankregulator.Thisregulatorcannotbeusedor
modifiedtoworkonanyothersetup.
Ifyouarerunningoffofalargecapacitytank(morethan20lbs),thenan“in‐line”LP
regulatorisneeded,CoyoteCustomerServicemustbecontactedtoassistwiththis
situation.
oAscountiesvaryfromstatetostate,itisupontheowner/installertoensurethatallcounty,
stateandfederalcodesarefollowedforanygasinstallation.
12
-
Alwayschecktheratingplatetomakesurethegassupplyyouarehookinguptoisthegastypethegrillis
manufacturedfor.
ThisnaturalgasgrillisdesignedtooperateonnaturalgasONLY,atapressureregulatedat4”(101.6mm)water
column(W.C.)whenequippedwiththecorrectnaturalgasorificesonthevalvesandanaturalgasregulatoron
thesupplylineregulatedattheresidentialmeter.
IMPORTANT:Neverconnectthegrilltoanunregulatedgassupply.
Naturalgasconnectionsmustbeperformedbyalicensedcontractororlocalgascompanyrepresentative.
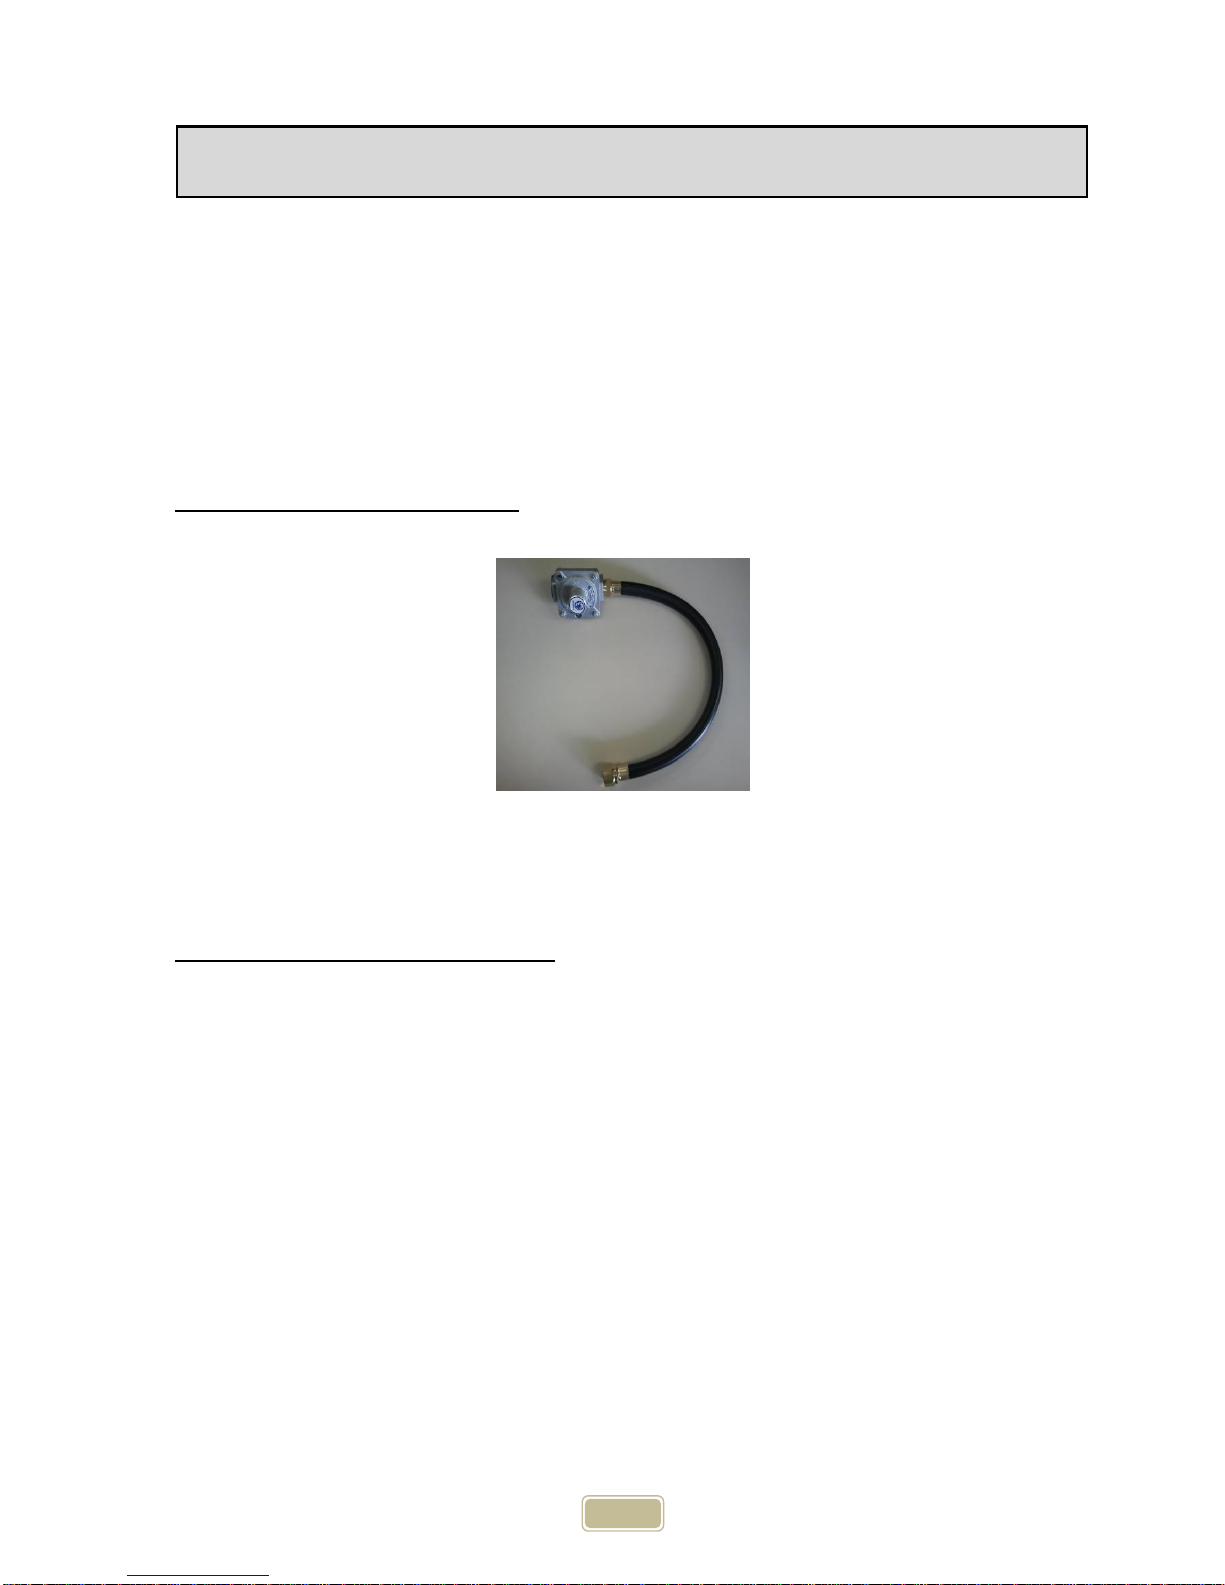
NaturalGasHoseandRegulator
IMPORTANT:NEVERusegrillwithoutleaktestingthisconnection.
Naturalgasregulatormodel:GR120
Gaspressure:4”(101.6mm)
Maximumrateworkingpressure:1/2Psig
NaturalGasSupplyandConnection
1. Makesureallburnervalvesareinthe“OFF”position
2. AllNGunitsneedtohavearegulatorandshut‐offvalveonthesupplyline.
3. AllPipethreadsneedtohaveproper,gasrated,outdoorratedthreadsealant.Flareendsdonotneedor
utilizepipesealant.
4. YourNGCoyotegrillcomeswitha½”regulator,alongwitha18”blackhose.
a) Youneedtosealtheregulatortothehoseusingyourpipesealant.
b) Thenattachtheflareendtoyourmanifoldline,withnopipesealant.
c) Next,attachyournextconnectionhose(notincluded)totheothersideoftheNGregulator(itisalso
½”MIP)
i. Wesuggestusing½”stainlesssteelcorrugatedhosesforallNGGrills
ii. Makesurethatyoupurchaseahoseofadequatelengthandcapacityfortheintended
application.
d) Connecttheotherendofthishose,toyourshutoffvalve
i. Dependingonyourchoiceofhoseandshut‐off,thenipplegoingintotheshut‐offvalvemay
vary.
e) Testallconnectionsforleakswithasoapandwatersolution.
Natural Gas Hook-up

13
HighElevationInstallationandUse
CoyoteGrillsaredesignedtooperatemostefficientlyat0‐2000feetabovesealevel.From2000‐4000feetabovesea
levelyouwillnotnoticeanysubstantialdecreaseinyourheat,althoughmoregasiscombustingwithintheburners
duetolessoxygen.Above4000feet,youmayexperiencealittlelongercookingtimeonyourgrillthanyouwould
experienceatsealevel.Butagain,thisisjustduetotheair/fuelmixturetakingplacewithintheburners.Ifany
problemsorconcernsexistaboutyourlocationorelevation,pleasecontactCoyoteCustomerServiceforassistance.
GasConversions–NaturalGasandPropane
Coyotegrillsareabletobeconvertedbutyoumustobtainthecorrectconversionkitandwealwayrsrecommend
thatanygasapplianceconversionshouldalwaysbeperformedbyaLicensedPlumberoracertifiedInstaller.
ConversionkitsaresoldforCoyotegrillsandcanbepurchasedthroughyourdealer,orCoyote’sCustomerService
Department.AnyotherkitororificesusedthatarenotofCoyotebrand,willautomaticallyvoidanywarrantyonthe
unit.Furthermore,itisimportanttounderstandthatwhereeverthereisaburner,thereisanorificethatwillneed
tobechanged(donotforgettherotisserieorsearburner).
ThestepsforconvertingyourCoyotegrillsmainandsearburnersare:
1. Pullgrilloutofislandorcart.
2. RemoveDripPanandCookingGrates
3. Unscrewboltconnectingthemanifoldpipetothegrillbody,locatedatthebacksideofthegrill.
4. Unscrewthe4boltsholdingthefaceplatetothebody(onthefrontedgewhereyourcookinggratesits)
5. Unscrewthe2bolts(oneachside)ofthemanifoldandfaceplateassembly,thatholdsthisentireassembly
tothebodyofthegrill.
6. Disconnectallwiresandflexlines,fromthevalvesandigniterassemblywhilepayingcloseattentiontotheir
originallocation.
7. Slideentirecontrolpanelandvalveassemblyoutfromthegrillbody.
8. Flipcontrolpaneloveronitsside,soyouhaveeasyaccesstothevalves.
9. SearBurnerGrillsOnly–Removecenterknob,unscrewtopandbottomscrewsonly.
a. Thesafetyvalvethatcontrolsthethermocoupleonyoursearburnermustbecompletelychanged.
Youcannotchangeonlytheorifice.
10. SearBurnerGrillsOnly–Unscrewbasebracket,holdcentervalvetogasmanifoldpipeandremovevalve
11. SearBurnerGrillsOnly–InstallnewSafetyValveinthecorrectgastypeandfollowtheremovalinstructions
inreverse.
12. Oncethepanelisflippedover,youwillseetheorificeattheendofthevalve.Withawrenchremovethe
orificefromthevalveandinstallthenewgasorifice,
13. Re‐assembleinreverseandtestallconnectionsagainwithasoapywatersolutiontoensurenoleaks.
Toconvertyourrearburnerorifice:
1. Removeyourentirerotisserieassembly
2. Removethebackpanelthatcoversyourrearrotisserieburner
a. Withthehoodopen,removethe4screwsontopofthispanel
b.Withthehoodclosed,removethe4screwsonthebackofthispanel
c. Withthehoodclosed,lookunderneaththissamebackpanelandyouwillsee4‐5bolts(depending
onyourgrill),theseonlyneedtobeloosened
3. Next,pulltheentirepanel(startingfromtheback)outfromthegrill
a. Itisdesignedtofittight,soyoumayneedaflatheadscrewdrivertopopthestainlessawayfromthe
body
4. Next,youwillseethegasline,brasselbowandorifice
5. Useawrenchtoremovetheorificeandinstallthenewone
6. Re‐assembleinreverseandcheckyourbackburnertoensureproperignitionandburning

14
Yourgrillisdesignedtoreachatemperaturethatyousetbyadjustingavalvethatinturnsadjuststheamountofgas
thatgoesthrougheachburner.ThisValveislocatedbehindyourknobandisthekeytoyourheatandfuel
consumption.Anexamplebeing:Cookingonlowwillgiveyoulongeruseoutofa20lbLPtankthanwillcookingon
higheverysingletime.
Furthermore,thewaytoignitetheburnersisthroughthevalves,sopleaseunderstandtheimportanceofthispiece
andtheposition/caretakentotheknobs.
•Example:Ifyouforgettoturnaknoboffandtheburnerisnotlit,thenyouwillhaveagasleakoutofthat
valve.Youmustbeawareofyourgrillsstatusandberesponsible!
BurnerConfigurationandHeatDispersion:
Ifyoulookundertheveryfrontofyourcookinggrates,youwillrealizethatforthefirstfewinches,theburnerdoes
notreleaseanygas.Thisisdesignedtobethemediumheatportionofyourgrillforseveralreasons.
•Onebeingthattheflavorizersensureevenheatdispersionlaterallyacrossyourgrillscookingsurface,sothe
frontisdesignedtobeyourmediumheatsection,whileyoucanutilizethemiddleofyourcookinggratesto
getagoodhighheat(donotforgetthatthisalldependsonhowhighyouhaveyourvalvesturnedaswell).
•Asyoumovetowardsthebackofyourgrillandpastthemiddlesection,youwillrealizethatthisisthe
hottestportionofyourgrill.
oUnderneath,wheretheburnerisboltedtothebackofthebody,youwillseethatthereisa
“crossover”inbetweeneachburner.Thiscrossover,sendsgasfromoneburnertothenext(aslong
asthevalvesareopen),toensurethatallofyourburnerswilllightincaseyourignitersfail.
oForexample,ifyoucanonlygetoneburnertolight,youjustneedtokeepthehoodopenandturn
onthevalvenexttoit,tothehighposition.Gaswillthentravelthroughthenew/openburnerand
willcatchtheflamefromtheinitialburner.Thiscrossoverdoesprovideyouconstantheatacross
thebackthatincreasesthetemperatureandprovidesyouwithyourhottestpositiononthegrill
(unlessyouhaveaCSmodelwithasearburner–inwhichthesearburnerwillprovideyourhighest
temperatureforcooking/searing).
Tounderstandhowthiswilleffectyourcooking,pleasetakealookatthepicturesbelowforvisualassistance.
Using Your Burners and Grilling Safely

15
BurnerUse–Indirect,Direct,Sear,RotisserieCooking
Asyoucanimagine,bycontrollinghowmuchgasflowsthroughyourburner;determinesthesizeofyourflame.The
idealflamewillbeblue,withnoyellowtip,orexcessivenoisecomingoutoftheburner.
Ifyouhappentohaveanyoftheseproblems:
•Youwillwanttochecktheairadjustmentscrewonthesideoftheburneritself(calledtheAirVenturi)and
alsotheadjustmentscrewthatresidesdirectlybelowtheorificetoensurepropergasflowintotheburner
fromthevalve
•Therearemanyreasonsthatcancausepoorflamesandheatbutnonearemoreseriousthanagasleak,so
alwayspayattentionfortheodorofgas(NGorLP)butdonotalsoforgettocleanyourburners!
ForDirectCookingyousimplycookyourfoodoveradirectflamethatishotandquicktocookbutisalsothe
quickestwaytoburnyourfood.Payattentioncloselyifyouchoosethismethod!
IndirectCookinghoweverisusedforlargercutsofmeatsandanythingthatyouareintendingtokeepniceandjuicy!
•Allyouneedtodoisturnofftheburnerthatliesunderthefoodbeingcookedandadjusttheexterior
burnersflamesothatyoucreateaslow,constantandevencookingenvironmentforyourfood!
Ifyouarelookingforacookingexperiencethatwillalmostinstantlycookyourfooditem,thenSearCookingisan
essential!SearCookingusesaceramicburnerthatemitsadifferentformofheatthatcanproduceamuchhigher
temperaturequicker,tolockinthejuices!
Now,ifyouarelookingforanexperiencethatwillallowyoutohaveajuicybird,straightfromtherotisserieofyour
grill,thenRotisserieCookingisgoingtobeyourchoice!Coyotegrillsutilizethesameceramicburnertechnologyin
theirsearburner,astheirrotisserieburner,alongwithamotorandspitthatwillholdandrotateupto20lbsoffood.
Allowingyoutocookabirdamazinglyquick,withoutburningorcharringanyportionofit.
InstructionforRotisserieAssembly
Rotisserieismostlyusedtocooklargepiecesofmeatandpoultrytoassureslow,evencooking.Theconstant
turningprovidesaself‐bastingaction,makingfoodcookedonarotisserieexceptionallymoistandjuicy.
Rotisseriecookinggenerallyrequires1½to4½hrstocookdependingonthesizeandtypeofmeatbeing
cooked.Youcanhaverotisseriecookingwithindirectheatwithinfraredrotisserieburner.Preferredby
professionalchefsoverothermethods,theintenseheatisidealforsearinginthenaturaljuicesandnutrients
foundinqualitymeats.
WARNING: Never stand with your head directly over the Grill when preparing to light the Rotisserie
burner, to prevent possible bodily injury.

16
Forsuccessfulrotisserie,themeatshouldbecenteredandbalancedasevenlyaspossibleonthespitrodto
avoidoverworkingtherotisseriemotor.
1. AttachMotorBracketAssemblytothesideofthebarbecueframe(canbemountedoneitherleftorthe
rightsideoftheframe)usingtwoscrewsandtwonuts.
2. InsertRotisserieMotorontoMotorBracketAssembly.
3. AssembleKeyWasher,Counter‐balanceandhandletoSpitRod.SlideShaftCollarwithlongendtowards
handle.
4. SlideProngForkswiththeprongsfacingawayfromthehandleontotheSpitRod.PlacefoodontoSpit
RodandsecurewiththesecondProngForks.Securewiththumbscrews.PlaceSpitRodassemblyand
positionintoMotor.Securepositionwiththumbscrew.Itmaybenecessarytosecureanyloose
portionswithbutcher'sstring.Neverusenylonorplasticstringasitwillmeltandruinthefood.
5. Oncethefoodissecured,placethesharpendoftheSpitRodontothemotor,andthenresttheSpit
Rodonthesupportsateithersideofthegrill.
6. EnsurethatallBoltsaretightenedsecurely.
7. Whentherotisserieisbeingoperatedexclusively,itisstronglyrecommendedthatapanbeplacedon
thegrillinggrids,beneaththefoodtocatchthemeatdrippings.Thiswillpreventexcessivebuildupof
drippingsonthegridsandfacilitatecleaning.
a) Ifyourfoodislargeandapanwillnotfitontopofthegrates,youcanremovethecooking
gratesandplaceyourpandirectlyontheflavorizers.
i. Thecenterofyourspitrodtothetopofthehood,equalsthesamedistancefromthespit
rodtothetopoftheflavorizers.
NOTE:ClosehoodcarefullyandalignMotorBracketandShaftMountingBracketsothatRotisserieRodisin
betweenthehoodopenings.
No.QtyDescription
11110VMotor
No.QtyDescription
11110VMotor
21MotorBracket
31SpitRod
42ShaftCollar
52 4‐ProngFork
61Handle
71 Counterbalance
82Screw
92HexagonalHeadScrew
WARNING:NeveroperateRotisserieBurnerwithmain(other)burner(s)“ON”.WarmingRackmustbe
removedwhenRotisserieBurnerisON.

17
ElectricalGroundingInstructions:
•Therotisseriemotorisequippedwithathree‐pronggroundingplugforyourprotectionagainst
electricshock.Thisplugmustbeinserteddirectlyintoaproperlygroundedthree‐prongreceptacle.Do
notcutorremovethegroundingprongfromthisplug.
•Therotisseriemotormustbeelectricallygroundedinaccordancewithlocalcodesor,intheabsence
oflocalcodes,inaccordancewiththeNationalElectricalCode,ANSI/NFPA70‐1990orCanadian
ElectricalCode,CSAC22.1.
•Donotuseanextensioncordtosupplypowertoyourgrill.Suchusemayresultinfire,electricalshock
orotherpersonalinjury.Donotinstallafuseintheneutralorgroundcircuit.Afuseintheneutralor
groundcircuitmayresultinanelectricalshockhazard.Donotgroundthisappliancetoagassupply
pipeorhotwaterpipe.
InstructionforConnectingtheTransformer
1. TransformerforInteriorLights‐Yourtransformerwillconnectontheleftsideofyourgrill(lookingatit
fromthefront)andoperatesthelightsinsideyourgrill.Followthepicturesandinsertthewhitemaleplug
intothewhitefemalesocket,ontheleftsideofyourgrillandthenplugthetransformerintoastandard
110voutlet.
LeftSideofGrillsMalePlugFemaleSocket
2. TransformerforBackLitKnobs–(onlyonCSLX36andCSLX42modelswithbacklitknobs)
Yourtransformerwillconnectontheleftsideofyourgrill(lookingatitfromthefront)andoperatestheLED
lightsbehindknobbezels.Followthepicturesandconnectthetransformer,andthenplugthetransformerinto
astandard110voutlet.ReadbelowinstructionforhowtochangenewLEDs.
RemovetheKnobRemovetheScrews

18
TakeDowntheKnobBezelTheLEDPlasticBezel
PullOuttheWiresDisconnecttheWireandChangeNewLEDs
DotheoppositetoassembletheLEDs.
WARNING:ThetransformershouldbekeptawayfromtheheatoftheBBQ.
This manual suits for next models
8
Table of contents
Other Coyote Grill manuals

Coyote
Coyote C1EL120SM User manual

Coyote
Coyote C1CH36 User manual

Coyote
Coyote C Series User manual

Coyote
Coyote C1P28 User manual

Coyote
Coyote C1ELCT21 User manual

Coyote
Coyote CCX2LP User manual

Coyote
Coyote CC2LP User manual

Coyote
Coyote CC2LP User manual

Coyote
Coyote C1P28 User manual

Coyote
Coyote C1S36 User manual


