Cozzia 8 Series User manual
Instruction Manual

1
Table of Contents
Thank you for purchasing Cozzia Reclining Furniture.
Before using your reclining furniture, please read the contents of
this instruction manual and refer to it when needed.
Installation & Moving .................................................. 2-5
Grounding Instructions ............................................... 6
Specifications ............................................................. 6
Operation Guide ........................................................ 7-10
Troubleshooting ......................................................... 11
Product Maintenance ................................................. 12
Warnings .................................................................... 12
Consumer Warranty ...................................................13-15
Warranty Card (Attachment)
Installation
01
2
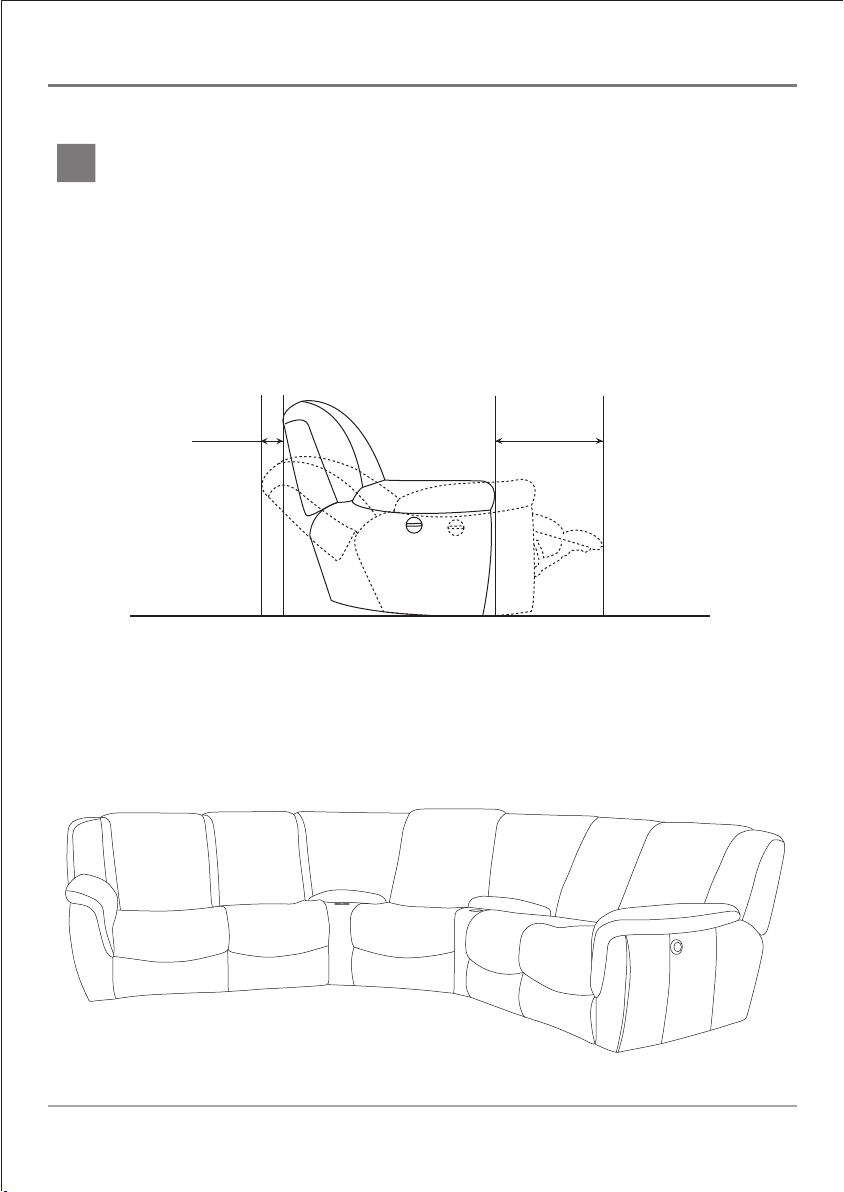
Step1:
When positioning the reclining furniture, make sure there is at least 5
inches of space behind the backrest and 24.5 inches of space in front of the legrest.
Note: Do not use sharp or pointed objects to remove furniture packaging, as
such objects can damage the upholstery.
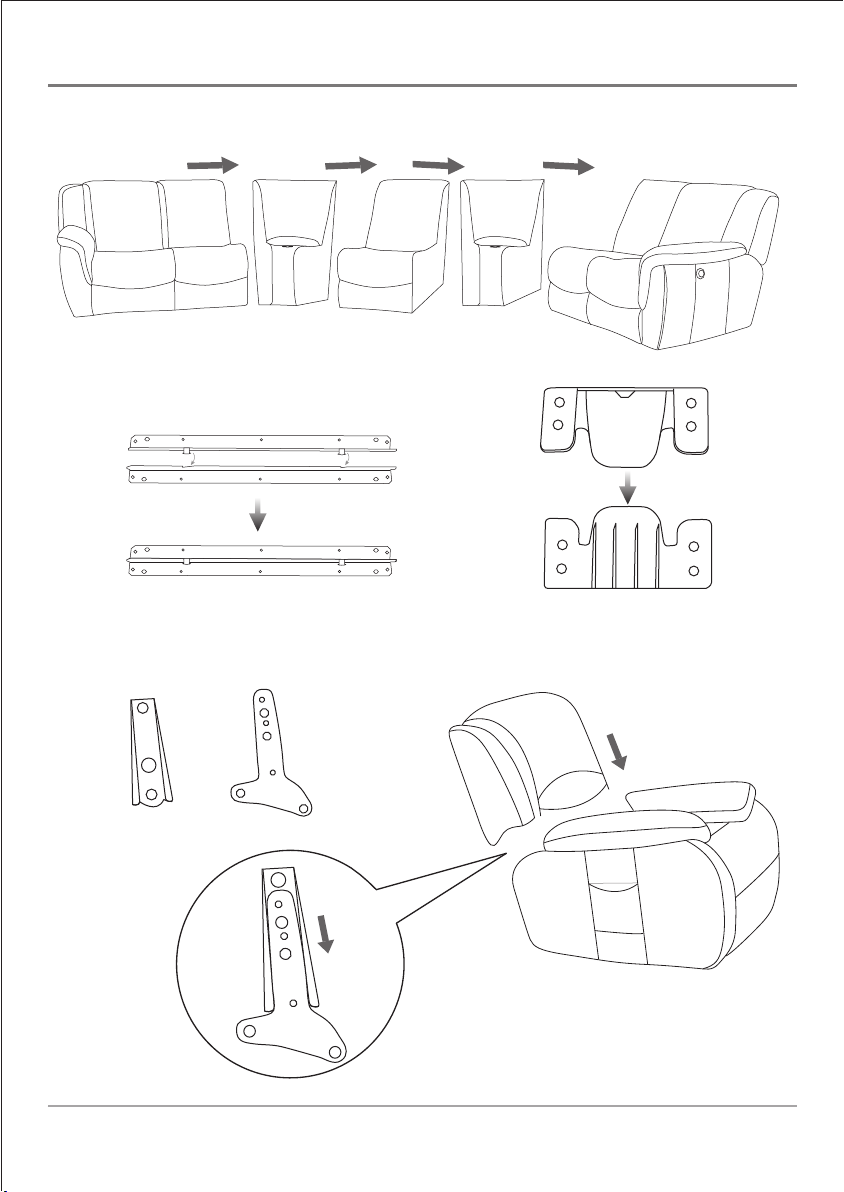
Step 2:
(only necessary for sectional and home theater models): After aligning
the sectional component parts, insert a metal dowel or a plastic bracket into the
right side of each component part. Position the component parts close together
until they are firmly connected.
5 inches 24.5 inches
3
Step 3:
Lift the backrest up, then lower the backrest into the seat brackets.
Securely lock the flat head bolts into both sides of the seat.
ff
g
g
C:
D:
A:
B:
I: II:
CCD
D
AA
BB

4
Step 5:
(Only necessary for Shiatsu or kneading models.): Attach the backrest
pad using the hook and loop fasteners and the zipper as demonstrated in Picture 2.
Step 4:
Insert the wire plug into the seat as demonstrated in Picture 1.
Picture 2
.
Picture 1
a
b
1. Match the arrow of the back connector with
the base connector as illustrated.
2. Connect the plugs together then turn the back
connector clockwise to secure the connection.
3. Make sure the connection is tight.(a with b)
Back Connector
Base Connector

5
Moving
When moving your furniture, lift the base of the furniture and carry it to a specific
location.
Note:
DO NOT lift furniture by the armrests.
DO NOT drag or push furniture over smooth or rough surfaces such as rugs or
carpeting.
Grounding Instructions
02
Specifications
03
6
Back
Fully insert the plug into an appropriate outlet.
An improper equipment-grounding conductor may result in electric shock. Contact
a qualified electrician if you are not sure whether or not the product is properly
grounded.
Do not modify the plug that is included with the product.
If the plug does not fit the outlet, contact a qualified electrician to install an outlet to
fit the product plug.
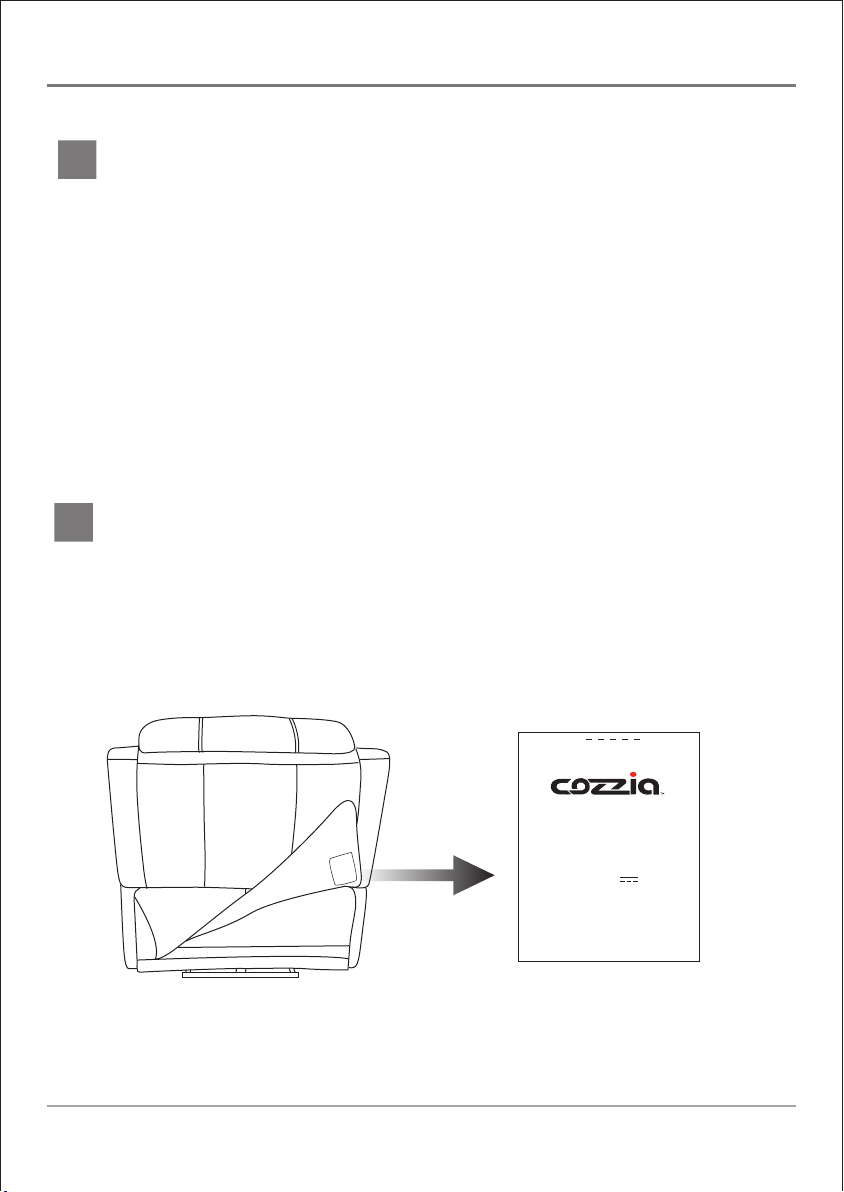
Specification parameters can be found on a label attached to the bottom of the
reclining furniture as shown below.
(Only for Shiatsu or kneading models)
MADE IN CHINA
Label(eg.)
Label
Model: 8XXX
MASSAGE SOFA
Input: 24V
Rated Power: 72W

7
Operation Guide
04
1) Reclining Furniture with Electric Mechanism
a) Armchairs with an electric mechanism provide power
angle adjustment for the backrest and legrest.
b) A switch, located on the outside of the
armrest, enables the legrest to extend
and the backrest to recline.
● Armchairs with an electric mechanism
● Armless chairs with an electric mechanism
a) Armless chairs with an electric mechanism provide power angle
adjustment for the backrest and legrest.
b) A switch, located on the seat side of the armless chair.
8
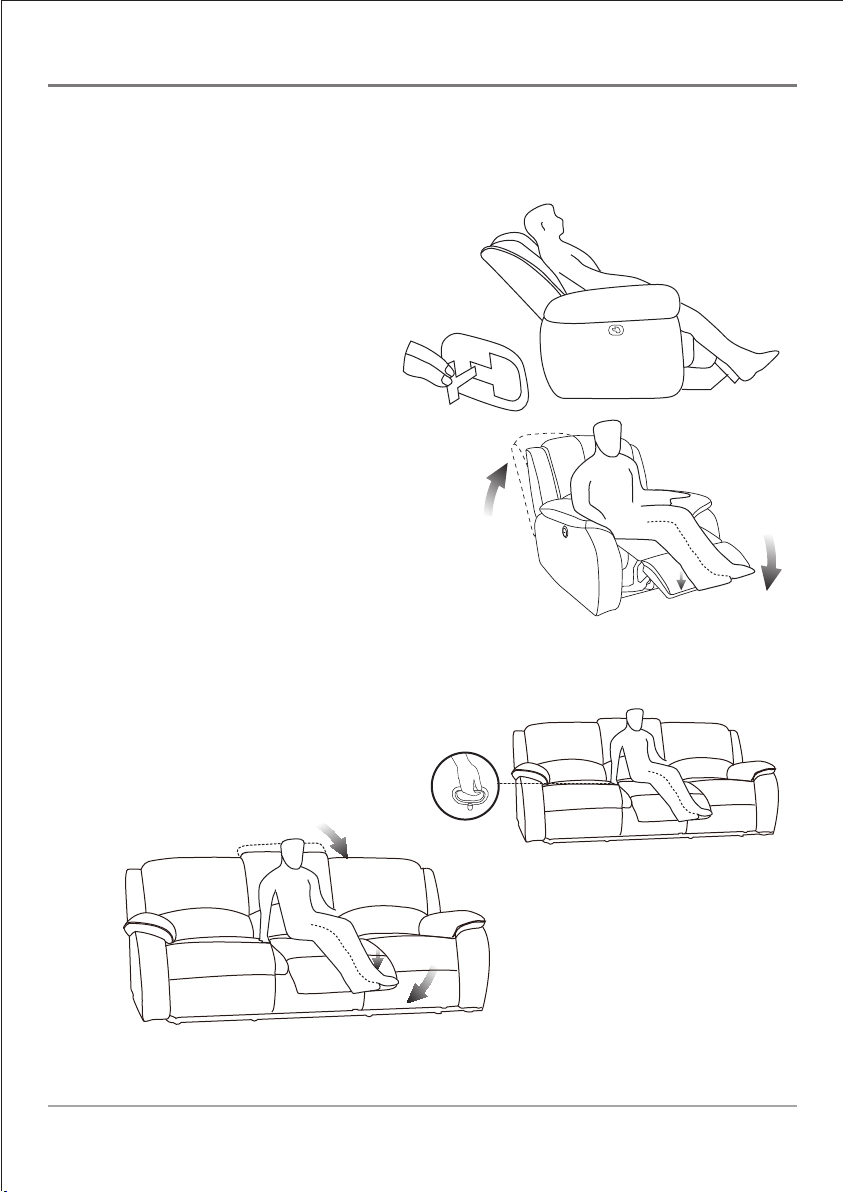
2) Reclining Furniture with manual mechanism
a) Armchairs with manual mechanisms are
operated by using the latch located on
the outside of the armrest. While seated,
pull on the handle to extend the legrest
and press back into the trunk of
the chair to recline the backrest
as demonstrated in Picture 1.
b) To return the armchair to its original
position, press legs into legrest and
move the trunk of the chair forward
as demonstrated in Picture 2.
● Armchairs with manual mechanism
● Armless chairs with manual mechanism
a) Armless chairs with manual mechanism are operated
by using the latch located on the seat side of the armless chair. While seated,
pull on the handle to
extend the legrest and press back into the trunk of the
chair to recline the
backrest as demonstrated in Picture 1.
b) To return the armless chair to its original
position, press legs into legrest and
move the trunk of the chair forward
demonstrated in Picture 2.
Picture 1
Picture 1
Picture 2
Picture 2

9
3) Armchairs and Sofas with Shiatsu Massage Mechanism
FULL BACK
UPPER BACK
LOWER BACK

10
1. POWER
Press this button once and the power button backlight will automatically light up.
Press any button to begin the massage functions.
Press the POWER button again to stop all massage functions.
2. DEMO
Press this button for a brief demonstration of the features of the Shiatsu massage
mechanism.
3. RECLINE/RESTORE
Power Recline Control Button for Backrest and Legrest.
Press and hold the RECLINE button to adjust the backrest and legrest to a
comfortable position. Release the RECLINE button to confirm the position.
Press and hold the RESTORE button to adjust the backrest and legrest to a
comfortable position. Release the RESTORE button to confirm the position
Note: The backrest and legrest move simultaneously.
4. FULL BACK
Full Back Massage Start/Stop Control Button
5. UPPER BACK
Upper Back Massage Start/Stop Control Button
6. LOWER BACK
Lower Back Massage Start/Stop Control Button
Note: The backlight of the remote controller will automatically light up when any
button on the remote is selected.
Insert the power cord plug into an electrical outlet.

Troubleshooting
05
The massage mechanism is controlled by a microcomputer and is susceptible to
power surges of +10 to –10%. The following situations may display in the event
of a power surge:
1. Make sure the massage mechanism
is plugged into a working outlet.
2. Turn the power OFF and then ON
again.
Check to see that the plug is well
connected and working.
The massage mechanism is
connected to the power supply
but is not functioning.
The remote controller works, but
the massage mechanism is not
functioning.
The massage mechanism may have
overheated due to prolonged use.
Turn off the power and allow the
massage mechanism to cool for
30-50 minutes.
Both the remote controller and the
massage mechanism are not
functioning.
Situation Solution
If you continue to have problems, please read the warranty card and contact the
COZZIA service department.
11

12
06 Product Maintenance
07 Warnings
Foam Padding
Polyurethane foam padding tends to soften over a period of three months as
pressure from use breaks down the micro-cells in the foam. Light creases may
also form on the leather cover during the first three months of use. These are
natural occurrences and do not require any type of maintenance.
Stain Removal Guide
1) Remove all stains by blotting the stain with a dry clean cotton towel. Do not rub
the stain.
2) Next, apply light pressure and circular movements to the stain with a new towel
that has been moistened with water and a neutral detergent.
3) Dry the cleaned leather surface with a soft towel.
Note:
A professional cleaner should be contacted for particular types of stains such as ink marks.
Please Note:
Leather is a natural material, so imperfections, grain and dye variations and natural
markings do not constitute a defect.
1) Do not use water and other cleaning detergents on the reclining furniture except
when following the stain removal guide.
2) Do not stack, stab, slit or harshly pull on the surface of the reclining furniture.
3) Gently press the buttons during operation and avoid hitting the buttons with
hard objects.
4) Do not use the recline function for more than one minute at a time. This action
could cause the motor to shut-off due to overheating. If this occurs, turn off the
massage mechanism for five minutes to restore the motor to correct functioning
before turning it on again.
5) Pull out the power supply plug after each use or when cleaning or performing
other operations.
6) Do not use the massage mechanism for more than 30 minutes at a time.
7) Do not allow children to play with the massage mechanism.
8) The adaptor is fixed on the bottom of the chair so do not need to connect it, just
insert the power cord plug into an electrical outlet.

13
08 COZZIA CONSUMER WARRANTY
COZZIA products have the following warranty:
COZZIA’s massage chairs,
massaging motion upholstery and home theater massage seating provide a one
year in-home service warranty and a two-year parts warranty. COZZIA customer
service will not issue Return Material Authorizations (RMAs) for products. COZZIA
products will be either repaired by the consumer or by an in-home technician.
COZZIA will not issue Return Material Authorizations (RMAs) for buyer’s remorse.
SERVICE AND TECHNICAL SUPPORT
Consumers may contact COZZIA’s customer service department at
877-977-0656
between 9:00 am to 5:00 pm EST, Monday through Friday for warranty or service
issues.
Consumers are required to provide the unit serial number and dated proof of
purchase (sales receipt) when they contact the COZZIA service department
regarding a repair.
A COZZIA customer service representative will attend to most consumer inquiries,
but in some cases a technical service specialist will provide advanced support.
Non-warranty repair is provided on a "per incident" basis. COZZIA customer service
will verify that the unit has failed and provide instructions for repairing a unit.
All applicable repairs, parts, shipping, handling, local tax and a "per incident" fee will
be charged for non-warranty repairs and support calls.
Proof of purchase (original receipt) is required for all warranty repairs or service.
PRODUCT REPAIRS
Many COZZIA product repairs may be performed by the consumer in their own
home with parts and instructions supplied by COZZIA such as remote controller
replacements that don’t require a technician.

14
Canadian consumers may contact COZZIA's customer service department at
877-977-0656
between 9:00 am to 5:00 pm EST
, Monday through Friday for
warranty or service issues.
●
Floor Models and Demonstration Units
have a prorated warranty period
that begins the day the model is placed on the floor and connected to an
electrical outlet by the retail partner. Proof of purchase is required in order
to obtain warranty service and parts. Non-warranty parts and service are
available at a “per incident” charge.
●
Warranty Coverage Period
- Warranty coverage starts at the time that the
consumer PURCHASES their chair. Proof of purchase is required for all
warranty repairs. The warranty time period is measured by continuous
calendar days based on a seven-day week.
●
Field Service
– COZZIA customer service department will diagnose and
schedule an authorized service provider to repair the chair in the
consumer's residence. Refer to Consumer Warranty as to which products
include field service.
●
Parts
- All parts deemed necessary for repairs will be shipped to the
consumer at no charge by the COZZIA service department.
CONSUMER WARRANTY LIMITATIONS AND EXCLUSIONS
● Warranties are only valid in the 48 contiguous United States and Canada
and are contingent upon the consumer operating the chair according to the
corresponding instruction manual.
● The warranty only applies to COZZIA products and does not include any
accessories or enhancements.
● Field service requires pre-approval and must be performed by COZZIA’s
authorized field service personnel. Field service is only available in the
United States and in major metropolitan areas in Canada.
● Softening of foams and filling composites in pillows, pads, and memory
foam occurs naturally and does not constitute a defect under this warranty.
● Fading, wear and piling of fabrics occurs naturally and does not constitute
a defect under this warranty.

15
● Natural markings, grain and dye variations in leather do not constitute a
defect under this warranty.
● Warranties do not cover any loss or damage resulting from improper
installation, unauthorized repairs or modifications, improper use of
electrical/power supply, loss of power, dropped product, a malfunction or
damage of an operating part from failure to provide manufacturer's
recommended maintenance, transportation damage, theft, abuse, misuse,
neglect, vandalism or environmental conditions (fire, floods, rust, corrosion,
sand, dirt, windstorm, hail, earthquake or exposure to weather conditions),
loss of use during the period the product is at a repair facility, or otherwise
awaiting parts or repair.
● Damage due to shipping and handling does not constitute a defect under
this warranty.
● Under no circumstance shall COZZIA or its representatives be liable for
indirect, consequential, or incidental damages (including damages for lost
profits, business interruption, bodily injury, medical and the like), even if
any party has been advised of the possibility of such damages.
● Warranties are non-transferable and shall be in lieu of any other warranty,
express or implied, including but not limited to any implied warranty or
merchantability or fitness for particular use.
● COZZIA’s sole liability and the purchaser's exclusive remedy shall be for
the repair, or at COZZIA’s option, for the replacement of the defective part.
Not withstanding the above, if replacements parts for defective materials
are not available, COZZIA reserves the right to make substitutions in lieu
of repair or replacement.
● All warranties begin on the DATE OF PURCHASE; no allowance or
extension is offered for delivery and/or installation.
●
Warranties do not apply to rental, business, commercial, institutional or
other non-residential users.

Product Serial No. (located on product):
Purchase Price: Model No:
Date Purchased:
First Name: Last Name:
Address:
City: State: Zip:
Phone:
Email:
Please mail to: 3280 Pointe Parkway
Suite #2400
Norcross, GA 30092
WARRANTY REGISTRATION FORM
Warranty Card
Table of contents
Other Cozzia Indoor Furnishing manuals


Popular Indoor Furnishing manuals by other brands

Dorel
Dorel ELMWOOD 5285096PCOMUK manual

Argos Home
Argos Home Tongue and Groove 326/3002 manual

Mocka
Mocka Dakota Console Table Assembly instructions

Astonica
Astonica Jilliano instruction manual

Furniture of America
Furniture of America CM6412-CH Assembly instructions

Astonica
Astonica Hadley IV instruction manual


