CR Clarke 1550 User manual

Product Data Sheet
1550 Diamond Edge Polisher
CR Clarke Data Sheet 1550 Diamond Edge Polisher.qxp_Brochure by SIGGA Design Ltd. 15/03/2017 8:50 am Page 1
Abbeon Cal, Inc., 1363 Donlon Street Unit 1, Ventura, CA 93003-8387
Operating Instructions

1550 Inst Issue 6 05/09/06
1
Operating & Maintenance Instructions
1550 Diamond Edge Polisher
Table of Contents
1. Introduction ............................................................................................................................................ 2
2. Health & Safety Information................................................................................................................... 3
3. Specifications......................................................................................................................................... 4
4. Positioning & Location ........................................................................................................................... 5
5. Electrical Supply & Connection.............................................................................................................. 6
6. Machine Controls................................................................................................................................... 7
7. To Polish an Edge.................................................................................................................................. 9
8. Accessing the Cutter Area ................................................................................................................... 10
9. Opening the Main Cabinet ................................................................................................................... 11
10. Changing a Cutter Hub ...................................................................................................................... 12
11. Cutting Principles............................................................................................................................... 14
Transport Parallelism.................................................................................................................. 15
Transport Pressure ..................................................................................................................... 16
Feed Track Alignment................................................................................................................. 17
Cutter Cover................................................................................................................................ 18
Spindle Tilt .................................................................................................................................. 19
Effect of Cutter Height – Cutter Too Low.................................................................................... 20
Effect of Cutter Height – Cutter Too High................................................................................... 21
Effect of Panel Thickness on Cutter Height................................................................................ 22
12. Cutter Height Adjustment................................................................................................................... 23
13. Maintenance ...................................................................................................................................... 25
14. Connection Diagrams ........................................................................................................................ 26
Abbeon Cal, Inc., 1363 Donlon Street Unit 1, Ventura, CA 93003-8387

1550 Inst Issue 6 05/09/06
2
1. Introduction
Edge finishing of acrylic, polycarbonate and similar thermoplastics can be a labour
intensive procedure using traditional techniques. Regeneration of the sawn edge
using the Diamond Edge Polishing technique produces a high quality, square and
gloss polished finish, cost effectively and without heat and stress. This results in
improved serviceability and will eliminate cracking problems if subsequently
cemented.
The 1550 Diamond Edge Polisher is the first UK designed and manufactured
machine for this process and will convert a good sawn edge to a polished edge at the
rate of, typically, one metre (40in) per minute.
The machine consists of three basic elements:
A high speed precision spindle, onto which is mounted a cutter hub fitted with two
polycrystalline diamonds and one single crystal diamond.
A transport system, which grips the material and passes it over the cutter.
An extraction system, which removes the swarf created by the polishing process.

1550 Inst Issue 6 05/09/06
3
2. Health & Safety Information
The 1550 Diamond Edge Polisher is fitted with interlock switches and sound
reduction to meet European legislation. The following points should be observed for
safe operation of the machine:
1. At no time should operators place their hands into the transport system
2. Always disconnect the machine from the mains supply before removing covers
3. Always wait for revolving parts to stop before attempting to adjust the machine
4. Always wear ear protection when using the machine
5. Never use the machine if any of the interlock switches are defective
6. Never attempt to bypass interlock switches
Should there be any queries regarding Health & Safety aspects of the 1550 please
refer back to the manufacturer or their nominated representative.
1550 Inst Issue 6 05/09/06
4
3. Specifications
Mechanical specification
Maximum material thickness 50mm (2in)
Spindle speed (maximum) 20,000 rev/min
Spindle speed (minimum) 12,000 rev/min
Feed rate 1) For general commercial finish 1-2m/min (40-80in/min)
2) For maximum quality finish 0,5m/min (20in/min)
In and out feed track length 1220mm (48in)
Maximum sheet size (typical) 1850 x 900mm (72in x 36in)
Cutting tools –roughing 2 x polycrystaline synthetic
diamonds
Cutting tool - finishing 1 x Monodie 4mm (0.2in)
single crystal diamond
Stock removal per pass 0.75mm (0.030in)
Weights and Dimensions
Width x Depth x Height (mm) 2375 x 572 x 915
Width x Depth x Height (in) 93.5 x 22.5 x 36
Weight 410kg (902lb)
Electrical specification UK / Europe USA
Voltage 220-240 208-220
Frequency 50Hz 60Hz
Current - max 7.75A 9.13A
Watts - spindle motor 550W 550W
Watts - transport motor 150W 150W
Watts - Vacuum motor 900W 900W
Noise Emissions
Noise Level 80dB (normal) 85dB (full load)

1550 Inst Issue 6 05/09/06
5
4. Positioning & Location
The 1550 weighs 410kg (902lb), and therefore needs to be positioned by
mechanical means. The machine can be lifted either:-
1. Under the main frame
2. Using the lifting holes drilled in the wings of the machine
3. Under the wings
Diagram 1. Lifting Points
Do not attempt to lift the machine other than by the approved lifting points
Option 1 is ideal when lifting the machine directly using a fork lift truck or hand
pumped truck.
Options 2 and 3 should be used when lifting the machine with slings.
The machine has four adjustable feet and it is important that it is sited on a firm,
preferably concrete, floor, for maximum rigidity. It need not be secured to the floor
or, necessarily, truly level but at least one of the feet must be adjusted and locked
with the foot adjustment locking nut such that all four feet are taking equal weight and
there is absolutely no evidence of instability.

1550 Inst Issue 6 05/09/06
6
5. Electrical Supply & Connection
The electrical specification of your new machine is as follows:-
Voltage 240V AC 50Hz (standard)
220V AC 60Hz (North America)
Current (max) 7.75A / 9.13A
Watts (max) 1860W / 2000W
Electrical supply to the machine must be in accordance with the details shown on the
rating label. As the colours of the wires in this mains lead may not correspond with
the coloured markings identified in your plug appliance, should the plug need to be
changed proceed as follows:-
Standard Specification
The wire which is coloured green and yellow must be connected to the terminal
which is marked with the letter E or by the earth symbol or coloured green and
yellow or green.
The wire which is coloured blue must be connected to the terminal which is marked
with the letter N or coloured blue or black.
The wire which is coloured brown must be connected to the terminal which is
marked with the letter L or coloured brown or red.
North American Specification
The wire which is coloured green must be connected to the terminal which is marked
with the letter E or by the earth symbol or coloured green and yellow or green.
The wires which are coloured black and white must be connected to the silver
coloured terminals. Polarity is unimportant.
!!IMPORTANT!!
THIS EQUIPMENT IS FITTED WITH FILTERING TO COMPLY WITH
ELECTROMAGNETIC LEGISLATION. THESE FILTERS WILL BE DESTROYED BY
FLASH TESTING. SHOULD A FLASH TEST BE CARRIED OUT ON THIS EQUIPMENT
DISCONNECT MAINS FILTER BEFORE PROCEEDING
Should there be any queries regarding the electrical requirements of the 1550
please refer back to the manufacturer or their nominated distributor.

1550 Inst Issue 6 05/09/06
7
6. Machine Controls
All of the machine controls are located on the front control panel as shown in
Diagram 3 below.
Diagram 3. Machine controls
1. Emergency Stop Buttons. Disable all machine movements. Push to operate.
Twist buttons to release.
2. Mains Neon. Illuminates when machine Mains Switch (3) is in the On (I)
position.
3. Mains Switch. I = On. O = Off. No power is available to the machine controls
unless in the I position.
4. Fuse–Control. Provides overload protection for the Control Circuit. Rating =
500mAF.
5. Fuse-Spindle. Provides overload protection for the Spindle Motor. Rating =
2A-T.
6. Fuse-Transport. Provides overload protection for the Transport Motor.
Rating=5A-T.
7. Machine Functions On-Off Button. Pressing I switches on Spindle, Transport
and Extraction systems. Pressing O switches these functions off.
8. Speed Control – Transport. Adjusts Feed Rate of material through machine.
9. Speed Control – Spindle. Adjusts Spindle speed.
10.Phase Invertor Display. Provides display of spindle frequency. 50.0Hz =
20,000rpm. 30.0Hz = 14,000rpm. The display can also be used to configure
the phase invertor. This procedure should only be carried out with guidance
from the Technical Staff of the supplier or distributor.

1550 Inst Issue 6 05/09/06
8
11.Extraction Over-ride Switch. Switches on the Extraction system only, e.g. for
swarf clearance while changing cutter hubs.
12.Hour Counter – Machine. Counts the Total Number of machine running
Hours. This Counter cannot be reset.
13.Hour Counter – Cutter Hub. Counts the machine running hours, but can be
reset by pressing the black push button inside the control enclosure (see
Diagram 4 below). This counter can be used to monitor cutter life, and should
be reset when the cutter hub is changed.
Diagram 4. Cutter Hour Reset Button

1550 Inst Issue 6 05/09/06
9
7. To Polish an Edge
Your machine will be supplied set up with a cutter hub and ready to polish. To polish
an edge proceed as follows:
Select your piece of material
The 1550 will accept pieces of material of thicknesses up to 55mm. Should you wish
to polish thinner materials, these can be polished as packs up the 55mm maximum.
The minimum panel size which should be polished is 100mm square. The ends of
longer rods or bars of material can also be polished, but care should be exercised.
The 1550 will polish most thermoplastic materials. It must be noted however that
cutter life will vary depending upon the characteristics of the material being polished.
Cutter life can be improved by adjusting the transport and spindle speed to suit the
material. These adjustments should be made as follows:
Spindle
Harder materials – e.g. Cast Acrylic 50Hz (Max Speed)
Softer materials - e.g. PETg, Polycarbonate 30Hz (Min Speed)
Transport
Harder materials - e.g. Cast Acrylic Speed 2-3
Maximum speed that does not
chip the edge
Softer materials - e.g. PETg, Polycarbonate Maximum speed
Switch on the machine as described in Section 7 above. Set the spindle and
transport speeds and start the motors.
Load the material vertically onto the infeed (left hand) track.
Push the material until the transport system grips it and starts to feed it into the
machine.
At this stage, let go of the material, and let the machine transport it over the cutter
and polish the edge.
Once the material has been released from the transport, remove and inspect.
Note that the piece being polished must have exited the transport system before the
next piece is loaded. Failure to observe this could result in damage to the cutters.
After use, switch off the machine.

1550 Inst Issue 6 05/09/06
10
8. Accessing the Cutter Area
The cutter area is accessed by opening the transport systems. Remove the four cap
head screws (1) and (2) in Diagram 5 below. Note that screws (1) are much longer,
as they extend down to contact interlock microswitches beneath.
Diagram 5. Transport Securing Screw Positions
Once the screws have been removed the transport assemblies can be pivoted open
(Diagram 6 below).
Diagram 6. Transport Systems Opened
1550 Inst Issue 6 05/09/06
11
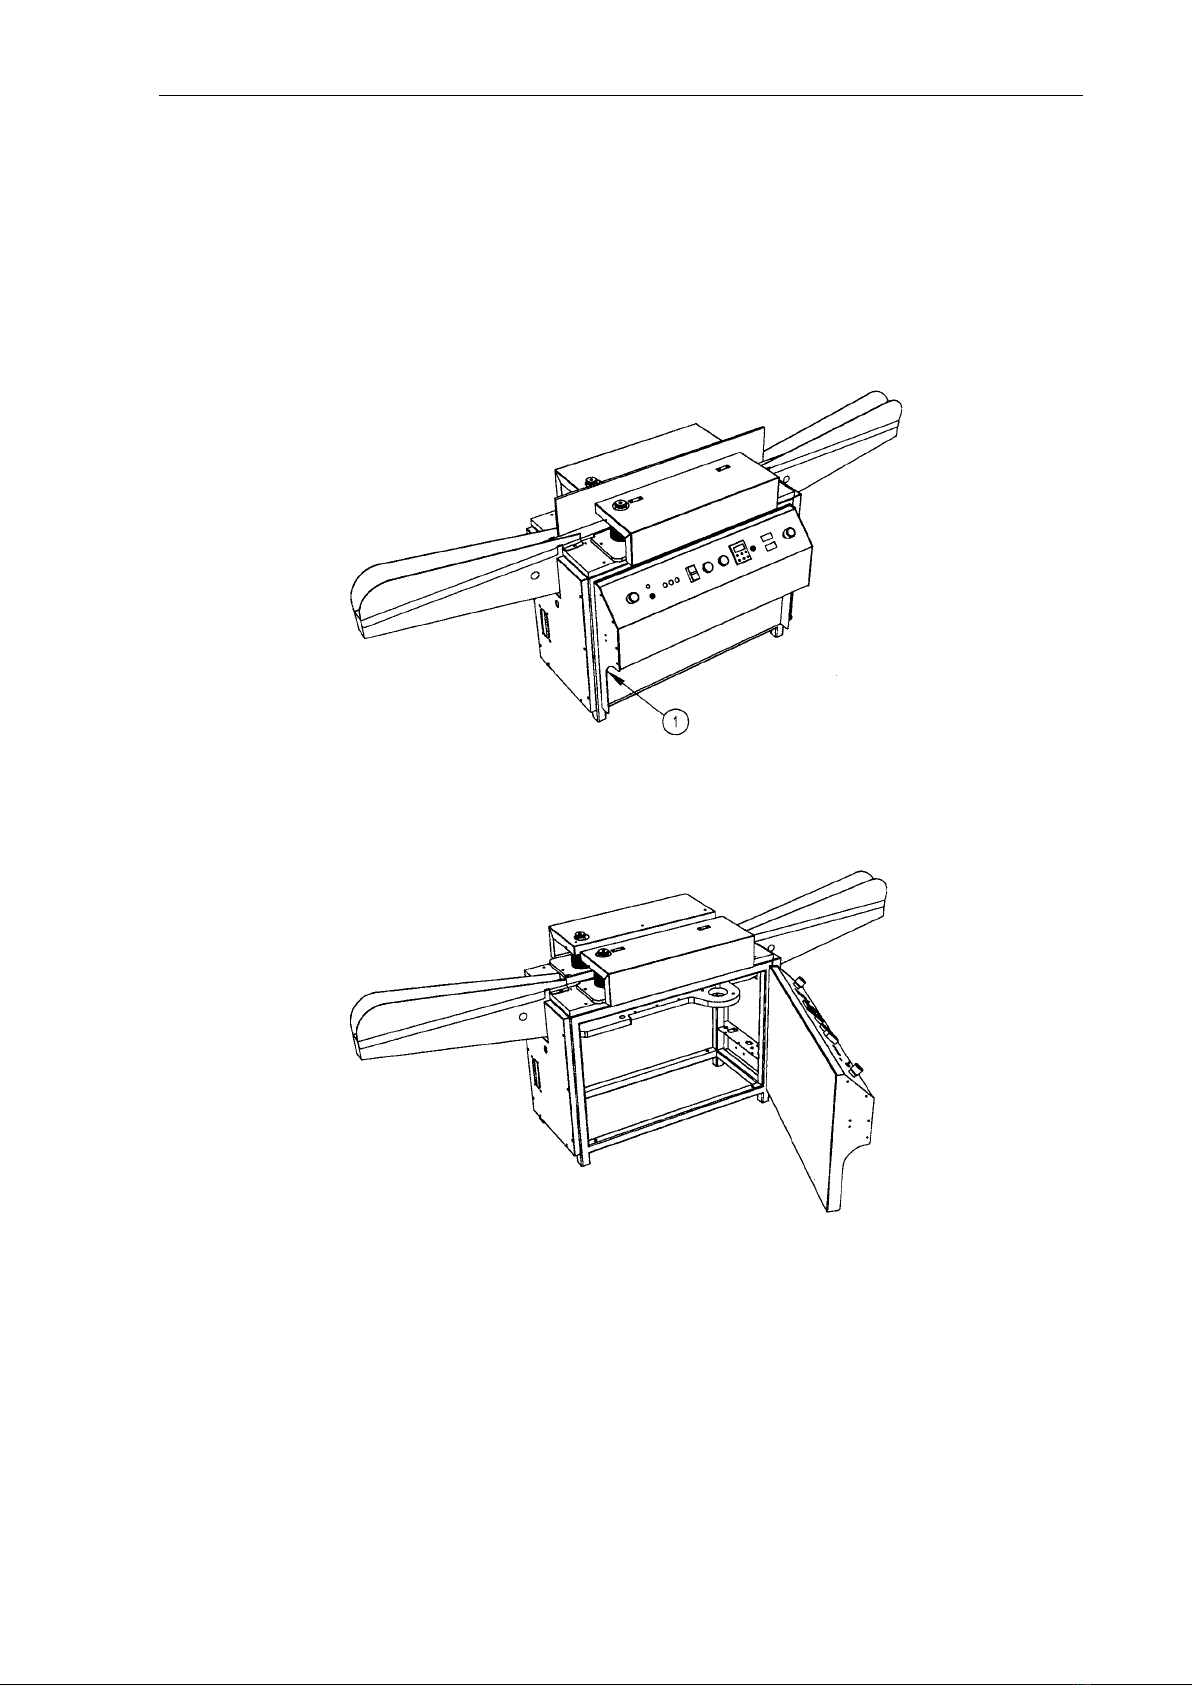
9. Opening the Main Cabinet
The control enclosure across the front of the machine is hinged from the right hand
side. There is a single handwheel (1) in Diagram 7 below) which must be unscrewed.
The control enclosure will then hinge open giving access to internal adjustments (see
Diagram 8 below). Note that the control enclosure is fitted with an interlock switch.
Diagram 7. Position of Handwheel for Opening Main Cabinet
Diagram 8. Main Cabinet in Open position

1550 Inst Issue 6 05/09/06
12
10. Changing a Cutter Hub
Access the cutter area as shown in Section 9 above.
Remove the 3 screws [(1) in Diagram 9 below] which secure the cutter cover. Lift the
cutter cover off the machine.
Diagram 9. Removal of Cutter Cover
Remove the central screw [(1) in Diagram 10 below] from the cutter hub
Diagram 10. Removal of Cutter Securing Screw

1550 Inst Issue 6 05/09/06
13
Screw on the cutter shield, and using a 4mm Hexagon Key tighten the central grub
screw until the cutter hub is released from its taper.
Remove the old cutter hub.
Clean the taper on the spindle, and the tapered bore of the new hub.
Remove the shield from the new hub and locate it onto the spindle.
Refit the central securing screw, ensuring that the washer is fitted under the head.
Refit the cutter cover.
Close the transport assemblies.
Cutter hubs are optically set so that they will be +/0 05mm. Therefore the machine
can be run straight after a cutter change. However, for optimum results the cutter
height should be checked and adjusted after each change. Refer to Section 13 for
details of checking cutter height.
N.B. It is imperative that the Diamonds are not touched during the
changing procedure. Any contact with the diamonds could result in a
chip on the cutting edge which could destroy polishing quality.
Never attempt to clean the diamonds, other than with a clean
compressed air blast.

1550 Inst Issue 6 05/09/06
14
11. Cutting Principles
The 1550 removes 0.75mm of material from the stock being polished. When dealing
with these small amounts, machine adjustments become imperative to optimum
performance. Below is a description of the machine adjustments which are available.
Should the machine not be performing, these checks should be carried out in the
order they are set out. This will usually restore polishing quality.

1550 Inst Issue 6 05/09/06
15
Transport Parallelism
The transport pressure plates are spring loaded to accommodate material
thicknesses from 3-50mm (0.125”-2”). The plates are mounted on linear guides, and
therefore will not twist to conform to the material. For this reason, it is important to
ensure that the pressure plates are parallel, so that the material being polished is
gripped all the way through the polishing operation.
To check and adjust transport parallelism:-
Select a piece of extruded material, thickness approximately 6mm, size approximately
450mm x 200mm.
Feed the material into the transport system, 25mm above the feedtrack level.
When equal amounts of material protrude from either side of the transport system,
switch off.
Rock the material, to check that it is being gripped equally across the transport
system.
Diagram 11. Checking for even Clamping
In the case of uneven clamping, remove the material, open the transport system and
adjust the parallel setting using the cap screws (1) in Diagram 12 below.
Diagram 12. Position of Adjuster Screws for Parallelism
Close transports and re-check.
Note : when closing transport systems always ensure that the heads of the adjusting
cap screws contact their stop point on the machine. Always adjust the transports
equally to ensure that material is fed parallel to the feed tracks.

1550 Inst Issue 6 05/09/06
16
Transport Pressure
Material to be polished is loaded vertically onto the infeed track. The transport
system grips the material and transports it across the cutter (arrow 1 in Diagram 13
below). The transport also applies a gentle downward pressure (arrow 2 in Diagram
13 below) This ensures that the material is supported by the smooth surfaces of the
feed tracks.
Diagram 13. Transport Pressure
To check & adjust transport pressure:-
Open transport systems
Turn the knurled knobs on the adjusters (1) below anticlockwise until they go slack.
Turn clockwise until they just tighten.
Note position of brass marker on scale.
Turn adjuster clockwise 3.25 turns.
Ensure that this is carried out on both front and rear transports. Do not adjust while
transports are closed – the driveshafts will contact the top deck of the machine and
give an incorrect setting. Ensure that thrust washers are correctly located on their
pins (2 in Diagram 14 below).
Diagram 14. Adjustment of Transport Pressure

1550 Inst Issue 6 05/09/06
17
Feed Track Alignment
The machine removes 0.75mm of material per cut. If the feed tracks were level, the
material would be unsupported once it was polished. This would cause the material
to fall onto the outfeed track as it left the transport and could mark the finish on
longer pieces. Therefore, the outfeed track is ground 0.75mm higher than the infeed
track. This height difference ensures that material is supported throughout the
cutting process.
This element is critical to machine performance and must be appreciated in order to
understand some of the principles below. It is not, however, adjustable by the user.

1550 Inst Issue 6 05/09/06
18
Cutter Cover
The cutter cover extends the feed tracks over the cutter aperture, supporting the
material, which improves finish quality. The left hand section (1 on Diagram 15
below) is level with the infeed track. The central and right hand sections (2 on
Diagram 15 below) are level with the outfeed track.
The cutter cover is precision ground and individually fitted to each machine on
assembly. It is not adjustable by the user.
Diagram 15. Principles of Cutter Cover

1550 Inst Issue 6 05/09/06
19
Spindle Tilt
The cutting action takes place on the left hand side of the cutter revolution. To avoid
leaving “backswipes”, or witness marks from the right hand side of the cutter, the
spindle is tilted to 0.14°. This leaves approximately 0.3mm of clearance between the
cutter and the material on the right hand side of the cutter revolution.
The spindle tilt means that the edge that is cut by the machine is slightly convex. This
would be measured as approximately 0.025mm over the full 55mm thickness
capacity and can therefore be overlooked in terms of tolerancing.
Spindle tilt is factory set and should not be adjusted under any circumstances.
Diagram 16. Spindle Tilt
Table of contents


