Pacific SeaRay 175HD Installation and operation manual

READ THIS BOOK
This operator’s book has important information for the use
and safe operation of this machine. Read this book care-
fully before starting the machine. Keep this book and tell
all operators to read the book. If you do not follow the
instructions, you can cause an injury or damage equipment,
furniture or buildings.
For new books write to:
Pacific
2259 S. Sheridan
Muskegon, MI 49442-6252
Carefully inspect all components to ensure that there is no
concealed freight damage. If such damage is discovered,
file a “CONCEALED DAMAGE REPORT” immediately
with the delivering carrier.
The contents of this manual are based on the latest product
information available at the time of publication. Pacific
reserves the right to make changes or improvements to its
machines without notice.
FOR YOUR CONVENIENCE, RECORD THE
MACHINE MODEL AND SERIAL NUMBER:
MODEL_______________________________
SERIAL NUMBER______________________
PART NUMBER_________________________
DATE PURCHASED_____________________
OPERATING & MAINTENANCE
INTRODUCTION INSTRUCTIONS
Heavy Duty Polisher
SeaRay 175HD

IMPORTANT SAFETY INSTRUCTIONS
To assure the safe operation of this machine, you must read and understand all warnings and instructions in this book. If you
do not understand, ask your supervisor.
READ ALL INSTRUCTIONS BEFORE USING THIS MACHINE
WARNING: To reduce the risk of fire, electric shock, or injury:
1. You must be trained to operate this machine. This machine is to be operated for its intended use only.
2. Do not operate this machine unless it is completely assembled.
3. Always use a three-wire electrical system connected to the electrical ground. For maximum protection against electrical
shock, use a circuit that is protected by a ground fault circuit interrupter. Consult your electrical contractor.
4. To prevent electric shock, always remove the electrical plug from the electrical outlet before doing any repairs or mainte-
nance and when leaving the machine unattended.
5. To prevent electric shock, keep the machine surface dry. Do not subject to rain. Store the machine in a dry building area.
Clean the machine with a dry cloth only.
6. Machines can cause an explosion when near flammable materials and vapors. Do not use this machine with or near fuels,
grain dust, solvents, thinners, or other flammable materials. Do not use flammables to clean this machine.
7. A qualified or authorized person must do maintenance and repairs.
8. To prevent damage to the power cord, do not move this machine over the power cord. Always lift the power cord over the
machine. Do not pull or carry cord, use cord as a handle, close a door on cord, or pull cord around sharp edges or corners.
Keep cord away from heated surfaces.
9. Do not use with damaged cord or plug. If the machine is not working as it should, has been dropped, damaged, left outdoors,
or dropped into water, return it to a service center.
This machine must be grounded. If it should malfunction or break down,
grounding provides a path of least resistance for electric current to reduce
the risk of electric shock. This machine is equipped with a cord having an
equipment-grounding conductor and grounding plug. The plug must be
inserted into an appropriate outlet that is properly installed and grounded
in accordance with all local codes and ordinances.
WARNING - Improper connection of the equipment-grounding conductor
can result in a risk of electric shock. Check with a qualified electrician
or service person if you are in doubt as to whether the outlet is properly
grounded. Do not modify the plug provided with the machine - if it will not
fit the outlet, have a proper outlet installed by a qualified electrician.
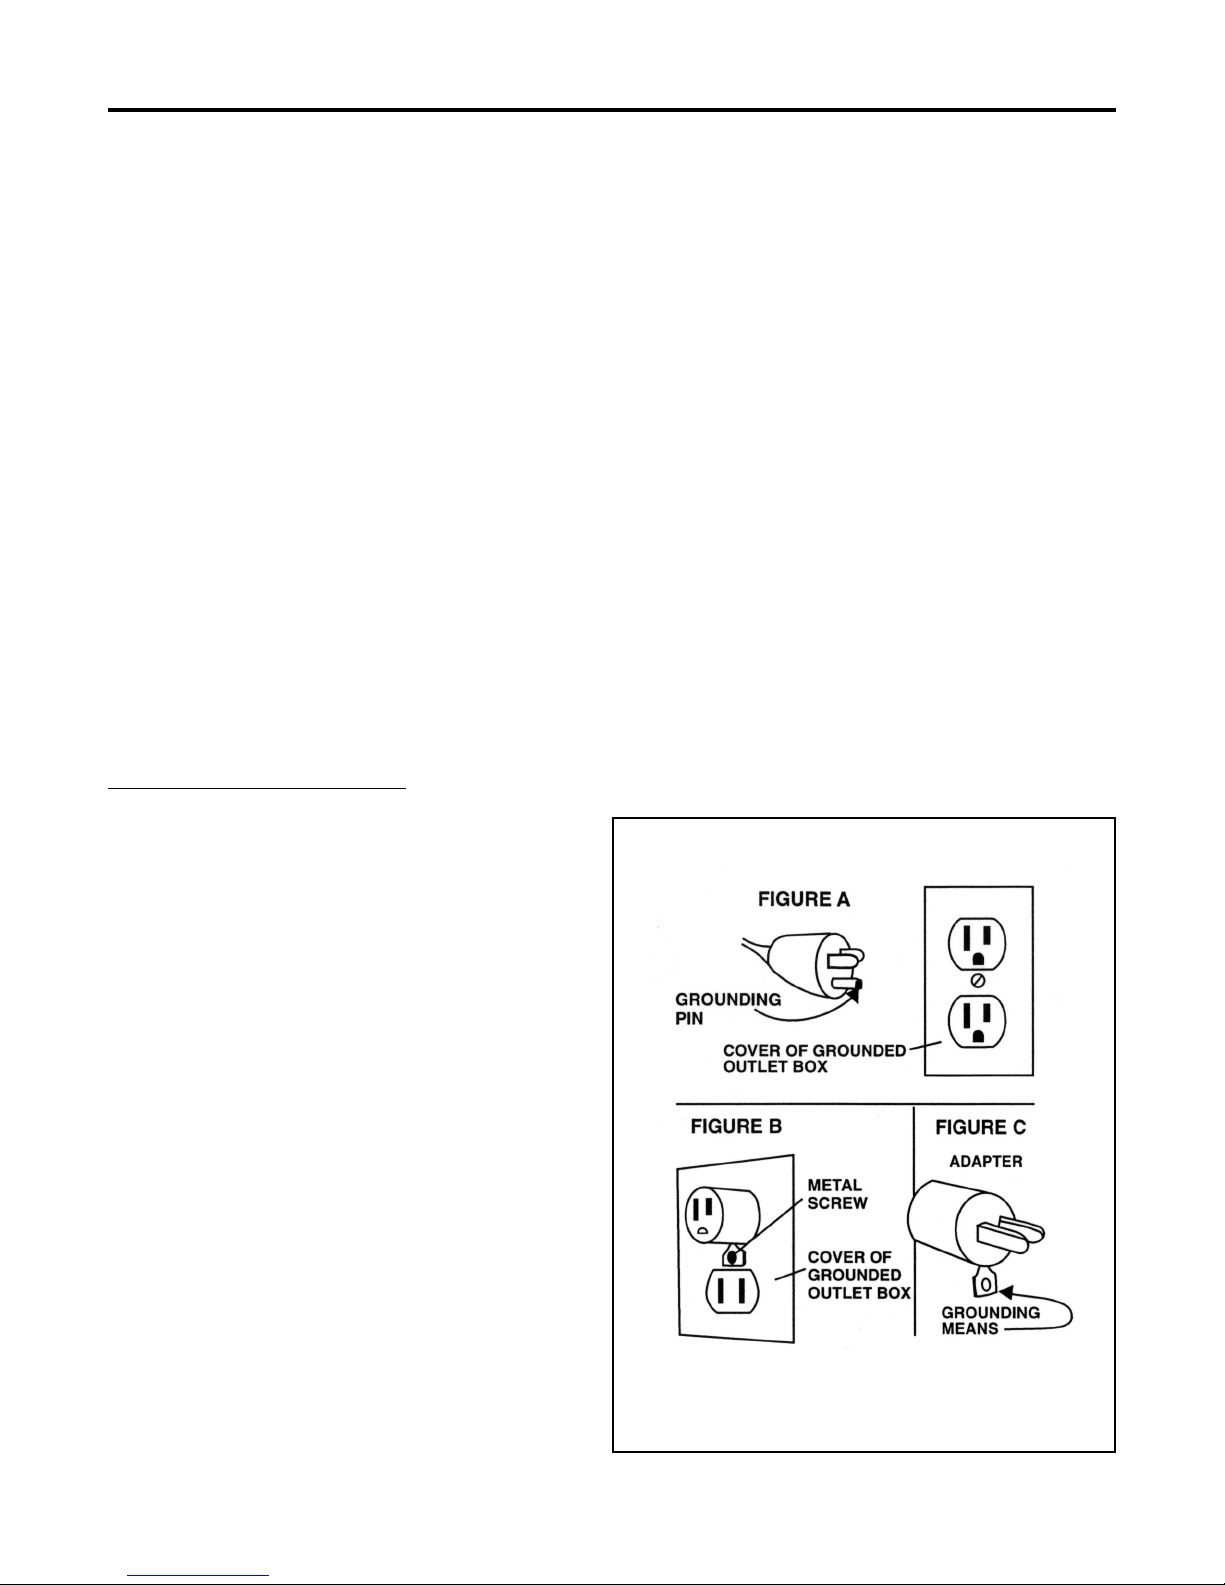
This machine is for use on a nominal 120-volt circuit, and has a grounded
plug that looks like the plug illustrated in figure A. A temporary adapter
that looks like the adapter illustrated in figures B and C may be used to
connect this plug to a 2-pole receptacle as shown in figure B if a properly
grounded outlet is not available. The temporary adapter should be used only
until a properly grounded outlet (figure A) can be installed by a qualified
electrician. The green colored rigid ear, lug, or the like extending from
the adapter must be connected to a permanent ground such as a properly
grounded outlet box cover. Whenever the adapter is used, it must be held
in place by a metal screw.
NOTE: In Canada, the use of a temporary adapter is not permitted by the
Canadian Electrical Code
EXTENSION CORDS
Use only three-wire 12/3 or larger gauge approved extension cords that have
three-prong grounding type plugs and three-pole receptacles that accept the
appliance’s plug. Replace or repair any damaged cords or plugs.
When servicing, refer to authorized person only. Use only identical
replacement parts.
Grounding Instructions
NOTE: Do not use adapters shown in figures B & C in Canada
2

OPERATING PROCEDURES
WARNING! For the safe operation of this machine
follow the instructions given in this manual and the
training given by your supervisor. Failure to do so can
result in personal injury and/or damage to machine and
property!
DO NOT OPERATE MACHINE IN AN EXPLOSIVE
ENVIRONMENT!
This machine is intended for commercial use.
PREPARATION
To prepare the machine for operation, make sure it is of
correct voltage and properly assembled.
Your new floor machine operates in the normal side to side
motion of a conventional single disc machine. Be prepared
before starting by removing all obstructions or other obsta-
cles in the area to be cleaned. Check the proper application
recommendations and procedures found on the label of your
cleaning or finish container. IF IN DOUBT, CALL
YOUR SUPERVISOR .
WARNING! NEVER USE THIS MACHINE WITH
FLAMMABLE OR EXPLOSIVE MATERIAL!
For Scrubbing or Polishing: Select the correct floor
pad or brush (your supplier can help you). If in doubt, ask
your supervisor.
NEVER OPERATE THE MACHINE WITHOUT THE
FLOOR PAD OR BRUSH INSTALLED!
To properly attach the brush, UNPLUG THE FLOOR
MACHINE, place the handle in the vertical position, then
tilt the machine back until the handle rests on the floor.
Straddle the handle, facing the motor, and grasp the brush
with the block toward you. Place the brush or pad clutch
plate over the three lugs on the motor drive adapter. Twist
the brush right to lock it into position. To remove the brush,
UNPLUG THE MACHINE and follow the same procedure
as above, but by twisting the brush off with a firm jerk to the
left. Remove the brush or pad driver when the machine is
not in use. This will help prevent brush damage and reduce
wobble problems.
OPERATION
Plug the machine’s power cable into a properly grounded
outlet (see Safety Instructions). Next, adjust the handle
height to a comfortable position.
Pull out on the “Watch Dog” Safety Lock button and start
the machine by depressing either the left or right switch
levers.
Both hands should be placed on the handle when the machine
is in operation. The machine will glide sideways over the
floor by a slight raising and lowering of the handle. Raise
the handle slightly to go to the right. Lower the handle
slightly to go left. Releasing the switch lever stops the
machine at once.
MAINTENANCE
AFTER EACH USE: Store the machine in a clean dry
area. Wipe the entire machine and cord down with a clean
cloth. Remove the pad or brush and clean thoroughly. Wrap
the machine’s electrical cord onto the handles and the cord
hook provided. CHECK the cord and plug for nicks, cuts or
damage. Report these to your supervisor for correction.
WARNING! Always disconnect the machine’s electrical
plug from the electrical outlet before performing any
service, maintenance, pad changing or inspection of the
machine.
3

SeaRay 175HD
4
1
28
2
3
5
4
67
8
9
10
11
12
13
14 15
16 17 18
19
20
21
22
24
23
26
25
29
27
30
30
31
32
33
19
34
38
19
36
35
37
41
40
39
44
43
50 49
50
52 51
53
54
55
48
36
47

SeaRay 175HD Parts List
WHITE WHITE
BLACK BLACK
GREEN GREEN
MOTOR
HANDLE
SWITCH
(COM)
(COM)
(N.O.)
(N.O.)
POWER
SUPPLY
CORD
HANDLE
CORD
SWITCH
HOUSING
SINGLE PHASE
GROUNDED
POWER SUPPLY
115 VOLTS
60 HERTZ
GROUND
5
SeaRay 175HD; Part Number 485494TE
ITEM PART NO. DESCRIPTION QTY. ITEM PART NO. DESCRIPTION QTY.
1 504810 Interlock Asm.-Switch 1 26 962005 Screw, 1/4-20 x 3/8 Set 1
2 962011 Screw, 10-32 x 3/4 Oval Hd. 2 27 504420 Cord Hook 1
3 962002 Screw, 10-32 x 1/2 Oval Hd. 2 28 505010 Turn Knob 1
4 980018 Washer, #10 Countersunk 1 29 980007 Washer, 5/16 Flat 2
5 486404 Switch Cover Plate 1 30 500840 Handle Brace 2
6 509821 Washer, Rubber 2 31 502021 Clamp-Handle 1
7 920005 Nut, 3/8-24 Hex 1 32 962009 Bolt, Carriage 5/16-18 x 2-1/2 1
8 508020 Switch Assembly 1 33 908004 Handle Cord 1
9 505120 Lever, Switch Right 1 34 509920 Yoke, Handle 1
10 505121 Lever, Switch Left 1 35 507480 Rod-Yoke 1
11 920001 Nut, 10-32 Elastic Stop 1 36 980002 Washer, 1/4 Lock 6
12 509830 Washer, Handle Tube 1 37 482304 Cover, Capacitor Box 1
13 503320 Flange, Strain Relief 1 38 483402 Gasket 1
14 505720 Handle Nipple 2 39 481306 Capacitor Box 1
15 481304 Switch Box 1 40 482303 Drip Cover 1
16 515150 Warning Label 1 41 485202 Motor 1
17 501210 Bumper, Handle 1 43 503537 Gear Asm.Complete 1
18 962003 Screw, 10-32 x 3/4 Pan Hd. 1 44 481202 Bumper, Grey 1
19 962006 Screw, 1/4-20 x 1/2 Pan Hd. 6 47 980004 Washer, 1/4 Flat 4
20 503711 Handle Grip, Grey 2 48 962010 Screw, 1/4-20 x 1HH 4
501501 Cap, Protective End 2 49 W502D Nut, 1/2-13 Hex 2
21 980015 Washer, #10 Ext. Tooth 2 50 980005 Washer, Wave 2
22 962015 Screw, 10-32 x 3/8 Pan Hd. 2 51 509781 Wheel, 1/2 x 5 Grey 2
23 508520 Strain Relief-Complete 1 52 509820 Washer, Fiber 2
502020 Strain Relief-Brass Clamp 1 53 487702 Wheel Axle 1
24 502422 Cord Asm.- Yellow 1 54 483215 Base Frame, Black 1
25 509082 Handle Tube 1 55 962016 Screw, 10-32 x 3/8 Set 1
5/18/2004

6
SEARAY 175HD MOTOR & GEAR ASSEMBLY
PARTS LIST
ITEM PART NO. DESCRIPTION QTY.
48520
2
Motor Only, 1.5HP 115V 60CY 1
Baldor #05E611W619G1
483101 Stator Assembly
480401 Rotor Assembly
481306 Capacitor Box (Item 39)
483401 Gasket between Capacitor Box & Motor
908090 Cord Asm.
486604 Endplate
960038 Thrubolts
483001 External Fan
482303 Drip Cover (Item 40)
482304 Cover, Capacitor Box (Item 37)
483402 Gasket, Cover (Item 38)
911238 Run Capacitor
91128
0
Start Capacitor
50353
7
Gear Asm.-11:1 for 1.5 HP-3 Plane
t
1
1 902007 Bearing, Ring Gear 1
2 504213 Ring Gear Housing-11:1 1
3 902016 Bearing, Needle B-86 1
4 902005 Bearing 1
5 503511 Gear - Idler 3
6 504218 Gear Housing - 3 Idler 1
7 503519 Pinion, 11:1 1
8 507701 Shaft - Idler 3
9 902016 Bearing, Needle B-86 1
10 502317 Cover - Ring Gear 1
11 902015 Bearing 1
12 902005 Bearing 1
13 Screw, 10-24 x 3/4 Pan Hd 6
14 508211 Spacer 1
15 506604 End Plate 1
16 507309 Ring - Retaining 1
17 502402 Coupler, Steel 1
18 925006 Dowel 2
19 Washer, 1/4" Lock 6
20 96416
9
Scre
w
6

7
503537 GEAR ASSEMBLY ILLUSTRATION
12
16
18
20
17
15
19
14
11
13
10
7
6
4
9
8
3
2
5
1

WARRANTY POLICY
POLISHER MODEL SEARAY 175HD
The Pacific Polisher has been manufactured, tested and inspected in accordance with specific engineering requirements and is
WARRANTED to be free from defects in workmanship and materials as follows:
Five (5) years parts, One (1) year labor - AC Motor and Gear Unit, except motor switch and capacitors which have a one (1)
year waranty.
Five (5) years parts, One (1) year labor - Castings
One (1) year parts and labor - All other components unless excluded below.
This warranty extends to the original user/purchaser and only when used, operated and maintained in accordance with Pacific
Operating and Maintenance instructions.
This warranty does not apply to the following wear parts and accessories of the machine including:
Part Number Part Name
Nor does it apply to damage or failure caused by improper use, abuse or neglect. Warranty credit or replacement of return parts
including motors, etc., is subject to incoming inspection of those items.
To secure repair under this warranty, the following procedure should be taken:
• The inoperative machine or warranted parts must be delivered to the authorized dealer with shipping and delivery charges
prepaid. If unable to locate the Dealer, you may contact Pacific at the address listed herein for the location of the nearest
Pacific repair center or agent or for other instructions pertaining to your warranty difficulty.
• Upon compliance with the above warranty procedure, all warranted repairs would be completed at no additional charge or
cost to the user.
• Only Pacific or its authorized dealers and agents may make no charge warranty repairs on this product. All others do so at
their own risk.
This warranty limits Pacific liability to the repair of the product and/or warranted parts replacement and does not include inci-
dental or consequential damages arising from the use of a Pacific machine whether defective or not.
This warranty is in lieu of all other expressed or implied warranties and is extended to the original purchaser/user.
05/04
Cord Assembly
Wheel, 5”
Handle Grip, Grey
Bumper
485614
502422
509781
503711
481202
2259 Sheridan
Muskegon, Michigan 49442
Ph: (800) 968-1332 Fax: (231) 773-1642
www.nextwaveofclean.com
Table of contents
Other Pacific Sander manuals

Pacific
Pacific SeaRay 175DS Installation and operation manual

Pacific
Pacific SEARAY LOW MOISTURE Installation and operation manual

Pacific
Pacific SeaRay 133 Installation and operation manual

Pacific
Pacific Wolverine PF7 System manual

Pacific
Pacific Rhino PFS 8 System manual

Pacific
Pacific SeaRay 175HD Installation and operation manual

Pacific
Pacific Rhino PFS 8 System manual

Pacific
Pacific SEARAY 175 Installation and operation manual

Pacific
Pacific Sea Ray 170 Manual

Pacific
Pacific P-20 Installation and operation manual