Crane Merchandising Systems ICON User manual

Part Number: PR15937000 Issue: A - 09/2017
Technical Manual
II COTI / ICON
EC Declaraon of Conformity
We Crane Merchandising Systems (UK),
Of Pipsmore Park, Bumpers Farm Industrial Estate, Chippenham, Wiltshire, UK,
SN14 6NQ
Declare that:
Type of Equipment: Beverage Vending Machine
Model Name: COTI / ICON
Has been designed and manufactured to comply with all essenal requirements of the
following Regulaons/Direcves:
2006/95/EEC The Low Voltage Direcve and its amending direcves
2004/108/EEC The Electromagnec Compability Direcve and its
amending direcves
on materials and arcles intended to come into contact
with food relang to plasc materials and arcles intended
to come into contact with food stus
The Essenal Requirements of the European regulaons for CE marking applicaon are:
1. Mechanical resistance and stability
2. Safety in case of re
3. Hygiene, health and the environment
4. Safety in use
5. Protecon against noise
6. Energy economy and heat retenon
Tests have been performed by accredited cercaon bodies in accordance to the
following specicaons:
Low Voltage Direcve: EN 60335-1:2002+A1:2004+A11:2004+A12:2006+A2:2006+
A13:2008
EN 60335-2-75:2004+A1:2005+A11:2006+A2:2008+
A12:2010
EMC Direcve: EN 55014-1:2006+EN55014+A1:2009+A2:2011
EN 55014-2:1997+A120
EN 61000-3-2:2006+A1/A2:200 EN 61000-3-3:2008
EN 61000-4-2:2009 EN 61000-4-3:2012 EN 61000-4-4:2004
EN 61000-4-5:2006 EN 61000-4-11:2010
With regard to hygiene for foodstus in locaon, the operator must comply with
852/2004/EEC which lays out the general and specic hygiene rules to ensure a high level
of consumer protecon with regard to food safety.
Gillian White
Vice President, General Manager Global Coee
Date: 01/07/2017:
REG. (EC) 1935/2004
REG. (EC) 10/2011
Technical Manual III
Introducon / Important Informaon
The following Symbol is used throughout this Manual:
Safety First! Take care, risk of personal injury.
Crane Merchandising Systems accepts no responsibility for damage caused to the
equipment through misinterpretaon or misuse of the informaon contained in this
manual.
© Copyright 2017 Crane Merchandising Systems
Introducon
This manual provides you with guidance on the installaon, daily operaon and basic
maintenance of your COTI/ICON freestanding vending machine. Crane Merchandising
Systems always recommend that a trained technician service its equipment.
Crane Merchandising Systems is commied to connuous product improvement. This
means that the informaon within this document although correct at me of publicaon,
is for guidance only and may be subject to change without prior noce.
Important Safeguards
Always follow these basic safety precauons when
operang or maintaining your machine:
1. Ensure that you and anyone who operates or
maintains your machine have this manual available
for quick and easy reference, read all instrucons
carefully before commencing work.
2. Beware of Electricity Certain maintenance
operaons require your machine to remain
connected and switched on. Only trained personnel
should carry out these rounes, and independently
of all other operaons. Observaon of safe working
pracces in accordance with current regulaons is
necessary at all mes.
Important! Unless otherwise specied always
disconnect your machine from the electricity supply
before commencing work.

IV COTI / ICON
Introducon / Important Informaon
3. Servicing the Heater Tank/Espresso pressurised water
system
Important! Water in this machine can exceed 99°C.
Water at this temperature can cause severe injury.
Espresso machines may be ed with a pressurised
water system, under no circumstance should this be
dismantled other than by a fully trained engineer.
4. Do not operate your machine if any part is damaged
unl a service technician has carried out necessary
repairs and ensured that it is safe.
5. Beware of moving components when servicing the
machine.
6. Allow your machine to cool before handling or
moving.
7. Never immerse your machine in water or any other
liquid and never clean it with a water jet.
8. If your machine should freeze up, call a service
technician before switching it back on.
9. In machines ed with carbonator units the CO2
bole is lled with gas at up to 800psi and MUST be
secured in an upright posion. In the event of a leak,
venlate the area in the vicinity
10.Ensure that you are familiar and adhere to the most
recent Health and Safety at Work and Electricity at
Work Regulaons.

Technical Manual V
Introducon / Important Informaon
Important! This appliance is not intended for use by
persons (including children under 8 years old and the
inrm) with reduced physical, sensory or mental
capabilies or lack of experience and knowledge.
Unless they have been given supervision or instrucon
concerning use of the appliance by a person
responsible for their safety and they fully understand
the hazards involved.
Children should be supervised to ensure that they do
not play with the appliance.
Children must not carry out any cleaning of
maintenance of the machine.
Your COTI/ICON machine is for indoor use only and
because it is a beverage machine should be sited in a
clean and hygienic area.

VI COTI / ICON
Table of Contents
Table of Contents
Secon 1 - Machine Specicaons ...................................................................... 1
1.1 Specicaons - COTI .......................................................................... 1
1.2 Specicaons - ICON.......................................................................... 2
1.3 Water Filter ....................................................................................... 2
1.4 External Features - COTI .................................................................... 3
1.5 External Features - ICON.................................................................... 4
1.6 Internal Features - COTI..................................................................... 5
1.7 Internal Features - ICON .................................................................... 6
Secon 2 - Installaon .......................................................................................... 7
2.1 Sing Your Machine .......................................................................... 7
2.2 Connecng the Water Supply ........................................................... 8
2.3 Connecng the Electrical Supply ...................................................... 9
2.4 Commissioning Procedure ................................................................ 10
2.5 Seng Up the Carbonator Unit (Where Fied) ............................... 14
2.6 Cup Drop Unit Set Up ........................................................................ 16
2.7 Sck Srrer Adjustment (Where Fied) ........................................... 17
2.8 Warranty Card ................................................................................... 18
Secon 3 - Navigaon and Programming Mode ................................................. 19
3.1 Navigaon - COTI .............................................................................. 19
3.2 Navigaon - ICON .............................................................................. 20
3.3 Program Entry ................................................................................... 21
3.4 Navigang through the Menu Display ............................................. 21
3.5 Accessing the Programming Mode ................................................... 22
3.6 Entering or Updang Parameters ..................................................... 22
Secon 4 - Customising the User Interface ......................................................... 24
4.1 Images ................................................................................................ 24
4.2 Image Locaons - COTI ..................................................................... 25
4.3 Image Locaons - ICON ..................................................................... 27
4.4 USB Sck Contents ............................................................................ 29
4.5 Copy USB Sck Contents ................................................................... 29
4.6 Select the Image for Display.............................................................. 31
4.7 Remove Content from Machine........................................................ 33
4.8 Edit the Product Name and Descripon ........................................... 34

Technical Manual VII
Table of Contents
4.9 Congure Generic Content ............................................................... 35
4.10 Standby Screen ............................................................................... 36
4.11 Allergens .......................................................................................... 41
4.12 Nutrion Info ................................................................................... 42
4.13 Operator Manuals ........................................................................... 45
4.14 ADA Mode (COTI machine only) ..................................................... 45
4.15 Addional User Interface Opons .................................................. 45
Secon 5 - Engineer’s Program ............................................................................ 47
5.1 Menu Structure Overview ................................................................ 47
5.2 Main Menu ........................................................................................ 52
5.3 Data Recall ......................................................................................... 52
5.4 Diagnoscs ........................................................................................ 55
5.5 Test .................................................................................................... 56
5.6 Price ................................................................................................... 61
5.7 Product Conguraon ....................................................................... 63
5.8 Menu Setup ....................................................................................... 73
5.9 Free Vend .......................................................................................... 74
5.10 Money ............................................................................................. 74
5.11 System Sengs ............................................................................... 78
5.12 Security Codes ................................................................................. 84
5.13 Timed Events ................................................................................... 85
5.14 Leave Service Applicaon ............................................................... 88
5.15 Machine Reboot .............................................................................. 88
Secon 6—Service Keypad Funcons .................................................................. 89
Secon 7 - Technical Informaon ........................................................................ 92
7.1 Water Services .................................................................................. 92
7.2 Hot Water System ............................................................................. 92
7.3 Ingredient Dispense .......................................................................... 92
7.4 Mixing System ................................................................................... 93
7.5 Moving Dispense Head ..................................................................... 93
7.6 Cup Dispense Unit ............................................................................. 93
7.7 Waste Level Probes ........................................................................... 94
7.8 CoEx Brewer (Espresso Machines) ................................................... 94
7.9 Oltre Brewer ...................................................................................... 94
7.10 Power Supply Units ......................................................................... 95

VIII COTI / ICON
Table of Contents
7.11 Mains Filter ...................................................................................... 96
7.12 Coin Mechanism Transformer (Oponal Extra) ............................. 96
7.13 Coin and Card/Key Systems ............................................................ 96
7.14 Change Giver ................................................................................... 96
7.15 Card/Key System ............................................................................. 96
Secon 8– Espresso System ................................................................................. 98
8.1 Example Vend .................................................................................... 98
8.2 System Overview ............................................................................... 98
Secon 9- Dispense Pipe Lengths ........................................................................ 102
9.1 To Replace Pipes ............................................................................... 102
Secon 10 - Diagnoscs and Maintenance Procedures ...................................... 104
10.1 Diagnoscs ...................................................................................... 104
10.2 Heater Tank De-Scale Procedure .................................................... 110
10.3 System Drain Down - Espresso Machines Only ............................. 111
10.4 CoEx Brewer/Bean Grinder Maintenance - Espresso Machines ... 113
Secon 11- Electrical/Electronics Informaon .................................................... 118
11.1 Touch Screen—COTI ........................................................................ 118
11.2 Touch Screen - ICON ........................................................................ 119
11.3 Control Board—Atlas H Board......................................................... 120
11.4 Control Board Connecons—Atlas H Board ................................... 121
11.5 Input/Output Board......................................................................... 123
11.6 Input Circuit 1................................................................................... 124
11.7 Input Circuit 2................................................................................... 125
11.8 Output Circuit 1................................................................................ 126
11.9 Output Circuit 2................................................................................ 127
11.10 Power Circuit—Instant & Freshbrew Machines ........................... 128
11.11 Power Circuit—Espresso Machines............................................... 129
11.12 Heater Circuit ................................................................................. 130

Technical Manual IX
Table of Contents
1COTI / ICON
Secon 1 - Machine Specicaons
Secon 1 - Machine Specicaons
1.1 Specicaons - COTI
General
Height 1830 mm Depth 785 mm
Width 700 mm Weight 184 kg
Cup Capacity
Cup Type Cup Capacity #
150ml plasc squat 7oz plasc squat 800
150ml plasc tall 7oz plasc tall 750
150ml paper tall 7oz paper tall 665
180ml plasc 9oz plasc 650
180ml paper 9oz paper 575
250ml paper 12oz paper 400
*Approximate and are for guidance only.
Electrical Services
Voltage 220 - 240 Volts
AC Current 13 Amp Fused
Frequency 50/60 Hz
Water Services
Pressure 200 kPa (2 Bar) - 600 kPa (6 Bar)
Stopcock 15 mm BSP from rising main
All weights and dimensions are approximate
and are for guidance only.
Sound Levels
A-weighted sound pressure level is below
70dB.

Technical Manual 2
Secon 1 - Machine Specicaons
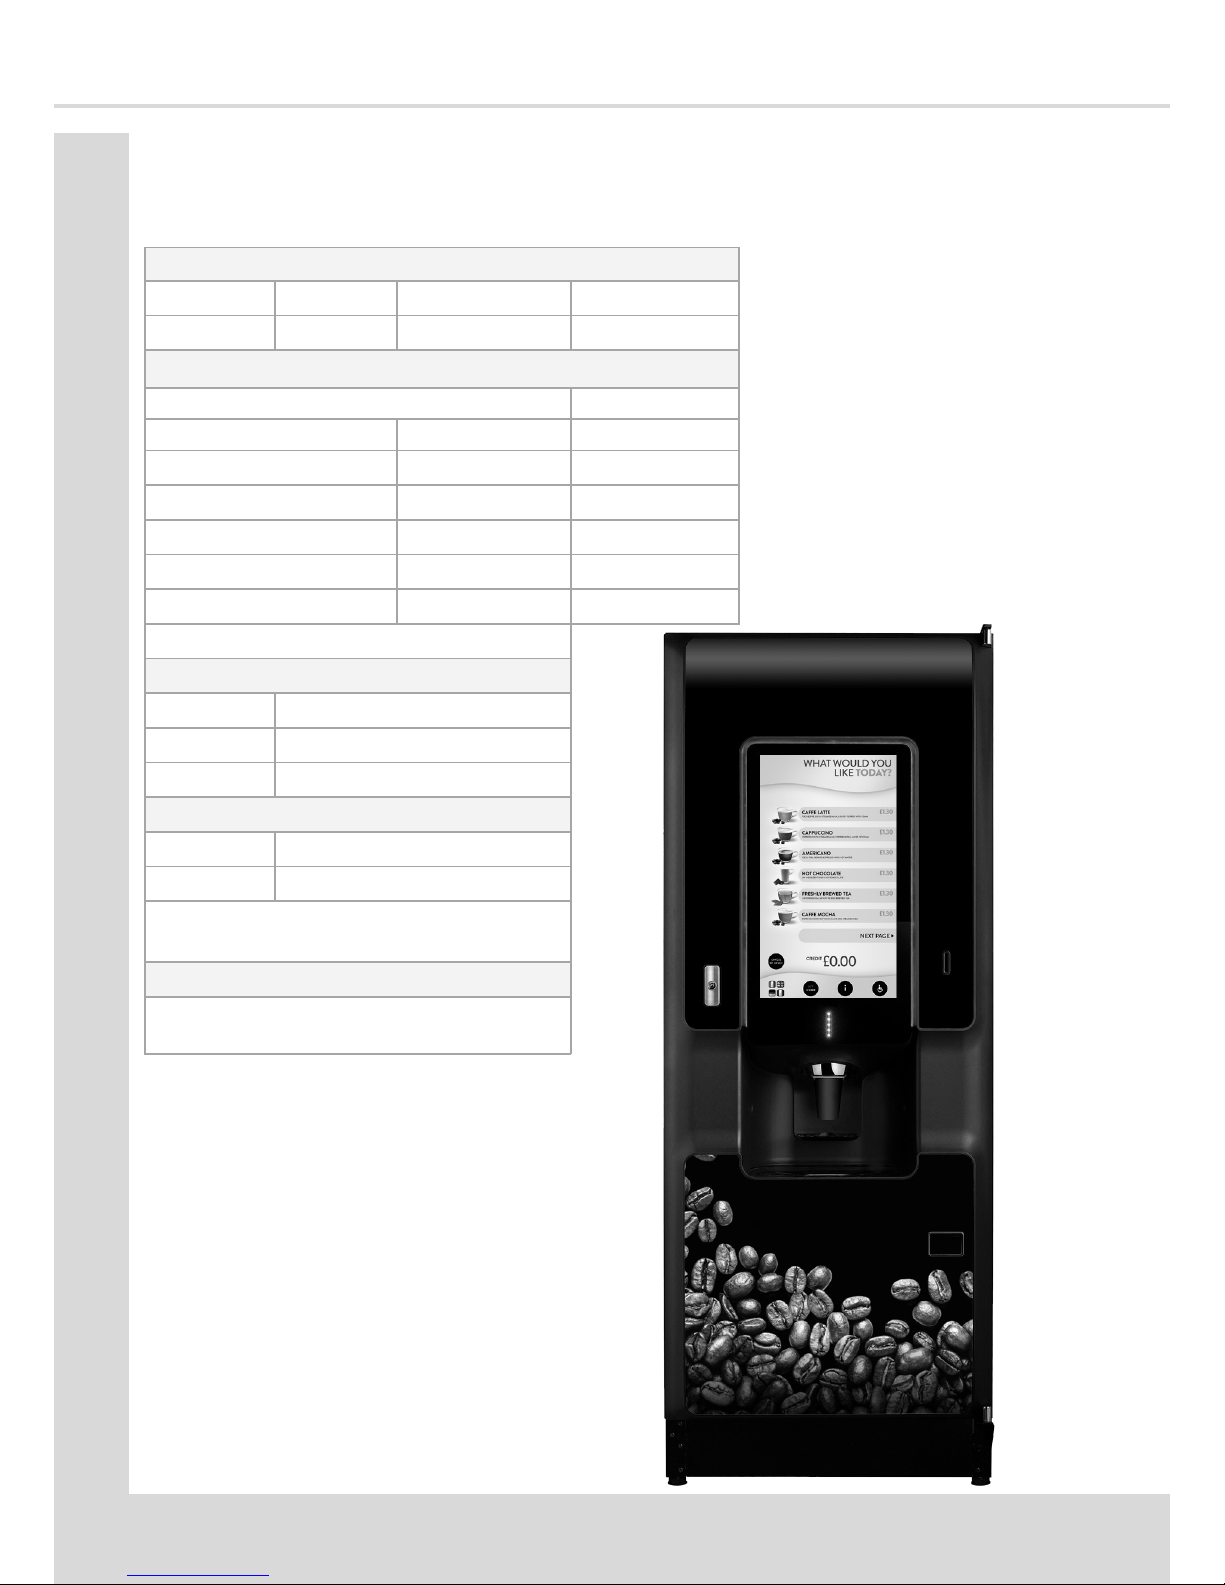
1.2 Specicaons - ICON
1.3 Water Filter
If your machine is ed with a CoEx® Espresso and/or
Oltre Freshbrew brewer, then it must be connected to
the water supply via a scale inhibing water lter.
Crane Merchandising Systems recommend and supply
the Brita and Cuno ranges of water lters.
General
Height 1830 mm Depth 790 mm
Width 700 mm Weight 193 kg
Cup Capacity
Cup Type Cup Capacity #
150ml plasc squat 7oz plasc squat 800
150ml plasc tall 7oz plasc tall 750
150ml paper tall 7oz paper tall 665
180ml plasc 9oz plasc 650
180ml paper 9oz paper 575
250ml paper 12oz paper 400
*Approximate and are for guidance only.
Electrical Services
Voltage 220 - 240 Volts
AC Current 13 Amp Fused
Frequency 50/60 Hz
Water Services
Pressure 200 kPa (2 Bar) - 600 kPa (6 Bar)
Stopcock 15 mm BSP from rising main
All weights and dimensions are approximate
and are for guidance only.
Sound Levels
A-weighted sound pressure level is below
70dB.

3COTI / ICON
Secon 1 - Machine Specicaons
1.4 External Features - COTI
Key:
1Door 6Drip Tray
2Touch Screen 7Adjustable Foot
3Door Lock 8Coin Entry
4Cup Staon 9Cup Stand
5SureVend™ Sensor 10 Coin Return Cup

Technical Manual 4
Secon 1 - Machine Specicaons
1.5 External Features - ICON
Key:
1Door 6SureVend™ Sensor
2Display Screen 7Drip Tray
3Drink Selecon Menu 8Adjustable Foot
4Door Lock 9Coin Entry
5Cup Staon 10 Cup Stand
11 Coin Return Cup
5COTI / ICON
Secon 1 - Machine Specicaons
1.6 Internal Features - COTI
Key:
1Main Switch 10 Kick Plate
2Service Keypad 11 Waste Bucket (liquids)
3Cup Turret 12 Waste Bucket (solids)
4Cup Dispense Unit 13 Dispense Head
5Door Locking Mechanism 14 Brewer
6Cup Catcher 15 Mixer
7SurevendTM Sensor 16 CoEx Brewer
8Drip Tray 17 Ingredient Canisters
9Drip Catcher

Technical Manual 6
Secon 1 - Machine Specicaons
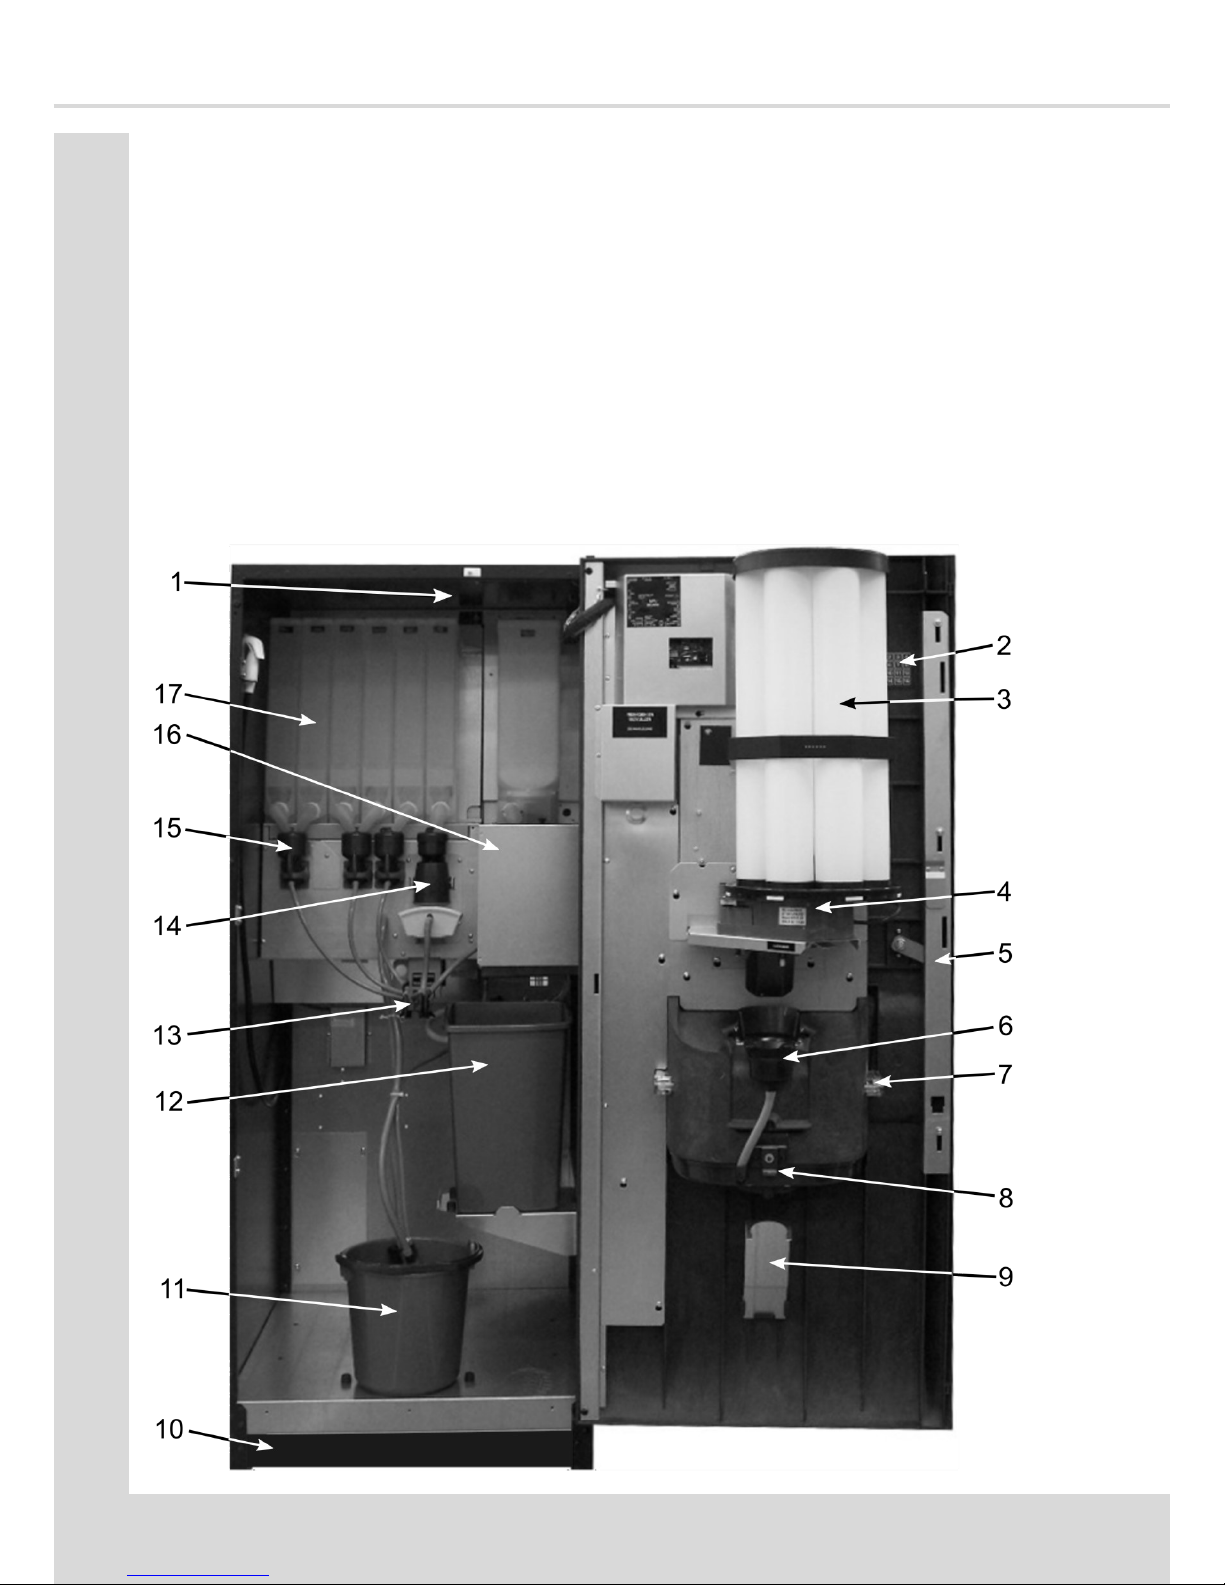
1.7 Internal Features - ICON
Key:
1Main Switch 10 Kick Plate
2Cup Turret 11 Waste Bucket (liquids)
3Service Keypad 12 Waste Bucket (solids)
4Cup Dispense Unit 13 Dispense Head
5Door Locking Mechanism 14 Brewer
6Cup Catcher 15 Mixer
7SurevendTM Sensor 16 CoEx Brewer
8Drip Tray 17 Ingredient Canisters
9Drip Catcher

7COTI / ICON
Secon 2 - Installaon
Secon 2 - Installaon
Important! It is essenal that the personnel
responsible for installing and servicing your machine,
understand the following:
1. The installaon and commissioning of your machine
should only be carried out by a trained and
authorised service technician.
2. All water and electrical services must be correctly and
safely connected in compliance with naonal and
local regulaons.
3. All covers must be replaced correctly and securely
and your machine le in a safe condion.
2.1 Sing your Machine
1. Your machine is only suitable for indoor use. We
recommend that it be situated in an area with an
ambient temperature not below 10º C and not
exceeding 30º C. Your machine should be located
near the appropriate water and electrical services,
refer to Secon 1.1 Specicaons.
2. It must also not be sited in an area where a water jet
could be used.
3. Prior to placing your machine in its nal locaon,
ensure that there is sucient access space available
via passageways, stairs, lis, etc.
4. Ensure that access to the machine is restricted to
personnel who have knowledge and praccal
experience of the appliance, in parcular as far as
safety and hygiene are concerned.

Technical Manual 8
Secon 2 - Installaon
5. To ensure adequate venlaon, 100 - 150 mm (4 - 6
inches) clearance must be allowed between the back
of the cabinet and the wall.
6. Open the door using the key provided. Remove
transit packing and installaon kit. Check for visual
signs of damage which may have occurred during
transit. If your machine is damaged or any parts are
missing, you must contact the supplier immediately.
7. Level your machine in both the front-to-back and
side-to-side planes by adjusng the feet. Ensure that
the door opens and closes easily and the lock
operates correctly.
2.2 Connecng the Water Supply
1. Your machine should be situated within 1 metre of a
drinking water supply from a rising main, terminang
with a W.R.C. approved 15mm compression stop-tap.
N.B. The water supply should comply with both local
and naonal regulaons.
Dynamic water pressure at the stop-tap must be
within the limits 200—600 kPa (2—6Bar).
2. Freshbrew & Espresso Machines: COTI/ICON
machines ed with a Oltre freshbrew brewer or
CoEx® brewer must be connected to the water supply
via a water lter. This lter must be of food grade
quality and able to remove temporary hardness
(scale), heavy metals (lead, copper, iron, cadmium),
chlorine and any organic pollutant’s/discolouraon.
9COTI / ICON
Secon 2 - Installaon
Warning! If your Freshbrew or Espresso machine is
connected to a water supply and used without a
water lter as specied above, your warranty will be
void.
3. Connect the exi-hose supplied with your machine to
the stopcock. Flush the water supply before
connecng the machine.
N.B. When connecng your machine to a water
supply always use the new exi-hose as supplied with
the machine. Never re-use an exisng hose.
4. Connect the hose to the inlet located on the rear of
your machine. Ensure that the seal is correctly ed.
Ensure that all water supply ngs are ght.
5. Turn on the water supply at the stop tap and check
for leaks.
2.3 Connecng the Electrical Supply
Safety First!
The electrical safety of this appliance can only be
guaranteed if it is correctly earthed. The manufacturer
declines all liability for damage resulng from a system
which has not been earthed. On no account should it be
earthed only to the water supply pipe.
The appliance must be connected to a 200—230V
50/60Hz 13 amp fused switched socket outlet. Installed to
the latest edion of the IEE regulaons, using a 3 pin BS
approved 13 amp fused plug for UK and in compliance
with Naonal and European regulaons on electrical
safety in other countries.

Technical Manual 10
Secon 2 - Installaon
Important: If any internal fuses become damaged or
fail in any way they must be replaced by the correct
fuse available from the manufacturer quong the
informaon wrien on the label adjacent to the
relevant fuse-holder.
Important: If the mains lead becomes damaged in
any way it must be replaced by a lead available from
the manufacturer.
2.4 Commissioning Procedure
A trained installaon engineer must carry out the
following procedure before the machine can be used for
the rst me. Ensure that the electrical and water
services to the machine are connected correctly. Check
for leaks in the water supply.
1. Open the front door of your machine.
2. Ensure that the waste bucket is ed correctly. Clip
the level probe and overow pipes correctly onto the
rim of the bucket.
3. Cup Turret. Unbox the cup tubes and lid and t in
place, then ll with the correct size cups for the cup
catcher ed to the machine. Allow the cups to drop
into the tubes directly from the packaging. DO NOT
touch the cups with your hands .
Important: Do not ll the tube directly above the cup
dispense posion. Allow the cup turret motor to
rotate a full tube to the cup dispense posion.
Rotang the cup turret by hand will damage the
mechanism.

11 COTI / ICON
Secon 2 - Installaon
Note: If you are using paper cups, rst inspect each
sleeve for damage to the cup rims. Damaged cups
must not be used.
4. The cup turret mechanism will index the rst
available cups to the dispense posion and drop the
cup stack into the cup drop mechanism. Fill the
remaining empty cup stack with cups and replace the
lid.
5. All Models: The water inlet valve will open and the
heater tank will start to ll. As the water heats,
ensure that no water overows from the heater tank
overow pipe into the waste bucket. Check the
system for leaks.
6. Instant & Freshbrew Machines: As heater tank lls
and heats, ensure that no water overows from
overow pipe into the waste tray.
7. Espresso Models: The machine will pump
approximately 400ml of water through the system
which will be heated to operang temperature.
Note: The machine has a safety cut-out which will
only allow the heater tank to ll for a maximum of
two minutes. If aer soware power-up the heater
tank has not lled within this me, the mains power
supply should be switched o and then on again to
reset the heater tank me-out.
Important: Should the machine fail to ll correctly or
leak, turn o the stopcock and the power to the
machine before invesgang the fault.
This manual suits for next models
1
Table of contents
Popular Coffee Maker manuals by other brands


Mr. Coffee
Mr. Coffee BVMC-KG6 user manual

Mr. Coffee
Mr. Coffee 403 Series Installation and operating instructions

Magic Chef
Magic Chef MCSCM12TB instruction manual

Magic Chef
Magic Chef MCCM1NB12 manual

Quickmill
Quickmill Michelangelo 07000 operating instructions

MACCHIAVALLEY
MACCHIAVALLEY JAVA Installation & maintenance