cre8audio NiftyCASE User manual

User Manual
Updated April 14th 2021
Checking connections
Welcome to NiftyCASE! Before powering your NiftyCASE for the first time we
recommend checking that everything is in order connection-wise and that nothing has
moved during transit.
Carefully unscrew and remove any modules and blank panels with the included Allen
key and ensure that the IDC bus cable is firmly connected to the mainboard. Check that
the smaller FFC flat cable (then one between the main board and I/O connector
circuitboard) is also firmly in place. Reseat the cable(s) if necessary.
Here is a video about checking connections
https://www.cre8audio.com/checking-connections

Installing modules
Always turn off NiftyCASE before adding or removing modules.
Handling modules that are powered can lead to damage.
Observe the following picture for the correct cable orientation. The red line on the
cables should always match (facing down).
Use the supplied tool to remove and replace the screws.
NiftyCASE uses M3 (3mm) thread screws.

Quick Start
Controlling NiftyCASE with a MIDI keyboard
Suppose you have a VCO (voltage controlled oscillator) installed in NIftyCASE and you
wish to change the pitch of said module using a MIDI keyboard. In this quick start we’ll
suppose that you are using our chipz module.
Step 1:
Connect a DIN5 MIDI cable between NiftyCASE and your MIDI keyboard.
Connect one end of the cable to the MIDI output of your keyboard and connect the other
end to the MIDI input of NiftyCASE (labelled “midi in”).
Step2:
Connect NiftyCASE to an audio mixer or sound interface using a ¼” mono (aka TS)
audio cable. Connect one end of the cable to the “audio out” jack at the rear of
niftyCASE and the other end to the input jack of your mixer or audio interface.
Step 3:
Connect a ⅛” mono (aka TS) patch cable between the CV1 output of NiftyCASE and
the top tune input jack of Chipz (chip1). The cable will be used to change the tune/pitch
of your module.
Step 4:
run another ⅛” mono (aka TS) patch cable from the top “out” jack of your chipz module
to either of the “to out” input jacks. This cable will carry the audio signal out of chipz and
through to your mixer or audio interface via the rear “audio out” jack.
Step 5:
Power on both NiftyCASE and your keyboard. Check that your MIDI keyboard output
channel is set to 1.
Step 6:
Play away! The NiftyCASE led will blink as you press keys, and the cv1 output voltage
will change as new notes are sent from your MIDI keyboard, the tune/pitch of chipz will
update accordingly.

Controlling NiftyCASE with a Software Sequencer AKA
DAW
Suppose you have a VCO (voltage controlled oscillator) installed in NIftyCASE and you
wish to sequence pitch changes of said module from your DAW. In this quick start we’ll
suppose that you are using our chipz module, controlled by Ableton Live.
NiftyCASE has a built-in USB to MIDI/CV converter so only a USB cable is required to
make the connection between NiftyCASE and your computer.
Step 1:
Connect a USB type B cable between NiftyCASE USB port and your computer.
Step2:
Connect NiftyCASE to an audio mixer or sound interface using a ¼” mono (aka TS)
audio cable. Connect one end of the cable to the “audio out” jack at the rear of
niftyCASE and the other end to the input jack of your mixer or audio interface.
Step 3:
Connect a ⅛” mono (aka TS) patch cable between the CV1 output of NiftyCASE and
the top tune input jack of Chipz (chip1). The cable will be used to change the tune/pitch
of your module.
Step 4:
run another ⅛” mono (aka TS) patch cable from the top “out” jack of your chipz module
to either of the “to out” input jacks. This cable will carry the audio signal out of chipz and
through to your mixer or audio interface via the rear “audio out” jack.
Step 5:
Power on NiftyCASE and launch ableton.
Configure Ableton to send at least MIDI track information to the NiftyCASE MIDI output.
This ensures that Live will send notes and their pitch to NiftyCASE.
Refer to the left screenshot below:
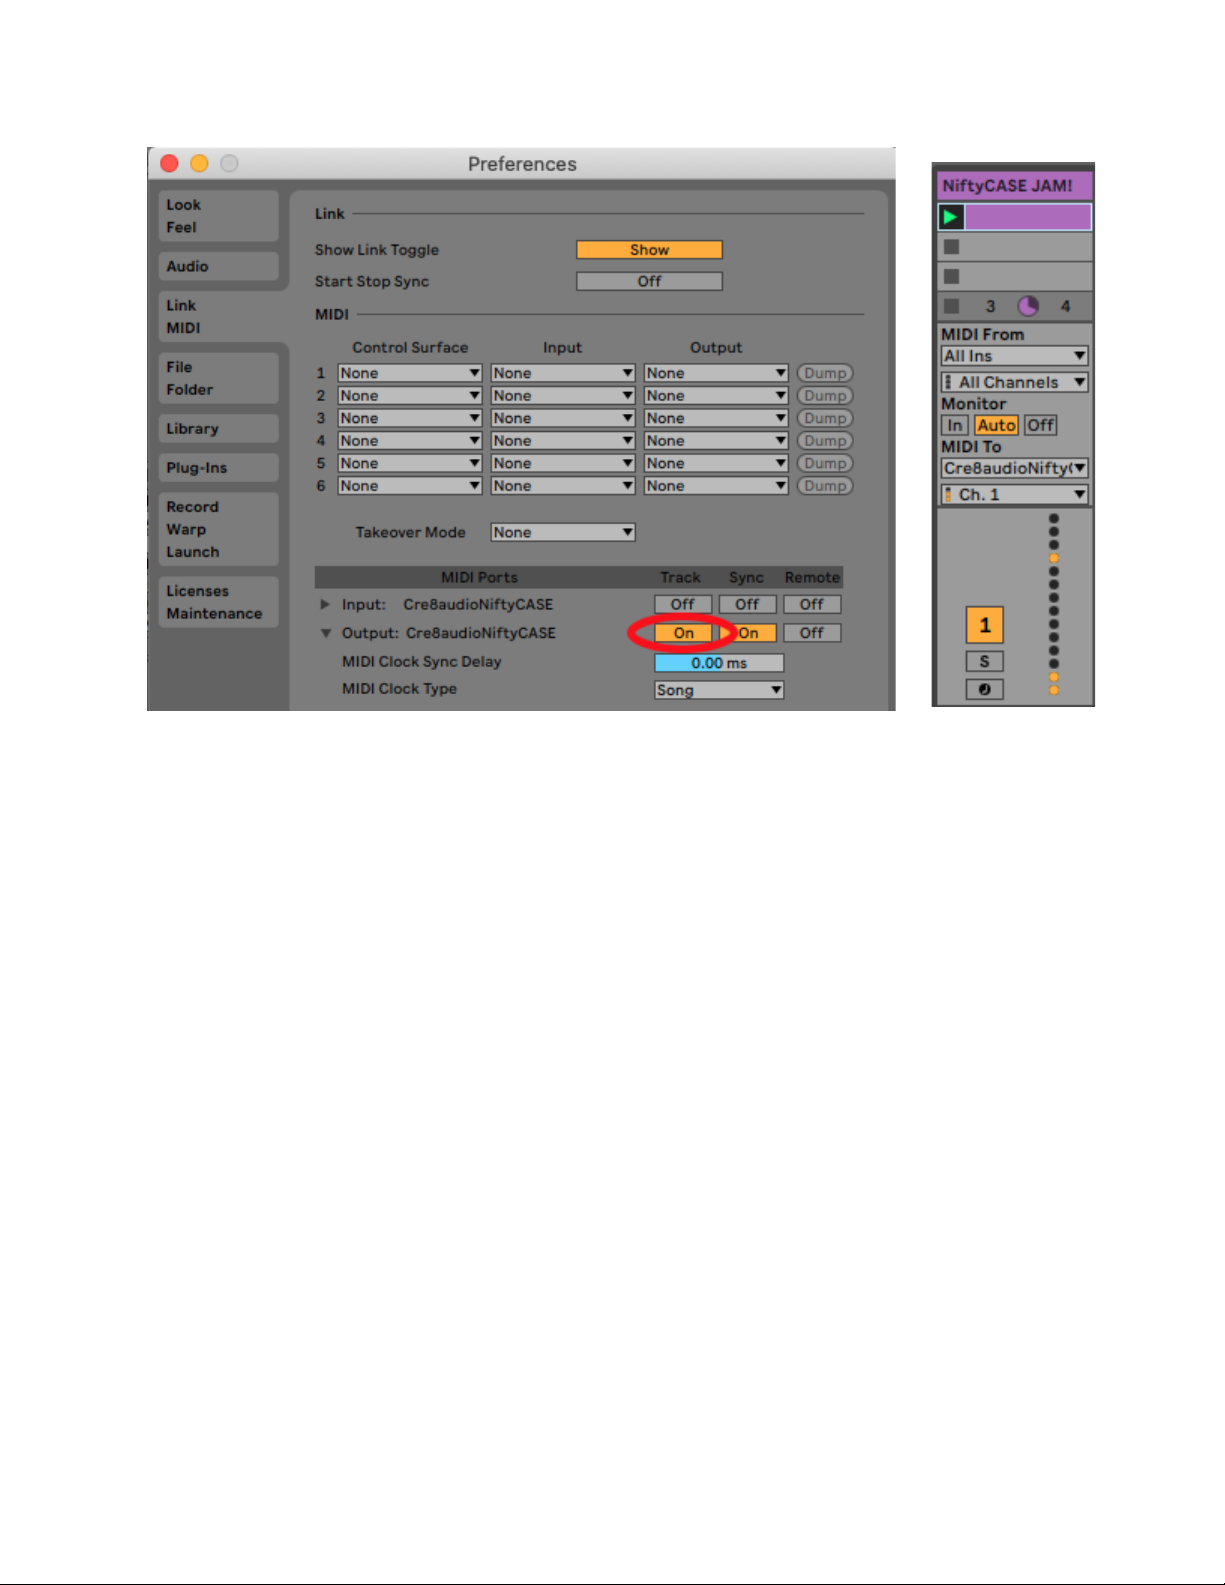
Step 6:
Let’s Assign a MIDI track to NiftyCASE channel1 (as per above right screenshot).
Change the “MIDI To” to Cre8audioNiftyCASE
And set the channel to Ch. 1
Step 7:
Sequence party time!
The NiftyCASE led will blink as new notes are received from Live.
The cv1 output voltage will change and the tune/pitch of chipz will update accordingly.

NiftyCASE anatomy
Top I/O
cv1 & cv2 outputs
These outputs transmit a variable control voltage (CV) according to the eurorack 1 volt
per octave standard. These jacks are typically used for controlling the pitch of a voltage
controlled oscillator (but not limited to this use). The output voltage range is 0-10 Volts (
a ten octave span).
Cv1 responds to incoming MIDI notes on MIDI channel1.
Cv2 responds to incoming MIDI notes on MIDI channel2
Both CV outputs also respond to MIDI channels 3 and 10. Refer to the MIDI
implementation below for more details.
gate1 & gate2 outputs
These outputs are either on or off, transmitting 5V or 0V respectively.
The gate outputs are used to turn voices on or off. They can also be used to trigger
envelope modules.
Gate1 responds to incoming MIDI notes on MIDI channel1.
Gate2 responds to incoming MIDI notes on MIDI channel2
Both CV outputs also respond to MIDI channels 3 and 10. Refer to the MIDI
implementation below for more details.
Mod (aka modulation wheel) output
This output transmits a variable control voltage (CV) ranging from 0V to 10V.
This output responds to MIDI CC#1 (mod wheel) transmitted to NIftyCASE on MIDI
channel 1. Refer to the MIDI implementation below for more details.

Clock output
This output transmits a 20mS 5V pulse on every 1/8th of a bar
This output responds to incoming MIDI clock signals and is used to synchronize (aka
slave) other modules to a master MIDI keyboard or sequencer.
Status LED
The LED serves 2 purposes: to indicate power to NiftyCASE and incoming MIDI.
The LED will stay lit when NiftyCASE is powered and in standby, and will briefly blink
when MIDI is received.
NiftyTIP: When MIDI clock is received the status LED will conveniently blink on every
1/8th of a bar and can therefore be used as a visual metronome.
“to out” input jacks
These audio input jacks are summed (aka mixed) and sent out of the “audio out” ¼” jack
at the rear of NiftyCASE. Both jacks are 3.5mm (⅛”) mono (aka TS).
NiftyTIP: All of the top jacks are 3.5mm (⅛”) mono (aka TS).
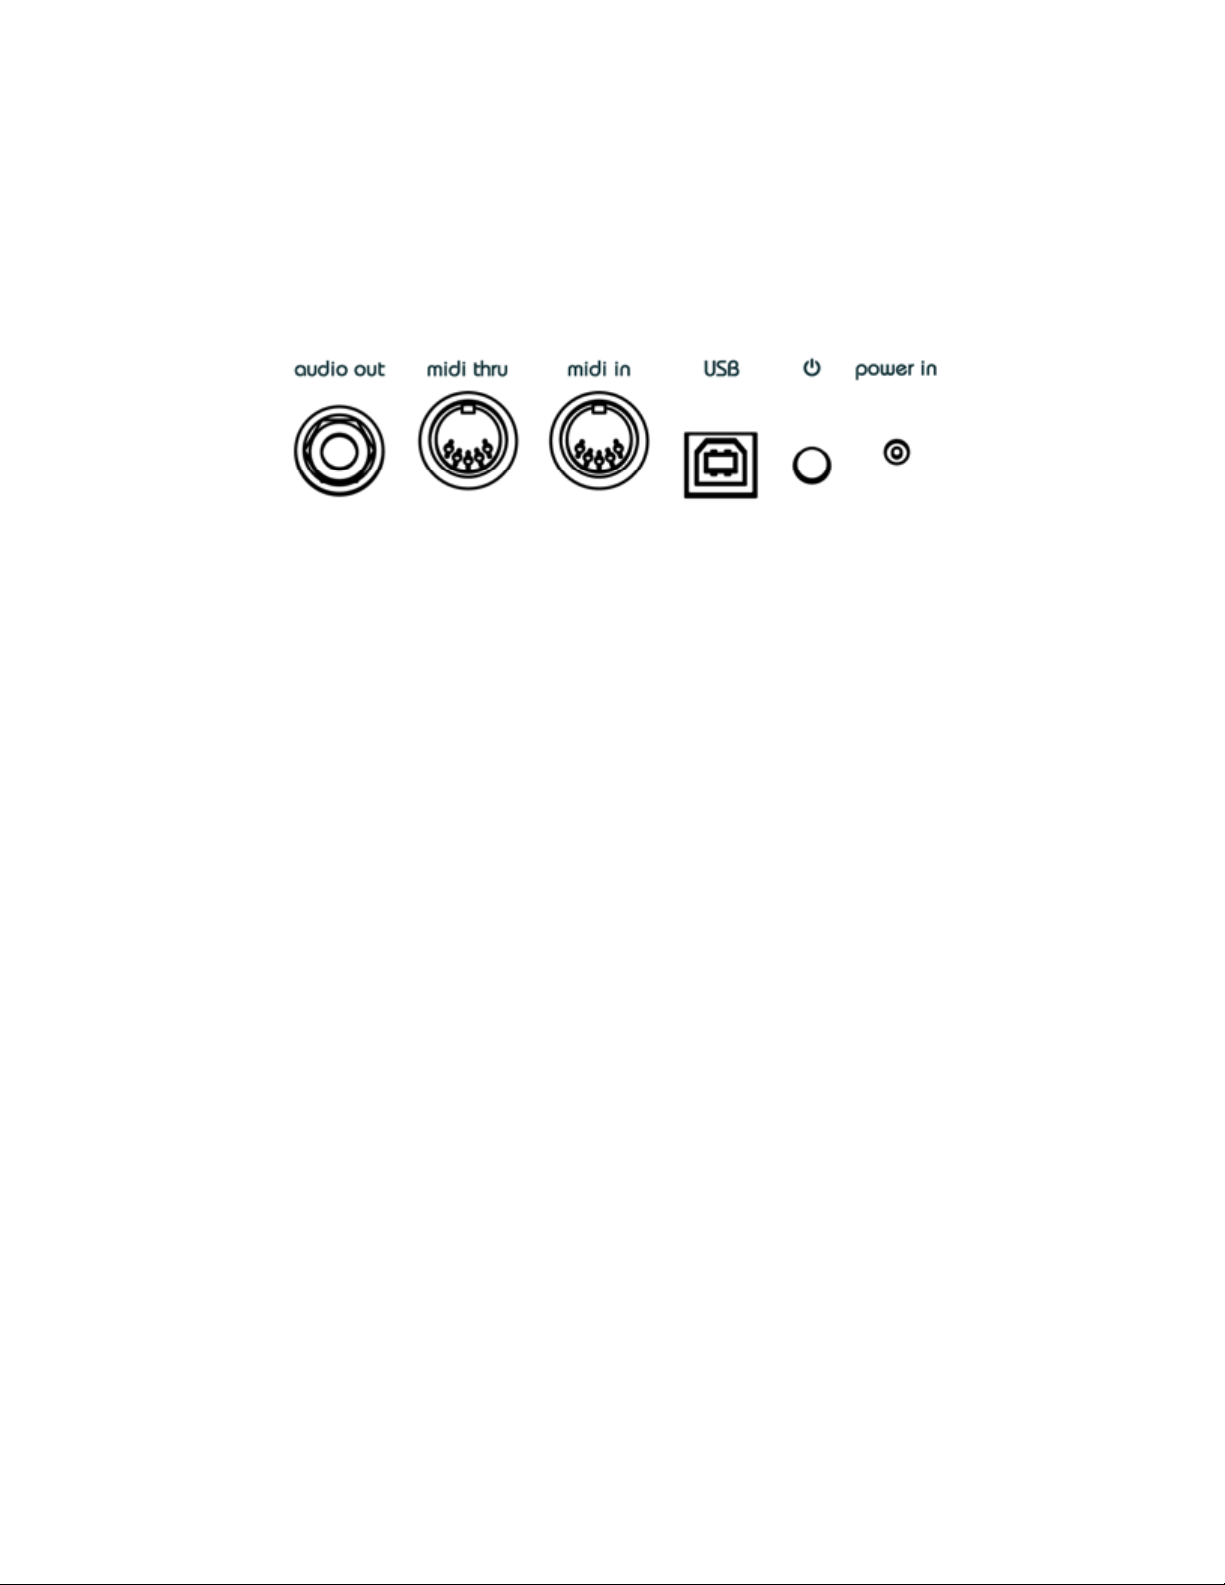
Rear I/O
“Audio out” output jack
This mono (ts) ¼” unbalanced jacks outputs the summed audio signals sent to “to out”
jacks on top of NifyCASE. A mono instrument cable should be used to connect
niftyCASE to a mixer or audio interface.
Midi thru
This DIN5 midi port will transmit any MIDI information received at the “midi in” port or via
MIDI-over-USB.
Midi in
Connect a MIDI keyboard or sequencer to this DIN5 port to take control of NiftyCASE.
NiftyCASE will also send midi information received out of the “midi thru” port so you can
daisy chain MIDI devices.
USB
The USB port is used to control NiftyCASE via MIDI-over-USB. Use a USB type B cable
to connect NIftyCASE to a computer.
It's not mandatory to connect NiftyCASE to a computer, it will operate “stand-alone”
NiftyTIP: NiftyCASE will also send MIDI received at this input over USB to a computer.
so can use NiftyCASE as a bi-directional USB-MIDI interface!

MIDI Implementation
Send MIDI information to NiftyCASE to control its outputs.
NiftyCASE will respond identically to MIDI received both at the “midi in” DIN5 jack and
via USB (from a computer/DAW).
The MIDI messages are handled differently depending on the MIDI channel:
MIDI Channel 1 - CV1/GATE1 monophonic
MIDI channel 1 will control cv1 and gate1.
MIDI Channel 2 - CV2/GATE2 monophonic
MIDI channel 2 will control cv2 and gate2.
MIDI Channel 3 - CV1/GATE1 + CV2/GATE2 duophonic
When sending MIDI over channel 3 the first note will output on CV1/GATE1 and the
second will output of CV2/GATE2 allowing you to control the pitch of 2 voltage
controlled oscillators at once!
In monophonic modes (CH1 or CH2) the respective Gates open (output 5V) when the
first Note on is received (aka when you press down the first key of your MIDI keyboard)
and close (output 0v) when the last key is released.
NiftyCASE also responds to pitch bend CC messages on all 3 channels. The range of
the pitch bend is +/- 1V (up or down by one octave)
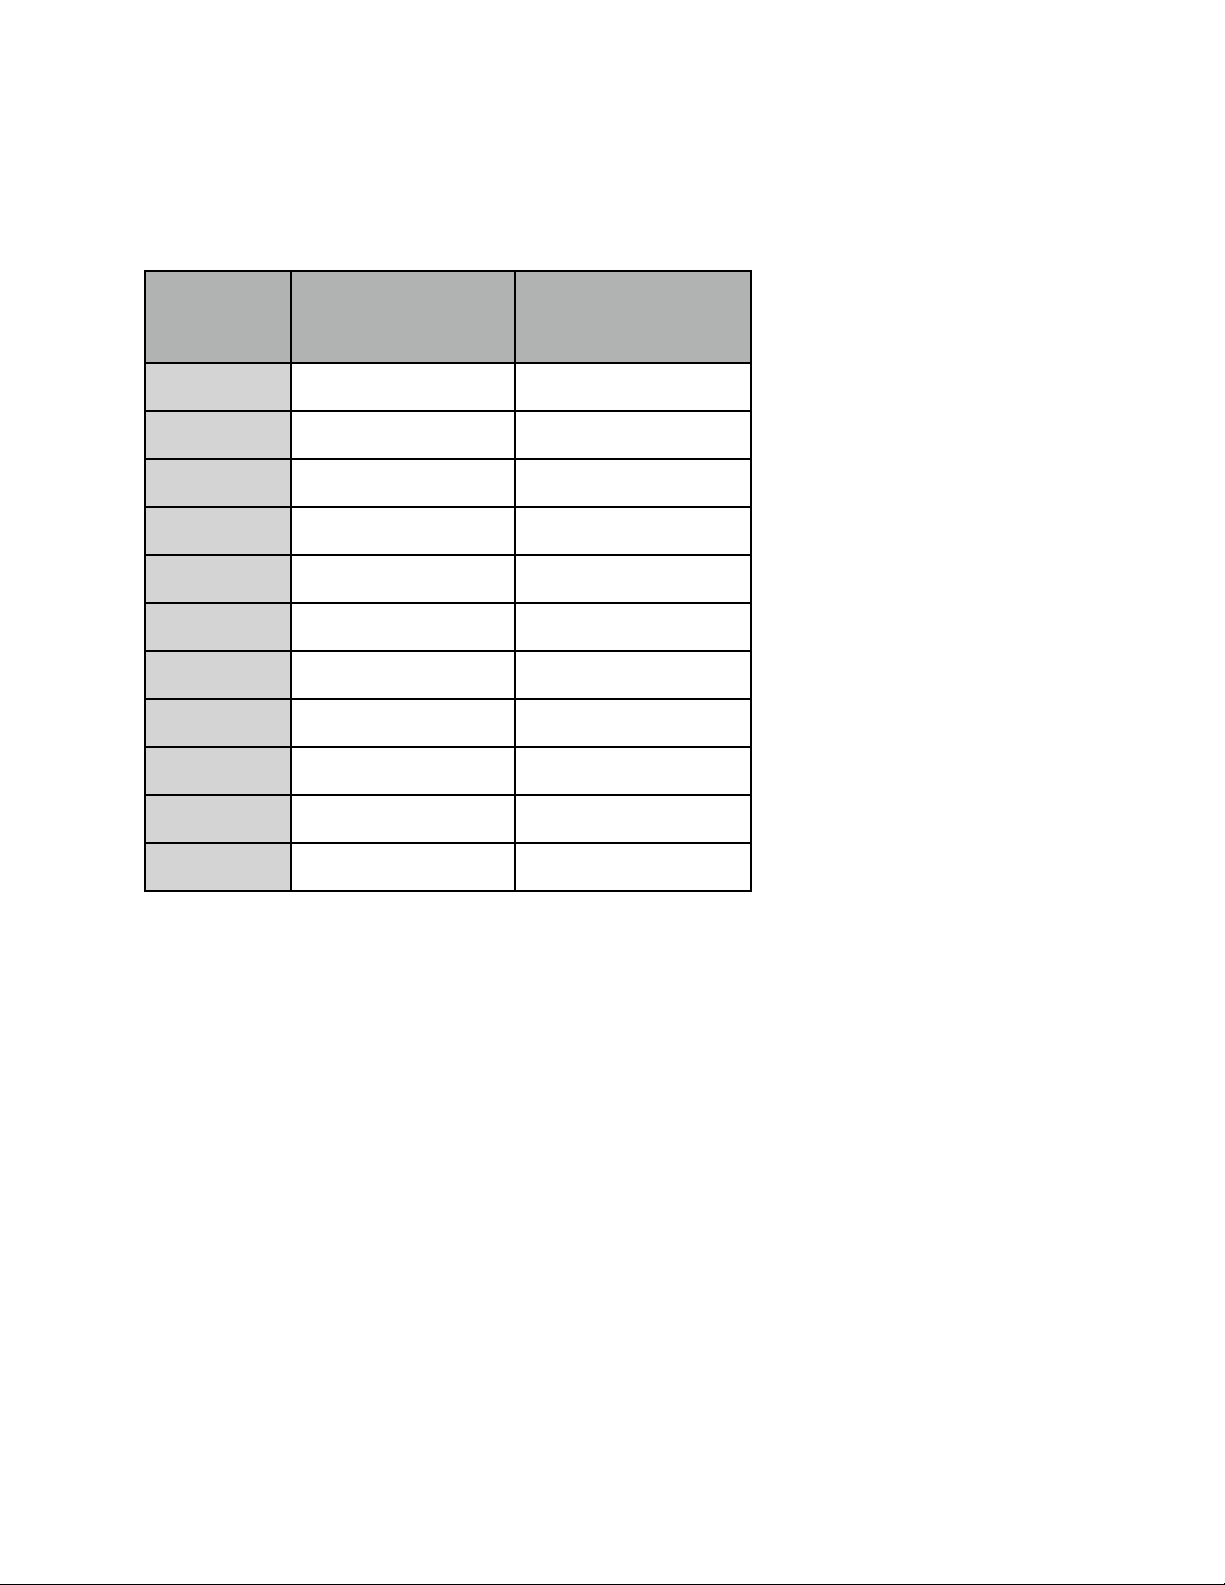
Cv1 and cv2 both output a voltage according to the 1V per octave standard:
MIDI note
CV1/2 Voltage output
Default Firmware
CV1/2 Voltage output
Alternate firmware with
-2V offset
C9
10V
8V
C8
9V
7V
C7
8V
6V
C6
7V
5V
C5
6V
4V
C4
5V
3V
C3
4V
2V
C2
3V
1V
C1
2V
0V
C0
1V
0V
C-1
0V
0V

NiftyCASE uses the highest-note priority on both channels as illustrated below:
MIDI Channel 10 - drum mode
MIDI received on channel 10 turns NiftyCASE into a 5 channel drum trigger machine.
In this special mode the first 5 top jacks behave as gates (closed=0V open=5V)
This mode can be used to trigger drum modules, advance sequencers or other
percussive modules. The jacks respond to the following MIDI notes:
MIDI note
Associated output jack
C1
cv1
C#1
gate1
D1
cv2
D#1
gate2
E1
mod

Frequently Asked Questions
Q. Is the out mono or stereo?
A. It’s mono ts, 6.35mm / 1/4"
Q. What size screws are these?
A. M3
Q. Is the out balanced or unbalanced?
A. It’s unbalanced (just like us)
Q. NiftyCASE is not showing up on my Mac with USB C when using with a 3rd party
adapter/dongle… What’s up with that?
A. We’ve discovered that not all USB C hubs and adapters are created equal. Apple
branded ones do seem to work consistently.
Q. The output on the rear of the NiftyCASE is very high is this normal?
A. The rear output simply passes the level input from the “to-out” on the case. It doesn’t
attenuate the signal at all. If the level is too high you should consider adding a VCA,
mixer, or other changes to bring down the signal level prior to plugging into “to-out”
Q. I’d like to add more than 10 modules to NiftyCASE! Is this possible?
A. Yes you can add an additional flying bus board cable to NiftyCase’s flying bus
Q. My windows computer is not detecting NiftyCase. What can I do?
A. look for Cre8audioNiftyCASE in your windows device manager. If it appears in the
"Unknown devices" tree with an “!” icon, right click and uninstall. Unplug the USB and
plug it back in again to refresh the driver. Cre8audioNiftyCASE should now appear as
an audio device.
Note: No drivers are required.
Q. My older MacBook is not detecting NiftyCase. What should I do?

A. We have found that some older MacBooks (specifically i7 processor-equipped from
around 2012) need a powered USB hub to operate with NiftyCASE.
Q. Will NiftyCASE make me some pizza?
A. Sadly no.
Table of contents
Other cre8audio Music Equipment manuals


