Creative Lighting Solutions CLS RGB LED Par Controller User manual
www.cls-led.com www.cls-led.com
- 8 - - 1 -
CLS Manuals
CLS RGB LED Par Controller
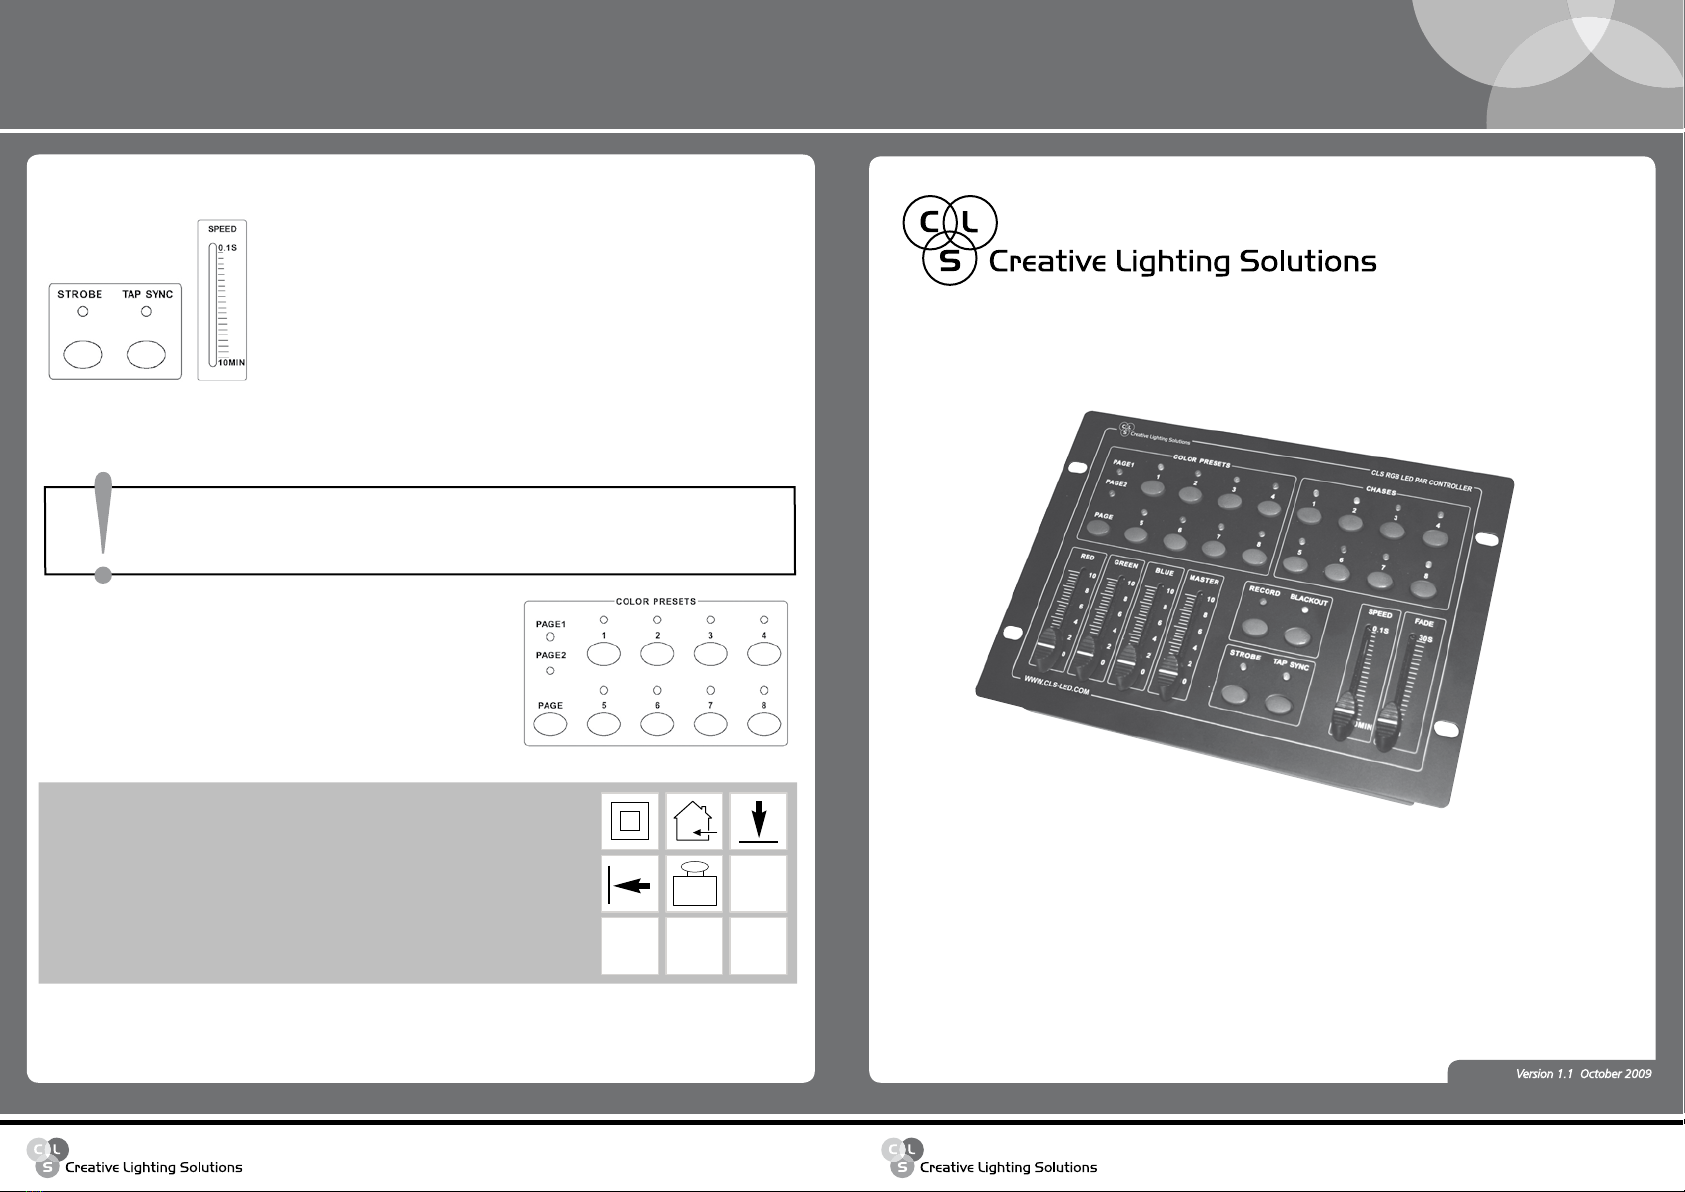
Version 1.1 October 2009
CLS RGB LED Par Controller
2007 CLS-LED BV. All rights reserved. Information subject to change without notice, CLS-LED BV and all affiliated companies disclaim liability for injury, damage
direct or indirect loss, consequential or economic loss or any other loss occasioned by the use of, inability to use or reliance on the information contained in this
manual. No part of this manual may be reproduced, in any form or by any means, without permission in writing from CLS-LED BV. Other legal information can
be found in our General conditions to be found on the back of your CLS-LED BV invoice or on our website www.cls-led.com/Conditions.pdf
2 At any time, you can adjust the Strobe flash rate by pressing and holding down the "STROBE" button and
then manually adjust the Speed fader.
3 Press the "STROBE" button again to disengage the strobe effect.
FACTORY DEFAULT RESET
1 Switch the LED controller main power OFF.
2 Press and hold down Colour Preset buttons 1, 6 & 8 then
simultaneously switch the power switch ON then release all
buttons. All LED indicators will flash three times to confirm that
factory settings have been restored.
TECHNICAL SPECIFICATIONS
Power Input: 9 VDC
Power consumption: 5 Watt
connection: 3P XLR connector
DMX output: DMX512
Dimension: 60 x 245 x 178 mm (hxwxd)
Housing: Steel
Weigth: 1,60 kg
Attention:
tHiS oPeRAtion WiLL eRASe ALL USeR-CReAteD CoLoUR
PReSetS AnD CHASeS.
WARNING
1,60 kg
CLS Manuals
CLS Atmosphere LED-panel
www.cls-led.com www.cls-led.com
- 2 - - 7 -
CLS Manuals
Optional accessories
• CLS cable 80cm XLR 3P complete (item nr. 911200)
• CLS cable 1,5mtr XLR 3P complete (item nr. 911201)
• CLS cable 3mtr XLR 3P complete (item nr. 911203)
• CLS cable 5mtr XLR 3P complete (item nr. 911205)
• CLS cable 10mtr XLR 3P complete (item nr. 911206)
• CLS cable 15mtr XLR 3P complete (item nr. 911207)
• CLS cable 20mtr XLR 3P complete (item nr. 911209)
SAFETY INFORMATION
Warning! This product is for professional use only, not for domestic use. Read this manual before
powering up or installing the CLS RGB LED Par Controller. Follow the instructions listed below
and observe all warnings in this manual.
INTRODUCTION
Thank you for selecting the CLS RGB LED Par Controller. The CLS RGB LED Par Controller is an universal
controller that allows you to easely control a set of RGB LED Par's.
NOTE: It is important to read this manual before you install this product.
CLS RGB LED Par Controller
Included items
The CLS RGB LED Par Controller is shipped in one package containing the following items:
• 1 x CLS RGB LED Par Controller + power supply
• 1 x user manual
Protection from electric shock
• Disconnect the power supply from AC power before installing, dismounting or maintaining the unit.
• Make sure all connectors are connected properly.
• Use only a source of AC power that complies with local building and electrical codes and has both
overload and ground-fault protection.
• Refer all service to a qualified technician.
Protection from burns and fire
• Do not install the CLS RGB LED Par Controller near a heat source.
• Do not install the CLS RGB LED Par Controller in a corrosive, flammable or explosive area.
• Do not modify the CLS RGB LED Par Controller, or install other than genuine parts.
• Do not operate the CLS RGB LED Par Controller if the ambient temperature exceeds 40º C.
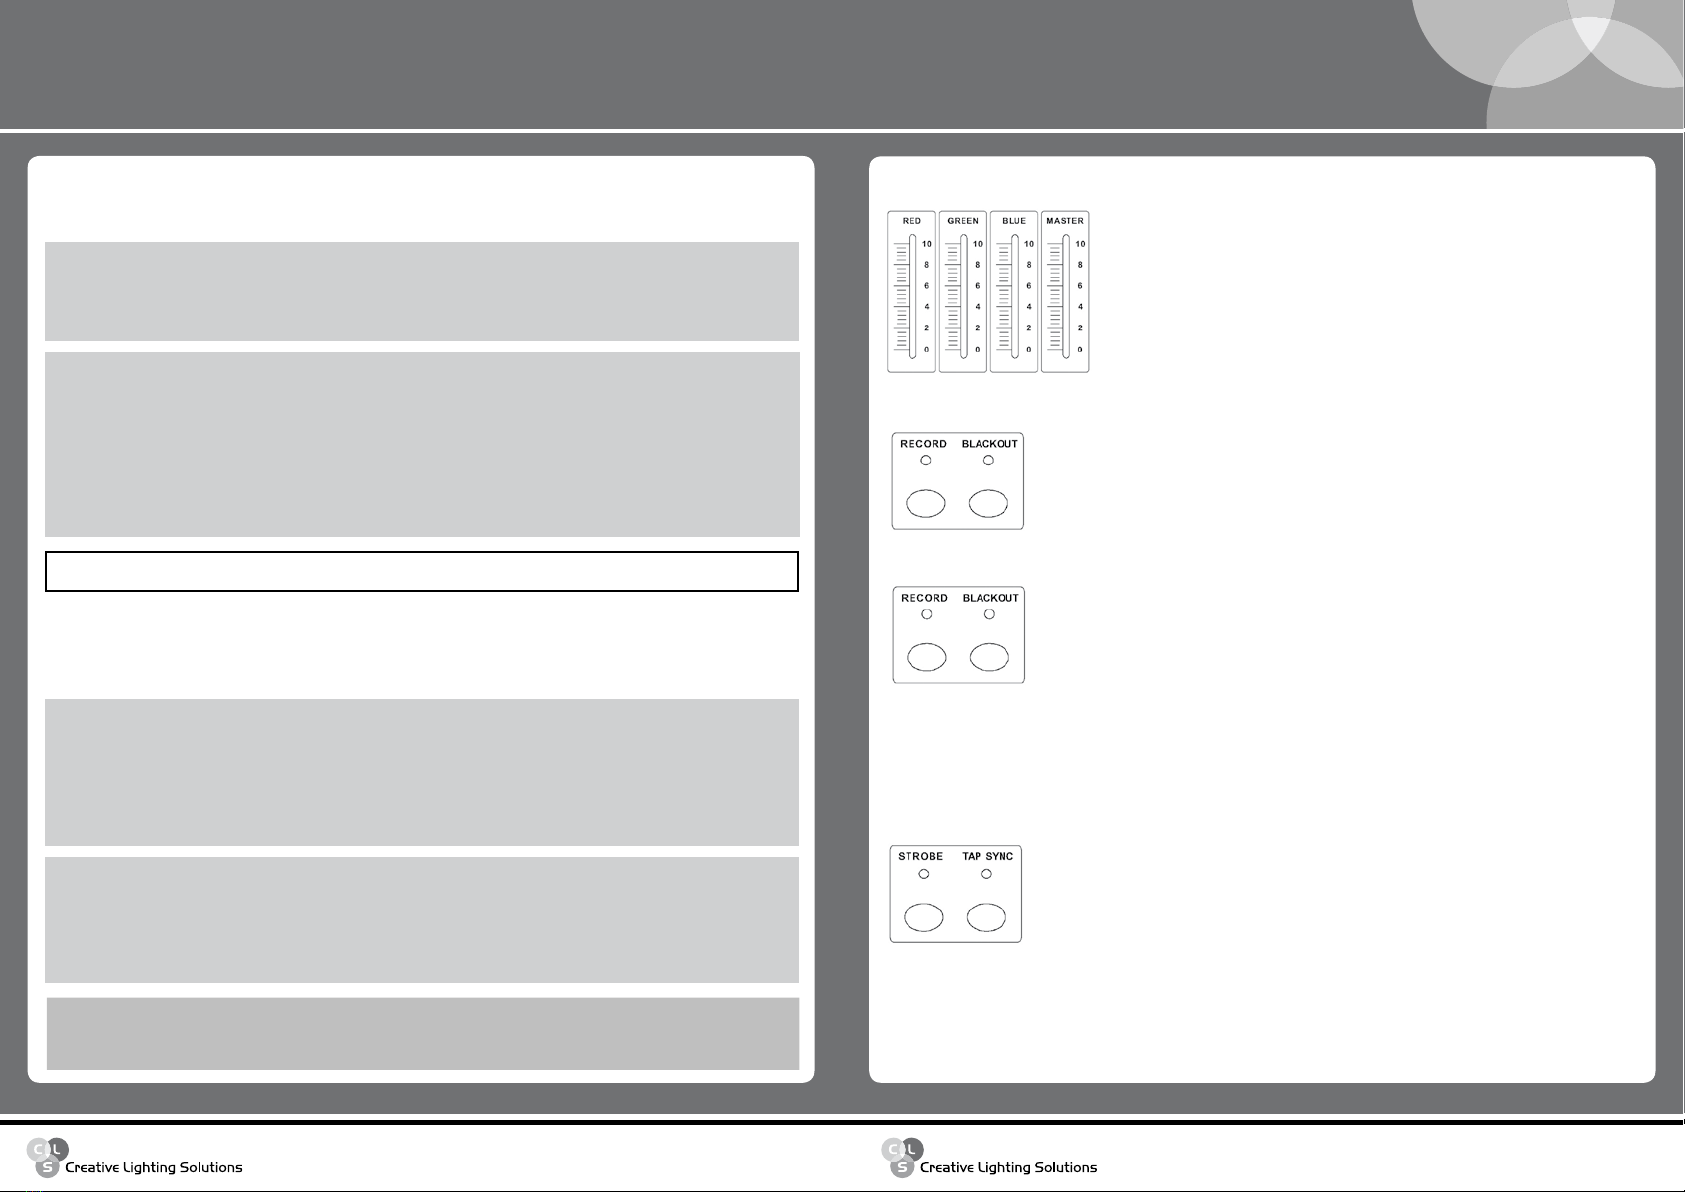
3. Set your scene with RED, GREEN, BLUE & MASTER faders to the desired setting.
4. Press the "RECORD" button to store the step. Repeat steps 3 & 4 to store up to 20 steps / scenes per chase.
5. Press the "BLACKOUT" button twice to exit.
STROBE FUNCTION
The strobe function will mix with a running Colour Preset or Chase. Pressing the Strobe button will
temporarily incorporate a strobe effect over a running colour preset or chase.
1. Press the "STROBE" button when effect is desired.
Protection from injury due to falls
• Verify that all covers and mounting hardware is securely fastened.
• Block the access around the work area whenever installing or removing the unit.

CLS Manuals
CLS Atmosphere LED-panel
www.cls-led.com www.cls-led.com
- 6 - - 3 -
CLS Manuals
CLS RGB LED Par Controller
FUNCTIONS
• RGB LED Controller • Grand Master fader
• 16 Colour Presets • Speed & Fade faders for Chase Control
• 8 Preset Chases • Record Function to record colours and Chases
• Strobe function • Power failure memory
• Individual RGB channel Faders
Product layout
1 Red, Green and Blue Faders: For manually setting the intensity of each colour.
2 MASTER Fader: For manual control of total intensity.
3 Record button: To engage record mode and record colour presets and chases.(Record code needed)
4 Strobe button: To trigger the strobe function at any time during playback.
5 TAP SYNC button: Press twice during Chase play back to set Chase speed.
6 Black Out button: Press the Black Out button to set all channels to 0.
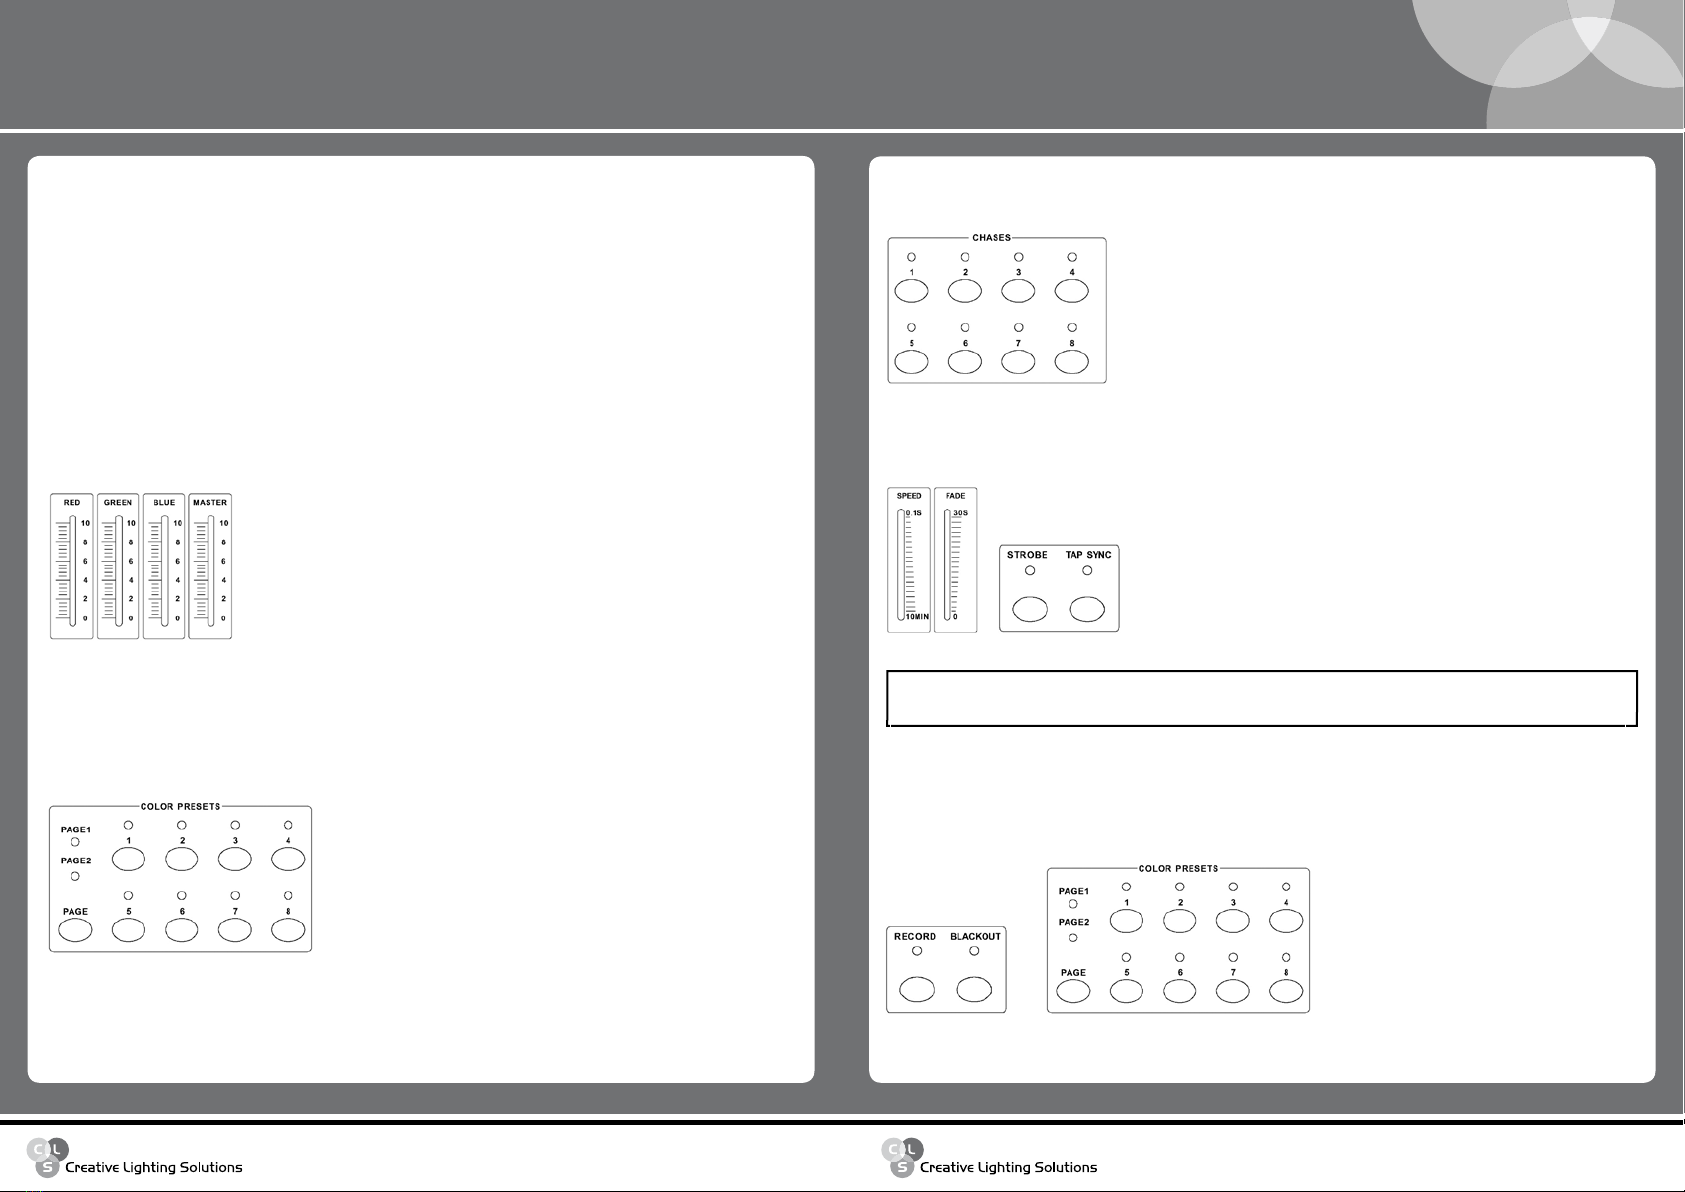
7 SPEED Fader: For manual control of the chase speed during playback.
8 FADE Fader: For manual control of the chase fade time during playback.
9 PAGE 1/2 LED indicators: Indicates the active Colour Preset page. When page 1 LED is on, presets 1-8 are
active. When Page 2 led is on, presets 9-16 are active.
10 PAGE button: To switch between Colour Preset page 1 and 2.
11 Colour preset buttons and LED indicators 1-8: Use these buttons to trigger colour presets.
12 Chase buttons and LED indicators 1-8: Use these buttons to trigger Chases.
Record Custom Colour Presets
1. Enter Record mode as described above.
2. Adjust the RED,GREEN, BLUE & MASTER faders to set the Colour Scene as desired.
3. Press a Colour PRESET button that you wish to save the scene to. Repeat step 2 and 3 to save additional
Colour Presets / Scenes.
4. Press the “BLACKOUT” button twice to exit RECORD MODE.
Record Custom Chases
Up to 8 chases can be programmed, each of which can store up to 20 scenes / steps.
Note: When recording custom chases, relevant factory chases will be erased.
1. Engage Record mode as described on page 5.
2. Press the "CHASE" button (1-8) that you want to record to.
CLS Manuals
CLS Atmosphere LED-panel
www.cls-led.com www.cls-led.com
- 4 - - 5 -
CLS Manuals
CLS RGB LED Par Controller
Pressing a selected chase button a second time will disengage the relevant chase. Adjust the “MASTER”
fader to set the overall output intensity.
Adjust the “SPEED” and “FADE” faders to manually set a desired chase speed and fade percentage.
You can also press the “TAP SYNC” button twice continually to set a desired chase speed. The TAP SYNC LED
will flash at the rate that it was pressed.
RECORD MODE
To enter Record Mode : Press and hold the "RECORD" button and sequentially press "Colour PRESET"
buttons 1, 6, 8, 1, 6, 8 then release the "RECORD" button. The RECORD LED indicator will turn ON, indicating
that RECORD mode is engaged.
OPERATION
• Connect the controller’s DMX output to the DMX input of your first LED RGB fixture in line. Connect the
DMX output of the first fixture to the input of the next fixture. Repeat this until each fixture is connected
to the DMX line. You can connect 32 fixture’s to a single DMX output, for more fixture’s a DMX splitter is
needed.
• Set the fixture to the correct addresses on the fixture’s, the controller sends 3 rgb channels per fixture, so
the addressing should be like 1,4,7,10,13,16 etc.
• BLACKOUT mode is active by default. When first powering on the controller, the "BLACKOUT" LED will
light. Press the "BLACKOUT" button once to turn the output on. The “Blackout” LED should go OFF.
• After the first use, the controller will remember its last state before being shut off.
Colour, Colour Preset and Chase Playback
1. Manual Setting of the desired Colour: Adjust the Red, Green, Blue & Master faders to set a scene as
desired.
2. Colour preset: Select a “Colour Preset” by pressing one or more buttons in the Colour Presets section.
Press the "PAGE" button to switch between colour preset pages 1 and 2. When “PAGE 1" LED is on, colour
presets 1-8 are accessible; when "PAGE 2" LED is on, colour presets 9-16 are accessible. When a colour
preset is selected, its LED will keep flashing. Press the same colour preset number button to turn it off. You
can also manually adjust the RED, GREEN and BLUE faders to temporarily edit the current colour. Adjust the
"MASTER" fader to set the overall output intensity.
3. Select a "CHASE” by pressing buttons 1-8 in the Chases section. When a chase is selected, its LED
indicator will keep flashing. Other chases can be selected and will playback in a sequential fashion. When
additional chases are selected, each relevant Chase LED will illuminate until it becomes its turn to playback
in the sequence.
Note: Default chases will not accept fade control. fade control will only work with custom
(user-created) chases.
Other Creative Lighting Solutions Dj Equipment manuals

Creative Lighting Solutions
Creative Lighting Solutions REVO Compact Basic User manual

Creative Lighting Solutions
Creative Lighting Solutions CLS LED PAR56-V3 User manual

Creative Lighting Solutions
Creative Lighting Solutions REVO MODULAR User manual

Creative Lighting Solutions
Creative Lighting Solutions CLS Zense User manual


