Crestron CEN-NVS100 How to use

Crestron CEN-NVS100
Network Video Streamer
Operations & Installation Guide

This document was prepared and written by the Technical Documentation department at:
Crestron Electronics, Inc.
15 Volvo Drive
Rockleigh, NJ 07647
1-888-CRESTRON
Industry Compliance
Federal Communications Commission (FCC) Compliance Statement
Reorient or relocate the receiving antenna
Increase separation between the equipment and the receiver
Connect the equipment inot an outlet on a circuit different from that to which the receiver is connected
Consult the dealer or an experienced radio/TV technician for help
This device complies with part 15 of the FCC rules. Operation is subject to the following conditions:
(1) this device may not cause harmful interference and (2) this device must accept any interference received,
including interference that may cause undesired operation.
CAUTION: Changes or modifications not expressly approved by the manufacturer responsible for compliance
could void the user’s authority to operate the equipment.
NOTE: This equipment has been tested and found to comply with the limits for a Class B digital device,
pursuant to part 15 of the FCC rules. These limits are designed to provide reasonable protection against harmful
interference in a residential installation. This equipment generates, uses and can radiate radio frequency energy
and if not installed and used in accordance with the instructions, may cause harmful interference to radio
communications. However, there is no guarantee that interference will not occur in a particular installation. If
this equipment does cause harmful interference to radio or television reception, which can be determined by
turning the equipment off and on, the user is encouraged to try to correct the interference by one or more of the
following measures:
As of the date of manufacture, the CEN-NVS100 has been tested and found to comply with specifications for CE
marking and standards per EMC and Radiocommunications Compliance Labelling.
Crestron is a registered trademark of Crestron Electronics, Inc.
Crestron Toolbox is a trademark of Crestron Electronics, Inc.
Firefox is a registered trademark of the Mozilla Foundation.
Internet Explorer is a registered trademark of Microsoft Corporation in the United States and other countries.
QuickTime is a trademark of Apple Inc., registered in the U.S. and other countries.
RealPlayer is a registered trademark of RealNetworks, Inc.
Safari is a trademark of Apple Inc., registered in the U.S. and other countries.
©2009 Crestron Electronics, Inc.

Crestron CEN-NVS100 Network Video Streamer
Contents
Network Video Streamer: CEN-NVS100 1
Introduction ............................................................................................................................... 1
Features and Functions................................................................................................1
Specifications ..............................................................................................................2
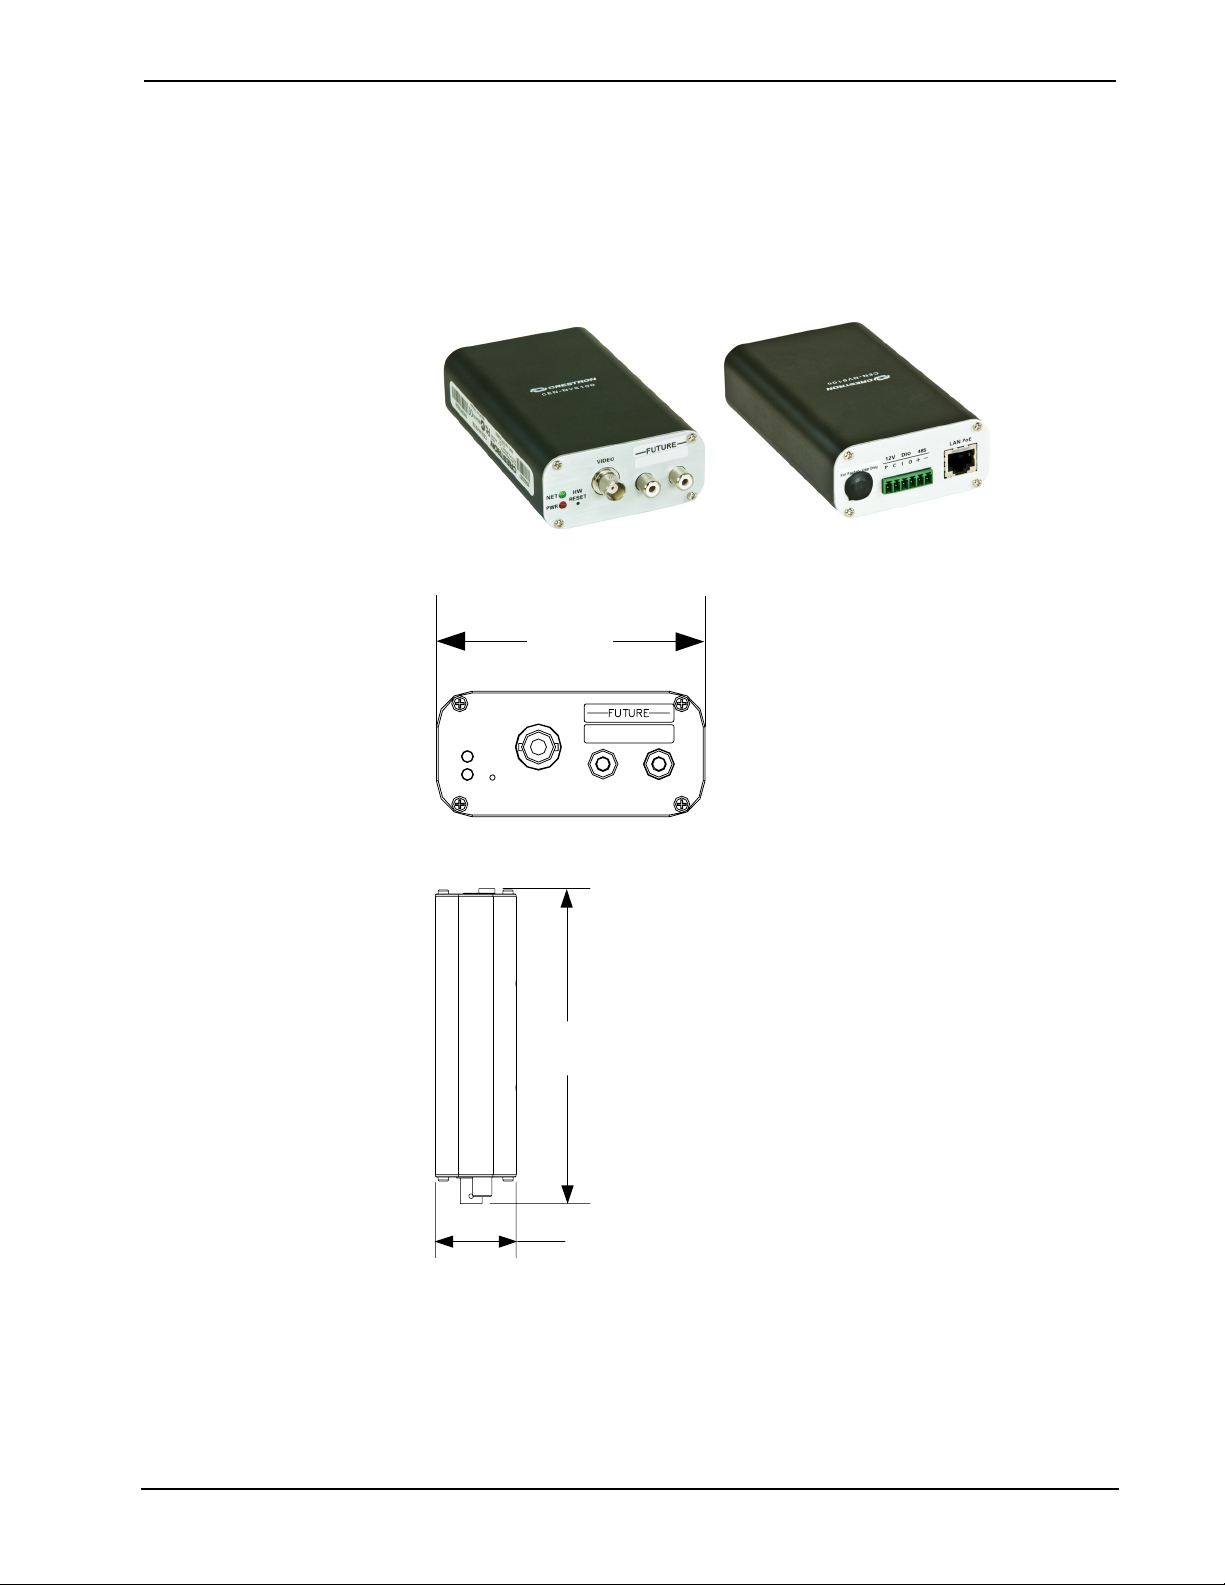
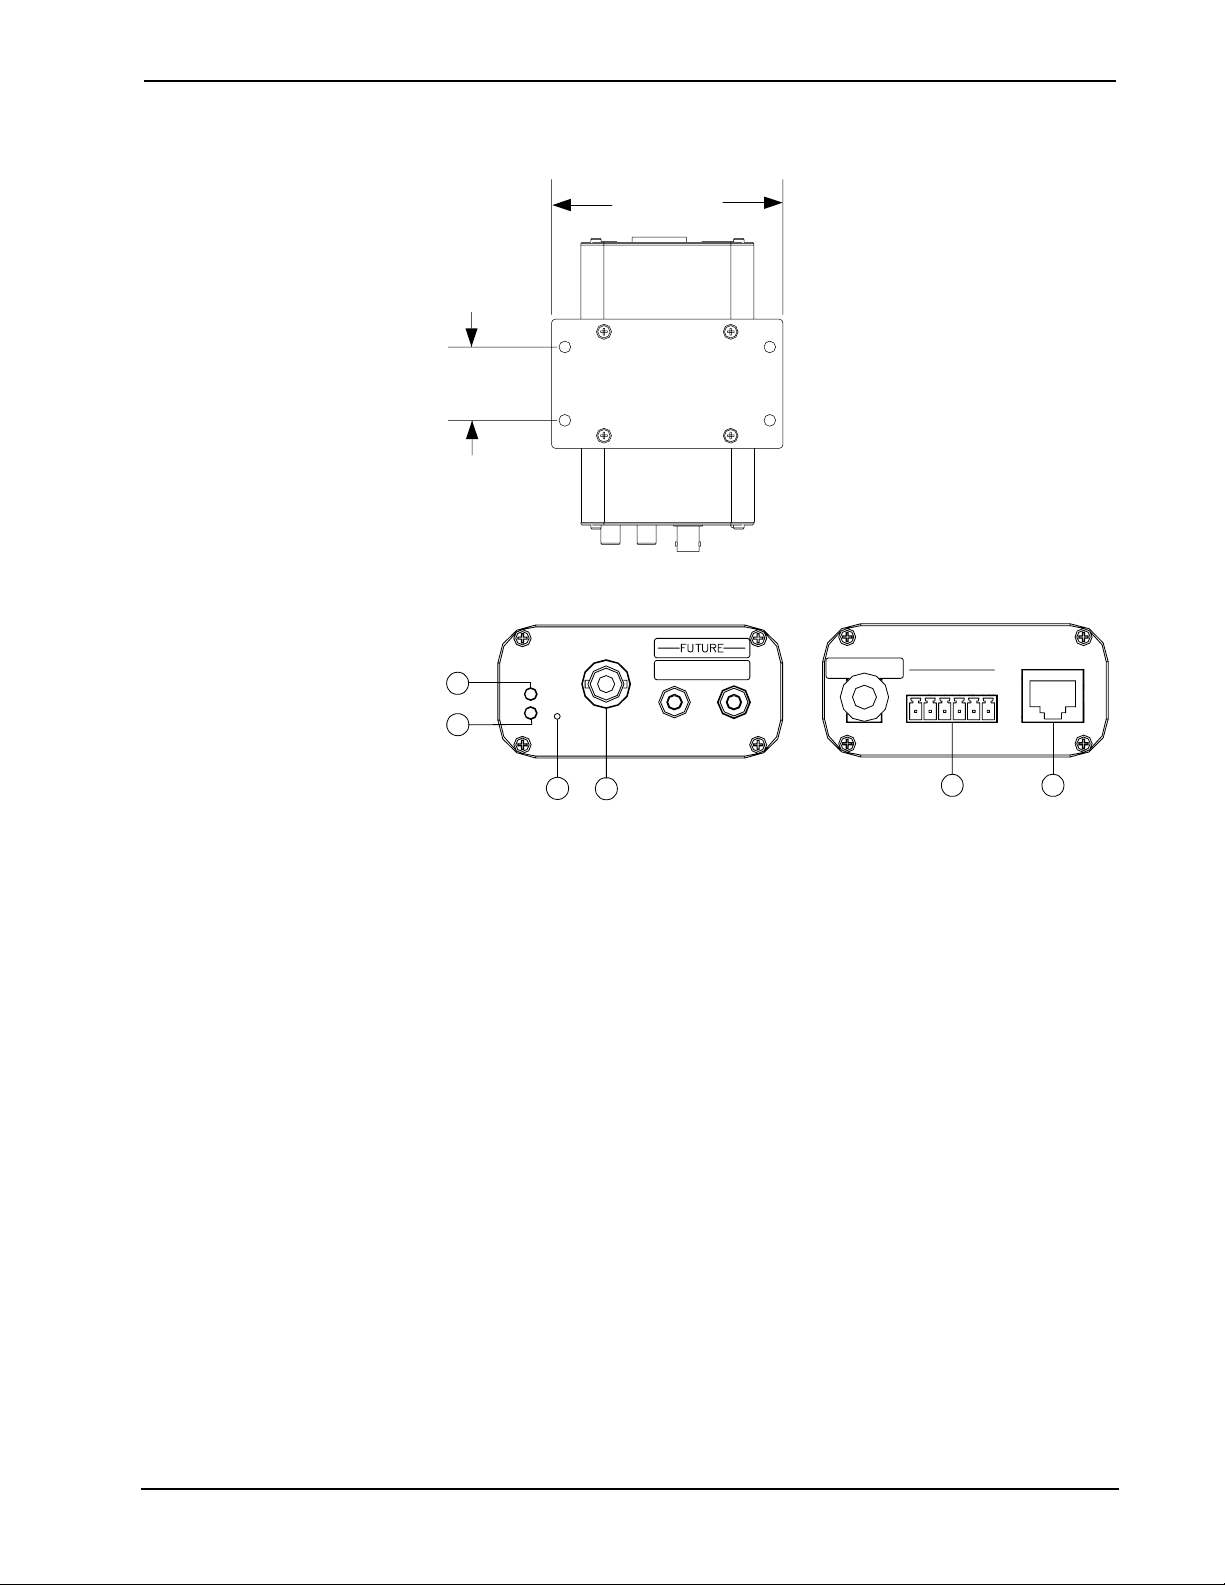
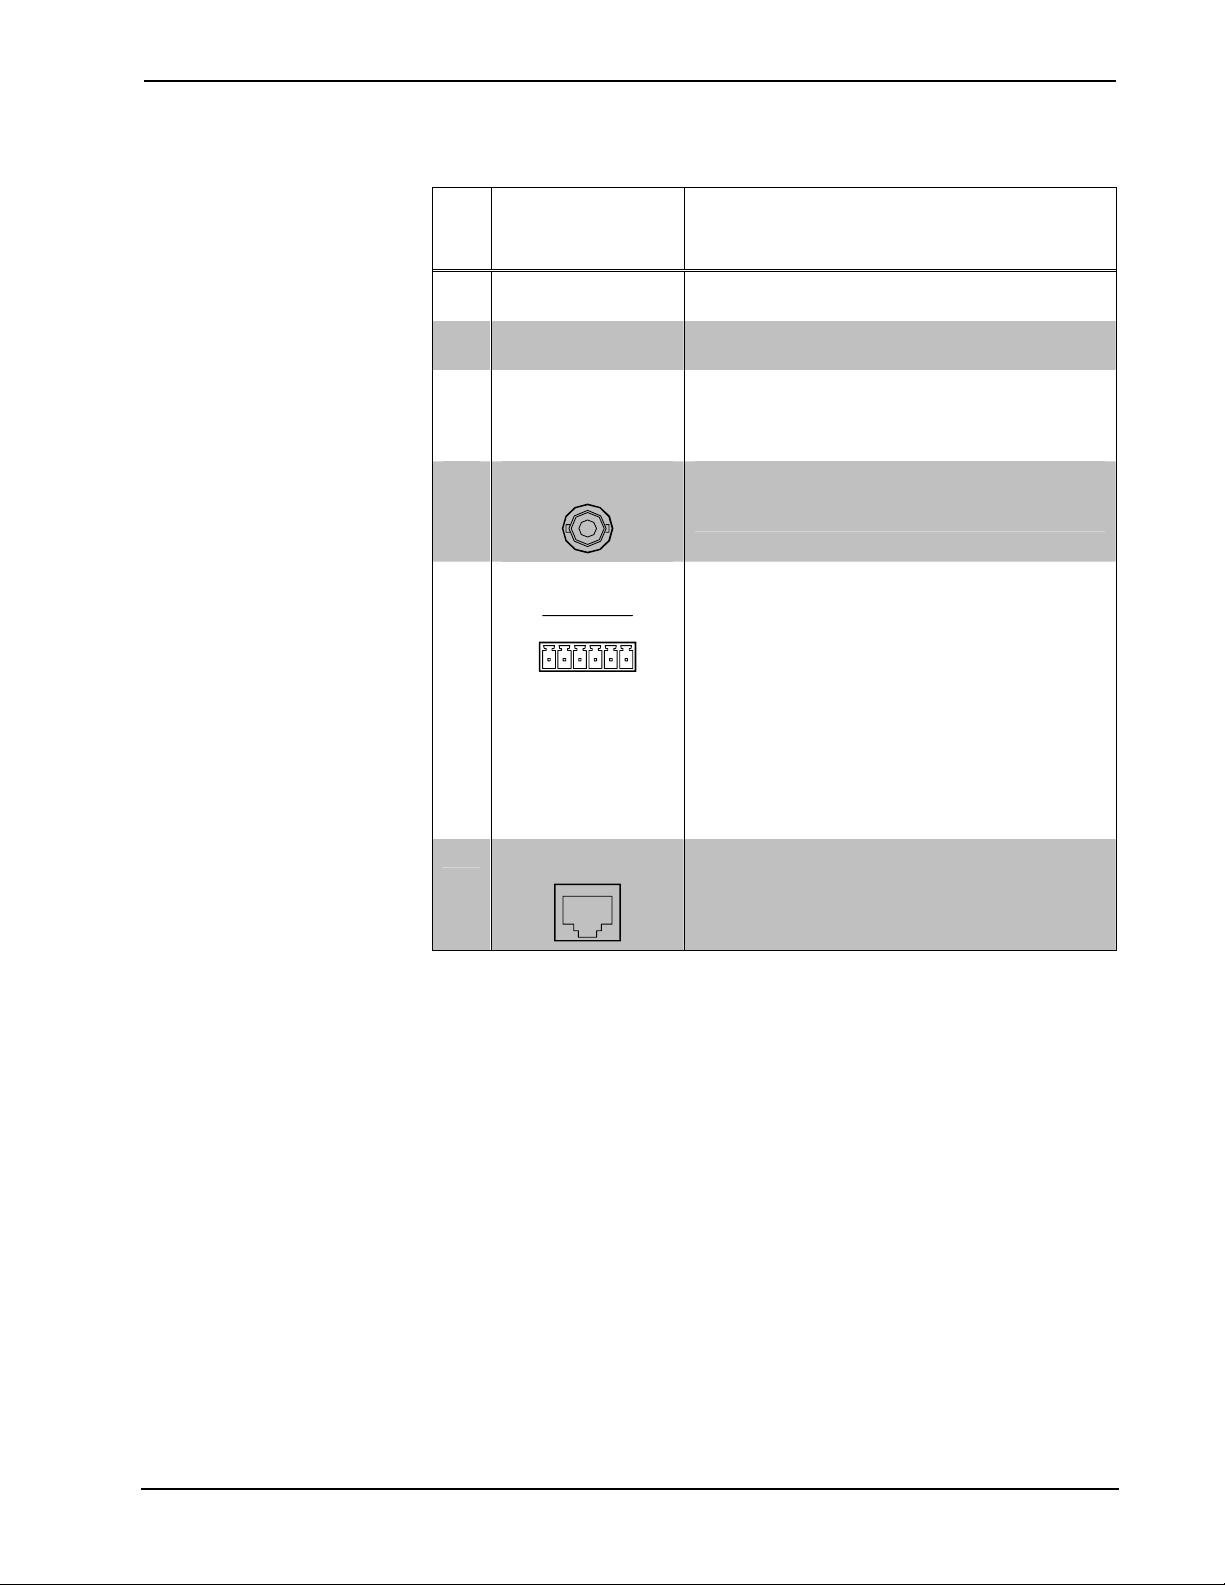
Physical Description....................................................................................................3
Setup ..........................................................................................................................................6
Network Wiring...........................................................................................................6
Supplied Hardware ......................................................................................................6
Installation................................................................................................................... 6
Hardware Hookup .......................................................................................................8
User Interface Overview............................................................................................................9
Accessing the CEN-NVS100 User Interface............................................................... 9
Navigating the Home Page........................................................................................12
Configuration...........................................................................................................................21
Configuring System Settings .....................................................................................22
Configuring Security Settings ...................................................................................24
Configuring Network Settings...................................................................................27
Configuring DDNS Settings......................................................................................34
Configuring Client Access Settings........................................................................... 34
Configuring Audio and Video Settings .....................................................................37
Configuring Motion Detection Settings.....................................................................45
Configuring Camera Control Settings .......................................................................47
Configuring Home Page Layout Settings.................................................................. 51
Configuring Event, Server, and Media Settings ........................................................53
Configuring Recording Settings ................................................................................59
Configuring System Log Settings..............................................................................62
Viewing System Parameters......................................................................................63
Performing Maintenance Actions..............................................................................63
Problem Solving ......................................................................................................................66
Troubleshooting.........................................................................................................66
Reference Documents................................................................................................67
Further Inquiries ........................................................................................................67
Future Updates ..........................................................................................................67
Software License Agreement................................................................................................... 68
Return and Warranty Policies .................................................................................................. 70
Merchandise Returns / Repair Service ......................................................................70
CRESTRON Limited Warranty................................................................................. 70
Operations & Installation Guide – DOC. 6873A Contents •i


Crestron CEN-NVS100 Network Video Streamer
Network Video Streamer:
CEN-NVS100
Introduction
The CEN-NVS100 provides a simple solution for streaming video from any
camera to Crestron®touchpanels throughout the home, school, or business.
Compatible with Crestron touchpanels that support the MJPEG Viewer
application, the CEN-NVS100 allows easy monitoring of door entry cameras,
nursery cameras, or any other video feed. Examples of compatible touchpanels are
the TPMC-3X, TPMC-4XG, TPMC-8L, TPMC-8T, and TPMC-8X.
Dual codecs allow the simultaneous streaming of signals with two different video
settings. Video settings include adjustable image size, quality, and bit rate.
Additional options include text and time stamp overlay and also privacy masking
that allows any portion of the video image to be obscured. Up to three motion
detection windows can be defined, enabling automated control events in response to
movement in specific areas on the screen. Events can also be triggered by an external
motion detector connected to the digital input or by detection of a total loss of
video signal.
An RS-485 control port is included, allowing remote control of a pant/tilt/zoom
(PTZ) camera with select drivers built in to support Pelco D and other popular
models.
Features and Functions
• Real-time motion-JPEG compression
• Up to D1 resolution (NTSC 704x480/PAL 704x576)
• Supports simultaneous dual streams
• Supports privacy masks
• Triple-window motion detection
• Includes digital I/O for external sensor and alarm
• Enables RS-485 control of Pelco D and other popular PTZ cameras
• PoE (Power over Ethernet) compatible
• Includes bracket for surface or rack rail mounting
• Compatible with Crestron touchpanels that support the MJPEG
Viewer application
Operations & Installation Guide – DOC. 6873A Network Video Streamer: CEN-NVS100 •1

Network Video Streamer Crestron CEN-NVS100
Specifications
Specifications for a CEN-NVS100 are listed in the following table.
CEN-NVS100 Specifications
SPECIFICATION DETAILS
Video
Input Signal Types NTSC or PAL compatible
Compression MJPEG video
Streaming Simultaneously dual-streaming MJPEG
over HTTP
Resolutions 176x112, 352x240, 704x480 (NTSC);
176x144, 352x288, 704x576 (PAL)
Frame Rates Up to 30 fps @ 352x240 or lower,
up to 12 fps @ 704x480 (NTSC);
Up to 25 fps @ 352x288 or lower,
up to 12 fps @ 704x576 (PAL)
Users Live viewing for up to 10 clients
Ethernet
Standards 10BaseT/100BaseTX, auto-switching, auto-
negotiating, auto-discovery, full/half duplex,
IEEE 802.3u compliant
Protocols IPv4, TCP/IP, HTTP, UPnP, IGMP, SMTP,
FTP, DHCP, NTP, DNS, DDNS, PPPoE, CIP
Security Multi-level user access, password protection,
IP address filtering
Power Requirements IEEE 802.3af Class 2 PoE Powered Device
Environmental
Temperature 32º to 104º F (0º to 40º C)
Humidity 20% to 80% RH (non-condensing)
Enclosure Metal construction, freestanding, surface or
rack-rail mount (detachable mounting
bracket included)
Dimensions
Height 1.38 in (3.50 cm)
Width 2.96 in (7.50 cm),
3.95 in (10.04 cm) with mounting bracket
Depth 5.37 in (13.62 cm)
Weight 7.06 oz (200 g)
NOTE: Crestron software and any files on the website are for authorized Crestron
dealers and Crestron Authorized Independent Programmers (CAIP) only. New users
may be required to register to obtain access to certain areas of the site (including the
FTP site).
2 •Network Video Streamer: CEN-NVS100 Operations & Installation Guide – DOC. 6873A

Crestron CEN-NVS100 Network Video Streamer
Physical Description
This section provides information about the connections, controls and indicators
available on your CEN-NVS100.
CEN-NVS100 Physical View (Front and Rear)
CEN-NVS100 Overall Dimensions (Front View)
VIDEO
HW
RESET
NET
PWR
2.96 in
(7.50 cm)
CEN-NVS100 Overall Dimensions (Side View)
5.37 in
(13.62 cm)
1.38 in
(3.50 cm)
Operations & Installation Guide – DOC. 6873A Network Video Streamer: CEN-NVS100 •3

Network Video Streamer Crestron CEN-NVS100
CEN-NVS100 Overall Dimensions with Mounting Bracket
1.25 in
(3.18 cm)
3.95 in
(10.04 cm)
CEN-NVS100 Connectors, Controls & Indicators (Front and Rear)
VIDEO
HW
RESET
NET
PWR
1
2
4
3
12V DIO 485
For Factory Use Only
P C I O + -
LAN PoE
5 6
4 •Network Video Streamer: CEN-NVS100 Operations & Installation Guide – DOC. 6873A

Crestron CEN-NVS100 Network Video Streamer
Connectors, Controls & Indicators
# CONNECTORS,
CONTROLS &
INDICATORS1
DESCRIPTION
1 NET
(1) Green LED: Indicates system activity and
Ethernet link status.
2 PWR (1) Red LED: Indicates power supplied from IEEE
802.3af-compliant PoE power source.
3 HW RESET2(1) Recessed pushbutton that reboots the device.
Pressing the HW RESET button until the green
NET LED flashes rapidly resets the unit to
factory-default settings.
4 VIDEO
VIDEO
(1) BNC female, composite video input;
Maximum Input Level: 1 Vp-p nominal;
Input Impedance: 75 ohms nominal.
5 12V, DIO, 485
12V DIO 485
P C I O + -
(1) 6-pin 3.5 mm detachable terminal block;
connects to alarm, relay, and PTZ camera;
P: 12 VDC power, for factory use only
C: Common Ground
I: Digital Input, rated for 50 mA @ 12 VDC,
2 kV isolated, logic threshold 3 VDC
O: Digital Output, 400 mA sink from
maximum 40 VDC, 2 kV isolated
+: RS-485, T+/R+, PTZ camera control
–: RS-485, T-/R-, PTZ camera control
RS-485 camera control includes built-in drivers
for DynaDome/SmartDome, Pelco D, & LI-LIN
PIH-7x00 cameras.
6 LAN PoE
LAN PoE
(1) 8-wire RJ-45 female connector;
10BaseT/100BaseTX Ethernet port, 802.3af
PoE compliant;
Connects to IEEE 802.3af-compliant PoE
power source.
1. RCA connectors on the front panel of the CEN-NVS100 are reserved for future use.
The 12 VDC power jack on the rear panel of the CEN-NVS100 is for factory use only.
2. To press the HW RESET button, use the end of a paper clip.
Operations & Installation Guide – DOC. 6873A Network Video Streamer: CEN-NVS100 •5

Network Video Streamer Crestron CEN-NVS100
Setup
Network Wiring
When wiring the Ethernet network, use CAT5 wiring. CAT5 wiring is a twisted pair
cable designed for Ethernet networks. These networks operate at speeds of up to 100
Megabits per second (Mbps) using the 100BaseT standard.
For information on connecting Ethernet devices in a Crestron system, refer to the
latest version of the Crestron e-Control®Reference Guide (Doc. 6052), which is
available for download from the Crestron website (www.crestron.com/manuals).
Supplied Hardware
The hardware supplied with a CEN-NVS100 is listed in the following table.
Supplied Hardware for a CEN-NVS100
DESCRIPTION PART NUMBER QUANTITY
Mounting Bracket 2022739 1
M3 x 5mm, Flat Head Phillips Screws 2022785 4
BNC-to-RCA-adapter 2022817 1
6-Pin Screw Terminal 2022818 1
Installation
Ventilation A CEN-NVS100 should be used in a well-ventilated area. The venting holes should
not be obstructed under any circumstances. To prevent overheating, do not operate
this product in an area that exceeds the environmental temperature range listed in the
table of specifications.
Mounting The CEN-NVS100 mounts onto a wall or a rack. The supplied mounting bracket
must be attached to the CEN-NVS100 before the device is mounted.
Attaching the Mounting Bracket
Attach the bracket to the bottom of the CEN-NVS100 using the four supplied
M3 x 5mm Phillips flat head screws as shown below.
Attachment of Mounting Bracket to CEN-NVS100
6 •Network Video Streamer: CEN-NVS100 Operations & Installation Guide – DOC. 6873A

Crestron CEN-NVS100 Network Video Streamer
Wall Mounting
Using four drywall screws (not supplied), mount the bracket and attached
CEN-NVS100 to the wall as shown below.
CEN-NVS100 Wall Mounting
Rack Mounting
The CEN-NVS100 can be mounted to a front or rear rail of a rack. Either the left or
right side of the attached mounting bracket can be used to mount the CEN-NVS100
to the rack (mounting of the right side of bracket is shown below).
To mount the CEN-NVS100 to a rack:
1. Position either the left or right side of the bracket so that its holes align with
the holes in the rack.
2. Secure the bracket to the rack using two rack-mount screws (not supplied).
CEN-NVS100 Rack Mounting
Operations & Installation Guide – DOC. 6873A Network Video Streamer: CEN-NVS100 •7

Network Video Streamer Crestron CEN-NVS100
Hardware Hookup
Make the necessary connections as called out in the following sections. Apply power
after all connections have been made.
Hardware Connections for the CEN-NVS100 (Front View)
VIDEO
HW
RESET
NET
PWR
VIDEO:
FROM CAMERA
Hardware Connections for the CEN-NVS100 (Rear View)
12V DIO 485
For Factory Use Only
P C I O + -
LAN PoE
FROM ALARM,
TO RELAY,
AND TO/FROM
PTZ CAMERA
LAN PoE:
TO/FROM 10BaseT/100BaseTX
802.3af-COMPLIANT
POWER SOURCE
8 •Network Video Streamer: CEN-NVS100 Operations & Installation Guide – DOC. 6873A

Crestron CEN-NVS100 Network Video Streamer
User Interface Overview
Have a question or comment about Crestron software?
Answers to frequently asked questions (FAQs) can be viewed in the Online Help
section of the Crestron website. To post a question or view questions you have
submitted to Crestron’s True Blue Support, log in at http://support.crestron.com.
First-time users will need to establish a user account.
The CEN-NVS100 user interface allows configuration of the CEN-NVS100, control
of basic camera functions, viewing of streaming video, viewing of system
parameters, and performance of system maintenance functions.
Accessing the CEN-NVS100 User Interface
NOTE: Access to the CEN-NVS100 user interface must be performed from a PC
whose IP address is in the same IP subnet. The default configuration of the
CEN-NVS100 allows the IP address of the network video streamer to be
automatically assigned by a DHCP (Dynamic Host Configuration Protocol) server on
the local area network.
If a DHCP server does not exist on the network and 45 seconds have elapsed since
the CEN-NVS100 was powered on, the IP address of the CEN-NVS100 defaults to
169.254.0.99 and the subnet mask defaults to 255.255.0.0. If another device uses that
address, another address in the local link address space is selected for the
CEN-NVS100 (169.254.xxx.xxx).
The CEN-NVS100 user interface can be accessed from a Web browser or from the
Crestron Toolbox™:
• You can access the CEN-NVS100 from a Web browser if you know the IP
address or host name of the CEN-NVS100.
NOTE: The default host name of the CEN-NVS100 is CEN-NVS100.
For additional information, refer to “Using a Web Browser” on page 10.
• You can access the CEN-NVS100 from the Crestron Toolbox if the
CEN-NVS100 is configured to operate in DHCP mode (default
configuration). The Crestron ToolBox automatically discovers the IP
address of the CEN-NVS100. For additional information, refer to “Using
the Crestron ToolBox” on page 11.
Operations & Installation Guide – DOC. 6873A Network Video Streamer: CEN-NVS100 •9

Network Video Streamer Crestron CEN-NVS100
Using a Web Browser
The CEN-NVS100 user interface can be accessed from the following Web browsers:
• Internet Explorer®7.0 or higher
• Firefox®3.0 or higher
• Safari®4.0 or higher
NOTE: Some configuration parameters require the use of the Internet Explorer
Web browser.
To access the CEN-NVS100 from a Web browser:
1. Start your Web browser.
2. Go to the IP address or host name of the CEN-NVS100.
NOTE: If the default HTTP port number of 80 has been changed, you must
append the port number to the IP address by entering a colon followed by
the new port number. If, for example, the IP address is 192.168.10.225 and
the HTTP port number has been changed from 80 to 150, go to
http://192.168.10.225:150.
For information about changing the HTTP port number, refer to
“Configuring Network Settings” on page 27.
3. If necessary, perform either of the following:
• For initial access to the CEN-NVS100 using Internet Explorer, you
may be prompted for permission to install a new plug-in for the
CEN-NVS100. Click Yes to proceed. If Internet Explorer does not
allow you to continue installation of the plug-in, check the Internet
security option and lower the security levels or contact your IT or
networking supervisor for assistance. The plug-in must be installed to
display the video in the Web browser.
NOTE: The Internet Explorer request to install a plug-in for the
CEN-NVS100 depends on the Internet security settings of your PC.
If the highest security level is set, the PC may prohibit any installation
and execution attempt.
• For initial access to the CEN-NVS100 using Firefox, install the
QuickTime®media player.
The user name and password window opens, allowing you to log in to the
CEN-NVS100. For log-in information, refer to “Logging In to the
CEN-NVS100” on page 11.
10 •Network Video Streamer: CEN-NVS100 Operations & Installation Guide – DOC. 6873A

Crestron CEN-NVS100 Network Video Streamer
Using the Crestron ToolBox
NOTE: To be able to use the Crestron Toolbox to access the CEN-NVS100, the
UPnP (Universal Plug and Play) Ethernet protocol configuration setting of the
CEN-NVS100 must be enabled. The UPnP protocol is enabled by default. For
additional information, refer to “Configuring Network Settings” on page 27.
To access the CEN-NVS100 from the Crestron Toolbox:
1. Open the Crestron Toolbox.
2. From the Tools menu, select Device Discovery Tool.
NOTE: You can also access the Device Discovery Tool by clicking the
Device Discovery Tool button ( ) in the toolbar.
NOTE: The security software running on your computer may send you a
program alert regarding the attempt of Crestron Toolbox to connect to the
network. You must allow the connection so that the Device Discovery tool
can be used.
3. From the device list on the left-hand side of the screen, select the
UPnP name of the CEN-NVS100. The default UPnP name is
CEN-NVS100.
The user name and password window opens, allowing you to log in to the
CEN-NVS100. For log-in information, refer to “Logging In to the
CEN-NVS100” below.
Logging In to the CEN-NVS100
The user name and password window allows you to log in to the CEN-NVS100.
“User Name and Password” Window
Operations & Installation Guide – DOC. 6873A Network Video Streamer: CEN-NVS100 •11

Network Video Streamer Crestron CEN-NVS100
To log in to the CEN-NVS100:
1. Enter the user name and password.
NOTE: The user name of the Administrator is permanently assigned as
root. The default root password is blank. For enhanced security, it is
recommended that the Administrator change the default root password. For
information about changing the root password, refer to “Configuring
Security Settings” on page 24.
NOTE: The setup of user accounts must be performed by the
Administrator. For information about setting up user accounts, refer to
“Configuring Security Settings” on page 24.
NOTE: The user name and password are case sensitive.
2. Click OK.
The home page of the CEN-NVS100 opens. Refer to “Navigating the Home
Page” below for information.
Navigating the Home Page
The home page of the CEN-NVS100 allows access to configuration of the
CEN-NVS100, control of basic camera functions, and display of streaming video.
The home page that is displayed varies depending on the following:
• Display mode, which can be set to Image mode or Text mode.
⇒ Image mode allows display of graphical buttons on the home page.
⇒ Text mode prevents display of graphical buttons on the home page.
NOTE: Display mode and other parameters that affect the appearance of
the home page are configured on the “Home Page Layout” configuration
page. For additional information, refer to “Configuring Home Page Layout
Settings” on page 51.
• Video mode, which can be set to MPEG-4 or JPEG streaming mode:
⇒ MPEG-4 allows video and audio transmission but requires a Web
browser for playback.
⇒ JPEG (motion JPEG) is compatible with Crestron TPMC
touchpanels that support the MJPEG Viewer application.
NOTE: Video mode is configured on the “Audio and Video” configuration
page. For additional information, refer to “Configuring Audio and Video
Settings” on page 37.
• Web browser (Internet Explorer, Firefox, or Safari)
The following screen illustrates the home page in Internet Explorer when the
CEN-NVS100 is set to MPEG-4 streaming and the home page is set to Image mode.
Observe that graphical buttons, such as for PTZ directional buttons, are displayed in
the left column.
12 •Network Video Streamer: CEN-NVS100 Operations & Installation Guide – DOC. 6873A

Crestron CEN-NVS100 Network Video Streamer
CEN-NVS100 Home Page—Image Mode in Internet Explorer (MPEG-4 Streaming)
The following screen illustrates the home page in Internet Explorer when the
CEN-NVS100 is set to MPEG-4 streaming and the home page is set to Text mode.
Observe that graphical buttons are not displayed in the left column.
CEN-NVS100 Home Page—Text Mode in Internet Explorer (MPEG-4 Streaming)
The following sections discuss the various functional areas of the home page.
Operations & Installation Guide – DOC. 6873A Network Video Streamer: CEN-NVS100 •13

Network Video Streamer Crestron CEN-NVS100
Snapshot
Clicking the Snapshot link allows a snapshot of streaming video to be taken. When
the link is clicked, a page opens displaying the snapshot.
To save a snapshot:
1. Right-click the snapshot.
A menu opens.
2. Click Save Picture As….
The “Save Picture” window opens.
3. Browse to the desired location in which you want to save the snapshot,
rename the file if desired, select the file type, and then click Save.
Saving a Snapshot
Configuration
Clicking the Configuration link allows configuration of various types of settings,
such as system settings, security settings, and so on. For additional information, refer
to the “Configuration” section on page 21.
14 •Network Video Streamer: CEN-NVS100 Operations & Installation Guide – DOC. 6873A

Crestron CEN-NVS100 Network Video Streamer
Client Settings
Clicking the Client Settings link opens the “Client Settings” page.
NOTE: You can also access the “Client Settings” page by entering the following
URL address in your Web browser:
http://Video Streamer/clientset.html
Video Streamer is the host name or IP address of the CEN-NVS100.
When using Internet Explorer, the “Client Settings” page appears as shown below.
“Client Settings” Page Using Internet Explorer
NOTE: If Firefox or Safari is used, only the Stream Options pane appears on the
“Client Settings” page.
To configure client settings, refer to the guidelines that follow.
NOTE: You can also obtain configuration guidelines by placing your mouse over
the appropriate help icon ( ) on the “Client Settings” page.
Stream Options: Select the stream to view: Stream 1 or Stream 2.
NOTE: A minimal view of the video can be accessed at the following URL address
in your Web browser:
http://Video Streamer/setup/viewer.html
Video Streamer is the host name or IP address of the CEN-NVS100.
Operations & Installation Guide – DOC. 6873A Network Video Streamer: CEN-NVS100 •15

Network Video Streamer Crestron CEN-NVS100
MPEG-4 Media Options: (Internet Explorer only) Select the MPEG-4 media for
playback: Video and Audio, Video Only, or Audio Only.
NOTE: Audio is not supported in CEN-NVS100 version 0100i.
Select the Enable deinterlace checkbox to improve image quality. When selected,
more CPU utilization is required.
MPEG-4 Protocol Options: (Internet Explorer only) Select the desired MPEG-4
connection protocol between client and server:
NOTE: After changing and saving the setting, close your Web browser and then
reopen it.
• UDP Unicast: Allows for better real-time performance; however, some
packets may be lost due to network traffic. If there are no special
requirements, UDP Unicast is the recommended setting.
• UDP Multicast: Identical to UDP Unicast except that it saves bandwidth
while serving multiple clients at the same time.
• TCP: Not subject to packet loss and produces a more accurate video
display; however, real-time effect performance may suffer.
• HTTP: Allows the same quality as TCP and may require less network port
configuration in some network environments.
MP4 Saving Options: (Internet Explorer only) Do the following:
1. In the Folder: text entry box, enter the directory path or browse for the
directory to which you want to save MP4 recordings. The default path is
C:\Record.
2. In the File name prefix: text entry box, enter the desired text to be added as
a prefix to the file name of the recording. The default prefix is CLIP.
3. Select the Add date and time suffix to file name checkbox to append the
recording date and time as a suffix to the file name. If the checkbox is not
selected, file names are numbered consecutively.
Click Save to save the changes.
Digital Output
NOTE: If the Hide Digital Output Controls checkbox is selected on the “System”
configuration page, the Digital Output controls (ON and OFF) are not displayed on
the home page. For additional information about the “System” configuration page,
refer to “Configuring System Settings” on page 22.
To enable the digital output of the CEN-NVS100 to be triggered, click ON.
To return the digital output to the normal state, click OFF.
Video Window
The video window displays MPEG-4 or MJPEG streaming video. For information
about configuring video settings, refer to “Configuring Video Settings” on page 39.
16 •Network Video Streamer: CEN-NVS100 Operations & Installation Guide – DOC. 6873A
Other manuals for CEN-NVS100
1
Table of contents
Other Crestron Media Player manuals