manuals.online logo
Brands
  1. Home
  2. •
  3. Brands
  4. •
  5. Crestron
  6. •
  7. Server
  8. •
  9. Crestron CEN-RVS-R210 User manual

Crestron CEN-RVS-R210 User manual

1
quickstart guide
CEN-RVS-R210
www.crestron.com
888.273.7876 201.767.3400
©2011 Specifications subject to
change without notice
CEN-RVS-R210
RoomView® Server
QUICKSTART DOC. 7118B (2029344) 01.11
The Crestron RoomView® server provides a simple and effective way
to add RoomView to your environment.
1. Carefully open the box the server was shipped in and unpack the
unit and the rest of the contents.
Your RoomView® server has arrived! 3. Review all of the documentation.
4. Attach the included ReadyRails static rail system to your rack
system.
2. Inspect everything that came in the box to ensure that nothing is
damaged or missing. You should have:
● Your RoomView Rack Server (a one rack unit Dell Server)
● Power cord, software and documentation from Dell
● Dell ReadyRailsTM
● A CD with all of your Crestron software and documentation
6. Attach a monitor, mouse and network cable (not provided).
5. Slide the server into the ReadyRails until it clicks into place.
7. Connect the power cable to the server.
NOTE: The operating temperature of the rack should be between 50°
to 95°F (10° to 35°C) with 20 to 80% relative humidity
(non-condensing). Temperature gradation should be limited to
50°F (10°C) per hour and humidity gradation should be limited to
10% per hour.
8. Secure the power cable to avoid tangled wires and possible
disconnection.
9. Plug the power cable into a suitably powered and grounded
electrical supply. An uninterruptable power supply (UPS) or power
distribution unit is recommended.
10. Press the power button on the server as well as the power button
on the attached monitor.
12. To attach the server to your domain, follow steps 1 through 9 of
this TechNet article:
CAUTION: Changing the name of the RoomView server may cause
the installed Microsoft® SQL Server® to stop running.
!
All brand names, product names, and trademarks
are the property of their respective owners.
11. Download and install the latest Windows® updates.
NOTE: The following login credentials are required: The Windows
username is: administrator, the password is Roomview1. The SQL
administrator username is: sa, the password is Roomview1. The
RoomView username is: Admin, the password is Admin.
For more information on these and other procedures in RoomView
Server Edition, please consult the embedded help by clicking the Help
icon ( circled in red below) at the upper right of the RoomView
interface:
2
edi
ug
tratskciuq
CEN-RVS-R210
www.crestron.com
888.273.7876 201.767.3400
©2011 Specifications subject to
change without notice.
QUICKSTART DOC. 7118B (2029344) 01.11
RoomView® Server
All brand names, product names, and trademarks
are the property of their respective owners.
1
Adding a Room in RoomView
Basic Setup: How to Add Rooms and Assets
.
These procedures assume that RoomView Server Edition has been
properly installed and configured on your system(s) and that you will
be connecting to a processor running the demo program when you add
a room as described in this guide. For more information refer to the
latest version of the RoomView Server Edition Installation Guide (Doc.
6543), which can be downloaded from the Crestron Web site
(www.crestron.com/manuals).
1. Log into RoomView.
2. Click the gear-shaped Setup icon ( circled in red below) at the
top right of the main “RoomView” window.
3. Click on the Add Room button and enter information into the field
as required by the red asterisk.
4. Enter the optional information, such as time zone, e-Control and
webcam urls, as desired.
5. Click the Processor Details control (circled in red) to expand the
Processor Details and Symbol Details fields. Enter the processor
details appropriate to your installation as shown in the following
figure.
NOTE: If the Auto Discover Symbols checkbox is selected and
your symbol in the control program is a version 7.2 or higher,
RoomView’s auto discovery feature will automatically import the
symbol’s information into the RoomView database.
CEN-RVS-R210
6. Select the Symbol version and IPID. Note that the demo program
has a RoomView Express/RoomView 6.0 symbol at IPID 03 and a
RoomView SE/RoomView 7.2 (RoomView SE/RoomView 7.0)
symbol at IPID 05.
7. Associate your room with an appropriate node in the Associate
with a Node field at the upper right.
8. Click the Update button and then Close to commit your choices.
Exit setup by clicking on the exit Setup icon ( circled in red
below left) and click on the Rooms tab at the top of the window to
see the new room in the “Status” window.
Adding an Asset in RoomView
1. Click the Setup icon at the top right of the main “RoomView”
window.
2. Click the Add Asset button.
3. Enter information into the fields indicated as required by the red
asterisks.
4. Enter the optional information in the IP Address and Port,
Password, SSL, Asset Tag, MAC Address and Custom Properties
fields.
5. Enter the maintenance details for the asset.
6. Associate the asset with a room or a node by clicking in the
appropriate check boxes in the Associate Asset field.
7. Click Update and then Close to commit your choices. Exit setup
and click on the Assets tab at the top of the window to see the new
asset in the “Status” window.
For More Information
If you cannot locate specific information or have questions after
reviewing this guide, please take advantage of Crestron's award
winning customer service team by calling the Crestron corporate
headquarters at 1-888-CRESTRON [1-888-273-7876].
You can also log onto the online help section of the Crestron Web site
(http://www.crestron.com/onlinehelp) to ask questions about Crestron
products. First-time users will need to establish a user account to fully
benefit from all available features.
Other Crestron Server manuals

Crestron Adagio AAS-1 User manual

Crestron

Crestron Adagio AAS-1 User manual

Crestron Adagio AAS-1 User manual

Crestron

Crestron Adagio AAS-1 User manual

Crestron Adagio AAS-1 User manual

Crestron

Crestron Adagio AAS-1 User manual

Crestron Adagio AAS-4 User manual

Crestron

Crestron Adagio AAS-4 User manual

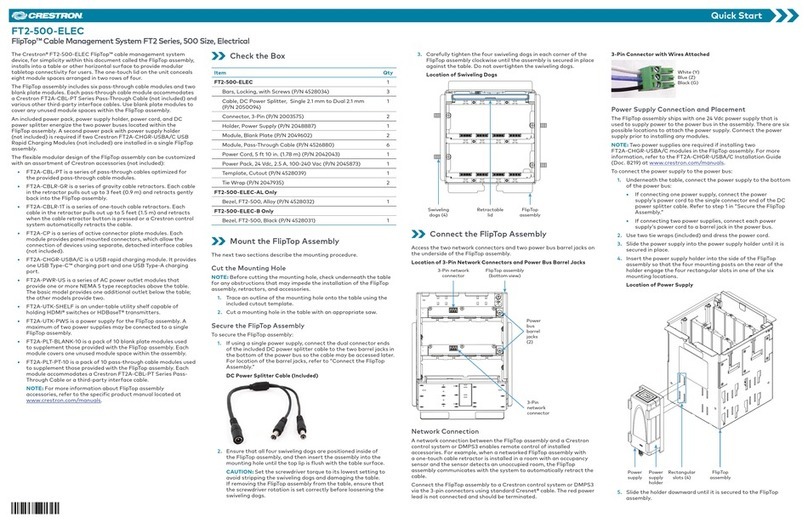
Crestron FlipTop FT2 Series User manual

Crestron

Crestron FlipTop FT2 Series User manual

Crestron CEN-iServer User manual

Crestron

Crestron CEN-iServer User manual

Crestron CEN-Fusion User manual

Crestron

Crestron CEN-Fusion User manual

Crestron Adagio AAS-1 User manual

Crestron

Crestron Adagio AAS-1 User manual

Popular Server manuals by other brands

Supermicro SuperServer 1029U-E Series user manual

Supermicro

Supermicro SuperServer 1029U-E Series user manual

Toshiba IPedge installation manual

Toshiba

Toshiba IPedge installation manual

QNAP WS-411U Quick installation guide

QNAP

QNAP WS-411U Quick installation guide

B&B Electronics Serial Servers Vlinx VESR9xx instruction manual

B&B Electronics

B&B Electronics Serial Servers Vlinx VESR9xx instruction manual

Fujitsu SPARC Enterprise T5120 Getting started guide

Fujitsu

Fujitsu SPARC Enterprise T5120 Getting started guide

NEC Express5800/R120h-1M 3rd-Gen USE PRECAUTIONS

NEC

NEC Express5800/R120h-1M 3rd-Gen USE PRECAUTIONS

Extreme Networks ExtremeControl IA-A-25 installation guide

Extreme Networks

Extreme Networks ExtremeControl IA-A-25 installation guide

Melco N1 Series Software manual

Melco

Melco N1 Series Software manual

Nortel 1000S Installation and configuration

Nortel

Nortel 1000S Installation and configuration

Supero AS-4041M-82R user manual

Supero

Supero AS-4041M-82R user manual

Encore ENNUS1 user manual

Encore

Encore ENNUS1 user manual

F5 VIPRION 2400 Platform guide

F5

F5 VIPRION 2400 Platform guide

Supermicro MicroBlade MBI-6219M-2N user manual

Supermicro

Supermicro MicroBlade MBI-6219M-2N user manual

HP Integrity rx8640 Quickspecs

HP

HP Integrity rx8640 Quickspecs

Lenovo HR630X V2 user guide

Lenovo

Lenovo HR630X V2 user guide

Measurement Computing NAP7000D user manual

Measurement Computing

Measurement Computing NAP7000D user manual

Meinberg IMS - LANTIME M3000S manual

Meinberg

Meinberg IMS - LANTIME M3000S manual

exaSound Gamma Music Server owner's manual

exaSound

exaSound Gamma Music Server owner's manual

manuals.online logo
manuals.online logoBrands
  • About & Mission
  • Contact us
  • Privacy Policy
  • Terms and Conditions

Copyright 2025 Manuals.Online. All Rights Reserved.