CRG LF100 User manual


LF100
LF500

I
CONTENTS
Chapter 1. Cash Register Introduction................................................................ 1
1. Introduction.......................................................................................................... 1
1.1 Important....................................................................................................... 1
1.2 Environmental operating characteristics.................................................. 2
1.3 Electrical characteristics............................................................................. 2
Chapter 2. Cash Register Characteristics...........................................................3
2.1 Parts of ECR..................................................................................................... 3
2.1.1 Mode switch...............................................................................................4
2.1.2 Display........................................................................................................4
2.1.3 Cash drawer.............................................................................................. 4
2.1.4 Interface..................................................................................................... 5
Chapter 3. System Management............................................................................6
3.1 System Initialization (Advanced setup)......................................................... 6
3.2 Restore& Backup..............................................................................................6
3.3 Format................................................................................................................ 6
Chapter4. System Setup.......................................................................................... 7
4.1 System Basic setup..........................................................................................7
4.1.1 Date & Time setup....................................................................................7
4.1.2 System Parameter setup.........................................................................7
4.1.3 Keyboard function setup........................................................................10
4.1.4 Clerk Authority Setup............................................................................. 13
4.2 Operator display setup.................................................................................. 14
4.3 Receipt setup.................................................................................................. 14
4.3.1 Receipt head and bottom setup........................................................... 15
4.3.2 Sales receipt setup.................................................................................17
4.3.3 Kitchen printer setup.............................................................................. 19

II
4.4 Sales setup......................................................................................................20
Chapter 5. Basic Information................................................................................21
5.1 PLU setup........................................................................................................ 21
5.1.1 Modify the PLU information.................................................................. 24
5.1.2 Change the PLU stock...........................................................................24
5.1.3 Delete the PLU........................................................................................25
5.2 Department setup...................................................................................... 25
5.3 Table setup...................................................................................................... 27
5.4 Taste setup...................................................................................................... 28
5.5 Payment setup................................................................................................ 28
5.6 Other name setup...........................................................................................28
5.7 Tax setup..........................................................................................................29
5.7.1 PLU with VAT.......................................................................................... 30
5.7.2 PLU with Add-on tax.............................................................................. 31
5.7.3 Department with tax............................................................................... 32
Chapter 6. Sale Operation..................................................................................... 33
6.1 Preparation work.............................................................................................33
6.1.1 Clerk Sign-on...........................................................................................33
6.2 PLU................................................................................................................... 33
6.2.1 Enter PLU................................................................................................ 33
6.2.2 Manual Price Entry................................................................................. 33
6.2.3 Repetition.................................................................................................34
6.2.4 Multiplication............................................................................................35
6.2.5 Split pricing.............................................................................................. 36
6.3 Department...................................................................................................... 37
6.3.1 Direct Department Sale......................................................................... 37
6.3.2 Manual price entry.................................................................................. 37
6.3.3 Multiplication............................................................................................38
6.3.4 Department Shift.....................................................................................38

III
6.4 Reduction, Discount, and Service charge function................................... 39
6.4.1 Reduction.................................................................................................39
6.4.2 Discount................................................................................................... 39
6.4.3 Service charge/Tip Operation...............................................................40
6.5 Correction Operation......................................................................................40
6.5.1 Void/ Last item Qty Correction..............................................................40
6.5.2 Void/ Cancel Products........................................................................... 41
6.5.3 Refund...................................................................................................... 43
6.6 Payment Method.............................................................................................44
6.6.1 Cheque/Credit card Payment............................................................... 44
6.6.2 Payment by User-defined......................................................................44
6.7 Other Functions.............................................................................................. 44
6.7.1 R/A & P/O................................................................................................ 44
6.7.2 Stop Printing............................................................................................ 45
6.7.3 Re-print.....................................................................................................45
6.7.4 Print Reference No.................................................................................45
6.7.5 Hold Bill Function....................................................................................46
6.8 Restaurant Management...............................................................................46
6.8.1 Assigning a table.................................................................................... 46
6.8.2 Suspense the table & Recall it............................................................. 47
6.8.3 Transferring the Table............................................................................ 48
6.8.4 Numbers of Guest.................................................................................. 49
6.8.5 Taste Information Setup........................................................................ 49
Chapter 7. Reports.................................................................................................. 51
7.1 E-Journal checking.........................................................................................51
7.2 E-Journal clear................................................................................................ 52
8.1 Bar code scanner Connection...................................................................... 53
8.2 E-scale Connection........................................................................................ 53
8.2.1 Bar code Scale........................................................................................53
8.2.2 Price computing scale............................................................................54

IV
8.3 External Printer Connection..........................................................................55
8.4 Label Printer connection................................................................................56
8.5 Connection Cable........................................................................................... 58

1
Chapter 1. Cash Register Introduction
1. Introduction
We wish to thank you for the purchase of the electronic cash register. Please
read the instructions to become familiar with its functions and operations
before you start to operate this equipment. Keep this manual for future use. It
will help you to solve most problems encountered in its operation.
Specification is subject to change without notice.
The company assumes no responsibility for any errors and their
consequences thereafter.
1.1 Important
◆To use this product safely and correctly, read this manual thoroughly and
operate as instructed.
◆Install the cash register in a place where it will not be exposed to direct
sunlight, unusual temperature changes or high humidity.
◆Clean the cash register with dry, soft cloth. Never use such cleaning agents
like petrol or solvents.
◆Avoid spilling any liquids on the cash register as they may damage its
functionality. The keyboard is to be carefully protected.
◆Connect the cash register with the supplied adapter into a standard network
plug. In an environment with strong interference use the special
anti-interference aids recommended by the manufacturer of the cash
register.
◆Never try to open the cash register or attempt your own repairs. Take the
cash register to your authorized dealer for repairs.
◆Use only the program recommended by your authorized dealer as well as
the original interconnecting cable for the cash register communication with
a computer.
◆If the cash register is used in ways other than those described in these
instructions, the dealer cannot be responsible for data correctness and
resulting damages.
◆Please ensure that the socket outlet is installed near the equipment and
shall be easily accessible.

2
◆Shock may occur if the battery on the main board is replaced by an
incorrect one. Be sure the specification of your new battery is the same as
the old one on the main board for your changing. And please dispose your
used battery correctly.
1.2 Environmental operating characteristics
Operating temperature: 0ºC ~ +45ºC
Storage temperature: -20º C ~ +55º C
Relative humidity: 20% ~ 95%
1.3 Electrical characteristics
Power voltage: AC220V ± 15% (for LF500)
AC100-240V (for LF100)
Power frequency: 50 Hz
Power rated: 30W

3
Chapter 2. Cash Register Characteristics
B serial machines have two models: LF100 and LF500. The battery function
is optional.
2.1 Parts of ECR
- LF100
-LF500
4
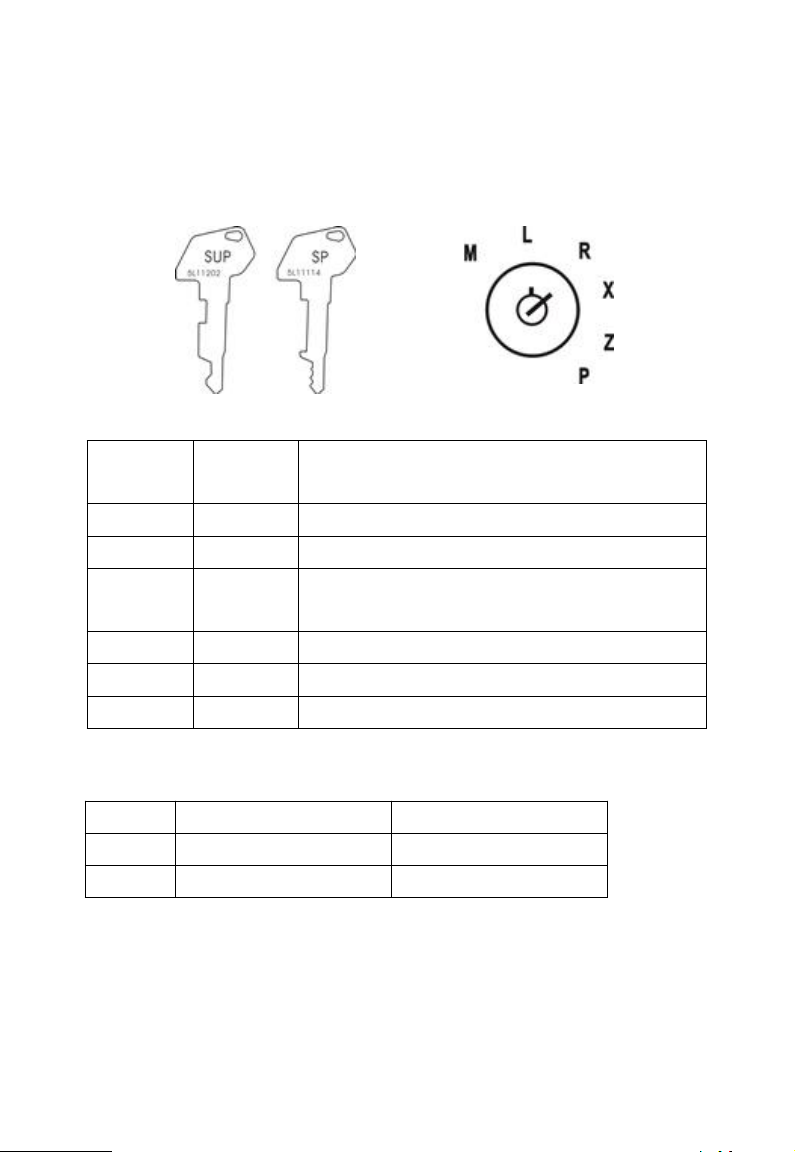
2.1.1 Mode switch
Insert the mode key into the mode switch and move the key to get an
appropriate mode.
Mode
Switch
Mode Name
Description
L
CLOSE
Turn off the cash register.
R
REGISTER
Use this mode for normal registration.
X
READ
Reads sales data in memory without clearing the
data.
Z
RESET
Reads sales data in memory and clears the data.
P
PROGRAM
Use this mode for cash register programming.
M
MANAGER
Use this mode for Manager control operation.
2.1.2 Display
Model
Operator Display
Customer Display
LF100
128*64 LCD
8 digits LED
LF500
192*64 LCD
8 digits LED
2.1.3 Cash drawer
The cash drawer can open automatically whenever you finalize a registration.
Press the “SHIFT” + “CASH” key can also open it when there is no sale in the
“R” mode. In case of power failure or the machine is in malfunction, the cash

5
drawer does not open automatically. Even in these cases, you can open the
cash drawer by pulling drawer release lever.
Note: The drawer will not open if it is locked with a drawer lock key.
2.1.4 Interface
Your cash register includes many different interfaces to connect several
external devices. Beside the well-known serial RS232-interfaces the cash
register also supports modem interfaces. So it has ports for typical cash
register peripheral devices such as kitchen printer, scanner, modem as well as
new powerful interfaces for fast data transmission.
For further operating instructions please see Chapter 8 Communication Port.
Note: Check COM1 set for LF100 COM port.
Port Name
Function Description
DK
Connect to cash drawer.
PS/2
Connect to P/S 2 bar code scanner.
COM2
Connect to barcode scanner or external printer.
COM1
Connect to PC, external printer, or scale.

6
Chapter 3. System Management
3.1 System Initialization (Advanced setup)
Warning:
System Initialization will clear all programmed data and reports. Please backup
all the useful information before initialization.
Turn the mode switch to P position → Advanced management → press【SBT】
→ Initialize →【CASH】to confirm.
Note: Please do the system initialization every time when upgrade the system.
3.2 Restore& Backup
Not support.
3.3 Format
All sales reports and programmed info will be cleared by this function. Usually,
it is unnecessary for the user to perform this function, for every machine has
been set as default before releasing.

7
Chapter4. System Setup
4.1 System Basic setup
System Basic setup includes the Date& Time setup, Communication setup,
Keyboard function setup, and Operator setup.
4.1.1 Date & Time setup.
Operation: P position → System setting→ Date & Time
4.1.2 System Parameter setup.
P mode → System setting →【SBT】→System parameter →【SBT】
The machine will show as:
Programming explanation please read the table 4-1.
Table 4-1
System
parameters
Format
Setting method
1.Shop No.
0000
0000-9999
2.ECR No.
0XXX
001-254
3.Baud Rate
0000
Setting communication baud rate between the
machine and back software or peripherals via
COM port.
If the value extends to more than 4 numeric, input
4 numeric ahead. For example, 1152 means the
baud rate 115200.
4.Reserved
0000
System Param.
01. Shop No. 0000
02. ECR No. 0001
03. Baud rate 9600

8
5. Min. No.
0000
0000-9999 (the min. serial no. of the receipt)
6. Max.No.
0000
0000-9999 (the max. serial no. of the receipt)
7.E-Barcode
ABCD
A=1, connect with the Guanghua e-scale, model
DS-788.
A=0, connect with the electronic instrumentation,
such as pricing.
A=4, connect with the electronic instrumentation,
such as weight.
CD is the e-scale barcode signs. Setting range
20-29.
8.Backlight
X00Y
X≠0, the machine has backlight.
X=0, close backlight.
Y is the time of closing backlight.
Y=0, the machine do not close the backlight.
(It’s dard for the LCD screen if Y=0)
9.Decimal
XYZK
X—number of digits: 0-4
Y---fraction control: round off=0, cut off<5, round
up>5
Z---restriction (0,1) last amount digit: 0 digit: Z≠0,
1 digit: Z=0
K--- rounding when restriction: fraction cut off=0,
get integer of cash after fraction round up=1,
get integer of fraction after round off=2
10.S/C rate
0000
Service charge rate setting. Input 0500 means
this PLU add 5% service charge.
11. DCT rate
0000
Discount rate setting. Input 9500 means 5%
discount.
12.Sales set
000D
D=1, PLU adds service charge automatic.
D=2, the machine give the reduction automatic.
13.COM1
AB0D
A- Setup the print font of the external printer.
B- Setup the print method of the external printer.
D- Setup the external printer model.
(Please make sure the baud rate is 9600 when
use COM1 for communication)
14.COM2
000D
Same to 13.
15&16.
Reserved
0000
17. Reset
Rep.
A00D
A=0, do not reset the serial no. after clear the
e-journal information.
A=1, reset the receipt serial no. after clear the
financial report.

9
A=2, reset the receipt serial no. after clear the
cashier report.
A=4, reset the receipt serial no. after clear the
e-journal information.
D=1, the machine will ask if sure to clear the
report after print the single report on Z.
D=0, the machine will clear the report automatic
after printed the single report on Z.
D=2, the machine will show and print the gross
profit when take X mode report.
D=0, the machine will print “***” instead of “gross
profit”.
18. Receipt
Font
ABCD
A- PLU name line.
B- Sub-total line.
C- commodity line.
D- receipt no., and date line.
1 =double height, 2=double width, 3=double H&W
19. Printing
Content
ABCD
A=1, print the PLU code on receipt.
A=0, print the serial no. on receipt.
A=2, do not print the serial no. on receipt.
A=0, the PLU name is in one line.(the name and
the qty, price, amount is not in the same
line.)
A=4, the PLU name, qty, price, and amount are in
the same line.
B=0, in R mode, print all PLUs when selling.
B=1, in R mode, print the sale receipt when do the
settlement.
B=2, the receipt will print the total qty.
B=4, recall the temporary receipts, but do not print
the detail info of the table. If need to print the
detail, please input the table no., pres【Shift】-
【Table】
B=5, recall the temporary receipts, but do not print
the detail info of the table. If need to print the
detail, please setup the program key【Suspense
account】.
C=1, combine the same PLU.
C=2, print the “cancel” item after the whole sale.
(B=1)
C=4, means just print the current receipt head infor.
Note: The default value of No.19 is 0040, which
means just print the current receipt head. If need to

10
print the next receipt head auto when the first sale
finished, C=0.
20. Print
parameter
ABCD
Printing setup.
A, printing color setup.
B, the receipt space setup.
C, the line space setup.
21. Reprint
00CD
Setup the number of the reprint receipt. (1-20)
22. Reserved
0000
23. Kitchen
printer set
ABCD
AB refers to the lines of one page.
CD refers to the spaces between one receipt and
another.
24. Table set
0000
Setup the table numbers. Max. is 250.
25. Black
0000
Reserved
26. Matrix
ABCD
A, setup offset to right. Range:0-15.
B, setup offset to left. Range:0-15.
C=1, check matrix printer, C=0, not check.
D, degree of paper tightness winding to printer
reel. Range:0-15.Default:4
27. Card
Capacity
0000
Setup the card numbers.
28. Point
Formula
ABCD
Record A points on member card if BCD paid by
customer in a business.
29. Member
Print
ABCD
A=1, print member card number. A=0, not print.
B=1, print member name. B=0, not print.
C=1, print card total points. C=0, not print.
D=1, print card available points. D=0, not print.
D=2, record integer points only, cut off decimal
points.
4.1.3 Keyboard function setup
In P mode → “System setting” → “Keyboard”
In R & M mode, the keyboards function can be programmed as you need.
The function attrib includes: Name, Code, No.1, No.2.
In that the “Name” is the key function, users do not need to set up it.
“Code”, it's the code for keyboard. All the keys function has their own function
code. (i.e. the function code of RA is 33)
“No.1 & No.2”, it's the function value1 and function value2. There are two
functions each key. For example, we program the key “D1” , (01, 01, 02), in R

11
mode, if we press this D1, we sell D1, if press “SHIFT” , then “D1”, means we
sell D2.
If need to cancel programmed keyboard, press 【CANCEL】→【SBT】
Below is the keyboard function value:
Table 4-2
Function
Code/Value
Function
Code/Value
Function
Code/Value
Forbid
0
Forbid
14
Hold
30
Dept.
1
Card
15
Forbid
31
Direct PLU
2
Feed
16
Forbid
32
PLU
3
Print
17
RA
33
Change
price
4
Open
drawer
18
PO
34
Service
charge
5
Cancel
19
Reference
no.
35
Discount
6
Clear
20
Correction
36
Open table
7
Operator
21
Taste
37
Transfer
table
8
Multiply/
Divide
22
Input cash
38
Reduction
9
Subtotal
23
Guest
40
Payment
10
Cash
25
Cancel all
42
Refund
11
Decimal
point
26
Cursor
(left)
43
Shift
12
00
27
Cursor
(right)
44
Forbid
13
Digit
28
Deposit
45
Only the programmable key “Payment method”, “Department”, “RA”, “PO”,
“Direct PLU” and “Refund” have two functions.
Below is the introduction of the programmable key functions:

12
Table 4-3
Function
Function
Code/Value
Function1&2 introduction
Direct PLU
02
Basic info—PLU setting, the PLU code.
Department
01
Basic info—Dept. setting, the department
code.
Payment
method
10
Basic info—Payment, the payment code.
RA
33
Basic info—Payment—from “11 Cash in
A” to “15 Cash in E”
PO
34
Basic info—Payment—from “21 Cash out
A” to “25 Cash out E”
Refund
11
Basic info—Other name—from “31
Refund A” to “35 Refund E”
Member
card
15
Function1 is 02.
Example, program the key【D6】to “RA”.
1. P mode → System setting → Keyboard.
Name: Open drawer
Code: 0018
No. 1: 00
No. 2: 00

13
2. Press 【D6】
3. Check the “RA” function code is 33 from the table 4-2. Input “33”--【SBT】
4. Input the No.1 and No.2 functions value are 0001 and 0002. Then press
【SBT】, when finish setting, press【CASH】to return.
4.1.4 Clerk Authority Setup.
Setup the operators name, password, and authority.
Note: The operator password should be any numeric 1-8.
Operations:
1. P mode → System setting → Cashier → 【SBT】.
Name: Dept.
Code: 0001
No. 1: 6
No. 2: 12
No.6 and no.12 means this key has
two function values, the
department6 and department12.
No.1
No.2
Code: 1
Psw:
Name: CLERK 1

14
2. Input the operator password “12345678” .
3. Press 【SBT】twice. The machine input operator name.
4. Press 【SBT】to confirm.
5. Press 【SBT】to choose the operator authority. Press cursor keys to go to
the next.
To change the operator information, it should be:
In P mode → System setting → Clerk → Input the clerk code → 【SBT】.
4.2 Operator display setup.
In P position → System setting → 【SBT】→ LCD Setting → 【SBT】
4.3 Receipt setup.
Receipt setup includes the sales receipt, KP receipt printing content, and
printing font etc.
Code: 1
Psw: ********
Name: CLERK1
CLERK Auth.
Sales Auth. N
Rf. Auth. N
PLU DCT N
LCD Contrast
<-Down Up->
SBT-Confirm
This manual suits for next models
1
Table of contents
Other CRG Cash Register manuals


