CRG CRG100 User manual

ELECTRONIC CASH REGISTER
USER MANUAL
V1.0
CRG100
CRG500

CONTENTS
1. Cash Register Introduction ............................................................. 1
1.1. Introduction ...................................................................................... 1
1.2. Important .......................................................................................... 1
1.3. Environmental Operating Characteristics......................................... 2
1.4. Electrical Characteristics ................................................................... 2
2. Characteristics ............................................................................... 3
2.1. Identification of Parts........................................................................ 3
2.2. Mode Switch ..................................................................................... 4
2.3. Display............................................................................................... 4
2.4. Cash Drawer...................................................................................... 5
2.5. Keyboards.......................................................................................... 5
2.6. Keyboard Functions .......................................................................... 6
2.7. Memory............................................................................................. 7
2.8. Interface............................................................................................ 8
3. Gettings Started............................................................................. 9
3.1. Overview ........................................................................................... 9
3.2. Unboxing ........................................................................................... 9
3.3. Paper Installation .............................................................................. 9
3.4. Date & Time .................................................................................... 10
4. Basic Programming ...................................................................... 11
4.1. Header & Footer ............................................................................. 11
4.2. Tax Settings ..................................................................................... 12
4.3. Department Setting ........................................................................ 13
4.3.1 Department Func. 1 List .............................................................. 14
4.3.2 Assign Tax to Department........................................................... 15
4.4. Clerk Setup ...................................................................................... 16
4.4.1 Clerk Authority Table................................................................... 17
4.4.2 Clerk Password Removal ............................................................. 18
4.5. Barcode Setup................................................................................. 18
4.5.1 Delete Barcode ............................................................................ 20
4.5.2 Barcode Stock Update................................................................. 20

5. Register Operation....................................................................... 21
5.1. Clerk Sign On ................................................................................... 21
5.1.1 Change Clerk ............................................................................... 21
5.1.2 Clerk Authority Override.............................................................. 22
5.2. Department Sale (Keyboard buttons)............................................. 22
5.2.1 Department Sale Example........................................................... 23
5.3. Sales Functions................................................................................ 24
5.4. Discounts and Premiums ................................................................ 25
5.5. Refunds ........................................................................................... 26
5.5.1 Refund Example .......................................................................... 26
5.6. RA and PO ....................................................................................... 27
5.7. Tables .............................................................................................. 27
5.7.1 Table example ............................................................................. 28
5.8. Order Hold....................................................................................... 29
5.9. Taste................................................................................................ 29
6. Reports........................................................................................ 30
6.1. Report Overview ............................................................................. 30
6.2. Financial Report .............................................................................. 31
6.3. Department Report......................................................................... 32
6.4. Clerk Report .................................................................................... 33
6.5. E-Journal.......................................................................................... 34
6.5.1 Clearing the E-Journal ................................................................. 35
7. Intermediate Programming .......................................................... 36
7.1. Receipt Format................................................................................ 36
7.2. Report Setting ................................................................................. 36
7.3. Receipt Font .................................................................................... 37
7.4. Printer Setting ................................................................................. 37
7.5. LCD Setting...................................................................................... 37
7.6. Table Setting ................................................................................... 38
7.7. Payment .......................................................................................... 38
7.8. Taste Setting.................................................................................... 39
7.9. Other Name..................................................................................... 40
7.9.1 Other Name Code Table .............................................................. 40
8. Advanced Programming ............................................................... 41

8.1. System Options ............................................................................... 41
8.2. Keyboard ......................................................................................... 43
8.2.1 Attribute Table ............................................................................ 43
8.2.2 Function Table............................................................................. 44
9. Useful Information....................................................................... 45
9.1. Factory Reset................................................................................... 45
9.2. Error Codes...................................................................................... 46
9.3. Spare Parts Codes ........................................................................... 47
10. PC Software................................................................................. 48
10.1. Overview ..................................................................................... 48

1
Cash Register Introduction
1. CASH REGISTER INTRODUCTION
1.1. Introduction
We wish to thank you for the purchase of the electronic cash register. Please
read the instructions to become familiar with its functions and operations
before you start to operate this equipment. Keep this manual for future use,
it will help you to solve most problems encountered in its operation.
Specification is subject to change without notice.
The company assumes no responsibility for any errors and their
consequences thereafter.
1.2. Important
To use this product safely and correctly, read this manual thoroughly
and operate as instructed.
Install the cash register in a place where it will not be exposed to
direct sunlight, unusual temperature changes or high humidity.
Clean the cash register with dry, soft cloth. Never use cleaning agents
like petrol or solvents.
Avoid spilling any liquids on the cash register as they may damage its
functionality. The keyboard is to be carefully protected.
Connect the cash register with the supplied adapter into a standard
plug. In an environment with strong interference, use the special
anti-interference aids recommended by the manufacturer.
Never try to open the cash register or attempt your own repairs. Take
the cash register to your authorised dealer for repairs.
Use only the program recommended by your authorised dealer, as
well as the original interconnecting cable for the cash register
communications with a computer.
If the cash register is used in ways other than those described in
these instructions, the dealer cannot be responsible for data
correctness and resulting damages.
Shock may occur if the battery on the main board is replaced by an
incorrect one. Specifications of new battery must match old one.

2
Cash Register Introduction
1.3. Environmental Operating Characteristics
Operating Temperature:
0ºC ~ +45ºC
Storage Temperature:
-20º C ~ +55º C
Relative Humidity:
20% ~ 95%
1.4. Electrical Characteristics
Power voltage:
CRG500: AC220V ± 15%
CRG100: AC100-240V
Power frequency:
50Hz
Power rated:
30W
3
Characteristics
2. CHARACTERISTICS
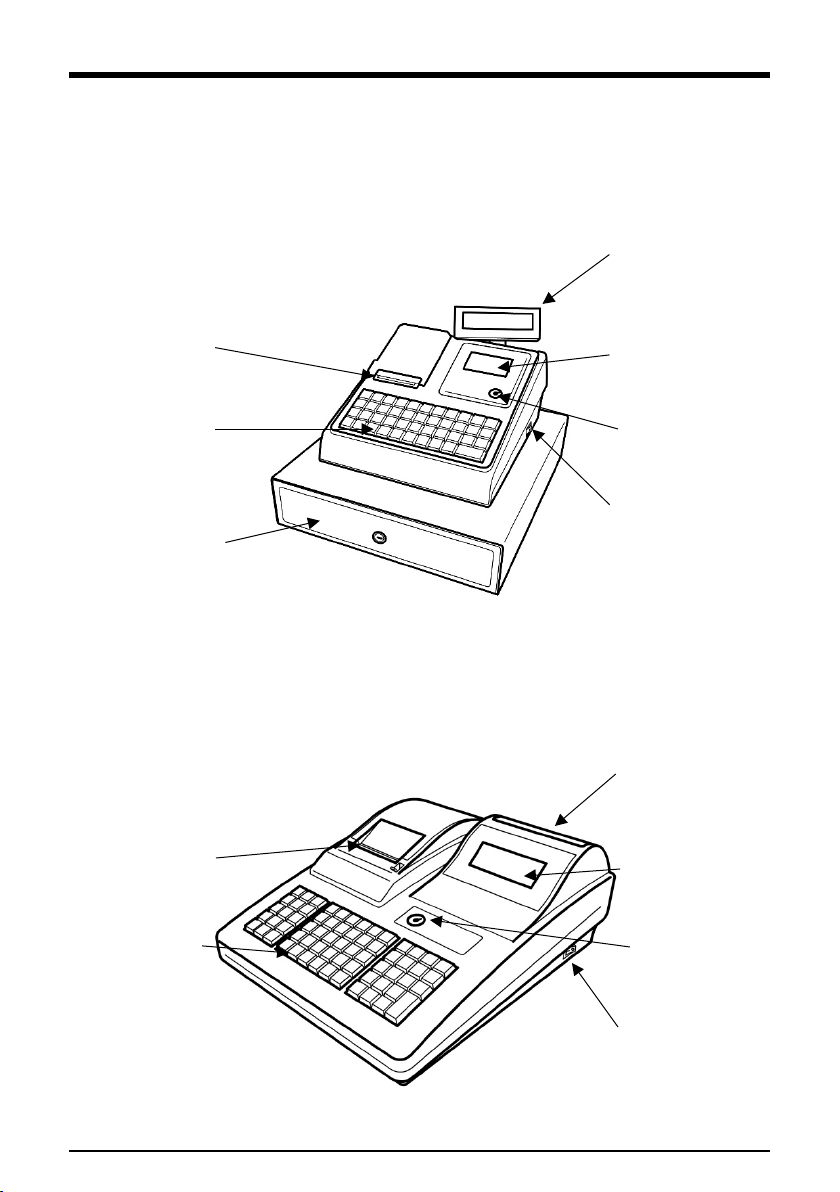
2.1. Identification of Parts
CRG100
CRG500
Customer Display
Operator Display
Mode Switch
Power Switch
Receipt Printer
Keyboard
Drawer
(optional)
Customer Display
Operator Display
Mode Switch
Power Switch
Receipt Printer
Keyboard

4
Characteristics
2.2. Mode Switch
Insert the mode key into the mode switch and move the key to the
appropriate mode.
Mode
Switch
Mode
Name
Description
SUP
Key
SP
Key
M MANAGER: Unrestricted sales mode
L CLOSE: Turn cash register off
R REGISTER: Normal sales mode
X READ: Read sales data without clearing data
Z RESET: Read sales data and clear data
P PROGRAM: All programming and settings access
2.3. Display
Model
Operator
Display
Customer
Display
CRG100
128*64 LCD
8 Digits LED
CRG500
192*64 LCD
8 Digits LED
5
Characteristics
2.4. Cash Drawer
The cash drawer can open automatically when a transaction is finalised.
Pressing the CASH/NO SALE button without inputting a transaction will open
the cash drawer in “M” mode, “R” mode is dependent upon cashier
authority.
In case of power failure or malfunction, the cash drawer does not open
automatically. The drawer can be released manually, using the lever located
on the bottom of the drawer.
Note: The drawer will not open if it is locked with a drawer lock key
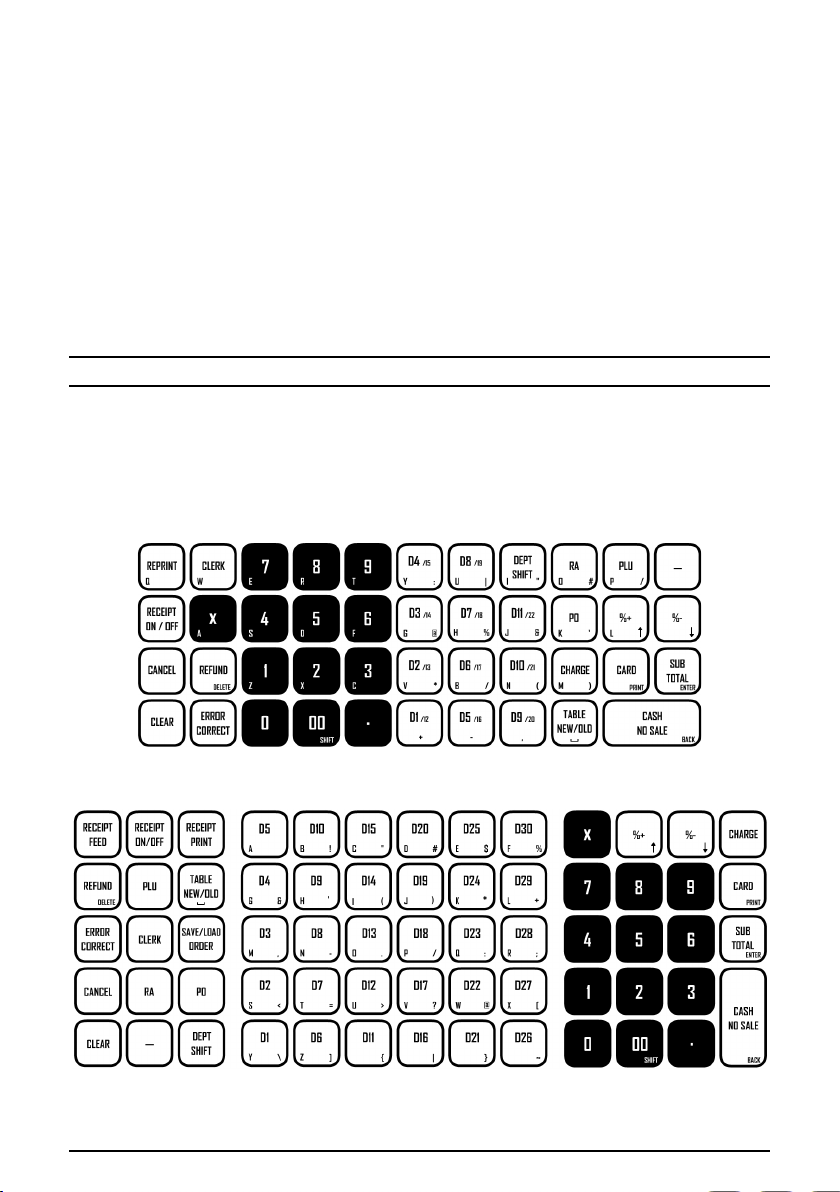
2.5. Keyboards
CRG100
CRG500

6
Characteristics
2.6. Keyboard Functions
Sales
Feed Paper*
Cancel Sale
Toggle Receipt Print
Refund Item
Print Last Receipt
Error Correct
Paid Out
Clear Text / Clear Errors
Received On Account
Percentage Premium
Hold / Recall Sale (one)*
Percentage Discount
Open / Hold Table
Discount Amount
Clerk Sign On
Decimal For Quantity
Product Lookup
Quantity
Shift Department Level
Charge Payment Method
Departments
Card Payment Method
Sub Total
Numerical
Departments

7
Characteristics
Menu Navigation
Enter / Confirm
Move Up
Back / Cancel
Move Down
Print Current Info
Clear Errors
Text Entry
Shift Text (A a *)
Delete Text
Space
Symbol Select
2.7. Memory
Departments:
50
PLUs:
3450
Clerks:
50
Receipt Lines:
50
Tables:
50
Tax Levels:
4

8
Characteristics
2.8. Interface
PS/2
Legacy port for older style barcode
scanners.
Not currently utilised on modern barcode
scanners.
COM
RS232 Serial port for PC or barcode
scanner connections.
Currently only used for barcode scanner
connections.
USB
USB-B port for PC connection.
Superseded the PC COM connection,
allowing the barcode scanner to stay
connected at the same time as the PC.
DK
RJ11 Drawer kick port.
Accepts RJ11/RJ12 cash drawers, must be
12V.

9
Gettings Started
3. GETTINGS STARTED
3.1. Overview
The CRG100 and CRG500 are preconfigured with default data, allowing
instant use of the product. Clerk 1 is signed on as default allows sales to be
created instantaneously. Manager mode is available to utilise all functions
that may be restricted for Clerk 1.
An A4 quick start guide is included in the box, detailing quick setup of
basic settings and functional use.
3.2. Unboxing
Remove the cash register from the box, keeping all packaging safe in case in
case of re-boxing.
Plug the cash register into a power socket and turn on the power switch.
Ensure the thermal paper roll and mode keys are available.
3.3. Paper Installation
Lift the printer lid manually on the CRG100, or by pushing the level on the
CRG500.
Drop the 57mm thermal paper into the base of the print unit, pull the paper
from the bottom of the roll towards the keyboard.
Close the print lid firmly on to the paper, tearing off the excess.

10
Gettings Started
3.4. Date & Time
Note: Date and time should be input before beginning any transactions.
⊚P SYSTEM SETTINGS [ENTER] DATE & TIME [ENTER]
Date:20221231
Time:123000
1. Input date in format YYYYMMDD [0] – [9]
2. Confirm date entry [ENTER]
3. Input time in format HHMMSS [0] – [9]
4. Confirm time entry [ENTER]

11
Basic Programming
4. BASIC PROGRAMMING
4.1. Header & Footer
Note: The header appears at the top of every printed receipt, whilst the footer
appears at the bottom.
⊚P SYSTEM SETTINGS [ENTER] HEADER & FOOTER [ENTER]
01YOUR RECEIPT
Flag1:Header
SBT-Confirm
1. Repeat the following steps for each receipt line
a. Use arrow buttons to select line [↑] & [↓]
b. Enter text edit mode [ENTER]
c. Input new line text using A-Z keys [A] – [Z]
d. Confirm new line text [ENTER]
e. Flag1: Header or footer [↑] & [↓]
f. Flag1 confirmation [ENTER]
g. Flag2: Text alignment [↑] & [↓]
h. Flag2 confirmation [ENTER]
i. Flag3: Print or disable [↑] & [↓]
j. Flag3 confirmation [ENTER]
k. Flag4: Font size [↑] & [↓]
l. Flag4 confirmation [ENTER]
Flag1
Header (top) | Footer (bottom)
Flag2
Left | Center | Right
Flag3
Print | No Print
Flag4
Normal | Double Height | Double Width | DH & DW

12
Basic Programming
4.2. Tax Settings
Note: Tax rate percentages are assigned to tax codes 1-4. These codes are then
assigned to departments or PLUs. This allows the rate to be changed in one
location, if required.
⊚P BASIC INFO [ENTER] TAX SETTING [ENTER]
Code:0001
Rate:0.00__________
Name:VAT
1. Use arrow keys to select VAT 1 - 4 [↑] & [↓]
2. Enter tax percentage between 0.00 and 99.99 [0] – [9] & [.]
3. Confirm tax rate entry [ENTER]
4. Input new tax name if required [A] – [Z]
5. Confirm changes and move to next record [ENTER]
Code:0002
Rate:0.00__________
Name:VAT2

13
Basic Programming
4.3. Department Setting
Note: Departments relate to the numbered buttons on the cash register and
can be used for direct sales. 1-11 (CRG100) and 1-30(CRG500)
⊚P BASIC INFO [ENTER] DEPT SETTING [ENTER]
Input Code:
_____________
1. Input the required department code [0] – [9]
2. Confirm department code [ENTER]
Price:0.00_________
Func. 1:00010040
Func. 2:00000000
DEPT:1
3. Input the price if applicable (no decimal) [0] – [9]
4. Confirm price [ENTER]
Note: To skip this step, press [ENTER] instead of [.]
5. Edit Func. 1 (Skip step to leave unchanged) [.]
a. Use arrows to navigate options [↑] & [↓]
b. Toggle option between Y / N [ENTER]
c. Save function changes [BACK]
6. Skip Func. 2 (Not required for this model) [ENTER]
7. Input the department name [A] – [Z]
8. Confirm the department name [ENTER]
9. Setup complete, screen showing now showing next department.

14
Basic Programming
4.3.1 Department Func. 1 List
Note: Options 1-7 default settings are the most common, but can be changed
here if required. Tax options 8/13 are explained further in section (4.3.2)
1/13 Add S/C
Y= Allow [%+] to apply to this item
N = [%+] does not affect this item
2/13 Discountable
Y= Allow [%-] to apply to this item
N = [%-] does not affect this item
3/13 Zero Price
Y= Allow sale of item at £0.00
N = Item must have value above £0.00
4/13 Negative
Y = Item will be negative, money to customer
N= Item sold as normal
5/13
Scale Item
Not applicable for this model
6/13 Change Price
Y= Allow manual price input of child barcodes
N = Price is always fixed for children
7/13
Lower than
price 2
Y= Item can be sold at any price
N = Item cannot be sold cheaper than cost
8/13 Tax included
Y= VAT, tax is calculated from the item total
N = Tax will be added to price, increasing total
9/13 Tax-on Tax
Only applicable if “8/13 = N”
Y = Tax 1 applies to the total after all other tax
N= All tax rates applied to item price
10/13 Tax rate1
Y = Value of tax rate 1 applies
N = Tax rate 1 ignored
11/13 Tax rate2
Y = Value of tax rate 2 applies
N= Tax rate 2 ignored
12/13 Tax rate3
Y = Value of tax rate 3 applies
N= Tax rate 3 ignored
13/13 Tax rate4
Y = Value of tax rate 4 applies
N= Tax rate 4 ignored

15
Basic Programming
4.3.2 Assign Tax to Department
⊚P BASIC INFO [ENTER] DEPT SETTING [ENTER]
Input Code:
_____________
1. Input the required department code [0] – [9]
2. Confirm department code [ENTER]
Price:0.00_________
Func. 1:00010040
Func. 2:00000000
DEPT:1
3. Skip price field [ENTER]
4. Edit Func. 1 [.]
5. Use arrow keys to select option 8 / 13 [↑] & [↓]
6. Toggle between Y / N [ENTER]
a. Y = VAT
b. N = Add-on tax
7. Select the rate to apply [↑] & [↓]
a. 10 / 13 = rate1
b. 11 / 13 = rate2
c. 12 / 13 = rate3
d. 13 / 13 = rate4
8. Toggle the required rate to enable or disable [ENTER]
a. Y = Apply selected rate
b. N = Disable selected rate
9. Confirm function changes [BACK]
10. Confirm department changes and exit [BACK]

16
Basic Programming
4.4. Clerk Setup
Note: If any clerk is assigned a password, all clerks will be required to sign in.
If all passwords are empty, clerk 1 will be default on R and X mode.
⊚P SYSTEM SETTINGS [ENTER] CLERK [ENTER]
Code: 0
Psw.:________
Name:MANAGER
1. Use arrows to select clerk [↑] & [↓]
2. Type password (optional) [0] - [9]
3. Confirm password [ENTER]
4. Open text edit mode for name [ENTER]
Name:CLERK04
ABC:
5. Input new clerk name using A-Z keys [A] – [Z]
6. Confirm clerk name [ENTER]
7. Set up clerk authority
Clerk Auth.
Sales Auth.
Y
Refund Auth.
Y
PLU Discount
Y
a. Use arrows to select authority [↑] & [↓]
b. Toggle between Y and N [ENTER]
8. Save changes [BACK]
This manual suits for next models
1
Table of contents
Other CRG Cash Register manuals


