Criterion 681-4009 User manual
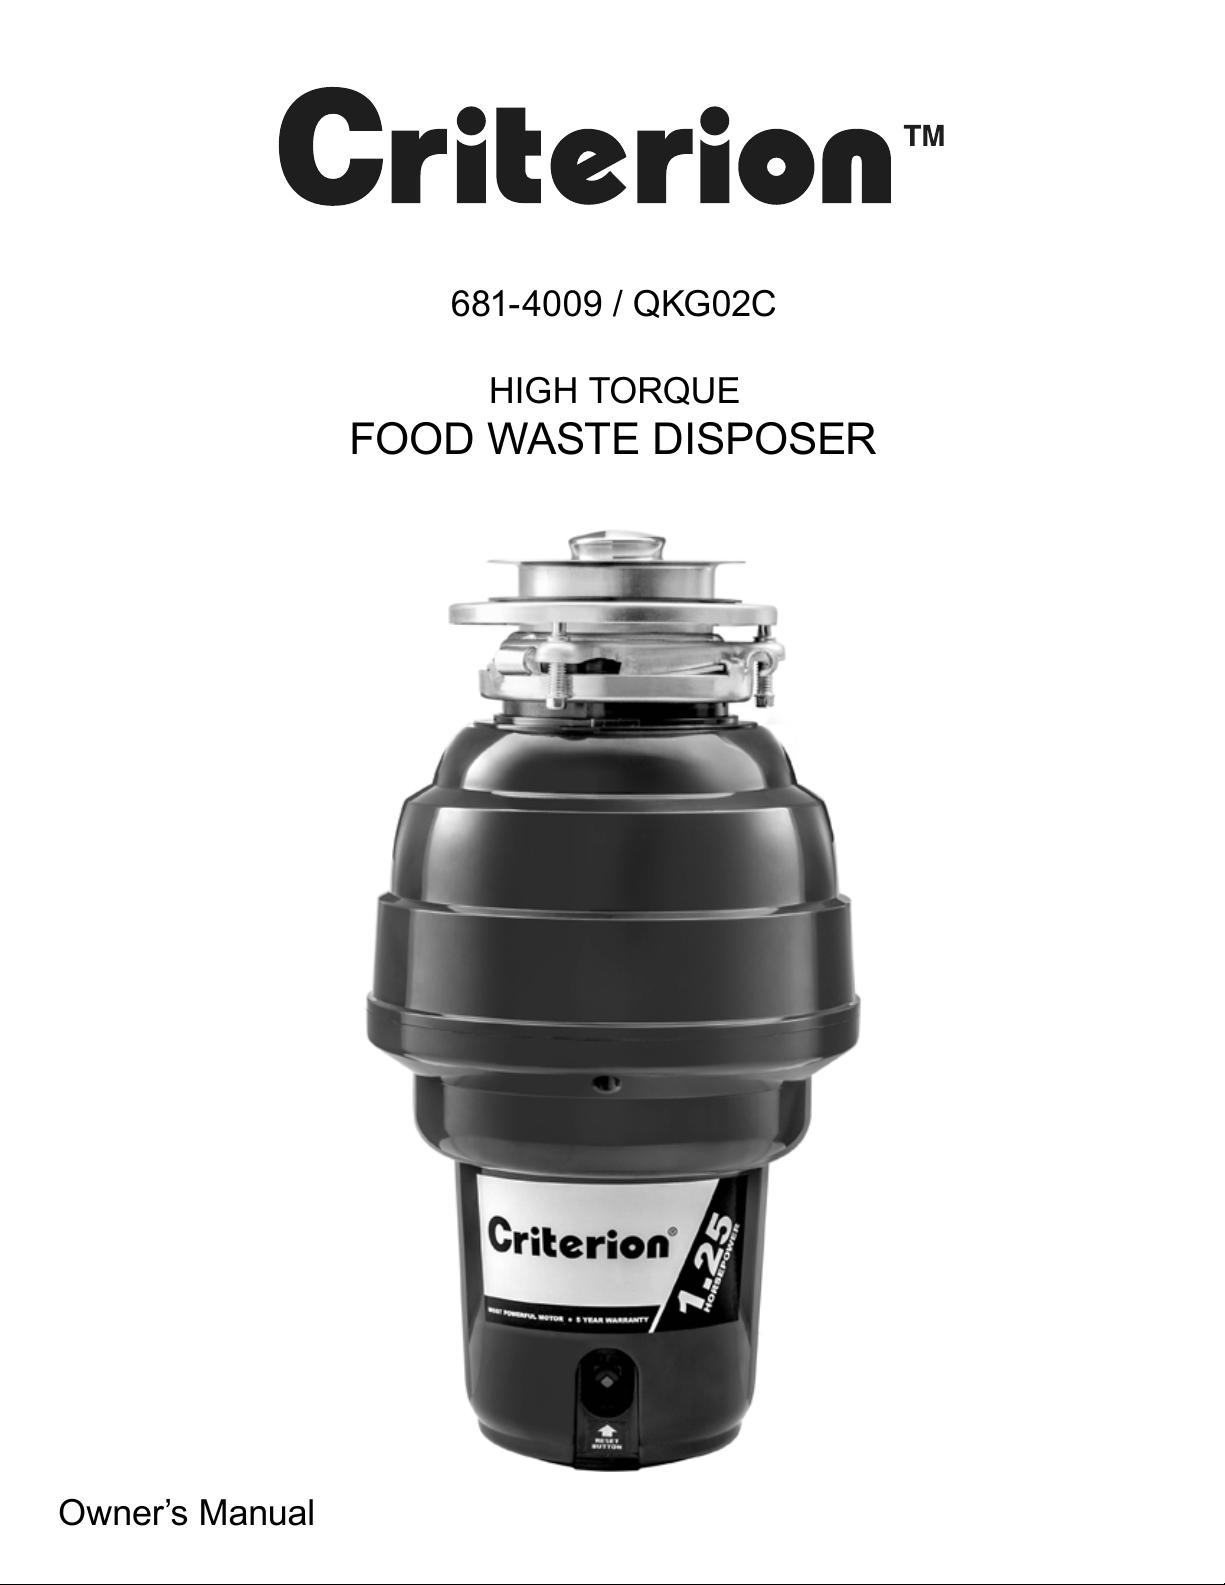
681-4009 / QKG02C
HIGH TORQUE
FOOD WASTE DISPOSER
Owner’s Manual
2
QKG02C
Web: www.conglom.com/documentation/
Table of Contents
Safety Information ...........................2
Warranty....................................
Five (5) Year Limited Warranty ................ 3
Warranty Claim Procedure.................... 3
Pre-Installation
Tools/Materials Required ......................4
Package Contents ...........................4
Installation ..................................
Removal of Old Unit .........................5
Installation of the Mounting Assembly ...........6
Attaching Discharge Elbow ................... 7
Removing Knockout Plug .................... 7
Connecting Disposal to Mounting Assembly .......8
Dishwasher Connection. . . . . . . . . . . . . . . . . . . . . . 9
Electrical Connection & Grounding .............9
Operation .................................10
Care and Maintenance .....................10
Troubleshooting .......................... 11
Service Parts ..............................12
Safety Information
READ ALL INSTRUCTIONS BEFORE USING THE APPLIANCE
IMPORTANT SAFETY INSTRUCTIONS
INSTRUCTIONS PERTAINING TO A RISK OF FIRE, ELECTRIC SHOCK,
OR INJURY TO PERSONS. WARNING - WHEN USING ELECTRICAL
APPLIANCES, BASIC PRECAUTIONS SHOULD ALWAYS BE
FOLLOWED, INCLUDING THE FOLLOWING:
NOTE:
This food waste disposal has been designed to operate on 110-
120 Volt, 60 Hz exclusively. Using any other voltage or frequency
adversely affects its performance.
1. Inspect your unit before proceeding. Once you unpack
your unit, check for chips, scratches, cracks, dents or scuff
marks. If any damage is noticed, do not install. Please
return to the place of purchase.
2. Use this unit only in the manner intended by the
manufacturer. If you have any questions, contact the
manufacturer.
3. Installation work and plumbing must be done by qualied
person(s) in accordance with all applicable codes and
standards.
4. When attempting to loosen an obstruction in a waste
disposal, use a long wooden object such as a wooden
spoon or the wooden handle of a broom or a mop.
5. When attempting to remove objects from a waste disposal,
use long-handled tongs or pliers. If the disposal is
magnetically actuated, non-magnetic tools should be used.
6. When not operating a disposal, leave the drain cover
(stopper) in place to reduce the risk of objects falling into
the disposal.
SAVE THESE INSTRUCTIONS
WARNING: Do not put ngers or hands into a waste
disposal.
WARNING: Turn the power switch to the off position
before attempting to unblock or remove an object
from the disposal.
WARNING: Do not operate disposal unless splash
guard is in place.
WARNING: To reduce the risk of injury by materials
that may be expelled by a waste disposal, do not put
the following into a disposal: clam or oyster shells;
caustic drain cleaners or similar products; glass,
china or plastic; large whole bones; metal, such as
bottle caps, tin cans, aluminum foil or utensils; hot
grease or other hot liquids; whole cornhusks.
WARNING: To reduce the risk of injury, close
supervision is necessary when the appliance is
used near children.
WARNING: This food waste disposal has been
designed to operate on 110-120 Volt, 8.8A, 60 Hz
and 930W.

3 CONGLOMKB.COM
Warranty
FIVE (5) YEAR LIMITED WARRANTY
A thorough inspection must be made before installation and any damage must be promptly reported. We will not be liable for
failures or damage that could have been discovered or avoided by proper inspection and testing prior to installation.
Conglom Kitchen & Bath warrants this product to be free from defects in materials or workmanship for ve (5) year from the
date of purchase. Proof of purchase (original sales receipt) from the original consumer purchaser must be made available to
Conglom Kitchen & Bath for all warranty claims.
This warranty is non-transferable and shall be voided if the unit is removed from its initial installation or if it is not installed
following the manufacturer’s instructions. It does not apply in the event of product damage due to the use of other than
genuine Conglom Kitchen & Bath replacement parts (replacement parts may be obtained by e-mail at cs@conglomkb.com
or by calling 1-888-449-9194 between 8:30 am - 5:00 pm EST), installation error, abuse, misuse or improper care and
maintenance (whether performed by a plumber, contractor, service provider or member of the purchaser’s household). The
warranty excludes damage due to aggressive air or water conditions, harsh or abrasive cleaners and/or materials.
Under no circumstance shall we be held liable for personal injury or property damage resulting from improper installation
or use of this product. We will not be held liable for inconvenience caused by loss of use of this product, costs incurred for
labour or materials, removal and installation of replacement units, or any other incidental or consequential damages. Costs
relating to obtaining access for repair or replacement are the responsibility of the user.
Our obligation shall be limited to the repair or replacement of a unit (at our discretion) that may prove, by our sole examination,
to be defective under normal use and service during the warranty period.
Any failure of this product that is not traceable to a defect in material or workmanship is not covered by this warranty. These
non-warrantable items include, but are not limited to:
-Improper installation not in accordance with manufacturer’s instructions.
-Dents and/or scratches incurred during shipping, handling, or installation.
-Change in colour or nish due to chemical usage.
-Damage caused by failure to follow care and cleaning guidelines, including damage caused by the use of abrasive
cleaners.
-Alterations made to the unit by the purchaser or installer.
-Damage caused by accidental impact, re, ood, freezing, and normal wear.
-Bends and warping caused by forced connections, over-tightened ttings, and inadequate support during
installation.
WARRANTY CLAIM PROCEDURE
If a claimable defect occurs or replacement parts are needed,
please contact our customer service team at cs@conglomkb.com
or 1-888-449-9194 (Service available in English and French, Monday - Friday from 8:30 am - 5:00 pm EST).
Before you make your call, please ensure that you have:
-Model number or description.
-Proof of sale.
-Details regarding the defect and/or part number.
-Name(s) and address(es) of the owner and/or installer.
4
QKG02C
Web: www.conglom.com/documentation/
Pre-Installation
TOOLS/MATERIALS REQUIRED (NOT SUPPLIED)
Pipe wrench Phillips
screwdriver Flat screwdriver
Electric drill with
1-1/4”(32mm) hole
saw
Plumber’s putty
PACKAGE CONTENTS
Carefully check the the package contents for damage and/or missing parts prior to installation. If there is any damage or if you
are missing parts, do not proceed with the installation. Report damage and/or missing parts immediately to our customer service
team at cs@conglomkb.com or 1-888-449-9194 (Service available in English and French, Monday - Friday from 8:30am - 5pm
EST). Please do not dispose of packaging before you are satised with your new waste disposer.
Stopper
Splash Guard
Sink Flange
Gasket
Supporting Plate
Top Supporting Ring
(with 3 screws)
Flange Ring
Ring Tool
Cushion Mount
Bottom Supporting Ring
Disposer Body
Discharge Elbow
Assembly
*
Part Description Quantity
Stopper 1
Removable splash guard 1
Sink ange 1
Rubber sink ange gasket 1
Flange ring 1
Ring tool 1
Supporting plate 1
Top supporting ring (with 3 screws) 1
Cushion mount 1
Part Description Quantity
Bottom supporting ring 1
Disposer body 1
Discharge Elbow Assembly Includes:
Elbow gasket
Discharge elbow
Flange elbow
Screw
1
1
1
2
*
NOTE: This waste disposer is intended to be
plugged into a grounded receptacle that is
controlled by a dedicated switch (usually wall
mounted).
5 CONGLOMKB.COM
Installation
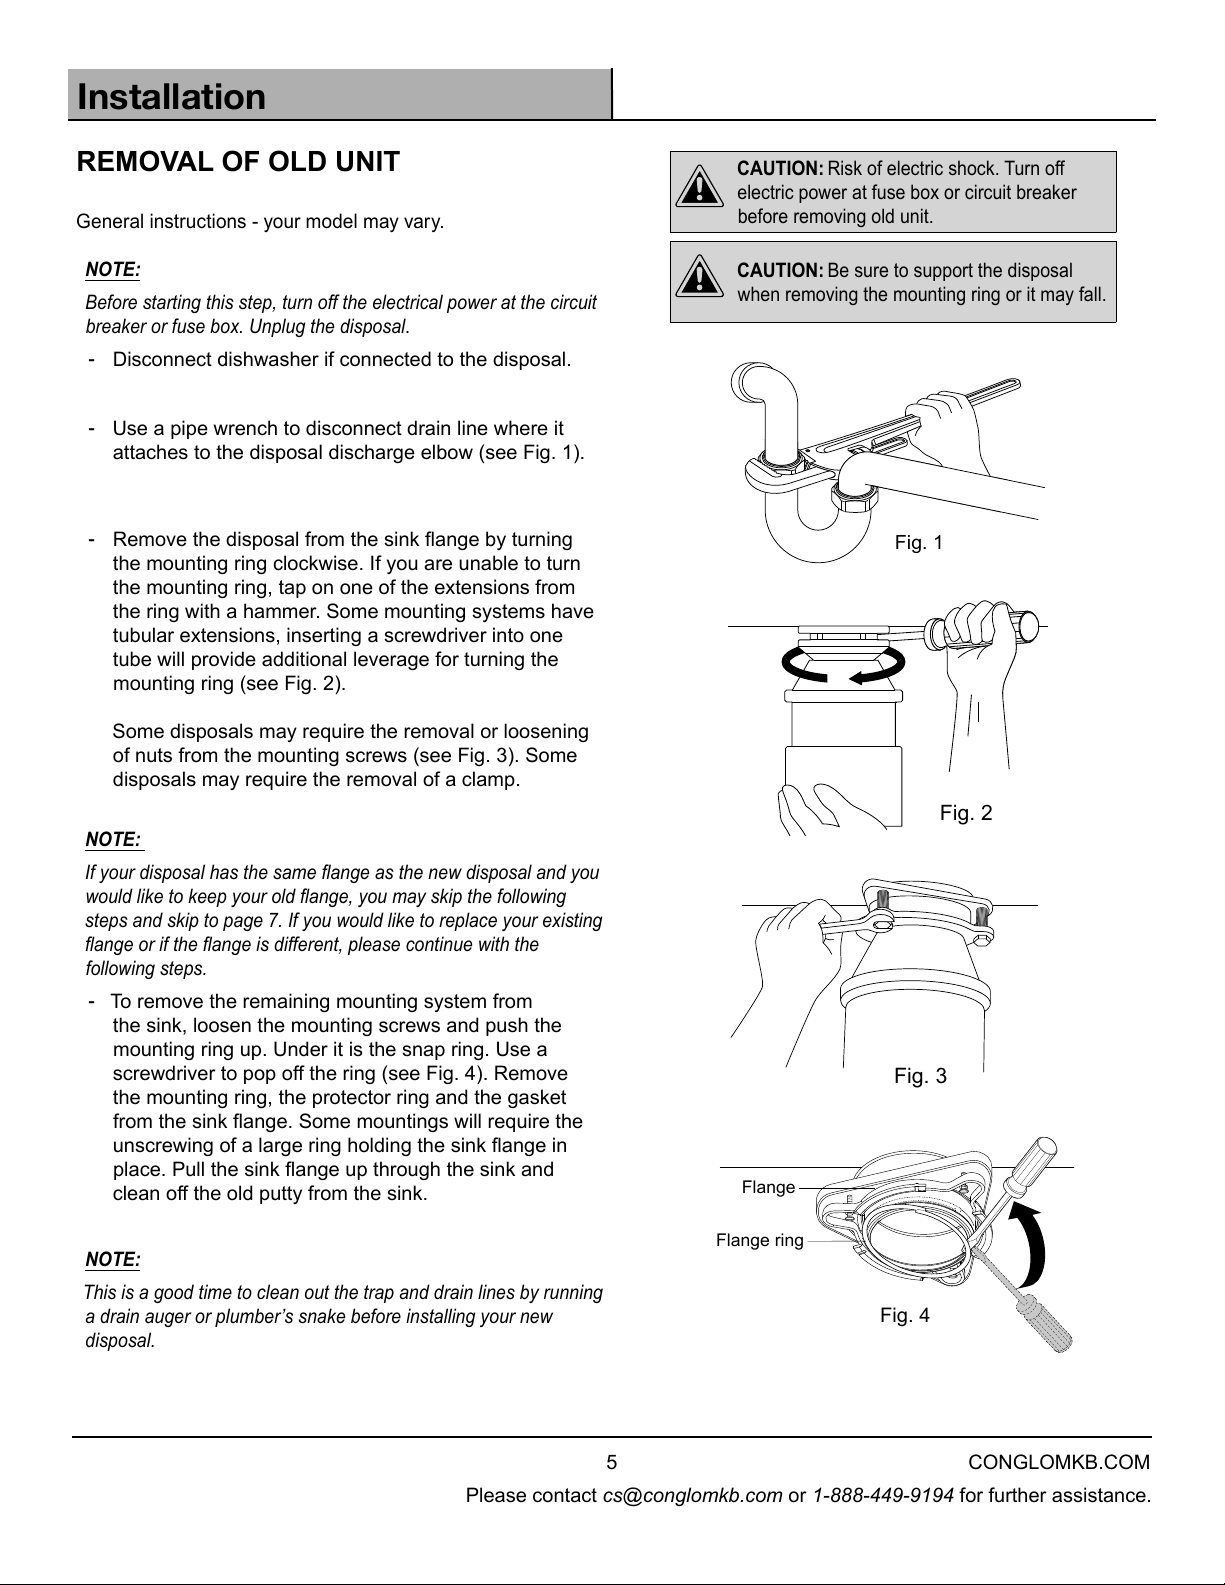
REMOVAL OF OLD UNIT
General instructions - your model may vary.
NOTE:
Before starting this step, turn off the electrical power at the circuit
breaker or fuse box. Unplug the disposal.
-Disconnect dishwasher if connected to the disposal.
-Use a pipe wrench to disconnect drain line where it
attaches to the disposal discharge elbow (see Fig. 1).
-Remove the disposal from the sink ange by turning
the mounting ring clockwise. If you are unable to turn
the mounting ring, tap on one of the extensions from
the ring with a hammer. Some mounting systems have
tubular extensions, inserting a screwdriver into one
tube will provide additional leverage for turning the
mounting ring (see Fig. 2).
Some disposals may require the removal or loosening
of nuts from the mounting screws (see Fig. 3). Some
disposals may require the removal of a clamp.
NOTE:
If your disposal has the same ange as the new disposal and you
would like to keep your old ange, you may skip the following
steps and skip to page 7. If you would like to replace your existing
ange or if the ange is different, please continue with the
following steps.
-To remove the remaining mounting system from
the sink, loosen the mounting screws and push the
mounting ring up. Under it is the snap ring. Use a
screwdriver to pop off the ring (see Fig. 4). Remove
the mounting ring, the protector ring and the gasket
from the sink ange. Some mountings will require the
unscrewing of a large ring holding the sink ange in
place. Pull the sink ange up through the sink and
clean off the old putty from the sink.
NOTE:
This is a good time to clean out the trap and drain lines by running
a drain auger or plumber’s snake before installing your new
disposal.
CAUTION: Risk of electric shock. Turn off
electric power at fuse box or circuit breaker
before removing old unit.
CAUTION: Be sure to support the disposal
when removing the mounting ring or it may fall.
Fig. 1
Fig. 2
Fig. 3
Fig. 4
Flange
Flange ring
6
QKG02C
Web: www.conglom.com/documentation/
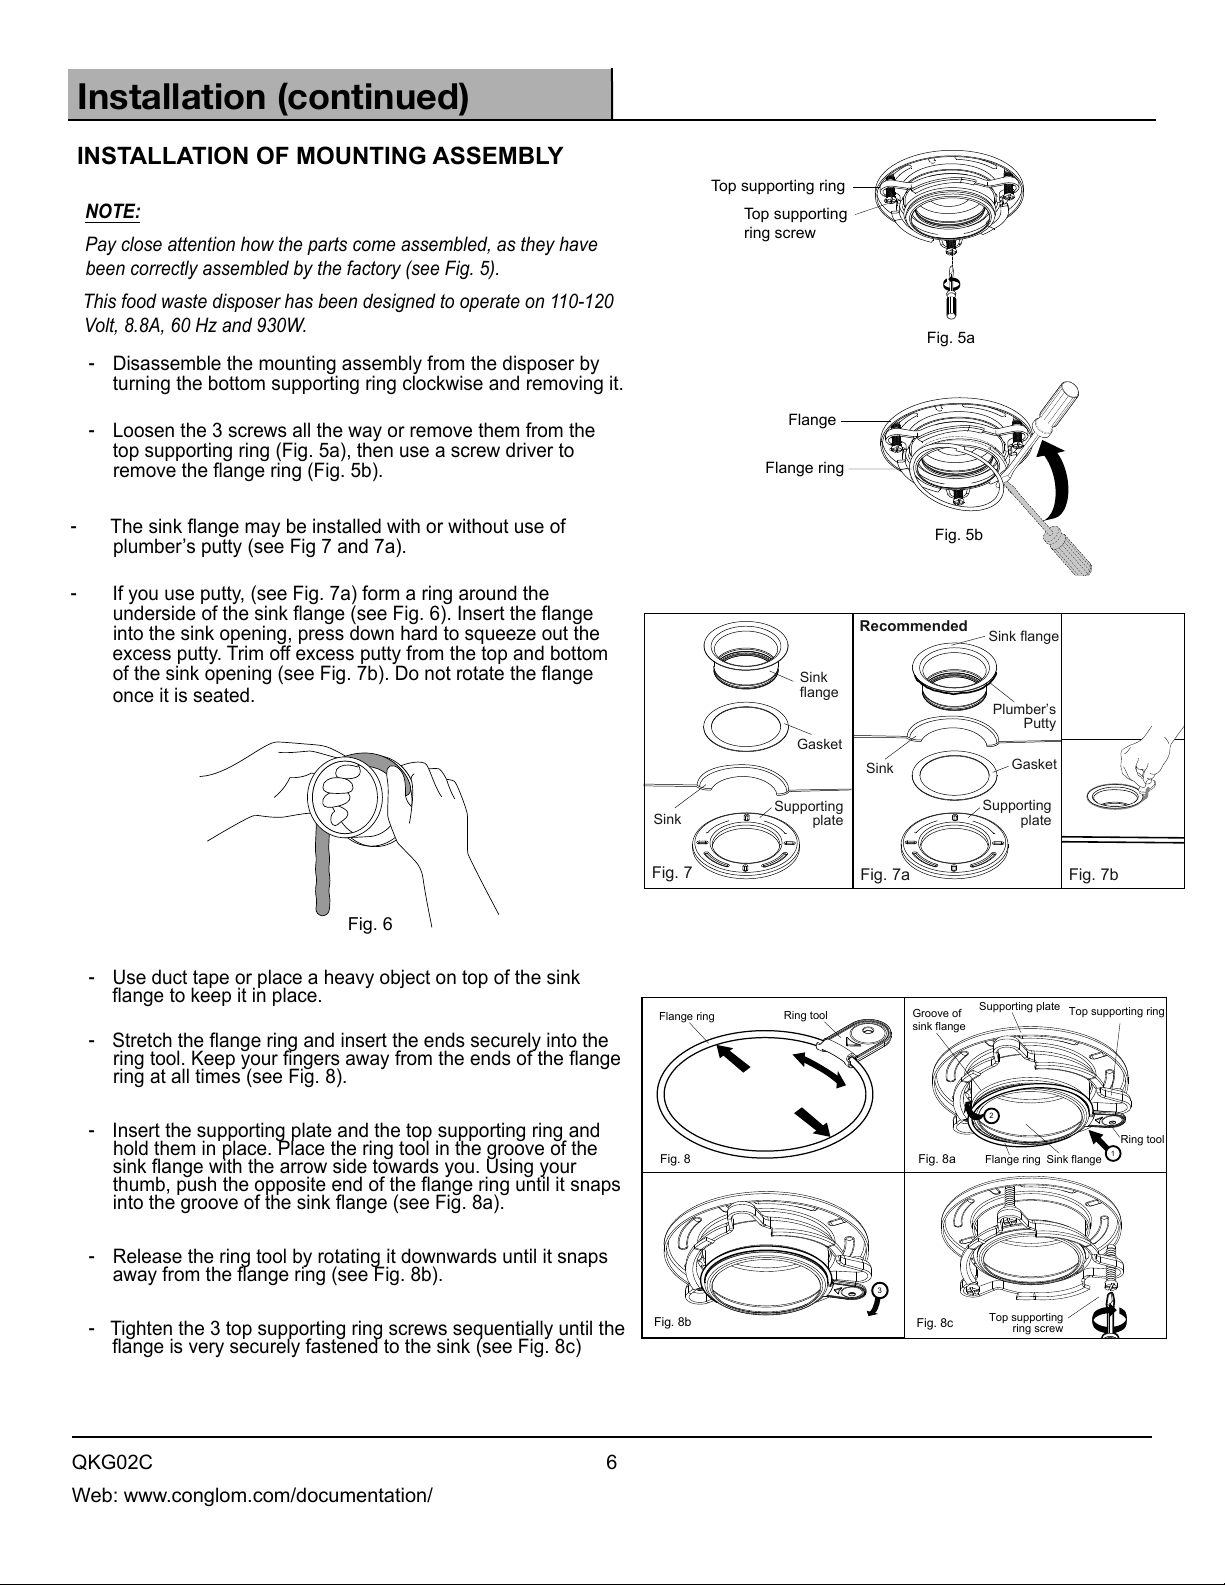
Installation (continued)
INSTALLATION OF MOUNTING ASSEMBLY
Top supporting ring
Top supporting
ring screw
Fig. 5a
Fig. 5b
Flange
Flange ring
Supporting
plate
Gasket
Plumber’s
Putty
Sink flange
Recommended
Sink
Fig. 7a Fig. 7b
Supporting
plate
Gasket
Sink
flange
Sink
Fig. 7
NOTE:
Pay close attention how the parts come assembled, as they have
been correctly assembled by the factory (see Fig. 5).
This food waste disposer has been designed to operate on 110-120
Volt, 8.8A, 60 Hz and 930W.
-Disassemble the mounting assembly from the disposer by
turning the bottom supporting ring clockwise and removing it.
-Loosen the 3 screws all the way or remove them from the
top supporting ring (Fig. 5a), then use a screw driver to
remove the ange ring (Fig. 5b).
-The sink ange may be installed with or without use of
plumber’s putty (see Fig 7 and 7a).
-If you use putty, (see Fig. 7a) form a ring around the
underside of the sink ange (see Fig. 6). Insert the ange
into the sink opening, press down hard to squeeze out the
excess putty. Trim off excess putty from the top and bottom
of the sink opening (see Fig. 7b). Do not rotate the ange
once it is seated.
Fig. 6
-Use duct tape or place a heavy object on top of the sink
ange to keep it in place.
-Stretch the ange ring and insert the ends securely into the
ring tool. Keep your ngers away from the ends of the ange
ring at all times (see Fig. 8).
-Insert the supporting plate and the top supporting ring and
hold them in place. Place the ring tool in the groove of the
sink ange with the arrow side towards you. Using your
thumb, push the opposite end of the ange ring until it snaps
into the groove of the sink ange (see Fig. 8a).
-Release the ring tool by rotating it downwards until it snaps
away from the ange ring (see Fig. 8b).
-Tighten the 3 top supporting ring screws sequentially until the
ange is very securely fastened to the sink (see Fig. 8c)
Top supporting ring
Ring tool
Supporting plate
Flange ring Sink flange
Groove of
sink flange
Fig. 8a 1
2
Fig. 8
3
Fig. 8b Fig. 8c
Ring tool
Flange ring
Top supporting
ring screw

7 CONGLOMKB.COM
Installation (continued)
If at any time the bottom supporting ring becomes
disengaged from the body of the waste disposer, then:
1. Align the slot in the bottom supporting ring with tab on
the waste disposer body.
2.Lower the bottom supporting ring and make the slot t
in the tab.
3.Turn the bottom supporting ring counter clockwise to
secure it in place.
Slot
Tab
ATTACHING DISCHARGE ELBOW
Elbow Gasket Groove
Discharge Elbow
Fig. 9a
Fig. 9
-Make sure the elbow gasket is attached to the
discharge elbow correctly (see Fig. 9a).
-Connect the discharge elbow to the disposer
(see Fig. 9).
REMOVING KNOCKOUT PLUG
(SKIP THIS STEP IF YOU DO NOT HAVE A
DISHWASHER)
-Using a blunt instrument (steel punch or wooden
dowel), knock out the entire plug (see Fig. 10). Do
not use a screwdriver or sharp instrument. When the
knockout plug falls into the disposer, you may remove
it, or grind it up when the disposer is being used. This
will not damage the disposer in any way, but may take
some time to grind. Fig. 10
Knockout Plug
Wood or
Metal Dowel

8
QKG02C
Web: www.conglom.com/documentation/
Installation (continued)
CONNECTING THE DISPOSER TO THE
MOUNTING ASSEMBLY
Elbow
Trap
Fig. 11
Fig. 12
Disposer body
Reset Button
Fig.13
Top
supporting
ring
Bottom
supporting
ring
Tab
Tool
Mount
Step
Sink
Mounting
Assembly
Cushion Mount
Fig.13a
Sink
Tool Mount
- Adjust the disposer position to make the elbow line up
with the trap (see Fig. 11).
- The disposer must be installed so that the reset button
is readily accessible (see Fig. 12).
- Make sure the cushion mount is properly in place. Line
up the disposer under the mounting assembly. Lift and
guide the disposer so that all three tabs of the bottom
supporting ring engage the steps of the top supporting
ring. Turn the bottom supporting ring counter-clockwise
until it is fully engaged and the tool mount comes in
contact with the top supporting ring. Insert a screw
driver into the tool mount for added leverage, if needed
(see Fig 13a).
If you are unable to fully engage the bottom supporting
ring, release and lower the waste disposer.
Fig. 13b

9 CONGLOMKB.COM
Installation (continued)
Turn the bottom supporting ring 1/3 of a turn counter-
clockwise and repeat the mounting procedure described
above (see Fig 13).
1/3 turn
Fig. 13c
-Connect the bottom of the elbow to the trap by
tightening the slip nut (Fig. 14).
-Run water and check all connections for leaks.
Fig. 14
DISHWASHER CONNECTION
Fig. 15
*Air Gap
Drain
Disposer
Rubber Hose
Dishwasher Hose
-Connect the dishwasher hose (see Fig. 15) using a
hose clamp. Make sure all plumbing connections are
tight. Run water and check for leaks.
*Air Gap may not be required for all installations, verify
your local plumbing codes.
ELECTRICAL CONNECTION & GROUNDING
-Connect the disposer to the appropriate household
current only.
WARNING: Improper connection of the equipment-
grounding conductor can result in a risk of
electric shock. Check with a qualied electrician
or serviceman if you are not sure. Do not modify
the plug provided with the appliance if it does not
t the outlet. Have a proper outlet installed by a
qualied electrician.
NOTE: The waste disposer plug provided needs
to be controlled by an on/off switch (usually wall-
mounted).
-This appliance must be grounded. In the event of a
malfunction or breakdown, grounding provides a path
of least resistance for electric current to reduce the
risk of electric shock. This appliance is equipped with a
cord having an equipment-grounding conductor and a
grounding plug. The plug, supplied with this unit, must
be connected to an appropriate outlet that is properly
installed, switched and grounded in accordance with
all local codes and ordinances. If the supply cord is
damaged it must be replaced by the manufacturer or a
qualied person in order to avoid a hazard.

10
QKG02C
Web: www.conglom.com/documentation/
Operation
TESTING AND OPERATION
-Remove sink stopper. Turn on a medium ow of cold water.
TIPS FOR SUCCESSFUL OPERATION
-Turn switch to ON position; your motor is turning at full speed
and ready to use. -Be sure disposal is empty before using your dishwasher
so it may drain properly.
-You may want to leave the stopper in the drain when not in
use to prevent utensils and foreign objects from falling into
the disposal.
-Your disposal is ruggedly built to give you many years of
trouble free service. It will handle all normal food wastes,
but it will NOT grind or dispose of such items as plastic, tin
cans, bottle caps, glass, china, leather, cloth, rubber, string,
clam and oyster shells, aluminum foil or feathers.
-Slowly insert food waste into disposal (table scraps, peelings,
rinds, seeds, pits, small bones and coffee grounds). To
speed up food waste disposal, cut or break up large bones,
rinds and cobs. Large bones and brous waste require
considerable grinding time and are more easily thrown away
with other trash. Do not be alarmed that the disposal slows
down while grinding. The disposal is actually increasing
torque (grinding power) and is operating under normal
conditions.
-Before turning disposal off, let water and disposal run for
approximately 15 seconds after shredding or grinding stops.
This assures that all waste is throroughly ushed through
trap and drain.
-It is not recommended to use hot water while running
disposal. Cold water will keep waste and fats solid so
disposal can ush away particles.
NOTE:
The anti-jam swivel impellers make a clicking sound as they initially swing into
place. This indicates normal operation.
Care and Maintenance
DO NOT ATTEMPT TO LUBRICATE YOUR DISPOSER!
The motor is permanently lubricated. The disposer is self cleaning and scours its internal parts with each use. NEVER put lye
or chemical drain cleaners into the disposer, as they cause serious corrosion of metal parts. If used, resulting damage can be
easily detected and all warranties are void. Mineral deposits from your water can form on the stainless steel turntable, giving
the appearance of rust. DO NOT BE ALARMED, the stainless steel turntables used will not corrode.
GENERAL INSTALLATION DIMENSIONS
15.75 in.
8.75 in.
SINGLE BOWL
approx 10 1/8"
DOUBLE BOWL CENTER OUTLET
approx 10 1/8"
DOUBLE BOWL END OUTLET
approx 10 1/8"
11 CONGLOMKB.COM
Troubleshooting
Before seeking repair or replacement, we recommend that you review the following:
Problem Solution
The disposer is making loud noises. -Other than the noises during grinding of small bones and
fruit pits, these are usually caused by accidental entry of a
spoon, bottle cap or other foreign objects. To correct this,
unplug the power cord, turn off the electricity and water.
After the disposer has stopped, remove the splash guard,
remove the object with long handled tongs, and replace the
splash guard.
The disposer does not start. -Unplug the power cord and turn either the wall switch or
breaker box switch to “OFF” position, depending on your
model and wiring conguration. Remove the stopper and/or
the splash guard. Check to see if turntable will rotate freely
using a wooden spoon handle. If turntable rotates freely,
replace the splash guard and check the reset button to see
if it has been tripped. The reset button is red and is located
on the front end of the disposer. Push the button in until it
clicks and remains depressed.
-If the reset button has not been tripped, check for a
shorted or broken wire connecting to the disposer. Check
the electrical power switch, fuse box or circuit breaker. If
the wiring and electrical components are intact, the unit
may have internal problems that require servicing or a
replacement.
The turntable does not rotate freely. -Unplug the power cord and turn either the wall switch or
breaker box switch to “OFF” position, depending on your
model and wiring conguration. Then check for any foreign
objects lodged between the turntable and the grind ring.
Dislodge the object by rotating the table with a wooden
spoon handle and remove the object. If no foreign object is
present, there may be internal problems.
The disposer leaks. -If the unit leaks at the top, it may be due to:
1) Improper seating of the sink ange (gasket centering,
putty or
tightening);
2) The support ring is not tightened properly;
3) Defective or improper installation for the cushion mount.
-If the unit leaks at the waste elbow, the leak may be due to
improper tightening of the elbow ange screws.
12
QKG02C
Web: www.conglom.com/documentation/
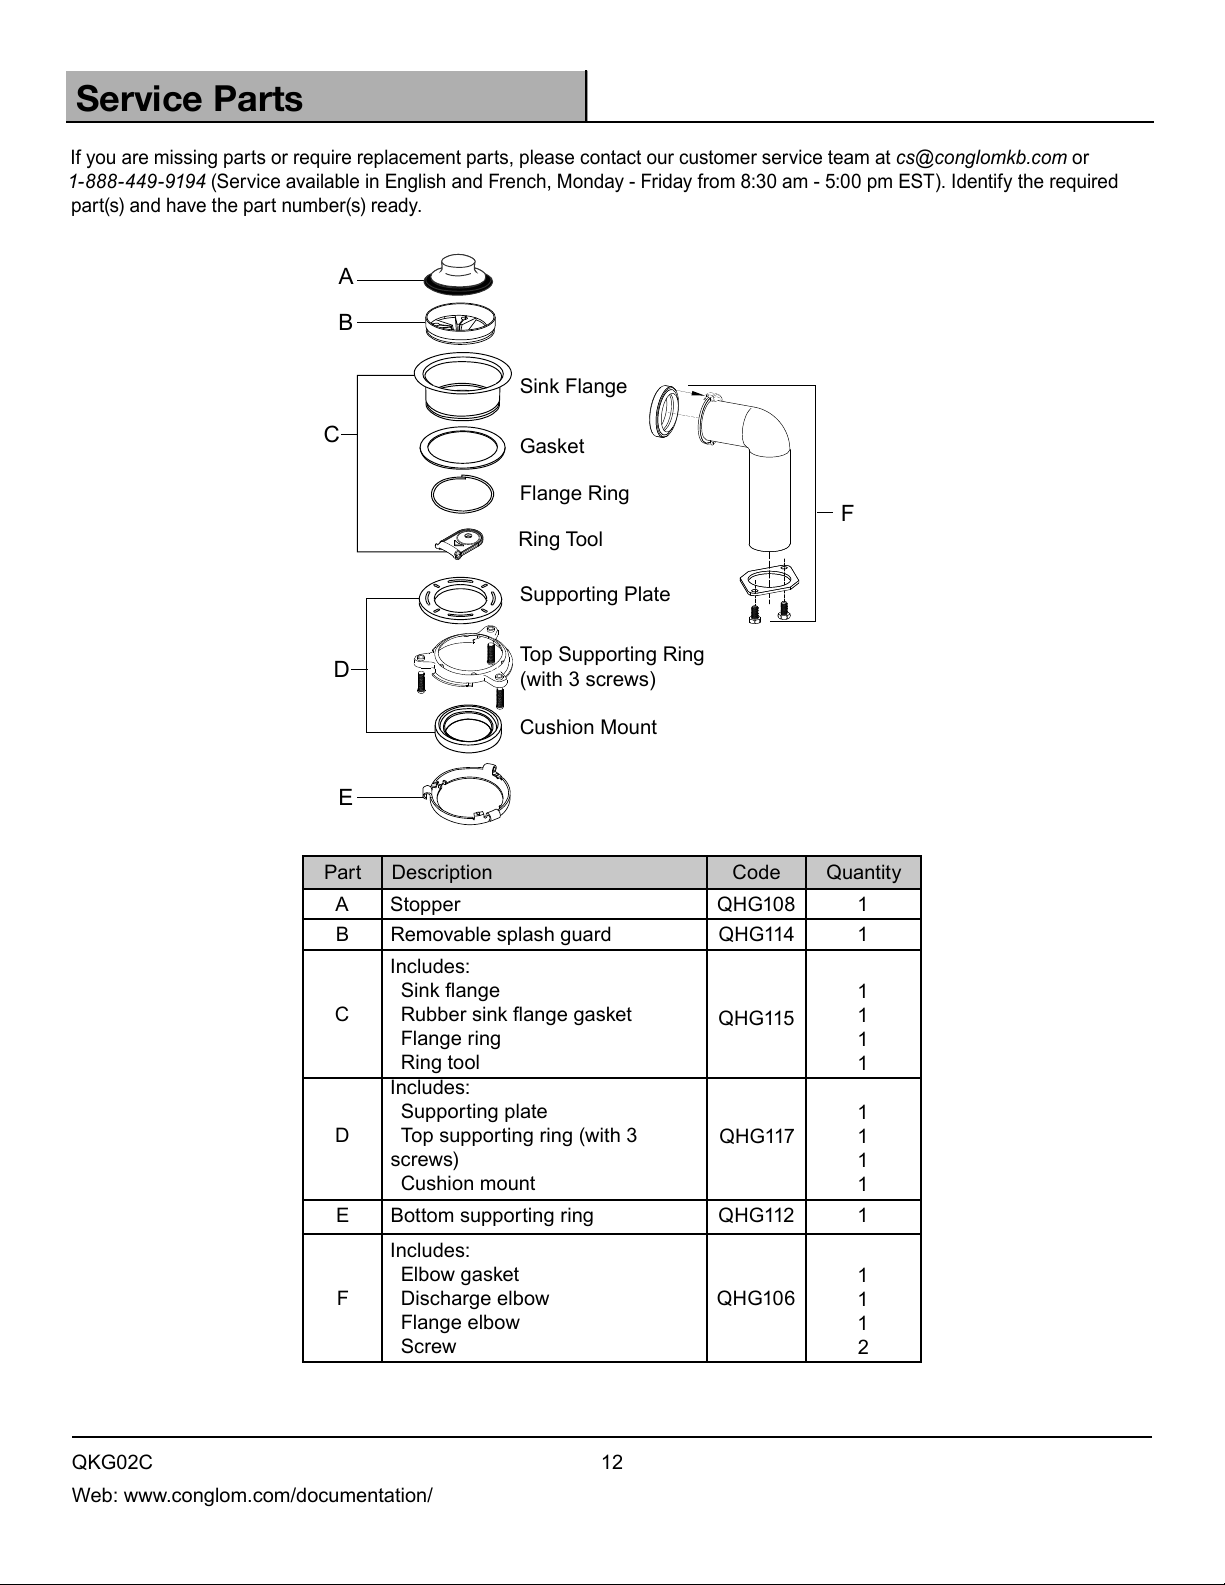
Service Parts
If you are missing parts or require replacement parts, please contact our customer service team at cs@conglomkb.com or
1-888-449-9194 (Service available in English and French, Monday - Friday from 8:30 am - 5:00 pm EST). Identify the required
part(s) and have the part number(s) ready.
A
B
E
F
Sink Flange
Gasket
Supporting Plate
Top Supporting Ring
(with 3 screws)
Flange Ring
Cushion Mount
C
D
Ring Tool
Part Description Code Quantity
AStopper QHG108 1
BRemovable splash guard QHG114 1
C
Includes:
Sink ange
Rubber sink ange gasket
Flange ring
Ring tool
QHG115
1
1
1
1
D
Includes:
Supporting plate
Top supporting ring (with 3
screws)
Cushion mount
QHG117
1
1
1
1
EBottom supporting ring QHG112 1
F
Includes:
Elbow gasket
Discharge elbow
Flange elbow
Screw
QHG106
1
1
1
2

Imported by:
St-Laurent, Québec, H4S 2C3
(service available in English and French, Monday - Friday from 8:30 am - 5 pm EST)
www.conglomkb.com
Made in China
This manual suits for next models
1
Table of contents
Popular Garbage Disposal manuals by other brands

Weber mt
Weber mt CR 12 Operating and maintenance manual

Leafield Environmental
Leafield Environmental Square Heritage installation guide

InSinkErator
InSinkErator PowerRinse PRP Series Installation, Care and Use Manual

Champion
Champion P5-30 Specifications

PAIFANG
PAIFANG HQD-314 product manual

Insinger
Insinger N-8 brochure


InSinkErator
InSinkErator Evolution PRO Series manual

Franke
Franke EXOS611X Installation and operating instructions

Ikon
Ikon FWD2/1 Installation and user manual

IMC
IMC 500 Series Maintenance manual

KitchenAid
KitchenAid ELECTRA KCDE200 Use and care guide

Maytag
Maytag DFC7500 Installation, care & use manual