Crivit Outdoor 96716 User manual

IAN 96716
IGLU STAN S DVOJITOU STENOU
Návod na obsluhu
DOUBLE-ROOF TENT
Instruction manual
IGLU-DOPPELDACHZELT
Bedienungsanleitung

2
1
67
8
2
3
4
5
9
A
B C D
E F G

3
H I J

4

5
Obsah/Contents/Inhaltsverzeichnis
Obsah ................................................................... 6
Technické údaje ................................................... 6
Použitie podľa predpisov .................................... 6
Bezpečnostné pokyny .................................... 6 - 7
Montáž ................................................................. 7
Demontáž ........................................................ 7 - 8
Údržba ................................................................. 8
Ošetrovanie .......................................................... 8
Skladovanie ......................................................... 8
Pokyny na likvidáciu ............................................ 8
3 roky záruka ....................................................... 8
Lieferumfang ....................................................... 12
Technische Daten ............................................... 12
Bestimmungsgemäße Verwendung .................. 12
Sicherheitshinweise .................................... 12 - 13
Aufbau ................................................................ 13
Abbau ................................................................. 14
Wartung ............................................................. 14
Pflege .................................................................. 14
Aufbewahrung ................................................... 14
Hinweise zur Entsorgung .................................. 14
3 Jahre Garantie ............................................... 14
Scope of Delivery ................................................ 9
Technical data ...................................................... 9
Intended use ......................................................... 9
Safety instructions ........................................ 9 - 10
Assembly ............................................................ 10
Disassembly ................................................ 10 - 11
Maintenance ...................................................... 11
Care .................................................................... 11
Storage ............................................................... 11
Notes for disposal ............................................. 11
3 years warranty ............................................... 11

6
Srdečne Vám blahoželáme!
Vašou kúpou ste sa rozhodli pre mimoriadne
kvalitný produkt. S produktom sa oboznámte
ešte pred jeho montážou a uvedením do
činnosti. K tomu si pozorne prečítajte nasledo-
vný návod na montáž a bezpečnostné pokyny.
Produkt používajte len v súlade s pokynmi
uvedenými v návode a na uvedené účely.
Tento návod si odložte. Ak produkt odovzdáte
tretej osobe, priložte jej aj všetky podklady.
Obsah (Obr. A)
(1) – Vnútorný stan 1 x
(2) – Vonkajší stan 1 x
(3) – Tyč, čierna 2 x
(4) – Tyč, šedá 1 x
(5) – Vrecko na tyče 1 x
(6) – Kolík 20 x
(7) – Vrecko na kolíky 1 x
(8) – Vrecko na zabalenie 1 x
(9) – Odkladacia sieť 1 x
Návod na obsluhu 1 x
Technické údaje
Materiál: sklolaminátové tyče, priedušný
polyester/sieť/polyetylén
Vodný stĺpec: 2000 mm
Rozmery: 110 + 240 x 210 x 150 cm
(predná časť + D x Š x V)
ca. 210 cm
ca. 240 cm
ca.
150 cm
Kat. A Kempingový stan (ľahká váha)
Výkonový stupeň: stupeň 2 – stan, ktorý je di-
menzovaný na používanie predovšetkým v priaz-
nivom počasí. Stan nie je určený na používanie
v extrémnych alebo horských podmienkach.
Použitie podľa predpisov
Tento produkt ponúka v prírode priestor na spá-
nok a pobyt. Je vhodný pre tri osoby. Produkt nie
je konštruovaný na používanie v zimnom období
počas sneženia alebo v búrkach.
Bezpečnostné pokyny
Nebezpečenstvo zranenia!
VAROVANIE!
Nebezpečenstvo ohrozenia života detí udu-
sením! Deti nenechávajte v blízkosti stanu bez
dozoru, pokiaľ stan nie je postavený, ani ich
nenechávajte bez dozoru v postavenom stane.
Deti sa môžu počas hry zadusiť materiálom zo
stanu.
VAROVANIE!
V stane nepoužívajte otvorený oheň a kvôli
nebezpečným výparom ani benzín alebo plyno-
vé lampy. Varte mimo stanu.
Preventívne opatrenia týkajúce sa
ohňa a vetrania
Pozor:
• Ak použijete plyn alebo iné spaľovacie
nástroje, nezabudnite na dodatočné vetranie;
• Do blízkosti stien stropu alebo záclon
neklaďte horúce prístroje;
• Vždy rešpektujte bezpečnostné pokyny
vzťahujúce sa na tieto prístroje;
• Deťom nikdy nedovoľte, aby sa zdržiavali v
blízkosti horúcich prístrojov;
• Východy musia byť voľné;
• Oboznámte sa s lokálnymi protipožiarnymi
predpismi;
• Dbajte na to, aby boli vetracie otvory po celý
čas otvorené, inak sa vystavujete riziku
ohrozenia života udusením.
VAROVANIE!
Nebezpečenstvo ohrozenia života v dôsledku
zasiahnutia bleskom! Stan nerozkladajte priamo
pod stromami. Počas búrky by ste sa vystavili
nebezpečenstvu zasiahnutia bleskom.
Blesk môže zapáliť stan alebo strom, alebo
môže strom vyvrátiť.
SK

7
• Nestanujte počas sneženia alebo búrok a
sledujte rôzne a meniace sa poveternostné
podmienky a silu vetra.
Prevencia proti vzniku
vecných škôd!
• Stan postavte tak, aby vchod do stanu nebol
otočený v smere vetra. Vietor by mohol stan
poškodiť.
• Látky použité na výrobu stanu podliehajú
následkom dlhšie pôsobiaceho a intenzívneho
slnečného žiarenia únave materiálu a
vyblednú. Ak budete stanovať dlhšiu dobu,
stan v rámci možností postavte v tienistej
lokalite. Stan nenechávajte zbytočne
postavený, ako ho nepoužívate.
Montáž
UPOZORNENIE!
Pred nástupom na dovolenku stan pre istotu
rozložte. Skontrolujte, či je príslušenstvo
kompletné.
Voľba stanovišťa
Podľa možnosti si nájdite rovné a čisté miesto.
Pozor na prepadávanie pôdy.
Z miesta odhoďte kamene, konáre a ostatné
špicaté predmety, aby sa nepoškodila podlaha
stanu. Využívajte prírodné závetrie, ako je kro-
vie, skaly atď.. Ak sa nachádzate na pieskovom
podklade, použite vhodné kolíky, vyhnete sa tak
zbytočnému uvoľneniu výstuže.
UPOZORNENIE!
Kolíky zastrčte do zeme trocha šikmo, aby
pevne držali, dajte ale pozor, aby nebol stan
príliš napnutý. Látka stanu a upínacie body by
mali byť napnuté len mierne, aby stan mohol
vyrovnávať nápory vetra. Dajte pozor, aby stan
nebol príliš napnutý. Napnutie stanu kontrolujte
podľa počasia.
UPOZORNENIE!
Voda v zásade kondenzuje vo všetkých stanoch,
hlavne v prípade výrazných teplotných rozdie-
lov. Po noci strávenej v stane sa na vnútorných
stenách stanu vytvoria kvapky kondenzovanej
vody. Kondenzácia preto neznamená netesnosť
stanu. Tvorbu kondenzovanej vody vo vnútri
stanu môžete znížiť dobrým vetraním.
1. Vystrite podlahu stanu, aby priľahla na
podklad, zapnite zipsy na vchodoch a kolíkmi
upevnite pútka na všetkých štyroch rohoch
(Obr. B).
2. Spojte segmenty tyčí (3) a (4). Obidve čierne
tyče (3) diagonálne vsuňte do pútka v strede
vnútorného stanu (Obr. C). Vnútorný stan
upevnite pomocou svoriek na tyče (Obr. D).
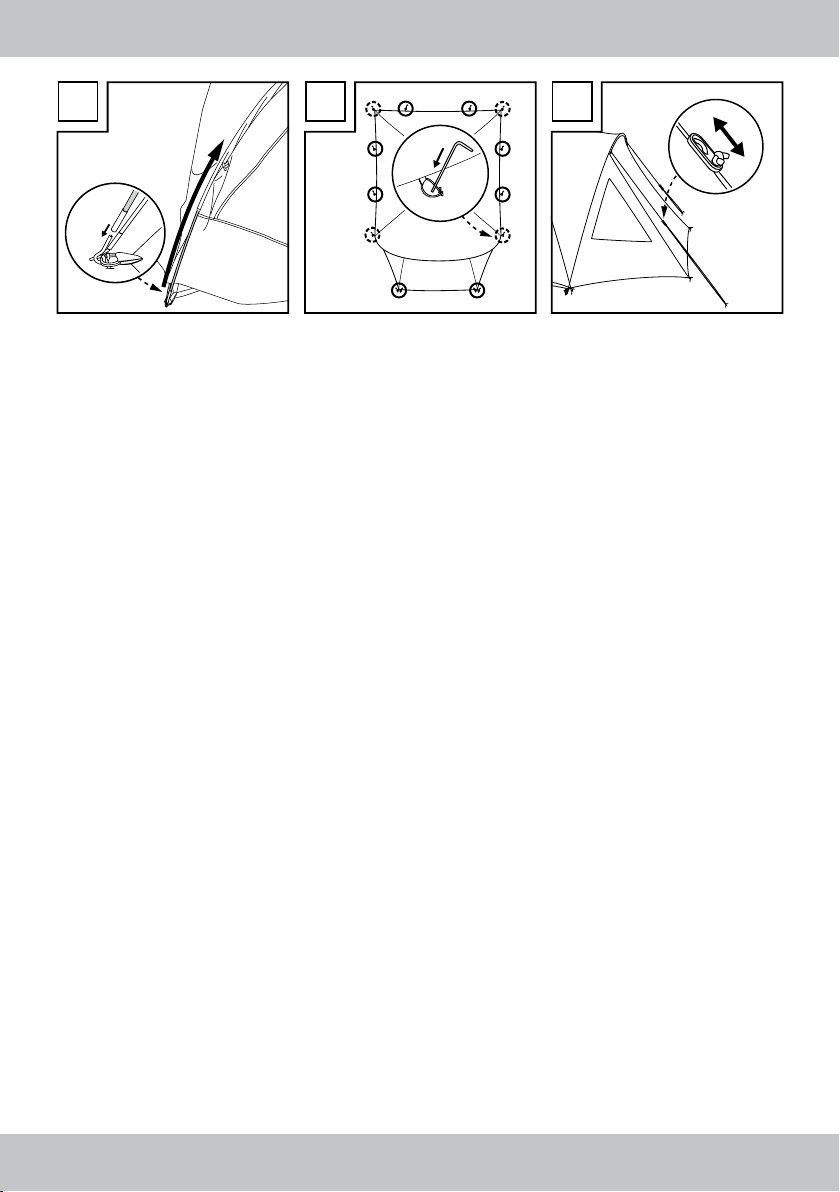
3. Tyče vzpriamte a kovové kolíky na rohoch
vnútorného stanu zasuňte do konca tyčí tak,
aby tieto boli napnuté (Obr. E).
4. Odkladaciu sieť (9) môžete teraz pomocou
háčikov upevniť na hrebeň strechy vo vnútri
stanu (Obr. F).
5. Vonkajší stan natiahnite na vnútorný stan
(Obr. G). Vonkajší stan upevnite pomocou
pásov na tyče a na miesto prekríženia tyčí.
Šedú tyč (4) presuňte tunelom na vonkajšom
stane (Obr. H). Tyče narovnajte a kovové
kolíky vsuňte od rohov vnútorného stanu do
koncov sútyčia. Vonkajší stan upevnite
pomocou 10 kolíkov, pričom pútka na štyroch
rohových bodoch upevnite spolu s kolíkmi
vnútorného stanu (Obr. I).
6. Každú zo 6 napínacích šnúr zabezpečte vždy
jedným kolíkom. Dĺžku napínacích šnúr
môžete upraviť pomocou napínača (Obr. J).
Demontáž
UPOZORNENIE!
Stan sa snažte zdemontovať čistý a suchý, v
opačnom prípade bude plesnieť a vytvoria sa
na ňom fľaky z plesne. Ak stan zdemontujete v
daždi, ihneď ho vysušte. Skôr ako stan zabalíte,
dôkladne vyčistite všetky diely.
• Vytiahnite kolíky a odstráňte napínacie šnúry.
• Vytiahnite tyče, poskladajte ich a zložte
vonkajší a vnútorný stan.
SK

8
Schéma zloženia
• Vonkajší a vnútorný stan zložte do obdĺžnika
a poskladaný stan vložte do vrecka tak, aby
jeho šírka zodpovedala šírke vrecka.
• Tyče a kolíky vložte do príslušného vrecka.
• Vnútorný stan položte na vonkajší stan.
Vrecko s kolíkmi a vrecko na zabalenie stanu
položte do stredu vnútorného stanu, vnútorný
a vonkajší stan potom zviňte.
• Stan, vrecko s tyčami a kolíkmi vložte do
vrecka na zabalenie a zapnite zips.
Údržba
Ak na stane objavíte drobné trhlinky a dierky,
zalepte ich pomocou lepiacej súpravy, ktorú
dostanete v špecializovanej predajni.
Polámané tyče ihneď vymeňte. Ak sa zipsy
zapínajú ťažko, trochu ich naolejujte.
Ošetrovanie
Znečistený stan vykefujte za sucha; eventuálne
dočistite čistou vodou. Nepoužívajte žiadne
chemické čistiace prostriedky. Švy stanu občas
utesnite. Na tento účel použite bežné tesniace
prostriedky na švy.
Skladovanie
V záujme zabránenia tvorbe plesní a fľakov
produkt skladujte na suchom mieste. Ak produkt
nebudete dlhšiu dobu používať, vyberte ho z
vrecka na zabalenie odložte ho na suché mie-
sto, kde nesvieti priamo slnko.
Pokyny na likvidáciu
Obal a produkt zlikvidujte ekologicky a
separovane! Produkt odovzdajte v príslušnej
autorizovanej zberni, alebo ho zlikvidujte pro-
stredníctvom komunálnej správy vo Vašej obci.
Rešpektujte platné predpisy.
3 roky záruka
Produkt bol vyrobený s maximálnou
zodpovednosťou a v priebehu výroby bol neus-
tále kontrolovaný. Na tento produkt máte tri roky
záruku od dátumu kúpy produktu. Pokladničný
lístok si odložte.
Záruka sa vzťahuje len na chyby materiálu
a výrobné chyby a zaniká pri neodbornej
manipulácii s produktom. Záruka nemá vplyv na
Vaše zákonné práva, predovšetkým na práva
vyplývajúce zo záruky.
V prípade reklamácie sa obráťte na nižšie uve-
denú servisnú linku, alebo nám napíšte e-mail.
Naši servisní zamestnanci sa s Vami dohodnú
na ďalšom postupe a urýchlene vykonajú všetky
potrebné kroky. V každom prípade Vám poradí-
me osobne.
Záručná lehota sa nepredlžuje v dôsledku even-
tuálnych opráv na základe záruky, zákonného
plnenia záruky alebo v dôsledku prejavu ocho-
ty. To platí tiež pre vymenené alebo opravené
diely. Opravy vykonané po uplynutí záručnej
lehoty sú spoplatnené.
IAN: 96716
Servis Slovensko
Tel.: 0850 232001
E-Mail: deltas[email protected]k
Náhradné diely na Váš produkt nájdete aj na:
www.delta-sport.com, servisná rubrika – servis náhradných
dielov Lidl
SK

9GB
Congratulations!
With your purchase you have decided on a
high-quality product. Get to know the product
before you start to use it. Carefully read the
following Instructions for use. Use the product
only as described and only for the given areas
of application. Keep these instructions safe.
When passing the product on to a third party,
always make sure that the documentation is
included.
Scope of Delivery (Fig. A)
(1) – Inner tent 1 x
(2) – Outer tent sheet 1 x
(3) – Tent poles, blac 2 x
(4) – Tent poles, grey 1 x
(5) – Tent pole bag 1 x
(6) – Tent pegs 20 x
(7) – Tent peg bag 1 x
(8) – Packsack 1 x
(9) – Storage net 1 x
Instruction manual 1 x
Technical data
Material: Fibreglass poles,
breathable polyester / net / PE
Water column: 2000mm
Size: 110 + 240 x 210 x 150cm
(vestibule + L x W x H)
approx.
210cm
approx. 240cm
approx.
150cm
Category: Cat. A Camping tent (lightweight)
Performance grade: Grade 2 – Tent for use in
generally mild weather conditions. Not designed
for extreme and mountain use.
Intended use
This product serves as an outdoor sleeping and
living space. It is suitable for three persons.
The product is not designed for use in snow or
storms.
Safety instructions
Risk of injury!
WARNING!
Risk of suffocation for children!
Do not leave your children unattended near a
tent that is not erected, or let them play with the
tent. There is the risk that children may suffocate
when playing with the tent material.
WARNING!
Do not use an open flame in the tent and never
use benzine or gas lamps due to the dangerous
fumes. Cook outside the tent.
Safety precautions for fire and
ventilation
Caution:
• When using gas or other flammable
appliances, additional ventilation is
necessary;
• Do not place any hot appliances near to the
walls, ceiling or curtains;
• Always observe the safety instructions for
these devices;
• Never allow children to play near to hot
appliances;
• Keep the exit clear;
• Ensure that you know the provisions for fire
on the premises;
• Ensure that the ventilation openings are
always open, in order to avoid suffocation.
WARNING!
Risk to life from lightening!
Do not erect the tent directly under trees.
During thunderstorms there is the risk of lightning
strikes, which can set the tent or tree on fire or
cause the tree to fall.
• Do not camp in snow and storms, and
consider different and changing weather
and wind conditions.

10 GB
Avoid damage to property!
• Do not erect the tent so that the tent entrance
is in the direction of the wind. Wind could
damage the tent.
• All the tent materials suffer material fatigue
and bleaching if they are exposed to
prolonged, strong sunlight. For this reason,
when the tent is to be used over longer
periods, erect it in a shady position.
Do not leave the tent assembled
unnecessarily.
Assembly
NOTE!
Perform a test assembly before the camping trip.
In doing so, ensure that all the accessories are
present.
Selecting a location for
placing the tent
Choose a place that is as flat and clean as
possible. Avoid dips in the ground.
Remove stones, branches and other sharp ob-
jects in order to prevent damage to the tent floor.
Use natural shade, such as hedges, rocks, etc.
Use the appropriate pegs for sandy ground in
order to prevent accidental loosening of the
tension.
NOTE!
Insert the pegs into the ground at a slight angle
to achieve good strength but without causing
tension in the tent surface. The tent material and
tension points should only be slightly taut, so that
it can compensate for pressure from the wind.
Ensure that there is not too much pressure on the
tent. Check the tent tension according to weather
condition.
NOTE!
Water condensation occurs basically in every
tent, however particularly during strong fluctu-
ations in temperature. After a night in the tent,
there will be drops of condensation on the inner
wall. Condensation is not evidence of leakiness.
Good ventilation reduces condensation in the
tent.
1. Spread the base of the inner tent flat on the
ground, close the zips for the entrance and fix
the loops at all four corners with the pegs
(Fig. B).
2. Build together the segments of the tent poles
(3) and (4). Slide the two black tent poles (3)
diagonally through the loops in the middle of
the inner tent (Fig. C). Secure the inner tent on
the tent poles using the clips (Fig. D).
3. Turn the tent around and insert the metal pins
at the corners of the inner tent into the end
of the tent poles so that these are under
tension (Fig. E).
4. The storage net (9) can now be hooked onto
the roof ridge in the interior of the inner tent
(Fig. F).
5. Place the outer tent over the inner tent
(Fig. G). Secure the outer tent using the bands
to the tent poles and at the crossing point in
the frame. Push the grey tent poles (4) through
the frame tunnel in the outer tent (Fig. H).
Right the frame up and insert the metal pins
from the corners of the inner tent into the end
of the tent poles. Secure the outer tent with
10 pegs and ensure that the loops at the four
corners are fixed with the pegs of the inner
tent (Fig. I).
6. Secure each of the 6 guy ropes with a peg.
The length of the guy ropes can be adjusted
with the tensioner (Fig. J).
Disassembly
NOTE!
Disassemble the tent, if possible, when clean
and dry to prevent the formation of mould and
mildew. After disassembling in rain, immedia-
tely dry the tent. Clean all the parts thoroughly
before packing them away.
• Remove the pegs and guy ropes.
• Remove the tent poles, fold them together
and disassemble the inner and outer tents.

11GB
Folding scheme
• Fold the outer and inner tent into squares and
adjust the sizes to match the maximum width
of the packsack.
• Place the tent poles and pegs into the
respective packaging.
• Place the inner tent onto the outer tent.
Place the tent peg bag and tent pole bag in
the middle of the inner tent and finally roll up
the inner and outer tents.
• Place the tent, tent pole bag and tent peg bag
in the packsack and close the zip.
Maintenance
In the case of small tears and holes, use a repair
kit from a specialist shop. Immediately replace
broken tent poles. Oil the zips a little if they
become stiff.
Care
Brush dirt off the dry tent surface; if necessary
treat with clean water. Do not use a chemical
cleaning product. Seal the tent seams from time
to time. For this, use a commercial seam sealer.
Storage
Store the product in a dry place to prevent the
mould and weather marks. If it is not used for
a longer period, take the product out of the
packsack and store it in a dry place out from
direct sunlight.
Notes for disposal
Please dispose of the packaging and product
separated according to materials and in an
environmentally-friendly manner! Dispose of the
product through an approved waste disposal
firm or by using your local municipal administrati-
on. Observe the current applicable legislation.
3 years warranty
The product was produced with great care and
under constant supervision. You receive a three-
year warranty for this product from the date of
purchase. Please retain your receipt.
The warranty applies only to material and
workmanship and does not apply to misuse or
improper handling. Your statutory rights, espe-
cially the warranty rights, are not affected by this
warranty.
With regard to complaints, please contact the
following service hotline or contact us by e-mail.
Our service employees will advise as to the
subsequent procedure as quickly as possible.
We will be personally available to discuss the
situation with you.
Any repairs under the warranty, statutory
guarantees or through goodwill do not extend
the warranty period. This also applies to
replaced and repaired parts. Repairs after the
warranty are subject to a charge.
IAN: 96716
Service Great Britain
Tel.: 0871 5000 720
(£ 0.10/Min.)
You can also find spare parts for your product at:
www.delta-sport.com, category Service - Lidl Spare Parts
Service

12 DE
Herzlichen Glückwunsch!
Mit Ihrem Kauf haben Sie sich für ein hochwer-
tiges Produkt entschieden. Machen Sie sich vor
der Montage und der ersten Inbetriebnahme mit
dem Produkt vertraut. Lesen Sie hierzu aufmerk-
sam die nachfolgende Bedienungsanleitung und
die Sicherheitshinweise.
Benutzen Sie das Produkt nur wie beschrieben
und für die angegebenen Einsatzbereiche.
Bewahren Sie diese Anleitung gut auf.
Händigen Sie alle Unterlagen bei Weitergabe
des Produkts an Dritte ebenfalls mit aus.
Lieferumfang (Abb. A)
(1) – Innenzelt 1 x
(2) – Außenzelt 1 x
(3) – Zeltstange, schwarz 2 x
(4) – Zeltstange, grau 1 x
(5) – Gestängesack 1 x
(6) – Erdnagel 20 x
(7) – Erdnagelsack 1 x
(8) – Packsack 1 x
(9) – Ablagenetz 1 x
Bedienungsanleitung 1 x
Technische Daten
Material: Fiberglasgestänge,
atmungsaktives Polyester/Netz/PE
Wassersäule: 2000 mm
Maße: 110 + 240 x 210 x 150 cm
(Vorzelt + L x B x H)
ca. 210 cm
ca. 240 cm
ca.
150 cm
Kategorie: Kat A Campingzelt (Leichtgewicht)
Leistungsstufe: Stufe 2 – Zelt, das zum Gebrauch
bei hauptsächlich milden Wetterbedingungen
ausgelegt ist. Nicht gedacht für Extrem- oder
Bergbedingungen.
Bestimmungsgemäße
Verwendung
Dieser Artikel dient als Schlaf- und Aufenthalts-
raum im Freien. Er ist für den Aufenthalt von drei
Personen geeignet. Der Artikel ist nicht für den
Gebrauch bei Schneefall oder Sturm konstruiert.
Sicherheitshinweise
Verletzungsgefahr!
WARNUNG!
Erstickungsgefahr für Kinder!
Lassen Sie Kinder nicht unbeaufsichtigt in der
Nähe des nicht aufgestellten Zeltes oder im Zelt
spielen. Es besteht die Gefahr, dass Kinder beim
Spielen mit dem Zeltmaterial ersticken.
WARNUNG!
Benutzen Sie im Zelt keine offene Flamme und
wegen gefährlicher Abgase niemals Benzin-
oder Gaslampen. Kochen Sie außerhalb des
Zeltes.
Vorsichtsmaßregeln zu Feuer und
Lüftung
Vorsicht:
• Bei Verwendung von Gas oder anderen
Verbrennungsgeräten ist zusätzliche Lüftung
notwendig;
• Keine heißen Geräte in der Nähe der Wände,
des Daches oder der Vorhänge aufstellen;
• Immer die Sicherheitshinweise für diese
Geräte beachten;
• Niemals Kindern erlauben, in der Nähe von
heißen Geräten zu spielen;
• Ausgänge frei halten;
• Stellen Sie sicher, dass Sie die Vorkehrungen
gegen Feuer auf dem Gelände kennen;
• Stellen Sie sicher, dass die Lüftungsöffnungen
zu jeder Zeit geöffnet sind, um Ersticken zu
verhindern.

13DE
WARNUNG!
Lebensgefahr durch Blitzschlag!
Bauen Sie das Zelt nicht direkt unter Bäumen
auf. Bei Gewitter besteht die Gefahr von Blitz-
schlägen, die das Zelt oder den Baum in Brand
setzen oder den Baum umstürzen könnten.
• Zelten Sie nicht bei Schneefall und Sturm
und beachten Sie unterschiedliche und sich
ändernde Wetter- und Windbedingungen.
Vermeidung von Sachschäden!
• Stellen Sie das Zelt nicht so auf, dass der
Zelteingang in Windrichtung zeigt.
Wind könnte das Zelt beschädigen.
• Alle Zeltstoffe erleiden bei länger
andauernder, starker Sonnenbestrahlung
eine Materialermüdung und bleichen aus.
Bauen Sie deshalb das Zelt bei längerer
Benutzung möglichst in einem schattigen
Gebiet auf. Lassen Sie das Zelt nicht unnötig
aufgebaut stehen.
Aufbau
HINWEIS!
Führen Sie vor Reiseantritt einen Probeaufbau
durch. Vergewissern Sie sich dabei, dass
sämtliches Zubehör komplett ist.
Wahl des Aufstellorts
Wählen Sie eine möglichst ebene, saubere
Aufbaustelle. Meiden Sie Bodensenken.
Entfernen Sie Steine, Äste und andere spitze
Gegenstände, um Beschädigungen des Zelt-
bodens zu verhindern. Nutzen Sie natürlichen
Windschatten wie Hecken, Felsen usw..
Benutzen Sie für Sandboden entsprechende
Erdnägel, um ein unbeabsichtigtes Lösen der
Verspannung zu verhindern.
HINWEIS!
Stecken Sie die Erdnägel etwas schräg in die
Erde, damit eine hohe Festigkeit erreicht wird, je-
doch keine Verspannung in der Zelthaut auftritt.
Zeltstoff und Abspannpunkte sollten nur leicht
unter Spannung stehen, damit Belastungen durch
Wind ausgeglichen werden können.
Achten Sie darauf, dass nicht zuviel Spannung
auf dem Zelt ist. Prüfen Sie die Zeltspannung je
nach Witterung.
HINWEIS!
Wasserkondensation kommt grundsätzlich in
allen Zelten vor, jedoch insbesondere bei starken
Temperaturschwankungen. Nach einer Nacht im
Zelt befinden sich Kondenswassertropfen an der
Innenwand. Kondensation ist daher kein Hinweis
auf Undichtigkeit. Gute Belüftung vermindert
Kondensation im Inneren des Zeltes.
1. Breiten Sie den Boden des Innenzeltes flach
auf dem Untergrund aus, schließen Sie die
Reißverschlüsse der Eingänge und fixieren
Sie die Schlaufen an allen vier Ecken mit den
Erdnägeln (Abb. B).
2. Stecken Sie die Segmente der Zeltstangen
(3) und (4) zusammen. Schieben Sie die
beiden schwarzen Zeltstangen (3) diagonal
durch die Schlaufe in der Mitte des
Innenzeltes (Abb. C). Befestigen Sie das
Innenzelt per Clips an den Zeltstangen
(Abb. D).
3. Richten Sie die Zeltstangen auf und stecken
Sie die Metallstifte an den Ecken des
Innenzeltes in das Ende der Zeltstangen,
so dass diese auf Spannung stehen (Abb. E).
4. Das Ablagenetz (9) kann nun in den
Dachfirst im Inneren des Innenzeltes eingehakt
werden (Abb. F).
5. Platzieren Sie das Außenzelt über dem
Innenzelt (Abb. G). Befestigen Sie das
Außenzelt mit den Bändern an den
Zeltstangen und am Gestänge-Kreuzpunkt.
Führen Sie die graue Zeltstange (4) durch
den Gestängetunnel am Außenzelt (Abb. H).
Richten Sie das Gestänge auf und stecken Sie
die Metallstifte von den Ecken des Innenzeltes
in die Enden des Gestänges. Befestigen Sie
das Außenzelt mit 10 Erdnägeln, wobei die
Schlaufen an den vier Eckpunkten zusammen
mit den Erdnägeln des Innenzeltes fixiert
werden (Abb. I).
6. Sichern Sie die 6 Spannleinen mit jeweils
einem Erdnagel. Die Länge der Spannleinen
kann mit dem Straffer angepasst werden
(Abb. J).

14 DE
Abbau
HINWEIS!
Bauen Sie das Zelt möglichst in sauberem und
trockenem Zustand ab, um Schimmelbildung
bzw. Stockflecken zu vermeiden. Nach einem
Abbau im Regen trocknen Sie das Zelt umge-
hend. Reinigen Sie vor dem Verpacken alle Teile
gründlich.
• Entfernen Sie Erdnägel und Spannleinen.
• Entfernen Sie die Zeltstangen, falten Sie sie
zusammen und bauen Sie Außen- sowie
Innenzelt ab.
Faltschema
• Außen- und Innenzelt in Rechteckform falten
und das Faltmaß auf maximale Breite des
Packsackes bringen.
• Zeltstangen und die Erdnägel in die jeweilige
Verpackung legen.
• Innenzelt auf das Außenzelt legen. Erdnagel-
sack und Packsack in der Mitte des Innen-
zeltes platzieren, anschließend Innen- und
Außenzelt aufrollen.
• Zelt, Gestänge- und Erdnagelsack in den
Packsack legen und Reißverschluss schließen.
Wartung
Verwenden Sie im Falle von kleinen Rissen und
Löchern ein Reparaturset aus dem Fachhandel.
Tauschen Sie zerbrochene Zeltstangen sofort
aus. Ölen Sie Reißverschlüsse bei Schwer-
gängigkeit etwas nach.
Pflege
Verschmutzungen an der Zelthaut im trockenen
Zustand abbürsten; evtl. mit klarem Wasser nach-
behandeln. Verwenden Sie keine chemischen
Reinigungsmittel. Von Zeit zu Zeit sollten Sie
die Zeltnähte abdichten. Verwenden Sie dazu
handelsübliche Nahtdichtmittel.
Aufbewahrung
Zur Vermeidung von Schimmel und Witterungs-
flecken lagern Sie den Artikel an einem
trockenen Ort. Bei längerem Nichtgebrauch
nehmen Sie den Artikel aus dem Packsack und
bewahren Sie ihn an einem trockenen, vor
direkter Sonneneinstrahlung geschützten Ort auf.
Hinweise zur Entsorgung
Verpackung und Artikel bitte umweltgerecht und
sortenrein entsorgen! Entsorgen Sie den Artikel
über einen zugelassenen Entsorgungsbetrieb
oder über Ihre kommunale Gemeindever-
waltung. Beachten Sie die aktuell geltenden
Vorschriften.
3 Jahre Garantie
Das Produkt wurde mit großer Sorgfalt und unter
ständiger Kontrolle produziert. Sie erhalten auf
dieses Produkt drei Jahre Garantie ab Kaufda-
tum. Bitte bewahren Sie den Kassenbon auf.
Die Garantie gilt nur für Material- und Fabrika-
tionsfehler und entfällt bei missbräuchlicher oder
unsachgemäßer Behandlung. Ihre gesetzlichen
Rechte, insbesondere die Gewährleistungsrech-
te, werden durch diese Garantie nicht einge-
schränkt.
Bei etwaigen Beanstandungen wenden Sie sich
bitte an die unten stehende Service-Hotline oder
setzen Sie sich per E-Mail mit uns in Verbindung.
Unsere Servicemitarbeiter werden das weitere
Vorgehen schnellstmöglich mit Ihnen abstimmen.
Wir werden Sie in jedem Fall persönlich beraten.
Die Garantiezeit wird durch etwaige Repa-
raturen aufgrund der Garantie, gesetzlicher
Gewährleistung oder Kulanz nicht verlängert.
Dies gilt auch für ersetzte und reparierte Teile.
Nach Ablauf der Garantie anfallende Reparatu-
ren sind kostenpflichtig.
IAN: 96716
Service Deutschland
Tel.: 0800-5435111
E-Mail: deltaspor[email protected]
Ersatzteile zu Ihrem Produkt finden Sie auch unter:
www.delta-sport.com, Rubrik Service - Ersatzteilservice Lidl

15

IAN 96716
DELTA-SPORT HANDELSKONTOR GMBH
Wragekamp 6 • D-22397 Hamburg
Version: 03/2014
Delta-Sport-Nr.: ID-1814
Table of contents
Languages:
Other Crivit Outdoor Tent manuals