Crommelins CFGKUB Administrator Guide

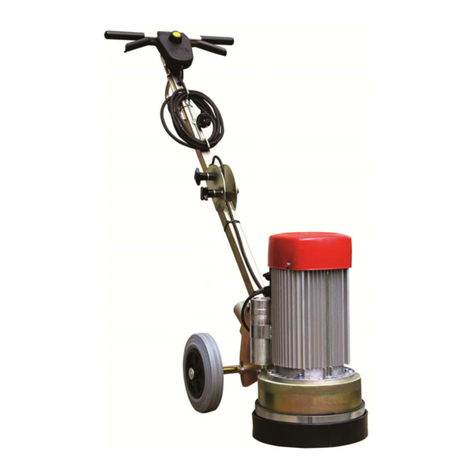
10” CROMMELINS™FLOOR GRINDER
Thank you for your selection of an 10” CROMMELINS™ Floor Grinder. This
Operation Manual explains its use, installation, checking and maintenance. We
highly recommend that you retain this manual for ready reference regarding
proper handling of the 10” CROMMELINS™ Floor Grinder.
Spare Parts & Service
Phone: 1300 554 524
Freecall Fax: 1800 636 281
spareparts@crommelins.com.au
www.crommelins.com.au
WA Metro 9350 5588
WA Regional 1800 655 588
East Coast 1300 650 659
OPERATION & INSTRUCTION MANUAL

2
Thank you very much for purchasing a 10” CROMMELINS™ FLOOR GRINDER. This manual
covers operation and maintenance of the 10” CROMMELINS™ FLOOR GRINDER.
Please take a moment to familiarise yourself with the proper operation and maintenance
procedures in order to maximise the safe and efficient use of this product.
Keep this owner’s manual at hand, so that you can refer to it at anytime.
Due to constant efforts to improve our products, certain procedures and specifications
are subject to change without notice.
When ordering spare parts please have handy your products model number and serial
number. Record these numbers in the boxes below for future reference.
CONTENTS
Introduction & Contents ..................................................................................... 2
General Safety Rules .......................................................................................... 3
General Information .......................................................................................... 4
Operating Floor Grinder ..................................................................................... 5
Maintenance ..................................................................................................... 6
Parts Diagram ..................................................................................................... 7
Parts List .......................................................................................................... 8
Warranty ........................................................................................................... 9
SERIAL NO.
MODEL NO.

3
GENERAL SAFETY RULES
This manual contains important information on how to use the following floor grinder
model CFGKUB correctly and safely. Please read through this manual before you attempt to
operate the machine.
This floor grinder is designed to give safe and dependable service if operated according to
the instructions.
1. Do not use the grinder for longer than prescribed in your local environment
working regulations, as the noise load from extensive daily use may result in
hearing defects.
2. Do not modify the grinder in any manner, or use a machine that has been modified
by anyone other than the manufacturer or authorised dealers.
3. Do not add weight to the machine to make the grinder work harder. Instead
reduce the number of segments on the grinding plates to increase the
performance.
4. Make sure that re-tipped plates and new grinding plates are balanced properly.
5. Do not run the grinder with the grinding head raised higher than necessary, i.e.
tipped back on the handle.
6. Always make sure that the folding handle latch is secure and has not vibrated loose
after use.
7. When grinding the machine is exposed to high vibration. Occasionally check the
machine if any nut or bolt has loosened due to the vibration.
8. Do not allow water or cotton to enter the interior of the motor.
To prevent injury wear the following protective items: Ear plugs/muffs, safety glasses, work
boots and any other protective item required by job conditions.

4
GENERAL INFORMATION
The floor grinder is a sturdy, reliable and easy to use machine.
The floor grinder is fitted with 2.2kW single phase motor. This motor offers direct drive to
the grinding plate with the incorporation of a flexible coupling between the motor and the
plate.
The shroud system is unique in design, automatically adjusting to suit segment height and
floor angle. This shroud system when used in conjunction with an appropriate industrial
vacuum unit eliminates dust loss during grinding. The shroud has 2 removable sections to
enable the operator to grind close up to the wall etc. Please note dust loss is possible when
this section is removed.
The floor grinder comes complete with a water connection for wet grinding should this be
required. There is also a ball valve which allows the operator to regulate the water supply
to obtain the best grinding results.
The floor grinder has a foldable handle which makes it easily transportable in any small
vehicle. The rear wheels can be extended outwards should the operator require more
stability from the grinder. This requires the use of an 8mm Allen key. The operator can also
raise and lower the height of the handle to maximise their comfort during their use of the
grinder.
TECHNICAL DATA
Motor HP
3 HP
Motor KW Rating
2.2 kW
Motor RPM
1450 rpm
Unit Weight
45 kg
Plate Type
Standard 250mm plate or K-Kub shoes
Plate Bolt Types
M12x25 countersunk socket bolts
M8 x 16 mm Hex head engineers bolt
Main Construction
Powder coated steel

5
OPERATING FLOOR GRINDER
The floor grinder is designed to be used either for wet or dry floor grinding. If the floor
that has to be ground is dry ensure a suitable industrial vacuum is connected and also
ensure the operator is wearing suitable breathing respiratory equipment. Contact your
local work place health authority to ensure that their requirements regarding respiratory
equipment are being met.
STARTING THE GRINDER
1. Check the grinding plate being used is suitable for the material being ground and
THAT THEY ARE CORRECTLY BALANCED.
2. Check that the grinding plates used are in good order and are properly attached, with
all countersunk bolts firmly in place. Check this occasionally during use, as they can
become loose during working.
3. Check that the grinding plate is adjusted so that it sits level on the ground.
4. Check all nuts and bolts on folding handle latch are tight and firm.
5. Raise the grinding plates from the floor.
6. Start the motor by pressing the Green switch on the starter box.
7. Lower the grinding plate and commence grinding.
STOPPING THE GRINDER
1. De-press the red stop button on the starter box.
FAULT DIAGNOSIS
Symptom
Possible Cause
Action
Grinder runs for 5 –15
minutes, then stops
Motor thermal overload
tripped
Allow to cool, reset
thermal overloads
Extension cable too long
and/or not made from
heavy enough cable
Then get electrician to
check extension lead
compatibility
Grinder runs but does not
perform adequately
Motor defective
Repair or replace
Grinder vibrates during use
Grinding plates not
correctly balanced
Replace or re-balance
the grinding plates
Grinding noise coming from
grinding head when up on
jockey wheel
Excessively worn motor
bearings
Have motor serviced

6
MAINTENANCE
Daily cleaning:
The motor in use should always be kept clean. No water droplets, cotton etc should be
allowed to get into the interior of the motors.
Check on load current:
While the motor is in operation, constant care should be taken to keep the load current
below the rated value.
Running sound:
During the operation of the motor there must be no rubbing noise shrike or other
random noise. Stop the motor immediately and restart after the corrections have been
made.
Check the folding handle latch periodically. This is adjustable. To adjust loosen the lock
nut on the latch and then screw in the treaded paw until a satisfactory tension has been
achieved.
The wheel bearing are sealed type so they do not require regular greasing.
**NB to minimize vibrations and uneven blade wear, rotate plate every 2 hours.
Failure to do so can lead to premature wear of the flexible coupling.

7
PARTS DIAGRAM

8
PARTS LIST

9
WARRANTY
Consult the CROMMELINS Machinery warranty leaflet (supplied with your new product)
for full details and a list of service dealers for this product, also available online at
www.crommelins.com.au.
NOTES
.................................................................................................................................................
.................................................................................................................................................
.................................................................................................................................................
.................................................................................................................................................
.................................................................................................................................................
.................................................................................................................................................
.................................................................................................................................................
.................................................................................................................................................
.................................................................................................................................................
.................................................................................................................................................

10
NOTES
.................................................................................................................................................
.................................................................................................................................................
.................................................................................................................................................
.................................................................................................................................................
.................................................................................................................................................
.................................................................................................................................................
.................................................................................................................................................
.................................................................................................................................................
.................................................................................................................................................
.................................................................................................................................................
.................................................................................................................................................
.................................................................................................................................................
.................................................................................................................................................
.................................................................................................................................................
.................................................................................................................................................
.................................................................................................................................................
.................................................................................................................................................
.................................................................................................................................................
.................................................................................................................................................
.................................................................................................................................................
.................................................................................................................................................

11
NOTES
.................................................................................................................................................
.................................................................................................................................................
.................................................................................................................................................
.................................................................................................................................................
.................................................................................................................................................
.................................................................................................................................................
.................................................................................................................................................
.................................................................................................................................................
.................................................................................................................................................
.................................................................................................................................................
.................................................................................................................................................
.................................................................................................................................................
.................................................................................................................................................
.................................................................................................................................................
.................................................................................................................................................
.................................................................................................................................................
.................................................................................................................................................
.................................................................................................................................................
.................................................................................................................................................
.................................................................................................................................................
.................................................................................................................................................

12
Crommelins Operations Pty Ltd t/as
Crommelins Australia and
Crommelins Machinery
ABN 11 008 889 656
PO Box 352 BENTLEY WA 6982
Ph: (08) 9350 5588
Fax: (08) 9451 6381
email@crommelins.com.au
www.crommelins.com.au
Table of contents
Popular Floor Machine manuals by other brands

Factory Cat
Factory Cat 34HD operating instructions

Kärcher
Kärcher BR VS 400 USA operating instructions

Husqvarna
Husqvarna Scandinavia 400 Operator's manual

Viper
Viper Dragon DR2000DC Dust Control owner's manual
Pullman Holt
Pullman Holt Gloss Boss GB-2000DC Operation & care instructions

Pacific
Pacific pro 7r Operating & maintenance instructions

Husqvarna
Husqvarna BS 75 Operator's manual

Advance acoustic
Advance acoustic Advolution 20 Instructions for use and parts list
HAKO
HAKO Scrubmaster B 310 R/WZB 960 instruction manual

Tennant
Tennant S30 Operator's manual

KLINDEX
KLINDEX Bella Basic 1,7 Max Manual book

Tomcat
Tomcat 2300 Operator and parts manual

