Cromtech CTP301 User manual

CTP301
OPERATION MANUAL
3 INCH CLEAR WATER PUMP

Pg. 2
Thank you for purchasing a Cromtech Pump.
This manual provides understanding of the operaon
and maintenance of your pump. Please read this
manual carefully before operang.
For any quesons regarding operaon or maintenance,
please consult your local service agent. Find your local
service agent at www.crommelins.com.au.
IMPORTANT ICONS
Important informaon is disnguished by the nocaons
below. The Safety Alarm Symbol ( !) alerts you to
potenal hazards. Please obey all safety informaon in the
symbol to avoid any possible injury or even death.
!DANGER: - Indicates a hazardous situaon which, if
not strictly complied with, will result in substanal property
damage, serious injury or DEATH.
!WARNING: Indicates a hazardous situaon which, if
not strictly complied with, may result in property damage,
!CAUTION: Indicates a hazardous situaon which, if
not strictly complied with, could result in property damage
or injury.
!NOTE: Indicates important informaon to simplify
operaon and understanding.
!WARNING: PLEASE READ AND UNDERSTAND THIS
MANUAL BEFORE OPERATING THE PUMP.
!NOTE: We connually seek advancements in product
design and quality. Therefore, there may be minor
discrepancies in actual machine and the printed manual.

INDEX:
Warranty ..................................................................... 4
Safety Warnings .......................................................... 5
CTP301 Features ......................................................... 7
Pump Specicaons .................................................... 8
Features ..................................................................... 8
Connecng hoses ........................................................ 9
Operang Checklist ..................................................... 10
Operang area ........................................................... 10
Operang condion ................................................... 10
Check engine oil .......................................................... 11
Check fuel levels .......................................................... 12
Priming the pump ........................................................ 13
Starng the pump ....................................................... 14
Stopping the pump .................................................... 15
Maintenance ............................................................... 16
Engine Maintenance ................................................. 16
Engine oil ................................................................ 18
Adding oil ............................................................... 18
Changing oil ........................................................... 18
Air lter ................................................................. 19
Oil bath lter ......................................................... 19
Spark plug .............................................................. 20
Spark arrestor ........................................................ 21
Adjustments .......................................................... 21
Troubleshoong ......................................................... 22
Storage and transport ................................................ 23
Storage ..................................................................... 23
Long term storage .................................................... 23
Transport .................................................................. 23
Pg. 3

WARRANTY
CROMTECH™and CROMMELINS™ are a registered trademark of The
Crommelin Group. Crommelins warrants their goods against defects in
materials and workmanship under normal use and service.
The Crommelin Group warranty does not cover fair wear commensurate
with the age of the product, any damage caused by accident, abuse, misuse,
neglect or failure to observe proper operang instrucons or proper
machinery maintenance as described in the instrucon manual.
It is the owner’s responsibility to regularly maintain a product in accordance
with the owner’s manual and only use the equipment for its designed
purpose.
Our goods come with guarantees that cannot be excluded under the
Australian Consumer Law. You are entled to a replacement or refund for
a major failure and for compensaon for any other reasonably foreseeable
loss or damage. You are also entled to have goods repaired or replaced if
the goods fail to be of acceptable quality and the failure does not amount to
a major failure.
CONSUMER ADVICE
Any claim under these warranes must be made in the warranty period
from the date of purchase of the product.
There are over 185 naonal authorised service/repair agents available, visit
www.crommelins.com.au for their details and locaons.
To make a claim under the warranty, you must return the product (with
proof of purchase) to the closest warranty agent or to the place of purchase.
Where a failure does not amount to a major failure, Crommelins Machinery
is entled to choose between providing you with a repair, replacement or
refund. To obtain compensaon, you would need to provide documentary
evidence of the loss or damage suered, and documentary evidence that
such loss or damage was a reasonably foreseeable consequence of a failure
by The Crommelins Group to comply with a consumer guarantee under the
Australian Consumer Law.
Crommelins Operaons Pty Ltd trading as The Crommelin Group,
Crommelins Australia and Crommelins Machinery
THE CROMMELIN GROUP:
Ph: (08) 9350 5588 Fax: (08) 9451 6381
recepon@crommelins.com.au
www.crommelins.com.au
PO Box 352, BENTLEY WA 6982
ABN 11 008 889 656
Pg. 4

SAFETY WARNINGS
! WARNING: DO NOT Operate this pump unl you have
read ALL safety, operaon, and maintenance instrucons
listed in this manual.
• Failure to follow the instrucons may result in property
damage, INJURY or DEATH.
! WARNING: Modicaons to any part of the pump is
not allowed and may void your warranty.
!DANGER: FIRE OR EXPLOSION - Gasoline is highly
ammable and extremely explosive.
• Fire or explosion can cause severe burns or death.
• Keep ammable items away while handling gasoline.
• Fill fuel tank outdoors and in a well-venlated area with
the pump stopped.
• Always wipe o spilled fuel and wait unl the fuel has
dried before starng the pump.
• DO NOT operate the engine with known leaks in the fuel
system.
• Use proper fuel storage and handling procedures. DO
NOT store fuel or other ammable materials nearby.
• Empty the fuel tank before storing or transporng the
pump.
• Keep re exnguisher handy and be prepared if a re
starts.
!DANGER: TOXIC FUMES - The exhaust of the pump
engine contains carbon monoxide, an odorless, colorless,
poison gas. Using engine indoors CAN KILL YOU!
• NEVER use pump inside any building or any kind of
enclosure, EVEN IF doors and windows are open.
• Place the pump in a well-venlated area and consider
wind and air currents when posioning the pump
!DANGER: MOVING PARTS - Moving parts can cause
severe injury. Keep hands and feet away.
• DO NOT operate pump with covers, shrouds, or guards
removed.
• DO NOT wear loose-ng clothing, dangling drawstrings
or items that could become caught. Tie up long hair and
remove jewelry.
• NEVER place ngers, hands, or body near the engine
when it is running.
Pg. 5

!DANGER: KICKBACK - Rapid retracon of the starter
cord will pull hand and arm towards the engine faster than
you can let go.
• Unintenonal startup could result in an injury.
!WARNING: CLEAR WATER ONLY - Do not use the pump
for ammable or corrosive liquids, chemical solvents, or
alkali liquids. For example; Gasoline, alcohol, seawater, oil,
wine or milk.
• Keep hands and body far away from discharge outlet of
the pump.
• Never secure the sucon hose with clamps to the pump
during operaon.
• Never put hand or body into an operang pump or
sucon hose.
!WARNING: OPERATION - Operate the pump on rm
dry ground and ensure it is not in mud or water, especially
when used next to ponds, ditches or water source.
• Never place hoses where they can be run over. If the
hose does lay across a road, place a specially made
metal plate over the hose to protect it from damage or
kinks.
• Never block the inlet or outlet ports.
• Never start the pump without the lter aached to the
sucon hose.
• ALWAYS Prime the pump upon inial start. Keep enough
water in the pump. DO NOT run pump without water in
it.
• DO NOT operate pump without reading the instrucons
• Children and pets must keep away from the area of
operaon at all mes.
• DO NOT operate while intoxicated or distracted
Pg. 6
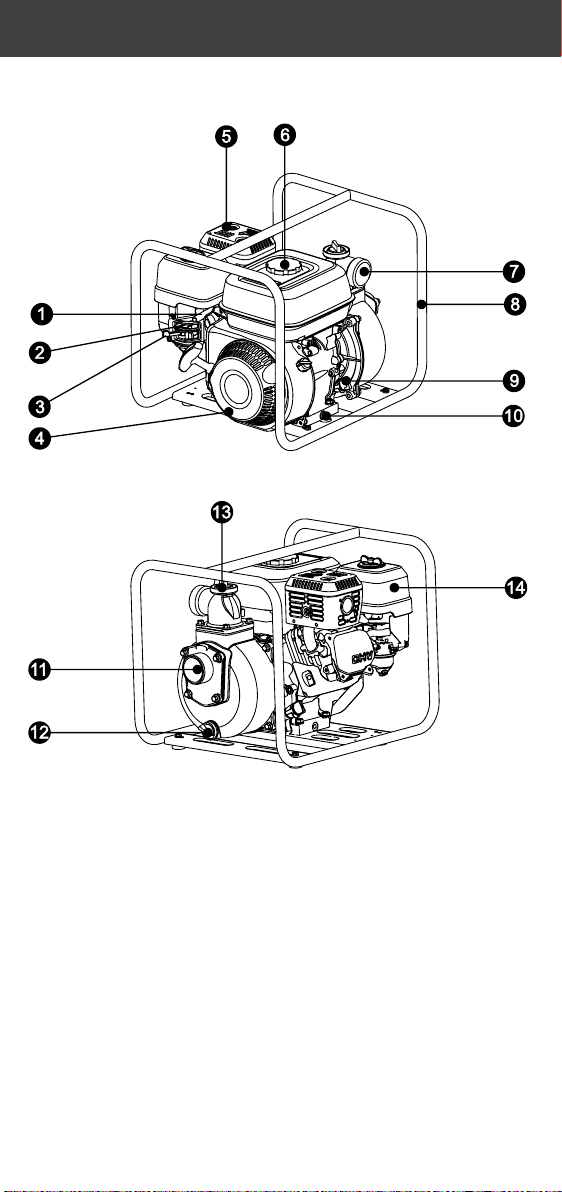
CTP301 FEATURES
① Throttle control ② Choke lever
③ Fuel switch ④ Recoil starter
⑤ Muffler ⑥ Fuel cap
⑦ Outlet ⑧ Frame
⑨ Oil dipstick ⑩ Oil drain
⑪ Inlet ⑫ Outlet drain plug
⑬ Inlet water plug ⑭ Air filter
Pg. 7

PUMP SPECIFICATIONS
Model CTP301
Max. Water Flow (L/min) 900L/min
Max. Total Head (m) 30m
Max. Sucon Depth 7m
Engine Cromtech
Max. Power 4.5kW
Max. Speed (rpm) 3800rpm
Fuel Tank 2.6L
Oil Capacity 0.6L
Outlet 3” (with 2” hose
tail supplied)
Weight (kg) 26kg
Packaging (LxWxH) 530x415x445mm
FEATURES
• 3” to 2” Reducon hose tail supplied
• Mechanical seal (ceramic carbon)
• Petrol powered
• Recoil start
• 1 Year Cromtech warranty
• Emptying ponds, dams and large water tanks
• Agricultural and general purpose
Pg. 8

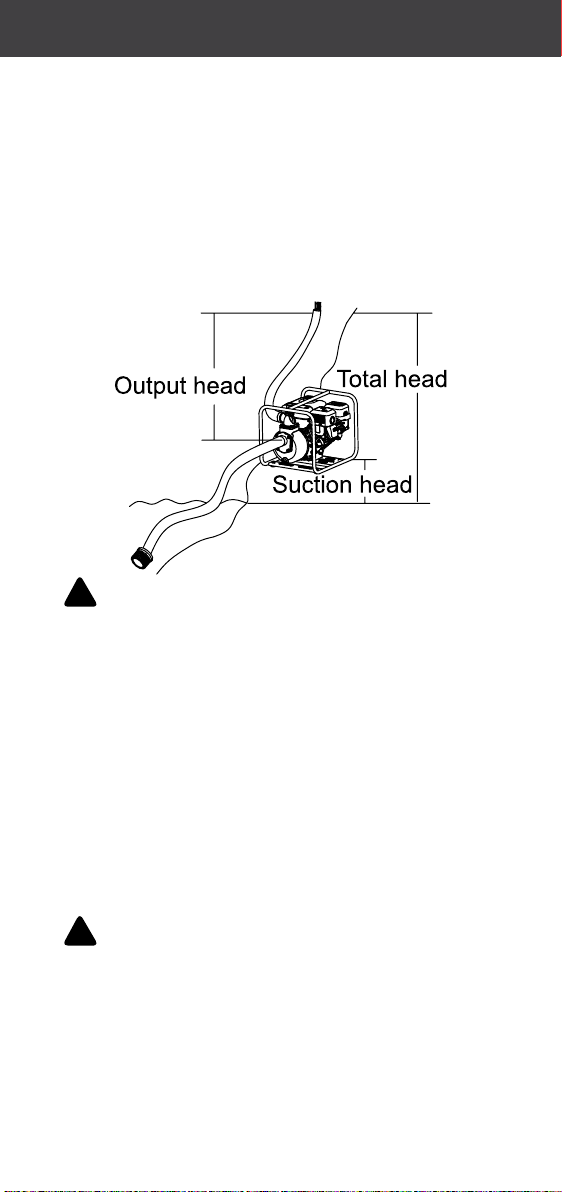
CONNECTING THE HOSES
! NOTE: DO NOT Operate this pump unl you have read
ALL safety, operaon, and maintenance Instrucons listed
in this manual.
1. Pump connecons - Check you have been provided with
all the following parts (Parts may vary from dierent
models). Connect them as follows;
1.1 Connect the lter to the sucon hose.
! CAUTION: Ensure that the lter is securely
connected so it can prevent debris being passed
into the pump. Keep the sucon hose at least
200mm below depth ensuring it is fully submerged
and there are no obstrucons.
1.2 Connect the sucon hose to the inlet port
! CAUTION: It is recommended that the sucon
hose be made of hardened pipe and it is short in
length (7m maximum based on sucon depth).
1.3 Connect the outlet hose to the outlet port
! CAUTION: The maximum water ow for the
pump is based on rpm, outlet size and hose size.
It is recommended to use a 3” hose for maximum
water ow. Fasten all hoses to the pump so they
cannot loosen under high pressure.
Suction hose
❶ Inlet port
❷ Rubber sealing gasket
❸ Hose tail
❹ Hose nut
❺ Clamp
❻ Sucon hose
Pg. 9
❶ Outlet port
❷ Rubber sealing gasket
❸ Hose tail
❹ Hose nut
❺ Clamp
❻ Outlet pipe
OPERATING CHECKLIST
1. OPERATING AREA - This pump is for outdoor use only.
Always keep the area around the water pump clear.
Place the pump in a well-vented area and carefully note
the wind and air currents. Place the water pump on rm
horizontal surface before running. The pump should not
exceed a height more than its maximum sucon depth
as it may not pump or could overheat.
! DANGER: TOXIC FUMES - The exhaust of the
pump engine contains carbon monoxide, an odorless,
colorless, poison gas. Using pump indoors CAN KILL
YOU! NEVER use inside any building or any kind of
enclosure, EVEN IF doors and windows are open.
2. OPERATING CONDITION - Check for loose or damaged
parts, signs of oil or fuel leaks, and any other condion
that may aect proper operaon. Repair or replace all
damaged or defecve parts immediately.
Remove any excessive dirt or debris, especially around
the muer and recoil starter.
! DANGER: Failing to correct problem(s) before
operaon could result in property damage, serious
injury or DEATH.
Pg. 10

CHECK ENGINE OIL
! WARNING: This engine is not lled with oil from the
factory. Any aempt to crank or start the engine before it
has been properly lled (with the recommended type and
amount of oil) may result in engine damage and void your
warranty.
1. ENGINE OIL - Place the engine on a level surface with
engine stopped. Remove the dipsck and wipe it clean.
Reinsert dipsck into oil ll neck; wait, DO NOT thread
cap into tube.
2. Remove the dipsck again and check oil level. Level
should be at top of indicator on dipsck.
3. If lower, ll to the upper limit (marked with “H”) of the
dipsck with the recommended oil. Reinsert and fully
ghten the dipsck.
! WARNING: Oil is a major factor aecng
performance and service life of an engine. Use 4-stroke
automove oil SAE30.
Pg. 11
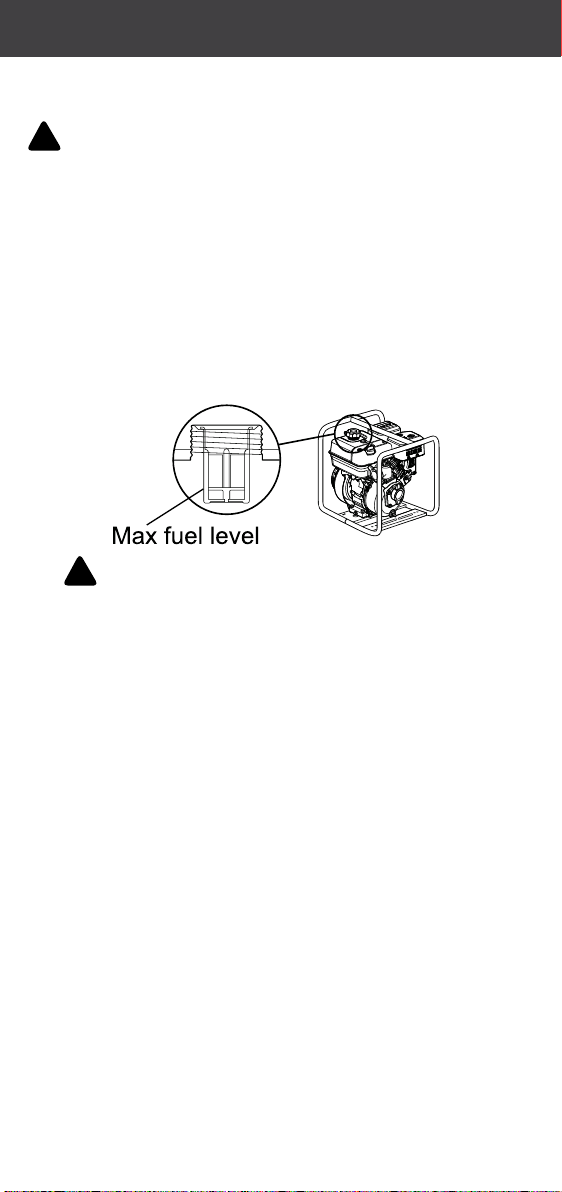
CHECK FUEL LEVELS
! CAUTION: Pressure can build up in the fuel tank. Allow
the engine to cool for at least two minutes before removing
fuel cap. Loosen the fuel cap slowly to relieve any pressure
in the tank
• ENGINE FUEL - With the engine stopped, check the fuel
level gauge. Rell the fuel tank if necessary.
• Use clean, fresh, regular unleaded gasoline only. DO
NOT mix oil with gasoline.
• Be sure not to ll above the upper limit mark, always ll
to the level indicator, or ll to 25mm le from fuel tank
(to allow room for fuel expansion).
! DANGER: FIRE OR EXPLOSION - Gasoline is highly
ammable and extremely explosive. A re or explosion
can cause severe burns or death.
• Keep ammable items away while handling
gasoline.
• Fill fuel tank outdoors and in a well-venlated area
with the engine stopped.
• Always wipe o spilled fuel and wait unl the fuel
has dried before starng the engine.
• DO NOT operate the engine with known leaks in
the fuel system.
• Use proper fuel storage and handling procedures.
DO NOT store fuel or other ammable materials
nearby.
• Empty the fuel tank before storing or transporng
this engine.
• Keep re exnguisher handy and be prepared if a
re starts.
NEVER use engine or carburetor cleaner products in the
fuel tank or permanent damage may occur.
It is important to prevent gum deposits from forming
in fuel system, such as the carburetor, fuel lter, fuel
hose or tank during storage. Also, any alcohol-blended
Pg. 12

fuels (called gasohol, ethanol or methanol) can aract
moisture, which leads to separaon and formaon of
acids during storage.
Acidic fuel can damage the fuel system of an engine
while in storage. Be sure to review the Storage
instrucons.
Gasoline/Alcohol Blends: up to 10% alcohol, 90%
unleaded gasoline by volume is approved as a fuel.
Other gasoline/alcohol blends are not approved.
Eects of old, stale or contaminated fuel may void your
warranty.
! CAUTION: To minimise gum deposits in your fuel
system and to insure easy starng, do not use gasoline
le over from the previous season.
PRIMING THE PUMP
! CAUTION: Operang a pump with no water will
damage the seals, which may void the warranty.
• PRIME THE PUMP - Fill the pump with water before
starng it. Remove the water inlet rubber plug and ll
pump head with water.
Pg. 13
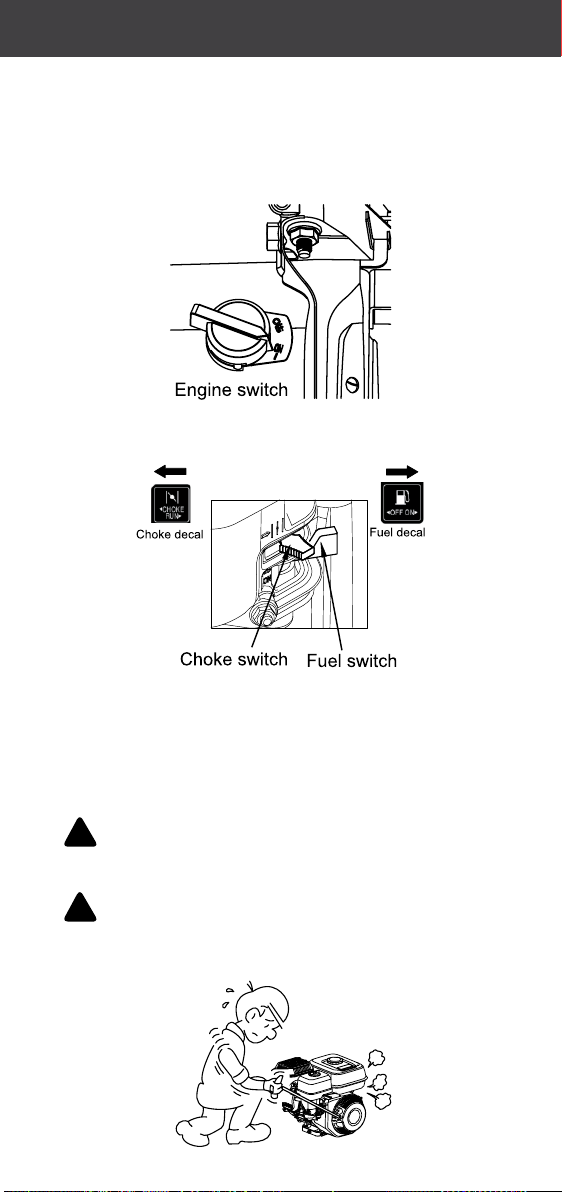
STARTING THE PUMP
1. Check the hoses are connected and the pump is primed
before operang the pump.
2. Turn the start switch to the ‘ON’ posion
3. Turn the choke lever to the ‘ON’ posion
4. Turn the fuel switch to ‘ON’ posion.
5. Push the throle lever 1/3 the way (from low speed to
high speed) across.
6. RECOIL START - Pull the starter handle unl feel
resistance force to start the engine, and then pull more
quickly to start it.
! CAUTION: Ensure that the recoil rope is not
damaged and repair if required.
! DANGER: Rapid retracon of the starter cord will
pull hand and arm towards the engine faster than you
can let it go. Unintenonal startup could result in an
injury.
Pg. 14

7. Switch ‘OFF’ the choke lever once the engine is started.
Do not run the engine for long periods of me with
choke lever in the ‘ON’ posion.
8. Push the throle lever to high speed to run the engine
under its standard speed.
STOPPING THE PUMP
1. Turn the throle lever to low speed and run the engine
for 1-2 minutes more.
2. Turn the switch to ‘OFF’ posion to stop the pump.
3. Turn fuel switch to ‘OFF’ posion.
Pg. 15
MAINTENANCE
! NOTE: It is owner’s/operator’s responsibility to
complete all scheduled maintenance in a mely manner.
• Ensure the pump is regularly checked before operang.
• Always follow the inspecon and maintenance
recommendaons and schedule in this manual.
! DANGER: Accidental starts can cause severe injury
or death. Remove and ground spark plug wire before
performing any service.
! DANGER: Improper maintenance or failure to correct
a problem before operaon can cause a malfuncon and
result in property damage, serious injury or DEATH.
Improper maintenance will void your warranty.
! CAUTION: The lter element may contain PAHs,
PAHs are harmful for your health. Please wear gloves for
protecon during air lter maintenance.
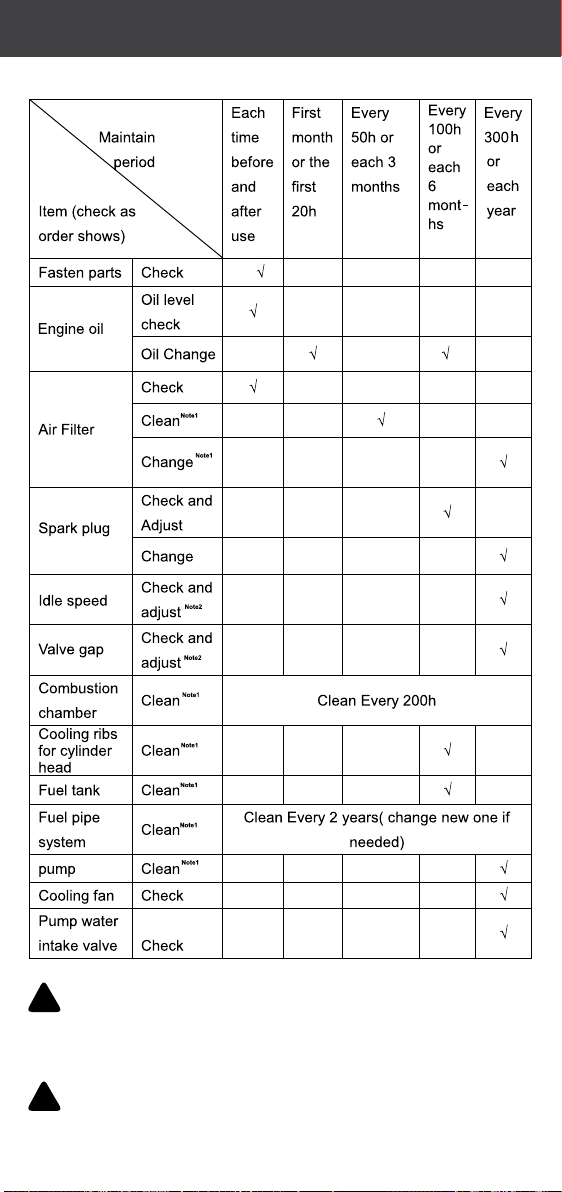
1. MAINTENANCE SCHEDULE - Service the pump in a clean,
dry and at area.
Follow the service intervals indicated in the chart.
Service your pump more frequently when operang in
dusty or adverse condions.
Contact your local service agent for parts.
2. GENERAL MAINTENANCE - Regularly check the engine
oil, air lter, spark plug and pump.
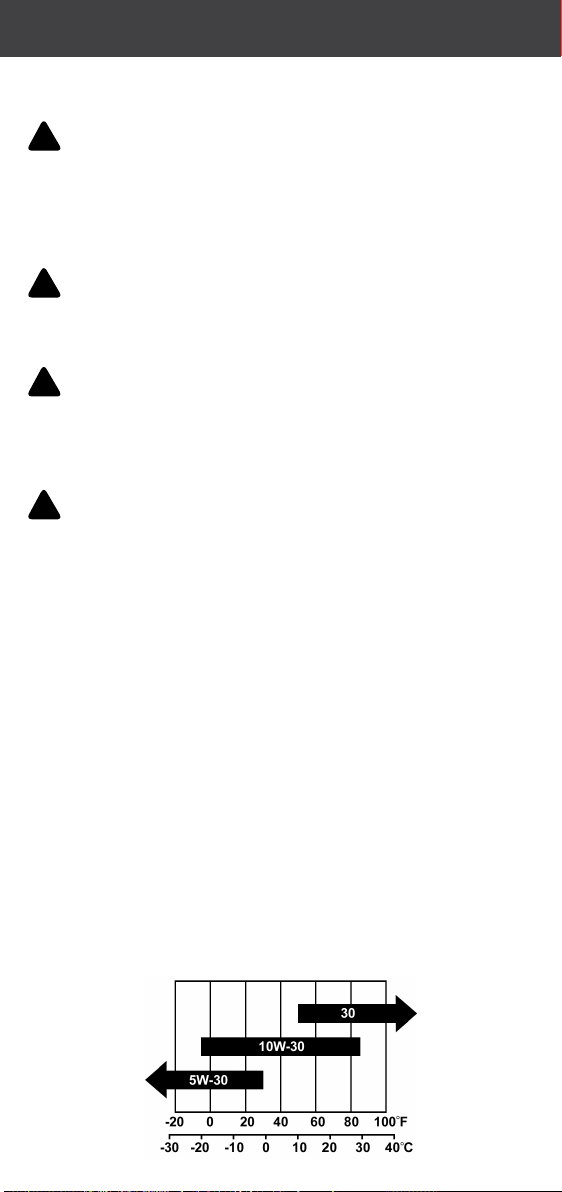
2.1 - ENGINE OIL - SAE30 is recommended for general, all-
temperature use. Other viscosies shown in the chart
may be used when the average temperature in your
area is within the indicated range.
Pg. 16
! NOTE 1: If the pump engine is running in dusty or
severe environments, more frequent maintenance is
required.
! NOTE 2: All major maintenance should be completed
by an authorised local service agent.
Pg. 17

2.2 - ADDING ENGINE OIL - Check oil levels are at the
correct level.
i. Place the engine on a level surface.
ii. Remove the dipsck and wipe it clean.
ii. Reinsert and check the dipsck for oil level.
! CAUTION: Reinstall dipsck into tube; rest on oil
ll neck, DO NOT thread cap into tube.
iv. Add the recommend oil to the upper limit of the
dipsck.
2.3 - CHANGING OIL - If the oil is dirty, replace with new
oil.
! CAUTION: Change oil when the engine is warm
from operaon.
i. Place the engine on a level surface.
ii. Prepare a tray to catch the oil.
iii. Remove the oil drain plug and allow the oil to drain
completely.
iv. Replace and fully ghten the drain plug.
v. Add recommended oil to the upper limit.
vi. Reinstall and fully ghten the dipsck.
vii. Dispose of used oil at an approved waste
management facility.
Pg. 18

2.4 - AIR FILTER - Check the air lter/s are clean and
change if required.
I. Loosen the nut to remove the lter cover.
Ii. Loosen the wing nut to remove the lter.
Iii. Clean/change the lter/s.
Foam lter: Clean the foam lter using warm
water with detergent. Dry the lter by pressing it
into a clean dry towel. Aer drying, lightly apply
clean engine oil to the lter.
Paper lter: Lightly tap the lter so that the dirt
can fall o. Never brush the dirt, which may
push the dirt into the lter. If the dust does not
remove and the lter is sll dirty, replace it.
Iv. Reassemble the lter back to the units.
V. Fasten cover with the screw down nut.
! WARNING: DO NOT run the engine without
the air lter, serious damage can result.
Pg. 19
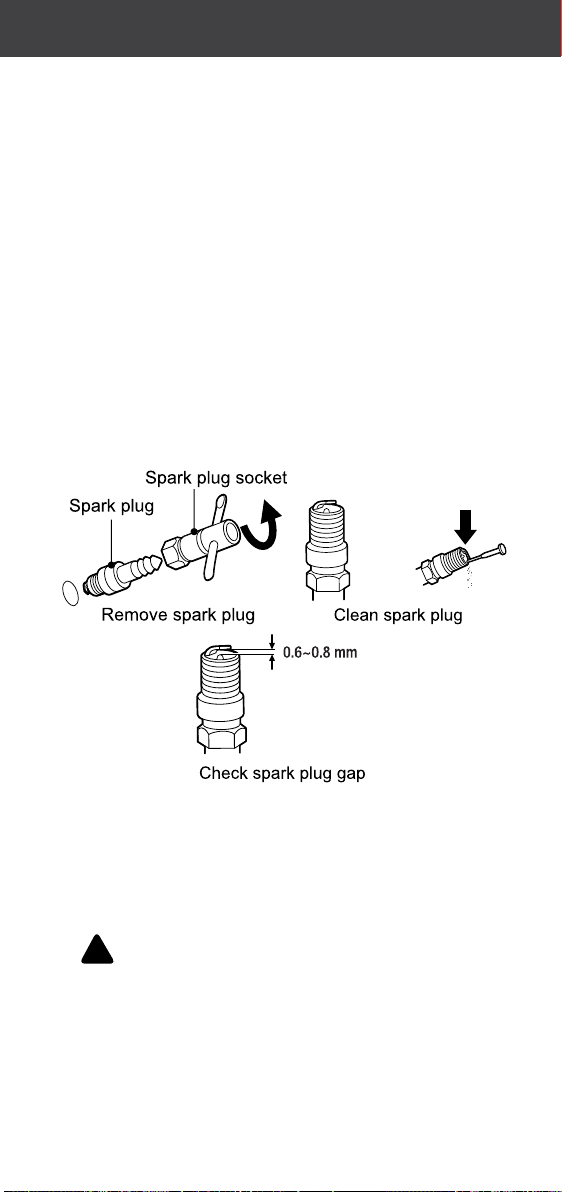
2.6 - SPARK PLUG - Check the spark plug is clean and
change if required.
I. Clean any dirt from the spark plug cap and spark
plug base.
Ii. Remove the spark plug cap.
Iii. Using socket wrench to loose and remove the spark
plug.
Iv. lnspect the spark plug and spark plug washer, if it’s
damaged or worn, replace with new one. Clean the
spark plug with wire brush before reng.
V. Check spark plug gap. Carefully bend side electrode
to adjust the gap if necessary.
SPARK PLUG GAP: 0.6mm to 0.8mm
SPARK PLUG: LG F7RTC
Vi. Carefully thread the plug into the engine by hand.
Vii. Aer the spark plug seated, use spark plug wrench
to ghten it. Spark Plug ghten Torque: 20-25 N.m
Viii. Aach the spark plug wire to the plug.
Viii. Replacement spark plug: LG F7RTC
! WARNING: Only use recommended spark plug
or equivalent. DO NOT use spark plugs that have
improper heat range.
Pg. 20
Table of contents
Other Cromtech Water Pump manuals


Popular Water Pump manuals by other brands


ULTIMATE SPEED
ULTIMATE SPEED UOP 12 B1 Translation of the original instructions

Liberty Pumps
Liberty Pumps LCU-15 installation manual

Enerpac
Enerpac EP3104D instruction sheet

Grundfos
Grundfos Sololift2 WC-1 Installation and operating instructions

Graco
Graco Mini Fire-Ball 246775 quick start guide

Aquatec
Aquatec HydroPro HZ2010 quick start guide

Becker
Becker DVX 3.80/0-43 operating instructions

PFT
PFT RITMO XL FU 230 operating instructions

RIDGID
RIDGID 1460-E operating instructions

Franklin Electric
Franklin Electric Little Giant 6EN-CIA-SFS instruction sheet

CountyLine
CountyLine CLW750 owner's manual

EINHELL
EINHELL BG-DP 5025 N operating instructions