Crorzar Outdoor 360 Owner's manual

WIFI PAN/TILT SMART CAMERA
Quick User Manual
CZ-PT-CAM1
1
Crorzar 360
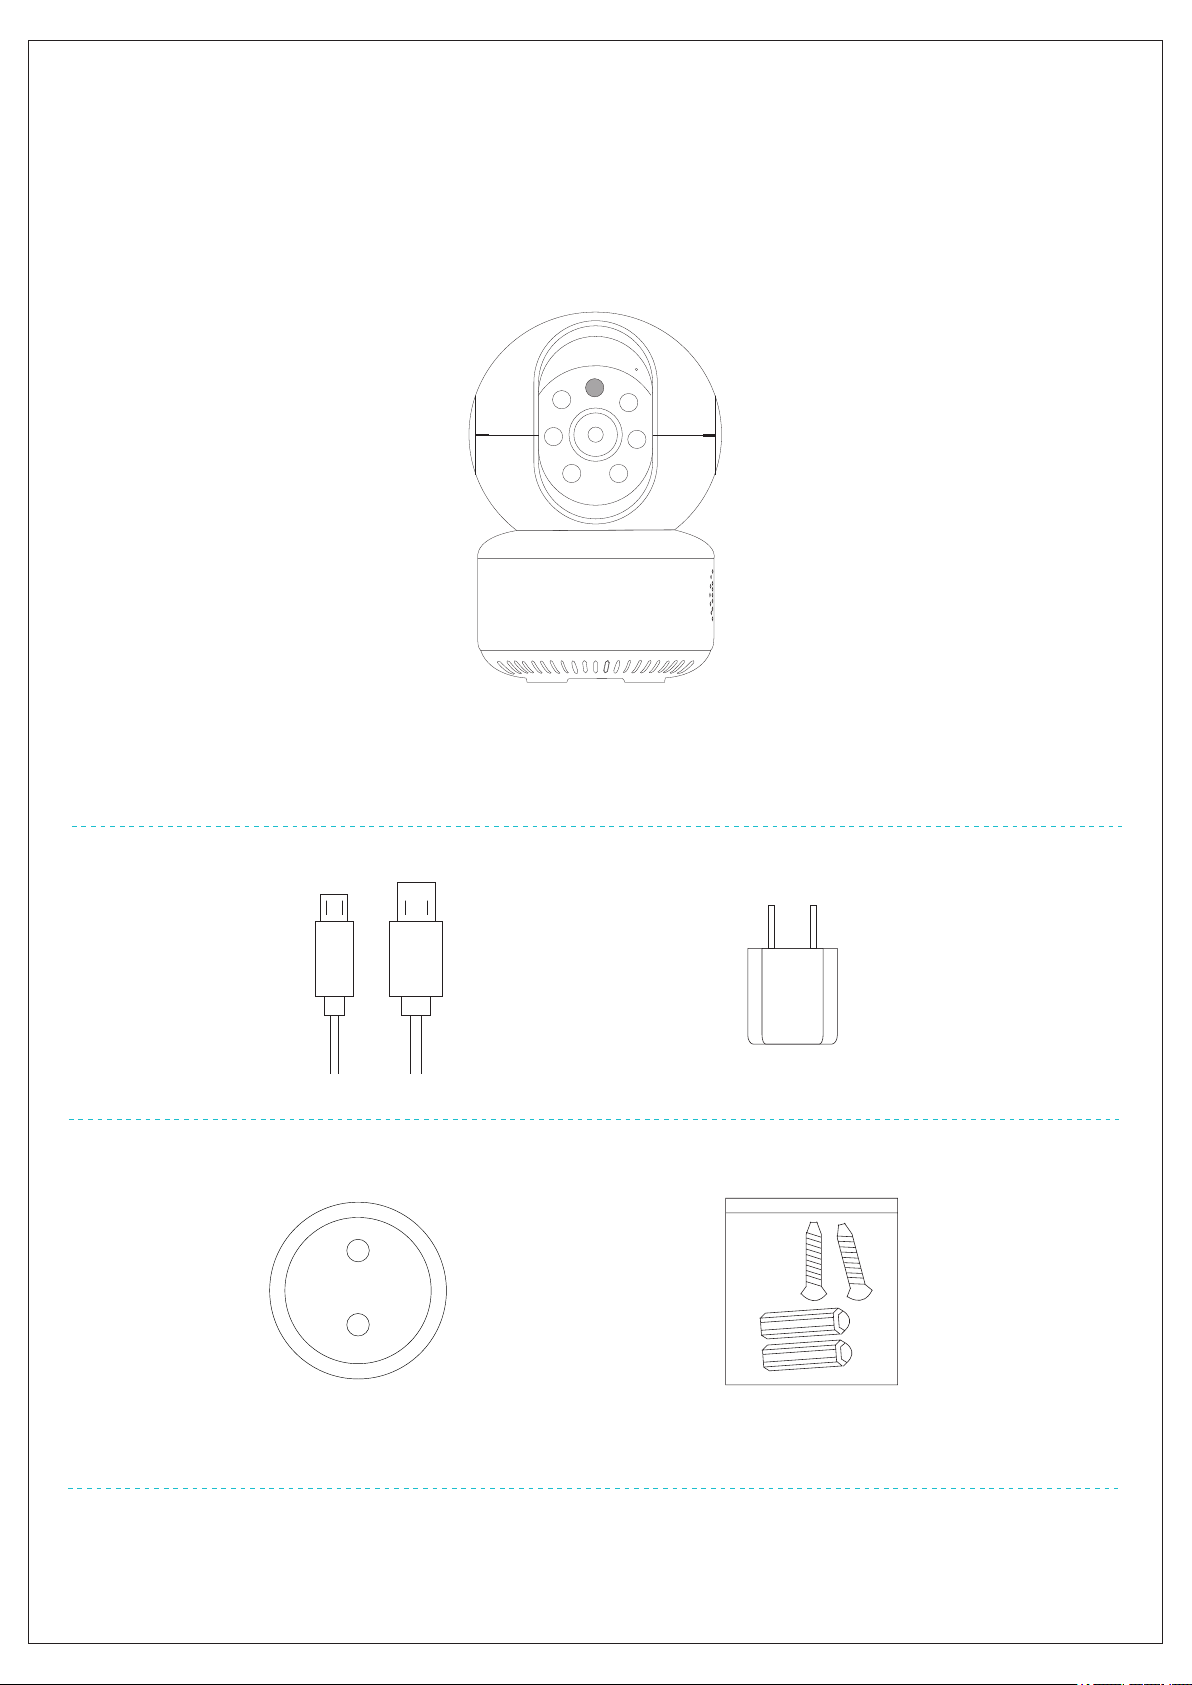
The following are included in the box with your purchase
Main Device: Camera x 1
Accessory 1: USB Cable x 1 Power adapter x 1
Accessory 2: Bracket x1 Screws bag×1
Included in the Box
2

Front view
SD Card slot
Please check the interface and buttons of the camera before using.
Product Details
Speaker
Back view
5V1.6A
Power interface
RJ45 Ethernet cable port
Reset factory
reset button
Photosensitive
resistance
LED night vision
infrared light
3
Million HD lens
Microphone
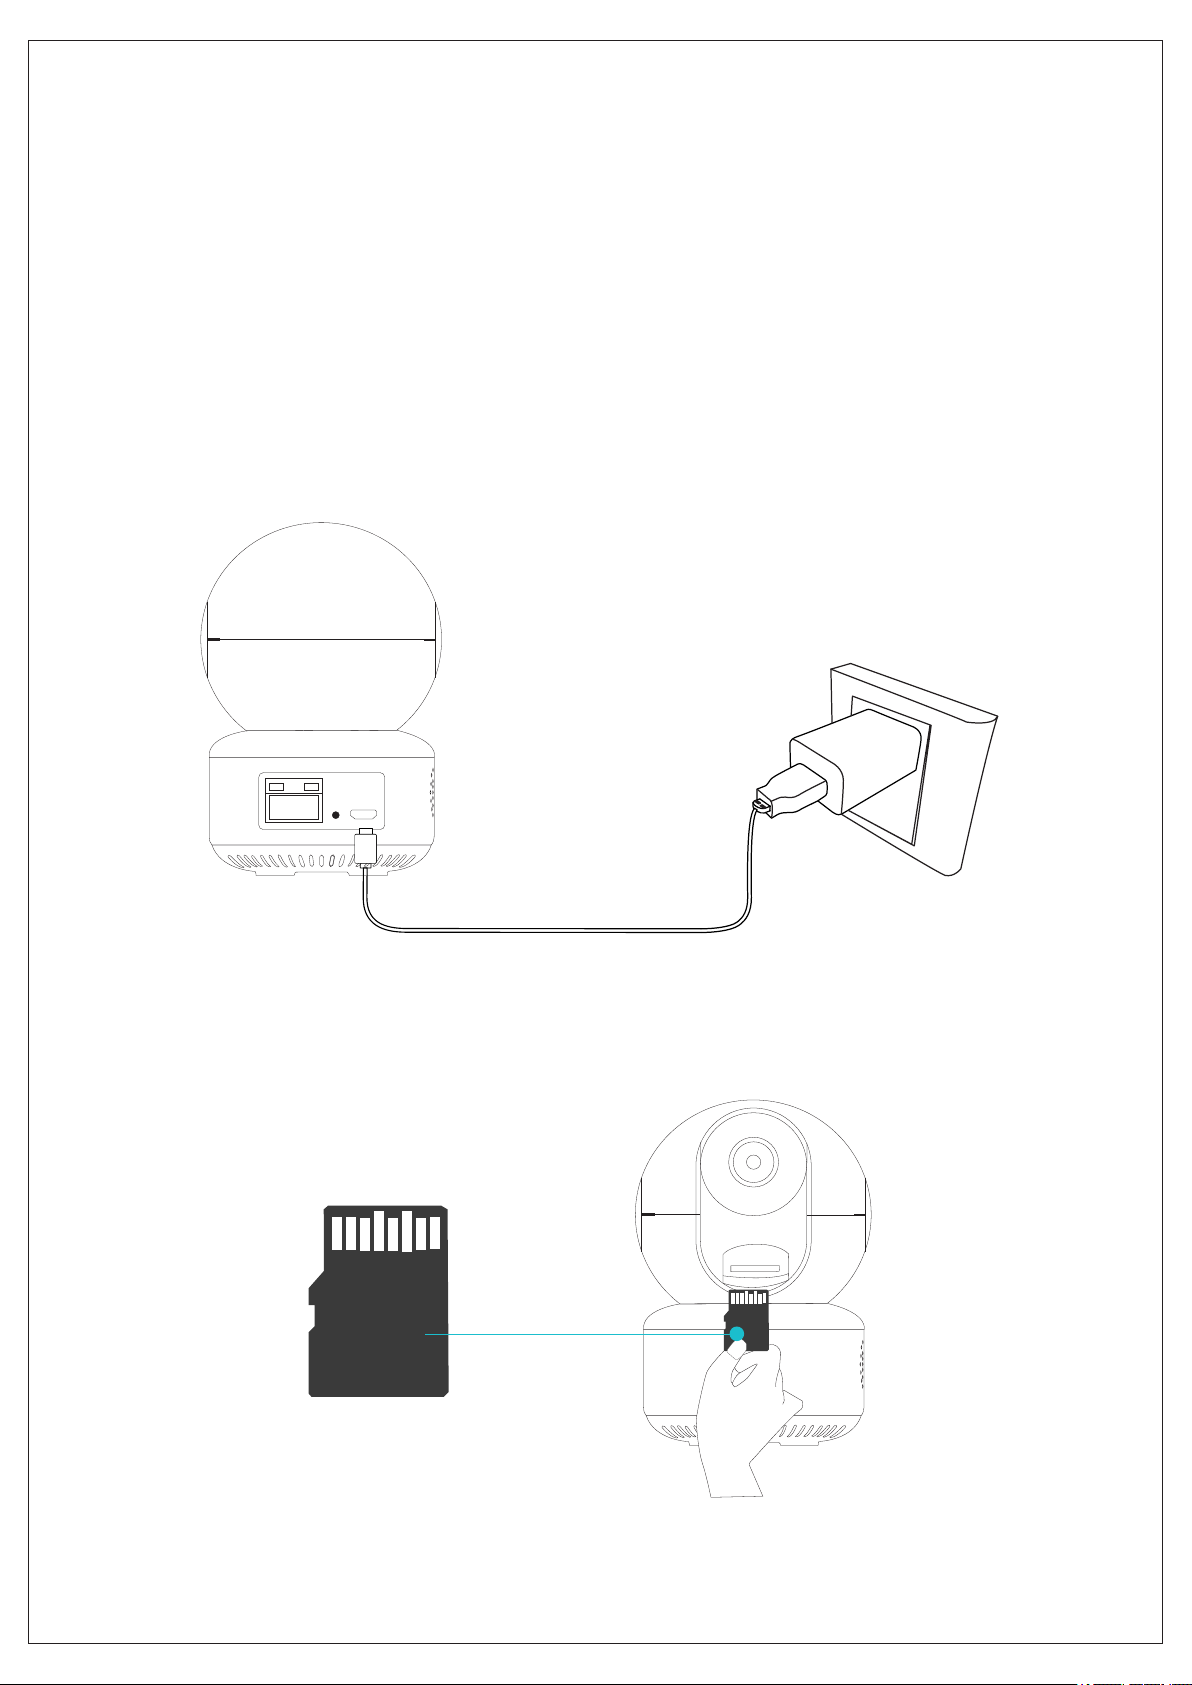
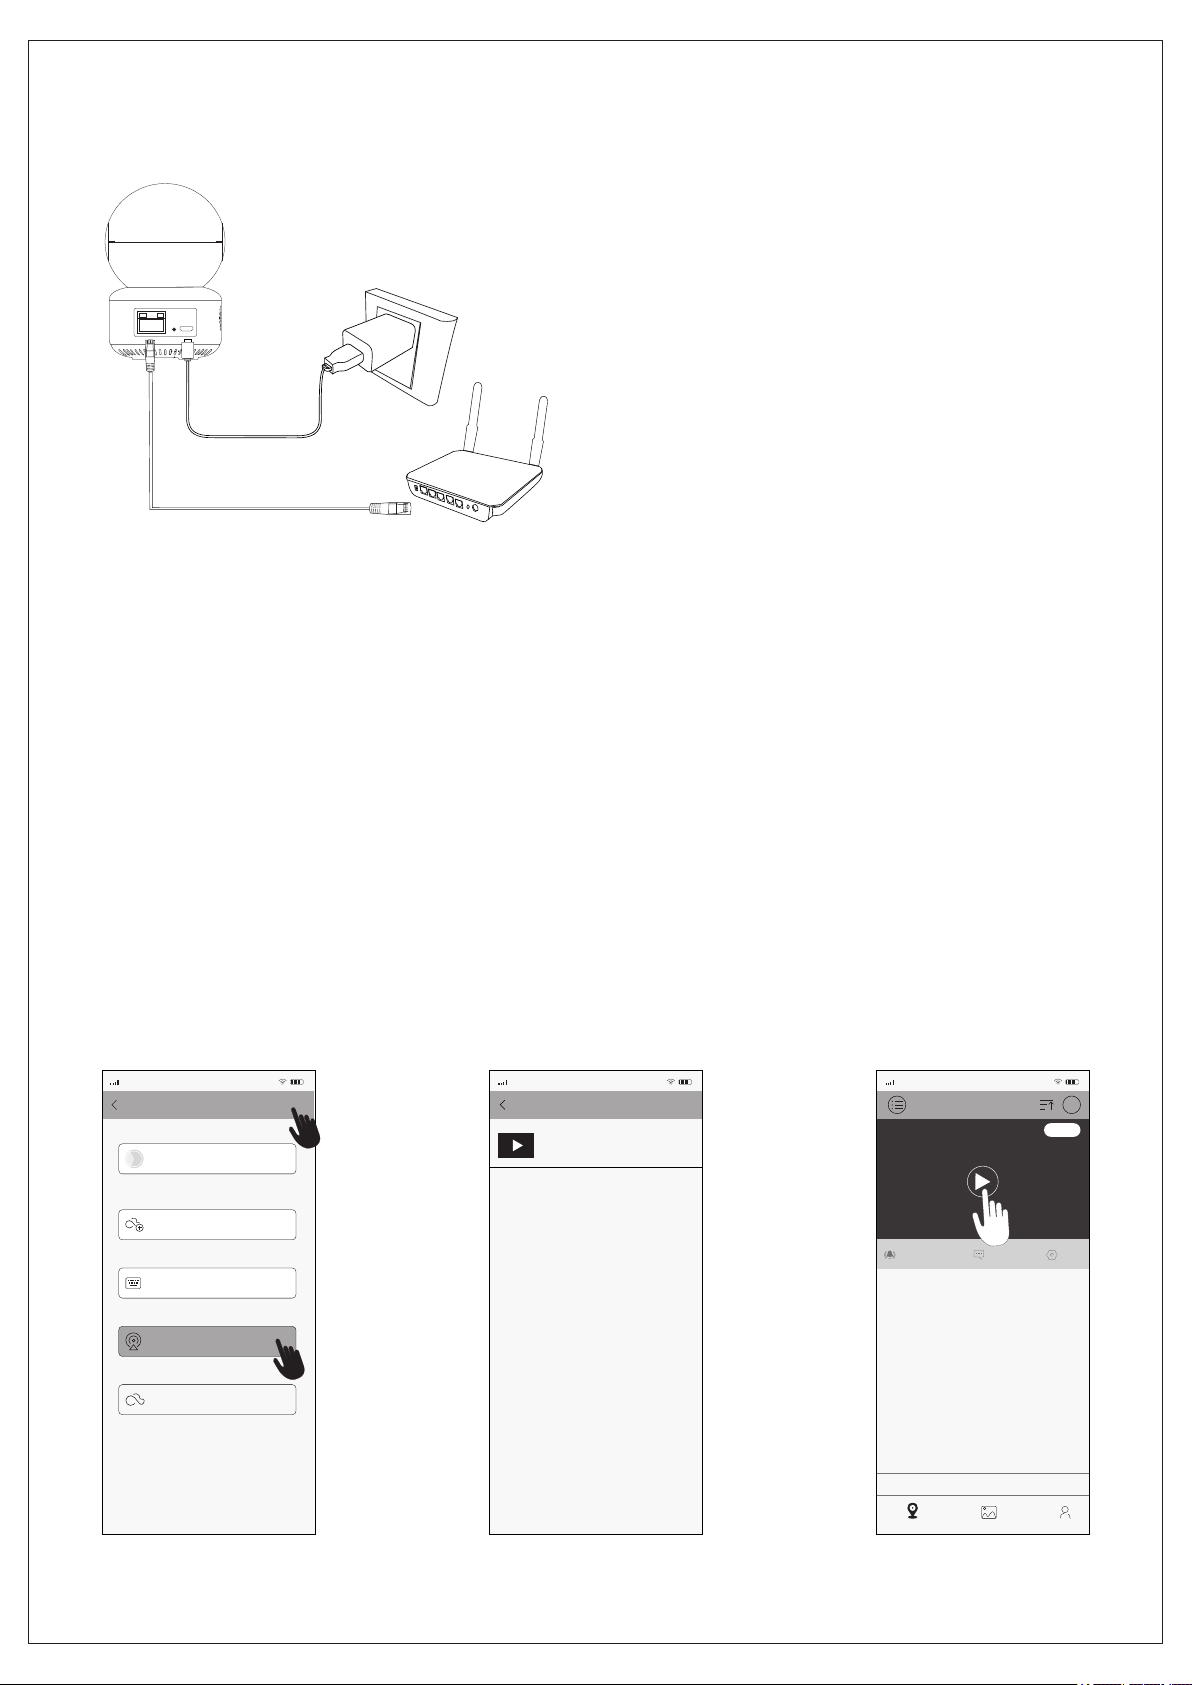
How to prepare the camera
Please note: Voice prompts are automatically available throughout
the configuration process. Your memory card comes pre-installed
in your camera. Connect your camera to power as shown below.
Do not unplug your memory card or insert a new one while the
power is turned on. Please power off to install or un-install your
memory card.
Memory card installation
Connect with power supply
4
Please make sure to plug the
memory card in the direction
shown in the figure.
Available on the
App Store
Get it on
Google play
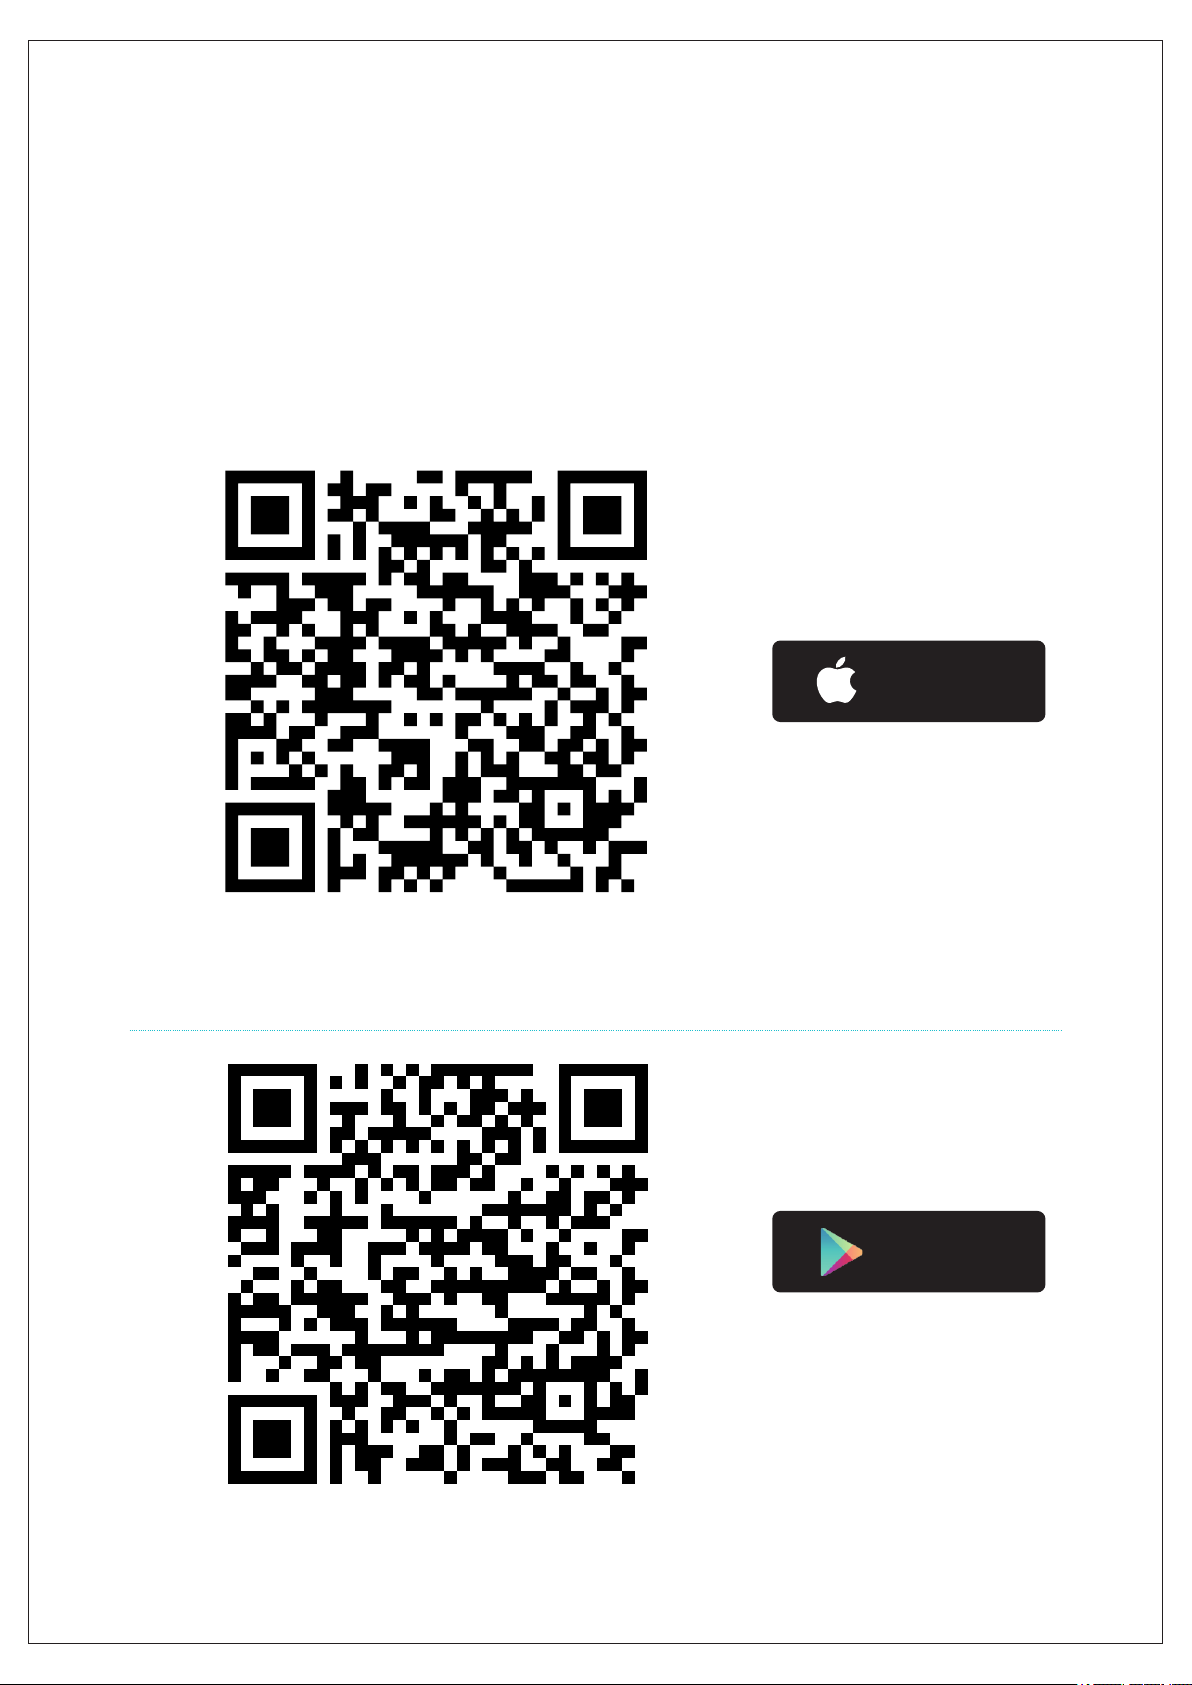
Method 1:
Scan the QR Code to download the App.
Method 2:
Search for "Crorzar Cameras" in the App Store or "Crorzar Pro" in Google Play
Store and download directly.
How to Download APP
5
Scan this QR code to download App for iOS devices
Scan this QR code to download App for Android devices

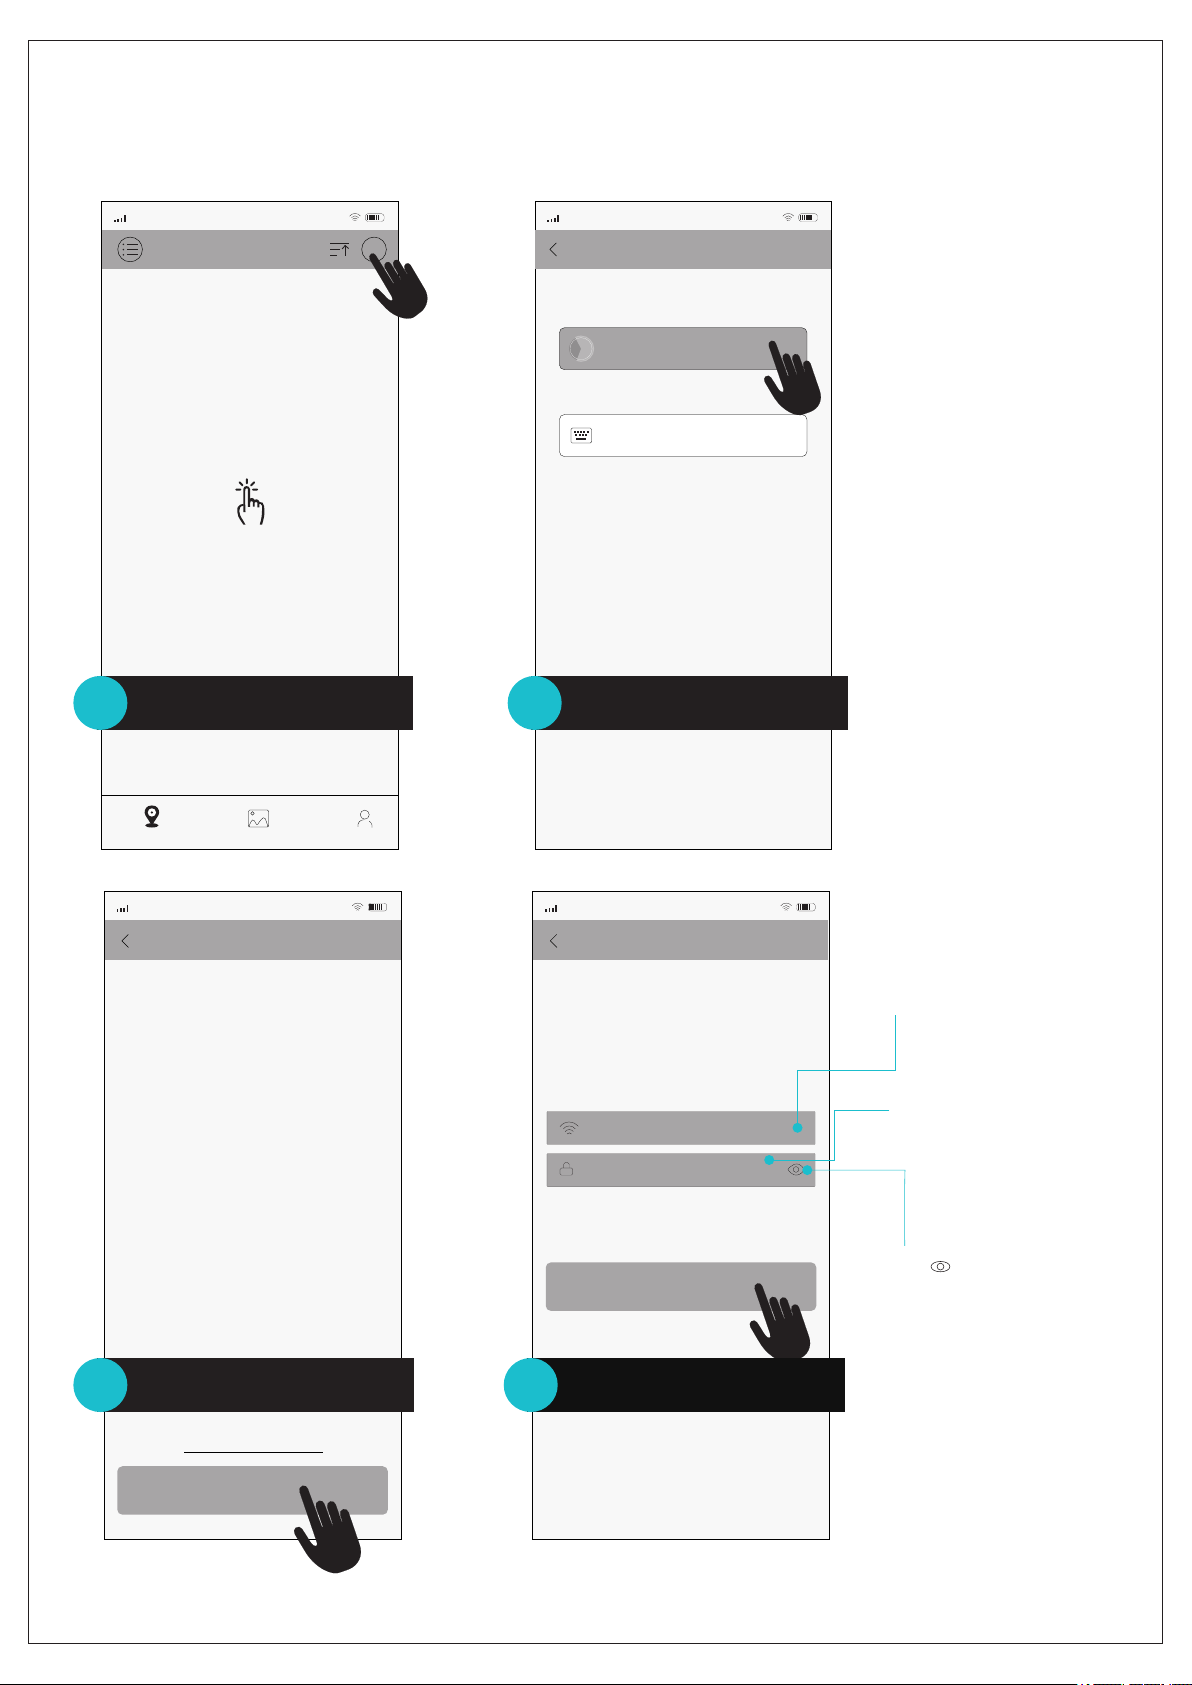
User registration & login
If you have a Facebook ID, you can tap the Facebook icon on
the APP interface directly to log in.
You can also create a new account and log in: Click "Sign Up" to register a
new account.
Enter new username and password.
Enter a email address and tap “Get Code”(a verification email with a code
will be sent to this address so please find the email to get the code and then
input this code in where you just entered the email address and tap Sign Up).
Then log in using the username and password you just registered.
1
2
3
4
5
6
Registration
4G 10:07…
Sign Up
Us e d for r e srt p a s swor d i f you f orge t i t
Username
Confirm password
Password
4-32 characters,numbers
8-32 digit with the combination of charater an
Enter password again
√I Agree Privacy Statement
1
3
4
Password
Log in
4G 10:07
Account Login
Username
Guest Login
username
..........
√Remember Password √Auto Login
Sign Up Forgot Password
f
2
Enter Email to Verify Account
Get Code
5
When D e v i c e says “wa i t to be c onfigured”,
click “ N e x t Step”.
Set Up Device Using Wi-fi
4G 10:07…
Next step
Click here for troubleshooting steps
Router Setting
4G 10:07…
Confirm
hyws2014
*Select Wi-fi network , e n t e r password, and push “c o n f i r m ”
Wi-Fi
Enter WiFi password
Connection Issues?
Enter the WIFI password and
click “Confirm”
Configure network connection for camera
Method 1: through WIFI (recommended)
7
Click " " to check whether
the WIFI password is
visible or not
3Make sure the WIFI network is okay,
click Next step
Smart Devices
4G 10:07
+
Add Device
Devices Manual Events My Account
1After logining in successfully,
click"+" in the upper right corner.
Add Device
4G 10:07
More
Set Up Device Using Wi-fi
Add Guest Device
Hold “ R E S E T ” but t o n on t h e bottom / b a c k of
the d e v i c e to b e gin s e t u p
2Click "Set Up Device Using Wi-fi”
4
Make sure your device is
connected to the same
WIFI network that you wish
the camera to connect to
Make sure WIFI password
is correct
Please n o t e , 2.4GHz W i - f i network requir e d

Smart Devices
4G 10:07
Devices Manual Events My Account
99f4b5b94d298110 Online
Long press the device in list to delete
+
Wifi Network
4G 10:07
Cancel
Push the QR code button in the
upper right hand corner to display
th e wifi configuration QR code
178'
connecting,Please Wait
Set Password
SN:53effc385dd8966a
Confirm New Rassword
Set Password
4G 10:07
※Pas s w o r d s e tting faile d , l o n g p ress reset b u t t o n t o restoer
fac t o r y s e t tings.Afte r w a r d s , add the devi c e a g a i n ,reset
pas s w o r d .
Confirm
Set New Password
8
This password is for sharing
the device and is required
when sharing the camera
with another user
Click "save" to finish the
operation to view the
real-time screen
Push the QR code button in the upper right hand
corner to generate a configuration code on your
device. Hold this code a few inches from the camera
lens for a few seconds to initiate camera setup. Hold
the QR code in place until you hear 2 prompts. The
first will say “Connecting, please wait”, and the
second will say “Connect to router successfully”.
HOLD THE QR CODE IN FRONT OF THE LENS UNTIL
YOU HEAR BOTH PROMPTS.
If you do not hear both prompts after 1 minute, press
and hold the reset button on the back of your camera
for 5-10 seconds until you hear a prompt indicating
that the camera is restoring to factory settings. Restart
the learn in process.
5
6Enter the new password of the
device and please save it
Do not close the interface
when configuring
Setup a name for the device
Pick a name
4G 10:07
Save
Camera
7Input the name of the device
Alerts Settings
Motion Settings
Note: About wired connection,
you need to connect the camera
to the router using the LAN cable.
9
Method 2: via LAN port
1. After logging in successfully, click “+” in the upper right hand corner
and then click “ ”and from the popup select the fourth methodMore
(Fig1).“Add device in the same WLAN”
The mobile phone must be connected to the same WIFI network.
(if no device found, please check if it is the same network)
2. Go to the "Search Device" interface and click on (Fig 2)."robot_****"
Click "Add Device" to complete it.
3. The device will appear in the device list of the APP (as shown in Fig 3),
and display the camera "online", indicating that the camera configuration
is complete.
4. Click play button on the screen to enter real-time monitoring, enter the
settings to set the wireless network and other relevant operations.
Search Device
4G 10:07
camera_c6a9
1580d7be9dcd0 10b
192.168.0.107
(Fig 1) (Fig 2) (Fig 3)
Smart Devices
4G 10:07
+
Devices Manual Events My Account
99f4b5b94d298 110 Online
Long press the device in list to delete
Alerts Setting s
Motion Sett ing s
Add Device
4G 10:07
hide
Set Up Device Using Wi-fi
Add Guest Device
Hol d “R ESE T ” b u tto n o n t h e b ott o m/b ack of th e de vice
to beg i n s etu p
Add My device(AP mode)
Add device in the same WLAN
AP mode
Connect the power supply
Lan Cable Connect the camera to LAN Port

Method 3: via AP Mode
1. Press the button 2-5 times “RESET”
Shortly on the device, the device will
prompt “Entering AP direct connection mode”.
2. Click the "+" at upper right corner of the APP , then click "More"
at the upper right. Select the fifth mode "AP mode" (Fig 4).
3. IOS device: click “to set the WIFI” (Fig 5)
Android: Search device name (Figure 6)
4. Find the device and click Add or display the name "robot_****"
and adding.
Input the AP password 1234567890 and add the device
to view it (Figure 7).
(AP mode is limited to remote access within 10 meters
when without network)
10
Note: Direct connection is limited to remote viewing
within 10 meters when without network
Search Device
4G 10:07…
camera_c6a9
1580d7be9dcd0 10b
192.168.0.107
(Fig 4) (Fig 5) (Fig 6) (Fig 7)
Smart Devices
4G 10:07…
Devices Manual Events My Account
99f4b5b94d298 110
Long press the devi ce in list to delete
Add Device
4G 10:07
hide
Set Up Device Using Wi-fi
Add Shared Device
Hol d ”R E SE T” b ut to n on the bo tto m/b a ck of th e de vi ce to
beg i n s et u p
Add My device(AP mode)
Add device in the sam e WLAN
AP mode
Add Device
4G 10:07
hide
Set Up Device Using Wi-fi
Add Shared Device
Add My device(AP mode)
Add device in the same WLAN
AP mode
<Settings Wi- Fi
Wi-Fi
robot_** **
robot_** **
robot_*** *
!
!
!
To set the WiFi
Select device hotsport
Go to phone Set tin gs-WLAN, and t hen s elect the devi ce
that you want t o con nect with,Wi fi pa ssword:123 456 789 0
The current WiFi:MERCURY_1306
Hol d ”R E SE T” b u tto n o n t he bot t om / ba ck o f th e de vi ce to
beg i n s et u p
Alerts Setting s
Motion Sett ing s
Smart Devices Smart Devices
4G 4G
10:07 10:07
Devices Manual Events My Account
Long press the device in list to delete Long press the device in list to delete
+ +
11
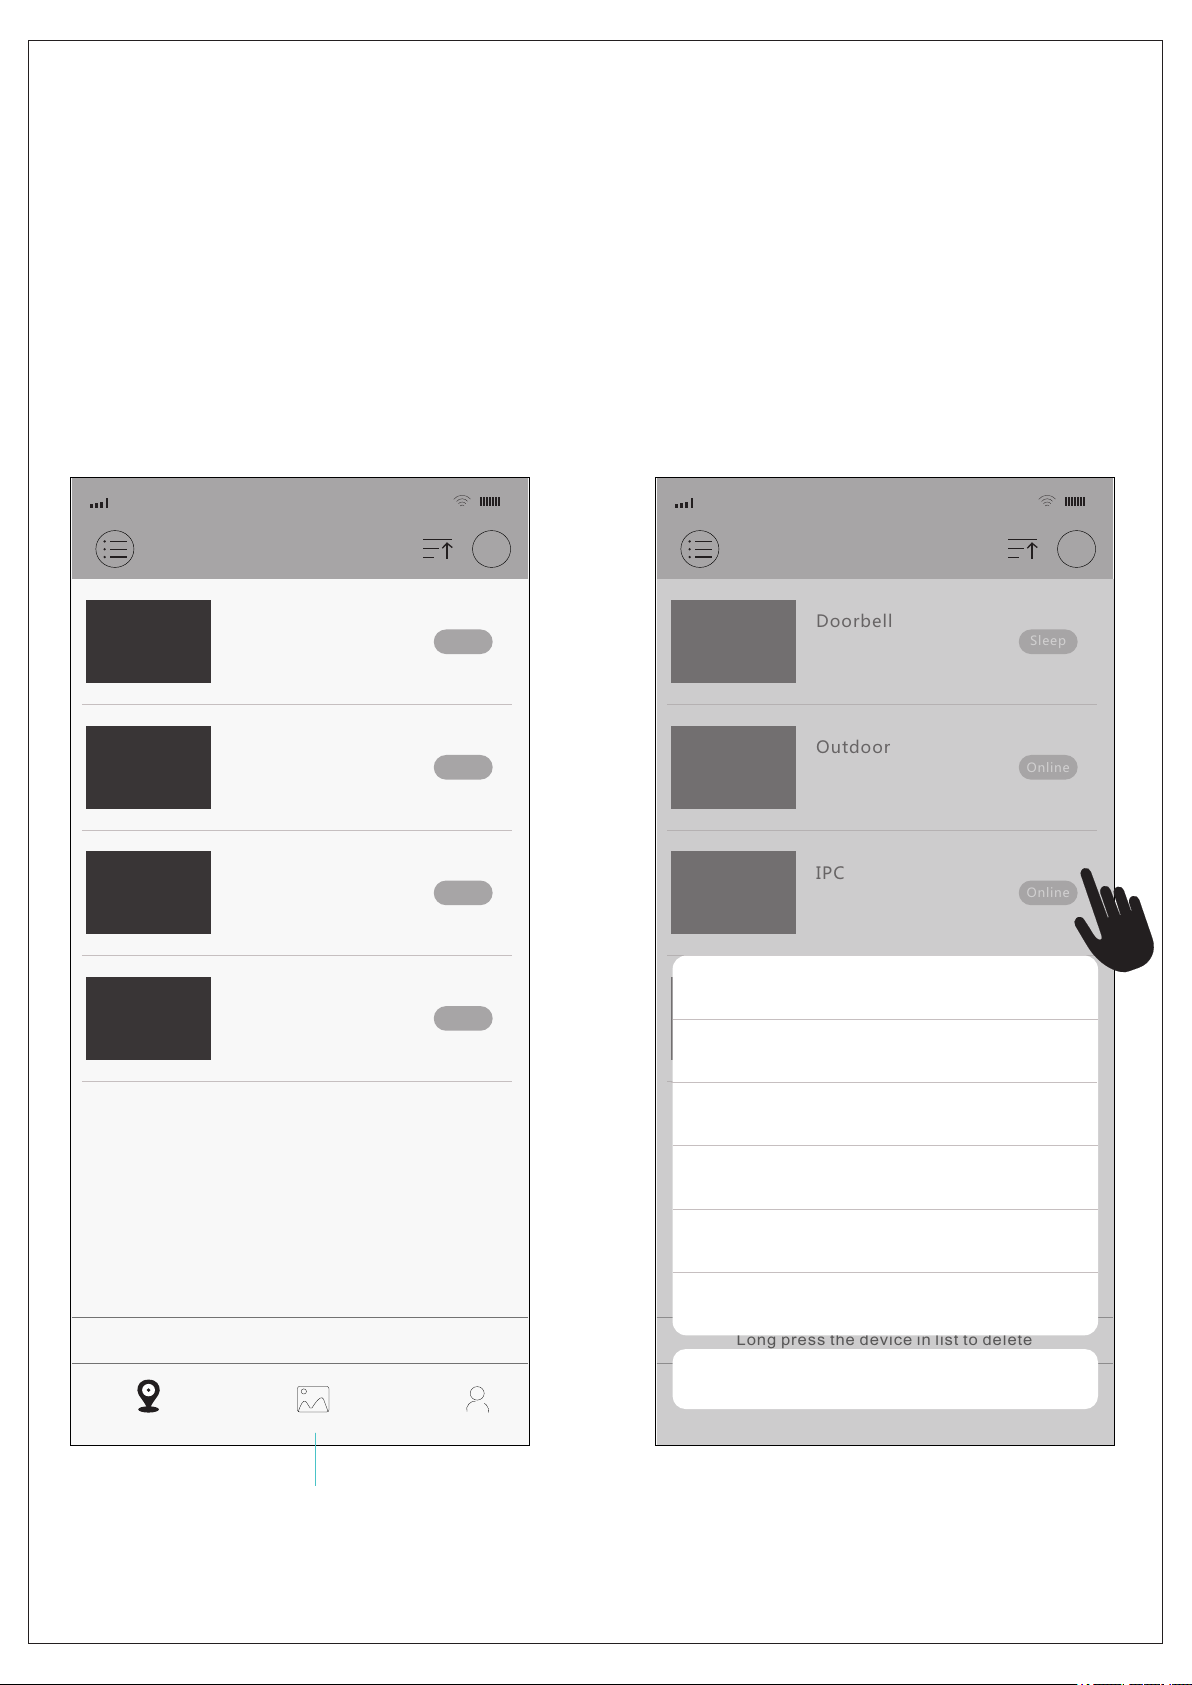
Multiple cameras can be added on the App and all of them will show up on the
main screen of the App, long press on an camera can lead to menu that user
can share, set or delete the camera.
Doorbell Doorbell
Outdoor Outdoor
IPC IPC
PTZ PTZ
Sleep Sleep
Online Online
Online Online
Online Online
Access manually
recorded events
from all of your
cameras
Cancel
Delete
Settings
Alerts
Motion Settings
Share
Device Management: IPC

12
(Fig 8)
Smart Devices
4G 10:07…
SD AUTO
Hold to Speak
View Events Snapshot
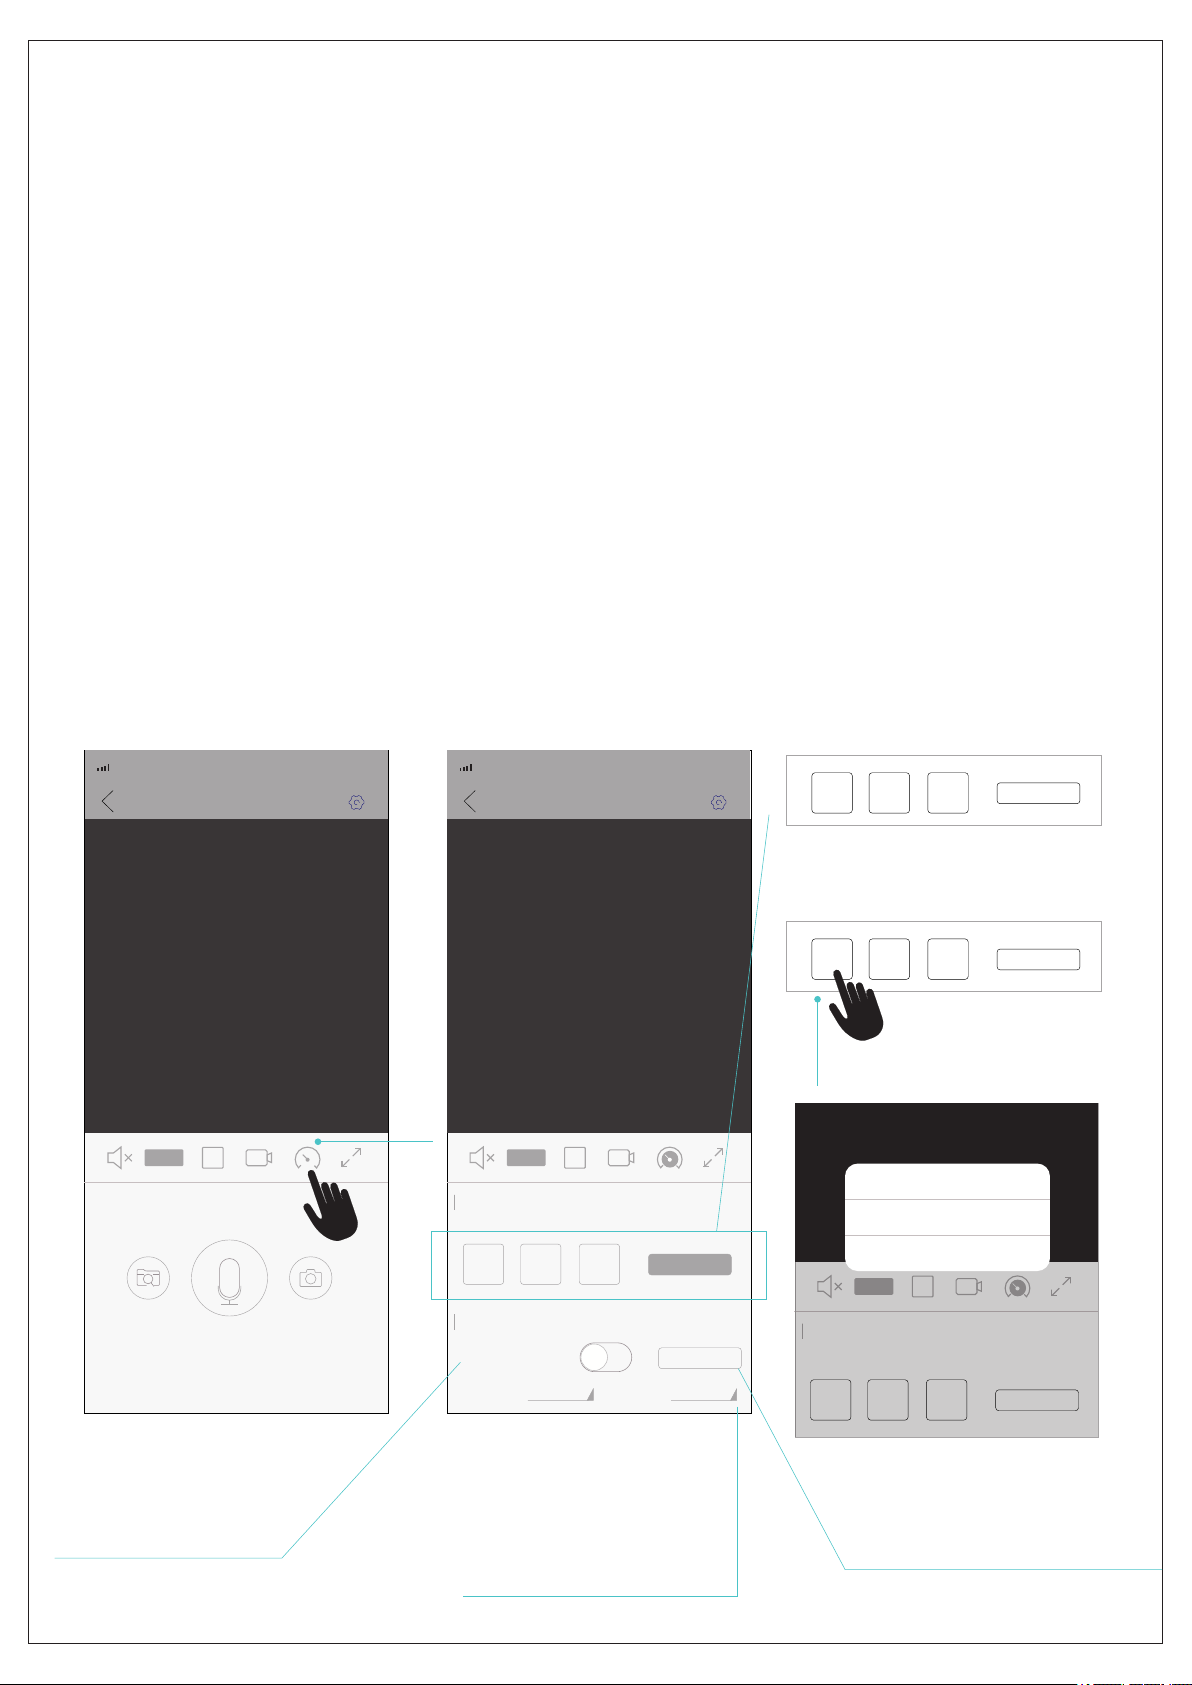
View the camera through App
User can achieve the real time monitoring through the camera once it is
added successfully on App by pressing the “Play” icon like Fig 7, there
are also some functions available user can use on the page below.
Settings
Enable or disable audio
(this device only)
To achieve fullscreen
on App to view camera
To start recording
the camera manually
View saved pictures
and videos
(check history recording
in SD card)
To take a snapshot
of the camera view
manually
Real time viewing
Hold it to speak through
camera to talk to people in front of camera
Move your finger on
the viewing image
to rotate camera
To setup the Tour
and Auto Track
13
(Fig 9) (Fig 10)
(Fig 11)
(Fig 12)
Smart Devices Smart Devices
4G 4G
10:07…10:07…
SD SD
SD
AUTO AUTO
AUTO
Hold to Speak
View Events Snapshot
Setup the Tour and Auto Track functions
User can tap the icon in Fig 9 to go to the settings of Tour and Auto Track shown in Fig 10.
Tour: it allows user to preset three positions from the camera view to create a route that
camera will follow to rotate for monitoring automatically.
3 tour points(No.1, 2, 3 buttons shown in Fig 10) need to be preset before user can start
the tour, user can rotate camera to a certain position which shall be the starting point
of a route, then press No.1 button, which will light up, then rotate camera to select a
position for No.2 button, and select a position as the ending point of the route for
No.3 button.
To start a tour, user can press the Start Tour button in Fig 11.
User can long press a button to reset or delete tour point in Fig 12.
Auto Track: this is a function that camera can monitor an watching position, and it will
start to automatically track an moving object or human that appears in camera view and
constantly follow it till it stays still or it's out of camera view. The camera will return back
to watching position after it no longer track a object or human.
User can rotate camera to select a position which shall be the default watching position
and press Set Watch button, and then turn on the Auto Track Switch.
To turn off the Auto Track Switch will stop the camera from tracking moving object
and human.
Start Tour
Start Tour
Start Tour
Start Tour
Set Watch
1
1
1
1
2
2
2
2
3
3
3
3
Tour
Tour
Auto Track
Auto Track Switch
Sensitivity High level Watch Time 1Mins
Reset Tour Point
Delete Tour Point
Cancel
Turn/off Auto Track
Press Set Watch to
select a default
watching position
set the time the camera wait on
before returning back to default
watching position when it no
longer track a object or human

14
Camera Settings
User can setup the camera when necessary, press the “setting” icon in
the upper right hand corner on Fig 8.
Settings
4G 10:07…
Basic Settings
Manage Password
Alert Settings
Manage Storage
Advanced Settings
Network Settings
Device Info

15
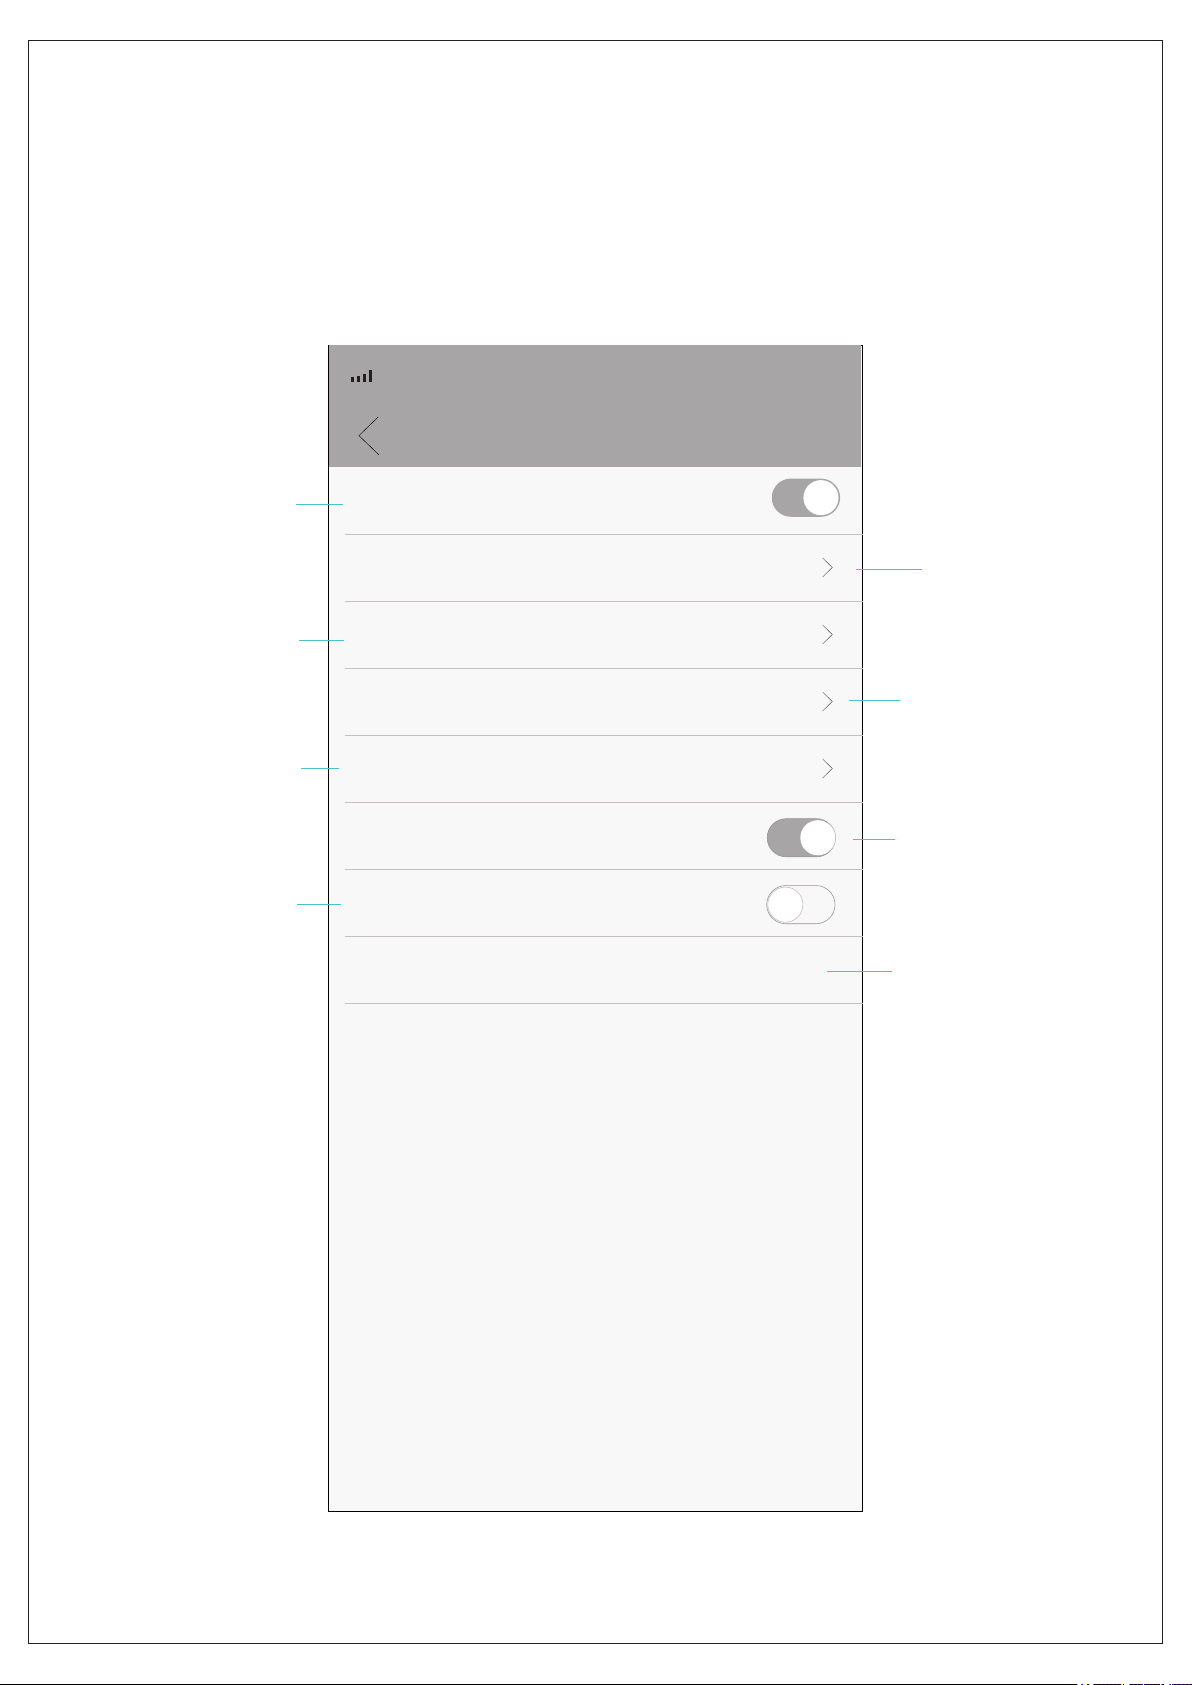
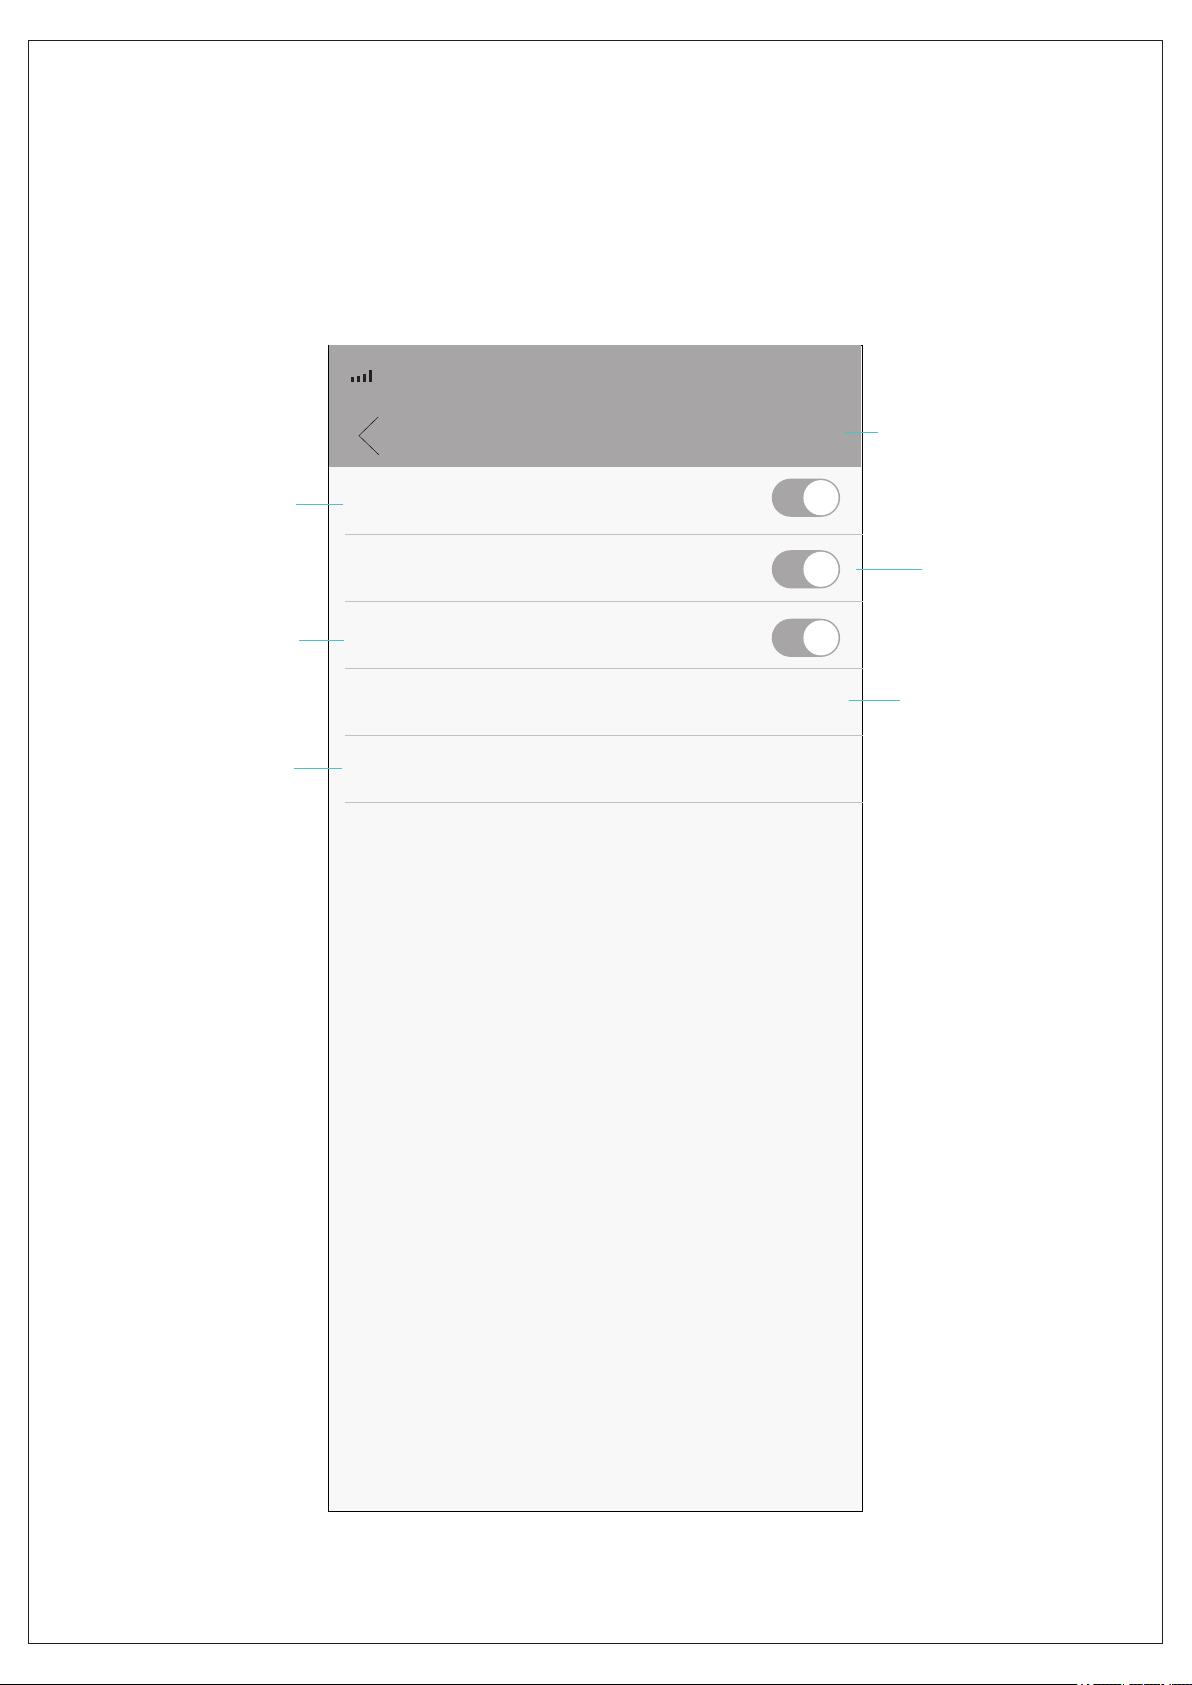
Basic Settings
Basic Settings
4G 10:07…
Tone
Device Name
Flip Upside-Down
Flip Left-Right
Device Language
Rotation Speed
Speaker Volume
Save
Indoor
English
Normal
100
5
Enable or disable
voice prompts
Change device
name
Enable or disable
flip of orientation
of image on screen
Change device
language
Change rotation
speed of pan/tilt
Change volume
of speaker with
camera
Day/Night
Sensitivity

16
Set Password
4G 10:07…
Manage Password
Current Password
New Password
Confirm Password
Save
Input current
password
Input a new
password
Input the new
password again
Press “Save”
to finish operation
17
Alert Settings
Motion Settings
4G 10:07…
Motion Activated Alerts
Video Duration(S)
Actions
on Alerts
Alarm Schedules
Sensitivity
Alert Push
00:30
Middle
Trigger alarm when there is a motion
Photos and Videos
All day alarm
Enable or disable
motion activated
alerts Set the time of
video duration
for recording
upon alerts
Change the actions
on alerts
Change the
schedules for
alarm
Change the
sensitivity of
motion detection Enable or disable
push notification
for alerts sent
from camera
Ignore Messages
Don't send alert messages
App on mobile
phone will not
receive alert
messages if this is
enabled
Intelligent Vigilance Setup Intelligent
human detection
18
Alert Settings-Intelligent Vigilance
Intelligent Vigilance Save
4G 10:07…
Smart Detection
Show Traces
Cordon
Camera will only
detect human for
triggering alarm if
it's enabled
Enable it to setup
the perimeter that
human movement
can trigger alarm
Enable it to
show traces
of human
detected
Perimeter Alert
Custom Areas
To setup the
alerting line and
direction of human
movement that
can trigger alarm
Tap Save after a
setting is done
To draw the
alerting area where
human movement
can trigger alarm

19
Storage Capacity
Capacity for Video
Capacity for Snapshot
Available Storage
At Full
Storage
Manage Storage
4G 10:07…
Manage Storage
Stop
Record Overwrite
Format SD Card
Check entire
capacity of SD card Check the storage
capacity for videos
on SD card
Check the storage
capacity for
snapshots on SD
card
Check the available
storage on SD card
Set the action
when SD card
is full
Format SD card
20
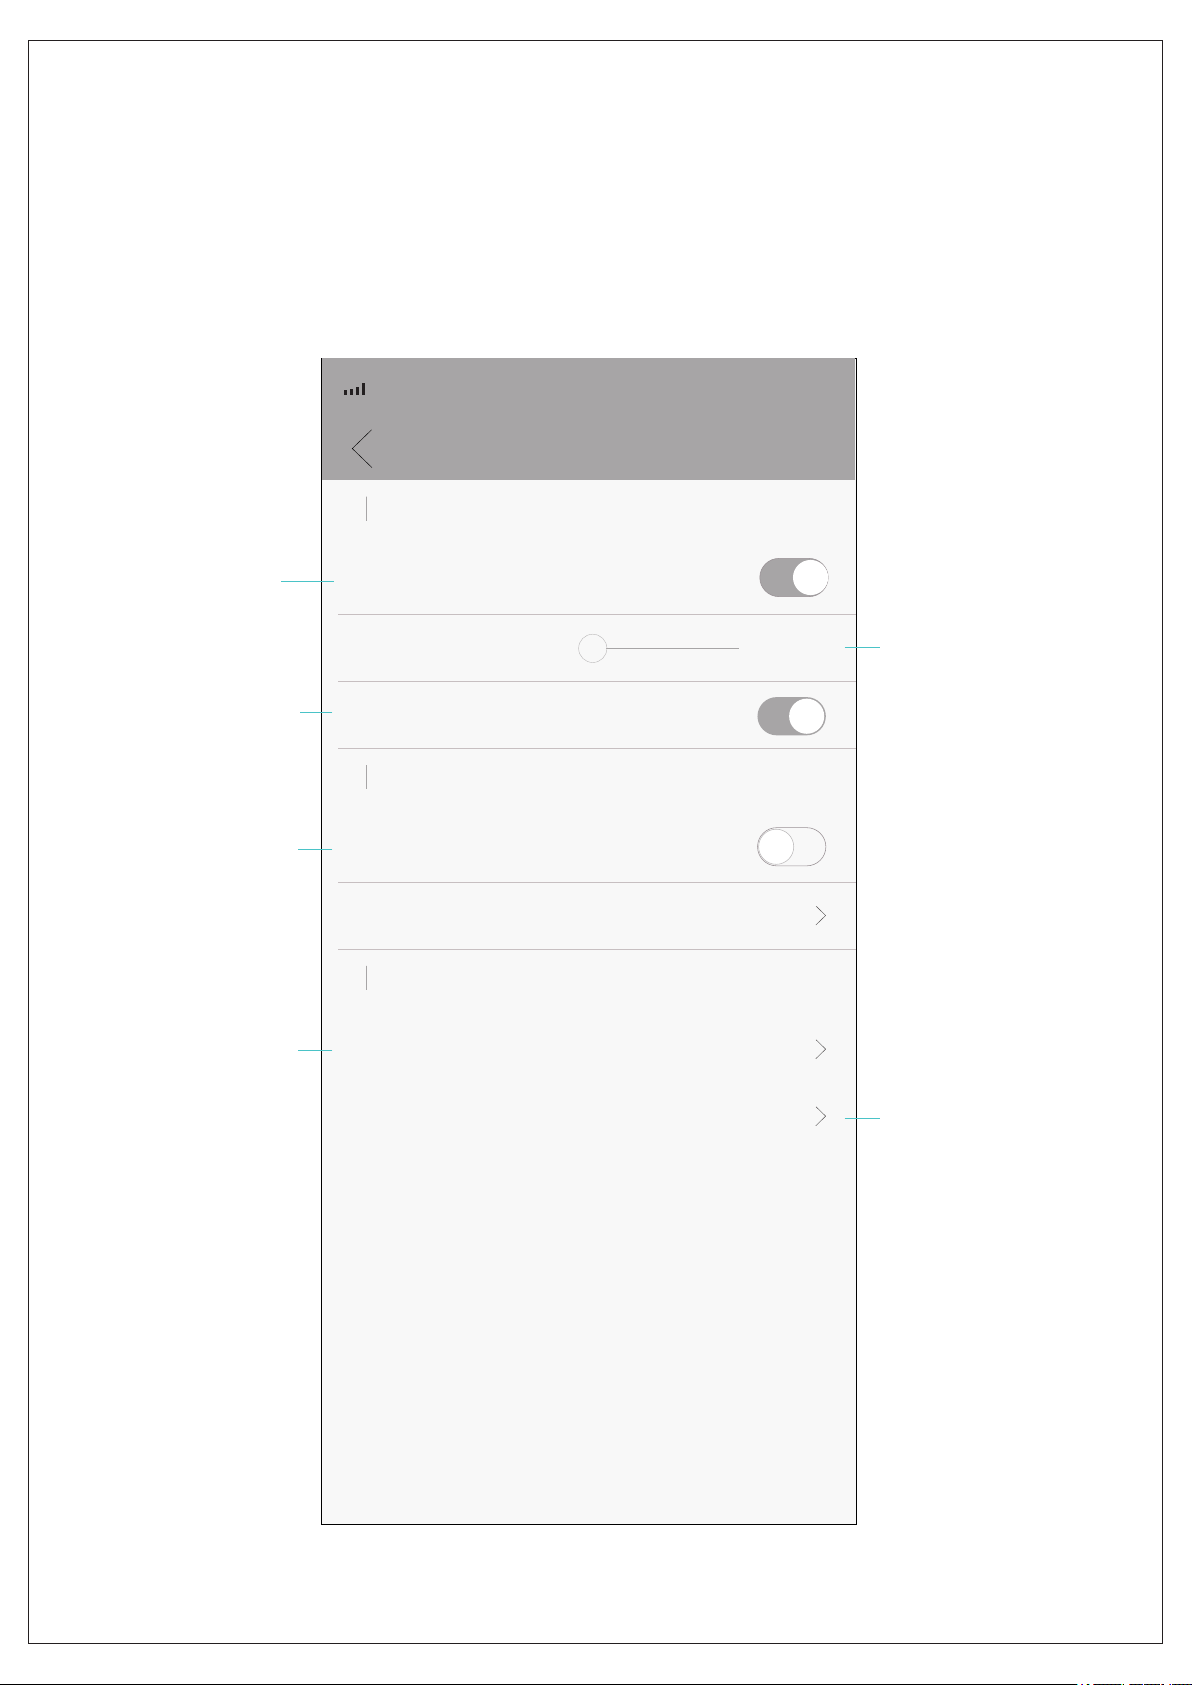
Advanced Settings
Advanced Settings
4G 10:07…
Record Settings
Record Switch
Duration
Record Audio
Auto Track
Other Settings
Auto Track Switch
Video Quality
Auto Track Sensitivity
H265X
Normal
High level
H265X
Save
5Mins
Turn on/off video
recording on SD
card Set the duration
of video clips on
SD card
Enable or disable
audio recording
Turn on/off
Auto Track function
Change video
quality
Change video
format
Other manuals for Outdoor 360
1
This manual suits for next models
1
Table of contents
Other Crorzar Digital Camera manuals

Popular Digital Camera manuals by other brands

Sony
Sony DSC-P2 - Cyber-shot Digital Still Camera operating instructions

Samsung
Samsung GX10 - Digital Camera SLR Brochure & specs

FujiFilm
FujiFilm FinePix E 500 Brochure & specs

Mustek
Mustek GSmart A30 instruction manual

Kodak
Kodak Z981 - EXTENDED GUIDE Extended user guide

Olympus
Olympus Camedia C-2500L instructions


