Croton Miyota OS Instruction Manual

THE BENCHMARK OF
QUALITY, PRECISION, STYLE AND VALUE
OWNERS MANUAL AND WARRANTY INFORMATION

Table of Contents
2. Congratulations
3. Helpful Terms
4.-5. Water Resistance
6.-7.-8.-9 Basic Instructions
10.-11. Miyota OS Chronograph Instructions
12.-13. Seiko VD Chronograph Instructions
14.-15. Sub-Dials and Bezels
16.-17. Clasp Instructions
18.-19. Rubber Strap Instructions
20. Care of your timepiece
21. Warranty
22. Repair Return Instructions
23. Repair Return Document

Congratulations!
You have just acquired a finely crafted Croton Timepiece that we
are sure you will enjoy for many years to come.
Croton has been crafting high quality timepieces for more than
130 years. Built on a rich tradition that began in 1878, at Croton
we search the world over for the finest materials available with
which to build our spectacular watches such as; 316L stainless
steel, sapphire crystals and exotic leather straps. We then entrust
these precious materials to the creative genius and unparalleled
expertise of the Croton watchmakers. The result is an exquisite,
ever evolving collection of fine Croton timepieces that will surely
stand the test of time, at a value everyone is quick to admire.
Take confidence in knowing that your timepiece is protected by
an unprecedented limited lifetime warranty. Croton is: the
benchmark of quality, precision, style and value.
Visit our website www.crotonwatch.com, stop by the “Press”
section, sign up for our newsletter and be the first to learn about
new product introductions as well as other exciting Croton news!
2
Helpful Terms
Movement: The engine that powers all timepiece functions.
Automatic Movement:
Mechanical Movement powered by
the movement of your wrist free of any battery assistance.
Quartz Movement: Electronic Movement powered by an
internal battery and regulated by a quartz crystal.
Chronograph: Timepiece possessing stopwatch functions.
Bezel: Outer dial ring on top of the watch case.
Clasp: Instrument used for watch band closure.
Crown: Knob used for adjusting watch functions.
Screw down crown: Crown used for adjusting watch functions
that can be screwed tight for added water resistance.
Crystal: Transparent, protective dial cover.
Dial: Watch face.
3
Water Resistance
Water resistance testing of watches is rated in a laboratory by
pressure tests done on a watch in a static position. However,
many water based activities involve a lot of movement and
involve other environmental changes. These exceptions to
how the watch is rated may challenge or eliminate the water
protection features of a water resistant watch. In particular,
the water resistance rating of a watch does not take into
account sudden, rapid and repeated water pressure changes,
high water temperatures and sudden changes of tempera-
ture.
Do not wear your watch in the shower or bath as this can affect
its water resistance. Steam can penetrate rubber gaskets,
cause condensation on the crystal and rust the movement. In
addition, sudden temperature changes can adversely affect
the watch. If your watch is equipped with a screw down crown,
make sure it is in the locked position to ensure its water
resistance.
4
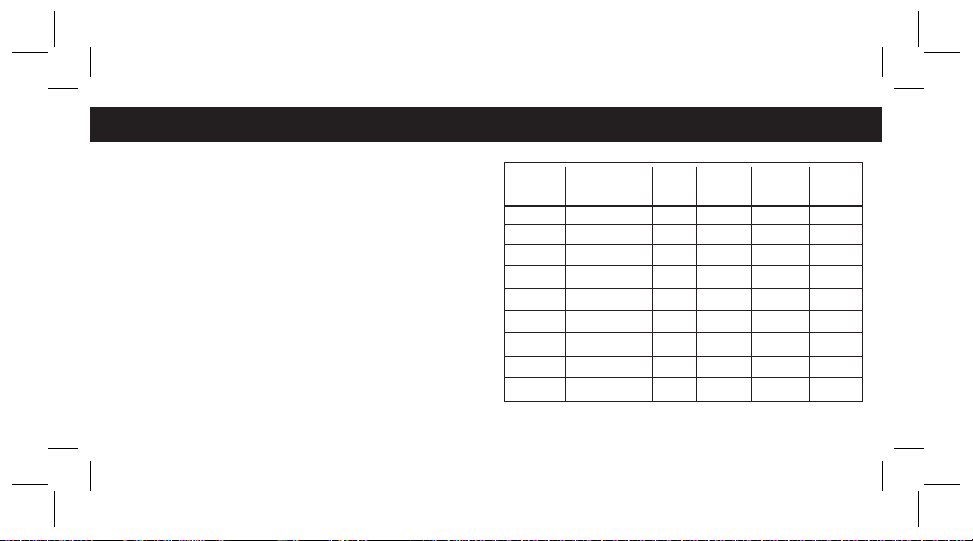
Water Resistance Table
Case DepthFt/Meter Splash
Rain Swimming Snorkeling
Unmarked
Marked:
1 ATM 33FT/10M
3 ATM 100FT/30M
5 ATM 165FT/50M
10ATM 330FT/100M
20ATM 660FT/200M
30ATM 1,000FT/303M
50ATM** 1,650FT/500M
*Only with a screw down, lock crown and pushers.
**When diving in a helium environment, watch should be equipped
with a helium release valve.
Scuba
Diving
NO NO NO NO
YES NO NO NO
NO NO NO
YES
YES
YES
YES
YES
YES
YES
YES
YES
YES
YES
NO NO
NOYES
YES YES*
YES YES*
YES YES*
5
TO SET TIME
1. Extend crown to position 3.
2. Rotate crown clockwise to desired time.
3. Depress crown back to 1st position.
TO SET DAY/DATE
1. Extend crown to 2nd position.
2. Rotate crown clockwise to desired date.
3. Rotate crown counterclockwise to desired day.
4. Depress crown back to 1st position.
5. Do not adjust the day/date on an automatic watch while
the watch is set between 9pm-3am as this will damage the
movement.
SCREW DOWN LOCK CROWN
Some watches have screw down crowns. To open grasp crown
and turn counterclockwise, to close press & screw in clockwise.
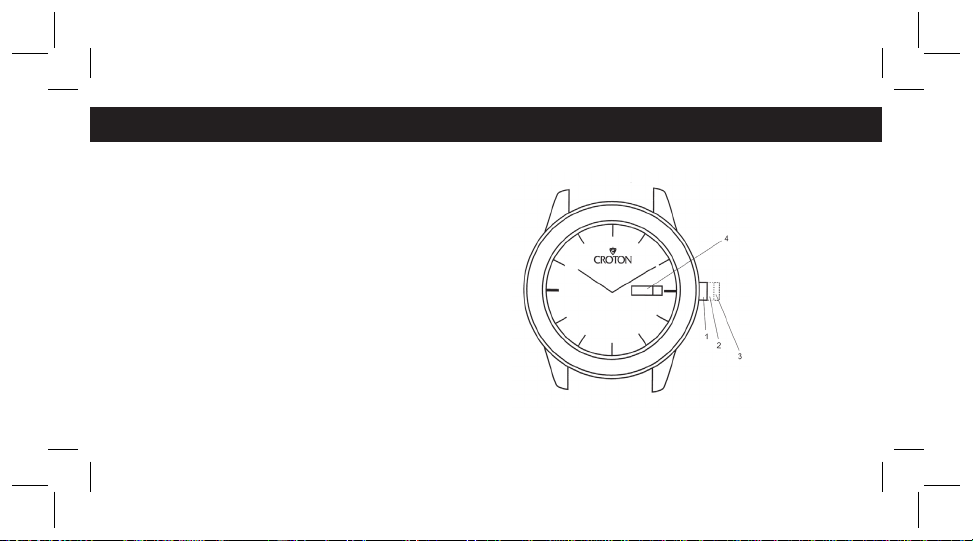
Basic Instructions
6
Basic Instructions
1. CROWN 1ST POSITION
2. CROWN 2ND POSITION
3. CROWN 3RD POSITION
4. DAY/DATE DISPLAY
7

Basic Instructions
TO POWER AN AUTOMATIC MOVEMENT
An automatic watch is powered by motion without a battery.
1. While the crown is in the 1st position (unlocked if it contains a
screw down crown) wind the crown 15-20 times clockwise.
2. The movement of your wrist should keep your watch wound.
3. When your watch is fully wound, if left stationary, it should run
accurately for 24-30 hours depending on the movement.
4. If you are using a watchwinder it should be set to run
clockwise for Japan automatics and either clockwise or
counterclockwise for Swiss automatics.
TO SET QUICK CHANGE DATE
Some automatic movements have a special date change
feature.
1. Pull or unscrew crown to 3rd position.
2. Extend crown out until you feel a click. Each time you
extend the crown the date will change.
3. Close crown or screw down depending on crown type.
8
Basic Instructions
Moonphase Function
Some Automatic and Quartz timepieces come equipped with
a function for monitoring the phases of the moon.
1. Do an internet search for the current moonphase.
2. Pull or unscrew crown to 3rd position.
3. Rotate the crown clockwise to advance the moonphase to
the correct position.
4. Close or screw down crown depending on crown type.
*Note that as each month has unique lunar rotations your
moon phase timepiece will need to be adjusted monthly.
9

TO SET TIME
1. Extend crown to position 3.
2. Rotate crown clockwise to desired time.
3. Depress crown back to original 1st position.
TO SET DAY/DATE
1. Extend crown to 2nd position.
2. Rotate crown clockwise to desired date.
3. Depress crown back to 1st position.
USING CHRONOGRAPH FUNCTION
1. Press Pusher A to initiate chronograph function.
2. Press Pusher A to stop chronograph function.
3. Press Pusher B to reset chronograph.
TO RESET CHRONOCOUNTER TO SPECIFIC POSITIONS
1. Pull Crown to third position.
2. Press the “A” pusher and hold to move counterclockwise.
3. Close crown and initiate chronograph.
NOTE: Do not press Pusher B while chronograph is in motion.
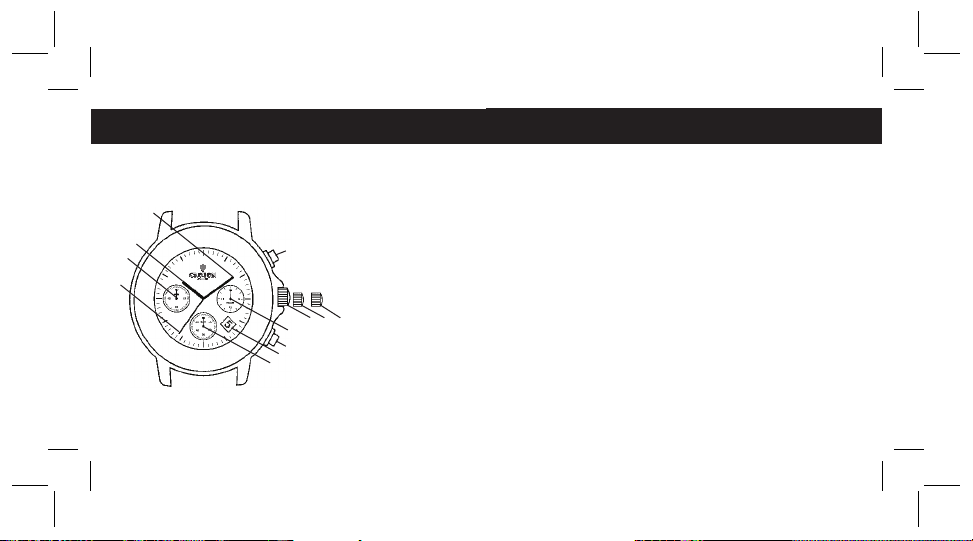
Miyota OS Chronograph
10
1. Crown 1st position
2. Crown 2nd position
3. Crown 3rd position
4. Date display
5. Pusher A
6. Pusher B
7. Sub-Dial
8. Sub-Dial
9. Sub-Dial
NOTE: Some chronographs may have sub-dials in other formations.
11
Miyota OS Chronograph
1. Crown 1st position
2. Crown 2nd position
3. Crown 3rd position
4. Pusher A
5. Pusher B
6. Date Display
7. Sub-Dial Seconds
8. Sub-Dial Minutes
9. Sub-Dial Hours
10. Hour Hand
11. Minute Hand
12. Second Hand
NOTE: Some chronographs may have sub-dials in other formations.
NOTE: Do not press Pusher B while chronograph is in motion.
Seiko VD Chronograph
123
4
5
6
7
8
9
10
11
12
Seiko VD Chronograph
12
TO SET TIME
1. Extend crown to position 3.
2. Rotate crown clockwise to desired time.
3. Depress crown back to original 1st position.
TO SET DAY/DATE
1. Extend crown to 2nd position.
2. Rotate crown clockwise to desired date.
3. Depress crown back to 1st position.
USING CHRONOGRAPH FUNCTION
1. Press Pusher A to initiate chronograph function.
2. Press Pusher A to stop chronograph function.
3. Press Pusher B to reset chronograph.
TO SET CHRONOCOUNTER TO SPECIFIC POSITIONS
1. Pull Crown to third position.
2. Press the “A” pusher to move counterclockwise.
3. Press the “B” pusher to move clockwise.
4. Close crown and initiate chronograph.
Seiko VD Chronograph
13

Sub-Dials
14
These are some of the most common sub-dials.
1/10th second
60 second
accumulator
one minute
accumulator
30 minute
accumulator
one hour
accumulator
12 hour
accumulator
24 hour
accumulator 31 day indicator
Sub-Dials & Bezels
Day Indicator Month Indicator Day/Night Indicator
Moonphase Indicator Divers Bezel Tachymetre Bezel
15
Clasp Instructions
TO ADJUST
1. Grasping both sides of interior buttons depress together.
2. Lift the top part of buckle.
3. Lift strap off peg and slide to desired length.
4. Place desired strap hole over peg and lower onto peg.
5. Snap top part of buckle closed.
6. With watch on wrist close side without peg first.
7. Close peg side.
8. Slide extra strap length into strap keeper.
16
Clasp Instructions
4
5
33
2
1
17
1. Strap keeper
2. Side without peg
3. Interior buttons
4. Top buckle
5. Peg
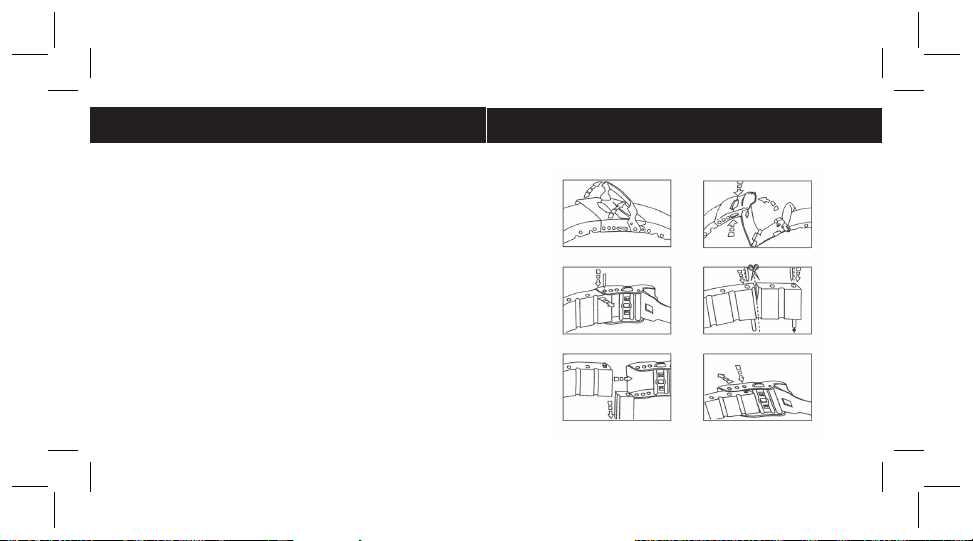
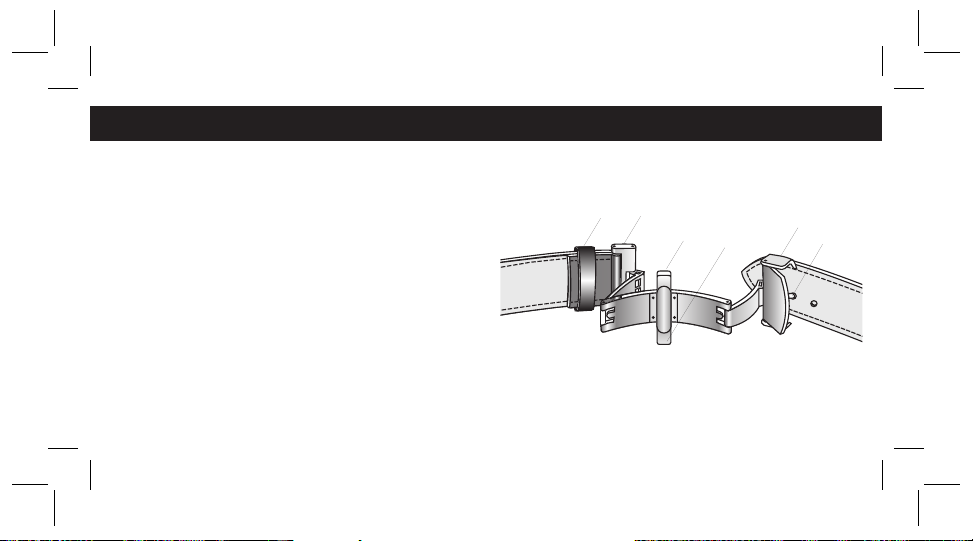
Rubber Strap Adjustments
TO ADJUST
1. Lift to open safety lock as in Fig. 1.
2. Push side button to release and open buckle as Fig. 2.
3. Push down spring bar with a pin, pull strap sideways to
disassemble strap from buckle as Fig. 3.
4. Cut along grid channel to shorten strap. Push out both rod
and spring bar with a pin as Fig. 4. Cut one channel at a time
on each side until band fits comfortably.
5. Remove excess rubber and insert spring bar into 1st hole as
Fig. 5.
6. Place one end of spring bar into desired hole, push down the
other end, slide strap towards the buckle simultaneously.
Spring bar pops into parallel home and holds strap in position
as Fig. 6.
18
Fig.1 Fig.2
Fig.3 Fig.4
Fig.5 Fig.6
Rubber Strap Adjustments
19


THE BENCHMARK OF
QUALITY, PRECISION, STYLE AND VALUE
W W W. C R O T O N W A T C H. C O M
WEST NYACK, NY 10994
CROTON WATCH COMPANY INC.
250 WEST NYACK ROAD
This manual suits for next models
1
Table of contents
Other Croton Watch manuals

Popular Watch manuals by other brands

CONCORD
CONCORD Quartz instruction manual

Xiaomi
Xiaomi Smart Band 7 manual

Pyle Sports
Pyle Sports PAW1 instruction manual

Wenger
Wenger AltiNav instruction manual

ARBRE London
ARBRE London Ceno INSTRUCTION MANUAL AND WATCH CARE

Audemars Piguet
Audemars Piguet royal oak offshore alinghi polaris Instructions for use


