Wenger AltiNav User manual

ii iii
Instruction Manual
AltiNav
Wenger NA
15 Corporate Drive
Orangeburg, NY 10962 USA
Tel: 1-800-431-2996, 1-845-365-3500
Email: [email protected]
Web: www.WengerNA.com

iv 1
Low Battery Detection .....................................42
Power Saving Mode........................................43
Caring For Your Watch .......................................44
Warranty Information ........................................45
Warranty Service Instructions ..................................46
Registration Form ...........................................48
Table of Contents
Crafted for Life .............................................2
Watch Components ...........................................3
General Features and Components ................................4
Operating Instructions
Setting the Analog Watch ....................................6
Digital Read-out Modes ......................................7
Setting the Digitial Time and Calendar ...........................8
Activating the Weather Forecast Feature ........................10
Setting the Alarm .........................................11
Using the Chronograph (Stopwatch) Feature......................14
Using the Altimeter Feature..................................17
Using the Barometer Feature ................................20
Precautions and Tips for Using Compass.........................24
Digital Compass Instructions .................................25

23
Crafted For Life
Delémont, Switzerland 1893
Over a century ago, Wenger built a factory in this tiny Swiss village and
transformed it into production headquarters for the Genuine Swiss Army
Knife™ still used by the Swiss Army today. As it was 100 years ago, each
tool, implement and knife manufactured by Wenger is crafted by hand in solid
stainless steel and each individually inspected for quality and craftsmanship.
This same attention to detail has been applied to genuine Wenger watches.
Wenger watches are Swiss-designed, -engineered and -crafted with only the
most accurate Swiss movement available. Each watch is constructed with form
and function that last a lifetime. As with the genuine Swiss Army knife, Wenger
watches are durable, high quality, and versatile enough for use on any occasion.
Wenger watches are engineered to provide the same resourcefulness as the
genuine Swiss Army knife, supplying functionality beyond the everyday.
Wenger Watch Components
Movements – Specialized Swiss mechanism.
Case Body – All PVD coated stainless steel for quality and durability.
Straps – Silicone rubber strap
Luminous Markers – Hands, markers, and numerals may be overlaid with
Super Luminova®which recharges in seconds when exposed to direct sunlight
for extended nighttime visibility.
Crystal – Scratch resistant Sapphire.
Crowns – Crowns are stainless steel buttons on the sides of the case body used
to control the many functions of this watch.

45
Start/Stop Button
•Tostartorstopthechronographtimer.
•Toselectbetweenfunctionswithinthesamemode.
•TotoggleYes/No.
•Toincreasevalueswithinfunctions.
Reset Button
•Toactivatethe“lap”or“reset”modeinthechronograph.
•TotoggleYes/No.
•To decrease values within functions.
Mode Button
•ToselectCurrentTime,Alarm,Chronograph,
Altimeter, Barometer or Compass Modes.
•ToentertheSettingDisplayinTime,Alarm,Altimeter,
Barometer and Compass Modes.
•Toselectfunctionswithinthedifferentmodes.
Light Button
•Toincreasethebrightnessofthedigitalread-outsfor3seconds.
note: Press any button to activate your watch under Power Saving Mode.
See p.43 for more information.
General Features and Components
Digital read-out
Digital read-out
Strap or bracelet
Start/Stop button
Reset button
Light button
Mode button
Minute hand
Second hand
Inner bezel
Hour hand
Crown

67
Digital Read-out Modes
Current Time Mode
Compass Mode
Alarm Mode
Barometer Mode
Chronograph Mode
Altimeter Mode
Note: A different sound will be emitted when entering Current Time Mode.
Setting the Analog Watch
1. To set the analog time, gently pull out the crown to Position 2.
2. Rotate crown so the watch hands move clockwise to the correct time.
3. Push crown back to Position 1.
Second Hand Alignment
To synchronize the digital with analog seconds, push in the crown to return it to
Position 1 at correct moment.
Position 1 Position 2
Important note:
Iftheanalog“second”
andthedigital“second”
are not synchronized, the
digital setting may not
function properly.

89
Setting the Digital Time and Calendar
1. To set the digital time, press and hold the mode button for 2 seconds in the
Currenttimemode.Theselecteditemwillashinthedigitalread-out.
2. Press the Mode button to change the function within the Time Setting
Sequence diagram shown at right.
3. PresstheStart/Stopbuttontoincreasethefunctionvalueandpress
the Reset button to decrease it.
4. Press and hold the Mode button to exit the Current Time Setting Mode.
Current Time Mode
Day of Week Date
Current Time
Digital Time Setting Sequence Diagram
Press Mode button
to toggle thru
the functions
Flashingeldsindicate
that they are selected.
Second
Key Tone
On/Off
Hourly
Chime
On/Off
Minute
DST
On/Off
LCD
Auto Off
Hour
Hour
Format
LCD
Auto On
Year
Date
Format
Contrast
Month
Day
Temperature

10 11
Setting the Alarm
There are 5 Daily or Schedule alarms. Schedule alarms can be set to sound on a
particular date. See Diagram on p.12.
1. When in Alarm Mode, press and hold the Mode button to enter into the Alarm
Numberfunction.PresstheST/STPbuttontochoosethealarmnumberand
press the Reset button to move in the opposite direction.
2. Press the Mode button to enter the Alarm Type function and choose between the
Daily or Schedule type. Press the Mode button again to enter the Hour function
andpresstheST/STPorResetbuttonstoincreaseordecreasethevaluefor
either function. Press the Mode button to enter the Minute function and repeat
the steps to increase or decrease the value. Follow these same steps for selecting
the Year, Month and Day for the Schedule Type of alarm.
3. PresstheModebuttontoenterandselecttheNoteOn/OffFunction.UseST/STP
and Reset to choose on or off. If you have selected Note On, press the Mode button
toselecttheNote.UseST/STPandResettochooseoneofthe7presetnotes.
4. Press the Mode button to revert back to the beginning of the alarm setting
sequence. Press and hold the Mode button to exit the alarm setting sequence.
Note: The watch will exit the setting sequence automatically when no button is
pressed for more than 1 minute.
Weather Forecast Feature
The AltiNav watch analyses the changes in air pressure to predict upcoming
weather. The watch provides 4 different symbols to indicate the weather forecast.
Activating the Weather Forecast Feature
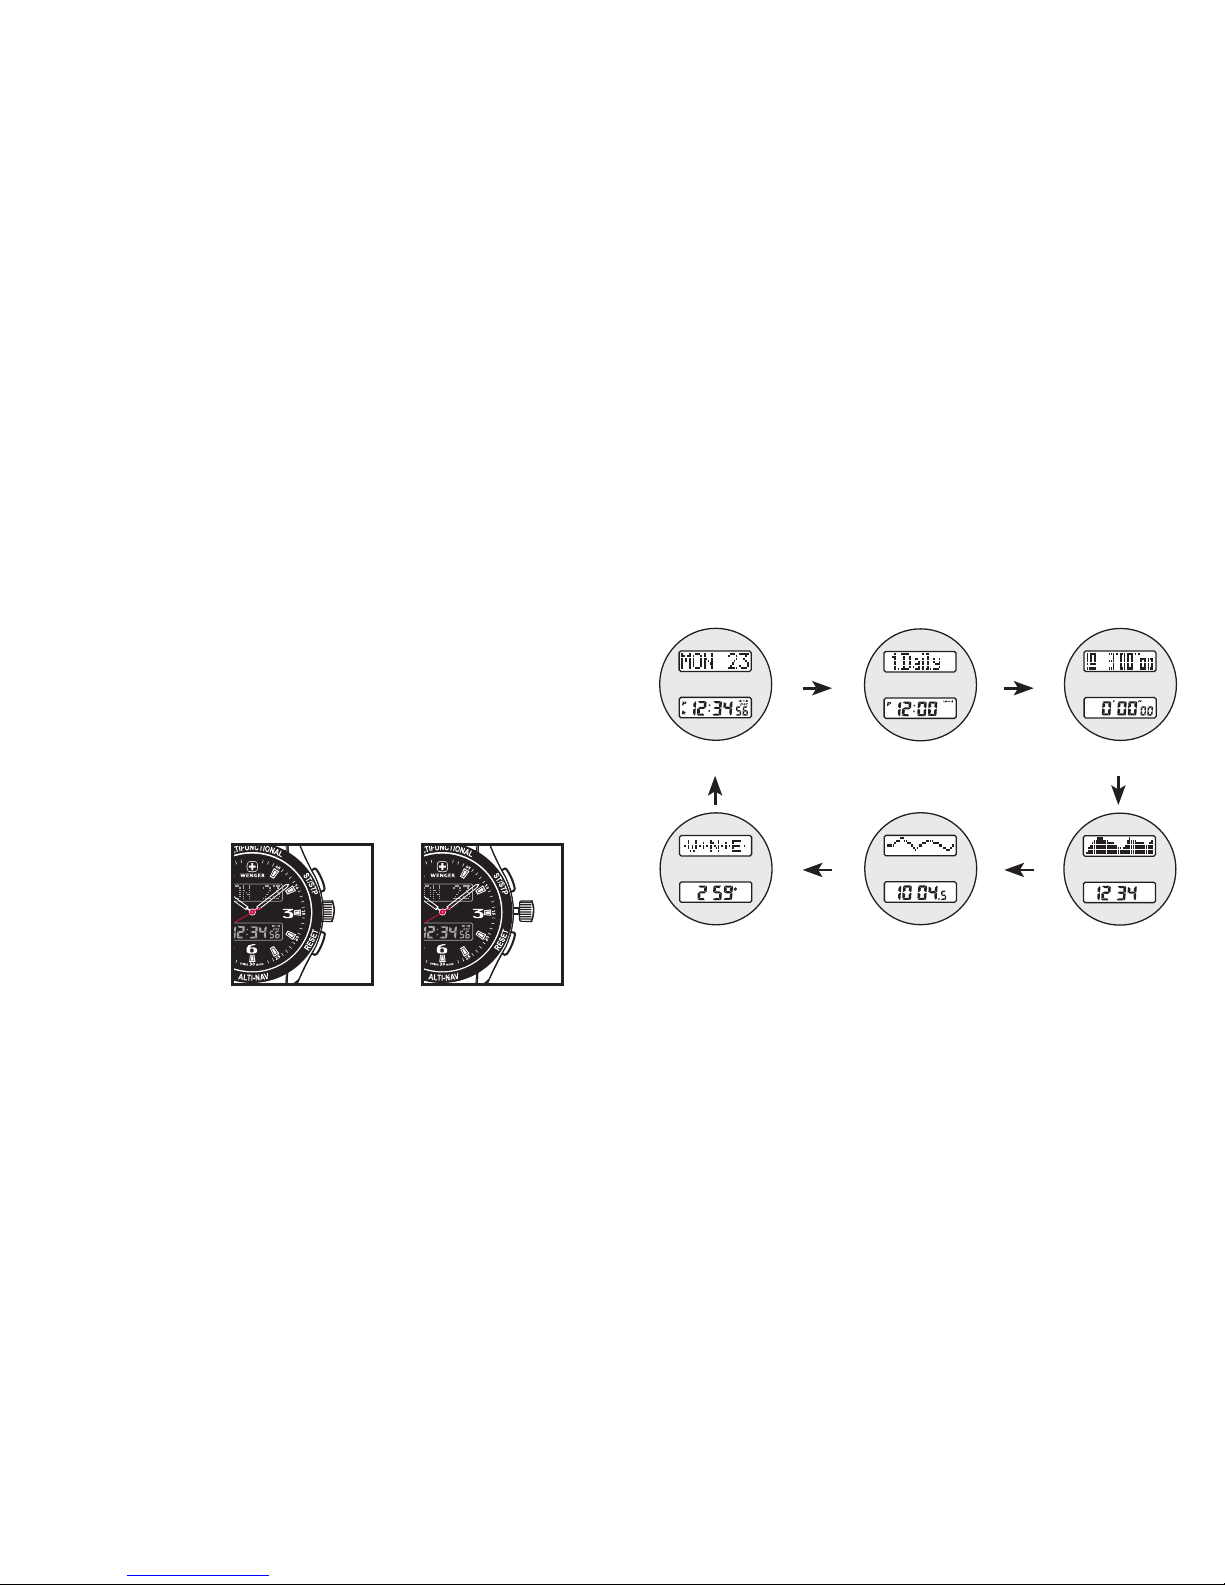
1.PresstheST/STPButtonwhileinCurrentTimeModetotogglebetweenthe
date and the weather forecast and temperature.
Important note: Since the watch predicts the upcoming weather by analysing
changes in air pressure, accuracy may increase when the user stays at the same
altitude for at least 24 hrs. The watch predicts the weather by adopting
general weather prediction principles. It is not capable of indicating dramatic
changes in weather within a very short period of time.
Sunny Cloudy with Sun Cloudy Rainy

12 13
Activating the Alarm
1.WheninAlarmMode,presstheST/STPbuttontoselectdifferentalarms.
2. ToturnON/OFFanalarm,selectthetargetalarmandpresstheResetbutton
to turn it ON or OFF.
3. To set an alarm, select the target alarm and hold down the Mode button to
enter the setting display sequence described on pg. 11.
4. When the alarm sounds, press any key to stop the beeping.
Note: When the Schedule Alarm is selected, the date of the alarm will be
scrolled once.
Alarm Setting Sequence Diagram
Alarm Mode
Alarm ON Alarm OFF
[L/R]
Alarm ON Alarm OFF
[L/R]
Alarm ON Alarm OFF
[L/R]
Alarm ON Alarm OFF
[L/R]
Alarm ON Alarm OFF
[L/R]
Alarm # Alarm Type
Daily Alarm
Schedule Alarm
“OFF”
“ON”
Alarm ON or Alarm OFF
or
Alarm # Alarm
Type
Note
Selection**
Hour
Note
On/Off
Minute
Day*
Year*
Month*
Note:*Day/Month/Yearsettingswillonlyappearif“Schedule”isselectedasthe
AlarmType.**NoteSelectioncanonlybeaccessedwhentheNoteoptionis“ON”.

14 15
Using the Chronograph (Stopwatch) Feature
The chronograph feature is a stopwatch which measures elapsed hours, minutes,
and seconds. It is also capable of measuring split-timed events (timing a continu-
ous event and sub-events simultaneously; e.g., timing an individual lap and an
entire race).
Stopwatch
1.Tostartthestopwatch,presstheST/STPbuttoninChronographMode.
2.Tostopit,presstheST/STPbuttonagain.
3. Read the seconds, minutes, and hours on the Total Time read-out.
4. To reset the stopwatch to zero, press and hold the Reset Button.
Note: The clock function of the watch will continue to operate while using
the stopwatch.
Chronograph Mode
Lap # Elapsed Time
Total Time
Using the Split-Timing Function
1.Tostartthestopwatch,presstheST/STPbuttoninChronographMode.
2. To mark or record a lap or other intermediate segment of time, press the Reset
button. The Lap time will be shown for a short while. The chrono will continue
to record the lap time internally, then externally. After that, the lap number will
be increased by 1. If there are more than 10 laps, the laps over the 10th lap will
be accumulated into the 10th lap. The watch will continue to time the total
event internally while the lap time is being recorded.
After 10 Sec
Lap # increased by 1
Stopwatch Running
(no lap recorded)
Lap Display
Lap Time Recording
Stopwatch Continuous
Running
Lap Time
Total Time

16 17
Recalling the Lap Records
1. Press the Reset button when the chronograph is stopped.
2.PresstheST/STPbuttontomovetothelastlaprecord.Thiswatch
has a ten lap memory.
Recalibrating the Chronograph
1. Press and hold the Reset button. All lap records will be reset to zero.
Chronograph Stop
Read-out
Lap Records Recall Sequence
1st Lap
Record
Last Lap
Record
Reset Reset
Reset
Reset
ST/STP
Next Lap
Record
Using the Altimeter Feature
The top digital read-out row displays an Elevation Chart for the previous 36 hours.
In order to conserve power, your altitude is updated as follows:
•First5minutes:itupdateseverysecond
•Next24hours:updatesevery10seconds
•Afterwards:updateseveryminute
Note: The altimeter range is from -2,316 ft to 30,067 ft (-706m to 9,164m).
Press the Reset button to switch between or Ft. As this is a sophisticated
timepiece, please refer to our website for more in depth information.
Altimeter Mode Display
-1 hour
-36 hour
Current Altimeter
36-Hr Elevation Chart

18 19
Calibrating the Altimeter
1. Press and hold the Mode button.
2.Thelastaltitudedigitalread-outwillbedisplayed.PresstheST/STPbutton
or the Reset button to increase or decrease the altitude based on your current
position (research on Google).
Resetting the altitude to factory default setting
1. Press and hold the Mode button to access the reset option. Choose Yes or
NowiththeST/STPbuttonortheResetbutton.
2. Press and hold the Mode button to exit the Setting Mode.
Altimeter Digital Read-Out
To calibrate the altimeter
Press ST/STP or Reset
buttons to change the
digital read-out value.
Holding down the ST/STP
or Reset buttons will allow
you to change the value at
a higher speed.
Press
Mode
Press
Mode
Press
Mode
Press ST/STP or Reset

20 21
Using the Barometer Feature
The Air Pressure Chart for the previous 36 hours is shown in the top digital
read-out row. In order to conserve power, the current air pressure is updated as
follows:
•First5minutes:itupdateseverysecond
•Next24hours:updatesevery10seconds
•Afterwards:updateseveryminute
Note: The barometer range is from 8.86 inHG to 32.48 inHg (300mb to
1100mb). Press the Reset button to switch the unit of air pressure between
and . As this is a sophisticated timepiece, please refer to our website
for more in depth information.
= Milibars
= inches of Mercury
= hectopascal
Barometer Mode Display
Unit Setting
-1 hour
-36 hour
Reset Reset
Reset
Current Air Pressure
36-Hr Air Pressure Chart

22 23
Calibrating the Barometer
1. Press and hold the Mode button to access the Barometer digital read-out.
2.Thecurrentairpressurewillbedisplayed.PresstheST/STPbuttonor
the Reset button to increase or decrease the barometer reading based on your
current location. (Research on Google)
Resetting the air pressure to factory default setting
1. Press and hold the Mode button to access the reset option. Choose Yes or
NowiththeST/STPbuttonortheResetbutton.
2. Press and hold the Mode button to exit the Setting Mode.
Barometer Digital Read-Out
To calibrate the barometer,
Press ST/STP or Reset
buttons to change the
digital read-out value.
Holding down the ST/STP
or Reset buttons will allow
you to change the value at
a higher speed.
Press
Mode
Press
Mode
Press
Mode
Press ST/STP or Reset

24 25
Precautions and Tips for Using Compass
1. Keep the watch away from any magnets or appliances that contain magnets
orgeneratemagneticeldssuchasmobilephones,speakers,motors,etc.
2. This watch points to the magnetic north, which is slightly different from
truenorth.Checkthe“WhatisMagneticDeclination”sectiononp.30
for more details.
3. Perform compass calibration (see p.39) frequently, or under the following
conditions:
•Firsttimeusingthecompass
•Whenthemeasuringresultissuspectedtobeincorrect
•Whenthebatteryhasbeenreplaced
•Whenthewatchisinadifferentlocationfromwhereitwas
previously calibrated
4. Avoid measuring direction in the following conditions:
•Watchisplacedclosetomagneticobjects,metalobjects
or electrical appliances
•Watchisplacedinsideamovingobjectoraferroconcretebuilding
Compass Bearing vs. Compass Direction
Compass Bearing –thehorizontaldirectionofanobjectasmeasuredbythe
observer in degrees.
Compass Direction – the path given by a compass using the four cardinal
points including North, South, East & West.
Visit:http://geology.isu.edu/geostac/Field_Exercise/topomaps/bearing.htmfor
more information.
Compass Mode
Compass direction
Bearing direction

26 27
Calculating Compass Directions
Compassdirectionsareshownintheadjacent
table.Forexample,inthegureshownbelow,the
compassdirectionofobjectBfrompointAisdue
East.ThecompassdirectionofobjectCfrompoint
AisSoutheast.thecompassdirectionofobjectD
from point A is Northwest.
Calculating Compass Bearing Directions
TheCompassBearingdirectionofanobjectis
denedastheangulardifferencebetweenNorth
andtheobject.(Assume0˚for due North, and the
measuring range is from 0˚to 359˚). For example,
inthegureonbelow,thebearingdirectionof
objectBfrompointAis90˚. The bearing direction
ofobjectCfrompointAis135˚. The bearing
directionofobjectDfrompointAis315˚.
a n g u la r
d iffe re n c e
N
E
90
S E
135
NW
315
0
0
N
object D
object D
object B
object C
object B
point A
point
A
object C
Compass Directions Bearing Directions
a n g u la r
d iffe re n c e
N
E
90
S E
135
NW
315
0
0
N
object D
object D
object B
object C
object B
point A
point
A
object C
Compass Directions Bearing Directions
Compass Direction
Bearing Direction
Compass
Directions
Bearing
Directions
Compass
Directions
Bearing
Directions
North 349˚- 11˚South 169˚- 191˚
North Northeast 12˚- 33˚South Southwest 192˚- 213˚
Northeast 34˚- 56˚Southwest 214˚- 236˚
East Northeast 57˚- 78˚West Southwest 237˚- 258˚
East 79˚- 101˚West 259˚- 281˚
East Southeast 102˚- 123˚West Northwest 282˚- 303˚
Southeast 124˚- 146˚Northwest 304˚- 326˚
South Southeast 147˚- 168˚North Northwest 327˚- 348˚

28 29
Compass Mode - Different Digital Read-outs
Normal Display
In Compass Mode, the digital read-out for the compass direction in the top row
while the bearing direction is displayed in the bottom row.
note: Analog movement will be stopped temporarily during compass measurement.
Idle Display
If no key is pressed for 1 minute, the watch will go to the IDLE Mode automati-
cally to conserve battery power. To activate the compass again, press any button.
Distortion Display
Ifdistortionisdetected,thebearingdirectionwillash.Pleasereferto
“CalibratingtheCompass”onp.39torestorethecompasstonormal
operation when distortion is detected.
Distortion Display
Compass Mode Display
Normal Display Idle Display
ashing
Distortion Display
Normal Display Idle Display

30 31
What is Magnetic Declination?
•TheMagneticNorthPoleisslightlydifferentfromtheTrueNorthPole.
This watch points to the Magnetic North Pole. Everything measured on a
map is related to the True North Pole.
•TheangulardifferencebetweentheMagneticNorthPoleandtheTrue
North Pole is called Magnetic Declination. The amount (degrees and
minutes) and direction (easterly and westerly) depends on where you
are in the world.
•Fortheadvancedcompassuserwhointendstoperformanaccuratenavigation,
thecompassmustbeadjustedformagneticdeclination.
•The Watch also includes a compensation setting for Magnetic Declination. Check
thecomingsection“Calibratingthecompass-MagneticDeclinationMode”on
p.39-41 for more details.
Magnetic Declination Information
•Mosttopographicmapsshowamagneticnorthpoleand/orthemagnetic
declinationinformation.Seethe“MagneticDeclinationatMajorCities”
section on p.34-38.
•Forthosecitieswhosenamesarenotincludedinthelist,enterthecities
latitude and longitude into one of the below magnetic declination
calculator websites:
-http://gsc.nrcan.gc.ca/geomag/index_e.php
-http://www.ngdc.noaa.gov/geomag
Magnetic Declination Magnetic Declination
Magnetic North True North

32 33
Magnetic Declination Compensation
•ThisWatchallowsyoutocompensatethecompassbearingataplacewhere
the magnetic declination is either Westerly declination or Easterly declination.
•Tocompensateforanobject’sbearing,eithersubtractwesterly(W)magnetic
declination or add easterly (E) magnetic declination with the magnetic bearing.
Example 1: Westerly magnetic declination 23° and the compass needle points 323°.
•TB=MB-W.WhenMB=323°;W=23°
•TB=323°-23°
•TB=300°
•Thetruebearingis300°.
Example 2: Easterly magnetic declination 22° and the compass needle points 278°.
•TB=MB+E.WhenMB=278°;E=22°
•TB=278°+22°
•TB=300°
•Thetruebearingis300°.
•Checkthecomingsection“CalibratingtheCompass”onp.39formoredetails
of the setting.
Compensate the Bearing
with Westerly (W) Magnetic Declination
magnetic bearing
323°
true bearing
300°
true north
0°
magnetic declination
23°W
magnetic
north
point A
object B
True Bearing (TB) =
Magnetic Bearing (MB) - Westerly Magnetic Declination (W)
300° (TB) = 323° (MB) - 23° (W)
Compensate the Bearing
with Easterly (E) Magnetic Declination
magnetic
bearing
278°
true bearing
300°
true north
0°
magnetic declination
22°E magnetic
north
point A
object B
True Bearing (TB) =
Magnetic Bearing (MB) - Easterly Magnetic Declination (E)
300° (TB) = 278° (MB) - 22° (E)
Compensate the Bearing
with Westerly (W) Magnetic Declination
magnetic bearing
323°
true bearing
300°
true north
0°
magnetic declination
23°W
magnetic
north
point A
object B
True Bearing (TB) =
Magnetic Bearing (MB) - Westerly Magnetic Declination (W)
300° (TB) = 323° (MB) - 23° (W)
Compensate the Bearing
with Easterly (E) Magnetic Declination
magnetic
bearing
278°
true bearing
300°
true north
0°
magnetic declination
22°E magnetic
north
point A
object B
True Bearing (TB) =
Magnetic Bearing (MB) - Easterly Magnetic Declination (E)
300° (TB) = 278° (MB) - 22° (E)

34 35
Magnetic Declination at Major Cities
Country City Declination
Australia Canberra 12-E
Austria Vienna 2-E
Bangladesh Dhaka 0
Belgium Brussels 1-W
Brazil Brasilia 19-W
Canada Ottawa 14-W
Chile Santiago 5-E
China Beijing 6-W
China Hong Kong 2-W
Costa Rica San Jose 0
Cuba Havana 3-W
Czech Republic Prague 2-E
Magnetic Declination at Major Cities (continued)
Country City Declination
Denmark Copenhagen 1-E
Egypt Cairo 3-E
Finland Helsinki 6-E
France Paris 1-W
Germany Berlin 1-E
Greece Athens 3-E
Hungary Budapest 4-E
India New Delhi 1-E
Indonesia Jakarta 1-E
Israel Jerusalem 3-E
Italy Rome 1-E
Japan Tokyo 7-W

36 37
Magnetic Declination at Major Cities (continued)
Country City Declination
Jordan Amman 3-E
Kenya Nairobi 1-E
Korea Seoul 7-W
Malaysia Kuala Lumpur 1-E
Mexico Mexico City 6-E
Nepal Kathmandu 0
Netherlands Amsterdam 1-W
New Zealand Wellington 22-E
Norway Oslo 0
Pakistan Islamabad 2-E
Philippines Manila 1-W
Portugal Lisbon 5-W
Magnetic Declination at Major Cities (continued)
Country City Declination
Russia Moscow 9-E
Singapore Singapore 0
South Africa Cape Town 23-W
Spain Madrid 3-W
Sweden Stockholm 3-E
Switzerland Bern 0
Taiwan Tai-pei 3-W
Thailand Bangkok 0
UAE Abu Dhabi 1-E
United Kingdom London 3-W
United States Washington DC 10-W
United States Juneau, AK 25-E
Table of contents
Other Wenger Watch manuals

Wenger
Wenger Clock User manual

Wenger
Wenger Traveler Pocket Alarm User manual

Wenger
Wenger Attitude Automatic ETA 2824-2 User manual

Wenger
Wenger Traveler Pocket Alarm User manual

Wenger
Wenger TerraGraph User manual

Wenger
Wenger Nomad User manual

Wenger
Wenger Commando Traveler Series User manual

Wenger
Wenger Nomad User manual

Wenger
Wenger Urban Metropolitan Automatic SELLITA SW... User manual

Wenger
Wenger Clock User manual