CROWNFUL IM2200BA-UL User manual

USER MANUAL
SMART ICE MAKER
MODEL: IM2200BA-UL
SAVE THIS MANUAL FOR FUTURE USE

IMPORTANT SAFETY INSTRUCTIONS ........................................................................................................3
PACKAGE CONTENTS .................................................................................................................................5
SPECIFICATIONS ........................................................................................................................................5
KNOW YOUR ICE MAKER ............................................................................................................................6
BEFORE FIRST USE .....................................................................................................................................7
CROWNFUL APP SETUP .............................................................................................................................8
HOW TO CONTROL ICE MAKER ON APP ..................................................................................................12
CONTROL PANEL ......................................................................................................................................14
USING YOUR ICE MAKER ..........................................................................................................................15
CLEANING AND MAINTENANCE ...............................................................................................................16
TROUBLESHOOTING ...............................................................................................................................17
FCC STATEMENT .......................................................................................................................................19
TECHNICAL PARAMETERS ........................................................................................................................20
WARRANTY INFORMATION .......................................................................................................................21
CUSTOMER SUPPORT ..............................................................................................................................21
NOTES ......................................................................................................................................................22
TABLE OF CONTENTS

IMPORTANT SAFETY INSTRUCTIONS
To reduce the risk of fire, explosion, electric shock, or injury when using your ice maker, follow
these important safety instructions:
Before using check that the voltage power corresponds to the one shown on the appliance
nameplate.
Do not remove any safety, warning, or product information labels from your ice maker.
Plug the ice maker into an exclusive grounded power outlet. No other appliance should be plugged
into the same outlet. Be sure that the plug is fully inserted into the receptacle.
This appliance must be grounded. It is equipped with a power cord having a grounding plug. The
plug must be plugged into an outlet that is properly installed and grounded.
Avoid the use of an extension cord because it may overheat and cause a risk of fire. However, if it is
necessary to use an extension cord:
1) Use only an extension cord with a grounding plug.
2) The marked rating of an extension cord must be equal to or greater than the rating of this appliance.
3) It should be positioned in a way that it does not drape over the counter or tabletop where it can be pulled by children
intentionally.
Do not operate any appliances with a damage cord, plug or after the appliance malfunction or has
been damaged in any manner. Return the appliance to the nearest authorized service facility for
examination, repair or adjustment.
If the supply cord is damaged, it must be replaced by the manufacturer, its service agent or a
similarly qualified person in order to avoid a hazard.
Do not let the cord hang over the edge of the table or counter.
Do not place near a hot gas, electric burner or in a heated oven.
Place the power cord in away that it cannot be pulled by children or cause a tripping hazard.
Place the power cord away from hot surfaces.
The use of attachment not recommended or sold by manufacturer may cause fire, electric shock or
injury.
Do not touch the evaporator when using the ice maker to avoid frostbite.
Do not immerse any part of the product in water.
To disconnect, turn any control to "OFF", then remove the plug from the wall outlet.
Do not plug or unplug the product with wet hands.
Unplug the product before cleaning, maintaining and when not in use.
1.
2.
3.
4.
5.
6.
7.
8.
9.
10.
11.
12.
13.
14.
15.
16.
17.
3

Do not use microbiologically unsafe water or with unknown quality.
Do not clean your ice maker with any flammable fluids. The fumes may create a fire hazard or
explosion.
Do not overturn the ice maker. If the ice maker is overturned accidentally, make it stand
steadily for two hours before powering it on again.
If the ice maker is brought in from outside of winter time, do not use for a few hours, allowing the
unit to warm up to the room temperature before operating.
Never put flammable, explosive and corrosive articles into the ice maker.
Never use the ice maker when there is flammable gas leakage.
Never store or use gas and other flammable articles near the ice maker to avoid any fire.
Unplug the ice maker before moving it to avoid damaging the refrigerating system.
Do not attempt to disassemble, repair, modify, or replace any part of your product.
This appliance is not intended for use by people (including children) with reduced physical, senso-
ry, mental capabilities or lack of experience and knowledge, unless they have been given
supervision or instruction concerning the use of the appliances by someone responsible for their
safety.
Children should be supervised to ensure that they do not play with the appliance.
Close supervision is necessary when any appliance is used by or near children.
Do not leave the appliance unattended while in use.
Do not use outdoors.
Do not use the appliance for other than intended use.
Please abandon the ice maker according to local regulators, as it uses flammable blowing gas and
refrigerant.
Please dispose of the appliance for its flammable refrigerant and blowing gas according to local
regulations.
WARNING: Keep venation openings, in the appliance enclosure or in the built-in structure, clear of
obstruction.
WARNING: Do not use mechanical devices or other means to accelerate the defrosting process,
other than those recommended by the manufacturer.
WARNING: Do not damage the refrigerant circuit.
Do not store explosive substances such as aerosol cans with a flammable propellant in this
appliance.
18.
19.
20.
21.
22.
23.
24.
25.
26.
27.
28.
29.
30.
31.
32.
33.
34.
35.
36.
37.
38.
4

WARNING: Do not use electrical appliances inside the food storage compartments of the
appliance, unless they are of the type recommended by the manufacturer.
WARNING: Risk of fire/flammable materials.
WARNING: When positioning the appliance, ensure the supply cord is not trapped or damaged.
WARNING: Do not locate multiple portable socket-outlets or portable power supplies at the rear of
the appliance.
Do not use with a 220-240V outlet.
40.
41.
42.
43.
39.
PACKAGE CONTENTS
1 x Ice Maker 1 x Ice Basket 1 x Ice Scoop 1 x User Manual 1 x Warranty Card
SPECIFICATIONS
2.8L / 94.6oz Water Reservoir Capacity:
33lbsProduction in 24H:
120V/60Hz
1.8A
Power Source:
Rated Current:
R600a /27.5gRefrigerant:
SUS430+ABSHousing:
SAVE THESE INSTRUCTIONS
5

KNOW YOUR ICE MAKER
Control panel
Viewing window
Front cover
Front housing
Water rese rvoir
Ice basket
Infrared light-
receiving diode
Top lid
Back housing
Evaporator
Ice tray
Ice shovel
"MAX" water level
Drain plug
Ice spoon
Ice basket
Filter
Infrared light-
emitting diode
6

BEFORE FIRST USE
Unpack the appliance, then check and make sure that all the accessories including ice basket and
ice scoop, etc. are complete. Please contact the seller or manufacturer if some accessories are
missing.
Please ensure the ice maker is level and on a stable table or platform to avoid malfunction .
The incline angle of the ice maker cabinet should not exceed 45° during transportation or use.
Do not turn the ice maker upside down. Doing so could cause the compressor or refrigerating
system to operate incorrectly. Please allow time for the fluids in the compressor to settle after the
ice maker is moved or transported. Before using the ice maker for the first time, please wait for 2
hours after the unit has been leveled and positioned in the proper place.
Do not fill the water reservoir with hot water. This may damage the ice maker. It is best to fill the
water reservoir with water of room temperature or lower.
Do not use the appliance in a very cold environment (lower than 5°C).
Clean the appliance by following the operation "CLEANING AND MAINTENANCE" before use.
1.
2.
3.
4.
5
6.
7.
The appliance must be placed on a dry and
level surface with sufficient ventilation, far
from heat sources such as ovens, heaters and
corrosive gases. Leave a 6-inch (l5cm)
clearance on all sides of the ice maker for
proper ventilation.
7

CROWNFUL APP SETUP
Open the CROWNFUL app. If you already have an account tap login.
B: CREATE / LOGIN YOUR OWN CROWNFUL ACCOUNT
To download the CROWNFUL App, please scan the QR code or search for "CROWNFUL" in
Apple App Store® (iOS) or Google Play Store(Android).
A: DOWNLOADING THE FREE MOBILE APP
1. Turn on Bluetooth® and WiFi® on your phone.
C: PAIRING WITH CROWNF UL APP
For Android™ users, choose "Allow" to use CROWNFUL. It won't be used to record personal, private
information.
The CROWNFUL App is continually being improved and may change over time. If there are any
differences, follow the in-app instructions.
Follow the instructions to finish setting up your ice maker.
NOTE:
CROWNFUL APP
You must create your own CROWNFUL account to use third-party services and products.
These will not work with a guest account.
With a CROWNFUL account, you can also allow your family and friends to control your smart ice
maker.
NOTE:
8

Hold the "ON/OFF" button of the ice machine for three seconds to turn on the WiFi.
After the WiFi is turned on, WiFi indicator flashes slowly. Press and hold the "SELECT" for 5 seconds
to enter the network configuration state of the device, and the WiFi light flashes quickly.
Tap + in the CROWNFUL App and select your smart ice maker from the product list during the first
setup.
Once paired successfully, it will remain in "Searching for Devices". You can tap it directly the next
time you use it.
2.
3.
4.
5.
Find the product to start the WiFi network configuration of the device, then select WiFi and enter
the password to connect.
If it discovered the ice maker, please tap "Add Device" and set up WIFI.
6.
7.
9

TROUBLESHOOTING
Make sure your router is turned on and connectable.
The Wi-Fi® password is entered correctly.
Make sure your WiFi® signal can cover the device.
Only use 2.4G network connection.
NOTE:
1. Make sure the Wi-Fi indicator is blinking.
2. Make sure your phone's Bluetooth® is turned on.
3. Make sure your device isn't connected to any other phones
when trying to pair. (Only one phone can be connected to
this device at a time.)
4. Turn this device off and on again by unplugging the device
andreinserting it. Click "Try Again" and follow the steps 5 & 6
above.
SOLUTIONS:
1. You or Your family have used another Crownful account to
connect this ice maker with Crownful App before.
2. Repeat connecting the same device on this app.
WHY DOES IT SHOW THIS REMINDER?
SOLUTION:
Can't find your device
Reset My Device
Please click "Reset My Device" and then you can connect to other
new devices. However, it will lose all your saving settings on this
device. ( You can also use this method to reset your device upon
demand)
If you don't want to reset your device, please click "Exit Set Up" and
it will keep all your saved settings.
10

1. It takes time for the first time to pair with the Crownful App. Please wait for the connection, and you
can visit the ice maker operation interface after the connection is successful.
2. Select the ice machine under "My Device" on the next usage and it will connect automatically.
D: PAIRING WITH THE DEVICE
NOTE: If the device connects well, please do not press and hold the "SELECT" button again for 5
seconds to avoid re-entering the network configuration state of the device and resetting the device. It
will lose all your saving settings on this device for the above situation.
R
R
Bluetooth Connection Failed
If the Bluetooth connection failed, please keep your phone closer to the device
and reconnect again.
WIFI Connection Failed
If the device network configuration failed, please make sure the WiFi password is
correct, or try to switch WiFi to connect.
Device Connection Failed
Press and hold the select button for 5 seconds until the WiFi light flashes quickly
and try to reconnect it again.
11
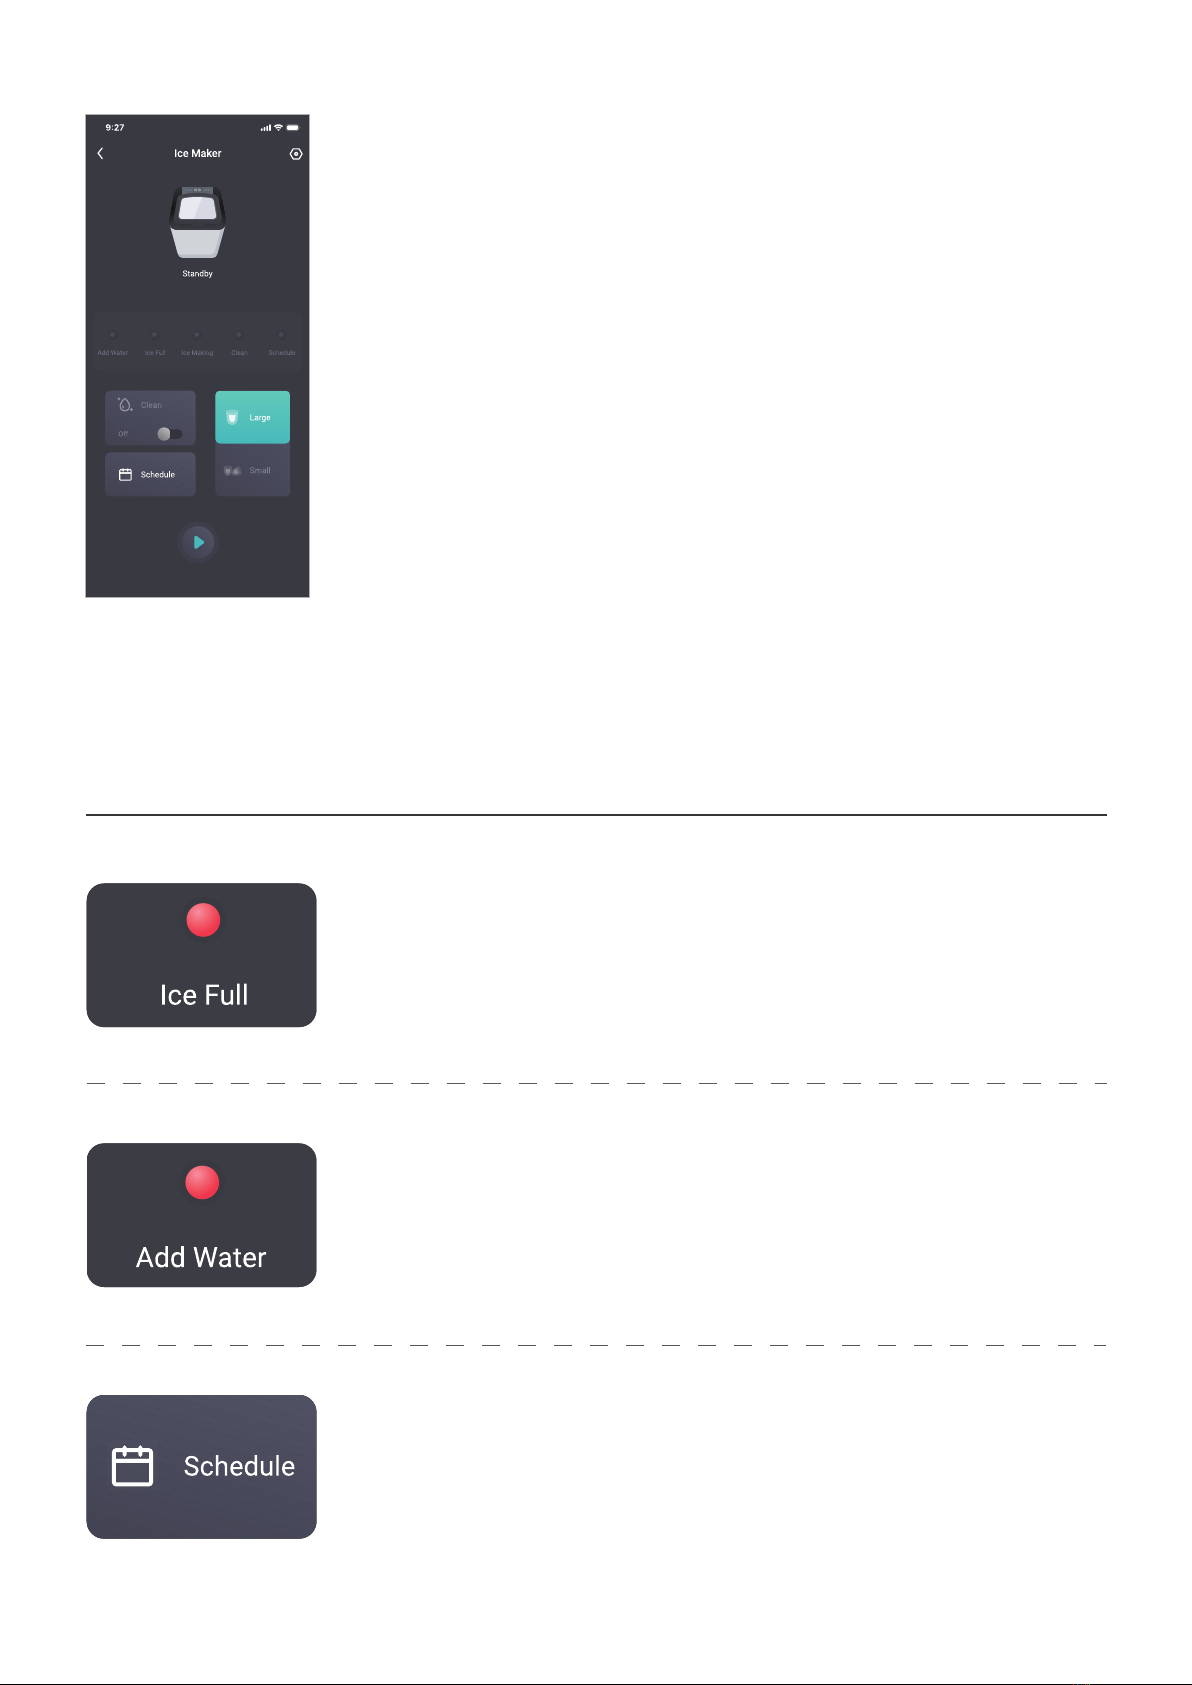
HOW TO CONTROL ICE MAKER ON APP
1. Remote Control
All smart ice maker functions can be controlled remotely.
2. Check the status of your ice maker
Including when your ice is full, or you need to add water.
3. Setting a schedule for ice making
Make sure you always have ice when you need it
4. Third-Party Voice Control
Compatible with Amazon Alexa and Google Assistant ™ for voice commands.
NOTE: The Crownful app is continually updated and the app features will
expand.
APP FEATURES:
Schedule
You can customize the schedule plan for the
ice making which is in a periodic plan.
Choose the ice size, start time and end time,
and then select the day. You can also use the
last set plan the next time you use it.
Add Water Reminder
When the ice maker lacks water, the Add Water
indicator will turn on and you need to add water
to the reservoir.
Ice Full Reminder
When the basket is full, the Ice Full indicator will
turn on and you need to remove the ice cubes
from the ice maker.
12
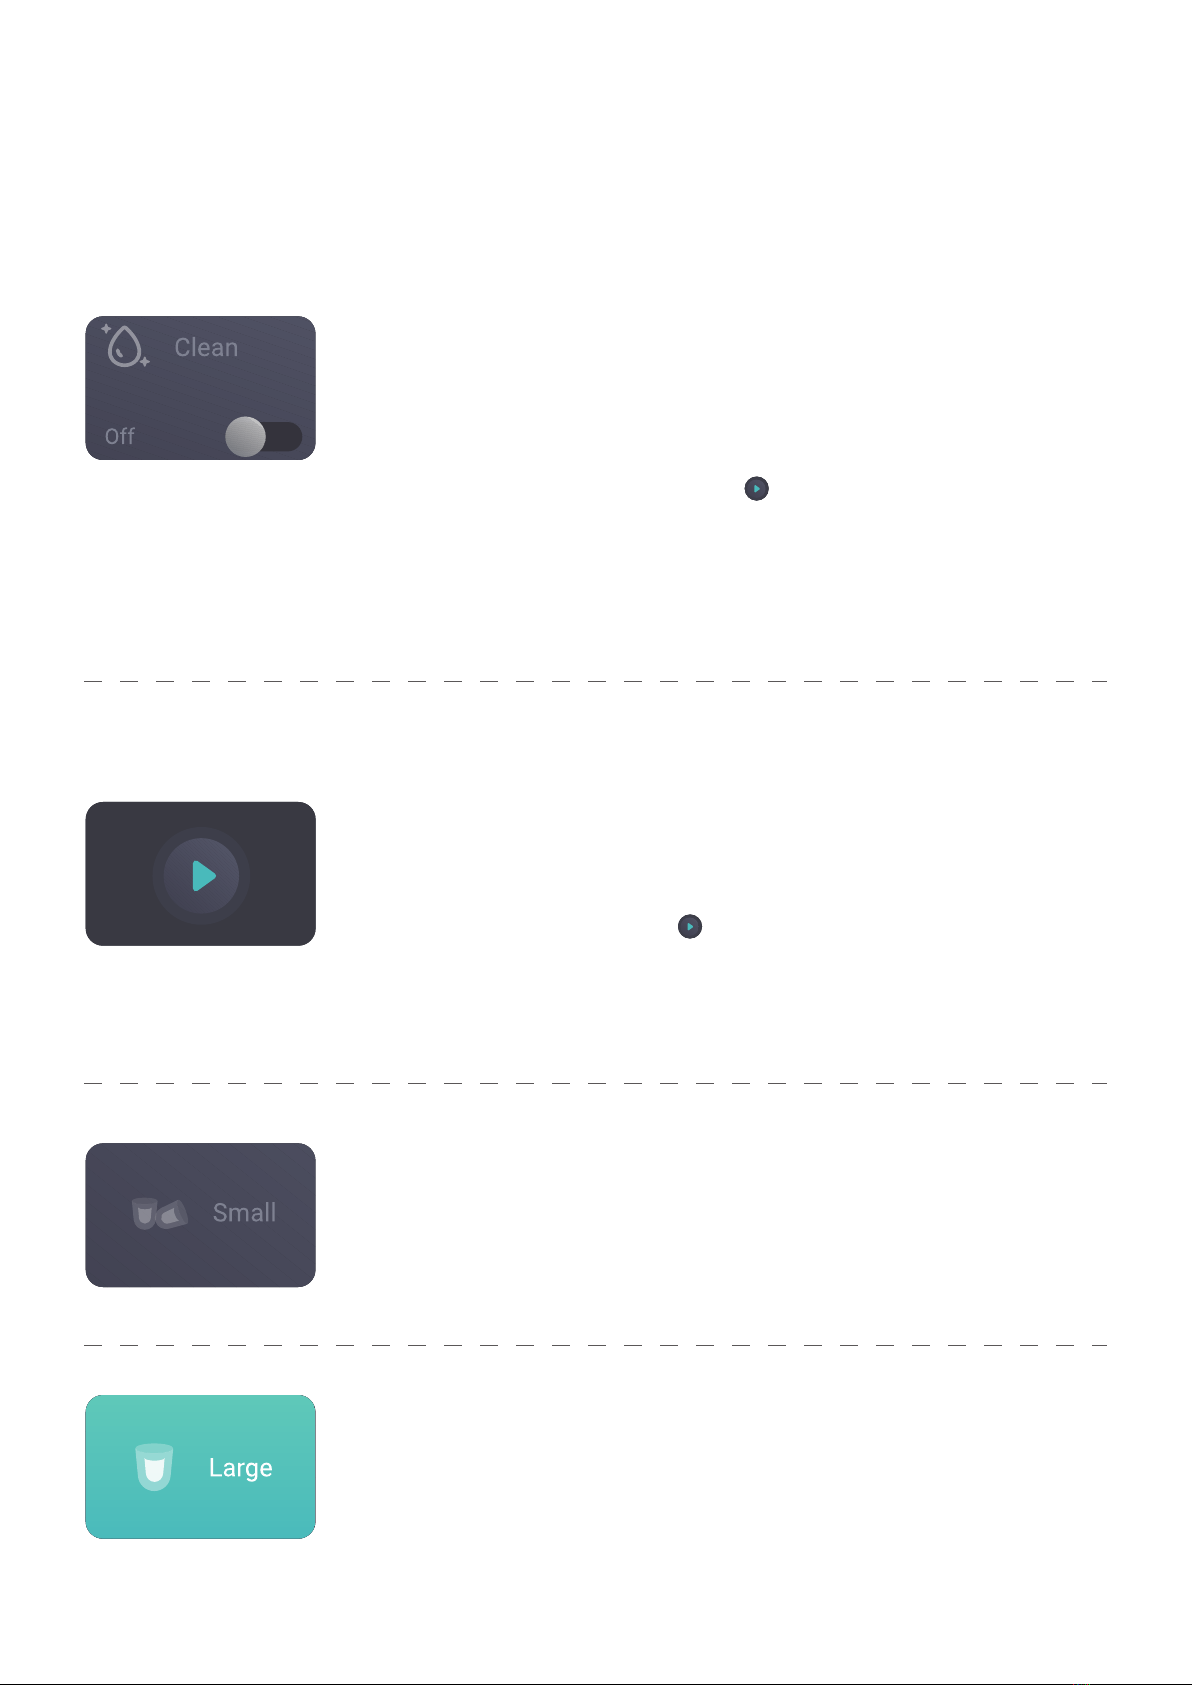
Power Switch
Tap this button to turn it on/off. After turning it
on, the machine will remember all the settings
before the last power off.
If you want to turn off the ice maker, please
press button to stop the ice maker and then
unplug the it. Otherwise, the ice maker will
remain in Stand By mode when it is plugged
into the wall outlet.
Large Ice Button
The default ice size is set to large. When the
ice maker is making large-sized ice, the Ice
Making indicator and Large icon light solidly.
Small Ice Button
Tap this button to make small-sized ice. When
the ice maker is making small-sized ice, the Ice
Making indicator and Small icon light solidly.
The device will switch to small ice after the
current large ice cube is made.
Automatic
Cleaning Button
No other operations are allowed during the
cleanup unless once completed. If the
cleaning time coincides with the ice-making
scheduled time, the ice-making operation will be
performed after the cleaning is
completed.
NOTE:
· If the machine is making ice, you can not turn
on Clean Mode.
· Please tap to stop the ice maker and wait for
a moment (around3-10mins).
The ice maker will be stopped after the current
ice cube is made. And then you can turn on Clean
Mode.
13
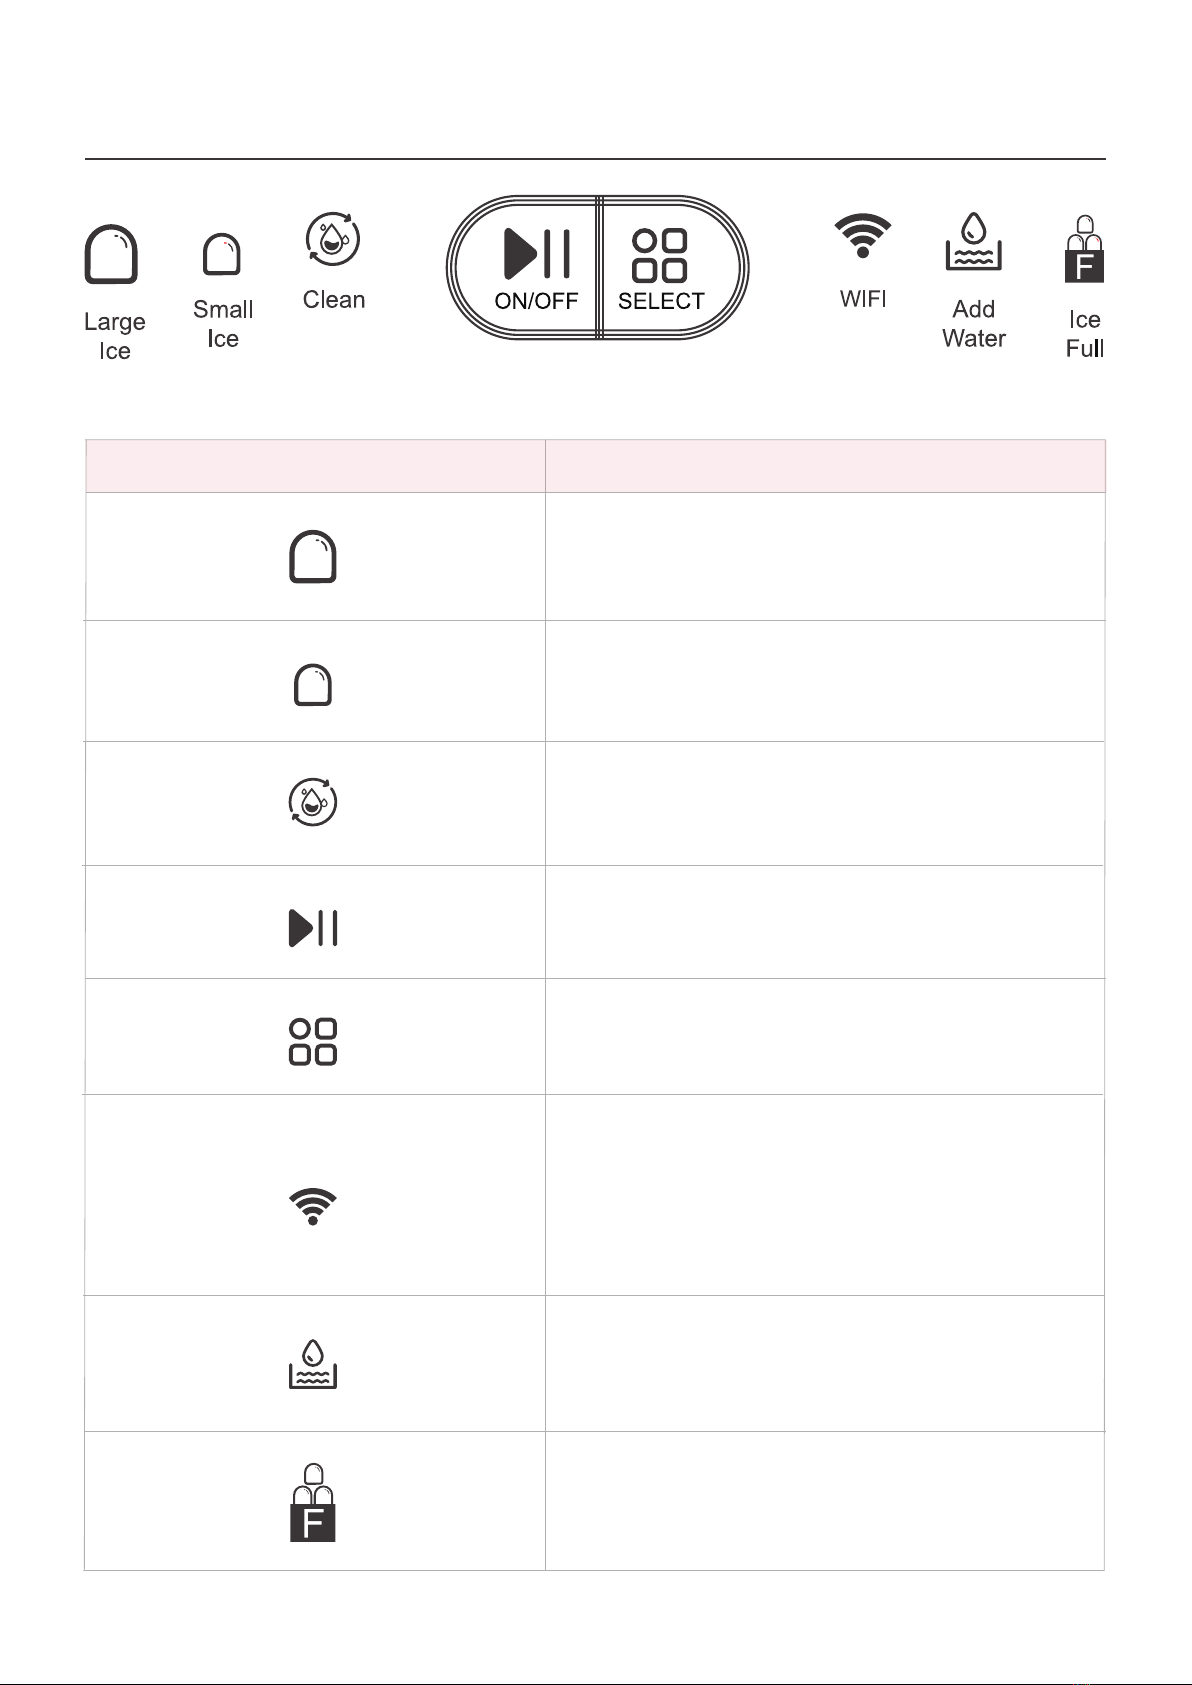
The indicator lights in red when the water
reservoir is lack of water.
The indicator lights in red when
the ice basket is full.
The indicator lights in green when
selecting small ice.
The indicator lights in green when running
self-cleaning program.
Select the ice size and cleaning mode.
Start or stop the appliance.
The indicator lights in green when
selecting large ice.
CONTROL PANEL
KEY (WITH INDICATOR) FUNCTION
1. The indicator light will be SOLID GREEN
when connected to the network successfully.
2. The indicator light will BLINK GREEN when
waiting to pair with App.
14

Ensure that the drain plug at the bottom of water reservoir is closed well.
Plug the ice maker in to the wall outlet, the" and "indicator blinks. Connect Crownful App
under instruction. After connecting, the WiFi indicator lights solidly.
1.
2.
Allow the ice maker to wall up to room temperature.
Suggest replacing the water weekly. Please empty the water reservoir if the ice maker is not used
for a long time.
14.
15.
Open the top lid and remove the ice basket.
POTABLE WATER: Fill the water reservoir with potable water only.
3.
4.
Install the ice basket and close the top lid.
Press " " key to select the ice size," " means small ice while" " means large ice.
Press the " " key and the" " indicator lights solidly.
The ice machine is not a freezer. Please use the ice ASAP or transfer it to your freezer.
The ice-making cycle starts with water being pumped into the ice tray situated below the
evaporator. Over the next 7-15 minutes ice forms on the evaporator. Once this has completed, the
ice tray will tilt backwards and the remaining water in the ice tray is drained back into the water
reservoir. The ice cubes are then dropped from the evaporator and pushed forward into the ice
basket by the ice shovel. The ice tray will automatically move back into position under the evapora-
tor and start the next cycle.
The" " indicator will light up when the ice basket is full and then the ice maker will stop the
ice-making cycle automatically. Gently remove the ice from the ice basket with the ice scoop. About
5 seconds later, the ice maker will restart its ice-making function automatically.
The" ", indicator will light up when the water reservoir is lack of water and
the ice-making cycle will stop automatically. At that time, remove the ice basket and add water to
the water reservoir, and then press " " key again to restart the ice-making cycle.
When you have gotten your desired amount of ice, stop the ice-making cycle by pressing the " "
key and unplug the unit from the wall outlet.
Open the top lid and transfer the ice to a freezer.
5.
6.
7.
8.
9.
10.
11.
12.
13.
USING YOUR ICE MAKER
NOTE: Please make sure to let the ice maker rest for 30 minutes before plugging if it has been moved.
NOTE: The ice machine is not a freezer. Please use the ice ASAP or transfer it to your freezer.
NOTE: Do not fill above the MAX water level mark.
15

To keep your ice tasting fetch and your ice maker looking great, we recommend cleaning your
ice maker at least once per week.
Stop the ice-making cycle by pressing the " " key, wait five minutes and unplug
If residual water is found in the ice tray, gently push the ice tray back so that all water drains into
the water reservoir.
Move the appliance forward to a place 60mm away from the working table and open the drain plug
to drain out excess water (sce Fig.l, Fig.2 and Fig.3).
Check and make sure the drain plug is properly closed. Fill the water reservoir with clean water,
press " " until the " " indicator flashes, then press the " " key, the pump will start to pump
water and keep running for 6 minutes, and it will enter into standby state. Finally, open the drain
plug and empty the water.
Remove the ice basket.
Clean the ice maker interior with a soft cloth soaked with warm water and vinegar, then rinse with
clean water and then drain all the water.
Replace the drain plug well in position Wash the ice basket and ice scoop with soap and warm
water. Rinse and dry.
Clean the exterior of the ice maker with a soft damp cloth. Use a mild dishwashing soap,
if necessary.
1.
2.
3.
4.
5.
6.
7.
8.
Please empty the water reservoir and dry it for storage if the ice maker will not be used for a long
time.
9.
CLEANING AND MAINTENANCE
Fig.1 Fig.2 Fig.3
NOTE: Do not use organic solvent, boiled water, detergent, strong acid and strong alkali etc,
for cleaning.
16

TROUBLESHOOTING
Indicator turns on
The ice maker stops
working.
The ice basket is full
but the " " indicator
does not illuminate.
Indicator lights up
Indicator blinks
PROBLEM POSSIBLE CAUSES SOLUTION
1. Low water level or lack of
water
2. The water screen at the
bottom of the water reservoir
is blocked.
3. Pump malfunction.
1. Ice basket is full and the
infrared light is blocked by the
ice.
2. Infrared light-emitting diode
& light-receiving diode do not
work.
The ice shovel is blocked.
The ice tray is not in the right
position.
The "ice full" condition can not
be detected as the infrared
light module is interfered by
sunlight.
1. Stop making ice, refill water and
then press " " key to restart
ice-making cycle.
2. Do cleaning.
3. Send it to the authorized
department for repair.
Please remove the ice if the ice
shovel is blocked by ice, otherwise,
call customer service for
consultation.
Unplug the appliance and move it
to a place which is not exposed to
the sunlight, then plug the
appliance and activate it again.
1. Remove the ice in the ice tray and
press the " "key to restart the
appliance.
2. Call customer service if the
appliance still does not work after
restart.
1. Remove the ice from the ice
basket.
2a. Wipe up the foreign objects on
the infrared light-emitting diode &
light-receiving diode and restart the
ice maker.
2b. Call customer service if the
infrared light-emitting diode &
light-receiving diode still do not work
after wiping up the foreign objects on
them and restarting the ice maker.
17

The ice collects
together.
The ice-making cycle
seems normal but no
ice is produced.
Poor ice-making
result.
PROBLEM POSSIBLE CAUSES SOLUTION
Refrigerating system leaks.
Refrigerating system blocks.
Call customer service.
Call customer service.
Making ice takes too much time.
The water in the water reservoir
is of too low temperature.
The ambient temperature or
water temperature is too high.
Stop making ice and restart the
ice-making cycle after the ice melts.
Fill the water reservoir with water
ranges between 46.4℉ and 77℉.
Start the ice-making cycle with an
ambient temperature less than
89.6℉ environment and fill the water
reservoir with some cold water.
1. Poor heat dissipation.
2. The water temperature is
too high.
3. The ambient temperature is
too high.
1. Leave a 6-inch (l5cm) clearance
on all sides of the ice maker for
proper ventilation.
2. Fill the water reservoir with water
ranges between 46.4℉ and 82.4℉.
3. Operate the ice maker in an
environment with ambient
temperature between 50℉ and
89℉.
18

This device complies with Part 15 of the FCC Rules. Operation is subject to the following two
conditions:
FCC STATEMENT
(1) This device may not cause harmful interference, and
(2) This device must accept any interference received, including interference that may cause undesired
operation. This device must accept any interference received, including interference that may cause
undesired operation.
Any changes or modifications not expressly approved by the party responsible for compliance
could void the user’s authority to operate this equipment.
This equipment has been tested and found to comply with the limits for a Class B digital device,
pursuant to Part 15 of the FCC Rules.
These limits are designed to provide reasonable protection against harmful interference in a residential
installation.
This equipment generates, uses and can radiate radio frequency energy and, if not installed and used in
accordance with the instructions, may cause harmful interference to radio communications. However,
there is no guarantee that interference will not occur in a particular installation.
If this equipment does cause harmful interference to radio or television reception, which can be
determined by turning the equipment off and on, the user is encouraged to try to correct the
interference by one of the following.
Reorient or relocate the receiving antenna.
Connect the equipment into an outlet on a circuit different from that to which the receiver is
connected.
Increase the separation between the equipment and receiver.
Consult the dealer or an experienced radio/TV technician for help.
MEASURES:
FCC RADIATION EXPOSURE STATEMENT
This equipment complies with FCC radiation exposure limits set forth for an uncontrolled environment.
End users must follow the specific operating instructions for satisfying RF exposure compliance.
To maintain compliance with FCC RF exposure compliance requirements, please follow operation
instructions as documented in this manual.
This transmitter must not be co-located or operating in conjunction with any other antenna or
transmitter.
19

This equipment should be installed and operated with a minimum distance of 20cm between the
radiator and your body.
The availability of some specific channels and/or operational frequency bands are country dependent
and are firmware programmed at the factory to match the intended destination.
The firmware setting is not accessible by the end user.
TECHNICAL PARAMETERS
IM2200BA-ULModel:
ST/SN/N/TAppliance Climate:
I
AMP 1.8A 120V AC 60HZ
Class:
Electrical Rating:
130WRated Power:
R600a/0.0605LBSRefrigerant/Refrigerant Amount:
Upper limit: 290Psig / Lower limit:138Psig
C5H10
11KG
SUS430
Design Pressure:
Foaming Agent:
Net Weight:
Housing:
9.69*15.75*16.93 inUnit Size (W*D*H):
20
Table of contents
Other CROWNFUL Ice Maker manuals


Popular Ice Maker manuals by other brands

Hoshizaki
Hoshizaki KM-115B instruction manual

Moosoo
Moosoo YT-E-005D operating instructions

Whirlpool
Whirlpool Cornelius JEACS50SLF1 Use & care guide

White and Brown
White and Brown TG 570 Fresca user manual

Follett
Follett Horizon Elite 1400 Series Operation and service manual

Cornelius
Cornelius CR-1200 Service maintenance manual


