frozy FR25 SI User manual

Buz Makineleri
Ice Makers
USER MANUAL

01
Max 5 Bar
Min 1 Bar
02
03
04

07
08
0505
06
On-Off
Ice Size Dim
Cleaning
10 cm
10 cm
20 cm

Location: In case the unit is located in an area with no side
ventilation, ice making capacity will be decreased by 20%
of the posted limit. Leaving enough room around the unit
will allow the unit work properly. Normal ice-production
capacity is directly relevant with the condenser air delta
temperature, water temperature, states of the condenser
air channel and age of the machine.
Location: The ice machine must be located inside
temperature controlled room. Running the ice machine
outdoors or in an area that the temperature can go
outside of the working limits may harm the machine,
and your warranty may become void. Ice machines are
designed and built with the highest respect for security.

Dear Customer,
Your Ice-Maker was manufactured at the Eskişehir Facilities of
TASİS Makine Mühendislik Sanayi ve Ticaret A.Ş.
Please always have your Ice Maker installed by an Authorized Service.
Your manufacturer’s warranty might become void in the case your Ice Maker has
been installed by a third party service.
NOTE:
This User’s Manual has been issued for several models.
Some features mentioned in this manual (indicated by *) may not be available on
your product.
“READ THE INSTRUCTIONS BEFORE ASSEMBLING OR USING THIS ICE MAKER.”
This product has been manufactured in environment-friendly modern facilities
without harming the environment.

TABLE OF CONTENTS
Chapter 01..... Safety warnings
Chapter 02..... General Outlook and Technical Specifications
Chapter 03..... Installation of Your Ice Maker
Chapter 04..... Operating Instructions
Chapter 05..... Cleaning and Maintenance
Chapter 06..... Troubleshooting
Chapter 07..... Warranty Information

Chapter 01. Safety warnings
1. Always plug in your product to a grounded power outlet.
2. Your ice maker is designed to operate at voltage shown on Technical Table.
Running the product at a different voltage may cause the product to become
dysfunctional or even may cause fire.
3. Do not place your ice maker next to any heat source.
4. Set up your ice maker at a humidity-free location and with un-obstructed air
circulation around the unit.
5. After the installation is done, do not move your ice maker and wait for at least
two hours to start it.
6. Make sure you cleaned the inside surface of your product before first use.
7. Do not use power strips or extension cords to run your product.
8. Protect the power cord against hot surfaces.
9. Do not let un-trained and/or unsupervised children younger than 8 years old
operate your ice maker.
10. The cleaning and maintenance of the device should not be made by children
unless they are under supervision. (Whoever wrote this must have had a bad
experience or trouble with children)
NOTE
This product bears (AEEE/WEEE) classification symbols indicating waste electric
and electronic equipments. Accordingly, the user must comply with the European
directive 2002/96/EC on recycling for the purpose of minimizing the impact of the
waste product on the environment. It is recommended to communicate with local
authorities about waste disposal.
Caution! This contains information necessary for prevention of serious hazards
which may cause the product to become dysfunctional, or may cause injury or loss
of life and property during the use of the product.
Warning against electric shock.
This indicates the explanatory and facilitating information related to use of the
product.

Chapter 02. General Outlook and Technical Specifications
Ice Storage Bin
Stainless Steel
Body
Ventilation
Filter
Button Group
Adjustable Leg*
Small differences in color and other variations are possible for different visualization, imaging technologies
or other technical reasons. The manufacturer is not liable for these differences and deviations. No rights can
be obtained due to typographical errors, product descriptions or obvious errors on the website.
* Adjustable legs can vary according to product models.

Technical Table
(*) Indicates the daily ice making capacity of the product at 20 OC Ambient and 10 OC Water Inlet temperature.
The presence of particles in the water due to quality of the water source and / or contamination with dirt,
installation residue, burrs, slag and so on will adversely affect the operation of the ice maker. Such
contamination may cause inefficient operation, no ice making, loud noises, etc. Problems with the machine
due to plumbing and/or calcified water are not covered by the warranty.

Chapter 03. Installation of Ice Maker
Selection of Location for Your Product
Your product should not be in direct contact with or in close proximity to any heat
source.
You should leave at least 10 cm of distance if you place your ice maker next to
other electrical equipment (such as ovens, computers etc,) that are considered as
heat sources.
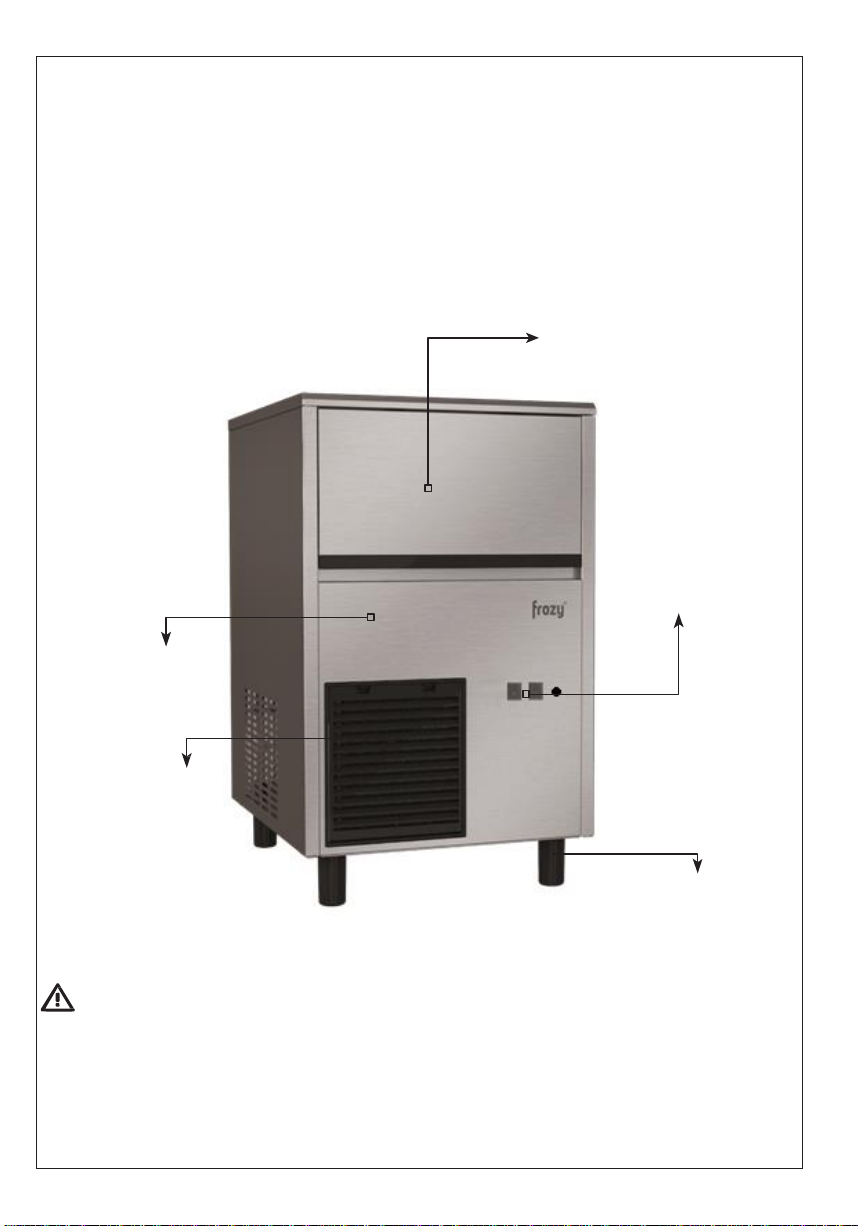
If the product is to be placed next to a wall, the distance between the back surface
of the product and the wall should not be less than 20 cm (See Figure-7).
Do not place objects in front of the ventilation filter of your ice maker that might
prevent air circulation into your product.
Do not place your product outdoors. This product is designed to be used indoors.
Electrical Connection
The voltage and frequency values of the main power supply have to be the same
as written on the product label. If you are in doubt or need assistance, please
contact the nearest Authorized Service or get help from a qualified electrician.
Make sure your power outlet has been grounded.
The amperage of the circuit breaker to which the product will be plugged in should
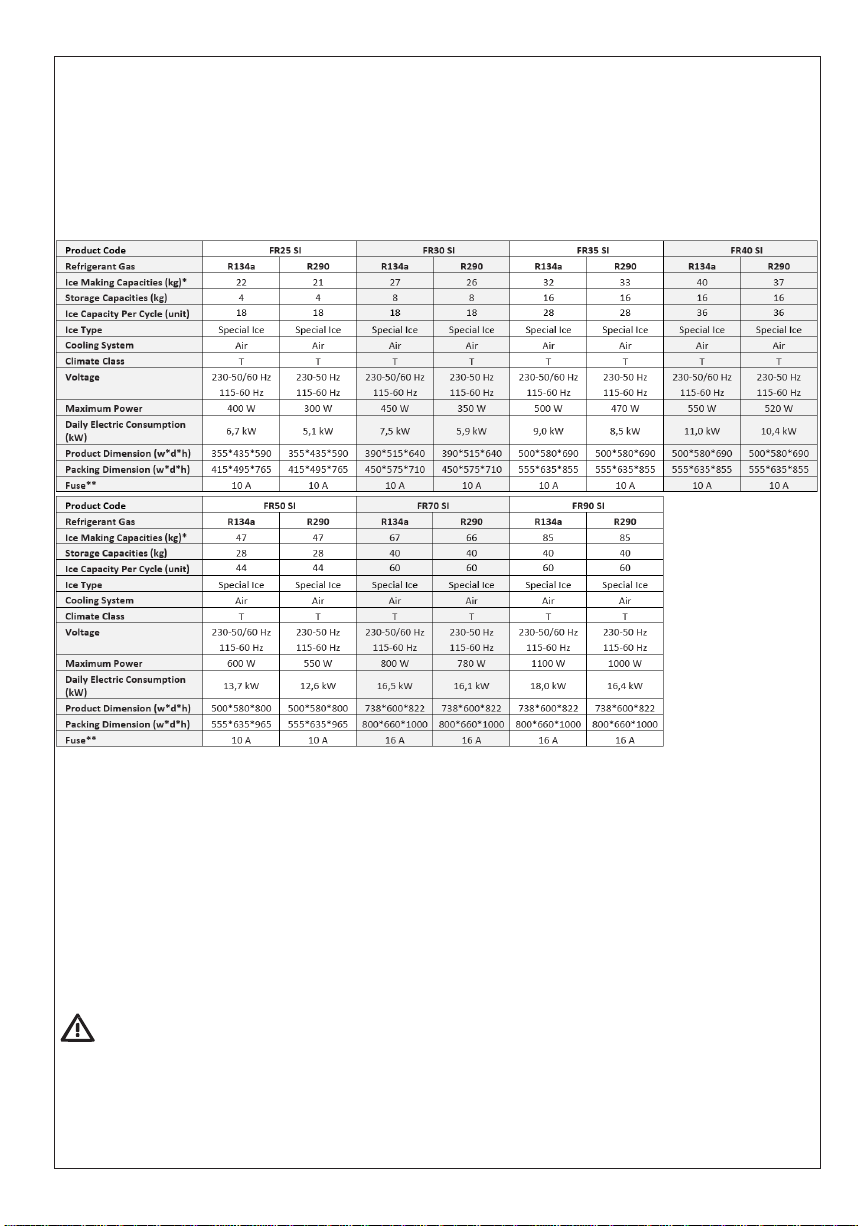
be 10A**. (See Technical Table / Entry fuse section.)
Do not use power strips with multi sockets or extension cords to operate your
product.
Water Use and Connection
Your ice maker is designed to make ice cubes within the most ideal time and size.
However, it is important to note that there are some things that will affect the
quality of the ice produced by the machine, as well as the health of the internal
components of the ice maker.
The Main Water Supply
Should be good for human consumption,
Should have an optimum level of hardness,
Should include minimal amount of chlorine.
The optimum water filters to be used on your product are available and can be
purchased from your Authorized Service.
Water temperature should be between 10°C and 30°C

Installation
Remove and disassemble all packaging materials of the product before
installation.
The ice wire, waterproofing plastics and the ice scoop are provided inside the
product. If any part or accessory is missing, please contact our customer services.
Clean the inner body with warm water and a soft cloth before using the ice maker.
Clean the ice trays with warm soapy water. Dry with a soft, cotton cloth. After
placing the ice maker at the installation point, wait 2 (two) hours before operating
to get the cooling system pressure stabilized. Install the parts inside the ice maker
in accordance with the assembly instructions.
The cold water inlet must not exceed the operating water pressure (5 Bar)
indicated on the technical data sheet. If the line pressure is higher than 5 Bar, a
pressure reducer must be installed.
Connect your device to the mono phase - grounded power supply of the rating
indicated on the nameplate. Your device is designed to function normally within
± 10% of the main voltage. If this range cannot be provided in your local power
network, it is recommended to use a voltage regulator.
If it is necessary to change the location of your ice maker, be sure to transport the
unit according to the markings on the original packaging of the device.
Protect your device against factors that may damage the package and the device
(moisture, water, impact, chemical, etc.).
Only Authorized Service should disassemble the device. Never interfere with the
internal parts and elements of the ice-maker.
The device must be commissioned by the Authorized Service.
Failure to comply with the above conditions will void your product warranty.
Do not leave packaging materials (plastic bags, nylon, etc.) within the reach of
children.
The manufacturer reserves the right to change the information in this manual.
Therefore; this booklet does not constitute a commitment to specifications.

Chapter 04. Use of the Ice Maker
Operating the Ice Maker
After installing your Ice Maker following the instructions above and making all
necessary connections;
1. Make sure that the power outlet you are using for your ice-maker is live and
has power.
2. Turn on the water.
3. Set the On-Off button at the front of your product to the On position. (When
you set it to the On position, the power light on the button will turn on.)
4. The product will automatically go into a delay-time mode for 1 minute after
it is turned on.
5. At the end of the delay-time mode, the product will start getting water and
making ice.
6. Your product will complete the ice-making cycle after a certain time,
depending on the ambient and water temperature.
7. To change the size of the ice made by the machine, adjust the potentiometer
in the direction of the arrow. (See Figure-2).
NOTE
In order to allow your product to make ice in the optimum size and time, you
need to wait for at least 2 hours after the installation, before turning on the
machine.
Shutting Off The Ice Maker
Set the power button at the front of your Ice Maker to “Off” position.
Unplug the product if you are not going to use the ice-maker for a long time.
Turn off the water.
There are some malfunction and warning signals defined for the Red light on the
power button of the product as detailed in the chart below.
Function Mode
On
Off
Cleaning
3 sec
1 sec
Fault
3 sec
3 sec
Ice Bin Full
1 sec
1 sec

Chapter 05. Cleaning and Maintenance of Your Ice Maker
Safety rules must be observed before cleaning your Ice Maker:
1. Unless otherwise specified, turn off and unplug the unit before starting to
clean the Ice Maker.
2. The outer casing of the product should only be cleaned by wiping with a
damp cloth. Do not spray the unit with water or any other cleaning solvent.
This causes undesired electrical failures and jeopardizes the safety of the
user.
3. Always wear protective gloves and similar protective equipment during
cleaning.
4. Never use cleaning agents and chemicals which may cause cutting, piercing
and corrosion to your product. Your Ice Maker will be out of warranty if
chemicals are used for cleaning.
5. Do not use any cleaning agents not recommended by your Authorized
Service.
Exterior Cleaning of the Ice Maker
The exterior of your ice-maker is made of stainless steel. Wipe the exterior surfaces
with a cotton damp cloth or a sponge and then wipe it with a dry, clean cotton cloth.
Cleaning of the Sprayer System
1. Make sure the water and electrical connections of the product are off, in
compliance with the cleaning instructions above.
2. Remove all the ice from the storage bin.
3. The power switch should be off, and the water inlet valve should be opened.
4. Remove the wire located inside the pool and then remove the level discharge
plastic from its slot, and ensure the water to be discharged. (See Figure-3)
5. Place the level discharge plastic back to its slot after discharging the water
inside the pool. (See Figure-4)
6. Then, pour the cleaning solution recommended by Authorized Service into the
water pool.
7. Select the ‘cleaning’ setting on your product, then turn the power switch to the
“On” position. WITHIN 30 SEC OF TURNING ON THE POWER, YOU MUST PRESS
AND HOLD THE ‘CLEANING’ BUTTON FOR 8 SEC. (See Figure-5)
8. The cleaning process will continue for 10 minutes.
9. At the end of the cleaning cycle, remove all the produced ice from the storage
bin.

Do not turn off the product while cleaning is in progress.
After the cleaning process, discharge the water inside the water pool. (See figure 3)
Right after this cleaning, the Ice Set must be cleaned.
Cleaning of the Ice Set
To remove the top cover, remove the screws in “Figure-6”. Remove the plastic cover
on the cooling pipes. Clean the cooling pipes and visible surfaces in the tank with
cleaning solution / soapy cloth. Then rinse and then dry. Close the plastic cover that
protects the cooling system pipes and then close the top cover of the product. Then
replace the screws.
Cleaning of the Ice Storage Bin
1. To clean the ice tank, first turn the power switch to the “Off” position. Then
disconnect the product from the main power supply.
2. Drain the ice completely from the ice tray.
3. Wipe the inside of the container with cleaning solution / soapy cloth and then
rinse / dry.
4. Take care not to allow any lime and/or cleaning solution residue to remain.
Cleaning of the Water Inlet Filter
1. Disconnect the Ice Maker from main power supply.
2. Disconnect the water connection of your ice maker.
3. Remove the water inlet filter. (The frequency of cartridge replacement varies
depending on the usage period, but it is recommended to change every 6
months.)
4. Follow the filter manufacturer's maintenance and cleaning instructions /
recommendations to perform cleaning and maintenance of the water inlet filter.
Then return the Ice Maker to operation by following the installation instructions.
The applications specified in the product cleaning instructions should be performed
at least 4-5 times a year.

Chapter 06. Actions to be Taken Before Calling Authorized
Service
Malfunction
Probable
Reason
Solution
Ice Maker does not
work
Power button is
Off.
Set the power button to the “On” position.
The power
connection is
faulty.
Get the power connection checked by a
qualified electrician.
The Ice Maker is
in protection
mode.
Check the place selection instructions of the
ice maker. Ice Maker does not receive
adequate amount of air.
No power in the
outlet.
Check the fuse connected to the outlet.
The compressor
stops shortly after it
starts working
Ambient
temperature is
very high
Check the place selection instructions of the
ice maker. Ice Maker does not receive
adequate amount of air. Clean the
ventilation filter.
Grid voltage is
low
Get the power connection checked by a
qualified electrician.
Ice Set is cooled but
the water inside the
water pool is
insufficient
Water valve is
faulty
Contact the nearest Authorized Service.
Main water
pressure is low
Make sure that the main water pressure is
greater than 1 Bar.
Pool’s discharge
plastic seeps
Place the pool’s discharge plastic to its slot
tightly.
Ices are not
transparent
Water nozzle is
blocked
Water nozzle sprayer should be checked.
The blocked nozzles should be cleaned.
Water pool is
dirty
Clean the Ice Maker by following the
cleaning instructions.
Pressure of the
water pump is
low
Contact the nearest Authorized Service.
The water is
blurry / dirty /
chlorinated
Use a water filter.

Ices are much
smaller than they
should be.
Water is
insufficient
Place the pool’s discharge plastic to its slot
tightly.
Cooling system
is faulty
Check the water main connection for the
water leakage. Contact the nearest
Authorized Service.
Ices are much
bigger than they
should be.
Time setting is
incorrect
Set the time on the electronic card to a
lower value.
Sensor is faulty
Contact the nearest Authorized Service.
The quantity of the
ice is insufficient
Gas leakage in
the defrost
solenoid
Contact the nearest Authorized Service.
Water valve is
faulty
Contact the nearest Authorized Service.
Device does not
stop when the ice
tank is full
Sensor is faulty
Contact the nearest Authorized Service.

Chapter 07. Scope of Warranty
Dear Customer,
This warranty provided by our company does not cover the repair of defects
caused by unusual use of the ice maker, and the following items are excluded
from the warranty.
Malfunctions and damages caused by the operator during use,
Malfunctions and damages that occurred during shipment or during loading or
unloading and during delivery to the end-user,
Malfunctions and damages that occurred due to low or high voltage, usage
contrary to the voltage written on the label of the product and the electrical
installation,
Malfunctions and damages that occurred after any fire or lightning during use,
Malfunctions resulting from use of the product contrary to the warnings and
methods specified in the user manual,
The repairing of the above-mentioned malfunctions shall not be included in the
scope of the warranty, the repair shall be charged.
The shipment to the place of use and the assembly of the product are excluded
from the product price.
The responsibility for confirming and granting Warranty Certificate to the
consumer shall belong to the seller, reseller, agency or representation from
which the consumer bought the good.
The warranty is valid for the period mentioned in the warranty certificate and
only for the malfunctions that occurred in the product; no other claims, for a
refund, repair or replacement shall be done. In the case that any
destruction/falsification of the original serial number recorded on the warranty
certificate and on the product is found, the product shall be out of warranty. As
for the repairs within the scope of the warranty, only the services specified in the
warranty certificate or on our website are authorized.

Measuring the Mains Water Supply Hardness and Use of Water Filter
NOTE:
...........................................................................................................................................
...........................................................................................................................................
...........................................................................................................................................
...........................................................................................................................................
...........................................................................................................................................
...........................................................................................................................................
...........................................................................................................................................
...........................................................................................................................................
...........................................................................................................................................
...........................................................................................................................................
...........................................................................................................................................
............................................................................................................................................
............................................................................................................................................


16
110122010
0
This manual suits for next models
6
Table of contents