Crystal air UV PRO 550 User manual

UV PRO 550, 550T, 1100, 1100T
ozone generator instruction manual
****IMPORTANT****
PLEASE RETAIN THE SHIPPING BOX AND PACKING FOR FUTURE USE!
If the product needs to be returned for any reason there may be a packing charge if the original packing is not
used!

550 /550T / 1100/ 1100T operation and maintenance instructions
IMPORTANT!!!!!
1. Read instructions thoroughly before operating!!
2. After shipping the unit via courier or after rough handling such as falling off a shelf open cabinet by following
step 1 of the cleaning instructions. Check to make sure the UV tubes are in place. If the tubes have come out of
place, re install them. If they are broken, wearing rubber gloves clean the glass out and replace the tubes.
CAUTION, THIS OZONE GENERATOR PRODUCES DANGEROUS ULTRAVIOLET LIGHT,
DISCONNECT POWER BEFORE OPENING TO SERVICE
SPECIFICATIONS FOR 550 & 1100T SERIES OZONE GENERATOR
Maximum output 550:(550mg/hr) / 1100T:(1100mg/hr)
Fan (rated cfm) 105 cfm
Filter 1 Cleanable foam filters
Cabinet material PVC outer cabinet with stainless steel inner chassis
Generation method Ultraviolet Light
Weight and size 550:(10lb) / 1100T:(12.6lb) 23" long x 5 wide x 6 5/8 height (including handle)
INTRODUCTION
This line of ozone generators are designed for various uses. This ozone generator can be used for many uses such
as deodorizing cars homes as well as oxidizing many organic contaminants.
WARRANTY (please refer to complete warranty attached)
The 550 is warranted against defects in materials and workmanship for a period of 6 years from date of purchase.
Liability is limited to parts and labor only. Shipping is the sole responsibility of the customer. CAPS is not liable
for damage caused by shipping, misuse, neglect or lack of regular maintenance.
LIABILITY
CAPS assumes no responsibility for any damage done to items from the use or miss use of any product sold or
manufactured by CAPS . It is the customers responsibility to test materials prior to use and to ensure that the
procedure and installation technique they are using is correct for the application.
HEALTH AND SAFETY
Ozone can be an irritant and a powerful oxidizing agent. As with most all products, ozone is dangerous only when
used improperly, as such it is important to follow safe usage guide lines.
*When doing a shock treatment, no people plants or pets/animals may be in the room when the unit is running.*
The room should not be re entered until all ozone has been depleted unless proper breathing respirators are used.
MAINTENANCE FREQUENCY
Under heavy duty use or severely polluted areas, The ozone generator filter should be inspected and cleaned if
necessary every 2 to 3 weeks. Inspect the UV tubes for fine dust or residue collecting on UV generator tube
surfaces. Light duty use requires cleaning every 2 to 6 months depending on the severity of pollution in the feed
air. In dirty conditions cleaning can be as often as 4-6 weeks.
DESCRIPTION OF OZONE GENERATOR
These ozone generators produce ozone by UV light, converting normal oxygen to ozone gas which is a very strong
oxidizing agent used to destroy odors and other organic contaminants.
PLACEMENT OF UNIT
This ozone generator is designed as a portable commercial deodorizing device. It uses 120VAC for North America,
and 220-240VAC for European countries etc. European models come with an IEC connector and it is up to the
customer to supply the proper cord (this can be acquired at any computer shop).
Please note the following points when placing the unit.
-Place on a flat solid surface such as a table or shelf. Do not place on rug flooring to reduce dust entering the unit
-Do not place in an area where the unit could be splashed with water, moisture or in an area that it could get
flooded with water.
-Ensure that the unit gets proper fresh air flow. Do not obstruct the incoming or outgoing air from the unit.
-If used in temperatures below freezing, ensure that condensation inside the unit does not occur.
-Set the unit in an area where it will provide the best ozone distribution.
-The use of circulation fan will greatly increase the efficiency of the treatment.
-If the ozone generator being used is large enough to treat the whole house, the air handling system can be used
to distribute the ozone, just point the ozone generator into the return air duct of the air handler, and turn the fan
on to run constantly (summer fan setting on most furnaces).
550 / 1100T operation and maintenance instructions
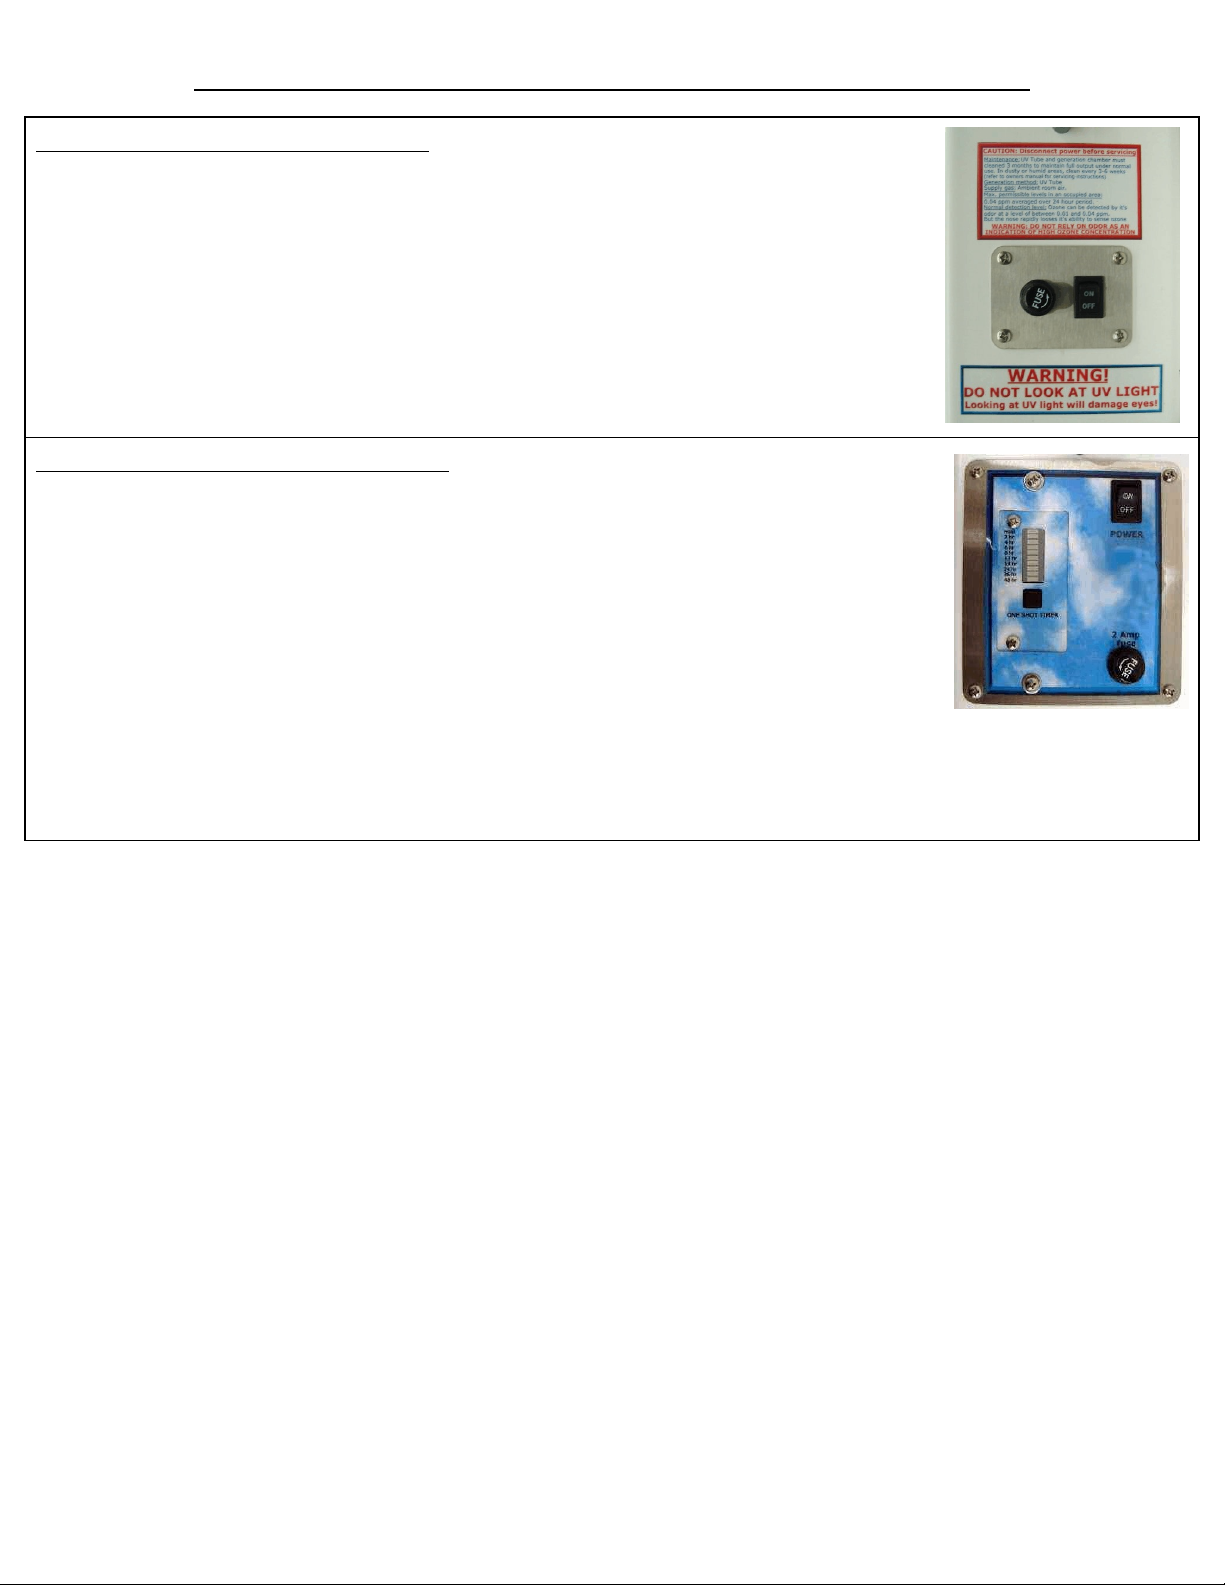
SETTING OF MACHINE, 550 & 1100
(Refer to ozone application/usage instructions for more detailed instructions.)
1. This series has controls that feature a On/off switch to power the unit and fan. Ozone
production begins when the power switch is turned on or when the timer is set to go on.
2. This unit is designed exclusively for shock treatments.
SETTING OF MACHINE 550T & 1100T
(Refer to ozone application/usage instructions for more detailed instructions.)
1. This series has controls that feature a On/off switch to power the unit and fan. Ozone
production begins when the power switch is turned on or when the timer is set to go on.
2. This unit is designed exclusively for shock treatments.
3. The CAMI one shot timer is designed to allow the user to turn on the ozone generator
and have it turn off after a given amount of time. Depending on the ozone generator
model purchased your timer may or may not have the same settings as the one shown in
the pictures however the operation will be the same.
A. To turn the timer on to constant run (hold) simply press the button once, the top
green LED will light up and after about 2 seconds the machine will turn on.
B. To set the timer for a one shot timed operation press the button several times until the LED beside the desired
amount of time is lit up, after about 2 seconds the machine will start.
C. To stop the operation of the timer press and hold the button for 3 seconds until the LED goes out and the
machine stops.
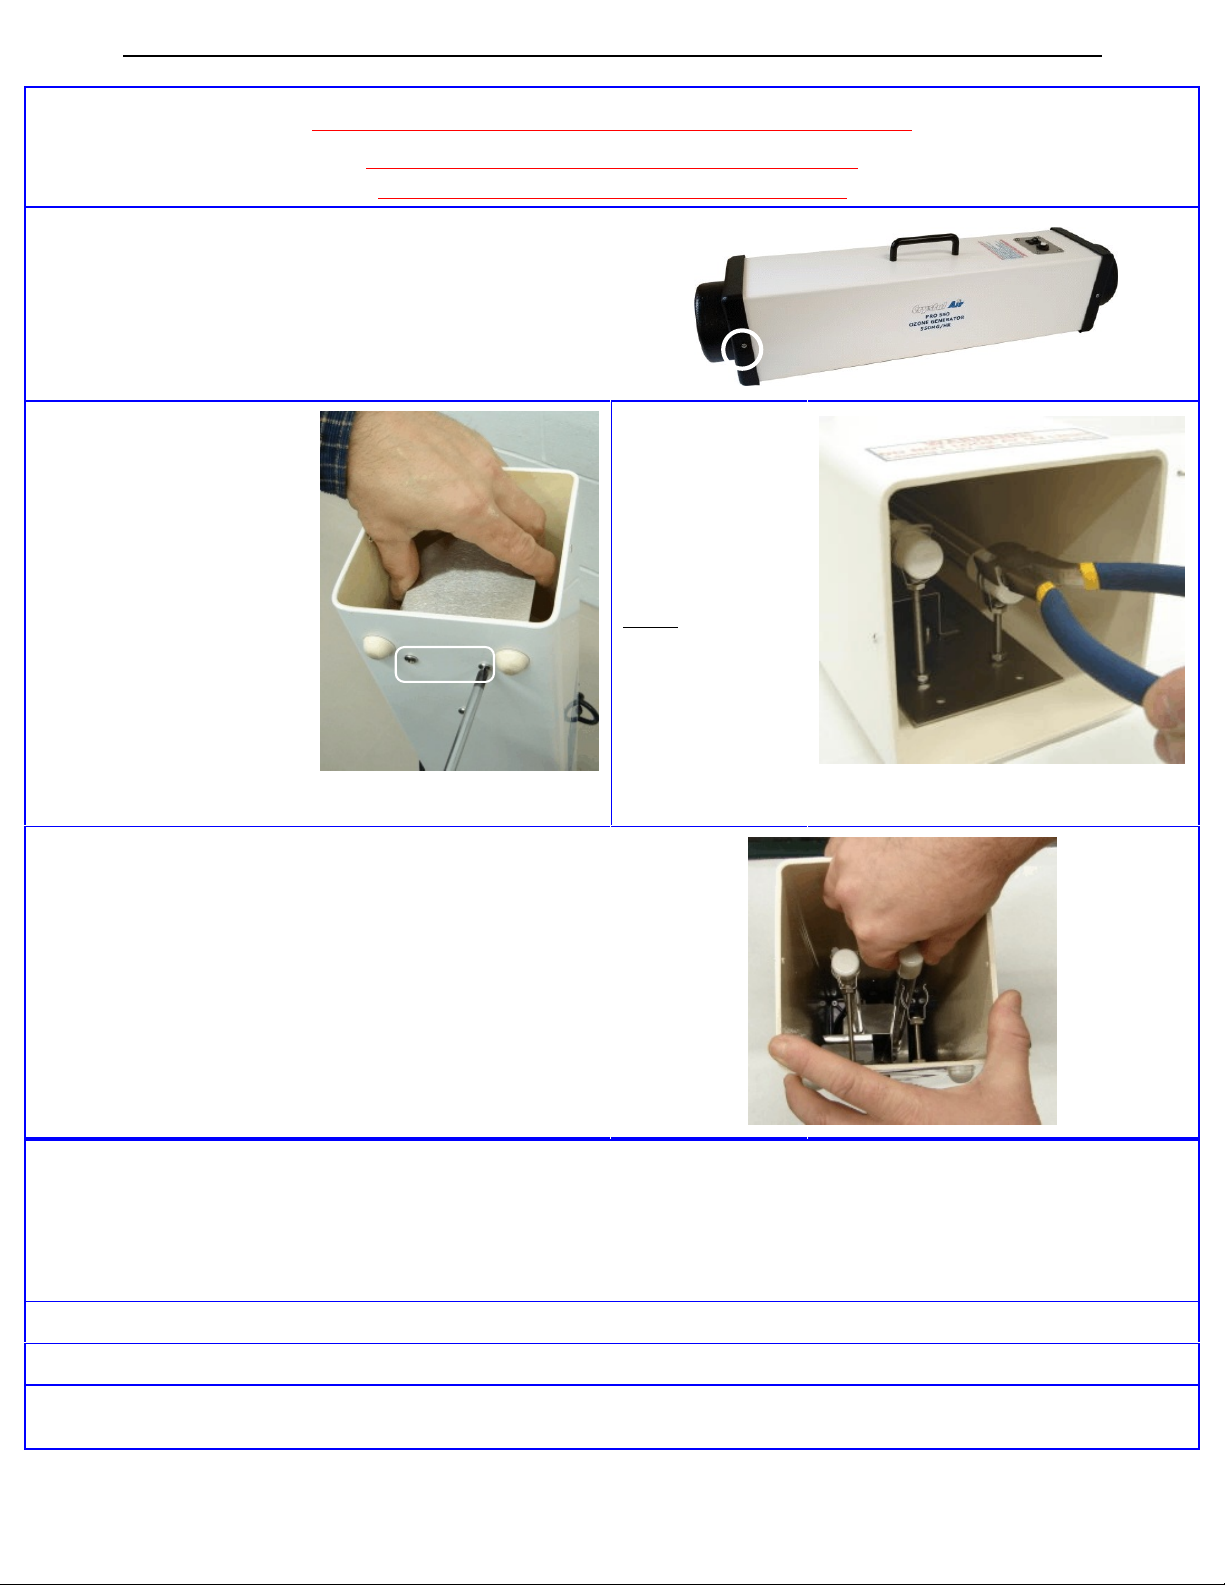
UV 550 / 1100T TUBE REMOVAL & CLEANING INSTRUCTIONS
DISCONNECT POWER BEFORE SERVICING
DO NOT LOOK AT UV LIGHT
DO NOT OPERATE WITH end cap OFF!!
1. Remove the 2 Philips (star) screws form each side of
the black end cap from the output end opposite of the
handle end as shown. Remove the cap and set it aside
2. Remove the 2 Philips
(star) screws form the
bottom of the machine at
the end that the cap was
removed from. These are
the 2 screws that are
between the rubber feet.
Hold the deflector while
removing the screws.
3. Using side
cutters or strong
scissors clip the
cable ties that
hold the tubes in
place and remove
the ties.
NOTE that if you
plan on shipping
the unit these
ties MUST be
replaced.
4. To remove the tube lift the end up out of the stainless
support and pull while wiggling the tube back and forth
being careful not to break it on the steel supports.
5.Take all the tubes and use an alcohol moistened paper towel or a lightly soap and water moistened paper towel to
wipe the tubes down and remove any deposits. If soap water is used then a second wiping with a clean water
moistened paper towel will be required to remove the soap.
-Be very careful not to damage the 2 wires that run the length of the tubes
-Note that using alcohol will allow you to use the ozone generator as soon as it is re assembled.
-If water is used for cleaning allow tubes to dry in a warm place for a couple hours, ensure that they completely dry.
6. If dirty, wipe the inside of the unit with an alcohol soaked paper towel.
7. Remove the filter by removing the two Philips screws on the end with the switch and remove the cap.
8. Clean the foam filter with dish soapy water, and rinse thoroughly and allow to dry completely before re installing.
Replace the filter placing it back into the the ozone generator and re installing the end cap and screws.

UV 550 / 1100T TUBE REMOVAL & CLEANING INSTRUCTIONS
10. Replace the tubes by inserting them with the 2 wires that
run the length facing the top or bottom of the machine.
Wiggle the tube slightly side to side while pushing until the
pins are fully in the socket. The tubes are fully in when the
supports line up approximately the middle of the ceramic
end cap of the UV tube.
Replace the wire ties with new ones, especially if the unit is
to be shipped. Note that the wire ties are standard 3 1/2"
wire (cable) ties available at your local lumber store.
11. Replace the lid and re install the 2 end cap screws. The unit is now ready for use.
This manual suits for next models
3
Table of contents
Popular Portable Generator manuals by other brands


Claind
Claind Nitro70 user manual

Champion
Champion 73531i Owner's Manual and Operating Instructions

POTOMAC INSTRUMENTS INC.
POTOMAC INSTRUMENTS INC. AG-51 instruction manual

ComSonics
ComSonics QAM Marker user guide

Chicago Electric
Chicago Electric 95126 Assembly and operating instructions

RVMP
RVMP Flex Power RVMP-OEM-4L1-RV401 installation manual


