CSC SG250 Instruction Manual

SG250 Owner’s and Service Manual
www.CSCMotorcycles.com
1
Contents
Foreword....................................................................................................................................................... 4
Caution and Warning Symbols...................................................................................................................... 4
Section 1: Owner’s Manual.......................................................................................................................... 5
General Motorcycle Safety Guidance ........................................................................................................... 5
Inspections Before Riding ............................................................................................................................. 6
Motorcycle Specifications............................................................................................................................. 6
Motorcycle Description................................................................................................................................. 8
Controls......................................................................................................................................................... 9
Ignition Lock and Fork Lock........................................................................................................................... 9
Fork Lock ....................................................................................................................................................... 9
Instruments................................................................................................................................................... 9
Left and Right Handlebar Switchgear ........................................................................................................... 9
Fuel, Fuel Tank, Filler Cap, and Petcock...................................................................................................... 10
Choke .......................................................................................................................................................... 11
Load Limits ..................................................................................................................................................11
Tool Kit ........................................................................................................................................................12
Engine Break-In Procedure ......................................................................................................................... 12
Starting the Motorcycle ..............................................................................................................................12
Operating the Motorcycle...........................................................................................................................13
Cleaning the Motorcycle............................................................................................................................. 13
Storing the Motorcycle ............................................................................................................................... 14
Section 2: Service Manual......................................................................................................................... 16
Maintenance Cautions and Warnings......................................................................................................... 16
Component Cleaning................................................................................................................................... 16
Parts Inspection ..........................................................................................................................................17
Maintenance Adjustments.......................................................................................................................... 17
Recommended Tools .................................................................................................................................. 17
Adjustment Specifications .......................................................................................................................... 17
Motorcycle Maintenance Schedule ............................................................................................................18
Torque Values .............................................................................................................................................18
Unpacking ...................................................................................................................................................19
Inspection.................................................................................................................................................... 19
Frame and Body ..........................................................................................................................................19
Brakes.......................................................................................................................................................... 20
Master Cylinder Location............................................................................................................................20
Front Brake Pad Inspection and Replacement............................................................................................ 21
Rear Brake Pad Inspection and Replacement............................................................................................. 22
Front Brake Rotor Inspection...................................................................................................................... 23
Flushing and Replacing the Brake Fluid ...................................................................................................... 24
Bleeding the Brakes .................................................................................................................................... 24
Brake Troubleshooting................................................................................................................................ 24
Power Transmission....................................................................................................................................25
Chain Drive System ..................................................................................................................................... 25

SG250 Owner’s and Service Manual
www.CSCMotorcycles.com
2
Chain Lubrication ........................................................................................................................................25
Chain Adjustment .......................................................................................................................................25
Sprocket and Chain Inspection ...................................................................................................................27
Chain Drive Troubleshooting ......................................................................................................................28
Clutch Maintenance.................................................................................................................................... 28
Clutch Cable Installation and Adjustment .................................................................................................. 29
Clutch Replacement....................................................................................................................................30
Clutch Troubleshooting............................................................................................................................... 39
Suspension ..................................................................................................................................................40
Forks............................................................................................................................................................40
Changing Fork Oil and Replacing Fork Seal.................................................................................................40
Swingarm and Rear Suspension..................................................................................................................44
Swingarm and Rear Suspension Troubleshooting ......................................................................................47
Steering System ..........................................................................................................................................48
Steering Stem Bearing Adjustment............................................................................................................. 48
Steering System Troubleshooting...............................................................................................................50
Wheels and Tires......................................................................................................................................... 50
Front Wheel Removal ................................................................................................................................. 51
Rear Wheel Removal................................................................................................................................... 52
Wheel and Tire Inspection ..........................................................................................................................55
Wheel and Tire Troubleshooting ................................................................................................................ 55
Fixing Flat Tires ........................................................................................................................................... 55
Engine..........................................................................................................................................................58
Oil Change................................................................................................................................................... 58
Spark Plug Removal and Installation...........................................................................................................62
Valve Adjustment........................................................................................................................................62
Carburetor................................................................................................................................................... 69
Air Filter Replacement ................................................................................................................................ 80
Exhaust System ...........................................................................................................................................81
Engine Troubleshooting .............................................................................................................................. 83
Fuel System .................................................................................................................................................84
Fuel System Troubleshooting......................................................................................................................87
Control Cables............................................................................................................................................. 88
Clutch and Throttle Cable Troubleshooting................................................................................................ 88
Electrical System ......................................................................................................................................... 88
Battery.........................................................................................................................................................93
Lighting and Turn Signals ............................................................................................................................ 95
Charging System..........................................................................................................................................97
Starting System .........................................................................................................................................100
Electrical System Troubleshooting............................................................................................................ 105
Electrical Schematic .................................................................................................................................. 107
Appendix A - Service Checklists ................................................................................................................108

SG250 Owner’s and Service Manual
www.CSCMotorcycles.com
3
A Word From Steve
Thank you for purchasing this CSC San Gabriel 250 motorcycle. The SG250 is a great motorcycle and we
are very proud of it. The SG250 is easy to maintain, it’s reliable, and it’s fun. You’ve made a wise
purchase decision.
I want you to know that we value the trust and confidence you have in CSC. Our guiding principle will
always be that our customers come first.
We wish you many miles of safe and enjoyable riding on your new SG250 motorcycle. If there’s
anything we can do to enhance your ownership experience, please let us know.
Thank you again,
Steve Seidner
Founder and CEO
CSC Motorcycles, LLC
1331 W. Foothill Boulevard
Azusa, California 91702
909 445 0900
www.CSCMotorycles.com

SG250 Owner’s and Service Manual
www.CSCMotorcycles.com
4
Foreword
The SG250 Owner’s and Service Manual provides information on operating and maintaining the CSC
SG250 motorcycle. It includes the motorcycle’s technical specifications, performance parameters, and
operating, maintenance, and adjustment data. This manual includes both the Owner’s Manual and the
Service Manual. The Owner’s Manual is included in the first section of this document; the Service
Manual in included in the second section of this document.
CSC Motorcycles stocks all SG250 motorcycle parts, and we recommend that you use only parts and
materials provided by us when servicing or maintaining your motorcycle.
The SG250 Owner’s and Service Manual is provided free to all who purchase a new CSC SG250
motorcycle.
Reproduction of the CSC SG250 Owner’s and Service Manual or posting it online without CSC’s
permission is expressly prohibited.
If you have any questions, please contact CSC Motorcycles by calling us at 909 445 0900 or via email at
info@CSCMotorcycles.com.
Caution and Warning Symbols
Caution and warning symbols in this manual are as follows:
The Caution! symbol indicates a condition that may lead to motorcycle damage.
The Warning! symbol indicates a condition that may lead to injury or death.

SG250 Owner’s and Service Manual
www.CSCMotorcycles.com
5
Section 1: Owner’s Manual
General Motorcycle Safety Guidance
Warning! Do not attempt to ride this motorcycle on public roads if you do not have a motorcycle
license.
Warning! Do not attempt to ride this motorcycle if you do not know how to ride a motorcycle.
Warning! Always wear appropriate motorcycle gear when riding your motorcycle. Never ride your
motorcycle without wearing an approved helmet, a motorcycle jacket, eye protection, gloves,
motorcycle pants, and boots.
Warning! Always remain alert while operating your motorcycle. Pay attention to traffic conditions and
the road surface. Adjust your speed and following distances taking these factors into consideration.
Warning! Never operate your motorcycle while under the influence of drugs or alcohol, or when sleep
deprived.
Warning! The motorcycle’s cylinder, cylinder head, and exhaust system are hot when the motorcycle is
running and after turning it off. Do not touch these items.
Warning! Always maintain appropriate tire pressure. Operating the motorcycle with low tire pressure
will adversely affect the motorcycle’s handling.
Warning! Replace worn tires promptly.
Warning! Never attempt to lubricate the chain by running the engine, putting the motorcycle in gear,
and lifting the rear of the motorcycle. Lubricate the chain with the engine off.
Warning! Make sure the choke is fully open when riding the motorcycle.
Warning! Do not attempt to reach under the tank to open or close the choke while riding the
motorcycle.
Warning! Do not overload the motorcycle or load it unevenly.
Warning! Do not attempt to carry more than one passenger (in addition to the rider).
Warning! Do not attempt to perform “wheelies.”
Caution! Don’t park your motorcycle facing downhill without leaving the motorcycle in gear, or it may
roll forward and fall down.
Caution! Never operate your motorcycle without the air filter, the muffler, and all emissions
components in place. Doing so will reduce performance, damage the engine, and void your warranty.

SG250 Owner’s and Service Manual
www.CSCMotorcycles.com
6
Inspections Before Riding
Before riding your motorcycle, you should check the following:
Both tires are appropriately inflated.
Neither tire has nails nor other foreign objects embedded in the tread or the sidewall.
The fuel tank contains adequate fuel, and the fuel petcock is in the ON position. If the fuel
petcock is in the RESERVE position, fill the fuel tank at the next opportunity.
The crankcase has oil. You can check the oil level using either the dipstick or the crankcase
viewing port.
The turn signals, the front and rear brake lights, the horn, and the headlight all operate when
commanded to do so (the ignition switch must be in the ON position).
The front and rear brake levers have adequate free play.
The front and rear brakes operate.
The forks turn freely from side to side.
The rear-view mirrors are adjusted appropriately.
The engine kill switch is in the RUN position.
The chain has appropriate slack.
Major threaded fasteners are tight. We always hand check the axle nuts, the exhaust header
nuts and bolts, the muffler bolts and nuts (grab the muffler and check it for any side-to-side
play), the steering stem nut, and the front and rear caliper bolts.
Motorcycle Specifications
General
Type
Dual sport
Designation
CSC San Gabriel 250
Colors
Mocha, White, Black, Blue
Fuel
87 octane
Fuel Capacity
4.0 US gallons
Top Speed
Dependent on gearing and rider weight; approximately 70 mph with 15T
countershaft sprocket and 50T rear sprocket. Other gear ratios available
from CSC.
Powertrain
Engine Configuration
Single cylinder, air cooled, 2 valve, carbureted, counterbalanced, choke
SG250 Owner’s and Service Manual
www.CSCMotorcycles.com
7
Bore x Stroke
66.5mm x 66.2mm
Displacement
229.9 cc
Compression Ratio
9.6:1
Horsepower
16.1 @ 7000 rpm
Torque
13.5 ft-lb
Oil Type
10W 40, motorcycle type
Oil Capacity
1.3 quart
Starting
Electric and kick
Primary Type
Gear driven
Transmission
5 speed, constant mesh
Front/Rear Sprockets
15T/50T
Chain Type
428
Brakes
Type
Hydraulic disk front, drum rear
Front Disk Diameter
9.00 inches
Rear Drum Diameter
6.50 inches
Wheels and Tires
Wheels
Aluminum, spoked
Front Tire
90/70/17
Rear Tire
120/70/17
Front & Rear Tire Pressure
36 psi front, 40 psi rear
Switchgear/Controls
Instrumentation
Speedometer, tachometer, odometer, tripmeter, neutral indicator, turn
signal indicator, high beam indicator, fuel gage
Dash Cluster
Keyed ignition switch
Left Handlebar
High/low beam, horn, turn signals, high beam flash, choke
Right Handlebar
Engine kill switch, starter
Chassis and Suspension
Ground Clearance
6.3 inches
Seat Height
26.0 inches
Handlebar Height
35.0 inches
Footpeg Height (rider)
10.0 inches
Footpeg Height (passenger)
16.0 inches
Helmet Lock
Left rear frame
Tool kit
Right frame under battery
Wheelbase
52.0 inches
Weight
273 lbs
Gross Vehicle Weight Rating
573 lbs
Frame
Tubular steel
Rear Suspension Travel
2.3 inches
Front Suspension Type
Telescopic fork, upper fork diameter 32mm, lower fork diameter 43mm
Front Suspension Travel
4.0 inches
Rake
27 degrees
Rear Suspension
Twin nitrogen-charged shocks
SG250 Owner’s and Service Manual
www.CSCMotorcycles.com
8
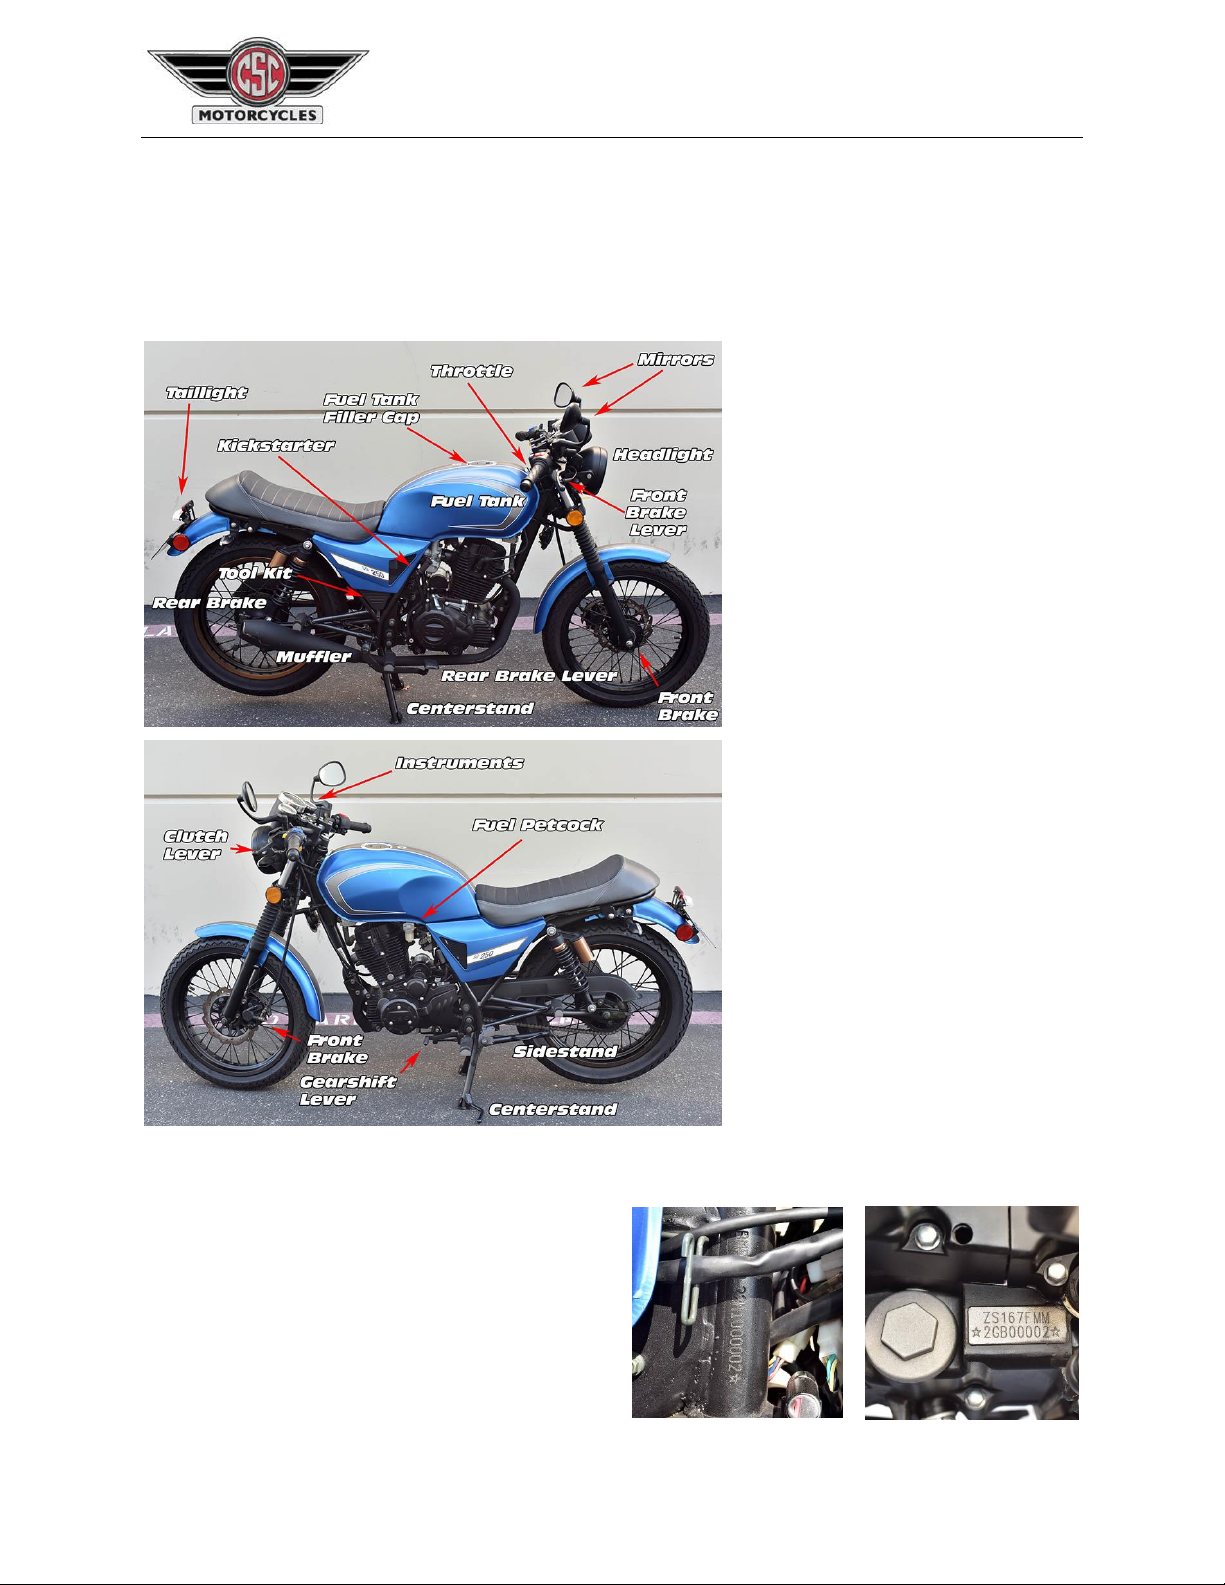
Motorcycle Description
The CSC SG250 motorcycle is a 250cc street motorcycle. The motorcycle has a single-cylinder, 4-stroke,
air-cooled engine and a 5-speed transmission. Major components are identified in the photographs
below.
SG250 Right Side View
SG250 Left Side View
Vehicle Identification Number and Engine Number
The vehicle identification number is located on the
right side of the steering stem, as shown in the
photo to the right.
The engine serial number is shown on the lower left
side of the engine crankcase (behind the shift
lever), as shown in the photo to the right.
SG250 Owner’s and Service Manual
www.CSCMotorcycles.com
9
Controls
The motorcycle is operated with the ignition switch, the instruments, the throttle, the clutch, the front
brake lever, and the rear brake lever. You can start your motorcycle using either the kick starter or the
electric starter. Locations for these items are shown in the photos above and below. Operating the
motorcycle is explained below.
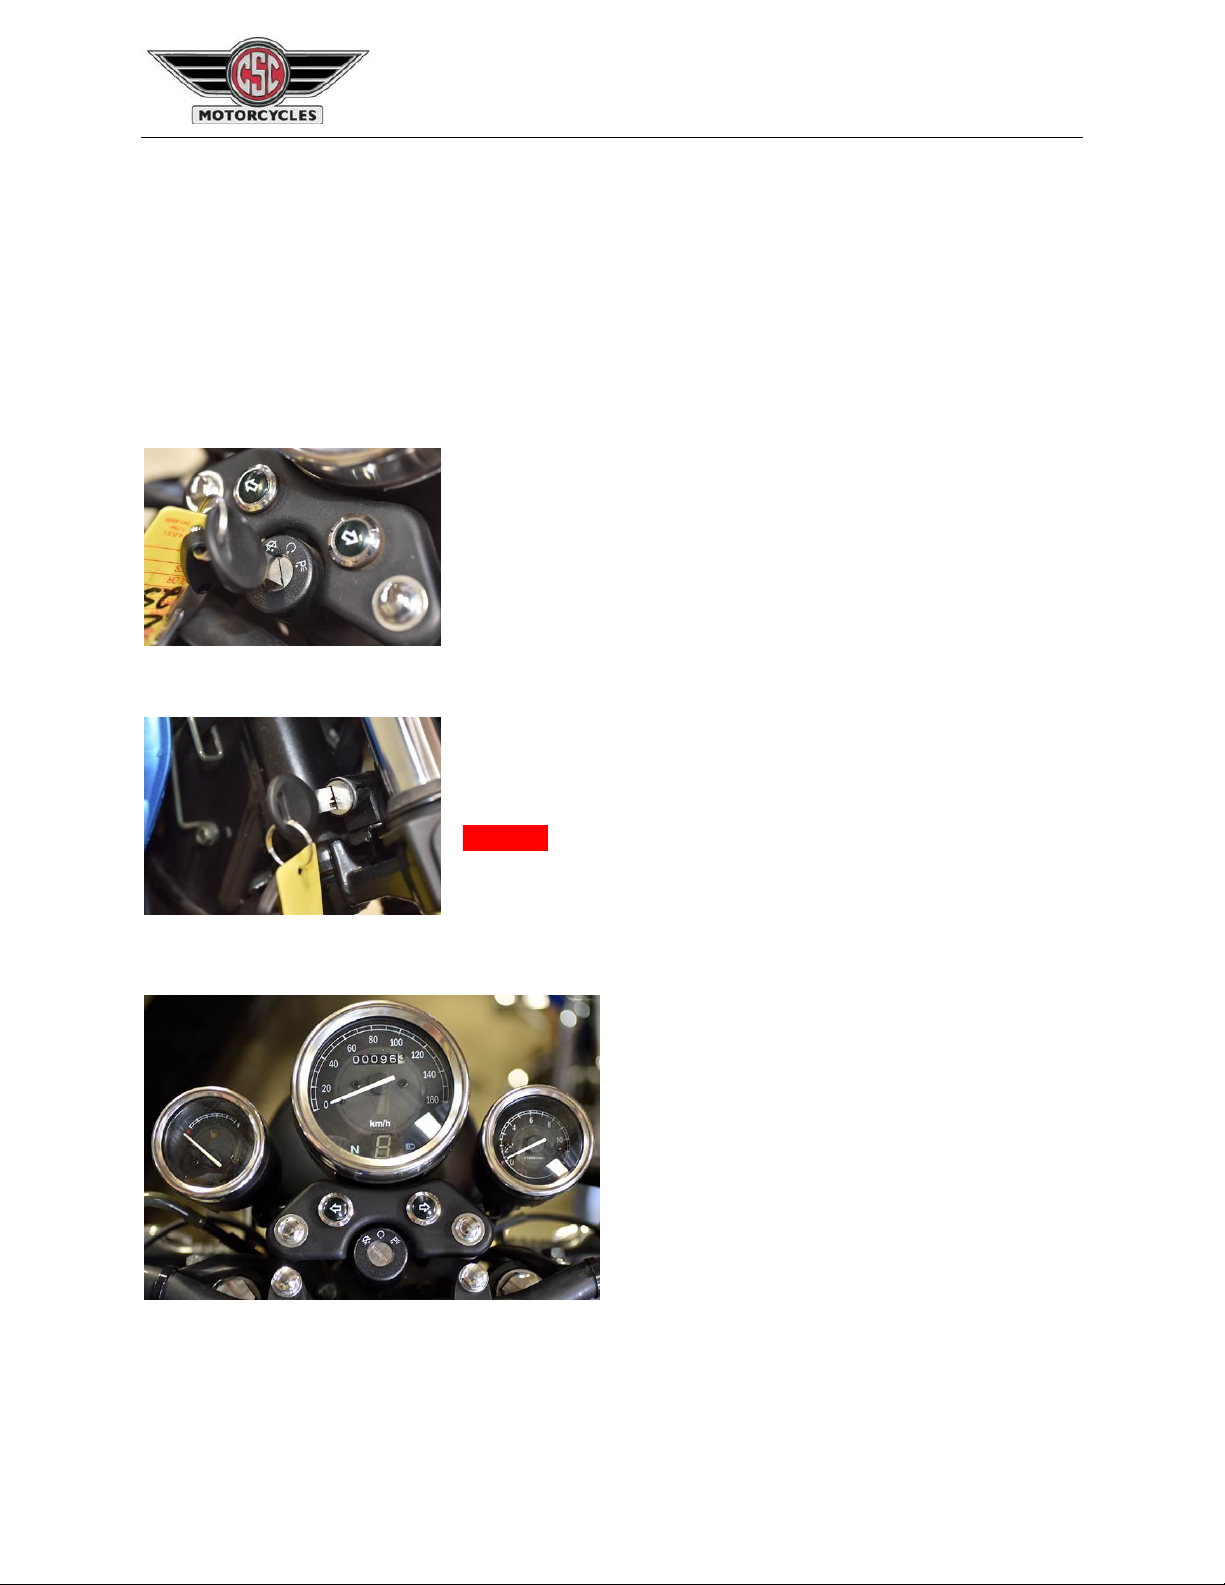
Ignition Lock and Fork Lock
The motorcycle key operates the ignition lock. Insert the key and
turn it to the right to turn the ignition on. The ignition switch also
operates the parking light.
If you need additional keys, CSC stocks the key blanks for the SG250
motorcycle. Please call us at 909 445 0900 if you need to make
additional keys for your motorcycle.
Fork Lock
The fork lock is located on the left side of the frame near the
steering yoke. To lock the forks, turn the forks all the way to the left.
Insert the ignition key, rotate it, and withdraw the key.
Warning! Do not attempt to ride the motorcycle with the forks in
the locked position.
Instruments
SG250 instrumentation includes a speedometer, a
tachometer, an odometer, a fuel gage, turn signal
indicators, a high beam indicator, and a gear
indicator.
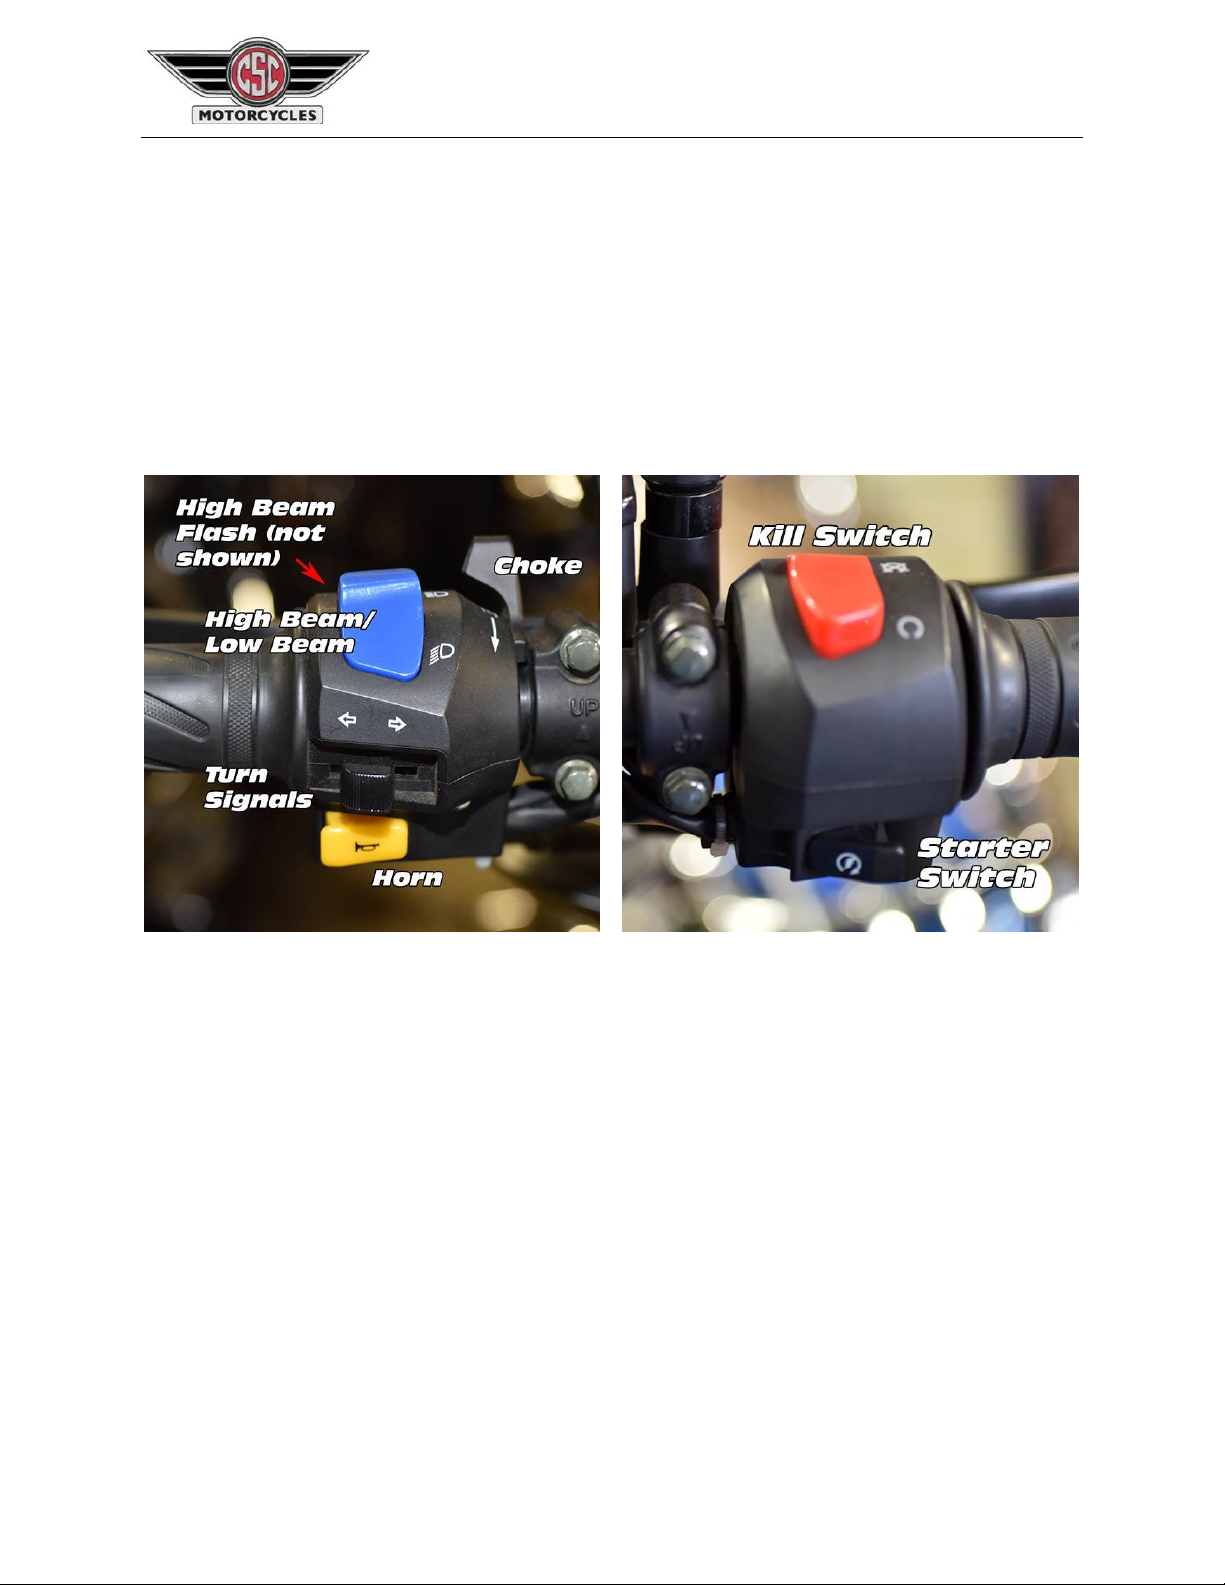
Left and Right Handlebar Switchgear
Left handle switchgear includes the passing light, the high beam/low beam switch, the turn signals, and
the horn. The high beam/low beam flash switch momentarily activates the motorcycle’s high beam
SG250 Owner’s and Service Manual
www.CSCMotorcycles.com
10
when the low beam is on. You can use it to alert a vehicle you are about to pass. The high beam/low
beam switch is used to switch between the high beam and low beam. The turn signals are activated
when the turn signal is pushed either to the right or to the left. The turn signals are not self-cancelling;
you must depress the turn signal switch sharply in its center position to turn the turn signal off. The
horn button sounds the horn.
Right handlebar switchgear includes the engine kill switch and the starter switch. The kill switch is used
to shut all electrical power to the motorcycle. Do not routinely use the kill switch to stop the engine
(use the ignition switch instead). The starter switch is used to start the engine after the ignition switch is
turned on.
Fuel, Fuel Tank, Filler Cap, and Petcock
The SG250 fuel tank holds 4.0 gallons of fuel. Use 87 octane or higher fuel.
The fuel petcock is located on left side of the tank. Turn the petcock to the OFF position when you are
not riding the motorcycle. Turn the petcock to the RUN position prior to operating the motorcycle. If
the motorcycle runs out of fuel, turn the petcock to the RESERVE position. Find a fuel station and fill
the motorcycle as soon as possible after the fuel petcock switching to the RESERVE position.
The fuel tank filler cap is a locking cap. To open it, insert the ignition key in the fuel tank and turn it
clockwise. After filling the fuel tank, push down firmly on the filler cap to lock it.

SG250 Owner’s and Service Manual
www.CSCMotorcycles.com
11
Off
Normal Operation
Reserve Operation
Filler Cap
Choke
The choke is located on the left side of the carburetor underneath the fuel tank. When the choke lever
is all the way down, the choke is not engaged. When the choke is all the way up, the choke is fully on.
There is an intermediate position halfway between the choke open and fully‐choked position.
When starting the motorcycle with a cold engine, push the choke lever all the way up to the fully‐choked
position. After the engine has warmed slightly, push the choke to the intermediate position. After the
engine has warmed, open the choke fully by pushing the choke lever all the way down.
Choke Fully On Intermediate Choke Choke Fully Open
Do not ride the motorcycle until the engine is fully warmed and the choke lever is in the fully open (all
the way down) position.
Warning! Do not attempt to actuate the choke lever while riding the motorcycle.
Load Limits
The SG250 motorcycle weighs 273 lbs. The gross vehicle weight rating is 573 lbs.
Warning! Do not overload or unevenly load the motorcycle or the handling will be adversely affected.

SG250 Owner’s and Service Manual
www.CSCMotorcycles.com
12
Tool Kit
The SG250 includes a tool kit stored in a container
on the right side of the motorcycle beneath the
battery. Pull up on the tab beneath the tool kit
cover and the cover will rotate up, providing access
to the tool kit.
Engine Break-In Procedure
When an internal combustion engine is new, it should not be subjected to hard acceleration, lugging,
overheating, or running for long periods at a constant engine speed. You should avoid these situations
during the first 500 miles of service. Caution! Do not violate the guidance provided here, or you may
damage your motorcycle engine.
We recommend the first oil change when the motorcycle reaches between 200 and 500 miles. We
recommend a second oil change at 1,000 miles, and every 2,500 miles thereafter. We recommend
using only 10-40W motorcycle oil. Caution! Never use any oils intended for automotive use, or any oil
that contains friction reducing additives (use of these oils will induce clutch slippage not covered by the
CSC warranty).
Use only non-synthetic oils during the first 1000 miles of use. After that, you may wish to change to
synthetic motorcycle oil.
The oil change procedure is outlined in the Oil Change section of this Owner’s and Service Manual.
Starting the Motorcycle
After completing the pre-ride inspection, you can start the motorcycle using either the kickstarter or the
electric starter. Follow the steps listed below:
Put the fuel petcock in the RUN position.
In cold weather, close the choke.
Insert the ignition key and turn it to the ON position. Make sure the transmission is in the
neutral position. Make sure the engine kill switch is in the RUN position.
If using the kick starter, vigorously kick the engine through a compression cycle, while opening
the throttle slightly.
If using the electric starter, depress the start button while opening the throttle slightly. Do not
crank the engine with the electric starter for more than a few seconds.
SG250 Owner’s and Service Manual
www.CSCMotorcycles.com
13
After the engine starts, allow it to warm for at least one minute. As the engine warms, open
the choke an intermediate position and then after the engine has warmed to the fully open
position (the choke lever should be all the way forward).
Operating the Motorcycle
Operate the motorcycle as outlined below:
After completing the pre-ride inspection in the Inspections Before Riding section and putting on
your riding gear (helmet, gloves, jacket, eye protection, and other protective riding apparel),
mount the motorcycle. Warning! Do not attempt to hold the motorcycle upright while putting
on your riding gear. You could drop the motorcycle and injure yourself. Put all of your riding
gear on before you get on the motorcycle.
Straddle the motorcycle.
Start the motorcycle as outlined above.
If the motorcycle is on the centerstand, push it forward to take it off the centerstand. If the
motorcycle is on the sidestand, lift the sidestand to the retracted position. Warning! Do not
ride the motorcycle with the sidestand down.
Pull in the clutch and push the gearshift lever down to put the motorcycle in first gear.
Open the throttle slightly and engage the clutch.
As the motorcycle accelerates, pull in the clutch, pull up on the gearshift lever, and engage
second gear. Repeat the above process to engage third, fourth, and fifth gear.
When you need to stop, allow the throttle to close and apply both the front and rear brakes.
Warning! Do not apply the brakes too aggressively, as this can induce a skid. Be cognizant of
the road surface and adjust braking force appropriately.
As the motorcycle slows, pull in the clutch, depress the gear shift lever to shift to a lower gear,
and release the clutch. Match your speed as you decelerate to the gear you are downshifting
to. Warning! If you downshift too aggressively (i.e., you downshift to too low a gear for your
speed), you can induce a skid.
Repeat the above process, using engine braking and the front and rear brakes to slow the
motorcycle. Prior to coming to a complete stop, pull in the clutch. Shift the motorcycle to
neutral.
If you wish to park the motorcycle, turn off the ignition key. Caution! Do not use the kill switch
for routine stops and leave the ignition key in the ON position when the engine is not running.
This will run down the battery.
Deploy the sidestand and lean the motorcycle to the left. Make sure the sidestand is fully
forward prior to leaning the motorcycle to the left. Caution! Do not park the motorcycle with
the front end angled downward; it could roll forward (off the sidestand) and fall.
Lock the front forks. Caution! Do not leave the ignition key with the motorcycle.
Cleaning the Motorcycle
Clean your motorcycle when it becomes dirty as outlined below:
Wash the motorcycle with low pressure water to loosen and remove mud, insects, and other
debris.

SG250 Owner’s and Service Manual
www.CSCMotorcycles.com
14
Wash the motorcycle using soapy water. Rinse the motorcycle. Caution! Do not spray water
directly into the muffler.
Clean the chain using a suitable chain cleaner.
Dry the motorcycle with a towel or a chamois.
Lubricate the chain with a suitable chain lubricant. Caution! Do not spray lubricant directly into
the brakes.
Wax the motorcycle using a suitable wax.
Warning! When riding the motorcycle after cleaning it, actuate the brakes to make sure they
have not been degraded as a result of cleaning the motorcycle.
CSC stocks numerous cleaning and lubrication products; please call us at 909 445 0900 to order these
items.
Storing the Motorcycle
For storage longer than 60 days, store the motorcycle as outlined below:
Drain the fuel from the fuel tank, the fuel lines, and the carburetor. Close the fuel tank cap.
Remove the spark plug and add 5cc of motor oil into the cylinder. Reinstall the spark plug. With
the ignition switch in the OFF position, cycle the engine several times with the kick starter.
Remove the battery, charge it, and store it in a cool and dry environment.
Support the motorcycle on blocks to prevent tire damage.
Cover the motorcycle to protect it from dust, moisture, and other contaminants.
Add fuel stabilizer to the fuel to prevent gumming in the tank, the carburetor, or the fuel lines.
After storage, charge and reinstall the battery. Add fuel. Replace the engine oil if the
motorcycle has been in storage longer than 6 months.
For shorter storage intervals, we recommend attaching the motorcycle to a Battery Tender.

SG250 Owner’s and Service Manual
www.CSCMotorcycles.com
15
CSC stocks all the items described above. Please call us at 909 445 0900 to order any of the items
described above.

SG250 Owner’s and Service Manual
www.CSCMotorcycles.com
16
Section 2: Service Manual
Maintenance Cautions and Warnings
When you maintain or repair the motorcycle, please use original components and parts, accessories,
lubricating oil and other materials that are made or recognized by CSC Motorcycles. Caution! If you use
any parts or components other than those recommended by CSC, it may adversely affect the
performance, reliability, stability, or warranty of your motorcycle.
When working on your motorcycle, you should follow this guidance:
Warning! Whenever the motorcycle is to be reassembled after disassembly, washers, seals, and
cotter pins need to be replaced.
When you fasten a series of bolts or nuts, you should do so in a diagonal pattern.
Warning! Do not use flammable cleaning fluid to clean components and parts.
Caution! Before assembly operations, add lubricating oil or lubricating grease to lubricated
surfaces.
Warning! After assembly, make sure all parts are properly assembled and tightened.
Warning! Stop the engine when repairing the motorcycle.
Warning! If the maintenance operation needs to be done while the engine is working, make
sure the area is well-ventilated.
Warning! Gas is flammable and combustible, so do not smoke or provide ignition sources in the
work area.
Warning! The battery can liberate hydrogen, which is flammable. Do not smoke, ignite or make
sparks near the battery, especially when it is charging.
Warning! The electrolyte of the battery contains sulfuric acid. If your eyes, skin or clothes are
splashed with electrolyte, rinse them thoroughly with water and seek immediate medical
attention.
Warning! Disconnect the negative battery terminal when performing any maintenance on the
motorcycle engine, drive train, or fuel system.
Component Cleaning
After parts are disassembled, they may need to be cleaned. Cleaning methods vary according to the
characteristics of the parts.
To remove oil or grease contamination, CSC recommends using Simple Green or other similar
degreasing agents.
Warning! Never use gasoline as a cleaning agent.
To remove carbon deposits, use mechanical or chemical methods. The mechanical method uses
a wooden or plastic scraper or blade to clear the carbon deposit first, and then rinse the parts
with an appropriate cleaning agent. The chemical method is to soak the parts in the cleaning
agent first, then clean them with a brush, and then rinse them with hot water.

SG250 Owner’s and Service Manual
www.CSCMotorcycles.com
17
Parts Inspection
Parts should be inspected after they are cleaned. The purpose of inspection is to check if the parts need
to be repaired or replaced.
Maintenance Adjustments
The SG250 motorcycle requires adjustments in the following areas:
The clutch must be adjusted according to the maintenance instructions included in this manual.
The main adjustment feature is the clutch lever free travel (¼ to ½ inch), and the clutch cable
adjusting mechanism. This Service Manual presents the procedure for clutch adjustment.
The throttle cable adjustment is performed at the throttle. The throttle should have 2 to 5
degrees of free rotation. This adjustment is presented in this Service Manual.
The drive chain is adjusted by positioning and aligning the rear wheel. The drive chain should
have 3/5 inch of free play. The drive chain adjustment procedure is explained in this Service
Manual.
The valves should be adjusted to the specified gap. This Service Manual presents the procedure
for adjusting the motorcycle’s valve.
Tire pressure should be maintained at 40 psi for the front tire and 36 psi for the rear tire.
Recommended Tools
The CSC SG250 motorcycle includes a basic tool kit that is stored under the battery. These tools are
suitable for emergency repairs only. CSC sells custom tool kits with professional grade tools; please
contact us at 909 445 0900 to order tools.
Adjustment Specifications
Item
Adjustment Limits
Clutch lever free play (at tip)
¼ to ½ inch
Throttle free travel
2-5 degrees
Drive chain
3/5 inch
Valve gap (at TDC)
0.04 to 0.08 mm
Tire pressure (front/rear)
40/36 psi

SG250 Owner’s and Service Manual
www.CSCMotorcycles.com
18
Motorcycle Maintenance Schedule
Maintenance
Times
Maintenance
Item
Odometer (miles)
500
miles
2,500
miles
5,000
miles
7,500
miles
10,000
miles
12,500
miles
15,000
miles
Fuel system
I
I
I
Fuel filter
I
I
I
I
I
I
I
Air cleaner element
I
I
I
I
I
I
I
Spark plug gap
l
l
l
l
l
l
l
Valve lash
l
l
l
l
l
l
l
Oil change
I/L
I/L
I/L
I/L
I/L
I/L
I/L
Rear chain
I/L
I/L
I/L
I/L
I/L
I/L
I/L
Battery
l
l
l
l
l
l
l
Brake pad wear
l
l
l
l
l
l
l
Braking system
l
l
l
l
l
l
l
Stop lamp switch
l
l
l
l
l
l
l
Headlamp
l
l
l
l
l
l
l
Sidestand
l
l
l
l
l
l
l
Front and rear
suspension
l
l
l
l
l
l
l
Nuts/bolts/ fasteners
l
l
l
l
l
l
l
Front/rear wheel
bearings
l
l
l
l
l
l
l
The motorcycle should be maintained according to the schedule above. The symbols are defined below:
R-rinsing
L-lubrication
l-inspection, cleaning, adjustment, lubrication or replacement
If you operate the motorcycle in dusty areas, the maintenance cycle should be shortened.
Torque Values
A table for general torque values follows. In various places in this Service Manual, specific torque values
may be provided, and you should use those where specified. In all other instances, use the values
provided below. The values provided throughout are for clean, dry threads.
Bolt Size (mm)
Torque (ft-lbs)
Bolt Size (mm)
Torque (ft-lbs)
6
3-5
14
60
8
8-12
16
60-94
10
15-22
18
60-130
12
39
20
166-188
SG250 Owner’s and Service Manual
www.CSCMotorcycles.com
19
Unpacking
When the motorcycle is delivered, check the condition of the delivered crate. If there are any
anomalies, stop and call CSC at 909 445 0900. Check the VIN numbers on the exterior of the crate.
Compare these numbers to the documentation delivered to you prior to the motorcycle’s arrival. If the
numbers don’t match, stop and call CSC at 909 445 0900.
Inspection
Perform the following inspections when servicing the motorcycle.
Check to confirm all fasteners are properly tightened and all components are installed correctly
and in an operational state.
Swing the handlebars from side to side to make sure motion is uninhibited.
Check chain tension and rear wheel alignment in accordance with the requirements of this
Service Manual.
Insert the ignition key and turn it on.
Check horn function, turn signals, headlight high and low beam, brake lights for front and rear
brake activation, and instrument panel readout.
Check oil level and tire pressure.
Confirm the motorcycle is in neutral.
Place the clutch in, close the choke, and start motorcycle. Allow engine to warm.
Check brake and suspension function.
Test ride motorcycle to confirm operability.
Detailed inspection checklists are included in Appendix A of this Service Manual.
Frame and Body
The frame and body subsystem include the motorcycle’s steel frame, the seat, the body panels, the
sidestand, the Footpeg, the tool kit, and the fenders.
The tool kit is stored in a container under the battery.
The seat is held in place by two bolts. The rear seat can be removed to provide access to some of the
motorcycle’s electrical components.
Frame and body maintenance and troubleshooting guidelines are summarized below.
Frame and Body Maintenance and Troubleshooting
Item
Cause
Symptom
Vehicle Effect
Maintenance Action
Frame
Frame is hit or falls
over
Frame is curved or
deformed
Drift
Correct or replace the
frame
Frame is hit or falls
over
Frame is cracked or
fractured
Motorcycle cannot drive
Weld or replace the
frame
Frame is impacted
and shocked by road
Frame welding
detachment
Shake or drift
Weld the frame

SG250 Owner’s and Service Manual
www.CSCMotorcycles.com
20
Item
Cause
Symptom
Vehicle Effect
Maintenance Action
Sidestand
Deformation or
fracture
Sidestand cannot
return
Noise and compromised
parking
Correct or replace the
side support
Left or right
rear panel
Impact
Panel damaged
Compromised
appearance
Replace or repair the
panel
Left or right
tank panel
Impact
Panel damaged
Compromised
appearance
Replace or repair the
panel
Front fender
Impact
Deformation or
breakage
Compromised
appearance
Replace the front
fender
Rear fender
Impact
Deformation or
breakage
Compromised
appearance
Replace the rear
fender
Seat cushion
Impact
Seat cushion
damaged
Riding comfort
decreases
Replace the seat
Front footpeg
Impact
Deformation or
breakage
Compromised driving
safety
Replace the footpeg
Rear footpeg
Impact
Deformation or
breakage
Compromised driving
safety
Replace the footpeg
Rearview
mirror
Impact
Deformation or
breakage
Compromised driving
safety
Replace the rearview
mirror
Rear rack
Impact
Deformation
Compromised
placement of items
Replace the rear rack
Brakes
This section of the SG250 Owner’s and Service Manual covers the following topics:
Master cylinder locations
Inspecting and replacing the brake pads
Inspecting and replacing the brake disk
Flushing and replacing the brake fluid
Bleeding the brakes
Brake troubleshooting
Master Cylinder Location
The front brake master cylinder is located on the right
handlebar. It has a fluid level indicator on the master
cylinder that shows the “low” level. When the front master
cylinder fluid level is at the low mark, it is an indication that
the front brake pads should be replaced. Do not rely only
on this indication; you should check the pad thickness
regularly and replace them when they are worn below
acceptable limits (to be described below).
Table of contents
Other CSC Motorcycle manuals


