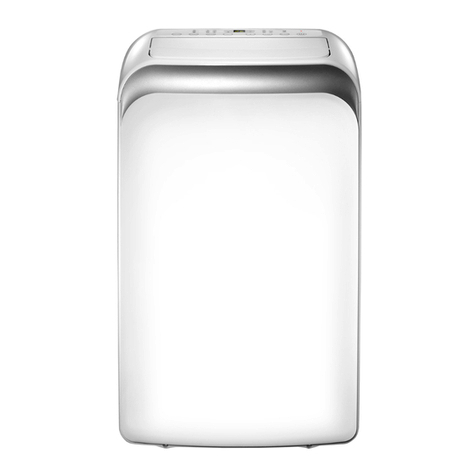
CSrental HHB70 User manual

User Manual
EVAPORATIVE AIR COOLER
HHB70/PC240

Index
1.
Declaration of Conformity
p. 3
2.
Instruction
p. 4
3.
Applications
p. 4
4.
Technical specifications
p. 4
5.
Technical feature
p. 4
6.
Important reminders
p. 5
7.
Key components
p. 5
8.
Installation and use
p. 8
9.
Precautions for use
p.8
10.
Cleaning
p. 9
11.
Circuit diagram
p. 10
12.
Trouble shooting
p. 11
13.
Theoretical outgoing air temperature
p. 11
2

3
1.
Declaration of Conformity

4
2.
Instruction
Product: Evaporative Air Cooler
Type: HHB70
Using effective cooling pads as evaporator, this type of air cooler makes full use of the principle of evaporative cooling. As a
result, it can not only lower the temperature effectively, but also filter the dust particles in the air to improve the air quality.
Details about the cooling principle: Negative pressure is produced through the air draft by the fan. At the meantime, water
is transported by the water pump to the water distributor and it can wet the whole surface of the cooling pads. The special
angle of the cooling pads enable the water stream to flow to the side where hot air is absorbed.
A large amount of heat will be absorbed when the hot air passes the water-soaked cooling pads, resulting in the cooler,
moister and fresher air that will be sent out to the room since the temperature of the air is greatly lowered and the air itself
gets filtered. Then the unevaporated water drops to the bottom, forming the water cycle.
3.
Applications
The HHB70 can be used in:
•
Company offices,shops, hospitals, schools, workshops, workers dormitories, outdoor teahouse/coffee bars, restaurants,
recreation facilities.
•
Manufacturing: Textile, machinery, ceramic, refined chemical industries, metallurgy, hardware and leather industries.
•
Industrial processing: Electronics, clothes & shoe making, plastics, food industries, packaging.
•
Others: Indoor sports courts, bakeries, playgrounds, laundries, kitchens, vegetable markets, gymnasiums, underground
parking lots, greenhouses, chicken and pig farms, gardens.
4.
Technical specifications
Model
HHB70
Max Airflow
7000 m³/h
Weight
34 kg
Power Supply / Frequency
230V / 50Hz
Effective Cooling Area
50 - 60 m²
Power Consumption
0.15 kW
Rated current
1.50A
Fan type
Axial
Noise
<54dB(A)
Water Consumption
5 - 6 l per hour
Water Capacity
70 l
Dimension (L x W x H)
840 x 560 x 1320 mm
5.
Technical feature
Brand new evaporative
cooling pads, pioneers in
energy saving and environ-
ment protection
Low noise
Time setting function
More convenient with
remote controller.
3 levels fan speed (low,
medium & high).
Large capacity water tank
for longer operating hours.
Large wheels and brake,
allow easy movement.
Micro-computer program
control, LCD panel.
Swing function

5
Cooling and humidity-adding effect
being more obvious in a traditional air
conditioning room.
Anions and oxygen function, make peo-
ple feel like in natural environment such
as forests and waterfall regions.
Independent moisture-
keeping function, feel
better in dry weather.
Three wind types can be
chosen, able to feel more
naturally.
6.
Important reminders
Please read the manual carefully before operating the cooler.
Operating conditions:
1.
Air supply must be largely free of dust or extra cleaning is required.
Protect the power cable from vehicle or foot traffic.
Connection to incorrect electric voltage, or faulty installation, will cause danger of electric shock.
Other tips for cooler use:
1.
Keep doors and windows open to allow fresh air to enter, and treated air to exit when cooler is operating.
2.
Flashing red light on the control panel means water level in reservoir is low.
3.
Rinse the reservoir with fresh water and clean prior to use after a period when the cooler is not being used.
4.
Take care when moving the cooler, especially when it is full of water. Pushing too hard will cause the cooler to
overbalance and tip over, which may cause injury and will damage the cooler.
5.
To prevent build-up of algae and other biological organisms in the reservoir, regularly add chlorine/bromine tablets as
per tablet manufacturer recommendation for evaporative cooler reservoirs.
7.
Key components

6
7.1
The LCD panel
7.2
Control panel / remote control

7
Keypad instruction
Comment
Power source button
When the power source is connected, the power pattern will light up,
the buzzer will ring once and the air cooler will be in standby mode.
ON/OFF
Connect the power source and press the on/off button to start the air
cooler. The default state is cooling state when the air cooler is used
for the first time and the operating state will remain the same when
used the next time. No matter what state the air cooler is in, it will stop
working once the on/off button is pressed.
COOLING
Press the cooling button, the air cooler enters into the cooling state
and the cooling pattern lights up. The default wind speed is low wind
speed.
SPEED
Press the wind speed button to set the satisfying wind speed. Three
types of wind speed are provided: high, medium and low. The wind
speed pattern will display the corresponding wind speed.
SWING
The fan blades will swing from the left side to the right side and the
wind swing pattern will light up when the wind direction button is
pressed. Repress the button to stop the swing.
WIND TYPE
Press the wind type button to change the wind type between the
standard wind , the natural wind and the sleeping wind. The corres-
ponding pattern will display on the screen.
Standard Wind:
The wind type will not change once one particular
wind type is chosen.
Natural Wind:
The wind speed will change randomly among high,
medium and low.
Sleeping Wind:
When the wind type is changed to sleeping wind when
the operating wind speed is high, the wind speed will automatically
change to medium wind after half an hour.
Then the wind speed will automatically change to low wind after
working in the state of medium wind for another half an hour and will
maintain in the state of low wind as long as no further instruction is
made.
ANION
Press the anion button to release anions. The anion pattern lights up at
the same time.
TIMER
The timing function will be started and the timer pattern will light up
when the timer button is pressed. Press the button
continuously
to
adjust the time from 1hour to 9hours. The time set by the timer will
display on the screen. When the time is adjusted to 9hours, the timing
function will stop working by pressing the button a second time.
LIGHT
The light of the LCD is on by default. Press the light button to turn off
the LCD and repress it to turn it on again.
Sound prompt
The buzzer will ring once every time a button is pressed, no matter it is operated through the remote control on the control
panel.
Water storage protection
When the water level is below the warning line, the water pump will stop working, the buzzer will send out alarm sound and
the water shortage pattern will also flash. The water pump will start to work again after water is added to the air cooler.

8
8.
Installation and use
1.
Open the packing box and take out the air cooler.
2.
Add water: Open the water-adding hole on the left side of the air cooler (press it
to open) and add water to thewater tank. Control the amount of water added by observing the water level
display and pay attention to the
following three points:
•
Don’t splash water onto the motor or its surrounding area lest the electrical
apparatus elements will be damaged.
•
Add no more water when the water level reaches “MAX’’, or the extra water
will spill from the air cooler.
•
Please use clean tap water.
3.
Connect the air cooler to the power source to enter the standby mode. Press the on/off button to start the
machine and press different buttons to set the desired wind speed, wind type, wind direction and to use any
other function.
4.
When the air cooler is in operation, you can press the on/off button to stop it and return to the standby mode.
5.
You can also use the remote control to operate the machine. The function of the remote control is the same as
the control panel.
1.
You can start to use the remote control after you open the battery cove on its back and equip it with
batteries.
2.
When you are using the remote control, please direct it to the control panel. The effective remote
control distance is 10 meters.
3. There is a place on the top of the machine where you can place the remote control in case it will fall
down.
9.
Precautions for use
1.
The water level of the water tank mustn’t go over the “MAX” scale at any time. When the air cooler is in the state of
cooling,don’t let the water level go below the“MIN” scale.
2.
When the environmental temperature is too high, it’s better to choose the cooling function because it can not only lower
the temperature but also add moisture to the air.
3.
After adding water to the air cooler, avoid incline and collision when the machine is being positioned or moved so as not
to spill the water.Turnover of the machine is forbidden so as to avoid accident.
4.
Other objects (other than the remote control) are not allowed to be put on the air cooler. The air outlet is forbidden to be
covered and obstacles mustn’t be positioned within one meter of the machine’s front and back.
5.
If the “Cooling” function is turned on when there is no water in the water tank, the water pump will not work.
6.
Please pull the power plug and cut off the electricity before any cleaning or maintenance is done.
7.
When you are cleaning the machine appearance, please use wet cloth (or wet cloth with some cleanser essence). Don’t
use any corrosive cleanser essence to clean the machine. Also drip washing and rinsing are strictly prohibited.
8.
If the machine topples with water inside, pull the power plug immediately. The air cooler can’t be turned on again before
it is completely dried,or the machine may be damaged.
9.
The back of the machine can’t be positioned near the wall or curtain, or the airflow will be blocked and the effect will be
badly influenced.
10.
Don’t shake or knock on the machine forcibly when the air cooler is in use, or the machine will stop working
automatically and have to be turned on again.
11.
Please pull the power plug when the machine is not in use. Attention: Any part of the control panel can’t be moistened.
Please pull the power plug and cut off the electricity before cleaning since the pressure inside the machine is high.
12.
If the power cord is damaged, please call the specialized people from the manufacturer or the maintenance department
to avoid potential danger.
13.
Please keep the following three points in mind when you are replacing or handling the remote control battery.
•
Replace the batteries with the ones with the same specifications when changing the batteries. Pay special
attention to the polarity.
•
Don’t throw away the wasted battery casually in case it will pollute the environment.
•
If the remote control will not be used for a long time. Please take out the battery.
14.
People who are physically weak or with slow response or mental disorders (children included) are allowed to use this
product only under the supervision or help of the people who are responsible for their safety.
15.
Children should be supervised to prevent them from playing with the machine.

9
10.
Cleaning
Dustproof Net
Unplug the power source, screw off the screw on the upward side of the dustproof net and then pull the dustproof net
backward after pressing its buckle to take down the dustproof net. Use mild soap water and soft brush to clean the
dustproof net, dry it and then put it back to the air cooler.
Cooling pads
Unplug the power source, take down the dustproof net and then take out the cooling pads. Clean the cooling pads with clean
water and then put it back to the air cooler.
Attention:
The water pressure can’t be too high when cleaning. Don’t use acid or alkaline detergent to clean the cooling
pads.
Water tank
Unplug the power source and then the choke plug of the cleaning hole on the back of the machine to drain the waste water,
then add clean water into the air cooler.
Suggestion:
Replace the water with clean water everyday in case undesirable smell will be produced.

10
11.
Circuit diagram

11
12.
Trouble shooting
Problem
Possible cause
Solution
The indicator light is being dark
1
The power source has no power
2
Main control panel failure
3 The blowout of fuses
4 Panel failure
1
Restore the power and check the
power supply circuit
2
Replace the main control panel
3 Replace the fuses
4 Replace the panel
Control failure
1 Power supply shock interference
2 Environmental disturbance
3 Panel failure
1
Turn off the power and restart the
machine
2
Clear up or keep away from the
interference source
3
Replace the panel
No wind supply or wind speed being
too soft
1
Machine shell get stuck
2
Cooling pads or air filter net stocking
3
Machine shell deformed
4 Panel failure
1
Check whether the motor is
damaged and whether the fixed
hoop and the fan base are deformed
2
Clean or replace the Ccooling pads
or the air filter net
3
Replace the machine shell
4
Replace the main control panel
Motor out of control
1 Main control panel damage
2 Panel failure
1 Replace the main control panel
2 Replace the panel
Abnormal sound
1
Sundries inside
2
Fan looseness
3
Motor failure
1 Take down the filter net and cooling
pads, then take out the dundries
2 Tighten the fan
3 Replace the motor
NOTE:
This troubleshooting is for reference purposes only. If any technical assistance is needed, please contact your
distributor for service/repair.
13.
Theoretical outgoing air temperature of an adiabatic cooler (dew point cooler)

Dryfast B.V.
Kreekweg 22
3133 AZ Vlaardingen
The Netherlands
Phone:
+31 (0)10 426 14 10
Fax:
+31 (0)10 473 00 11
Email: info@dryfast.nl
Website:
www.dryfast.nl
Dryfast BVBA
Klein Siberiëstraat 1C
3900 Overpelt
Belgium
Phone:
+32 (0)3 544 83 94
Fax:
+32 (0)3 544 83 95
Email: info@dryfast.be
Website:
www.dryfast.be
This manual suits for next models
1
Table of contents
Popular Air Conditioner manuals by other brands

Nordyne
Nordyne WARRCOIL01 quick start guide

Daikin
Daikin RX15RMVJU installation instructions

Ocean Breeze
Ocean Breeze OBZ-10ESN owner's manual
Mitsubishi Electric
Mitsubishi Electric Mr. SLIM SLZ-M15FA2.TH Technical & service manual
Frigidaire
Frigidaire GHWQ103WC1 use & care
Crosley
Crosley CAE10MR410A13 use & care


