Cuisinart CSC650U User manual

Cook & Hold
CSC650U


3
Congratulations on your purchase of the Cuisinart Cook & Hold.
For over 30 years Cuisinart’s aim has been to produce the very nest kitchen equipment
so that cooks at home as well as professional chefs have the tools to express their
creativity.
All Cuisinart products are engineered for exceptionally long life, and designed to be
easy to use as well as to give excellent performance day after day.That is why they have
come to be regarded as the dening machines in their eld by chefs across the world.
Whatever you cook, cook it better with Cuisinart.

4
Contents
Product Description . . . . . . . . . . . . . . . . . . . . . . . . . . . . . . . . . . . 5
Safety Cautions . . . . . . . . . . . . . . . . . . . . . . . . . . . . . . . . . . . . . 6
Instructions for Use . . . . . . . . . . . . . . . . . . . . . . . . . . . . . . . . . . . 9
A Cooking with the timer . . . . . . . . . . . . . . . . . . . . . . . . . . . . . . . . . . 9
B Cooking without the timer. . . . . . . . . . . . . . . . . . . . . . . . . . . . . . . . . 11
C Hints & tips . . . . . . . . . . . . . . . . . . . . . . . . . . . . . . . . . . . . . . . . 12
D Adapting your recipies . . . . . . . . . . . . . . . . . . . . . . . . . . . . . . . . . . . 14
Cleaning & Maintenance . . . . . . . . . . . . . . . . . . . . . . . . . . . . . . . . 16
UK Guarantee . . . . . . . . . . . . . . . . . . . . . . . . . . . . . . . . . . . . . . 17
UK Wiring Instructions . . . . . . . . . . . . . . . . . . . . . . . . . . . . . . . . . 18
UK After Sales Service . . . . . . . . . . . . . . . . . . . . . . . . . . . . . . . . . 19
Recipes . . . . . . . . . . . . . . . . . . . . . . . . . . . . . . . . . . . . . . . . . . 20

5
Product Description
Glass Lid with Stainless Steel Rim
and Chrome Plated Handle
Temperature Dial
Stainless Steel Housing
Chrome Plated Handle
Ceramic Pot
Timer Dial
‘‘HOLD’’ Indicator Light
Ceramic Handle
‘‘HOLD’’ Indicator Light

6
Carefully read all the instructions thoroughly before using the appliance and keep in a safe
place for future reference
Safety Cautions
Always follow these safety cautions when using this appliance to avoid personal injury or damage to the
appliance. This appliance should be used only as described within this instruction book.
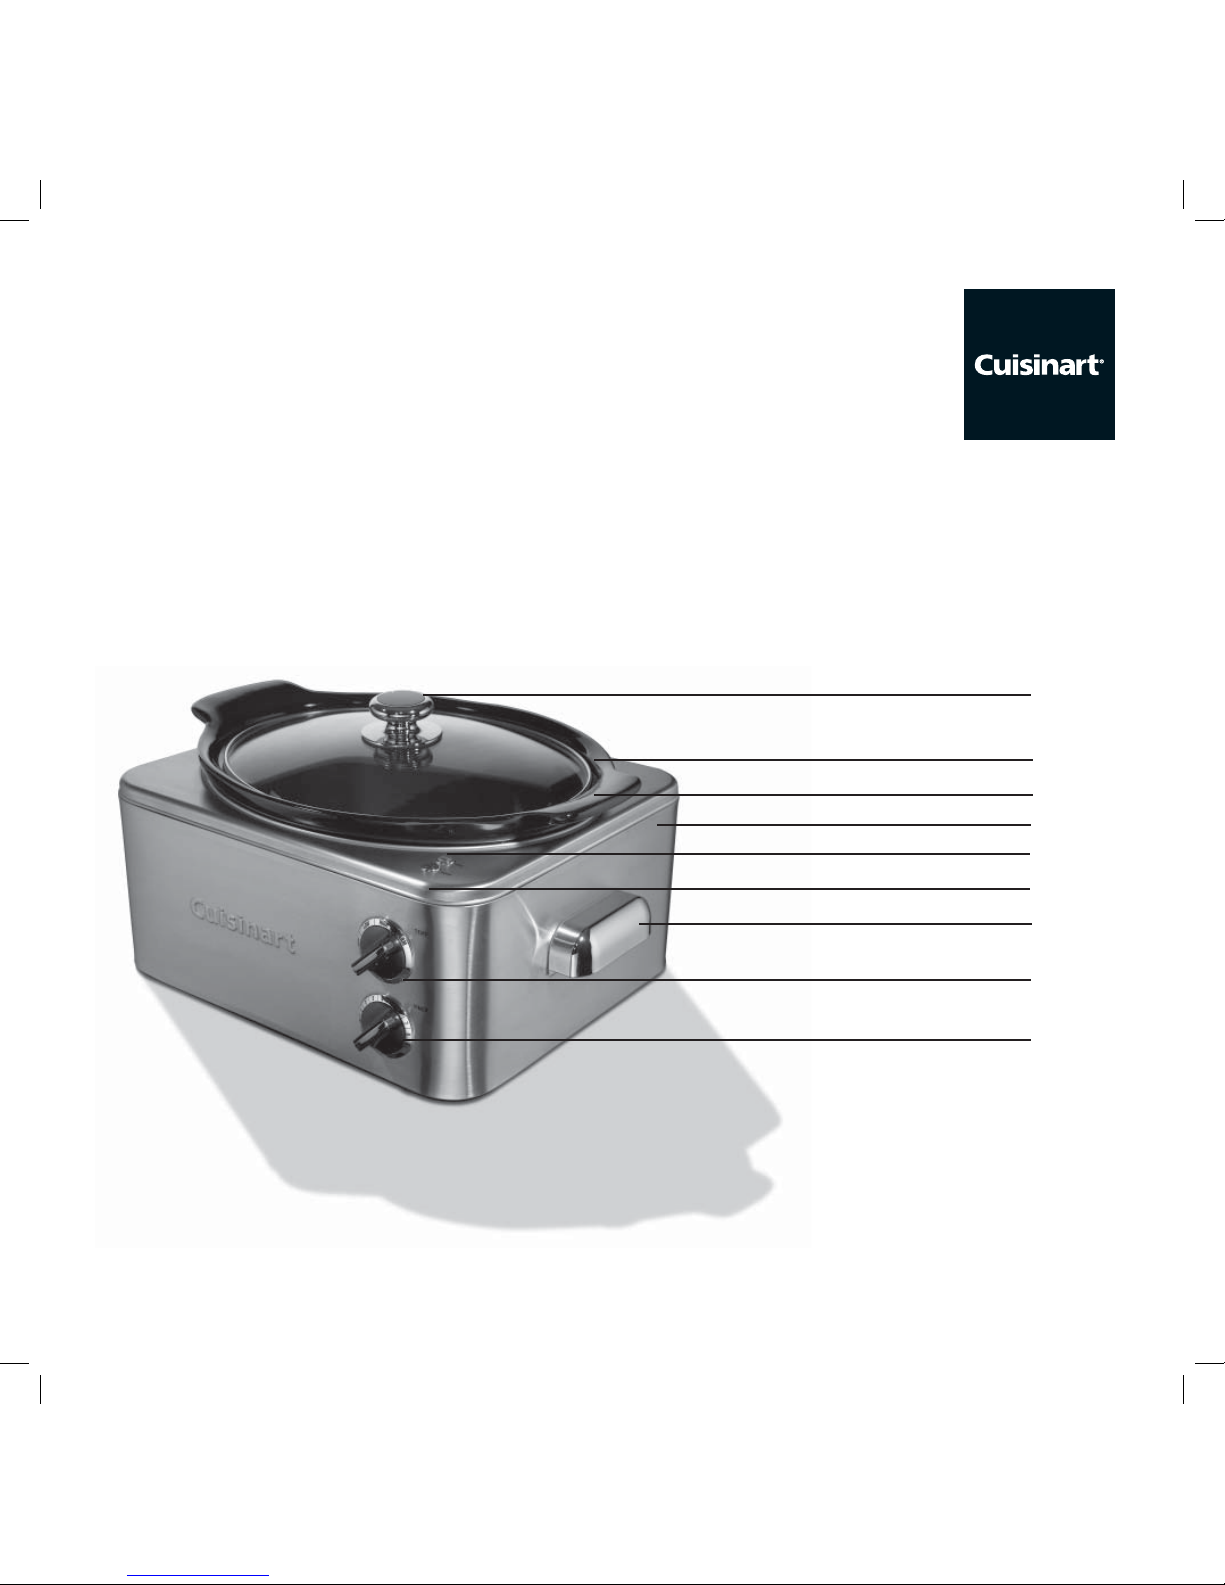
ßThe lid and bowl can be removed for washing manually or within a dishwasher.
ßDo not immerse the heater base in water or put it in a dishwasher. Disconnect from the mains, allow to
cool, and clean using a damp cloth / scourer.Allow to dry thoroughly before re-use.
ßAlways disconnect the Cook and Hold immediately after use.
ßNever disconnect the plug by pulling on the mains lead.
ßAlways ensure that your hands are dry before removing the plug from the mains socket.
ßDo not allow the lead to overhang the edge of the table or work surface.
ßThis appliance should not be used by adults or children whose lack of experience, product knowledge or
disability might cause a hazard, unless they have been correctly instructed and are adequately supervised.
ßChildren should always be supervised to ensure that they do not play with this product.
ßDo not use this appliance if the lead is damaged. In the event of damage the lead must be replaced by a
special lead available from the manufacturer or its service agent. (See “UK After Sales Service” section).
WARNING: A cut off plug inserted into a 13 amp outlet is a serious safety (shock) hazard. Ensure the cut
off plug is disposed of safely.
WARNING: Polythene bags over the product or packaging may be dangerous. To avoid danger of suffocation,
keep away from babies and children. These bags are not toys.

7
ßDo not use the Cook and Hold if it has fallen or shows signs of damage. Discontinue use immediately.
(Cuisinart Conair “After Sales Service” section).
ßNo repair can be carried out by the user. Return the Cook and Hold to the ‘Cuisinart Service Centre’ for
inspection or repair or replacement. (See ‘UK After Sales Service’ section).
ßUse this appliance for cooking only as described within these instructions for use. Retain these for future
reference.
ßAlways wear oven gloves to remove the ceramic pot and lid.
ßFor indoor use only.
ßFor domestic use only.
ßMaximum capacity of the appliance is 5 Liters.
ßThis appliance complies with the basic requirements of Directives 04/108/EEC (Electromagnetic Compatibility)
and 06/95/EEC (Safety of domestic electrical appliances) amended by Directive 93/68/EEC (CE Marking).
ßDo not use any attachments other than those recommended or sold by Cuisinart.
ßDo not touch hot surfaces, always use handles.
ßUnplug from the mains when not in use and before cleaning. Allow to cool before putting on or taking off
parts.
ßExtreme caution must be used when moving a slow cooker containing hot oil or other hot liquids.
ßDo not place on or near a hot gas or electric hob or oven
ßAvoid sudden temperature changes such as placing a chilled ceramic pot into the Cook & Hold.

8
ßWhen hot, never place the ceramic pot directly on a table or work surface.
ßNever heat ceramic pot when it is empty.
ßDo not touch sides of the ceramic pot or the housing whilst food is cooking.
ßAlways use the handles and oven gloves when removing the lid or ceramic pot from the housing base after
cooking.
ßThe ceramic pot should always be at least half full for best cooking results; however, the appliance should
never be more than 3 quarters full or approximately 4cm from the top rim.
ßFor food safety reasons, whole chickens should not be cooked in a Slow Cooker. They may not reach safe
temperature in the correct amount of time.
ßWhen cooking meat, set the appliance on ‘High’ for 1 hour and then reduce to ‘Low’ for the remaining
cooking time.
ßBecause the appliance heats and cooks at low temperatures, food should be at room temperature before
it goes into the appliance.
ßThe Cook and Hold is not recommended for reheating foods. It may not reheat chilled foods quickly
enough to prevent the development of harmful bacteria.
ßAvoid sudden temperature changes. Really cold food or water can crack the hot ceramic pot.
ßIf foods are to be cooked the next day in the ceramic pot, do not store in the refrigerator overnight.
ßTo save any leftover food, remove from the ceramic pot and store in plastic containers up to 2 days, or
freeze for future use.
ßDo not add frozen foods to the Cook and Hold. Heat to room temperature before adding.

9
Instructions for Use
Before using this appliance, ensure the ceramic pot, cooking rack and lid are cleaned and dry.
A Cooking with the timer
ßPlace the housing base on a at, clean and dry surface. Place the ceramic pot in the housing base.
ßFill the ceramic pot with desired ingredients. Place the lid on top of the ceramic pot and plug the unit into
the mains.
ßSet the desired time by turning the timer dial to the recommended cooking time: 1-8 hours using half hour
increments.
ßSet the desired temperature, by turning the temperature dial to ‘Low’,‘High’ or ‘Hold’ setting.
N.B. The ‘Hold’ setting is not a cooking function; therefore, it is only for use with preheated foods.
ßThe ‘Cook’ indicator light will illuminate to denote the appliance is in‘Cook’ mode and set on ‘Low’ or ‘High’
temperature setting.
ßWhen the appliance is in ‘Hold’ mode, the ‘Hold’ light will illuminate. This will remain illuminated until the
appliance is turned off.
N.B. If the timer is set to‘0 hours’, the appliance will remain in‘‘Hold’’ mode no matter what the temperature
states.
ßWhen the time has expired, the appliance will automatically switch to the ‘Hold’ setting and the ‘Hold’ light
will illuminate.

10
ßThe appliance will continue to stay in ‘Hold’ mode until it is turned off, by turning the temperature dial to
the ‘Off’ position.
ßLift the ceramic pot by using the ceramic handles.
Cooking times will vary depending on the meat and personal taste, however, follow the table below as a guide
for cooking temperatures and time:
Joint Weight (kg) Temperature Time (hours)
Beef,lamb,veal 1.25-1.5 Low 4-8
or venison High 3-6
1.6-2.25 Low 7-8
High 5-8
Chicken Up to 1.5kg High 3-4
Duck Up to 1.75kg High 5-6
Pheasant Large High 3-4
Pork joint 1.25-1.5 High 3-5
1.6-2.25 High 4-6

11
B Cooking without the timer
Using the ‘Low’ temperature setting without the timer is to be used only for recipes that require a constant
‘Low’ temperature.
ßPlace the housing base on a at, clean and dry surface. Place the ceramic pot in the housing base.
ßFill the ceramic pot with desired ingredients. Place the lid on top of the ceramic pot and plug the unit into
the mains.
ßTurn timer dial anticlockwise to the ‘On’ position.
ßSet the desired temperature, by turning the temperature dial to ‘Low’,‘High’ or ‘Hold’ setting.
N.B. The ‘Hold’ setting is not a cooking function; therefore, it is only for use with preheated foods.
ßThe ‘Cook’ indicator light will illuminate to denote the appliance is in ‘Cook’ mode and set on ‘Low’ or
‘High’ temperature setting.
ßTemperature will remain on the selected setting until the unit is turned off by turning the temperature dial
to the ‘Off’ position.
ßLift the ceramic pot by using the ceramic handles.

12
C Hints and Tips
ßBefore food is added, the ceramic pot can be lightly coated with cooking spray so cooked foods release
more easily.
ßIn general, cooking for 1 hour on ‘High’ is the equivalent of cooking for 2 hours on ‘Low’
ßIf you are not ready to serve the meal as soon as the food is cooked, the appliance will ‘Hold’ food at the
perfect temperature until you are ready to serve.
ßEach time the lid is removed, heat will be lost and will add 15-20 minutes to your cooking time. If you
need to stir, lift the lid just enough to get the spoon in.
ßTo reduce fat content from recipes, remove as much of the visible fat as possible from meats and poultry.
Cook and drain all minced meats. Remove skin from poultry.
ßYou can skim the separated fat from the top of the slow cooked food, or alternatively refrigerate the food
and the congealed fat can be lifted off and discarded before reheating and serving.
ßMany slow cooked foods such as stews benet from cooling and refrigerating, then reheating.
ßIf using frozen foods, ensure they are completely thawed before adding to the ceramic pot.
ßDried beans should be soaked overnight, then rinsed, drained and rinsed again before cooking. Do not
add salt or anything acidic to the beans when cooking, as it will prevent them from softening completely.
Dried beans can be cooked ahead drained and frozen. Thaw thoroughly before adding to recipes.

13
ßThe Cook & Hold is perfect for foods that require long slow simmering such as soups, stocks, stews and
dried beans
ßThe Cook & Hold is the perfect way to cook items that require a ‘Bain Marie’.We recommend using hot
water and cooking on ‘High’ for most of these recipes.
ßRoot vegetables such as carrots and potatoes will take longer to cook. Either cut into small pieces or
place on the bottom of the ceramic pot.
ßFor tender vegetables, or to achieve a ‘crisp-tender’ result, add to the ceramic pot 30 minutes before the
end of the cooking time, to prevent over cooking.
ßGround meats and uncooked sausages should always be browned and drained before adding to the Cook
& Hold. Smoked sausage does not need to be browned (though it may add avour and visual appeal. If
browning the night before, make certain the meat is thoroughly cooked and then refrigerated once coo-
led. Combine the meat with other ingredients just before slow cooking.
ßBrowning meats (roasts, chops, cubes for stews) and poultry adds avour and visual appeal to the nished
dish. It also helps to cook out some of the fat.
ßCooking ground meats in the Cook & Hold without pre browning is not recommended as ground meat
has a ‘High’ level of bacteria, which, unless destroyed through thorough browning, can cause food poiso-
ning. We strongly advise against cooking meatloaf in the Cook and Hold for this same reason.

14
D Adapting your recipes
ßFor most recipes, reduce the cooking liquid by at least 50% (soups are the exception). Liquids do not
evaporate as they do in traditional cooking, and you often end up with more than when you began.
ßIn most cases, all ingredients can go in the ceramic pot at once and can cook all day on a ‘Low’ setting.
While it is not necessary to brown or sauté vegetables (onion, carrots, celery, peppers etc), it will add to
the avour. Browning meats adds both avour and visual appeal and helps to remove fat.
ßCertain cuts of meat are more appropriate for the Cook & Hold; see table Meat Cuts Guide for slow
Cooking
ßDairy products milk, sour cream and some cheeses will break down and curdle during slow cooking.
Substitute with canned evaporated milk or dried skimmed milk or add dairy products during the last 30
minutes of cooking.
ßWhen making soups, add solid ingredients to the Cook and Hold and then liquid to cover. If a thinner
soup is desired, add more liquid to taste.
ßIf your recipe requires precooked pasta, undercook it.
ßAdd rice to recipes during the last hour of cooking.

15
Meat Cuts Guide for Slow Cooking
Meat/ Fish Cuts
Chicken/ Turkey/ Duck Portions Thighs,Breast
joints,Quarters,
Drumsticks
Beef Joints Brisket,Topside,Silverside
Minced
Steak Braising/Stewing
Fish Fillets
Lamb Joints Leg,shoulder,
middle neck Shanks
Minced
Steaks
Pigeon/ Pheasant/ guinea fowl Whole
Pork Chops
Joints Knuckle,Shoulder,Collar
Gammon
Minced
Steak Stewing
Rabbit Pieces
Veal/Venison Pieces Stewing

16
Cleaning & Maintenance
ßBefore rst use and after every use, clean each part thoroughly.
ßUnplug your appliance and allow it to cool before cleaning.
ßPlace ceramic pot, cooking rack and lid in the dishwasher or wash with warm soapy water.
ßIf food sticks to the side of the ceramic pot, ll with warm soapy water and allow to soak before cleaning.
ßIf scouring is necessary, use a non abrasive cleanser or liquid detergent with a nylon pad or brush.
ßNever immerse the stainless steel housing in water or other liquid, or place in a dishwasher. To clean
simply wipe the exterior with a clean damp cloth and dry thoroughly before storing. Apply any cleaning
agents to the cloth before cleaning, not to the housing.
ßMake sure all parts are clean and dry before storing. Store appliance in a clean, dry place.
ßPeriodically check all parts before reassembly. If any part is damaged or the ceramic pot is chipped or
cracked, DO NOT USE APPLIANCE.
ßThe symbol on the product or on its packaging indicates that this product may not be
treated as household waste. Instead it should be handed over to an appropriate collection point for the
recycling of electrical and electronic equipment. By ensuring this product is disposed of
correctly, you will help prevent potential negative consequences for the environment and human health,
which could otherwise be caused by inappropriate waste handling of this product. For more detailed
information about the recycling of this product, please contact your local council office or your
household waste disposal service.

17
UK Guarantee
ßThis Cuisinart appliance is guaranteed for domestic consumer use for 5 years.
ßThe guarantee covers defects under normal use from date of purchase and ceases to be valid in the event
of alteration or repair by unauthorized persons.
ßIf the appliance does not perform satisfactorily due to defects of material or manufacture, it will be repai-
red or replaced by the manufacturer (see UK after sales service for details).
ßThis guarantee is only valid in the United Kingdom (including Northern Ireland, Republic of Ireland, the
Channel Islands and the Isle of Man).
ßNo responsibility will be accepted for any damage caused in transit.
ßA charge may be made if goods are returned outside the relevant guarantee period or if the product is
returned unnecessarily.
ßThe manufacturer reserves the right to amend terms and specications without prior notice.
ßThis guarantee in no way affects your statutory rights.

18
UK Wiring Instructions
ßYour Cuisinart Cook and ‘Hold’ includes a BS 13 amp moulded (fused) mains plug on the supply cord.
ßShould it be necessary at any stage to remove this moulded plug and replace it with a re-wireable BS 13
amp mains plug, the re-wiring should be completed as follows:
Class I (1)
The wires in the mains lead are coloured in accordance with the following code:
GREEN & YELLOW’ = EARTH
BLUE = NEUTRAL BROWN = LIVE
As the colours of the wire may not correspond with the coloured markings identifying the
terminals in your plug, proceed as follows:
ßThe wire which is coloured Green &Yellow must be connected to the terminal in the plug which is mar-
ked with the letter E or or coloured green or yellow.
ßThe wire which is coloured BLUE must be connected to the terminal which is marked with the letter N
or coloured black.
ßThe wire which is coloured BROWN must be connected to the terminal which is marked with the letter
L or coloured red.
With this appliance, if a 13 amp plug is used, a 13 amp fuse should be tted. If any other type of plug is
used, a 10 amp fuse must be tted, either in the plug or at the distribution board.

19
UK After Sales Service
For further advice on using your Cuisinart Cook and Hold and other products in the Cuisinart range,
contact the Cuisinart Customer Care Line on 0870 240 6902 (09:00 to 17:00 hrs Monday to Friday) or,
alternatively, email your enquiry to support@cuisinart.co.uk
In Guarantee
Return the product to the Cuisinart Service Centre at the following address:
Cuisinart Service Centre
P.O. Box 506
WIGAN
WN1 9AA
Enclose your name and address, together with proof of purchase and details of the fault.
Cuisinart will either repair or replace the product, as appropriate.
Out of Guarantee
Contact the Cuisinart Customer Care Line on 0870 240 6902 (09:00 to 17:00 hrs Monday to Friday) or,
alternatively, email your enquiry to support@cuisinart.co.uk for details of the
standard repair or replacement charge. If you wish to proceed with the repair or replacement, return the
product to the Cuisinart Service Centre at the following address:
Cuisinart Service Centre
P.O. Box 506
WIGAN
WN1 9AA

20
Recipes
Stocks and Sauces
Apple Sauce . . . . . . . . . . . . . . . . . . . . . . . . . . . . . . . . . . . . . . . . . . . 22
Brown Beef Stock . . . . . . . . . . . . . . . . . . . . . . . . . . . . . . . . . . . . . . . . 23
Chicken Stock . . . . . . . . . . . . . . . . . . . . . . . . . . . . . . . . . . . . . . . . . . 24
Tomato Sauce . . . . . . . . . . . . . . . . . . . . . . . . . . . . . . . . . . . . . . . . . . 25
Soups
Caramelized Onion Soup . . . . . . . . . . . . . . . . . . . . . . . . . . . . . . . . . . . . 26
Classic Split Pea Soup . . . . . . . . . . . . . . . . . . . . . . . . . . . . . . . . . . . . . . 28
Curried Butternut Squash and Apple Soup . . . . . . . . . . . . . . . . . . . . . . . . . . . 27
Tomato Soup . . . . . . . . . . . . . . . . . . . . . . . . . . . . . . . . . . . . . . . . . . 29
Starters, Snacks & Sides
Almost Saked Potatoes . . . . . . . . . . . . . . . . . . . . . . . . . . . . . . . . . . . . . 30
New Potatoes with Rosemary . . . . . . . . . . . . . . . . . . . . . . . . . . . . . . . . . 31
Ratatouille. . . . . . . . . . . . . . . . . . . . . . . . . . . . . . . . . . . . . . . . . . . . 32
Spinach, Gruyere & Artichoke Dip. . . . . . . . . . . . . . . . . . . . . . . . . . . . . . . . 33
Table of contents
Other Cuisinart Cooker manuals