DIAGNÓSTICO Continuado
Cabezal de ducha montado en la pared
modelo SH-BN125
El reductor de caudal está u bicado en la
conexión roscada, debajo de un arosello
negro. Saque el cabezal de ducha del brazo de ducha y
ubique el disco blanco en la conexión. Utilice p inzas, unas
tijeras pequeñas o un alicate cónico para sac ar primero el
arosello negro y guardarlo. Luego, extraiga el disco blanco
de su lugar. Observe el arosello negro pequeño ubicado
debajo del disco blanco. Puede desechar el arosello
pequeño y el disco blanco. Vuelva a colocar el arosello
negro grande y luego vuelva a acoplar el cabezal de ducha
al brazo de ducha, apretándolo y comproba ndo que no haya
derrames de agua según las instru cciones de instalación
que se encuentran en este manual.
Cabezal de ducha sujeto a mano
modelo SH-BN135
El reductor de caudal está u bicado en la
agarradera del cabezal de ducha dentro de la
conexión de la mang uera. Quite la mangu era del cabezal de
ducha y guarde el arosello negro grande que se usó en la
conexión de manguera. Luego, ubique el disco blanco en la
agarradera. Utilice un par de pinzas, unas tijeras pequeñas
o un alicate cónico para ex traer el disco blanco de su lugar.
Observe el arosello negro pequeño ubicado debajo del
disco blanco. Puede dese char el arosello pequeño y el
disco blanco. Vuelva a acoplar la manguera al cabezal de
ducha, incluyendo el arosello grande, apriételo y compruebe
que no haya derrames de agua según las inst rucciones de
instalación que se en cuentran en este manu al.
Precaución: Debe proteger el filtro contra la c ongelación,
lo que puede causa r resquebrajaduras en el filtro y derrames
de agua. No utilice substancias químicas fuertes o abrasi vos
como blanqueador de cloro, líquidos de limpieza, o
almohadillas abrasivas para limpiar cabezal de ducha.
Advertencia: No lo utilice con agua que sea
microbiológicamente peligrosa o de calidad desconocida
sin usar una desinfección adecuada, antes o después
de la unidad. No tire del cabezal de ducha ni use el
cabezal de ducha o el b razo de la ducha com o apoyo.
Los contaminantes u otras substancias que pueden ser
eliminadas o reducidas por este aparato para el tratamiento
de agua no están necesariamente en su agua.
¡Felicitaciones por haber comprado de un cabezal de ducha
filtrante Culligan®! Una ducha refrescante es algo que todos
anhelamos todos los días y a veces más de una vez al día.
¡Ahora que usted pueda ducharse con agua filtrada, su
ducha será una experiencia aún más agradable!
He aquí la razón:
• Elcloroirrita.Elca bezaldeduchaltrantereduceelcloro
que pudiera estar p resente en su agua.
• Segúnlafuentedeagua,ustedp udieranotarelolora
azufre en el agua de la ducha. ¡Todo el mundo está de
acuerdo de que el olor a “huevo podrido” no es algo que
desearíamos exp erimentar en nuestra ducha diar ia! El
cabezal de ducha filtrante de reduce este olor brindándole
una ducha más refrescante.*
• Elmedioltrantepatentadoqu eseusaensucabezalde
ducha filtrante de reduce la acumulación de escamas.*
• Sucabezaldeduchal tranteleayudaaimpedirlalapiel
seca y irritada al reducir las impurezas que se encuentran
en el agua. También ayuda a impedir que el cloro dañe
la suavidad del cabello y ayuda a que el pelo tintado
mantenga su color por más tiempo.**
• Elltrodeduchatiene5p osicionesderociadodemanera
que usted pueda gozar de la ducha que prefiera. ¡El agua
filtrada y clara lo deja refrescante y más limpio que nunc a!
*Según las pruebas realizadas por KDF Fluid Treatment, Inc.
**No ha sido probado ni certificado p or NSF.
5 AJUSTES DISTINTOS
CABEZAL DE DUCHA FILTRADO
Montado a la Pared con Masaje
CABEZAL DE DUCHA FILTRADO
Regadera de Mano con Masaje
Cartucho de Repuesto Para
FILTRO DE DUCHA
Iguía de Instalación y
Manual del Usuario
WSH-C125
HSH-C135
WS H -BN 125
HS H -B N13 5
WHR-140
(Cartucho de
Repuesto)
INSTRUCCIONES DE INSTALACIÓN Continuado
Cabezal de Ducha Filtrado Regadera de Mano
con Masaje
Se instala en cualquier brazo de ducha estándar con rosca de
1/2 pulgada. Funciona únicamente con el cartucho filtrante para
ducha instalado.
1. Quite el cabezal de ducha existente del brazo de la ducha
girándolo a la izquierda.
2. Limpie cualquier suciedad en la tubería roscada.
3. Envuelva firm emente la rosca con una cinta
de Teflón ciñéndola 2 o 3 vueltas para impedir
derrames de agua.
4. Coloque el soporte de montaje en el brazo de
ducha y apriételo a man o girándolo a la derec ha.
5. Si necesita ap retarlo más, cubra la tue rca con un
paño suave para proteger su superficie y luego
apriétela con una llave de tu erca.
6. Introduzca una ara ndela de goma neg ra incluida
en el extremo roscado más pequeño de la
manguera de ducha y acople la manguera al
soporte de montaje.
7. Introduzca la arandela de goma negra resta nte
(suministrada) en el extremo roscado más grande
de la manguera de du cha y acóplela al ex tremo
roscado de la agarradera del cabezal de la
ducha.
8. Coloque el ca bezal de ducha en el soporte de
montaje, pruebe el sistema para comprobar que
no haya derrames de ag ua y apriete si es necesario.
PROCEDIMIENTO PARA EL CAMBIO
DE CARTUCHOS
1. Sujete firmemente con una m ano la agarrade ra
del cabezal de la ducha. Gire con la otra mano
el aro estriado ubicado detrás de la cara a la
izquierda para destornillarlo.
2. Agarre el ca rtucho filtrante blanco y jale el
cartuch o hacia arriba y hacia un lado para sacarlo.
3. Quite las etiquetas de ambos lados del
cartucho antes de instalarlo. Coloque el
cartuch o filtrante nuevo en su lugar empujando
el cartucho hacia dentro de la cavidad hasta que
quede bien asentado.
4. Alinee las roscas hasta que la placa frontal
encaje en la cavidad y luego gire la placa frontal completa a la
derecha hasta que quede fija.
5. Vuelva a instalar la tapa del filtro de ducha. Deje correr agua por
el cartucho durante cinco minutos pa ra quitar las par ticulas finas
de carbonon.
DIAGNÓSTICO
Síntoma: El caudal de agua que salía del cabezal filtrante
de mi ducha era bastante bueno, sin embargo éste ha
cambiado y ahora parece que sale menos agua del cabezal
de la ducha.
Solución: Cuando la presión del agua baje repentinamente,
siga las siguientes instrucciones para enjuagar el cartucho
filtrante: De vez en cuando pudiera observar que el caudal
de agua que pasa por el fil tro de su ducha disminu ye. Esto
es normal en lugares donde los índic es de sedimentos
en el agua de abastecimiento son altos o si el agua viene
de un pozo particular. Esta disminución de caudal puede
solucionarse fácilmente.
El cartucho filtrante de su ducha tiene una vida útil de
10.000 galones (37.850 litros) que se calculan a 6 meses
de utilización según el uso doméstico. Si obser va una
disminución del caudal durante este período de tiempo, abra
el cabezal de su ducha según el procedimiento de cambio
de cartuc hos que se encuentra e n este manual.
Una vez que el cabezal de la ducha esté abierto, quite el
cartuch o filtrante, gire el cartucho 180 grados y luego invier ta
el cartucho de modo que la par te delantera quede hacia
atrás. Reemplace el car tucho en est a orientación nueva y
luego vuelva a colocar la placa frontal y apriétela. Muévase
fuera de la trayectoria del agua y entonces abra la llave de
la ducha. Puede que observe por un tiempo breve que el
agua que sale del cab ezal de su ducha es turbia. Esto se
debe a los sedimentos que estaban obstruyendo las rejillas
del cartucho y produciendo la disminución de caudal. El
cartuch o filtrante es reversible y pue de usarse en cualquiera
de las dos direcciones. Una vez que haya terminado el
procedimiento, su cartucho continuará suministrándole agua
limpia y clara hasta el total de 10.000 galones (37.850 litros).
Síntoma: Después de instalar mi cabezal de ducha filtrante,
la presión del agua no es suficiente como para suministrar
un caudal de agua adecuado o disfrutar de una ducha
agradable.
Solución: En las zonas de baja presió n de agua, siga estas
instrucciones para quitar el reductor de caudal. Su producto
posee un reductor de caudal para ahorrar agua que reduce
el caudal a un má ximo de 9,5 litros (2 galones) por minuto.
Si su caudal de agua es menor de 9,5 litros (2 galones)
por minuto, usted puede fácilmente quitar el reductor de
agua para mejorar la magnitud de flujo y disf rutar de una
ducha más agradable al aumentar el caudal a la magnitud
recomendada.
Culligan®International Company
Rosemont, IL 60018
Servicio de Cliente:
L-V 8:00am - 4:30pm CST
Tel: (800) 721-7360
Fax: (920) 457-7366
Tel. Int’l: (920) 457-2726
Fax Int’l: (920) 457-7366
DATOS DE CAPACIDAD
Especificaciones y Límites de Funcionamiento
Caudal nomi nal: 7,6 lpm (2,0 gpm)
Capacidad: 38.000 litros (10.000 galones)
Gama de presi ón de funcio namiento: 40-100 psi (280-690 kPa)
Gama de tempe ratura de funcionamiento: 4º-49ºC (40º-120ºF)
Este sistema ha sido probado segú n la norma NSF/ANSI
177 para la reducción de cloro libre disponible. Se redujo
la concentración de cloro libre disponible en el agua que
entra al sistema a una conc entración inferior o igual al
límite permitido pa ra el agua que sale del sistema, según
lo especifica la nor ma NSF/ANSI 177. No se ha evaluado el
rendimiento del sistema para reducir cloro libre disponible
en presencia de clora minas. El rendimiento del sistema
para reducir cloro libre disponible puede se r afectado por
la presencia de cloraminas en la fuente de agua. Por favor
póngase en contacto con la empresa de agua potable de su
lugar para saber si se emplean clora minas en el tratamiento
del agua.
Notas sobre el protocolo de prueba NSF
La reducción minima de cloro según la norma 177 de NSF/ANSI
debe ser inferior al 50% de cloro residual libre (FAC) cuando
se usa con un flujo de agu a por filtrar que lenga 2 mg de FAC
por litro. La concentración promedio debe ser el promedio
aritmético de todas las concentraciones de agua (el valor
limite de detección debe utilizarse para las concentrariones no
detectables). El porcentaje promedio especificado no debe ser
mayor que la reducción calculada con el promedio aritmético
de las concentraciones de agua.
Requisitos Generales de Instalación,
Funcionamiento y Mantenimiento
• Sejarápidayfácilmentealacañ eríadeladuchadel
baño después de quitar el cabezal de ducha existente.
Se instala en minutos y no se necesitan her ramientas.
• Asegúresedequelain stalacióncumplacontodaslas
leyes y reglamentos locales y estatales.
• Debecambiars eelcartucholtrantecua ndosealcancela
capacidad nomina l de funcionamie nto o se observe una
reducción de caudal.
• Nodebeusarseestesistem aenaplicacionesdeagua
potable.
Cuerpo Entero
brinda una má xima cantidad de agua
Lluvia relajante
suministra suavemente el agua
Rociado pulsante y estimulante
brinda un masaje estimulante a los músculos
Cuerpo entero y Lluvia relajante
combinados
brinda una relajación máxima
Rociado intenso y pulsante combinados
brinda un masaje de calidez a todo el
cuerpo
El sistema ha sido p robado y certificado p or
NSF Inter national bajo la norma NSF /ANSI 177
para la reducci ón del cloro libre disponible.
INSTRUCCIONES DE INSTALACIÓN
Preparación de la Tubería de Suministro de la Ducha
Se instala en cualquier brazo de ducha estándar con rosca
de 1/2 pulgada. Identifique todas las piezas incluidas antes
de comenzar la instalación.
1. Quite el cabezal de ducha existente del brazo de la ducha
girándolo a la izquierda.
2. Limpie cualquier suciedad en la tubería roscada.
3. Envuelva firm emente la rosca con una cinta
de Teflón ciñéndola 2 o 3 vueltas para
impedir derrames de agua.
4. Coloque el cab ezal de ducha en el bra zo de
la ducha y apriételo a mano girándolo a la
derecha.
5. Si necesita ap retarlo más, cubra la tue rca
con un paño suave para proteger su
superficie y luego apriétela con una llave de tuerca.
6. Comprueb e que no haya derrames de agua y apriete mas
si es necesario.
PROCEDIMIENTO PARA EL CAMBIO
DE CARTUCHOS
1. Sujete firmemente con una m ano el cuerpo
del cabezal de la ducha. Gire con la otra
mano el aro estriado ubicado detrás de la a
la izquierda para destornillarlo.
2. Agarre el ca rtucho filtrante blanco y jale el
cartuch o hacia arriba y hacia un lado para
sacarlo.
3. Quite las etiquetas de ambos lados del
cartucho antes de instalarlo. Coloque
el cartucho filtrante nuevo en su luga r
empujando el cartucho hacia dentro de la
cavidad hasta que que de bien asentado.
4. Alinee las roscas hasta que la placa frontal
encaje en la cavidad y luego gire la placa
frontal completa a la derecha hasta que
quede fija.
5. Vuelva a instalar la ta pa del filtro de ducha. Deje correr
agua por el car tucho durante cinc o minutos para quitar las
particulas finas de carbonon.
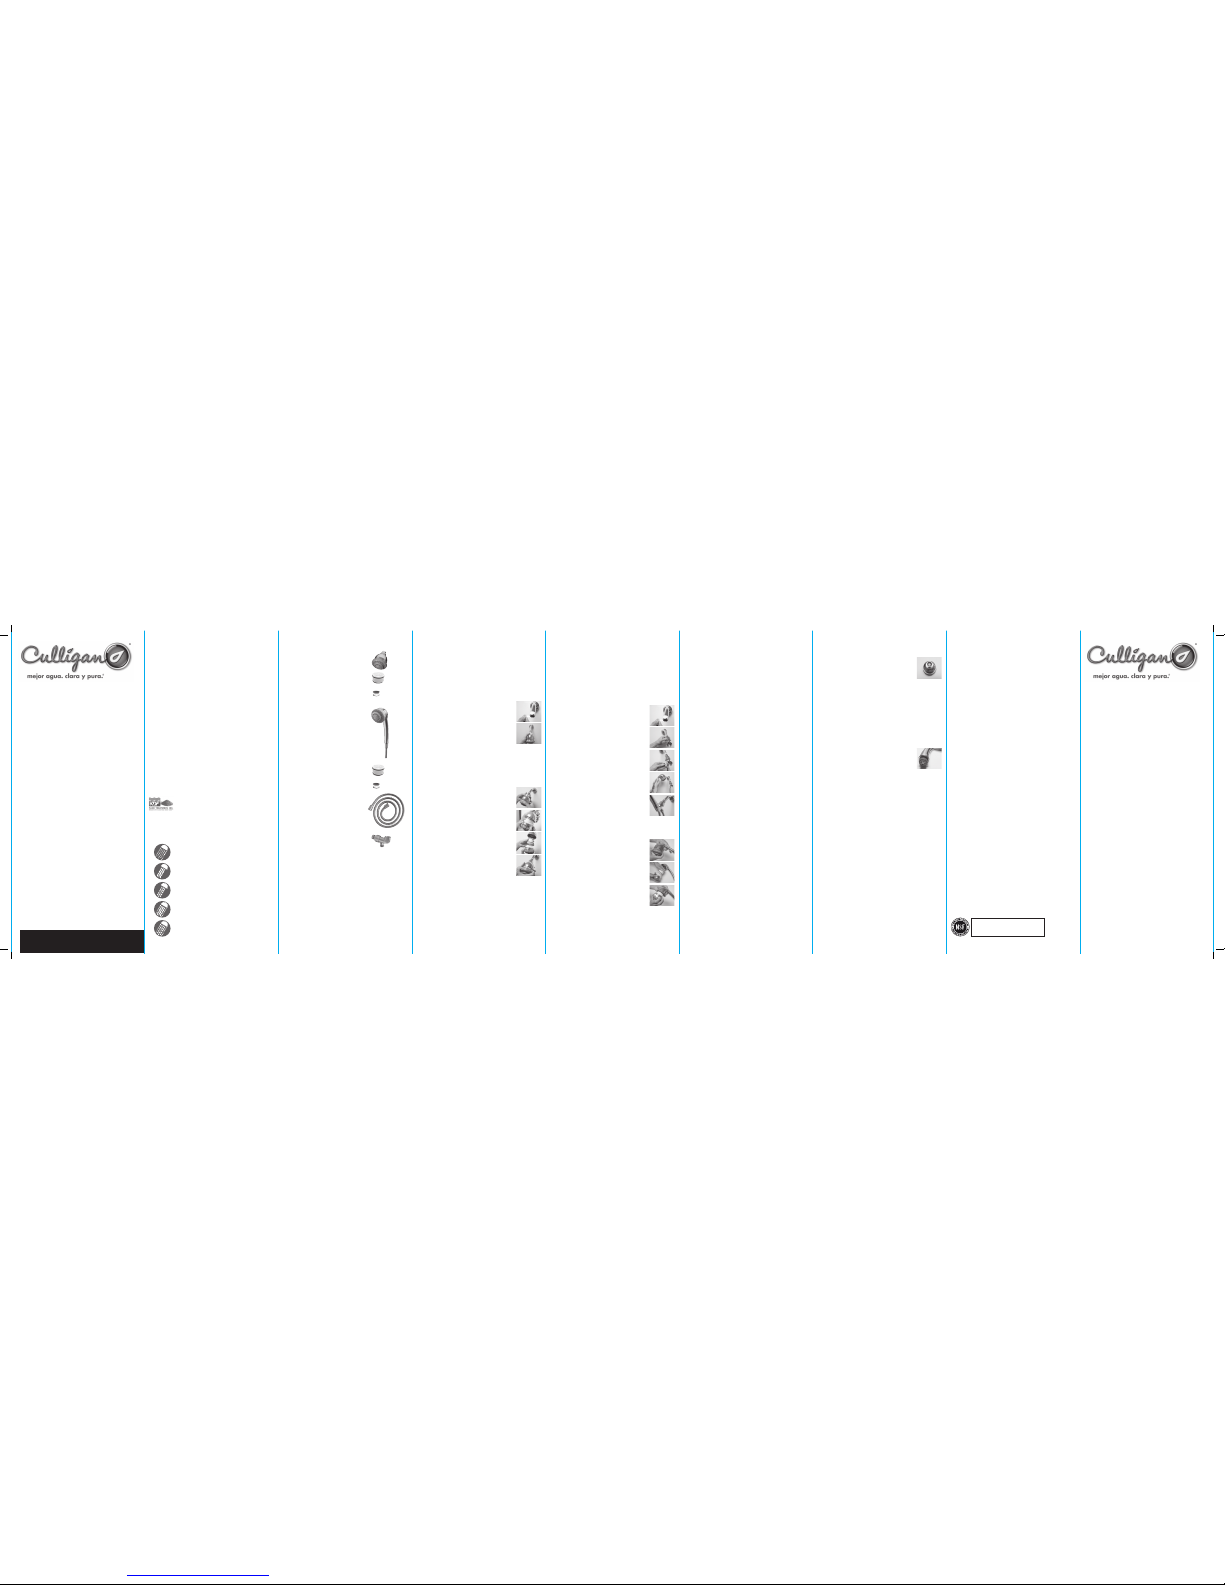
COMPONENTES INCLUIDOS
Cabezal de Ducha Filtrado
Montado a la Pared con Masaje
a. Regadera
b. Cartucho Filtrante (1)
c. Cinta de Teflon®
Cabezal de ducha Filtrado
Regadera de Mano con Masaje
a. Regadera
b. Cartucho Filtrante (1)
c. Cinta de Teflon®
d. Manguera metálica de 1,5 metros
e. Brazo
a.
b.
c.
a.
b.
c.
d.
e.
©Culligan International Company.
Todos los derechos reservados.
ww w.cul lig an.com
Patente en EE.UU.: 6,599,428 B1 # 01023667/01023668
0 8 /11