Currys Essentials CBCONW12 User manual

INSTRUCTION MANUAL
BUILT-IN OVEN
CBCONW12/CBCONX12
CBCONW_X12_IB rollover.indd 1 05/12/2014 17:27

Contents
Safety Warnings............................................................................................................................ 3
Unpacking..................................................................................................................................... 5
Installation .................................................................................................................................... 6
Use a Competent Person or Qualied Electrician ...................................................................... 6
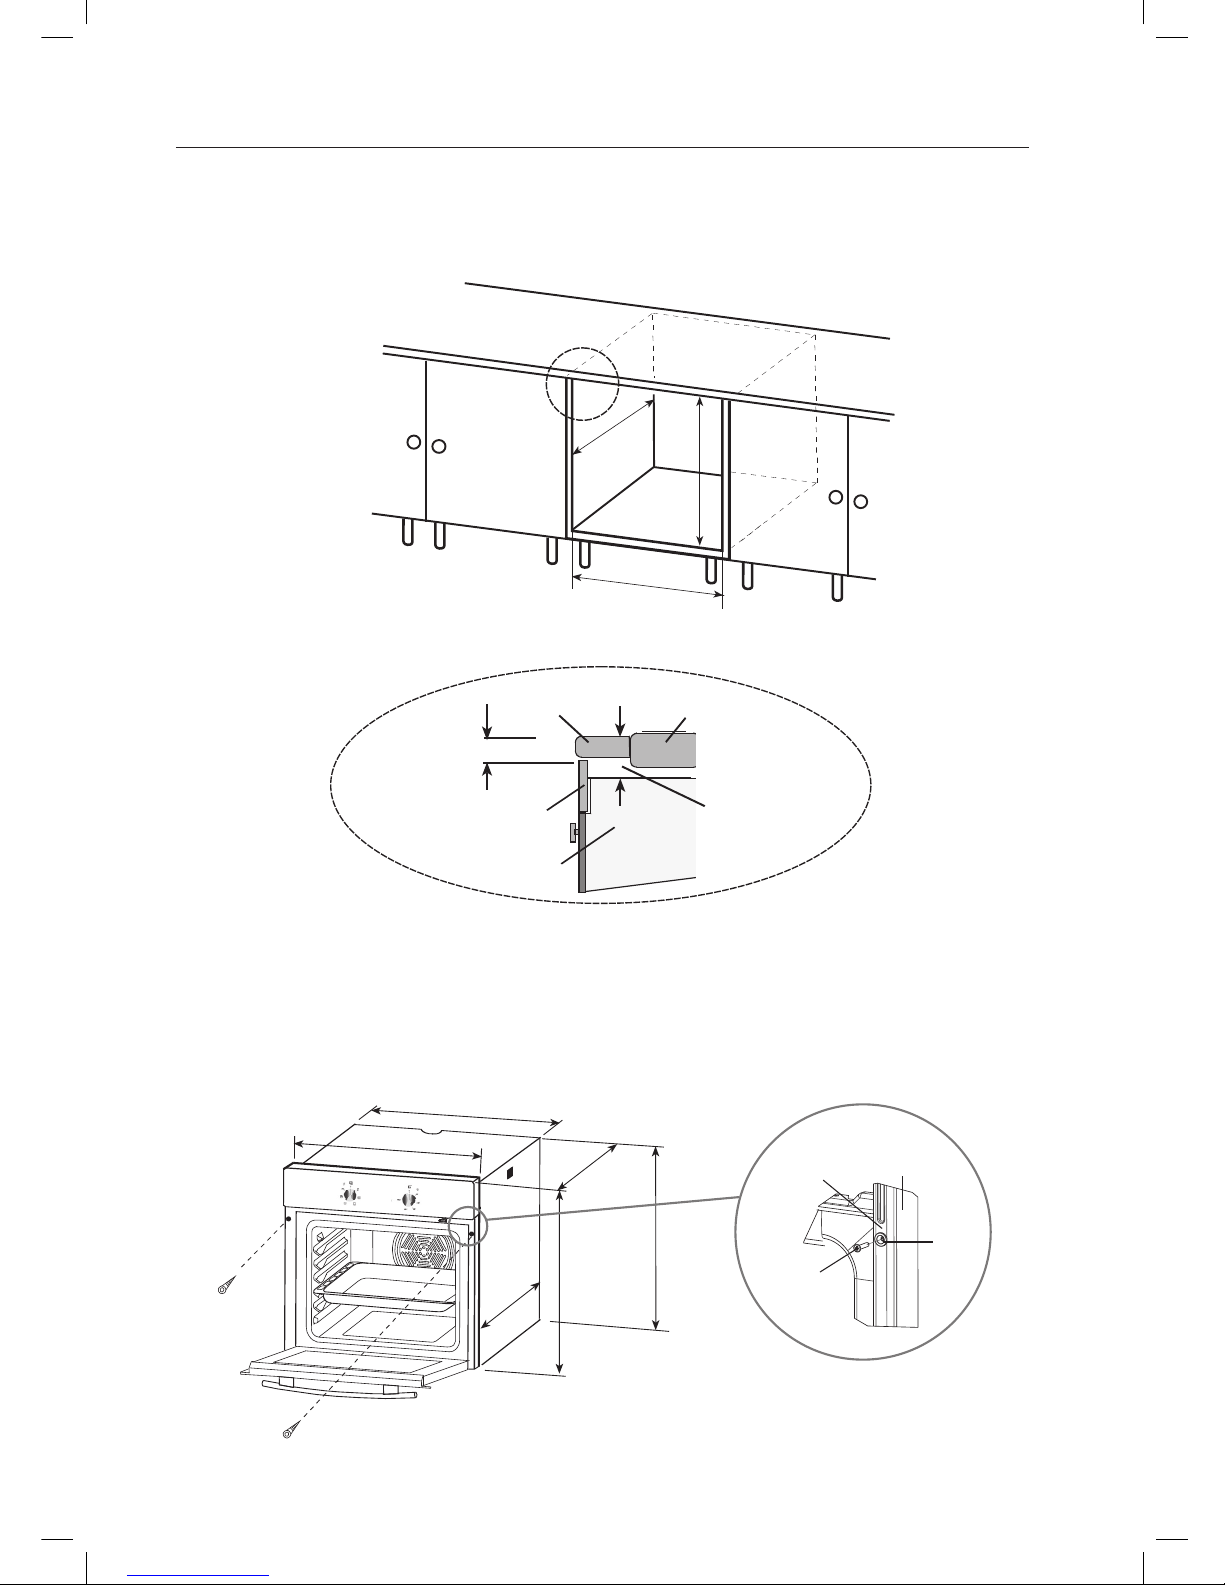
Installing the Built-in Oven.......................................................................................................... 7
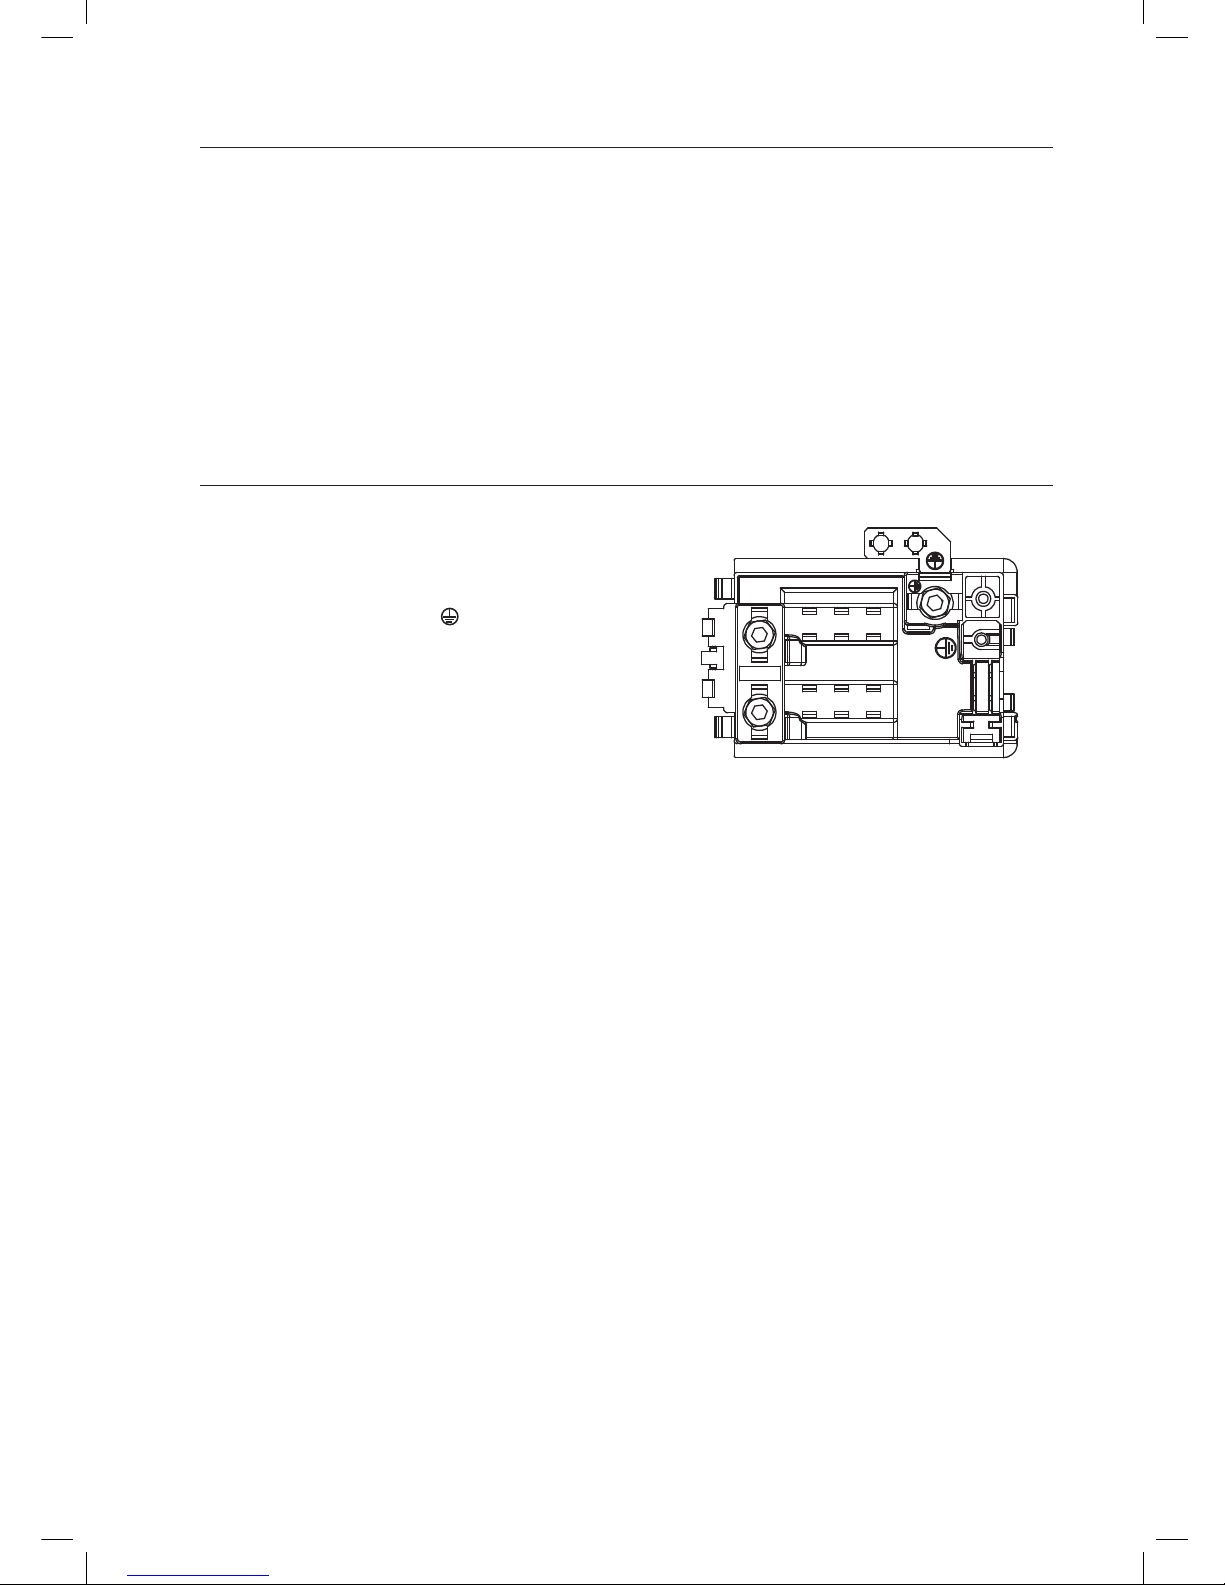
Making an Electrical Connection................................................................................................. 8
Terminal Box Connections ........................................................................................................... 8
Product Overview......................................................................................................................... 9
Front View ...................................................................................................................................................................9
Control Panel..............................................................................................................................................................9
First Time Use of the Oven ......................................................................................................... 10
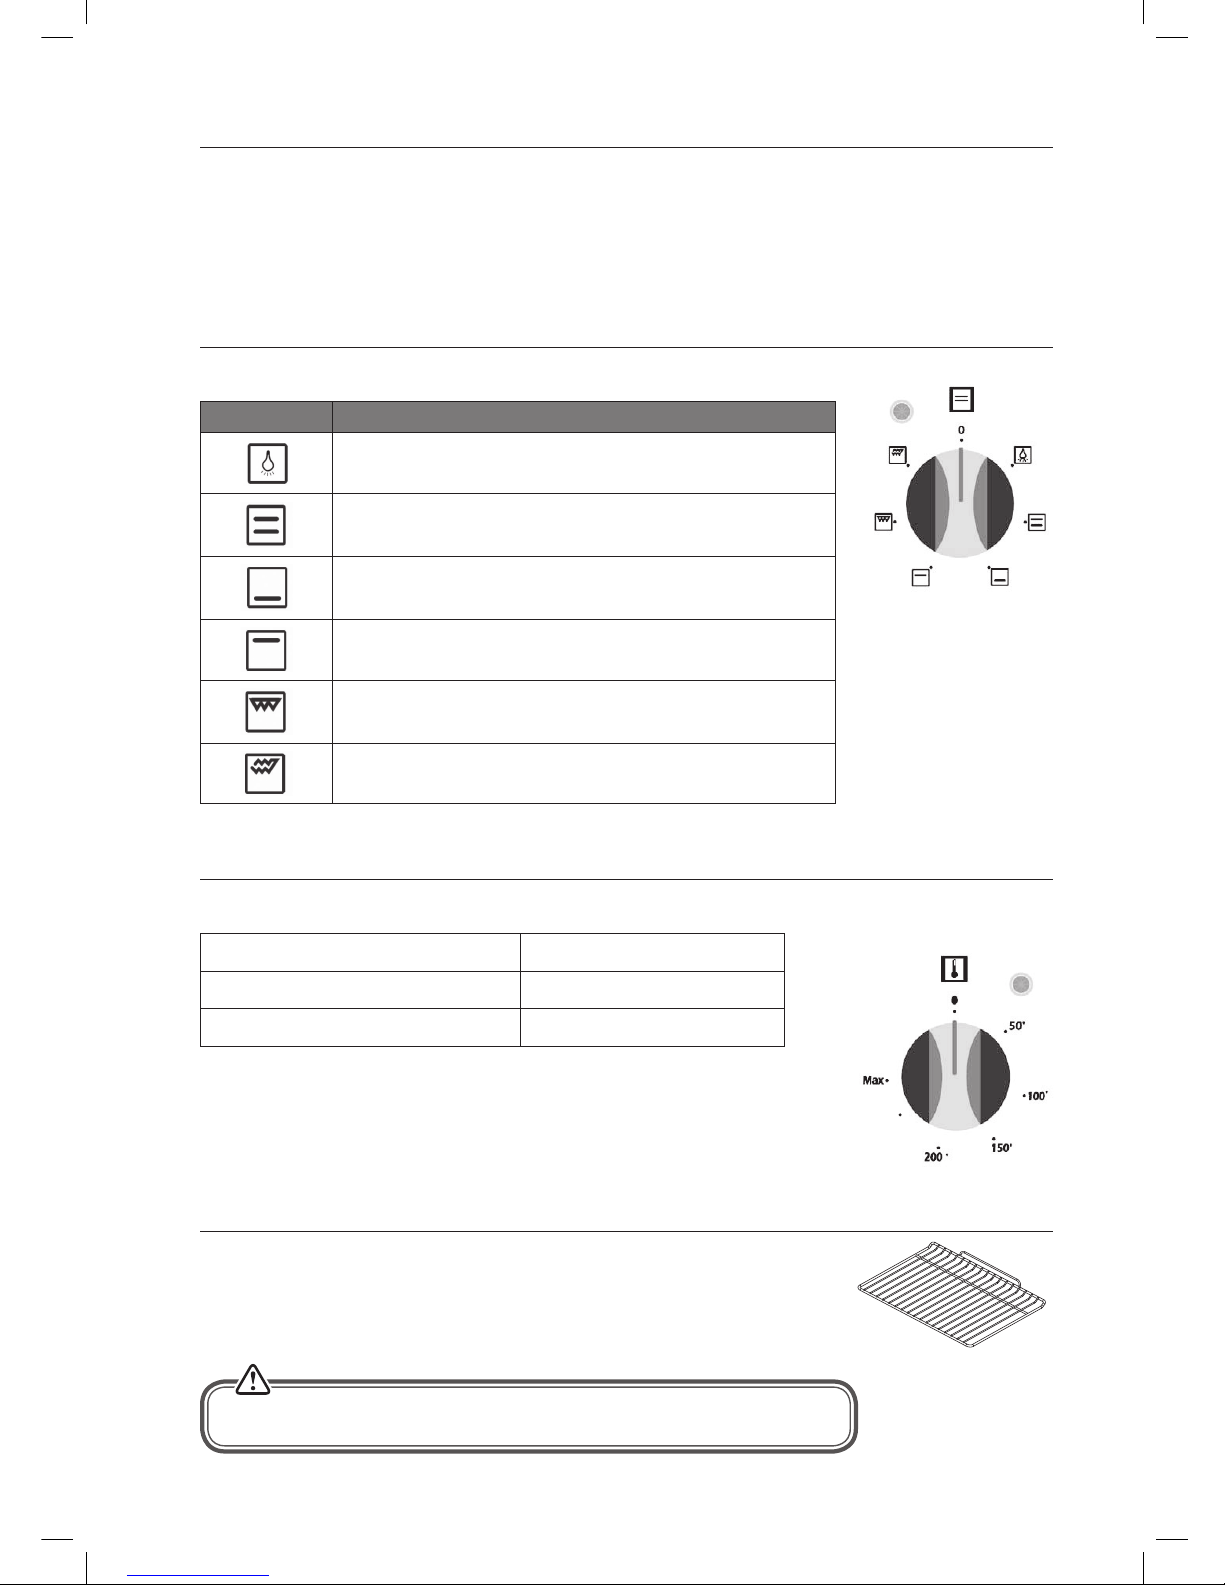
Function Selector Control .......................................................................................................... 10
Thermostat Control .................................................................................................................... 10
Replacing the Anti-tilting Oven Shelf....................................................................................... 10
Using the Oven ........................................................................................................................... 11
Using the Functions.................................................................................................................... 12
Baking Tips.................................................................................................................................. 12
Energy Saving ............................................................................................................................. 12
Cleaning Tips............................................................................................................................... 13
Cleaning the Outside of the Oven............................................................................................. 13
Cleaning the Oven Door Glass................................................................................................... 13
Replacing the Oven Light........................................................................................................... 14
Removing the Door for Easier Cleaning.................................................................................... 14
Taking out the Glass from the Oven Door for Cleaning........................................................... 14
Product Fiche and Specications .............................................................................................. 15
Energy Saving Tips and Energy Label....................................................................................... 15
- Main Oven..................................................................................................................................................... 15
CBCONW_X12_IB rollover.indd 2 05/12/2014 17:27

3
Safety Warnings
IMPORTANT SAFETY INSTRUCTIONS
READ CAREFULLY AND KEEP FOR FUTURE REFERENCE
• It is recommended that this appliance is installed by a qualied electrical
engineer. The manufacturer is not responsible for any damage caused by
incorrect installation.
• Check whether there is any damage to the appliance after you have
unpacked it. If any damage is found, do not use the appliance and
contact the store where you purchased it.
• This appliance is for Indoor Domestic Use only.
• For disconnection from the mains supply you must have a switch with
a contact separation of at least 3.0 mm in all poles and suitably rated that
provides full disconnection, this must be incorporated in the xed wiring
in accordance with the local wiring rules.
• If your mains cable gets damaged, it should be replaced by an authorized
service agent or qualied electrician in order to avoid a hazard.
• Only operate your appliance in a dry atmosphere.
• Ensure that the appliance is switched o at the mains supply switch
and allowed to completely cool down before cleaning, replacing the
oven lamp or performing any maintenance to avoid the possibility of an
electric shock.
• This appliance can be used by children aged from 8 years and above
and persons with reduced physical, sensory or mental capabilities or
lack of experience and knowledge if they have been given supervision
or instruction concerning use of the appliance in a safe way and
understand the hazards involved.
• Cleaning and user maintenance shall not be made by children without
supervision.
• Children should be supervised to ensure that they do not play with
the appliance.
• During use the appliance becomes hot. Care should be taken to avoid
touching the heating elements inside the oven.
• The appliance and its accessible parts become hot during use. Young
children should be kept away.
CBCONW_X12_IB rollover.indd 3 05/12/2014 17:27

4
• Danger of re: Do not store items in the oven other than the accessories
supplied.
• When the oven is hot never touch the oven glass or any other parts that
get hot. Allow the oven to cool before touching these parts.
• Do not use harsh abrasives cleaners or sharp metal scrapers to clean the
oven door glass since they can scratch the surface, which may result in
the glass shattering.
• Before starting to use your appliance, keep curtains, tulle, paper
or ammable materials away from your appliance. Do not keep
combustible or ammable things in or on the appliance.
• This appliance is for cooking purposes only. It must not be used for other
purposes, for example room heating.
• Do not use steam cleaners for cleaning the appliance.
• Do not rest any items on or stand on the open door.
• Take care when handling parts with glass, knocks, chips, heavy handling
and dropping could cause the glass to shatter.
• The glass oven door uses toughened glass and is designed to break into
many‘nugget’ size pieces if it breaks. These pieces will still have sharp
edges, please handle broken glass with care.
CBCONW_X12_IB rollover.indd 4 05/12/2014 17:27

5
Unpacking
Remove all packaging from the unit. Retain the packaging. If you dispose of it please do so
according to local regulations.
The following items are included:
Baking Pan Shelf x 1Grill Pan, Grill Rack and Handle Set x 1
The Main Unit
Wire Shelf x 1
0
240
Max
50°
100°
150°
200°
Thank you for purchasing your new Currys Essentials Built-In Oven.
You must read this manual in order to fully understand how to install and
operate it correctly.
Read all the safety warnings carefully before use and keep this manual for
future reference.
If items are missing or damaged please contact
Partmaster (UK only). Tel: 0344 8003 456 for assistance.
CBCONW_X12_IB rollover.indd 5 05/12/2014 17:27

6
Installation
Use a Competent Person or Qualied Electrician
• This oven must be installed in compliance with local safety standards.
• Wiring connections must be in accordance with Local Wiring Rules and any particular conditions of the
local authority.
• Refer to data plate for rating information. The data plate is positioned behind the bottom of the oven door.
The electrical wiring diagram is positioned on the rear panel of the appliance.
• A means of disconnection with a contact separation of at least 3 mm must be supplied in the xed wiring.
• This appliance must be properly earthed.
• Do not lift the appliance by the door handles.
• Prepare the cupboard opening to match your appliance measurements. (See diagrams)
• Slide appliance into the cupboard, ensuring that the supply cable does not kink.
• To prevent tipping, secure your oven into the cupboard by fastening with the 2 screws supplied.
• The cabinet must be suitable for use in built in ovens and capable of withstanding 75°C Installation into low
temperature tolerant cabinetry (e.g. Vinyl coated) may result in deterioration of the low temperature coating
by discolouring or bubbling.
• We cannot accept responsibility for damage caused by installation into low temperature tolerant cabinets.
• After installation, test and ensure that the appliance operates correctly.
• The electrical connection of this oven should be carried out by a competent person, if in doubt consult
a qualied electrician, according to the instructions in this installation section and in compliance with
the current regulations.
• The oven is intended for indoor domestic use only.
• The manufacturer reserves the right to introduce changes which do not aect the operation of
the appliance.
To avoid any potential hazard, you must follow our instructions when you install your appliance.
Failure to install the appliance correctly could invalidate any warranty or liability claims.
CBCONW_X12_IB rollover.indd 6 05/12/2014 17:27

7
Installing the Built-in Oven
1. The space where the oven will be placed needs to be at least 560 mm wide, 555 mm deep and 600 mm high.
A minimum gap of 2.5 cm between the work surface and the control panel, and a distance of 5 cm between
the work surface and top of the oven is needed, in order to be able to get to the back of the oven if necessary
and for easy access when sliding the oven out.
2. Ensure the electrical connections have been made.
3. Insert the oven into the cabinet by pushing it back into the space within the cabinet (Ensuring the electrical
cable is not trapped or touching hot parts). Open the door carefully, and insert the xing screws through the
spacers into the xing surface of the cabinet, ensure the front frame of the oven is touching the xing surface
of the cabinet and tighten the xing screws to hold the oven in place securely.
Cabinet cut - out sizes
60cm
58cm
56cm
60cm
Countertop
Built-in oven
Min.2.5cm
Control
panel
Distance between
countertop and
control panel
Built-in hob
Distance between
countertop and
top panel of built-in
oven
Min. 5cm
557mm
550mm
575mm
576mm
595mm
595mm
Mounting screws
Mounting
screw
Front
frame
Cabinet
edge
Spacer
Cabinet cut - out sizes
600mm
555mm
Min 560mm
Max 565mm
Countertop
Built-in oven
Min.2.5cm
Control
panel
Distance between
countertop and
control panel
Built-in hob
Distance between
countertop and
top panel of built-in
oven
Min. 5cm
CBCONW_X12_IB rollover.indd 7 05/12/2014 17:27

8
Making an Electrical Connection
An approved suitable cable must be connected from the Consumer Unit (main fuse box)and be protected by its
own 30 amp fuse or Micro Circuit Breaker (MCB).
The electrician must provide a fused double-pole isolation switch, which disconnects both the line (live) and
neutral conductors, with a contact separation of at least 3 mm incorporated into the xed wiring. The fused
switch should be tted to the kitchen wall, and must be placed in an easy accessible position in accordance with
IEE regulations. Connect the fused switch to a junction box which should be tted on the wall. The ovens power
supply cable can then be connected. Connect one end to the junction box and connect the other end to the
ovens power connection box which is located at the back of the oven. Remove the cover of the power connection
box and install the cable, in accordance with the connection diagram. The power supply cable must be positioned
away from direct heat sources. It should not be subjected to a temperature rise of more than 50°C above room
temperature.
Terminal Box Connections
For this oven, the cable type must be a minimum of H05VV-F
(PVC insulated and sheathed) 3 cores x 4 mm2and the
connection should be made as detailed below.
Green / Yellow (Earth) to the PE ( ) terminal
Brown (Live) wire to the terminal marked L
Blue (Neutral) wire to the terminal marked N
Ensure the cable exits through the cable grip, clamping on
the outer sheath of the cable, and x in place by tightening
the xing screw.
Ensure all connections are adequately tightened. Do not over
tighten as you may risk damaging the threads.
This appliance must be earthed.
For this connection, ‘Twin and Earth 6242Y’
type cable can be used.
L N
PE
CBCONW_X12_IB rollover.indd 8 05/12/2014 17:27

9
Product Overview
Front View
Control Panel
240
240
Function Selector
Control
Thermostat Control
Oven Indicator
Lamp
Thermostat
Lamp
0
240
Max
50°
100°
150°
200°
Control Panel
Shelf Guide Slots
Baking Pan
Shelf
Wire Shelf
CBCONW_X12_IB rollover.indd 9 05/12/2014 17:27

10
Thermostat Control
The temperature can be set from 50°C - 240°C. Select the desired temperature, as follows:
To keep food warm 50 - 100°C position
For traditional oven cooking 50 - 240°C position
For all types of grilling 190°C position
Function Selector Control
• This control is used to select the available cooking functions, which are:
Symbol Function Description
The oven light will be turned on.
The oven’s thermostat and warning lights and the lower and
upper heating elements will be switched on.
The oven’s thermostat and warning lights and the lower heating
element will be switched on.
The oven’s thermostat and warning lights and the upper heating
element will be switched on.
The oven’s thermostat and warning lights and grill heating
element will be switched on.
The oven’s thermostat, warning lights, upper and grill heating
elements will be switched on.
240
240
First Time Use of the Oven
Unpack the oven. Remove any packaging or labels. Use a damp cloth to carefully wipe the inner cavity wall and
housing. Clean all the detachable parts in hot, soapy water before using.
Heat the appliance on maximum, making sure the room is well ventilated as there may be a little smoke and
odour. This is normal, and is due to the protective substance on the appliance which protects it during shipping
from the factory. Switch the appliance o once the smoke and odour has stopped. This can take up to 30 minutes.
Replacing the Anti-tilting Oven Shelf
• Insert the shelf at an angle with the vertical section to the rear to clear the stops at
either side of the guide slot. Once past this stop the shelf can be placed level again.
• To remove, completely angle the shelf upward so the shelf stop is cleared from the
guide stop.
• Accessible parts may become hot when in use. Children should be kept away.
CBCONW_X12_IB rollover.indd 10 05/12/2014 17:27

11
1. To get the best results, the smallest distance
allowed between the food and the upper
heating element is 30 mm.
2. On the wall of the inner cavity there are 5
dierent shelf guide slots. You can place the
shelf at dierent heights to achieve the best
cooking performance depending on the heat
of the heating elements and the size of food.
If only the upper heating element is on, we
suggest that you place the shelf on guide 1
(make sure that there is a minimum distance of
30 mm between the food and the upper heating
element).
3. Always monitor the food during cooking to
ensure that you are not overcooking it.
4. For heavy food, use the Baking Pan rather than the wire shelf.
5. Select the oven function you require. Select the temperature you require.
6. Before placing food in the oven you may need to pre-heat the oven for 10 minutes.
7. The temperature light will go out when the chosen temperature has been reached.
8. To switch the oven o turn the function control dial to the o position ‘0’.
9. The grill pan has a detachable handle. Ensure the grill pan handle is centralised and
Using the Oven
• Under no circumstances should the oven be lined with aluminium foil as overheating may occur.
• Do not place dishes or baking trays directly onto the base of the oven as it becomes very hot and
damage may occur.
• Bread may catch re if the toasting time is too long. Close supervision is necessary during toasting.
• During use, this appliance becomes hot. Care should be taken to avoid touching hot surfaces,
e.g., oven door, heating elements.
• Accessible parts may become hot when in use. Children should be kept away.
• Do not leave the handle in position when grilling. If the handle is left in position when grilling,
it will get very hot.
Guide 1
Guide 2
Guide 3
Guide 4
Guide 5
CBCONW_X12_IB rollover.indd 11 05/12/2014 17:27

12
secure as shown below when in use.
Using the Functions
Symbol Function Description
Static Cooking Function
The static cooking function emits heat, ensuring even cooking of the lower and upper food,
this is an excellent function for making pastries, cakes, baked pasta, lasagne and pizza.
Lower Heating Function
The lower heating function is ideal for baking pizza, as the heat rises from the bottom of the
oven and warms food up, rather than cooking the foods.
Upper Heating Function
In this type of cooking, the heat emanating from upper heating element cooks the upper
side of the food. This is suitable for browning the top of a cooked dish.
Grilling Function
This function is used for grilling foods such as cheese on toast, always use the highest rack.
Lightly brush the grill rack with oil to stop foods sticking and place the foods in the centre.
The grill pan and rack should be used together to catch the drips of oil.
Faster Grilling Function
This function is used for faster grilling and for covering a larger surface area, such as grilling
meats, which tend to take up more room on a grilling rack. Use a lower shelf position for
grilling thick foods.
Baking Tips
1. Always place baking tins in the centre of the wire shelf.
2. Make sure you use bakeware that is oven proof.
3. Do not place bakeware too close to the rear of the oven wall.
4. You can inuence the degree of browning by changing the temperature setting.
5. If a cake collapses after removing it from the oven:
• Use less liquid on your next attempt.
• Consider using a longer baking time or use a slightly lower temperature setting.
Energy Saving
To save energy and to help protect the environment, we recommend these hints:
• Preheat the oven only if expressly required by the recipe or guidelines.
• Dark baking tins have a higher degree of heat absorption.
• In the case of longer baking times, you can switch o the oven 5–10 minutes before the full baking time and
use the residual heat. This will reduce energy usage.
• Use the oven eciently, by cooking many trays of food at the same time.
• Cook 2 trays of scones, small cakes or sausage rolls at the same time.
• Select the correct shelf location for food being cooked.
• Do not open the oven door more than necessary.
CBCONW_X12_IB rollover.indd 12 05/12/2014 17:27

13
Cleaning Tips
• Ensure that the appliance is switched o and isolated before cleaning the oven to avoid the possibility
of electric shock.
• Allow the oven to fully cool before cleaning.
1. Remove the wire shelves, wash them separately in hot soapy water and dry thoroughly.
2. Wash the interior of the oven with hot soapy water and wipe down with a damp cloth.
3. Leave the door open until the interior has dried, before replacing the wire shelves.
4. Clean the oven after each use, especially after roasting or grilling, this will help reduce spilt or splattered food
debris burning and becoming dicult to remove.
5. Do not use abrasive pads to clean the interior of the oven as this may remove the enamel, which will aect
the eciency of your oven.
6. Steam cleaners must never be used to clean this oven.
Cleaning the Outside of the Oven
1. You should regularly wipe over the control panel and oven door using a soft cloth and liquid detergent as
spilt liquids may damage the nish.
2. Wash enamelled or chrome plated parts of the oven with hot soapy water or with non-abrasive detergents.
3. Never use abrasive pads to clean enamelled, chromed or stainless steel surfaces.
4. When using commercially available stainless steel cleaning products, avoid cleaning any lettering or symbols,
as they can become damaged.
Cleaning the Oven Door Glass
Do not use harsh abrasive cleaners or sharp metal scrapers to clean the oven door glass since they scratch the
surface, which may result in shattering of the glass.
Take care when handling parts with glass, knocks, and chips; heavy handling and dropping could cause
the glass to shatter.
CBCONW_X12_IB rollover.indd 13 05/12/2014 17:27

14
1. Turn o the oven and make sure that it is cold. Switch o its
isolation switch.
2. Unscrew the glass cover in front of the light, unscrew and take
out the bulb.
3. Screw in the new bulb, which should be resistant to 300°C.
For replacement bulbs contact your local service centre or
Partmaster Direct (details at the back of this guide).
4. Re-t the cover.
5. If in any doubt, consult a qualied electrician for help.
Removing the Door for Easier Cleaning
1. We recommend you have someone to assist you during removal
of the door.
2. Open the door completely.
3. The door hinge has a small latch. Lift the latch on both hinges.
4. Lift the door slightly as if closing, and then with both hands
supporting the door, pull it away from the oven.
5. To replace the door, perform the above in reverse order. Ensure
the slot on the bottom of the hinge is seated when retting the
door. Open and close the door to make sure that it has been
tted correctly.
Taking out the Glass from the Oven Door for Cleaning
1. Remove the oven door.
2. Undo the screws from the metal panel that holds the glass
in place.
Replacing the Oven Light
• Ensure the appliance is switched o before replacing the light to avoid the possibility of electric shock.
• Take care when handling parts with glass.
It may require a little force due to the adhesive pads
under glass. Take care not to break the glass.
3. Lift the glass out of the frame. Clean it using appropriate glass
cleaning products.
4. To replace the glass, place it back in, placing the securing caps
over the top of the glass and screw it back into place.
5. Ensure the glass is not damaged in any way.
CBCONW_X12_IB rollover.indd 14 05/12/2014 17:27

15
Product Fiche and Specications
Brand Currys Essentials
Model CBCONW12 / CBCONX12
Energy Eciency Index - Conventional 103.8
Enegy Class A
Energy Consumption (electricity) -
Conventional 0.85 kWh/cycle
Number of Cavities 1
Heat Source Electric
Volume 64 litres
Product Type Electric Oven
Mass (CBCONX12)
Mass (CBCONW12)
29 Kg
28.5 Kg
This product complies with EN 60350-1
Rated Voltage 230-240V
Rated Frequency 50 Hz
Power 2600-2800 W
Current 11 – 12 A
Top Element 1200 W
Bottom Element 1100 W
Grill 1400/2600 W
Product Dimensions 59.5 (W) x 59 (H) x 57 (D) cm
Features and specications are subject to change without prior notice.
Energy Saving Tips and Energy Label
Main Oven
• Cook the meals together, if possible.
• Keep the pre-heating time short.
• Do not elongate cooking time.
• Do not forget to turn o the oven at the end of cooking.
• Do not open the oven door during cooking.
CBCONW_X12_IB rollover.indd 15 05/12/2014 17:27

IB-CBCONW12-141205V4
DSG Retail Limited (Registered in England No. 504877)
Maylands Avenue, Hemel Hempstead, Hertfordshire HP2 7TG. UK
The symbol on the product or its packaging indicates that this product must not be disposed
of with your other household waste. Instead, it is your responsibility to dispose of your waste
equipment by handing it over to a designated collection point for the recycling of waste electrical
and electronic equipment. The separate collection and recycling of your waste equipment at the
time of disposal will help conserve natural resources and ensure that it is recycled in a manner
that protects human health and the environment.
For more information about where you can drop o your waste for recycling, please contact your
local authority, or where you purchased your product.
Visit Partmaster.co.uk today for the easiest way to buy electrical spares and accessories. With over 1 million spares
and accessories available we can deliver direct to your door the very next day. Visit www.partmaster.co.uk
or call 0344 800 3456 (UK customers only). Calls charged at National Rate.
For general information about this appliance
and handy hints and tips, please visit
www.knowhow.com/knowledgebank or call 0344 5611234.
CBCONW_X12_IB rollover.indd 16 05/12/2014 17:27
This manual suits for next models
1
Table of contents
Other Currys Essentials Oven manuals
Popular Oven manuals by other brands

Ariston
Ariston H6TMH4AF operating instructions

Frigidaire
Frigidaire FEB30S5ASB Circuit diagrams

Samsung
Samsung NV75K5549RS User & installation manual

Electrolux
Electrolux COP846X1 user manual

Hotpoint
Hotpoint DX 1032 CX S Instructions for installation and use

Elba
Elba EBO9810S Instructions for the use - installation advices