Currys Essentials C510WM12 User manual

5KG WASHING MACHINE
INSTALLATION / INSTRUCTION MANUAL
C510WM12
C510WM12_IB_120323_Zell.indd 1 23/03/2012 5:00 PM

C510WM12_IB_120323_Zell.indd 2 23/03/2012 5:00 PM

Contents
Unpacking.................................................................................................................................... 4
Installing Your Washing Machine ............................................................................................... 5
Choosing the Right Location for Your Washing Machine ........................................................................ 5
Moving and Installing ................................................................................................................. 6
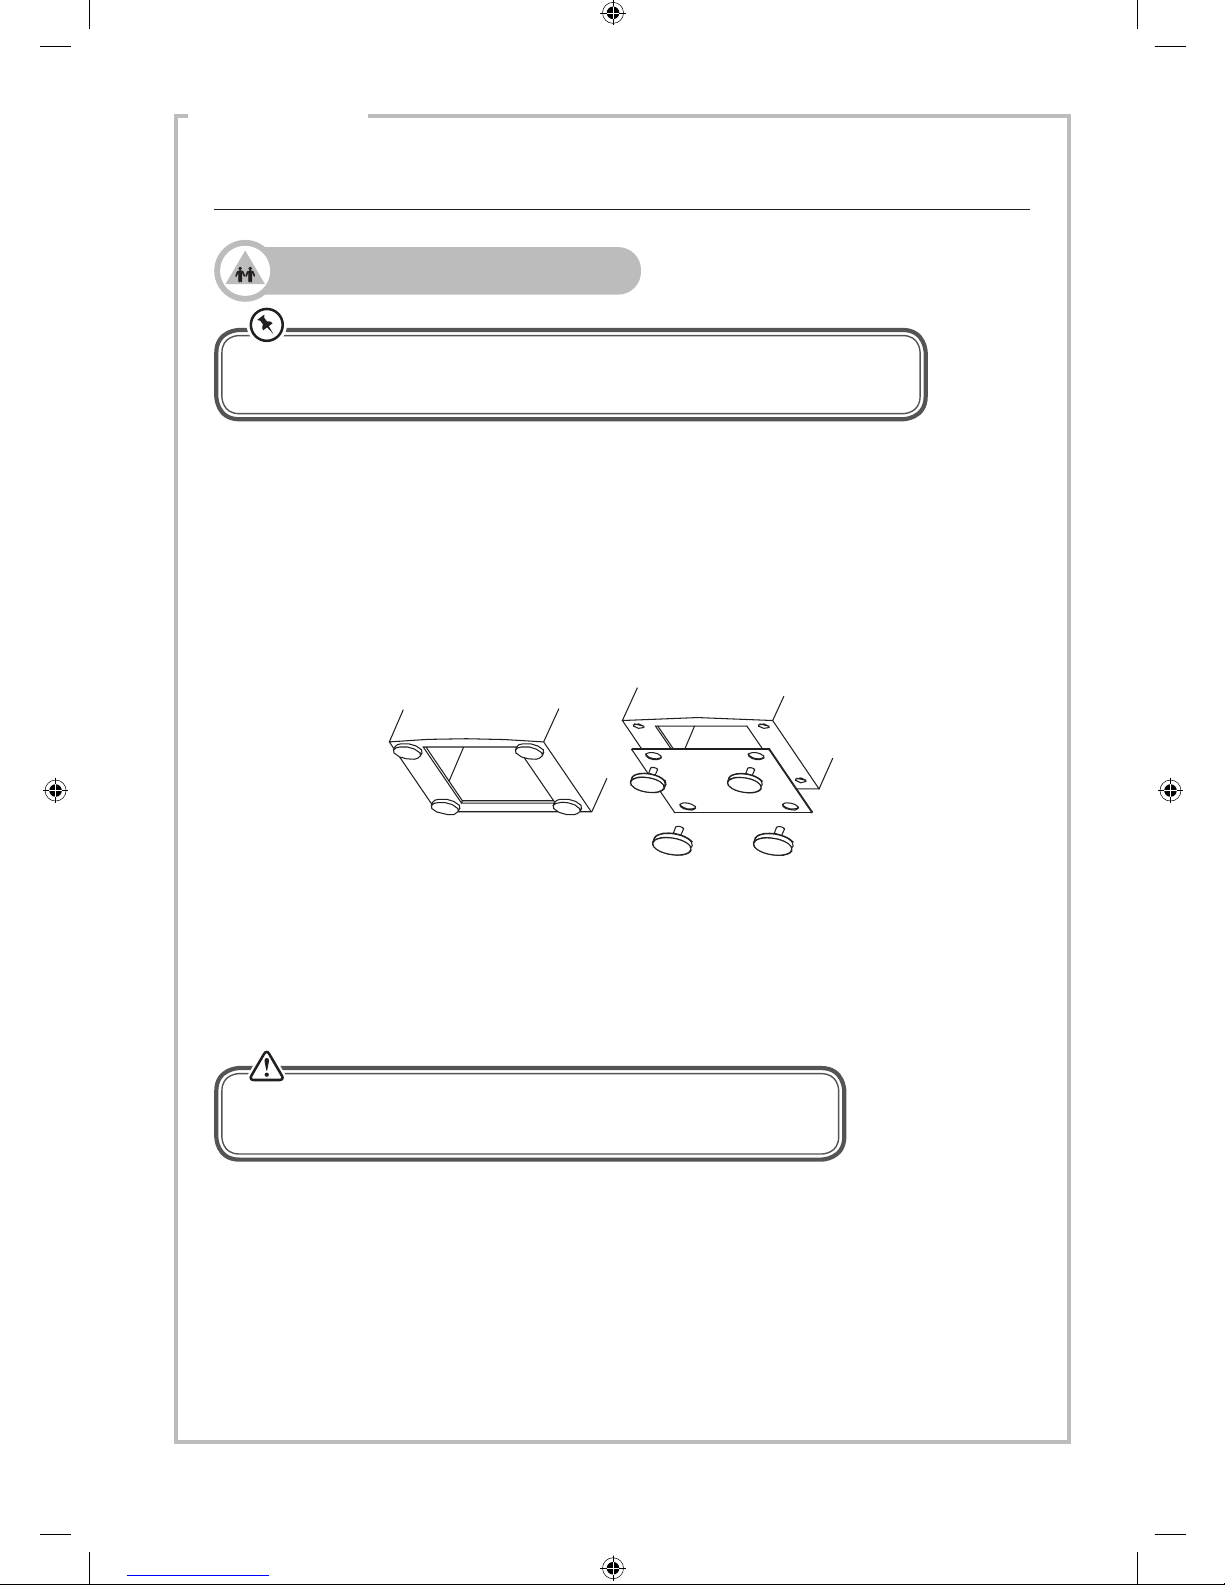
Removing the Transit Bolts ................................................................................................... 6
Moving the Washing Machine from One Location to Another.............................................................. 7
Hose and Cable Lengths...................................................................................................................................... 7
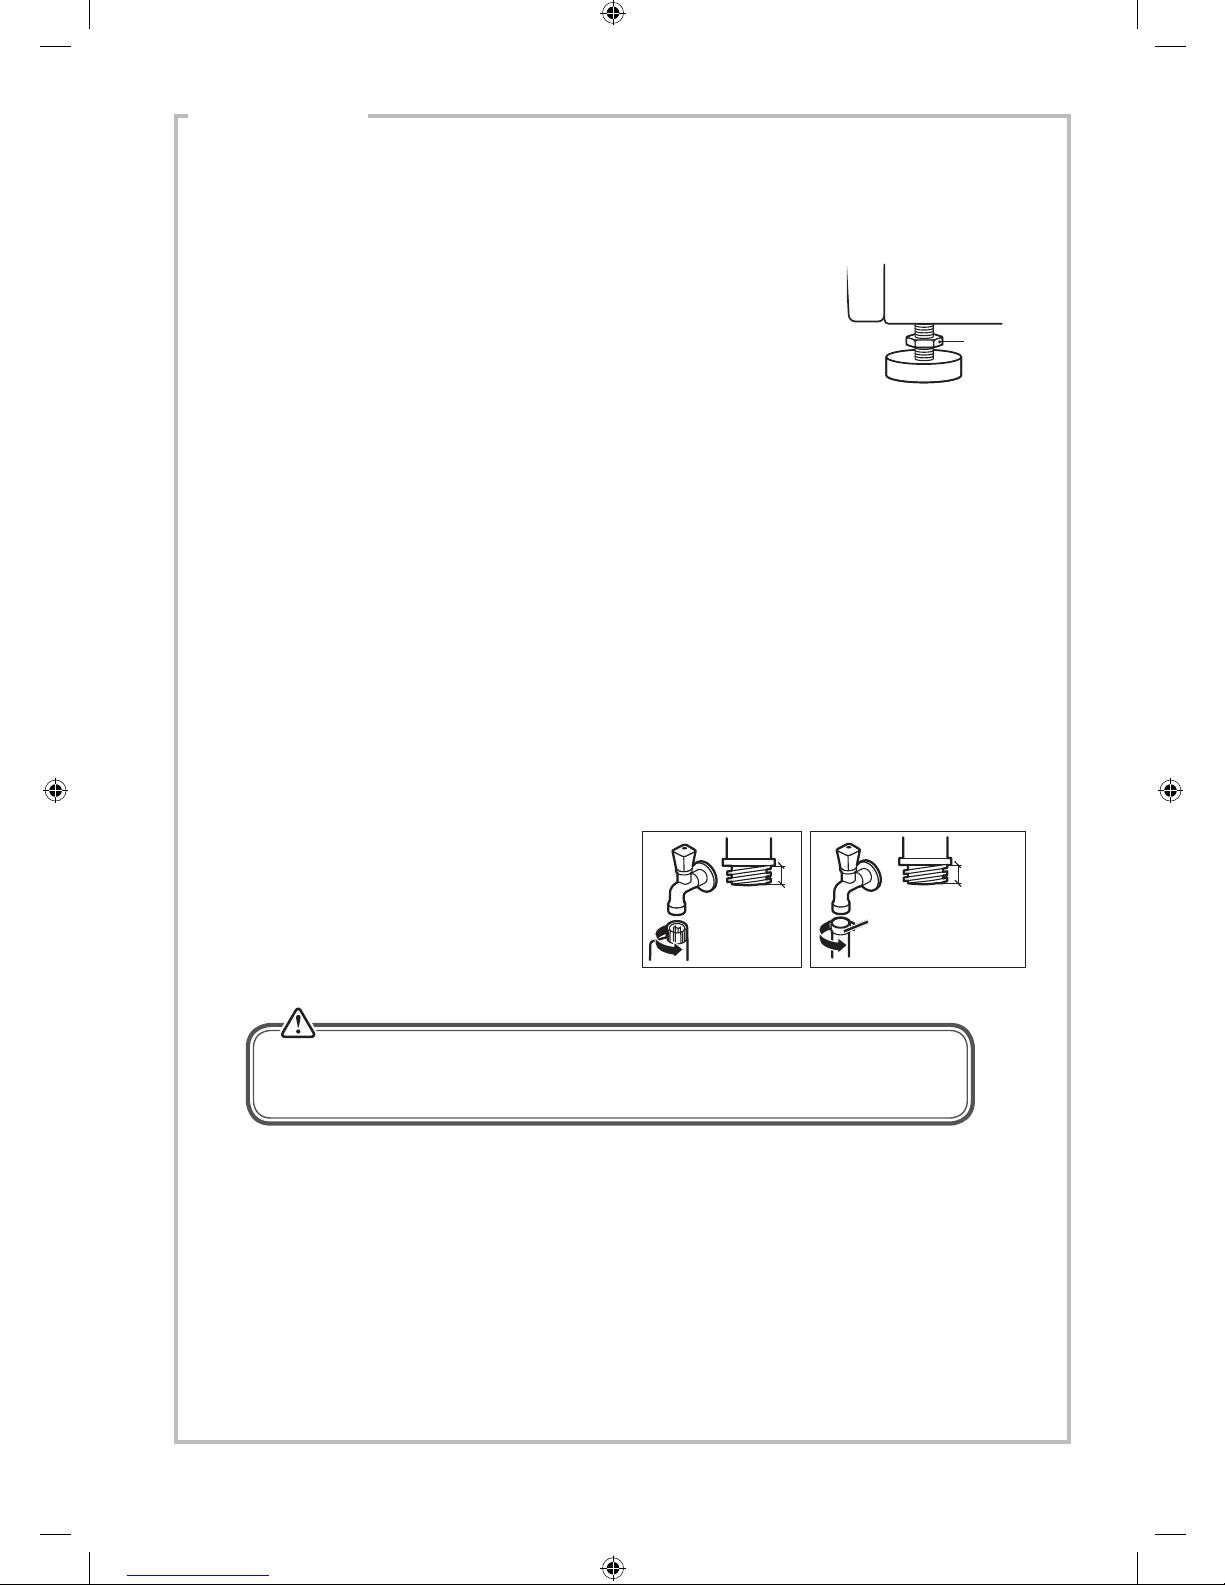
Levelling the Washing Machine ............................................................................................ 8
Water Supply Hose................................................................................................................................................. 8
Water Drain Hose.................................................................................................................................................... 9
Connecting to the Mains Supply ...................................................................................................................... 9
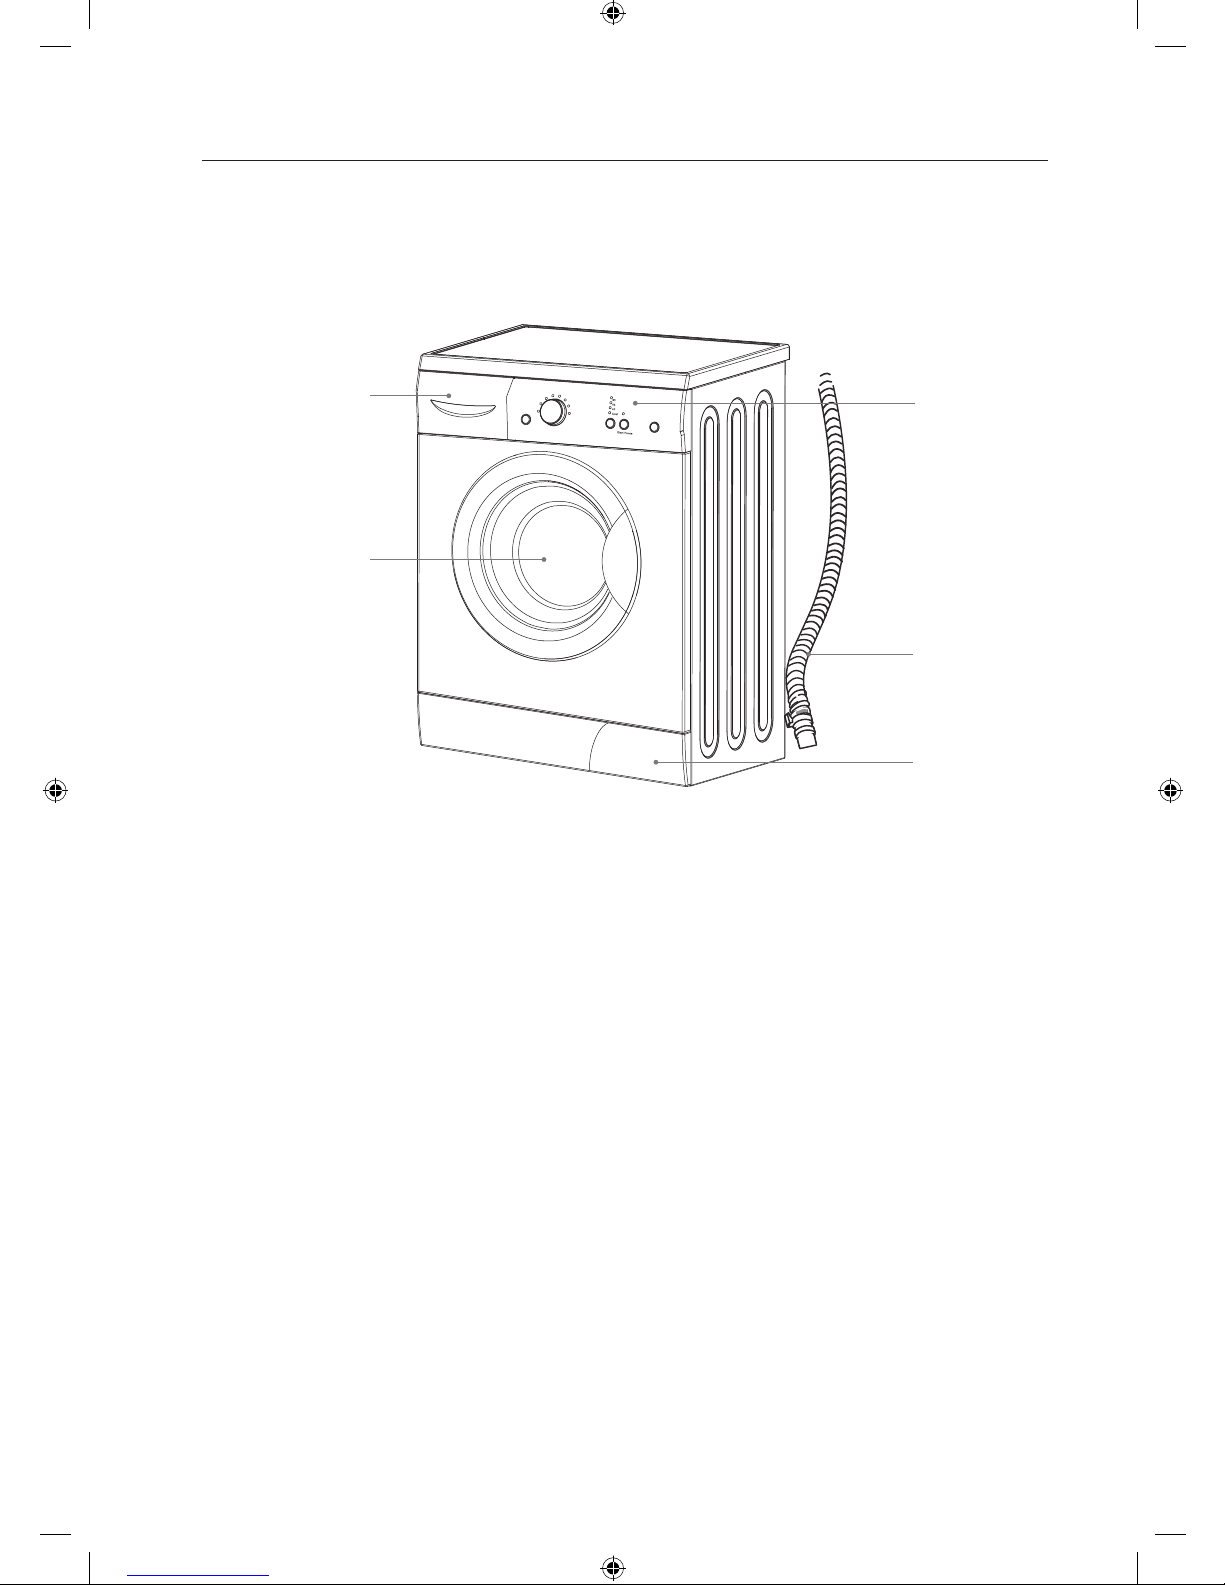
Product Overview...................................................................................................................... 10
The unit ....................................................................................................................................................................10
Control Panel .........................................................................................................................................................11
Preparation ................................................................................................................................ 12
Organising Laundry.............................................................................................................................................12
Preparing Laundry ...............................................................................................................................................12
Adding Detergent and Softener .....................................................................................................................12
Selecting the Programme..................................................................................................................................14
Wash Setting .............................................................................................................................. 15
Standard Washing ................................................................................................................................................15
Removing Washing (Once program is nished)........................................................................................15
Important Information.............................................................................................................. 16
Washing (Wool Programmes) ..........................................................................................................................16
Tips for Hanging Delicate Items to Dry.........................................................................................................16
If Clothing Shrinks in the Wash........................................................................................................................16
How to Use Laundry Starch ..............................................................................................................................16
Maintenance - Cleaning the Washing Machine....................................................................... 17
Cleaning the Exterior of your Washing Machine.......................................................................................17
Cleaning the Detergent Drawer......................................................................................................................17
Cleaning the Door Seal and Window ............................................................................................................17
Cleaning the Drain Filter....................................................................................................................................18
Preventing a Frozen Water Supply Hose......................................................................................................18
Cleaning the Filter Net of the Water Supply Hose....................................................................................18
Hints and Tips ............................................................................................................................ 19
Troubleshooting ........................................................................................................................ 21
Specications............................................................................................................................. 22
Product Fiche ............................................................................................................................. 23
Safety Warnings......................................................................................................................... 24
C510WM12_IB_120323_Zell.indd 3 23/03/2012 5:00 PM

4
The Main Unit
Cover Cap x 3
P.N.: 00221153000008
Noise Protection Board (includes
the feather felt)
P.N.: 00213400001800A
Instruction Manual
P.N.: C510WM12-001
Unpacking
Remove all packaging from the unit. Retain the packaging. If you dispose of it please do so according to
local regulations.
The following items are included:
If items are missing, or damaged please contact Partmaster (UK only).
Tel: 0844 800 3456 for assistance.
Temp.
/
Thank you for purchasing your new Currys Essentials Washing Machine.
We recommend that you spend some time reading this installation/instruction
manual in order that you fully understand all the operational features it offers.
Read all the safety instructions carefully before use and keep this installation/
instruction manual for future reference.
U - shape Holder x 1
P.N.: 00221123015002
For xing the water drain hose.
Water Supply Hose x 1
P.N.: 0020300158A
C510WM12_IB_120323_Zell.indd 4 23/03/2012 5:00 PM

INSTALLATION
5
Additional space (150mm) is required for the rear side of the washing machine. This is to allow
enough space for the water hose and drain hose.
Installing Your Washing Machine
Please read and follow the instructions carefully.
• In addition to the instructions mentioned here, special regulations of the relevant water and power
supply companies may apply. If in doubt, have the washing machine connected by a qualified
technician.
• The washing machine is heavy - caution when lifting it. Do not lift by projecting components (e.g.
washing machine door).
• Warning: Frozen hoses may tear/burst. Do not install washing machine in outdoor areas or where
there is a risk of frost.
• Lay hoses and cables in such a way that there is no risk of trapping or kinking.
Choosing the Right Location for Your Washing Machine
• Make sure there’s enough space for your washing machine.
• Install your washing machine on a flat, stable surface to avoid excessive vibration and noise.
• Don’t install your washing machine in direct sunlight or in a place where temperatures reach
freezing.
Sloping
surface
Unstable Bumpy
surface
• When moving, start by tilting the washing machine backwards.
• One person should stand behind it, holding the rear of the top panel. The other person should grip
the bottom feet at the front.
• Don’t touch the door opening button while holding.
• Check that you have all the required accessories for installation.
• Entrust the installation of the washing machine to a qualified technician or service agent.
Two or more people are required to carry
the washing machine.
C510WM12_IB_120323_Zell.indd 5 23/03/2012 5:00 PM

INSTALLATION
6
Moving and Installing
Do not run the washing machine without removing the bolts, as this
can cause excessive vibrations.
Installing the Noise Protection Board
To reduce the noise produced by the washing machine, install the noise protection board.
1. Lay down the machine. Unscrew the four feet.
2. Fit the board onto the bottom of the machine. The four holes in the board should correspond to
the screw holes of the levelling feet.
3. Screw the four levelling feet back on to fix the noise protection board to the machine.
4. Stand the machine upright.
Fix the Noise Protection Board onto the bottom of the machine BEFORE removing
the transit bolts.
Removing the Transit Bolts
Three (3) transit bolts keep the interior of the washing machine in place while it is being moved.
They need to be removed before installation. Use a spanner (not included) and follow the instructions
detailed below.
Two or more people are required to carry the
washing machine and for any installation work.
C510WM12_IB_120323_Zell.indd 6 23/03/2012 5:00 PM

INSTALLATION
7
C
90
C
60
C
40
C
40
C
30
Moving the Washing Machine from One Location to Another
To remove the transit bolts:
1. Ensure the unit is fully disconnected from
the mains power by unplugging it from
the mains.
2. Unscrew the three (3) transit bolts.
3. They are located at the rear side of the
washing machine. Use a spanner (not
included) to loosen the three (3) transit
bolts, then pull out the bolts horizontally.
Ensure the plastic bolt guides (if any) are
also removed.
4. Snap in the plastic caps to cover the transit
bolt holes.
1 2 3
Keep the three (3) transit bolts in a safe place, in case you need to move the washing machine.
Hose and Cable Lengths
How to connect from the left side
~80cm
~90cm
~85cm
~130cm
~40cm
~135cm
min. 80cm
max. 100cm
How to connect from the right side
Ensure the transit bolts are fixed in place prior to moving the washing machine.
Before you move the washing machine:
• Shut off the tap and run the washing machine to drain the water. Drain any remaining water from
the pump hose.
• Depressurise the water supply hose and remove it.
• Disconnect the unit from the mains.
• Replace the transit bolts (in the reverse order in which you removed them (please see the Moving
and Installing section for details).
C510WM12_IB_120323_Zell.indd 7 23/03/2012 5:00 PM

INSTALLATION
8
Water Supply Hose
Points to remember
• Follow the instructions in this section to avoid water leaks.
• Don’t connect the hose to a combination tap.
• Don’t twist, squash, modify or cut the hose.
• Optimum water pressure in the main pipe is 0.03 MPa - 1.0 MPa. If the water pressure is set higher
than this, you will need to install a depressurising valve. Ensure the water flow amount and speed
from the tap is sufficient. If you’re unsure, ask a qualified technician to connect the hose.
• This unit must only be connected to cold water mains using the new water inlet hose provided.
Connecting the Water Supply Hose
1. Connect the nut on the inlet hose to the
connector on the water valve.
2. Apply inlet hose to a water tap with cold, fresh
water.
3. Open the tap slowly and check that there are
no leaks around the joint.
3/4”
min. 10 mm
3/4”
min. 10 mm
Plastic joint
• The joint is subject to water pressure.
• Use the hose set supplied with the appliance. Old hose sets should not be reused.
Levelling the Washing Machine
There are 4 levelling feet on the underside. They must be adjusted to make sure the washing machine
is level.
1. On each stand, loosen the lock nut by turning it clockwise with a spanner.
2. Adjust all four feet in this way.
3. Use a spirit level to ensure the washing machine is level.
4. Tighten each lock nut by turning them anti-clockwise (towards the
washing machine body), again using a spanner.
Ensure all four lock nuts are tightened securely. Check the feet are still bolted to
the washing machine - if they’re unbolted, the washing machine will move around.
Lock nut
C510WM12_IB_120323_Zell.indd 8 23/03/2012 5:00 PM

INSTALLATION
9
Water Drain Hose
Points to remember:
• Don’t twist, pull out or bend the drain hose.
• Your washing machine should be no more than 100cm from the drain outlet.
Draining to a sink or wash-basin
• Secure the drain hose in position, so it can’t drop out of the basin.
• Don’t block the basin’s drain outlet, and make sure that the drainage
through it is sufficient.
• Don’t let the tip of the drain hose dip into the drained water, as this can
cause the water to flow back into the washing machine.
• Use the drain hose bracket to keep the end of the drain hose retained
and prevent the outflow of water. Don’t extend the length of the drain
hose; if an extended hose is required, please consult a serviceman.
Connecting to the Mains Supply
For your safety:
• Do not use a mains plug adapter or extension cable.
• If the mains cable or mains plug are damaged, stop using them and call a qualified technician for
assistance.
Installation Check List
By now, you should have installed the washing machine.
Let’s go through the checklist to ensure that the installation has been done correctly!
Questions Checkbox
Anchor bolts - Have you removed them and attached the cover caps properly?
4 levelling feet Are they bolted securely to the washing machine?
Are they standing flat?
Power supply - Is the household dedicated mains socket, fully rated at AC 220V to
240V independently?
Location - Is your washing machine on a flat, stable surface? Does it run without
vibrating?
Water Supply Hose - Is it free from leaks and is the water supply normal?
Water Drain Hose - Is it free from leaks and is it draining normally?
The drain hose should not be submerged in water and should be
securely fixed and leak-free. If the drain hose is placed on the ground
or if the pipe is at a height of less than 80cm, the washing machine
will continuously drain while being filled (self-siphoning).
U-Shape Holder
Draining to a wash-basin
Draining to a drain hose
C510WM12_IB_120323_Zell.indd 9 23/03/2012 5:00 PM

10
Temp.
/
Product Overview
The unit
The Detergent
Compartment The Control
Panel
Drain Hose
Service Panel
Window
C510WM12_IB_120323_Zell.indd 10 23/03/2012 5:00 PM

11
C
90
C
60
C
40
C
40
C
30
Control Panel
Power and Programme
Selection Dial
Dierent wash programmes
can be selected according to
your wash requirements.
Start / Pause
Press to start your wash.
Press while in operation
to pause your wash.
Power
Press to turn on
the machine.
Press and hold
to turn o the
machine.
Spinning Speed
Press to select the
desired speed.
When a speed is set,
the indicator light
will light up.
Start / Pause
Press to increase the
washing time and rinsing
times in main wash stage
of the selected program,
which is suitable for dirty
clothes.
• If you need to change a setting, press Start / Pause button and then re-select the desired
program.
• Water is poured into the washing machine to perform an inspection at the time of shipment
from the factory, so there may be drops of water or condensation in the washing machine. This is
not an indication of a malfunction.
C510WM12_IB_120323_Zell.indd 11 23/03/2012 5:00 PM

12
Preparation
Read the following to understand how best to prepare your laundry for washing.
Organising Laundry
• Read the washing label on each garment to help you sort your washing into different loads.
• Sort the laundry by colour, type of fabric and by how soiled it is.
This will help you choose the correct programme and temperature for each wash.
• Do not exceed maximum load!
• Be careful not to trap any items of clothing.
Preparing Laundry
• Treat stains before washing.
• Some items should to be put into a cleaning net before going
into the washing machine. i.e. bras with metal wires, tights and
lace clothing to prevent damage. Check that pockets do not
contain any objects which may damage your clothes and the
washing machine.
• Tie up any loose strings on laundry, close zippers and reverse
clothing with zips inside out.
• Remove any surplus hair, animal fur, sand, and other materials
with a brush before washing.
• If clothes have raised fabric turn them inside out.
• Clothes that are not colour fast should be washed separately.
• Insert your clothes into the washing machine. Close the washing
machine door. Ensure not to trap any items of clothing between
the loading door and rubber seal.
• When first using the washing machine, let it run unloaded for one
program to prevent the laundry from being tainted by oil or dirty
water from the washing machine. Before washing you should
run the machine without laundry, but with detergent, with 60°C
programme.
Adding Detergent and Softener
• The washing efficiency and the performance is determined by
the quality of detergent used. Special non-foaming detergent
produces good washing results. Use specific detergents for
synthetic and woollen goods. Do not use dry cleaning agents
such as trichloroethylene and similar products.
Main wash
detergent
Softener
Pre-wash
detergent
Do not add more detergent than needed. Please follow the
dosage recommendation on the detergent package.
• Slide out the detergent drawer and put the required detergent and softening agent into the
corresponding compartments. Push back the drawer gently. (Refer to the instructions on the drawer)
• Apply softener before you start washing to prevent static.
C510WM12_IB_120323_Zell.indd 12 23/03/2012 5:00 PM

13
• Do not use washing machine when the detergent drawer is removed. It may cause a water leak or it
may not work normally.
• If you forget to add detergent, you can drain the washing machine by running a spin only programme.
Then you can add detergent and start the programme again. Detergent only reaches the drum when
water flushes through the detergent drawer.
• To prevent powered detergent staying in the drawer, dry the inside of the drawer with a cloth. Make
sure the powder isn’t lumpy when you add it into the drawer.
• If the rinse cycle isn’t removing all the detergent from your wash, use less detergent.
• Softener should not exceed the MAX level in the compartment.
• Wash out unused softener with a splash of water or a damp cloth after the programme has finished.
• For pre-washing program, detergent should be added to both drawer and . For other
programs, do not add detergent to drawer .
• Use liquid detergent according to the instructions on its package. Do not use liquid detergent if
the pre-wash mode.
• Do not overuse softener; otherwise, it will damage the artificial fibres.
• Dilute viscous fabric softener and fabric conditioner with water. Prevent blockage of the
overflow. Maximum level is 70ml.
• Apply detergent and softener according to the washing amount, the soiling level, the water hardness
in your area and the manufacturer’s instructions of these products.
C510WM12_IB_120323_Zell.indd 13 23/03/2012 5:00 PM

14
Selecting the Programme
Here are the available programmes, additional functions and option settings.
Temperature can be selected separately for certain programmes.
Programme Description Max
Temperature
Max Load
(kg)
Preset Setting
Default Spin
(rpm)
Approximate
Time (Min)
Cotton
Prewash
For average soiled
cottons, household
linens and work / play
clothes.
✓ ✓
60°C 5.0 1000 160
90°C 90°C 5.0 1000 180
*60°C 60°C 5.0 1000 140
60°C 60°C 5.0 1000 90
40°C 40°C 5.0 1000 70
Synthetics
Cold For average or lightly
soiled garments for
mixed cotton, linen and
man-made fabrics.
✓
– 3.0 1000 60
30°C 30°C 3.0 1000 70
Wool
For machine washable
woolens and other
items marked with
hand wash care label.
✓40°C 600 50
Quick Wash
For lightly soiled
cottons, household
linens and work / play
clothes.
✓40°C 2.5 1000 70
Spin Sperate spin procedure ✓– 1000 12
*EN 60456 test program / Energy label program with Cotton 60°C ,max. spin speed and intense function
• Washing times depend on programme and temperature settings selected.
• Washing times may be longer if the laundry in the drum needs to be balanced.
C510WM12_IB_120323_Zell.indd 14 23/03/2012 5:00 PM

15
Wash Setting
Standard Washing
1. Press the Power button.
2. Pull the door handle and put the laundry in the drum.
Make sure no washing gets caught in the door.
3. Close the door and turn the Power & Programme
Selection Dial to select your wash programme.
4. Add detergent and softener as required (refer to
“Adding Detergent and Softener” section).
5. Select the required options (refer to “Control Panel”
section).
6. The washing machine beeps when the programme is
complete.
C
90
C
60
C
40
C
40
C
30
If the door is locked and you switched the washing
machine off - or if there’s a power cut - it will stay locked
for 1 minute.
Removing Washing (Once program is nished)
When you start the washing machine, the Start / Pause indicator change from flashing to on.
1. Open the washing machine door and remove your washing.
2. Remove any foreign objects to avoid risk of rusting.
3. Leave the door and detergent drawer open so that residual water can evaporate.
Door remains locked for 1 minute appro. after wash stopped.
Be careful not to burn yourself while handling your clothes or touching the inside of the drum after
a high temperature wash.
C510WM12_IB_120323_Zell.indd 15 23/03/2012 5:00 PM

16
Important Information
Washing (Wool Programmes)
These programmes rock the drum gently for best results on delicate laundry.
• Delicate laundry loads: 1.5kg or less
• Tips for Wool programme:
Approximate Weights:
- Wool sweater (400g)
- Silk blouse / under garment (200g)
- Trousers (400g)
- For wool items, use a mild liquid detergent.
Other detergents may damage your clothes.
Tips for Hanging Delicate Items to Dry
• Hang white or light colour clothes, wool and nylon
away from direct heat or sunlight.
• After washing, smooth creases and folds out of wool
and nylon clothes and return them to their normal
shape before hanging in the shade.
• Use a hanger for shirts, blouses and trousers. You can
wrap a towel around the hanger to fit the shoulder
width of your clothes, so they retain their shape as
they dry.
• Spread woollen items such as sweaters out to dry.
If Clothing Shrinks in the Wash...
• You can spread the item out to its original size on an
ironing board, and use dress pins to hold the size and
shape. Then use an iron to steam the item and leave
it to dry.
After using starch, clean the detergent drawer, especially the softener cover. Then remove any
excess starch in the drum, run a “Quick Wash” programme without detergent.
How to Use Laundry Starch
Laundry starch makes your clothes crisp in texture.
Synthetic laundry starch is a stiffening agent.
• To use laundry starch, simply add it to the softener compartment, next to where you add detergent. It
will automatically be applied to your clothes as part of the final rinsing cycle.
• If it’s hard to pour, you can dilute the starch slightly with water before adding it to the softener
compartment. Make sure you don’t fill the compartment over the MAX level.
C510WM12_IB_120323_Zell.indd 16 23/03/2012 5:00 PM

17
Maintenance - Cleaning the Washing Machine
Cleaning the Exterior of your Washing Machine
• Clean the outside of your washing machine with a soft cloth and mild detergent such as kitchen
detergent.
• Don’t splash water over the washing machine.
• Do not use corrosive solvents or cream cleansers, thinners or products containing alcohol or kerosene.
Cleaning the Detergent Drawer
1. Remove the detergent drawer by pulling and pressing the softener cover at the same time.
2. Wash out old detergent from the drawer with water. (Use a cloth to clean the washing machine.)
Residue detergent soon builds up if you don’t clean the drawer regularly, and can develop mould.
Pull out at the
same time
Press
Cleaning the Door Seal and Window
• Wipe the window and seal after each wash to remove lint and stains. If lint builds up, it can cause leaks.
• Remove any coins, buttons and other objects from the door seal after each wash.
C510WM12_IB_120323_Zell.indd 17 23/03/2012 5:00 PM

18
Preventing a Frozen Water Supply Hose
If your washing machine is delivered in freezing weather conditions,
leave it at room temperature for 24 hours after you’ve set it up before
using it. This ensures there’s no ice blocking the water supply hose.
If a programme is in progress, stop the programme and turn off the
unit. Turn on the unit again, select SPIN and wait for the water to
drain. Turn off the unit and wait 1 min for the door lock to release.
Remove laundry.
Cleaning the Filter Net of the Water Supply Hose
If water isn’t draining properly...
1. Turn the water supply off at the tap.
2. Close the washing machine door and select “Spin” programme and press the Start / Pause button.
3. When finished, turn the power off. Loosen the water supply hose and remove it from the tap.
4. Use a small brush, e.g. a toothbrush to clean the filter and water inlet valve.
5. Re-connect the water supply hose to the tap and turn the tap back on, checking for leaks.
5. Turn it clockwise and close the bottom cover.
Cleaning the Drain Filter
Clean the filter once a month.
Before cleaning the drain filter, first start the spin programme, then switch off and unplug the washing
machine.
1. Open the bottom cover.
C
90
C
60
C
40
C
40
C
30
Service Flap
2. Carefully loosen the drain filter. Turn anti clockwise until the water gentle begins to run, this is normal.
3. Remove the filter once the water has stopped.
4. Remove any lint and debris before carefully replacing the filter.
• The filter must be in place, or it may lead to leakage.
• Place a container under the drain pump filter, to collect any excess water that may come out
of the drain pump when the filter is removed.
about
50°C
C510WM12_IB_120323_Zell.indd 18 23/03/2012 5:00 PM

19
Hints and Tips
Problems Solutions
Buttons don’t work • The washing machine is operating a programme.
• The Programme Dial was turned to a different programme.
Door doesn’t open • Door lock may be active.
If you start a wrong
programme accidentally.
• First press Start/Pause button when the indicator light starts
blinking, press the power button. Next, turn the Programme Dial to
the correct programme, and select any required options. Press the
Start/Pause button to start the new programme. (Note: We suggest
that you do not change the programme after the machine has been
running for 3 minutes.)
Unusual odour • Rubber parts may give off a smell when you first start using the
washing machine, but this goes away over time.
• You should wash the drum once a month.
You can’t see any water This is normal: The water level is below the window.
There’s no water going into
the washing machine
• The water tap might be turned off.
• The water hose or water-supply hose may be frozen.
• Your water supply may be disrupted.
• The water-supply valve filter may be clogged.
There’s only a small amount
of water
• If you have paused the programme and you restart, the washing
machine may drain some water.
• Don’t pour water in through the door.
Water adds up during
washing
This is normal: water is supplied automatically as the level lowers, and
with heavy loads the water may fill up repeatedly.
Water drains away during
washing
This is normal: water often drains and refills to wash off excess foam.
(This is called foam detection.)
There’s no water going into
the washing machine during
rinse operation
Before rinsing, the washing machine spins to drain water remaining from
the wash. The water will fill up after that.
Rinsing begins before the
spinning finishes
• If your laundry has collected to one side of the drum, rinsing will
start automatically to correct the imbalance.
• If there’s excess foam after washing, water may drain and refill to
wash it off. (This is called foam detection.)
During the spin-dry, the
drum stops and rotates
several times
This is normal. The washing machine has detected an unbalanced load
and is trying to correct it.
Foam and water remain in
the door or door seal
Although foam and water may remain, it does not have any influence on
the performance of a rinse.
Spin starting is repeated This is normal. Although spin starting may be repeated, it is a function
made to spin quietly.
Wash time too long During washing, if the laundry is unbalanced, the machine will try to
correct by slowly rotating the drum. This may take several attempts. This
is normal.
C510WM12_IB_120323_Zell.indd 19 23/03/2012 5:00 PM

20
There’s not much foam • This can happen if you’ve put powder detergent directly into the
drum – you must put it in the detergent drawer.
• The amount of foam can vary, depending on the temperature, level
and softness of your water.
• You may not be using enough detergent.
• You may be using a reduced-foam type of detergent.
• Heavily soiled laundry can reduce the amount of foam.
• Larger loads of laundry can also reduce the amount of foam.
There’s a lot of foam • The amount of foam can vary depending on the temperature, level
and softness of your water.
• You may have used too much detergent.
• The type of detergent you use could cause excess foam.
• Some laundry types (Bathrobe, Bath towel), hold the detergent and
becomes agitated during washing cycle. This is normal. Do not over
fill the drum.
Fabric softener overflows • You may have exceeded the MAX level in the softener drawer.
• You may have spilt the liquid by closing the softener drawer too
sharply.
There’s a residue of powder
detergent at the end of the
wash
This can happen if you’ve put powder detergent directly into the drum –
you must put it in the detergent drawer.
There’s an unusual noise or
vibration
• Check there’s nothing metal in the drum.
• Make sure the transit bolts used in transportation have been
removed.
• Check the washing machine is on a flat, stable surface.
• Machine load is over 5 kg.
There’s a noise when the
water drains away
This is normal, it’s the pump starting and stopping.
The electricity supply cuts
out while the washing
machine’s on
Power-off memory function: In case of abrupt power failure or the need
to cut off the power during a program cycle, the present settings will be
saved and the preset operation will resume when the power is on again.
C510WM12_IB_120323_Zell.indd 20 23/03/2012 5:00 PM
Table of contents
Other Currys Essentials Washer manuals
Popular Washer manuals by other brands

Hotpoint
Hotpoint ECOT7F 1292 Instructions for use

Hotpoint Ariston
Hotpoint Ariston AQUALTIS AQLF8F 292 U Instructions for use & installation

LG
LG WT18 SB Series owner's manual

Whirlpool
Whirlpool Cabrio WTW6700T Installation information

Zanussi
Zanussi F855G Installation and instruction manual

LG
LG WT7305CW owner's manual

LG
LG FG1405S3W owner's manual

LG
LG WM9000H A Series Service manual

Tricity Bendix
Tricity Bendix BA 450 Operating & installation instructions

Tricity Bendix
Tricity Bendix AW 440 AL Operating and installation instructions

Bosch
Bosch WAJ24266IN User manual and installation instructions

CORBERO
CORBERO Lavadora Premium CLAV2284VPINVX user manual