CYBIO CYBIOLINK P-I User manual

2
Special Features
Important Information:
To use the Display Interactive service, the
Call Display service, the Caller ID on Call
Waiting service and/or the Class services,
subscription may apply to the particular
service or services from your provider.
Examine your new Screenphone
telephone. You will find an array of
special features including:
Call Display Memory - stores and
displays up to 99 multiple (name and
telephone number) Caller ID records.
Caller ID on Call Waiting - allows you to
view incoming Caller ID whether the
telephone is in use or not.
Ring Indication Light (Red) - flashes
when the telephone rings (speed follows
the ring cadence).
New Call Light (Red) - flashes when new
calls are received (0.5 seconds on, 1
second off).
Important: In order for the red light to stop
flashing, all new callers must be reviewed.
Message Waiting Light (Green) - flashes
when there are voice mail messages in
your mailbox (provided you have
subscribed to the Message Waiting
Service from the telephone company).
Services button - allows you to enter into
various services provided through your
telephone company. Please contact your
local telephone company to obtain
information regarding these services and
how to obtain them.
Display Interactive services - there are
two types of Interactive services available
from your telephone company:
a.) Interactive Services scripts offered by
different vendors, such as your local
bank.
b.) the telephony script which allows you
to access the Call Management
services offered by your telephone
company.
Predial - allows you to pre-store a phone
number (and edit it) before you dial it.
Speakerphone - allows you to operate in
speakerphone mode.
Directory - allows you to store up to 99
telephone numbers (and names) that are
most important to you.
Speed Dial - allows you to store up to 8
telephone numbers.
Multi-Language -usermayselectEnglish
or Spanish as desired.
Contrast Control - allows you to adjust
the display contrast.
Calendar - a full month calendar of the
current month will be displayed.
Large screen with backlight - an
adjustable large screen that tilts for easier
viewing.
Ringing Tone selection - 3 different
ringing tones for you to choose.
Dialing Button - your unit provides a
dialing softkey for convenient call back.
Desk/Wall Mountable - for use on a desk
or a wall.
Headset Jack - for connecting a headset
(not supplied).
1
Let the display be your guide
Follow the display on the module for
instructions to use features and handle
calls. Your Screenphone has an 8-line
display, with enlarged numbers.
Store the numbers of your friends right
in the phone
Once you've added numbers to the
Directory, calling is easy. Instead of
hunting for your phone book, look in the
Directory and dial the number with the
touch of a key.
There are also 8 speed dial memory
locations for you to store telephone
numbers.
Don't stop what you're doing to talk
If you need both hands to do something,
use the SPEAKERPHONE button. Then
just talk normally on the speakerphone
while you go on with your task.
See if you have a message
You've been expecting a call but you had
to run an errand. When you get back, look
at your phone: if the light is flashing, a
caller has left a message for you.
*Requires Call Answer services from
telephone company (light indicator
service may not be available in all areas).
Don’t worry if your line’s tied up*
Your Screenphone display lets you know
who that second caller is while you’re on
the phone.
Identify callers by preferred name*
The phone company knows her as Mrs.
Smith, but you call her “Mom”. If you’ve
got her number and name in the Directory,
you’ll see “Mom”on the display whenever
she calls.
See who’s called*
You’re out. Check the Callers List to see
who’s called, then call back at your
convenience. Or, if you’re busy, check the
display to see who’s calling. Then decide
if you want to answer.
Year 2000 compliance
Your new Screenphone is ready for year
2000.
* Requires Call Display services from
telephone company.
†† Requires Call Waiting services from
telephone company.
Introduction
CYBIOLINK is a trade-mark of Cybiotronics (Far East) Limited.

43
SAVE THESE INSTRUCTIONS
Important Safety Instructions
To reduce the risk of fire, electric shock and/or injury, always follow these
basic safety precautions when using your telephone equipment.
1. Read and understand all instructions.
2. Follow all warnings and instructions
marked on the telephone.
3. Unplug this telephone from the wall
outlet before cleaning. Do not use liquid
or aerosol cleaners. If necessary, use
a soft cloth lightly moistened with a mild
detergent solution.
4. Do not use this telephone near a
bathtub, kitchen sink, wash bowl,
laundry tub, swimming pool, a wet
basement or anywhere else there is
water.
5. Do not place this telephone on an
unstablecart,standortable.A fall could
cause serious damage to the phone.
6. Slots and openings in the cabinet at
the back or bottom are provided for
ventilation to protect the unit from
overheating. These openings must not
be blocked or covered. Do not place
this telephone on a bed, sofa, rug or
other similar surface. This telephone
should never be placed near or over a
radiator or heat register. Thistelephone
should not be placed in a built-in
installation unless proper ventilation is
provided.
7. Never push objects of any kind through
slots in the phone. They could touch
dangerous voltage points or short out
parts that could result in a risk of fire
or electric shock. Never spill liquid of
any kind on the telephone.
8. Unplug this telephone from the wall outlet
and refer to a qualified service repre-
sentativeinany of the followingsituations:
a. If liquid has been spilled into the
telephone.
b. If the telephone has been exposed
to rain or water.
c. If the telephone does not operate
normally by following the
operating instructions. Adjust only
those controls that are covered by
the operating instructions.
Improper adjustment of other
controls may result in damage and
will often require extensive work
by a qualified technician to restore
the telephone to normal operation.
d. If the telephone has been dropped
or the case has been damaged.
e. If the telephone exhibits a distinct
change in performance.
9. Avoid using a telephone (other than a
cordless type) during an electrical
storm. There may be a remote risk of
electric shock from lightning.
10.Do not use the telephone to report a
gas leak in the vicinity of the leak.
11. Never installjacksina wet locationunless
the jack is specifically designed for wet
locations.
12.Never touch uninsulated telephone
wires or terminals unless the telephone
line has been disconnected at the
network interface.
13. Use caution when installing or modify-
ing telephone lines.
14. To reduce the risk of electric shock,
do not disassemble this product, but
take it to a qualified serviceman when
some service or repair work is
required. Opening or removing covers
may expose you to dangerous
voltages or other risks. Incorrect
reassembly can cause electric shock
when the appliance is subsequently
used.
Use only with Class 2 Power
Source, 12V DC, 500mA
Important Tips
1. You must subscribe to Call Display,
Call Waiting, and CallAnswer services
from telephone company for these
services to work on the Screenphone.
2. If you subscribe to your telephone
company’s Call Display service, the
date and time will be set automatically
when you receive your first call. If you
do not subscribe to your telephone
company’s Call Display service, refer
to page 12 for setting the date and
time.
3. If you do not wish the Red LED light
to flash whenever you have new calls,
you can disable the NEW CALL
LIGHT. Refer to the NEW CALL
LIGHT section (page 14) for more
information.
4. When accessing the options list on
your Screenphone, only four options
at a time are visible on the phone's
display; press the down arrow to make
them visible. Refer to page 14 for more
information.
5. To enter space character during an on-
line session, press twice.
6. When you are requested to switch
between lowercase and uppercase
characters, you can use the OPTIONS
button.
7. When you dial from the Directory,
Callers’list, Redial list and Speed Dial
list, both the name and number will
appear on the display. When you dial
manually from the keypad, only the
number will appears on the display.

123
456
789
*
0#
Options Services
ABC DEF
JKL MNO
TUV WXYZ
GHI
PQRS
OPER
Speed Dial
Redial
Directory
Callers
Speakerphone Mute Hold
65
Control Locations.................................................................................................................................6
Getting Started .....................................................................................................................................8
Wall Mounting .................................................................................................................................. 10
Basic Telephone Operation...................................................................................................................12
Making a call using the Speakerphone button...................................................................................12
Predial............................................................................................................................................... 12
Changing the Ringer Volume.............................................................................................................12
Changing the Speakerphone Volume................................................................................................12
Hold...................................................................................................................................................12
Flash..................................................................................................................................................12
Mute...................................................................................................................................................12
Timer..................................................................................................................................................12
Line in use.........................................................................................................................................12
Headset Operation .................................................................................................................................13
Headset ............................................................................................................................................13
Operation ..........................................................................................................................................13
Customizing Your Screenphone ....................................................................................................14
Selecting an Option .........................................................................................................................14
8 available Option .............................................................................................................................14
Caller Identification .............................................................................................................................. 15
Reviewing the call log ...................................................................................................................... 15
Callback from the call log ................................................................................................................. 15
Editing the incoming number before Callback ..................................................................................15
Copying an incoming call to the Directory ........................................................................................15
Copying an incoming call to the Speed Dial list ................................................................................15
Deleting an incoming call ..................................................................................................................15
Deleting all incoming calls ................................................................................................................15
Review the call that you reviewed the last time ................................................................................15
Telephone Directory .............................................................................................................................16
Reviewing the Directory ...................................................................................................................16
Adding a new entry ..........................................................................................................................16
Dialing from the Directory ................................................................................................................16
Copying from the Directory to the Speed Dial list ...........................................................................17
Editing the Directory ........................................................................................................................17
Deleting an entry in the Directory ....................................................................................................17
Deleting all entries in the Directory ..................................................................................................17
Redial .....................................................................................................................................................18
Redialing the last number ................................................................................................................18
Selecting a number to redial ............................................................................................................18
Reviewing details of the redial number ............................................................................................18
Next Page ........................................................................................................................................18
Copying a Redial number to the Directory .......................................................................................18
Copying a Redial number to the Speed Dial list ..............................................................................18
Deleting a Redial number ................................................................................................................18
Speed Dial .............................................................................................................................................19
Selecting a number to Speed Dial ...................................................................................................19
Creating a Speed Dial number ........................................................................................................19
Reviewing details of the Speed Dial number ....................................................................................19
Next Page ....................................................................................................................................... 19
Editing / Deleting a Speed Dial number .......................................................................................... 19
Services ................................................................................................................................................ 20
Activating a Service ........................................................................................................................ 20
Navigation ....................................................................................................................................... 20
Switching between local features and services screen ...................................................................20
Display Icons and Prompts .................................................................................................................21
Display Icons ...................................................................................................................................21
Display Prompts ..............................................................................................................................21
Using Tone Services on a Pulse Line .................................................................................................22
Troubleshooting ...................................................................................................................................23
Care and Maintenance .........................................................................................................................24
FCC Requirements ................................................................................................................................25
Contents Control Locations
1. Handset - for speaking and private
listening during calls.
2. Handset Guide -holdstheHANDSETin
place when the telephone is mounted on
a wall.
3. HookSwitch -disconnectsthephoneline
when the HANDSET is in place.
4. MessageWaitingLight(Green)-flashes
when there are voice mail messages in
your mailbox.
5. Telephone Line Jack (at the bottom) -
insert one end of the telephone line cord
here when connecting the telephone.
6. DC Power Jack - used with an AC
adaptor for all Special Features.
7. ResetSwitch -presstoresettheunitafter
initial installation if required.
8. Handset Volume Switch - .
The handset sound volume may be adjusted
to three levels; low, medium and high.
Note: For regular use, the volume control
should be set at low or medium. Level
“high”is designed for louder
amplification for the hearing impaired.
12
14
12345789
10
11
13
15
16
17
18
20
21
22
25 23
24
26
6
19
27

87
Control Locations
9. New Call / Ring Indication Light (Red)
-flashes when there is a new call coming
in or when the phone rings.
Important: In order for the red light to
stop flashing, all new callers must be
reviewed.
10. 6 Softkeys - allow you to manipulate the
instructions and/or display prompts that
appear on the large screen.
11. Screen - 8-line x 20 characters display
- Tilts for easier viewing
- Backlighting
- ContrastAdjustment
12. Arrow , , , ,keys -pressto review
CID information and to move the cursors.
13. Caller button - press to enter the Caller
ID list.
14. Directory button - you can store up to
99 telephone numbers and names in the
telephone directory.
15. Redial button - for you to redial one of
the last 8 numbers dialed.
16. Speed Dial button - forspeedy dialing of
commonly used phone numbers.
17. Speakerphone Volume Control
18. Hold button - press to put a call on hold.
19. Mute button - allows you to mute the
microphoneinthespeakerphoneandthe
handset.
20. Microphone - for the speakerphone
mode.
21. Speakerphone button - press to initiate
speakerphone mode.
22. Dialingbuttons - dialnumbersmanually.
23. Servicesbutton - allowsyoutoscroll and
select the particular class service(s) you
want to activate.
24. Options button - for you to choose one of
the 9 options:
Language
Calendar
Date / Time
Contrast
Ring tone / Volume
Call log
Dial mode
Clear message mode
New call light
25. Phone Number Card - write down your
telephone number on this card.
26. Coiled Handset Cord - connects the
HANDSET to the BASE UNIT.
27. Headset Jack - for connecting a headset
(not supplied).
SAVE THESE INSTRUCTIONS
Getting Started
This section is a quick reference guide to the basic functions and operation of your telephone.
For a detailed description of the operation and features of your telephone, please refer to the
page references in the "Contents" section on page 5.
1. Carefully remove your telephone from its shipping carton. If there is any visible damage,
do not attempt to operate this equipment. Return it to the place of purchase.
2. Check to be sure you have all items that come with this telephone system. You should
have a HANDSET, BASE UNIT, TELEPHONE LINE CORD, SHORT TELEPHONE
LINE CORD, COILEDHANDSET CORD,anAC POWERADAPTOR, PHONESTANDand
an OWNER'S MANUAL.
COILED HANDSET CORD
TELEPHONE LINE CORD
SHORT TELEPHONE LINE CORD
AC POWER
ADAPTOR
PHONE STAND
123
456
789
*
0#
Options Services
ABC DEF
JKL MNO
TUV WXYZ
GHI
PQRS
OPER
Speed Dial
Redial
Directory
Callers
Speakerphone Mute Hold

109
Getting Started
3. Insert one end of the COILED HANDSET CORD into the HANDSET and the other end
into the modular jack on the left side of the BASE UNIT.
4. Insert one end of the TELEPHONE LINE CORD into the HOUSE MODULARTELEPHONE
WALLJACK and the other end into the TEL. LINE JACK at the bottom of the BASE UNIT.
5. Tie up loose cords to prevent tangling and tripping.
6. TheAC adaptor must be connected for the unit to operate. Plug the adaptor's barrel
plug into the unit's DC 12V jack and plug the adaptor into a standard AC outlet.
7. Lift the HANDSET to confirm that you have a dial tone. If you do not get a dial tone, please
review steps 3 and 4. If you still do not get a dial tone, see the Troubleshooting section on
page 23.
Note: Before placing a call, you must determine the type of dialing service you presently
have. Refer to the Dial mode option on page 14.
By selecting the position of the PHONE
STAND, you may choose to mount your tel-
ephone on a wall or put it on a desk.
To convert your phone to a wall phone:
1. Remove the PHONE STAND by press-
ing the two tabs on the wide edge of the
stand.
2. Connect one end of the SHORT TEL-
EPHONE LINE CORD into the jack at the
bottom marked TEL. LINE.
3. Position the PHONE STAND with the
wide edge towards the lower side of
your BASE UNIT, bring the free end of
the SHORTTELEPHONE LINE CORD
through the rectangular notch (on the
side of the PHONE STAND and to the
left hand side of the jack) and then
through the opening (between the up-
per and lower keyholes) in the stand.
Insert the two short tabs on the narrow
edge side of the stand into the matching
slots on the underside of the BASE UNIT.
The two hook tabs on the wide edge of
the stand will align with their respective
slots. Press the PHONE STAND firmly
until it locks tightly to the bottom of the
phone.
4. Mount the BASE UNIT onto the wall plate
by seating the upper and lower studs of
the wall plate into the respective upper
and lower keyhole openings on the bot-
tom of the PHONE STAND, then press
down until secure. If you do not have a
wall plate installed where you want to wall
mountyour phone, pleasereferto thetem-
plate on page 11 or consult your local
telephone company or installer.
5. TopreventtheHANDSETfromfalling, slide
the HANDSET GUIDE out, turn it upside
down and inside out with the tab pointing
up, then slide it back in place as shown.
Note: Youmaychoose to wallmountyour
phonewithoutawallplate.UsethePHONE
STANDasatemplateforpositioningscrews
in the wall. First leave about 1/8 of an inch
clearance between screw head and wall,
then adjust the screws until the PHONE
STAND can seat securely on them.
Wall Mounting
BASE UNIT
UPPER STUD
WALL JACK
TELEPHONE
LINE CORD
LOWER
KEYHOLE
SLOT
PHONE STAND
Line Jack Telephone Line Cord
House Modular
Telephone
Wall Jack

11 12
Basic Telephone Operation
Timer
The timer is built in into your unit for you
to time the length of your calls. The timer
begins counting when the call is
connected. The timer is also on when a
service is activated.
Line in use
When your Screenphone is in use, the
ICON will be turned on.
Making a call using the
SPEAKERPHONE button
Press the SPEAKERPHONE button to
switch on the speakerphone mode. Dial
the desired phone number. When the call
is completed, press the
SPEAKERPHONE button to hang up.
Predial
The Predial feature allows you to enter a
phone number and also edit it before it is
dialed out. Use the DIALING buttons to
enter a phone number without lifting the
HANDSET. Softkeys will be displayed on
the screen to allow you to edit the number
if necessary. Press the DIAL softkey to
dial the number.
Changing the Ringer Volume
Press OPTIONS button and 5 button to
select RING TONE. Press the ]] or
]]]] softkey to adjust the ringer volume.
Changing the Speakerphone Volume
Use the Speakerphone Slide Volume
switch located at the right hand side of
your Screenphone to adjust the
speakerphone volume.
Hold
Press the HOLD button to put a call on
hold.
Press the HOLD button again (or lift the
HANDSET of an extension phone) to
release the hold.
Flash
Press the FLASH softkey to activate
services such as Call Waiting or 3-Way
Conference.
Mute
Press the MUTE button to mute the
Speakerphone, handset or the headset.
Attach two screws to the wall surface using this template.
Once attached, carefully push your unit onto the screws and
slide down.
Wall Mount Template
3 1/4”
Wall Mount

]]
]]
There are 9 different options that can be
customized. Press the OPTIONS button
to review the different options.
Selecting an option:
1. Press the OPTIONS button and use
the ARROW keys to review
the list. Alternatively, you can enter a
number (for example, press 1 to set
the language).
2. Press the SELECT softkey to check
the current setting and use the
appropriate softkeys to change the
setting.
3. Press the EXIT softkey to leave the
list.
9 available options:
1. Language
English or Spanish display.
2. Calendar
A full month calendar of the current
month will be displayed. Press the
MONTH softkey to view the next
month, the YEAR softkey to view the
next year, the TENSYEAR softkey to
view the next 10 years and the
CENTURY softkey to view the next
century.
Press the SAVE softkey to change the
current setting (during idle mode) by the
one shown on the display.
3. Date / Time
Set the real time clock. The setting is
updated with each incoming call, when
you subscribe to Call Display.
Customizing Your Screenphone
4. Contrast
Change the contrast level of the display.
5. Ring Tone / Volume / Ringer Off
Select one of the 3 ringing tones by
pressing the CHANGE softkey. Press
the softkey or the ]]]] softkey to
adjust the ringer volume.
To set ringer off, press the softkey
until “Ringer is Off”appears on your
screen.
6. Call log
Select if all Caller ID received are to be
stored into the call log, or just those
unanswered Caller ID are to be stored.
7. Dial Mode
Select Tone or Pulse dialing.
8. Clear Message Indicator
Turn the Message Waiting Indication
Light off.
9. New Call Light
Enable or disable the New Call Light
(red LED) by pressing the CHANGE
softkey.
If the New Call Light is enabled, it will
flash when you have new calls. The
New Call Light will not stop flashing until
you have reviewed all new callers.
If the New Call Light is disabled, it will
not flash on new incoming calls.
13 14
13
Headset Operation
Using a headset (not supplied)
Headset
You can make or answer calls with hands-free convenience using an optional headset
with manufacturer’s type number CY-HSJ-I, or any UL1950 compliant headset with a
3/32-inch (2.5 mm) Plug and an input impedance of 150 ohms.
To connect the headset, insert the headset’s plug into the jack ( ) on the left side of the
phone. Make sure the headset plug is fully inserted.
Note: a) Connecting a headset will disable the speakerphone mode.
b) During the headet mode, the headset volume is not adjustable.
Operation
Starting a headset call
Connect the phone with the headset and press the SPEAKERPHONE button to make
or answer calls.
Switching from headset mode to handset mode
1. When the handset is on-hook, pick up the handset to switch to handset mode.
2. When the handset is off-hook, press the SPEAKERPHONE button to switch to
handset mode.
Switching from handset mode to headset mode
Connect the phone with the headset and press the SPEAKERPHONE button to switch
to headset mode.
Note: When switching from handset to headset mode, you must press the
SPEAKERPHONE button first before returning the handset on-hook.
Ending a headset call
1. When the handset is on-hook, press the SPEAKERPHONE button to end a headset
call.
2. When the handset is off-hook, be sure to return the handset back to the cradle and
press the SPEAKERPHONE button.
CAUTION:
Using unspecified headsets that reduce the headset performance may cause
damages to the phone and void the warranty.

16
15
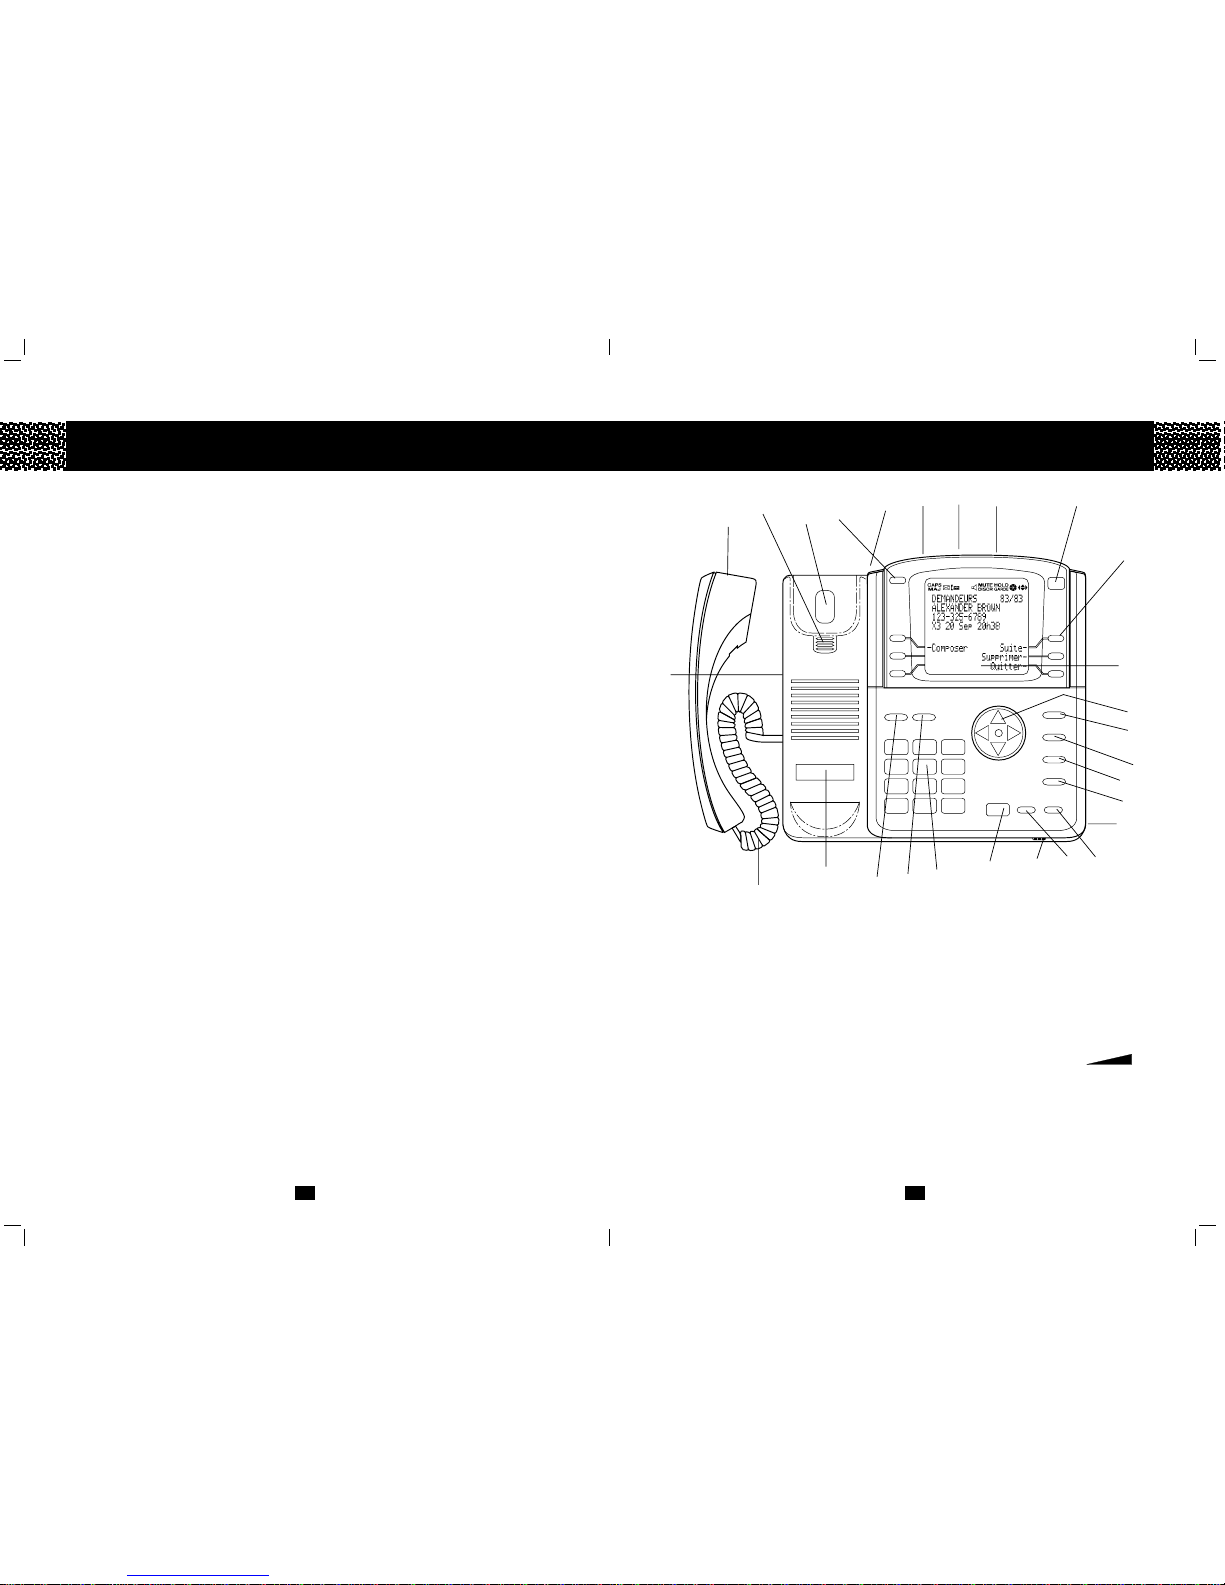
Your unit is capable of storing up to 99 incoming
calls in the call log. The call log stores calls that
called when you are not home or unavailable. It
also lets you dial the callers back by using the
DIAL softkey.
The call log can be programmed to store all calls
or only unanswered calls. Press the CALLERS
button to review how many incoming calls are
stored in the call log. Press the ARROW key
to review the most recent call and the
ARROW key to review the oldest call.
When the call log is full and a new incoming call is
received, the oldest call will be deleted
automatically to make room for the new incoming
call.
Reviewing the call log
Press the ARROW key to review the previous
incoming call and the ARROW key to review
the next incoming call. The name and telephone
number of the caller and the date and time of the
call made will be shown on the display.
The number of times the same incoming call is
received is shown on the display denoted by X1,
X2 ...... X9 where X2 means the same caller calls
twice.
If a"<" character appears on the left of the name
and number, the call is a Call Forwarded Call.
Important: In order for the red light to stop flashing,
all new callers must be reviewed.
Callback from the call log
3 dialing softkeys DIAL , DIAL 1+NUMS and
DIAL 7 NUMS are provided for callback from the
call log.
DIAL press to dial the number shown
on the display.
DIAL 1+NUMS press to dial the number shown
Caller Identification
on the display with “1”
automatically added to the front
of the number to make it a long
distance call.
DIAL 7 NUMS press to dial the last 7 digits of
the number shown on the
display.
Editing the incoming number before Callback
To edit the incoming number for the call log before
Callback (for example, adding a prefix and 3
pauses at the front of the number), press the
MORE softkey. Use the DIAL softkey to dial the
edited incoming number after editing.
Copying an incoming call to the Directory
Press the MORE softkey when the desired
incoming call is shown on the display. Then press
the COPY DIR softkey.
Copying an incoming call to the Speed Dial List
Press the MORE softkey when the desired
incoming call is shown on the display. Then press
the COPY SPD softkey.
Deleting an incoming call
To delete an incoming call, press the DELETE
softkey when it is shown on the display. Press
the DELETE softkey again to confirm.
Deleting all incoming calls
Press the DELETE ALL softkey in the Call log
summary screen. Press the DELETE softkey
again to confirm.
Review the call that you reviewed the last time
Your unit remembers the last incoming call
reviewed. To access the last reviewed incoming
call, press the LAST VIEW softkey.
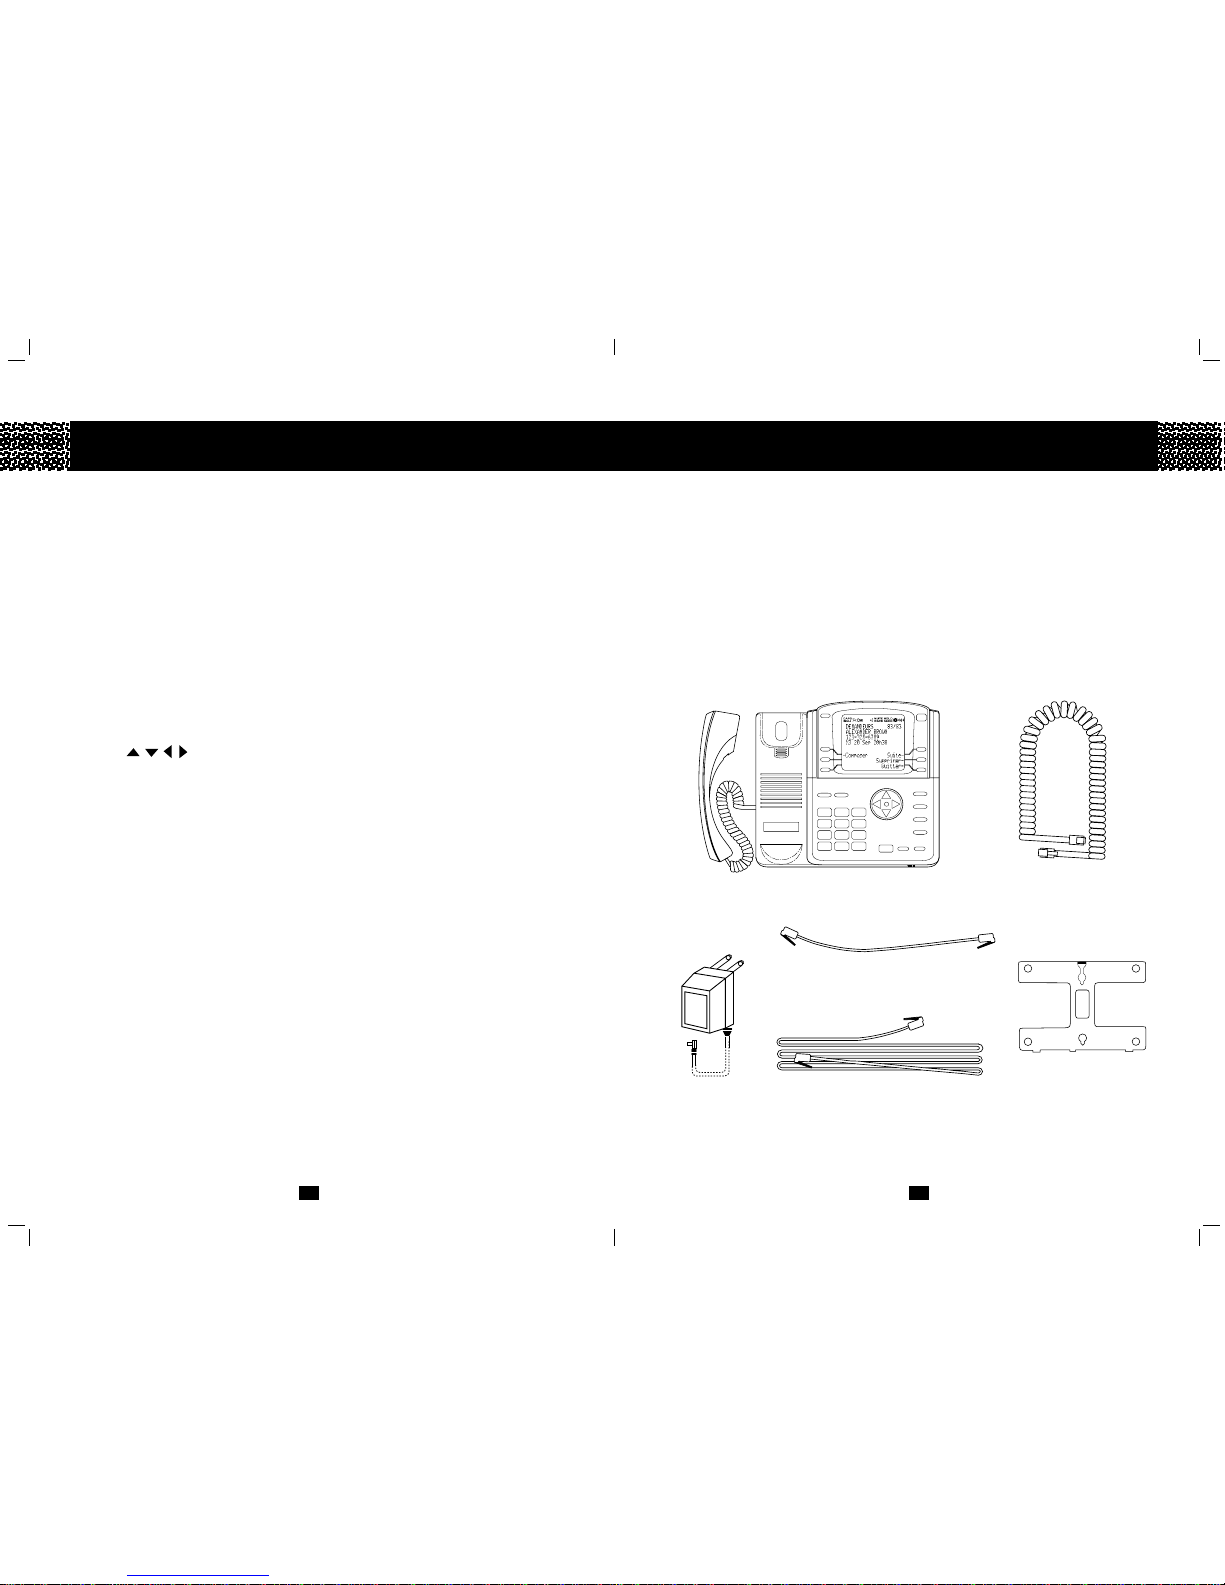
Telephone Directory
NEXT SPACE
softkey or the
ARROW
key.
b.)You can use * and # to enter some
special characters such as $, !, ", %.
c.) The letter 'Q' is on 7 and 'Z' is on 9
3. After the name is entered, press the
NUMBER softkey to enter the telephone
number by using the DIALING buttons.
The number can be up to 24 digits.
4.Ifthenumbercontainspersonalidentification
numbers, you can add a pause between
numbers by using the ADD PAUSE
softkey.
5. Pressing the HOME softkey places the
curser at the beginning of the number
allowing you to make edits if required. The
END softkey places the curser at the end
of the number.
6. Press the SAVE softkey to save the new
entry.
Dialing from the Directory
1. You can either pick up the Handset, or put
the Handset in place and press the
SPEAKERHPONE button.
2. Press the DIRECTORY button.
3. Use the ARROW or ARROW
key to search the name and number.
Alternately,youcantypeinthefirst letter of
the name from the DIALING buttons.
4. When the desired name and number
appears on the display, press the DIAL
softkey.
Note: When you dial from the Directory, both
the name and number will appear on
the display.
When you dial manually from the
keypad, the number will appear on the
display.
Up to 99 telephone numbers and names in
alphabetical order can be stored in the
Directory so that you can dial numbers from
theDirectory directly. Pressthe DIRECTORY
button to review the Directory or add new
entries to the Directory.
Reviewing the Directory
Press the ARROW or ARROW key
to view the previous or next entry.
Alternatively, press a DIALING button with
thedesired charactertoview thefirst Directory
entry with name beginning with that letter (for
example, R for ROSE).
note : always enter your Directory names in
the same order (first name first, or last name
first).
Adding a new entry
1. Press the DIRECTORY button to access
the directory mode.
Press theADD NEW softkey to add a new
entry manually.
Press the NEXT SPACE softkey or
ARROW key to move to the next
space
or add a space. Press the
BACK SPACE
softkey or ARROW key to erase a
character or backspace. Press the
CHANGE CASE softkey to change to
uppercase or lowercase letters.
2. For example, to enter ROSE, press
7 7 7
NEXT SPACE or ARROW
6 6 6
NEXT SPACE or ARROW
7 7 7 7
NEXT SPACE or ARROW
3 3
Note :
a.)Ifthenextletterisonadifferent DIALING
button, you do not need to press the

1817
Telephone Directory
Copying from the Directory to the Speed
Dial List
In the Directory, when the desired name and
number appears on the display, press the
COPY SPD softkeytocopy the telephone
number to the Speed Dial List.
Editing the Directory
A Directory entry can be edited by pressing
the EDIT softkey when it is shown on the
display.
Deleting an entry in the Directory
Todeleteanentry,pressthe DELETE softkey
when it is shown on the display. Press the
DELETE softkey again to confirm.
Deleting all entries in the Directory
Press the DELETE ALL softkey in the
Directory. Press the DELETE softkey again
to confirm.
Redialing the last number
When the Handset is lifted or the
SPEAKERPHONE button is pressed, press
the REDIAL button to dial the last dialed
number.
Selecting a number to redial
The last 8 numbers dialed are stored in the
Redial list automatically. When you put the
Handset in place, press the REDIAL button
andthenusetheARROW andARROW
keys to select a name and number you want
to dial. Alternatively, you can enter a number
(for example, 3) to select the desired name
and number. Then press the DIAL softkey to
redial the number you select.
Reviewing details of the redial number
Ifthenumberto be redialed is associated with
a name, press the DETAIL softkey to review
the details. You may press the LISTsoftkey
to return to the Main Redial screen.
Next Page
Press the PAGE DOWN or PAGE UP
softkeys to review the next or previous group
of numbers stored in the Redial list.
Copying a Redial number to the Directory
Press the DETAIL softkey first. Then, press
the COPY DIR softkey to copy a Redial
number to the Directory.
CopyingaRedial numbertotheSpeedDial
list
Press the DETAIL softkey first. Then, press
the COPY SPD softkey to copy a Redial
number to the Speed Dial list.
Deleting a Redial number
You may delete any number in the Redial list
by pressing the DELETE softkey. Then,
press the DELETE softkey again to confirm
the deletion.
Redial

2019
Speed Dial
Your unit provides you a Speed Dial list that
can store up to 8 telephone numbers. Press
the SPEED DIAL button to access the list.
Selecting a number to Speed Dial
Press any digit between 1 to 8 from the
DIALING buttons to select one of the eight
storedtelephonenumbersyouwanttospeed
dial. Aftera selection ismade,press the DIAL
softkey. Alternatively, you can use the
ARROW or ARROW key to select
the desired number.
Creating a Speed Dial number
Press any digit between 1 and 8 from the
DIALING buttons or use the ARROW or
ARROW key to select one of the eight
slotsavailableintheSpeedDiallist. Thename
and number can be input in the same way as
a new Directory entry.
A Speed Dial number can also be created by
copying from the Directory or the Redial list.
Please refer to the sections "Telephone
Directory" and "Redial".
Reviewing details of the Speed Dial
number
If the number to be dialled is associated with
a name, press the DETAIL softkey to review
the details. You may press the LIST softkey
to return to the Main Speed Dial list.
Next Page
Press the PAGE UP or PAGE DOWN
softkey to review the previous or next group
of Speed Dial numbers.
Editing / Deleting a Speed Dial number
You can edit or delete a number in the Speed
Dial list by pressing the EDIT or DELETE
softkey respectively.
Your unit comes with a large display screen,
multi-purpose softkeys and advanced
information processing capability for
accessingvariousDisplayInteractiveservices.
Examples of these services are financial
services, the visual directory listings etc.Any
services that are compatible to the Display
Interactive services can be accessed.
Advanced Call Management services make
use of intelligent and user-friendly interface
and on-screen instructions to enable
telephone users like yourself to enjoy the
different telephone services such as Call
Waiting Deluxe, 3 Way Conference, Voice
Mail. etc. very conveniently. Please contact
your local phone company about subscribing
to these advanced Call Management
services.
TheadvancedCallManagementservicesand
the other Display Interactive services require
the downloading of a 'script' into your unit.
Pleasecontactyour localtelephonecompany
regarding the various services and how to
obtain them. Your unit can store up to four
different scripts.
Activating a service
If available, Call Management services are
automatically activated when the Handset is
lifted or the Speakerphone is turned on. To
activate the other services, press the
SERVICES button and use the ARROW
and ARROW keys to select the service
you want. Press the SELECT softkey to
activate that service.
Once you have connected to the service,
please follow the instructions shown on the
display.
Services
Deleting a service
Press the SERVICES button and then the
DISABLEsoftkeytodeleteaselectedservice.
If no new script is downloaded to your unit,
you can press the RESTORE softkey to
restore the script.
Navigation
Usethesoftkeystoselectdifferent operations
and follow on screen instructions. If the
icon at the upper right corner of the display is
turned on (either or is on), it means there
is more information available for you to view.
You can press the ARROW or ARROW
key to view the additional information either
to the left or right of those already shown on
the display.
Ifeither or isonor both and are
on, it means there are more information
available for you to view either pageup or
pagedown. You can press the ARROW
or ARROW key to view the additional
information either on the above page or next
pageof the onealreadyshown onthedisplay.
When you are requested to switch between
lowercaseanduppercase characters,youcan
use the OPTIONS button.
Switching between local features and
Services screen
If you have to make use of a local feature, for
example, the Telephone Directory while a
service is activated, press the SERVICES
button to return to the display screen of that
service.

Using Tone Services on a Pulse Line
If you have pulse services, you can still use
special services that require tone signals by
following these steps:
1. Using pulse dialing to call the service.
2. When the service answers, press"*" or "#"
on the DIALING buttons.
3.Followthenormal procedure for the special
service you are using. Any additional
numbers you dial are sent as tone signals.
When you hang up, the phone returns to the
pulse mode.
2221
Display Icons and Prompts
Display Icons
MAJ
DISCR
GARDE
Indicates that this is a long
distance call.
Repeat Calls where #
being the count from 1 to
9.
Callerblockedthe CallerID
information.
Call received is not within
Caller ID service area.
Forwardedcalls. Itappear
before the name and
number of the incoming
call.
Call received is from a
Caller ID service area that
only sends single data
format, that is, only sends
nameonlyor number only.
The incoming call is a new
call.
The input characters are
uppercase characters.
You have received messages in
your voice mail.
Your unit is in an off-hook state.
Your unit is in an on-hook state.
Speakerphone mode.
Mute is activated.
Hold is activated.
A script is being downloaded.
Indicates that there is more
information available but cannot fit
all on the display. Press the
corresponding ARROW keys to
review more information.
Display Prompts
Long Distance
X #
Private name /
Private number
Unknown name /
Unknown number
"<"
(
Unknown name) /
(Unknown number)
NEW CALL

24
23
Your phone is manufactured from the finest grade materials and most reliable electronic com-
ponents. Weareconfident youwill receivemany yearsof uninterruptedservicefromthistelephone.
Before calling for service, please check this list of the most common problems.
Problem Check
SAVE THESE INSTRUCTIONS.
Troubleshooting
The phone doesn’t work
The phone doesn’t ring
No dial tone
Cannot dial
Other party cannot hear
The display is faded
CALLER ID doesn’t work
No caller’s name
You cannot hear or be heard clearly
Caller’s information is not registered
The red LED keeps flashing
Is the LINE CORD connected properly?
Checkthe RINGTONE / VOLUME setting.
Is the COILED HANDSET CORD
connected properly?
Check the phone jack with a known
working phone.
Do you have touch tone service?
Check the TONE/ PULSE setting.
Check if HANDSET cord is connected prop-
erly.
Adjust the Display Contrast.
Do you have CALLER ID service?
Does the CALLER ID service to which you
subscribe include the CALLERS NAME DE-
LIVERY feature?
Increase the receiver or speaker volume
Did you or your answering machine answer
calls before the second ring?
Did you review all the new calls?
The following suggestions will help you
care for the system so you can enjoy it
for years.
Keep the system dry.
If it gets wet, wipe it
dry immediately. Liq-
uids might contain
minerals that can
corrode the elec-
tronic circuits.
Use and store the
system only in nor-
mal temperature envi-
ronments. Tempera-
ture extremes can
shorten the life of
electronic devices,
and distort or melt
plastic parts.
Handle the system
gently and carefully.
Dropping it can dam-
age circuit boards
and cases and can
cause the system to
work improperly.
Care and Maintenance
Keep the system
away from excessive
dust and dirt, which
can cause prema-
ture wear of parts.
Wipe the system
with a damp cloth oc-
casionally to keep it
looking new. Do not
use harsh chemi-
cals, cleaning sol-
vents, or strong de-
tergents to clean the
system.
Modifying or tampering with the system’s
internal components can cause a mal-
function and might invalidate the system’s
warranty and void your FCC authorization
to operate it. If your system is not per-
forming as it should, take it to your local
store for assistance.
BEOONE

2625
FCC Requirements
This equipment complies with Part 68
of FCC Rules. A label on the BASE
UNIT of this equipment contains, among
other information, the FCC Registration
Number and the Ringer Equivalence
Number (REN) for this equipment. You
must, upon request, provide this infor-
mation to your telephone company.
The REN is also useful in determining
the number of devices that you may con-
nect to your telephone line and still al-
low all of these devices to ring when
your telephone number is called. In
most areas, but not all, the sum of the
RENs for all devices connected to one
line should not exceeded five (5.0). To be
certain of the number of devices you
may connect to your line, contact your
local telephone company.
If your equipment should cause harm
to the telephone network, the telephone
company may temporarily disconnect
your service. If possible, they will notify
you in advance that temporary discon-
tinuance of service may be required.
However, when advance written notice
is not possible, the telephone company
may temporarily discontinue service
without notice if such action is neces-
sary under the circumstances.
Federal Communications Commission Requirements
The telephone company may make
changes in its communication facilities,
equipment, operations, or procedures
where such action is reasonably re-
quired in the operation of its business
and is not inconsistent with the rules
and regulations of the Federal Commu-
nications Commission.
Do not attempt to repair or modify
this equipment. Changes or modifi-
cations not expressly approved by the
party responsible for its compliance
could void the user’s authority to oper-
ate the equipment.
This equipment should not be used on
coin telephone lines. Connection to
party line services are subject to state
tariffs. If trouble is experienced, discon-
nect this equipment from the telephone
line to determine if it is causing the
malfunction. If the equipment is deter-
mined to be malfunctioning, its use
should be discontinued until the prob-
lem has been corrected.
Current FCC regulations specify that
any direct connections to a telephone
company line be done using only stand-
ard phone jacks and plugs that meet
FCC regulations.
FCC Requirements
This equipment has been tested and
found to comply with the limits for a
Class B digital device, pursuant to Part
15 of the FCC Rules. These limits are
designed to provide reasonable protec-
tion against harmful interference in a
residential installation. This equipment
generates, uses, and can radiate radio
frequency energy and, if not installed
and used in accordance with the in-
structions, may cause harmful interfer-
ence to radio communications. How-
ever, there is no guarantee that inter-
ference will not occur in a particular in-
stallation. Ifthis equipment does cause
harmful interference to radio or televi-
sion reception, which can be deter-
mined by turning the equipment off and
on, the user is encouraged to try to cor-
rect the interference by one or more of
the following measures:
- Re-orient or relocate the receiving
antenna.
- Increase the distance between the
equipment and receiver.
- Connect the equipment into an out-
let on a circuit different from that to
which the receiver is connected.
- Consult the dealer or an experienced
radio TV technician for help.
NOTICE TO HEARING AID WEARERS: This telephone has
been registered with the FCC as hearing aid compatible

25 26
CYBIOLINK P-I Screenphone
Owner’s Manual
Installation and operating instructions
Please read
this manual
carefully
before use.
Keep for
your reference.
123
456
789
*
0#
Options Services
ABC DEF
JKL MNO
TUV WXYZ
GHI
PQRS
OPER
Speed Dial
Redial
Directory
Callers
Speakerphone Mute Hold
Printed in Hong Kong
RC 2601Y02
ZIM2135003CTS
Table of contents