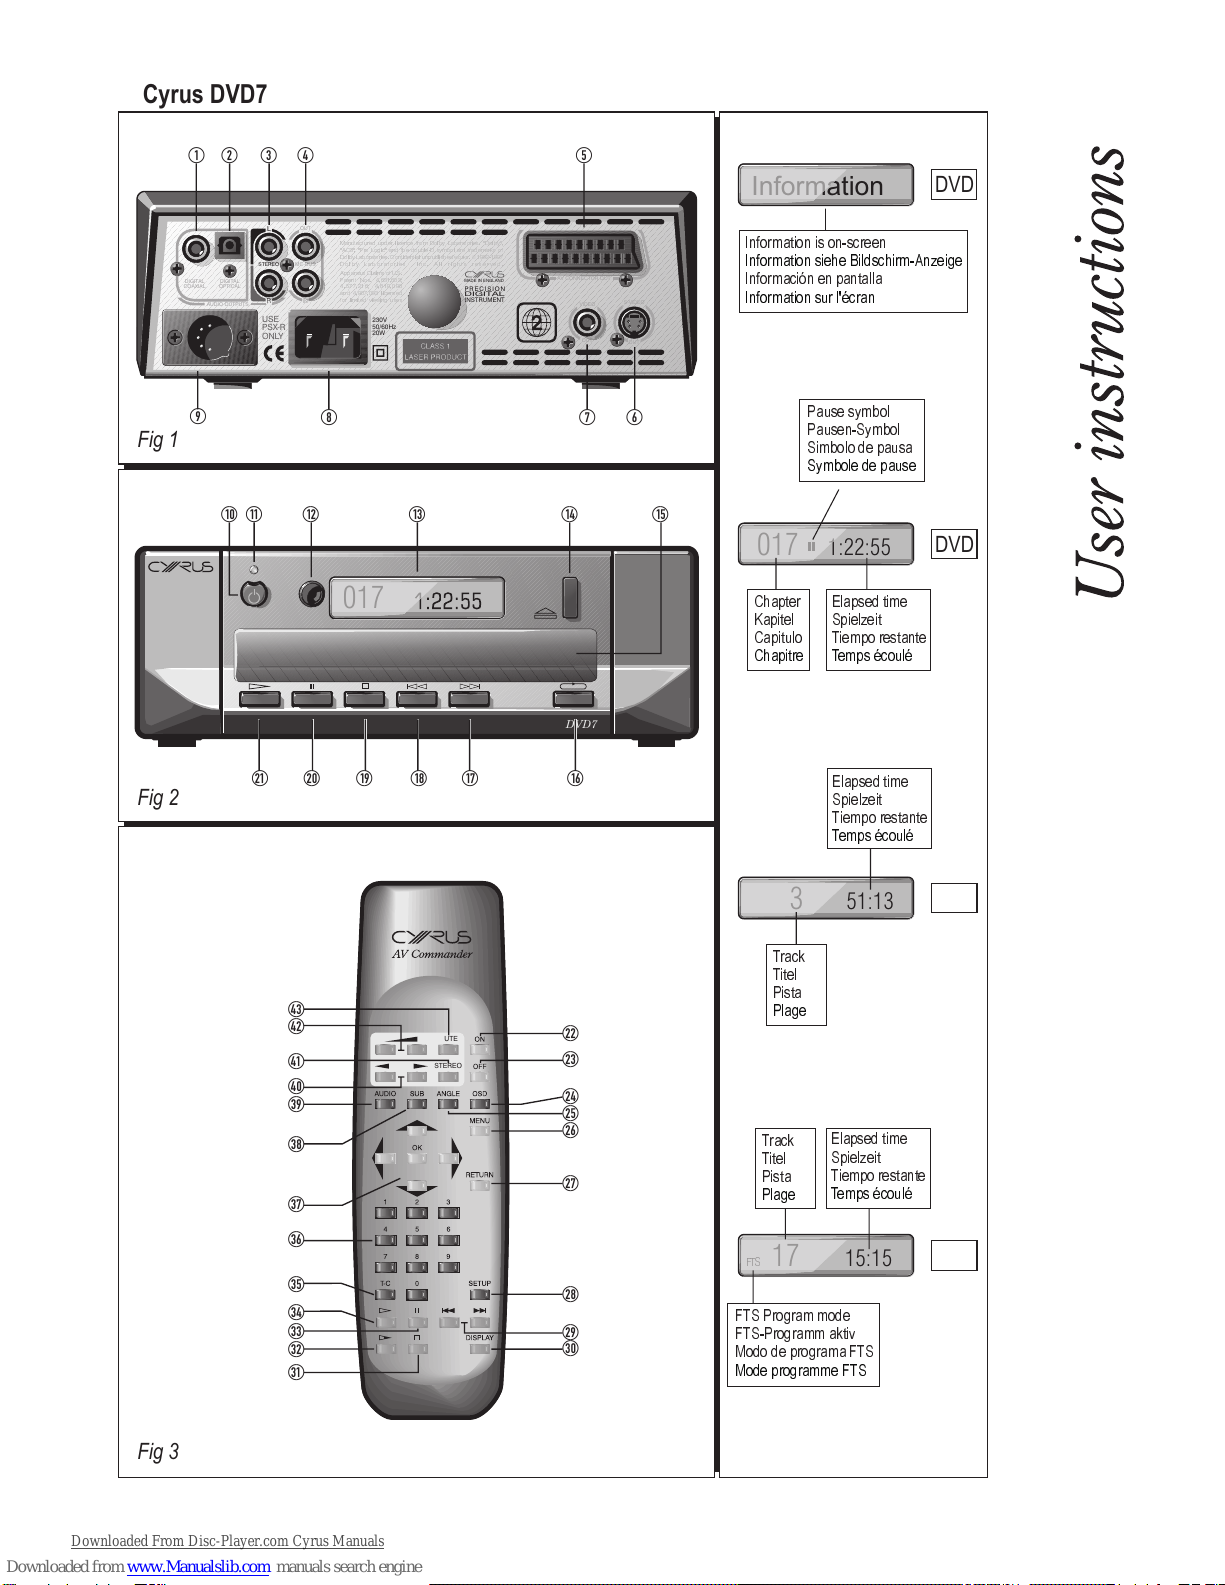
User Instructions Cyrus DVD7
4
GB
GB
Playing a DVD-Video Disc
You will recognize DVD-Video discs by the logo. Depending on the material
on the disc (a movie, video clips, a drama series, etc.) it may have one or
more Titles, and each Title may have one or more Chapters. Play stops at the
end of each Title. To make access easy and convenient, the DVD7 lets you
move between Titles, and also between Chapters.
On-Screen Display (OSD)
During playback of a DVD-Video disc, various icons will appear on the TV
screen for about 2 seconds to confirm that a function has been selected. You
can switch these off by pressing OSD.
At any time during play, you can press OSD to call up the Play Banner, which
shows you which functions are active, for about 2 seconds. To keep the Play
Banner on the screen, hold down OSD for a couple of seconds. To switch off
the Play Banner, press OSD again.
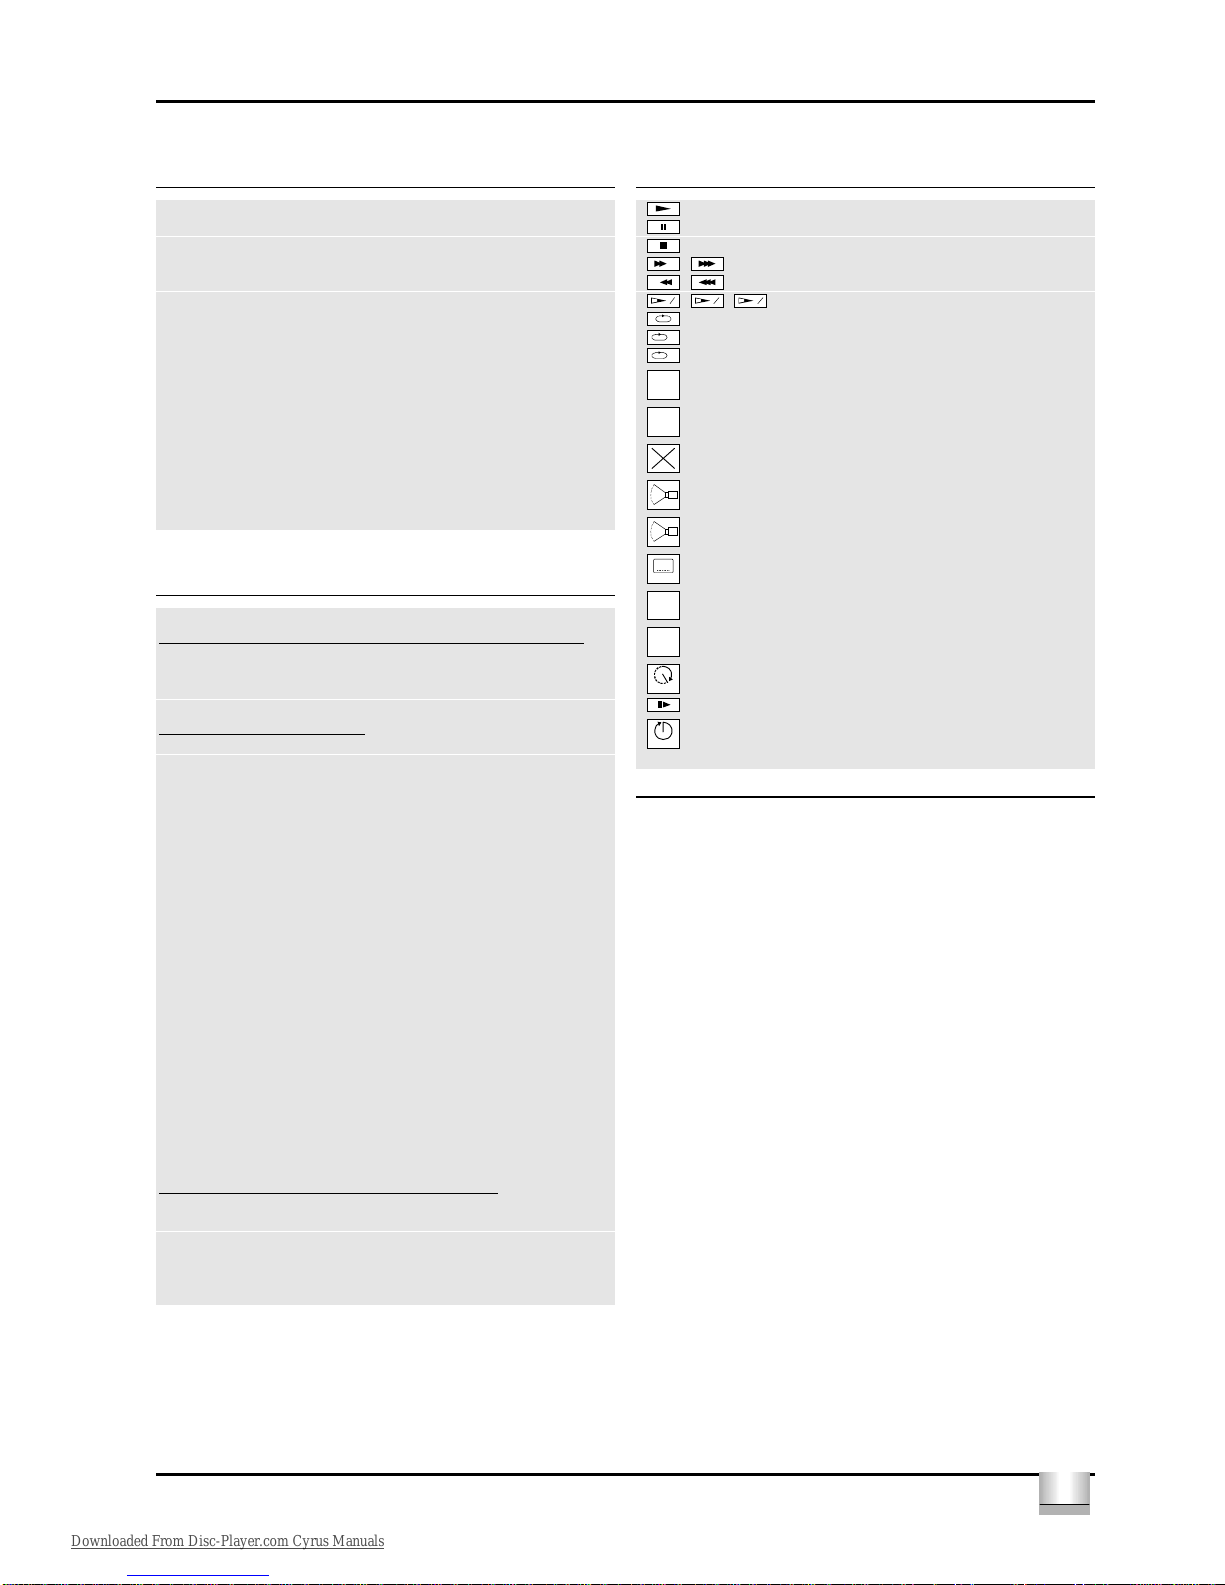
A table of the OSD icons is shown in the ‘Quick Reference Guide’.
Playing the disc
Press to play the disc. With AUTOPLAY on (see ‘SETTINGS’ for Autoplay
instructions), play starts when you close the disc drawer.
NOTE: Some DVD-Video discs carry their own Autoplay, in which case play
always starts automatically. The disc may invite you to select an item from a
menu. If the selections are numbered, press the appropriate Numerical key
3^; if not, use the Navigation keys 3& to highlight your selection, and press
OK.
Play will stop at the end of a Title and this can result in return to menu. To
move to the next Title, press .
To stop play at any other time, press .
You can resume play from the point at which you stopped. Press twice.
The resume feature applies, not only to the disc in the player, but also to the
last four discs you have played. Simply re-insert the disc, press if
Autoplay is off, and when you see the Resume icon on the screen, press
again.
Moving to another chapter
When a title on a disc has more than one chapter (which you can see from
the play display), you can move to another chapter by pressing or
briefly during play to step through the chapter sequence.
To go directly to any chapter, enter the chapter number using the Numerical
keys 3^. If the number has more than one digit, press the keys in rapid
succession.
For more information about chapters, see “Checking the contents of DVD-
Video discs: Menus”
Moving to another title
When a disc has more than one title (which you can see from the OSD if you
press OSD), you can move to another title by pressing T-C, then press or
briefly during play to step through the title sequence.
To go directly to any title, press T-C, then enter the title number using the
Numerical keys 3^. If the number has more than one digit, press the keys in
rapid succession.
For more information about titles, see “Checking the contents of DVD-Video
discs: Menus”
Parental control
If you activate Parental Control, only discs that you have already authorised
as suitable for all ages can be played as above. To play any other DVD-Video
disc, the OSD will ask you to enter your Parental Control PIN code. When this
has been done, play starts automatically. To activate Parental Control, and to
authorize discs, see Activating Parental Control.
NOTE:- If you forget your PIN code, you can erase it when the code is
requested as above, by pressing the key four times. Parental Control will
then be de-activated. To re-activate it, see Activating Parental Control.
Still picture and step frame
To get a still picture, press during play.
To step forward to the next picture frame, press again.
To return to play, press .
Search
To search forwards or backwards through the disc at 4x normal speed, press
and hold or for about 1 second during play. Search begins, and sound
is muted. To step up to 32x normal speed, hold or again until the
screen icon changes. To return to 4x normal speed, press or again.
Search speed and direction are indicated on the screen for 2 seconds each
time or is pressed.
To end the search, press or as desired.
Slow motion
Press to play video at ½ normal speed with sound muted.
Press again to play at ¼ normal speed.
Press again to play at ⅛normal speed.
Press again to play video at ½ normal speed.
Play speed is indicated on the screen for 2 seconds each time the button is
pressed.
To exit slow motion mode, press or /as desired.
Repeat chapter/title/disc
To repeat the currently playing chapter, press the key once. The Repeat
symbol will appear on the player display and the Repeat Chapter icon will be
displayed on the TV screen.
To repeat the currently playing title, press a second time. The Repeat
Title icon will now be displayed on the TV screen.
To repeat the entire disc, press a third time. The Repeat Disc icon will
now be shown on the TV screen.
To exit Repeat mode, press again. The Repeat symbol will switch off.
Camera angle
If the disc contains sequences recorded from different camera angles, the
angle icon appears showing the number of available angles, and the angle
being shown. You can then change the camera angle if you wish.
To select another angle, press ANGLE. The Angle icon will show the next
angle.
To go to any angle directly, enter the angle number using the Numerical keys
3^.
NOTE:- The Angle icon remains on the screen unless you turn off the angle
feature.
To turn off the angle feature, press OSD, the Angle icon will disappear.
Changing the audio language and channel configuration
This changes the language and the audio channel configuration when
alternatives are available on the disc.
Press AUDIO during play. The Audio language and Channel configuration
icons will appear on the screen for 2 seconds.
Press AUDIO repeatedly to step through the options. At each step, the
language changes. If the sound configuration changes too (for example from
multichannel to stereo) this is also indicated.
Subtitles
When subtitles are available on a disc, you can turn them on by holding SUB
down during play until the subtitles appear. To step through the language
options, press SUB repeatedly. To turn the subtitles off, hold SUB down
again.
Checking the contents of DVD-Video discs: menus
For titles and chapters, selection menus may be included on the disc. The
DVD7’s menu feature allows you to make selections from these menus. Press
the appropriate Numerical key 3^; or use the Navigation keys 3& to highlight
your selection and press OK.
Press MENU:- If the present title has a “root” menu, this now appears on the
TV screen. The “root” menu can list camera angles, spoken language and
subtitle language options, and chapters for the title. To exit the “root” menu,
press MENU again.
Press T-C followed by MENU. If the disc has a title menu, this now appears
on the TV screen. To remove the title menu, press T-C again.
Downloaded From Disc-Player.com Cyrus Manuals