Cytech TOMAHAWK Maintenance manual

Tomahawk Indoor Cycling Maintenance Manual
Contents
Page
Part 1
Introduction to care and maintenance of the Tomahawk Bikes 1
Warning instructions 2
Important instruction regarding reverse cycling 3
Part 2
The usage, care and cleaning by class participants 4
Part 3
Regular care procedures to be carried out by employees – 5-6
after EVERY 10 hours of usage
Part 4
Regular care procedures to be carried out by employees – 7
after EVERY 20 hours of usage
Part 5
Regular care procedures to be carried out by employees – 8-13
after EVERY 40 hours of usage
Please note! 14
Part 6
Check lists for service and maintenance intervals / Example of a 15-16
maintenance plan
Tomahawk spare parts / Description / Detailed diagrams 17-19
Tomahawk Order Form 20

Part 1
Introduction to care and maintenance of
the Tomahawk Bikes
Care and maintenance spray
Opening times
Warning instructions
Important instruction regarding reverse cycling

Introduction to care and maintenance of the Tomahawk Bikes 1
Dear Client
We’d first like to thank you for your confidence and for your purchase.
By choosing the TOMAHAWK INDOOR CYCLE you’ve decided on a
quality product, designed to meet the highest demands for product
reliability in accordance with all technical stipulations.
In the long term, optimum product reliability can only be sustained
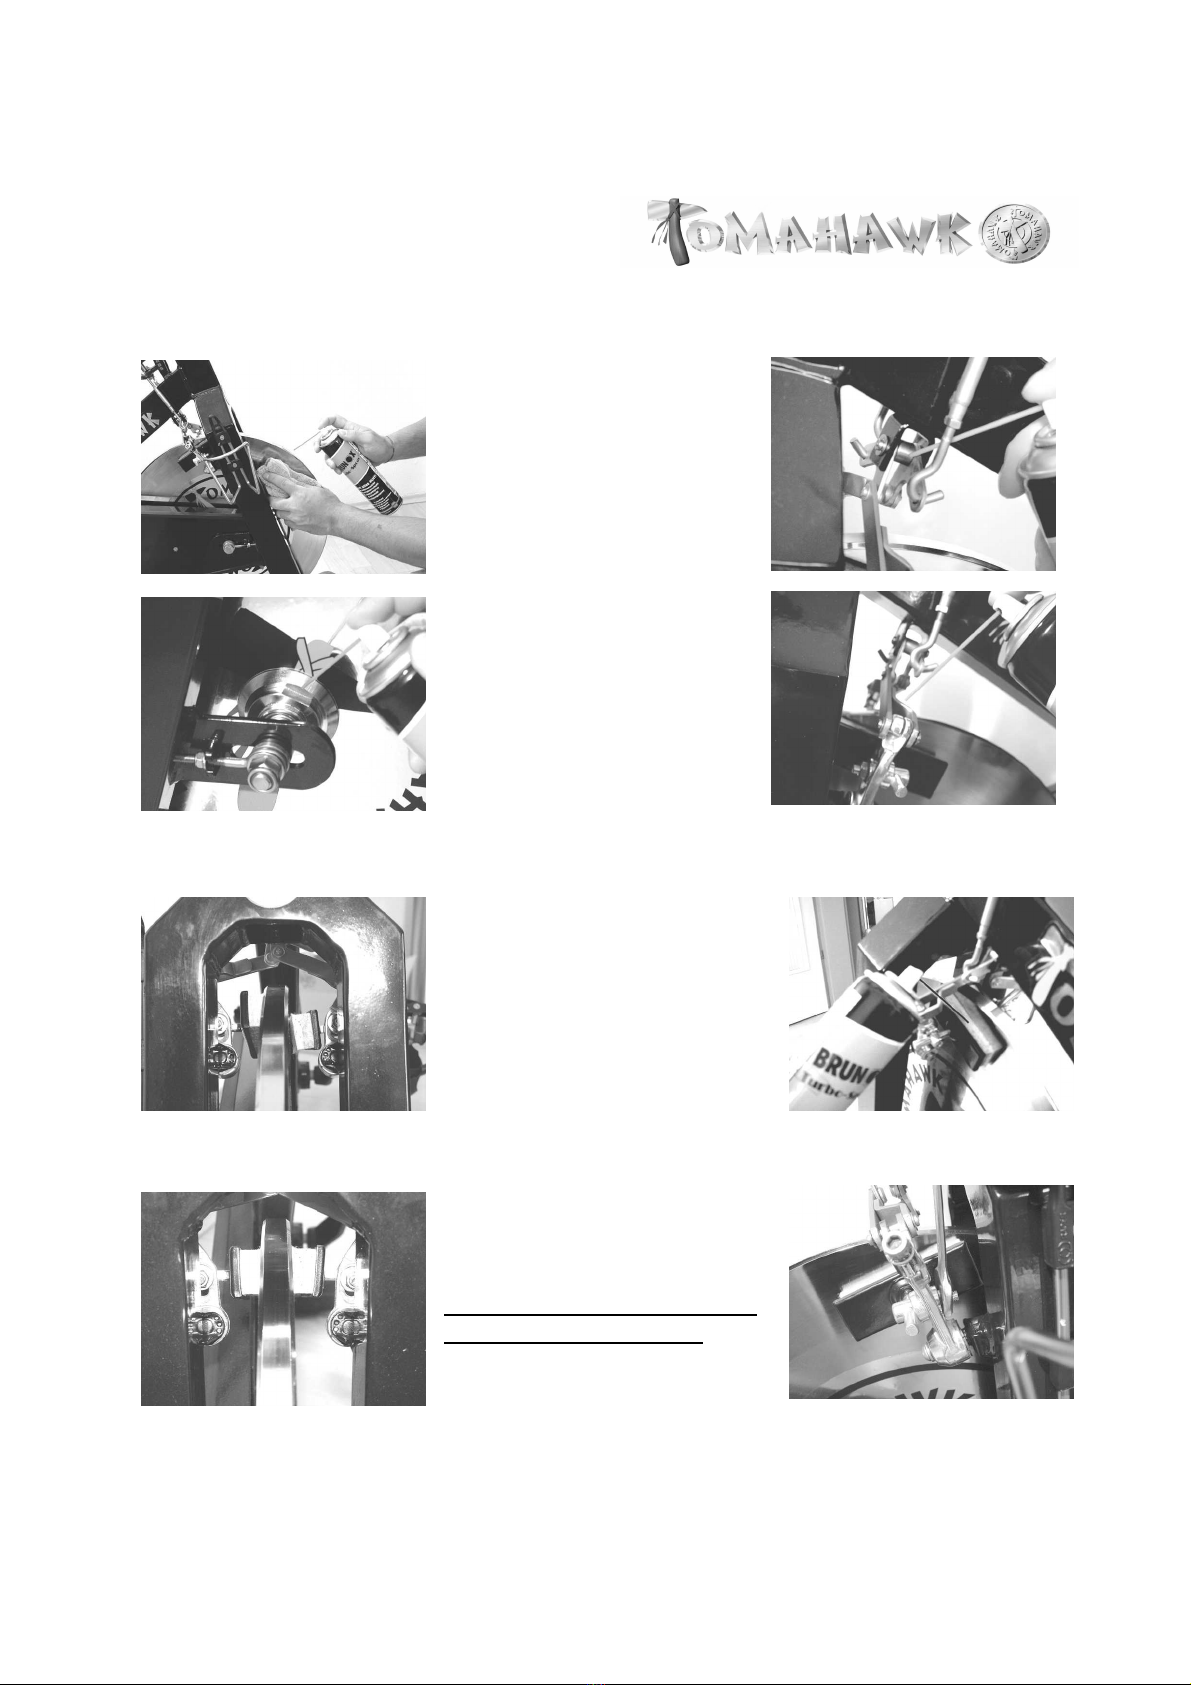
through regular care and maintenance. Adhering to the following care
and maintenance instructions, will ensure that your TOMAHAWK
INDOOR CYCLE achieves it's maximum life span with a minimum of
maintenance; guaranteeing you many years of trouble free usage.
When maintaining the bikes, please use only the care and maintenance
products recommended in this service manual. For further information
about these products contact your distributor or the manufacturer
directly , www.Indoorcycling.com or [email protected] .
Please understand that our guarantee obligations can only be upheld,
when the following care and maintenance checks are carried out at
regular intervals.
Paying regular attention to the maintenance instructions within this
manual will ensure the optimum performance of the bikes. Should you
wish to consider a maintenance and service contract with our customer
service technician to meets your individual needs, we would be happy to
provide a quotation. For further information please contact your dealer
+49 911 544 4529
Monday to Thursday from 9.00 a.m. –5.00 p.m.
Friday from 9.00 a.m. –4.00 p.m.

Safety instructions 2
SAFETY INSTRUCTIONS
The Tomahawk Indoor Cycle has a fixed
fly-wheel, rather than a 'free wheel' facility.
With a fixed-fly wheel mechanism, the
pedals continue to turn when the wheel is
moving. This should be pointed out to
clients to ensure cycling safety.
Clients should only use the Tomahawk
cycle after a thorough introduction by a
qualified instructor
Cycling should be performed with
controlled movement and always with some
resistance on the fly-wheel
Clients should be advised to wear close
fitting fitness clothes or special bike wear
Indoor cycling is not advised for children
under 14 years of age
Should dizziness or sickness occur, stop
training immediately

Important instruction regarding reverse cycling 3
IMPORTANT INSTRUCTION
To all trainers holding an
INDOOR CYCLING class ! ! !
It is essential to be aware that
during the class reverse cycling
does not take place whilst using
resistance,otherwise the screw
connection (thread) on the pedal
axle to the crank arm can be
loosened. Loosening of the
connection may result in the
pedal becoming detached from
the crank arm.

Part 2
Usage, care and cleaning
of the bikes by class participants
Before each class
After each class

Usage, care and cleaning of the bikes 4
Usage, care and cleaning of the bikes by the class participants!
The regular care procedures must take place after each class
and should be carried out by the
each bike user. Make sure that enough soft paper towels
or cleaning cloths as well as
maintenance and disinfectant products are available in the cycling room for this purpose.
For reasons of hygiene it is necessary to clean the handlebar and the saddle with a
disinfectant spray, after each class. It is also n
ecessary to clean the frame of any sweat
residue, to ensure a clean bike for the next class participant. For this purpose it’s best to spray
the affected areas with WD40
maintenance spray and then subsequently rub them with a dry
cloth.
Cleaning:
Spray the Brunox
maintenance
spray, which is recommended by the
manufacturer, onto a cloth and rub
down the frame parts and the chain
guard with it.
Before the beg
inning of each class, check that the bikes
are in a stable position. This should be carried out for
the safety of class participants. The underside of the
frame bearers (stabilizers) on TOMAHAWK INDOOR
CYCLES are equipped with feet on which the level can
b
e regulated, in order to ensure a stable position on an
uneven surface.
1. Before each class
2. After each class
Disinfectant
:
Lightly spray the handlebar and the
sadd
le with the disinfectant spray and
rub the surfaces dry with a cloth.

Part 3
Regular care procedures to be carried out
by employees
after EVERY 10 hours of usage
Thorough cleaning of the bikes
Maintenance of the brake pads
Emergency brake function

Care procedures after every 10 HOURS OF USAGE 5
So that the brake system’s very
sensitive resistance regulation can
maintain its optimum effect, and in
order to mi
nimise the wear and tear
of the brake pads: the brake pads’
supporting surface should be
sprayed ( slightly saturated )with
sufficient Brunox spray.
In addition, the correct set-
up and
adjustment of the brake pads
should undergo a visual check.
(see also Chapter C, Position 9 –
Set-up of the brake system)
1. Thorough cleaning of the bikes –after EVERY 10 hours of usage
Spray the
Brunox
m
aintenance
spray onto a cloth and rub down the
bike. Parts which cannot properly
be cleaned with the cloth, (like for
example the brake system, flywheel
hub and axle) should be sprayed
with the maintenance spray so that
a light oily film forms on these
parts.
2. Maintenance of the brake pads –after EVERY 10 hours of usage
incorrect brake pad set
-
up
correct brake pad set
-
up

Care procedures after every 10 HOURS OF USAGE 6
Due to safety reasons during classes, the
emergency brake function must be checked
regularly. In order to do this, t
he red
emergency stop handle is to be pulled whilst
pedalling. When functioning optimally, an
immediate braking effect should take place
bringing the flywheel to a stand still.
(see also
Chapter C, Position 9 - Set-
up of the brake
system )
3. Check emergen
cy brake function
–
after every 10 hours of usage

Part 4
Regular care procedures to be carried out
by employees
after EVERY 20 hours of usage
Clean handlebar & saddle supports
Clean flywheel & hub

Care procedures after every 20 HOURS OF USAGE 7
To ensure the
smooth and easy
adjustment of the handlebar and
saddle both the horizontal and
vertical saddle supports, as well
as the handlebar, must be taken
out of their inserts.
Remove the handlebar and
saddle support stems, spray the
stainless steel supports with
maintenance spray and rub them
down with a cloth. At the same
time, the inserts on the frame
should also be sprayed with
maintenance spray.
1. Clean handlebar & saddle supports
–
after every 20 hours of usage
2. Clean flywheel & hub
–
after every 20 hours of usage
Spray the flywheel and the
fly
wheel hub with maintenance
spray and rub these parts down
with a soft cloth, so that a light
oily film remains.

Part 5
Regular care procedures to be carried out
by employees
after every 40 hours of usage
Check locking and adjustment handles
Check chain play and adjust
Check all screw connections
Check function of the brake system

Care procedures after every 40 HOURS OF USAGE 8
1. Check locking and adjustment handles
–
after every 40 hours of usage
The thread of the three
adjustment handles on the saddle
and on the handlebar shaft
should be sprayed with
maintenance spray, in order to
ensur
e the normal smooth and
easy movement of the
adjustment handles. To do this
screw the adjustment handle out
as far as possible and spray the
thread. At this point, the function
of the engagement mechanism
should be checked for safety
reasons.

Care procedures after every 40 HOURS OF USAGE 9
2. Check chain play and adjust
XL version every 40 hours of usage
XXL version every 80 hours of usage
To do this proceed as follows:
Bring the pedal arms into a horizontal position
Operate the emergency brake system and rock (standing on the pedals)
backwards and forwards. The optimal chain play should be around 2-3 mm. If
chain play is too much, it’s necessary to tighten the chain. This can be determined
by a slight free play of the chain in the chain wheel, which causes a quiet clicking
noise.
Loosen the tightening screw on the flywheel axle by max. 2 turns (Please do not
completely remove the self-locking nut)
The automatic chain tension ring at the XXL bikes should be taken out before and
put into again afterwards.
With a 10 mm spanner slightly tighten the adjustment screw on the chain adjuster.
Whilst doing this, it is essential to make sure that the same amount of rotations
are made on the left and on the right side of the nut (usually one rotation is
sufficient). Otherwise the chain wheel, which is connected to the flywheel, will be
at an angle in the guider and the chain cannot retain its straight position. (If the
chain wheel is at an angle, an increase in chain noises can be heard.)
Tighten the screw on the flywheel axle (a hand-tight adjustment is sufficient, as
there is a self-locking nut). Maximum torque 40 Newton metres.
Test chain play again, as described above. Ride the bike whilst set at the medium
resistance, in order to establish whether increased running noises or vibrations
occur !!!
Running noises or vibrations are clear signs, that the chain has been tightened too
much or that the flywheel is at an angle with the chain wheel and therefore the
chain is no longer straight. The reason for this is the uneven adjustment of the
chain adjuster.

Care procedures after every 40 HOURS OF USAGE 10
Important ! ! Always evenly tighten and release the left and right chain
adjuster nut, so that the straight setting of the chain is not changed !!
remove flywheel axle
3. Check the tautness of all screw connections
–
after every 40 hourse of usage
As a precautionary measure,
check that all fixings and
screw connections are
tightened and in the correct
positions.
Moving parts can become
loose as a result of the
enormous amount of
pressure over a long period,.
For the safety of class
participants it’s also
important to check that pedal
straps, toe clips and saddles
are in good condition. It is
essential to repl
ace worn or
faulty parts immediately.

Care procedures after every 40 HOURS OF USAGE 11
4. Check functions of the brake system –after every 40 hours of usage
With an increase in the amount of usage and as a result of pressure, the brake pads
begin to show wear, which could mean that the fine resistance regulator and emergency
brake no longer operate at their optimum. We therefore recommend regular checks on
the brake system’s functions. Should you discover that the braking system’s functions
are deficient, it is essential to fine-tune the braking system before the bike is used again!
Please check the setting of the brake system as follows:
First turn the resistance regulator on the brake system as far as it will go to the
left (minimum braking effect). If the setting is correct, the brake pads should be
parallel to both sides of the flywheel and lightly touching each side, so that it’s
possible to cycle with a hardly noticeable amount of resistance.
If both brake pads are parallel, but the distance to the flywheel is too great,
then please first release the top locking nut on both brake hooks. The distance
of the right brake pad to the flywheel can now be set with the left adjustment
screw (screw on the carrier plate of the resistance regulator) and vice versa.
If the brake pads are not parallel to both sides of the flywheel, please release
the M10 nut on both sides of the brake pad mount and set the brake pads first
by hand, so that these sit correctly in a parallel position to the flywheel, before
you carry out the fine adjustment.
For safety reasons the bikes should never be ridden without
any resistance at all!

Care procedures after every 40 HOURS OF USAGE 12
Release the M8 locking nut
on both sides of the brake
rods.
Turn the brake locking handle to
the left as far as it will go ( open ).
After the brake pads have been
correctly set, they both lie flat
against the flywheel in a
parallel position at both sides.
Carry out the fine adjustment of
the distance of the brake pads
to the flywheel with the
adjustment screws.
Should the brake pads not be
parallel to the flywheel, release
the brake pad holder M10, and
then set the position of the
brake pads by hand;
subsequently carry o
ut the fine
adjustment.
Incorrect positioning of the
brake pads to the flywheel! The
brake system’s functions are
greatly limited –
it is essential
to reset the brakes !!!

Care procedures after every 40 HOURS OF USAGE 13
5. Check functions of the brake system –after every 40 hours of usage
In addition, the thread of the brake screw must be oiled at
regular intervals, in order to ensure the long term optimal
function of the resistance adjustment mechanism (othe
rwise,
an increase in wear and tear can occur on the thread of the
brake locking handle).
To adjust the brake resistance, turn the resistance regulator
(brake locking handle
) on the brake system as far as it will go
to the left (minimum resistance). As part of the maintenance
procedure, spray the ball bearing located directly under the
resistance regulator, as well as the thread and the brake rods
with maintenance spray: this
retains easy movement of the
brake adjustment mechanism and minimises wear and tear
on the threads of the brake mechanics.
As part of the regular maintenance procedures on the brake
system, the brake rods and the brake pads should always be
sprayed with maintenance spray. Care should be taken to
spray th
e brake pads sufficiently, in order to minimise wear
and tear, and to ensure the necessary degree of
sensitiveness on the resistance adjustment mechanism in the
long term.
Table of contents