D-Link DCS-2230L User manual

User Manual
Full HD Wireless Day/Night Network Camera
Version 1.00 | 11/10/2014
DCS-2230L

2D-Link DCS-2230L User Manual
D-Link reserves the right to revise this publication and to make changes in the content hereof without obligation to notify any person or
organization of such revisions or changes. Information in this document may become obsolete as our services and websites develop and
change. Please refer to the www.mydlink.com website for the most current information.
Manual Revisions
Revision Date Description
1.0 November 10, 2014 Version A1 with rmware version 1.00
Trademarks
D-Link and the D-Link logo are trademarks or registered trademarks of D-Link Corporation or its subsidiaries in the United States or other countries.
All other company or product names mentioned herein are trademarks or registered trademarks of their respective companies.
Apple®, Apple logo®, Safari®, iPhone®, iPad®, iPod touch® and Macintosh® are trademarks of Apple Inc., registered in the U.S. and other countries.
App StoreSM is a service mark of Apple Inc.
Chrome™ browser, Google Play™ and Android™ are trademarks of Google Inc.
Internet Explorer®, Windows® and the Windows logo are trademarks of the Microsoft group of companies.
Copyright © 2014 by D-Link Corporation, Inc.
All rights reserved.This publication may not be reproduced, in whole or in part, without prior expressed written permission from D-Link Corporation,
Inc.
Preface

3D-Link DCS-2230L User Manual
Table of Contents
Product Overview.............................................................. 5
Package Contents................................................................. 5
System Requirements ......................................................... 6
Introduction............................................................................ 7
Features.................................................................................... 8
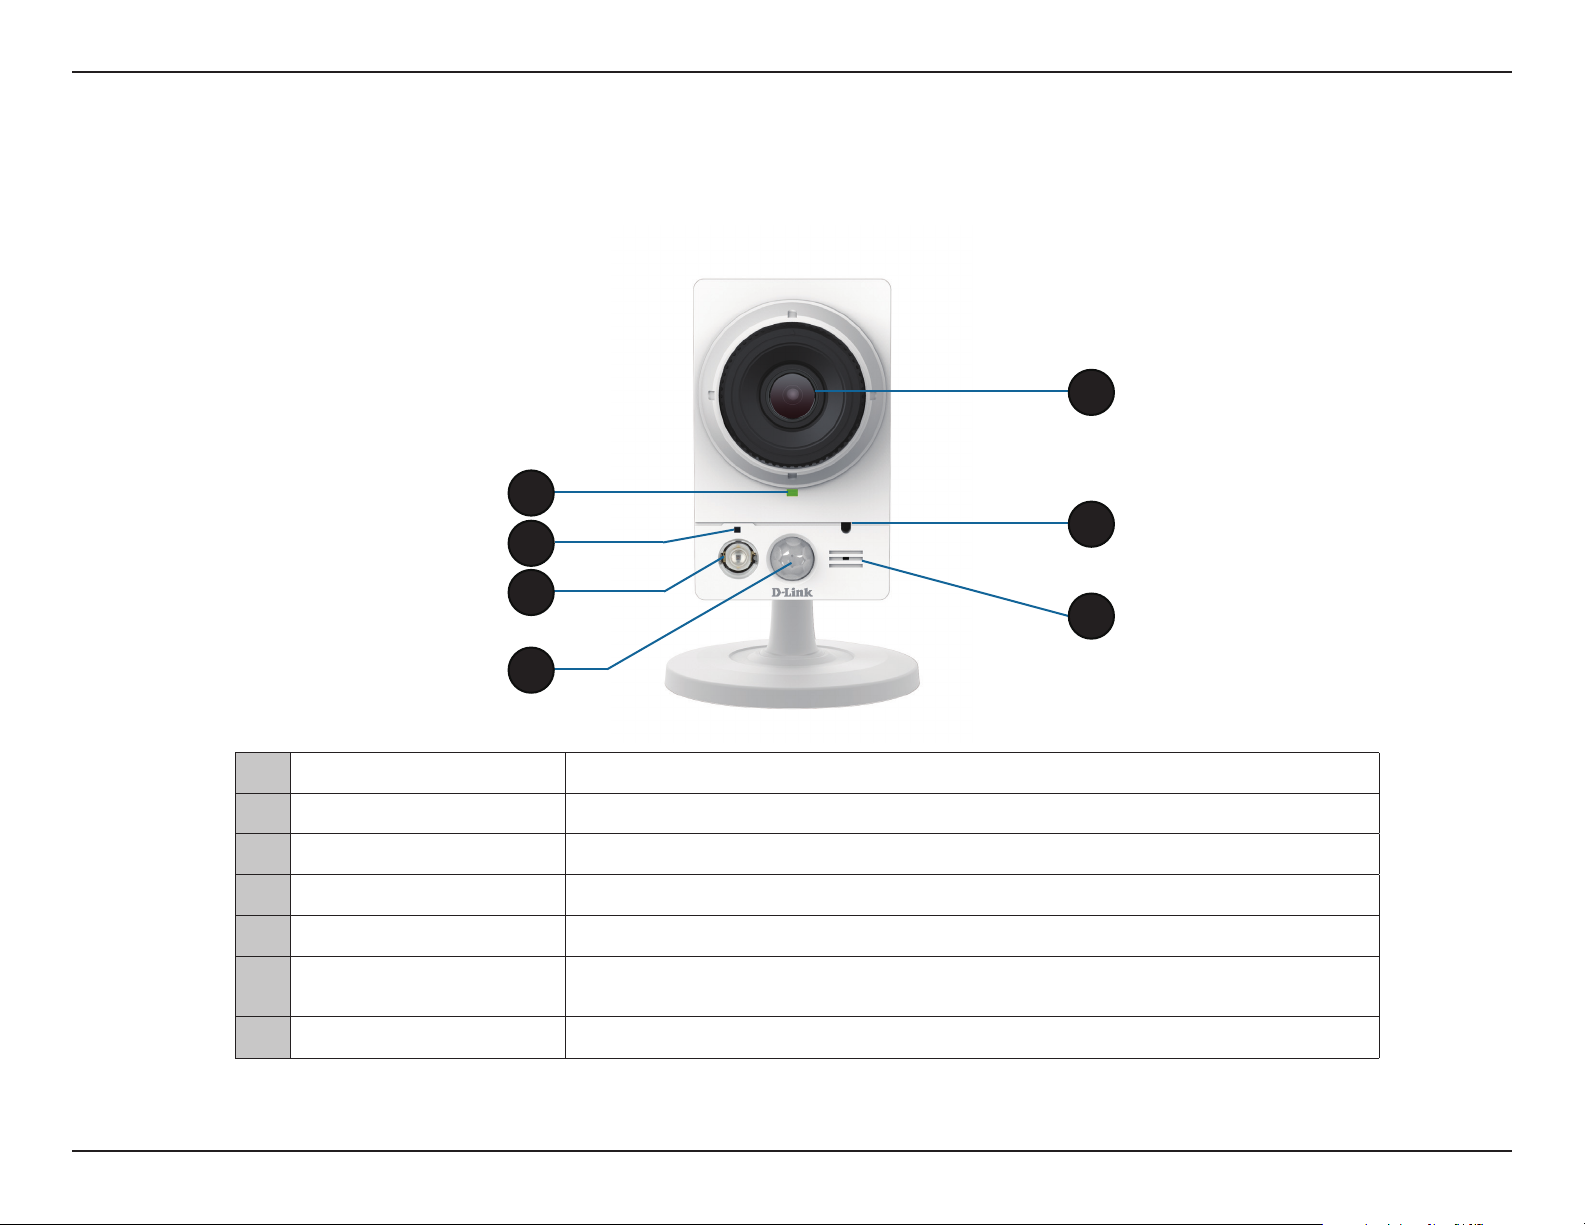
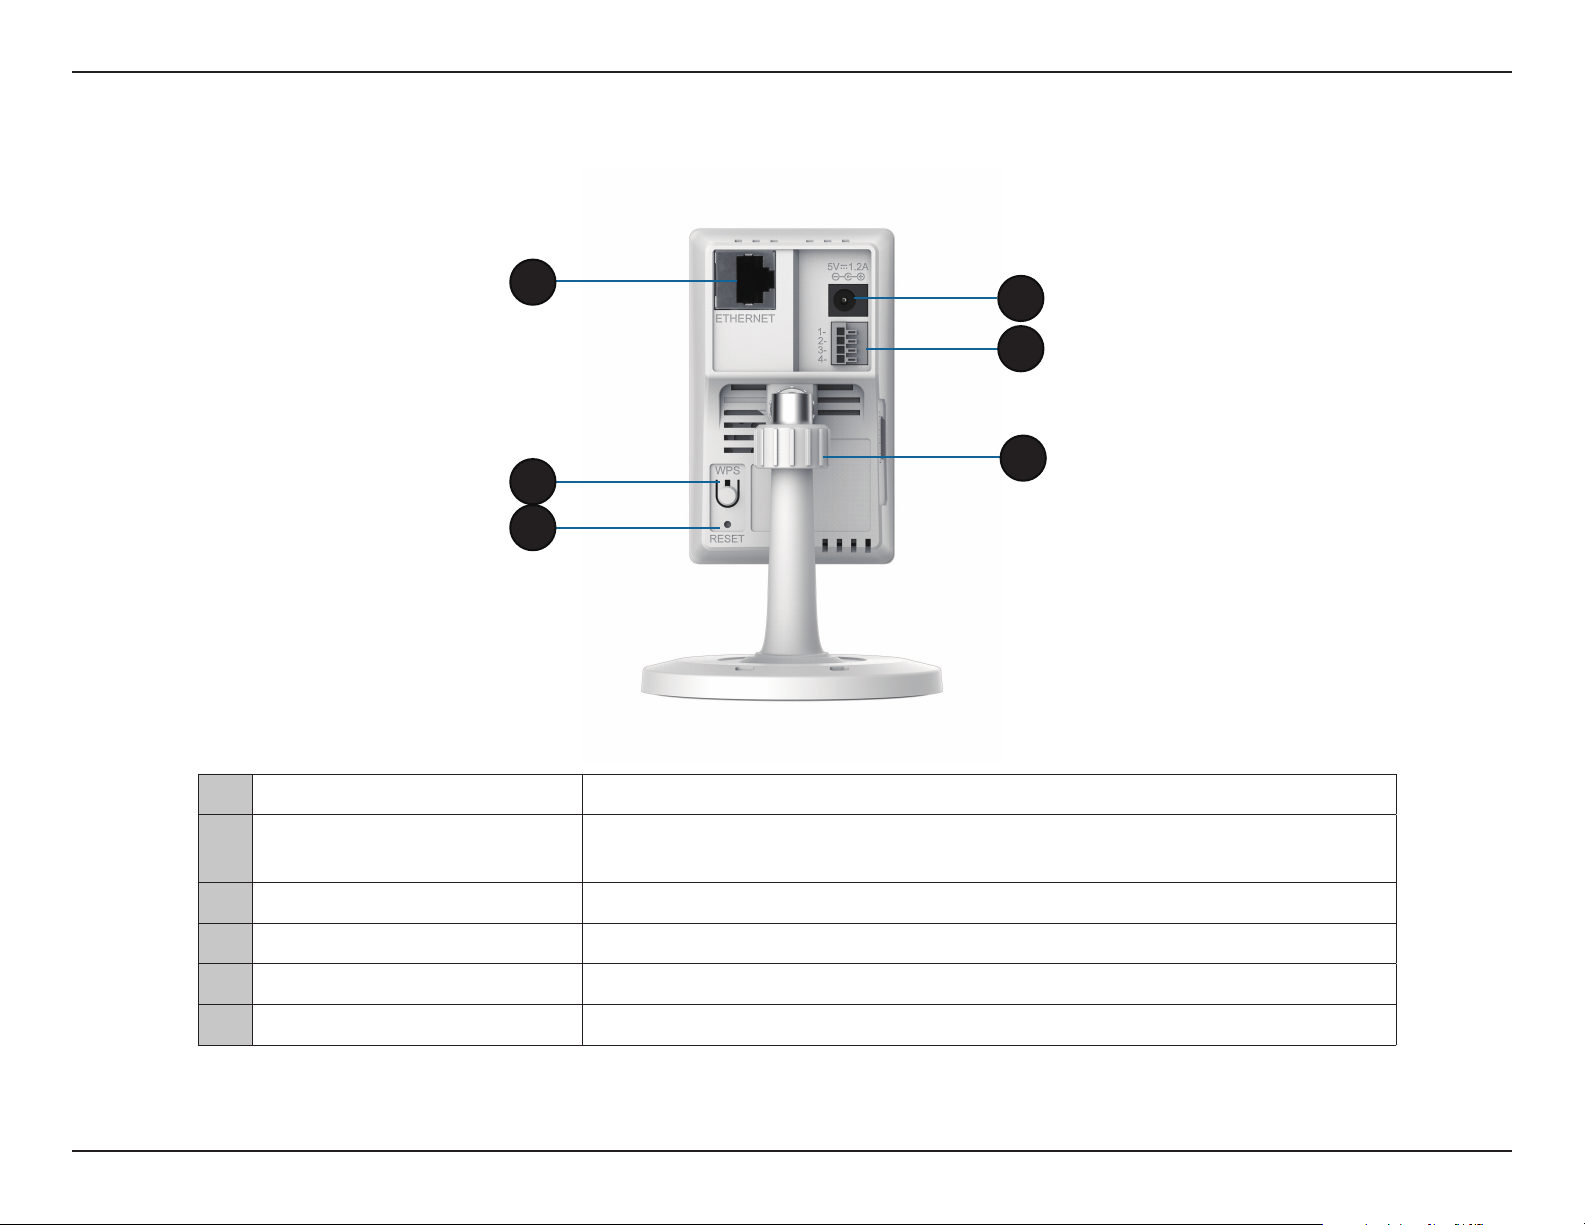
Hardware Overview ............................................................. 9
Front View............................................................................ 9
Rear View ...........................................................................10
Side View............................................................................11
Installation .......................................................................12
Wireless Installation Considerations............................12
Zero Conguration Setup................................................13
Camera Setup Wizard........................................................17
Windows Users ....................................................................17
Mac Users...............................................................................18
Manual Hardware Installation........................................20
WPS - Push Button Setup.................................................21
Mount the Camera .............................................................22
mydlink...........................................................................................23
Conguration...................................................................24
Using the Conguration Interface................................24
Live Video ..............................................................................25
Setup.......................................................................................27
Setup Wizard ....................................................................27
Network Setup.................................................................33
Wireless Setup..................................................................36
Dynamic DNS ...................................................................37
Image Setup .....................................................................38
Audio and Video..............................................................40
Preset...................................................................................42
Motion Detection ...........................................................44
Time and Date..................................................................45
Event Setup.......................................................................46
SD Card...............................................................................55
Advanced .........................................................................56
Digital Input/Output......................................................56
ICR and IR...........................................................................57
HTTPS..................................................................................58
Access List..........................................................................59
SNMP...................................................................................60
Maintenance ....................................................................61
Admin..................................................................................61
System ................................................................................62
Firmware Upgrade..........................................................63
Status................................................................................64
Device Info ........................................................................64
Logs .....................................................................................65
Help......................................................................................66

5D-Link DCS-2230L User Manual
Section 1: Product Overview
Product Overview
Package Contents
If any of the above items are missing, please contact your reseller.
Note: Using a power supply with a dierent voltage than the one included with your product will cause damage and void the warranty
for this product.
DCS-2230L Full HD Wireless Day/Night Network Camera
CAT5 Ethernet cable
Power adapter
CD-ROM with User Manual and software
Quick Installation Guide

6D-Link DCS-2230L User Manual
Section 1: Product Overview
System Requirements
Hardware Requirements
• A microSD memory card (optional) is required for
recording to onboard storage. SDHC Class 6 or
above is recommended.
Network Requirements
• An Ethernet-based cable or DSL modem
• IEEE 802.11n/g wireless clients
• 10/100 Ethernet
• Broadband Internet connection
Web-based Conguration
Utility Requirements
Computer with the following:
• Windows® XP/Vista/7/8, Linux-based, or Mac with
OS X 10.6 or higher
• An installed Ethernet adapter
Browser Requirements:
• Internet Explorer 7.0 or higher
• Firefox 12 or higher
• Safari 6.0 or higher (with Java installed and enabled)
• Chrome 20 or higher
Windows®Users: Make sure you have the latest version of
Java installed. Visit www.java.com to download the latest
version.

7D-Link DCS-2230L User Manual
Section 1: Product Overview
Introduction
Congratulations on your purchase of the DCS-2230L Full HD Wireless Day/Night Network Camera. The DCS-2230L is a versatile
surveillance solution for your small oce or home. The full HD 1920 x 1080 resolution 2 megapixel progressive scan CMOS
sensor lets you capture details like never before – especially important for face recognition. A built-in IR-cut lter and IR LED
makes sure you don't miss an event no matter how bright or dark your surroundings are. To make things convenient, support
for Wireless N means you can easily connect it to your network when setting up your camera on location.
Unlike a standard webcam, the DCS-2230L is a complete system with a built-in CPU and web server that transmits high quality
video images for security and surveillance. The DCS-2230L can be accessed remotely, and controlled from any PC over your
local network or through the Internet via a web browser. It also comes with the D-Link D-ViewCam™ software bundle that
allows you to manage multiple network cameras using remote monitoring, scheduling, recording, motion detection, and
notications for a complete and cost-eective home security solution.

8D-Link DCS-2230L User Manual
Section 1: Product Overview
Full HD Resolution
The DCS-2230L Full HD Wireless Day/Night Network Camera is equipped with a 2 megapixel progressive scan CMOS sensor that provides full HD
1920x1080 resolution, the video stream captures a larger scene and provides more details than an analog CCTV camera – so you can identify
criminals more easily in critical surveillance applications.
Wireless N for Convenience
The DCS-2230L supports Wireless N, which lets you connect your camera to your network without using an Ethernet cable. This feature lets you set
up your camera anywhere without worrying about running network cables to your location.
IR LED for Day and Night Functionality
The built-in IR-cut lter and IR LED enable night time viewing or recording in dark environments at ranges up to 16 feet (5 meters).
DI/DO for Connecting External Devices
Rounding out the exibility of the DCS-2230L, you can connect an alarm or trigger to its DI/DO port for integration into a surveillance solution.
Remote Monitoring Utility
The D-ViewCam™ application adds enhanced features and functionality for the DCS-2230L and allows administrators to congure and access the
DCS-2230L from a remote site via Intranet or Internet. Other features include image monitoring, recording images to a hard drive, viewing up to
32 cameras on one screen, and taking snapshots.
Built-in Mic and Speaker
Covering all the visual components, the DCS-2230L also has a built-in microphone and speaker, so you can transmit two-way audio easily.
mydlink Support
Embrace the power of the cloud by adding your DCS-2230L to the list of devices manageable via the free mydlink web portal.
Web Conguration
Using a standard web browser, administrators can congure and manage the DCS-2230L directly from its own web page via Intranet or Internet.
This means you can access your DCS-2230L anytime, anywhere in the world.
Broad Range of Applications
With today’s high-speed Internet services, the DCS-2230L can provide the ideal solution for delivering live video images over the Intranet and
Internet for remote monitoring. The DCS-2230L allows remote access using a web browser for live image viewing, and allows the administrator to
manage and control the DCS-2230L anytime, anywhere in the world.
Features

9D-Link DCS-2230L User Manual
Section 1: Product Overview
Front View
Hardware Overview
1 Status LED Indicates the camera's current status
2 WPS Status LED Indicates the WPS connection status of the camera
3 Infrared LED Used to illuminate the camera's eld of view at night
4 PIR Sensor Passive Infrared sensor for motion detection
5 Camera Lens Records video of the surrounding area
6Light Sensor The IR-Cut Removable sensor monitors lighting conditions and switches between
color and infrared accordingly
7 Microphone Records audio from the surrounding area
1
4
5
6
7
3
2

10D-Link DCS-2230L User Manual
Section 1: Product Overview
Rear View
1 Ethernet Port RJ45 connector for Ethernet
2 WPS Button Press this button, then press the WPS button for 5 seconds on your router to set up
a wireless connection automatically
3 Reset Button Press and hold this button for 10 seconds to reset the camera
4 Power Connector Connects to the included DC 5 V power adapter
5 DI/DO Connector I/O connectors for external devices
6 Adjustment Ring Tighten or loosen the adjustment ring to adjust the camera's position
1
5
6
2
4
3

11D-Link DCS-2230L User Manual
Section 1: Product Overview
Side View
1 microSD Card Slot Insert a microSD card for Local storage for storing recorded image and video
1

12D-Link DCS-2230L User Manual
Section 2: Installation
This D-Link device can connect to your wireless network from anywhere within the operating range of your wireless network. However, the number,
thickness and location of walls, ceilings, or other objects that the wireless signals must pass through, may limit the range. Typical ranges vary
depending on the types of materials and background RF (radio frequency) noise in your home or business. The key to maximizing wireless range
is to follow these basic guidelines:
1. Minimize the number of walls and ceilings between your adapter and other network devices (such as your DCS-2230L) - each wall or ceiling
can reduce your adapter’s range from 3-90 feet (1-30 meters).
2. Be aware of the direct line between network devices. A wall that is 1.5 feet thick (.5 meters), at a 45-degree angle appears to be almost 3 feet
(1 meter) thick. At a 2-degree angle, it looks over 42 feet (14 meters) thick. Position your devices so that the signal will travel straight through
a wall or ceiling (instead of at an angle) for better reception.
3. Building materials make a dierence. A solid metal door or aluminum studs may weaken the wireless signal.Try to position your access points,
wireless routers, and other networking devices where the signal passes through drywall or open doorways. Materials and objects such as
glass, steel, metal, walls with insulation, water (sh tanks), mirrors, le cabinets, brick, and concrete will degrade your wireless signal.
4. Keep your product at least 3-6 feet or 1-2 meters away from electrical devices or appliances that generate RF noise.
5. If you are using 2.4 GHz cordless phones or other radio frequency sources (such as microwave ovens), your wireless connection may degrade
dramatically or drop completely. Make sure your 2.4 GHz phone base is as far away from your wireless devices as possible. The base transmits
a signal even if the phone in not in use.
Installation
Wireless Installation Considerations

13D-Link DCS-2230L User Manual
Section 2: Installation
Zero Conguration Setup
If you have a D-Link Cloud Router, you can take advantage of Zero Conguration Setup. Zero Conguration automatically
congures your camera's settings for you, and adds it to your mydlink account automatically. This type of setup allows you to
set up your camera by simply plugging it in and connecting it to your router.
Connect your camera to your mydlink-enabled Cloud Router and Zero Conguration will automatically congure your
DCS-2230L and automatically add the camera to your mydlink account. You can now remotely access your camera from the
mydlink.com website to manage and monitor your DCS-2230L.
Connect the Ethernet Cable
If using an Ethernet connection: Connect the included Ethernet cable to the
Ethernet port located on the back of the DCS-2230L and connect it to your router.
Attach the External Power Supply
Attach the external power supply to the DC Power receptor located on the rear
panel of the DCS-2230L and connect it to your wall outlet or power strip.

14D-Link DCS-2230L User Manual
Section 2: Installation
To create a WPS connection:
Step 1
Press and hold the WPS button for approximately 5-6 seconds. The blue WPS
status LED above the button will blink.
Step 2
Within 60 seconds press the WPS button on your router. On some routers, you
may need to log in to the web interface and click on an on-screen button to
activate the WPS feature. If you are not sure where the WPS button is on your
router, please refer to your router’s User Manual.
The DCS-2230L will automatically create a wireless connection to your router.
While connecting, the status LED will ash. When the connection process is
complete, the status LED will turn solid.
Note: If your router does not support WPS, you can still use the wired connection
method on the previous page. After Zero Conguration setup is complete, your
router's wireless settings will be automatically transferred to the camera.
Optional: WPS Wireless Connection
Alternatively, if your router supports WPS, you can use the WPS button on the
camera to easily create a secure wireless connection to your network.

15D-Link DCS-2230L User Manual
Section 2: Installation
A summary and conrmation notication will appear with the automatically
congured details. Make a note of the details and click OK to add the camera to
your account.
Check Your mydlink Account
From any computer, open a web browser, go to http://www.mydlink.com and log
into your account. Once mydlink detects your camera, a New Device Found!
notice will appear in the bottom-left corner. Click on the device name to continue.
DCS-2230L
DCS-2230L

16D-Link DCS-2230L User Manual
Section 2: Installation
Zero Conguration is now complete and your camera has been added to your
mydlink account. You can now view your camera on the mydlink Live View tab.
Your camera is now set up, and you can skip to mydlink on page 23 to learn
more about the mydlink features of this camera, or to Conguration on page
24 for advanced conguration of your camera.
DCS-2230L

17D-Link DCS-2230L User Manual
Section 2: Installation
Insert the Installation CD-ROM into your computer’s optical drive to start the autorun program.
Simply click Set up your Cloud Camera to go through the Setup Wizard, which will guide you step-by-step through the
installation process from connecting your hardware to conguring your camera and registering it with your mydlink account.
Camera Setup Wizard
Windows Users
Note: If the autorun program does not open, go to My Computer, browse to your CD drive, and double-click
on the autorun.exe le.

18D-Link DCS-2230L User Manual
Section 2: Installation
Insert the Installation CD-ROM into your computer’s CD drive. On the desktop, open your CD drive and
double-click on the SetupWizard le.
Within 20-30 seconds, the SetupWizard will open, which will guide you step-by-step through the installation
process from connecting your hardware to conguring your camera and registering it with your mydlink account.
Mac Users

19D-Link DCS-2230L User Manual
Section 2: Installation
Conrm your camera login details and IP address details and click Done.
Your DCS-2230L camera is now set up. Log on to your mydlink account and
explore the exciting benets available to you.
Your camera is now set up, and you can skip to mydlink on page 23 to learn
more about the mydlink features of this camera, or go to Conguration on page
24 for advanced conguration of your camera.
DCS-2230L

20D-Link DCS-2230L User Manual
Section 2: Installation
Manual Hardware Installation
If you wish to set up your camera without using the Camera Setup Wizard, please follow these steps.
Note: In order to use the mydlink features of this product, you will need to go through the Camera Setup Wizard.
Connect the Ethernet Cable
If using an Ethernet connection: Connect the included Ethernet cable to the
Ethernet port located on the back of the DCS-2230L and connect it to your router.
Attach the External Power Supply
Attach the external power supply to the DC Power receptor located on the rear
panel of the DCS-2230L and connect it to your wall outlet or power strip.
Other manuals for DCS-2230L
1
Table of contents
Other D-Link Network Camera manuals