DèLonghi PACAN120EW User manual

4
Important safeguard
• Use this appliance only as described in this
instructionmanual.
Aswithanyelectricalappliance,theinstructions
aim to cover as many situations as possible.
Cautionandcommonsenseshouldbeusedwhen
operatingandinstallingthisairconditioner.
• This appliance has been manufactured to cool
and dehumidify domestic environments and
mustnotbeusedforotherpurposes.
• It is dangerous to alter or modify the unit's
characteristicsinanyway.
• The appliance must be installed in accordance
withtherelevantnationallegislation.
• Shouldrepairsbenecessary,contactthenearest
authorizedRepairServiceCenter.Unauthorized
servicingcanbedangerous.
• Theapplianceisnotintendedforusebypersons
(including children) with reduced physical,
sensory or mental capabilities, or lack of
experience and knowledge, unless they have
beengivensupervisionorinstructionconcerning
useoftheappliancebyapersonresponsiblefor
theirsafety.
Children should be supervised to ensure that
theydonotplaywiththeappliance.
• If the power cable is damaged, it must be
replacedbythemanufactureroranauthorized
technicalservicecentreinordertoavoidallrisk.
• Alwaysensurethe appliance is plugged intoa
grounded3-prongoutlet.Ifyouhaveanydoubts
checkwithaqualiedelectrician.
• Donotuseextensioncables.
• Before cleaning or maintenance operations,
alwaysunplugtheunitfromtheoutlet.
• Donotpullonorplacestrainonthepowercord
whenmovingtheappliance.
• Theapplianceshouldnotbeinstalledwherethe
atmospheremaycontaincombustiblegases,oil
orsulphur,ornearheatsources.
• Donotresthotorheavyobjectsontheappliance.
• Cleantheltersatleastonceaweek.
• Avoidusingheatersneartheunit.
• The unit should be transported in a vertical
position.Ifthisisnotpossiblesecuretheunitat
anangle,donotlieithorizontally.
• Before transporting the unit, drain the unit.
Aftertransportation,waitatleast6hoursbefore
switchingtheuniton.
• The packaging materials can be recycled. You
are therefore recommended to place them in
the special containers for dierentiated waste
collection.
• This appliance is tted with a special safety
device.Whenthecompressorswitcheso,this
devicepreventsitfromswitchingonagainforat
least3minutes.
• WARNING: Changes or modications not
expresslyapprovedbythepartyresponsiblefor
compliance could void the user's authority to
operatetheequipment.
Specic warnings for appliances with R410A
refrigerant gas
R410ArefrigerantgasconformstoECregulationson
theenvironment.
Avoid perforating the refrigerant circuit of the
appliance.
ENVIRONMENTAL INFORMATION:
This unit contains uorinated greenhouse gases
coveredbytheKyotoProtocol.
Maintenance and disposal must be carried out by
qualiedpersonnelonly(R410A,GWP=1975).
Save these instructions
Thisproductisforhouseholdonly

5
INTRODUCTION
ThankyouforchoosingaDe’Longhiproduct.Pleasetakeafew
momentstoreadtheinstructionstoavoidrisksordamagetothe
appliance.
DESCRIPTION
Description of the appliance (see page 3 - A)
A1 airoutletgrille
A2 controlpanel
A3 handles
A4 castorwheels
A5 BioSilverlter
A6 airintakegrille
A7 airexhausthosehousing
A8 airintakegrille
A9 powercable
A10drainagehosewith2caps
A11remotecontrolsignalreceiver
A12remotecontrolcompartment
Descrizione of the accessories (see page 3 - B)
B1 wallangewithcap
B2 airexhausthose
B3 hoseadaptor
B4 accessoryforwallmounting
B5 windowbracketwithpins
B6 additionalwindowbracket
B7 windowoutlet
B8 remotecontrol
B9 endofseasondustcover
B10endofseasonaccessoriesbag
Electrical connection
Beforepluggingtheapplianceintothetheelectricalreceptacle,
checkthat:
• Theoutlet’s powersupply corresponds to thevalueindi-
catedontheratinglabelonthebackoftheappliance;
• Theoutletandelectricalcircuitareadequatefortheappli-
ance;
• Theoutletisa3-holegroundedoutlet .Ifthisisnot
thecase,youmustchooseanotheroutlet.Failuretofollow
theseimportantsafetyinstructionsabsolvesthemanufac-
turerofallliability.
If it becomes necessary, the power cable must be re-
placed by a qualied professional only.
Theinstructionsbelowwillenableyoutoprepareyouraircon-
ditionerforoperationasecientlyaspossible.Beforeuse,make
suretheairintakeandoutletgrillesareunobstructed.
USE
AIR CONDITIONING WITHOUT INSTALLATION
For optimal results set-up in a double-hung window:
1) Place the bracket in the window sill, extend the bracket
fullywithinthewindowframe,xthebracketbyusingthe
pinthenlowerthewindowontothebracket,(shouldthe
windowbracketbetoolargeforthewindow.Theplastic
canbecutwithasawbyaqualiedprofessional.)
2) ScrewthehoseadaptorB3tothehose’sendB2.
3) Fittheairexhausthoseinthehousingatthebackofthe
appliance.Insertitasshowningure1.
4) ConnectthewindowoutletB7totheotherendoftheex-
hausthose.
5) Insertthewindowoutletendoftheexhausthoseintothe
slotofthewindowbracket(g.2).
Other set-up methods:
• Thankstothelockingpins,it’spossibletousethewindow
bracketalsoforslidingwindows.Positiontheholeofthe
bracketsotoallowacorrectinstallationoftheexhausthose
(seegure3).
1
2

6
• Ifyouhaveacasementwindow(gure4)followsteps2&
3andplacethewindowoutletB7outsidethewindowto
exhaustthehotair.
Forhelpwithinstallation,operation,andforall
accessoriesandspare/replacementparts,pleasecontact
ourtollfreecustomerservicecallcenterat:
1-800-322-3848[USonly]
1-888-335-6644[Canadaonly]
01-800-711-8805(Mexicoonly]
orlogontoourwebsiteat www.delonghi.com
SEMIPERMANENT INSTALLATION
If required, your appliance can also be installed semi-perma-
nently(Fig.5).
min. 12 inches
min. 30cm
min. 12 inches
min. 30cm
Proceedasfollows:
• Drillaholeø5,25inches(134mm)inanoutsidewallor
through a window pane. Respect the dimensions and
heightoftheholegiveningure6and7.
134
Ø 5.25 inches
• FitthewallangeB1intothehole.
• FittheairexhausthoseB2 intherelevanthousinglocated
ontherearsideoftheappliance.(g.1).
• FittheendofthehoseB2 tothewallangeB1 asshownin
g.7.
• WhenthehoseB2isnotconnected,thedrilledholecanbe
closedwiththeangecapB1.
3
4
5
6
inthe
window
panel
inthewooden
kickboard
ofaFrench
window
inthewall:
youare
recommended
toinsulatethe
sectionofwall
usingsuitable
insulation.
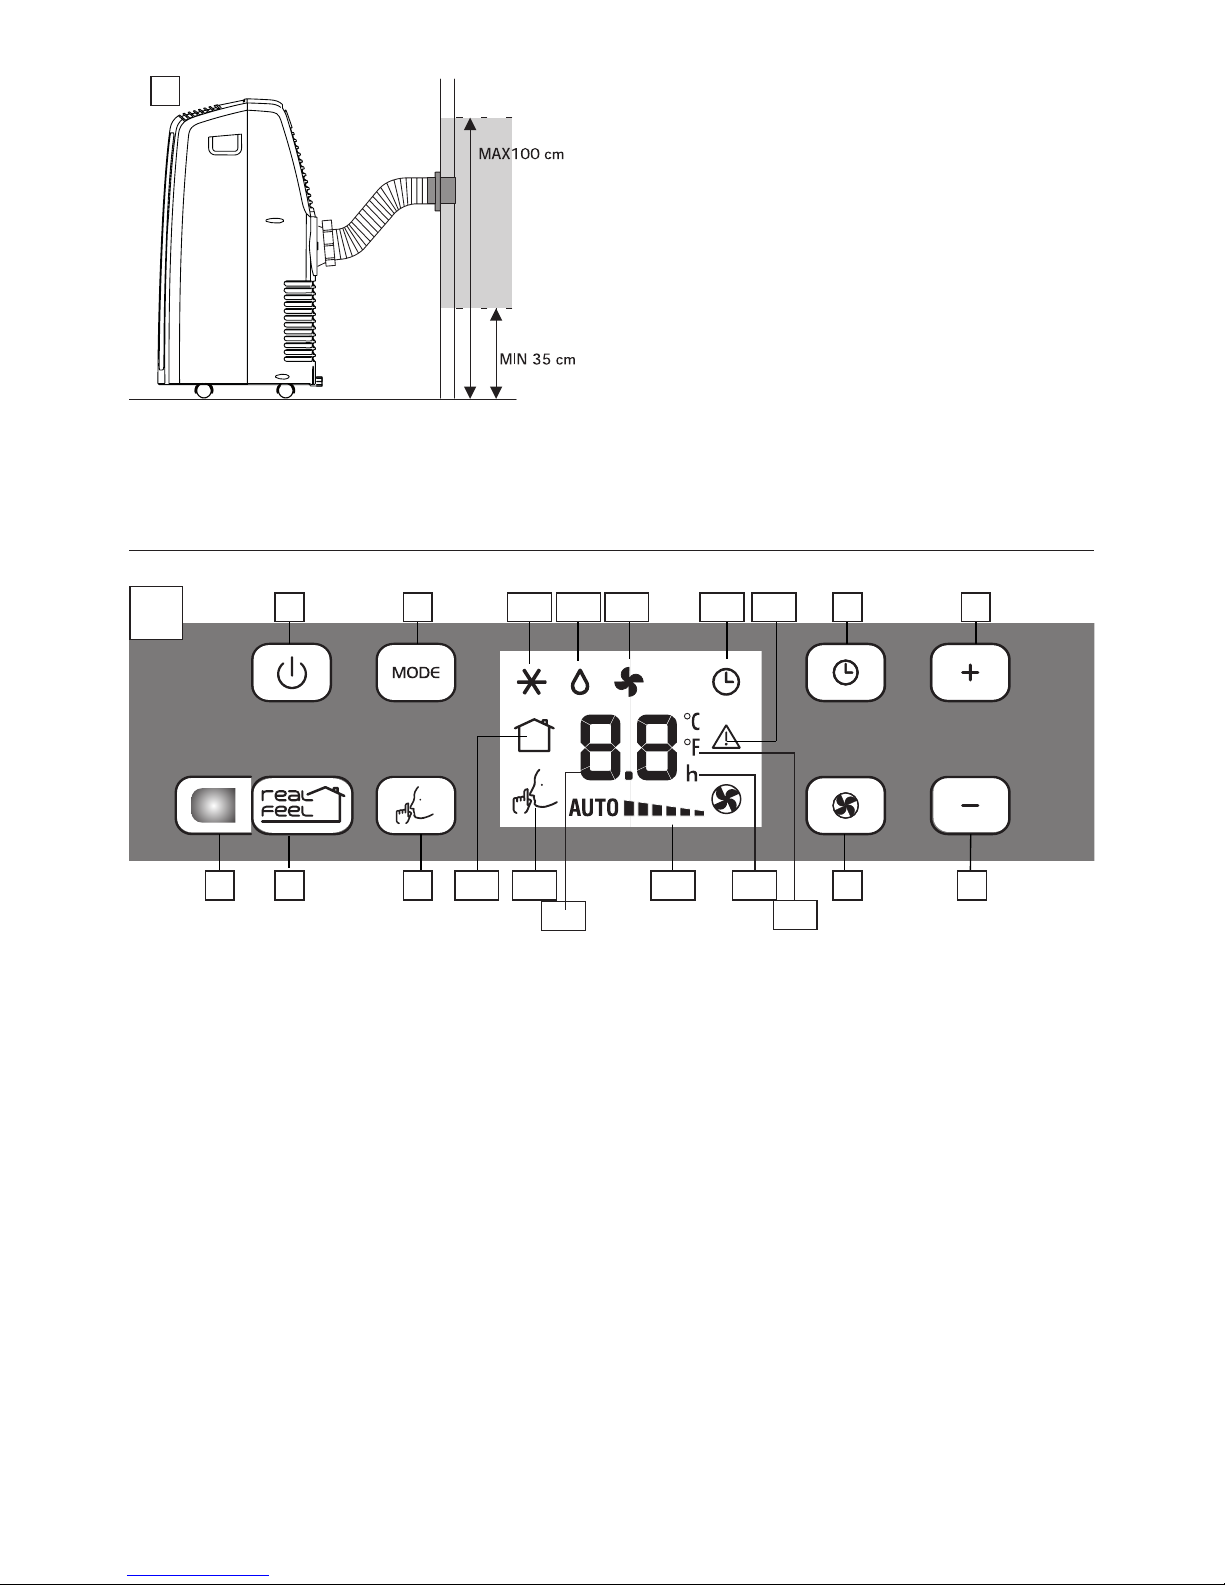
7
MAX 39 inches
MIN 14 inches
NOTE: As special tools are required for installation, we
suggest you have the appliance installed by specialized
personnel.
NOTE: Wheninstalling the air conditioner semi-permanently,
youshouldleaveadoorslightlyopenlittleas1/2“(1cm)to
guaranteecorrectventilationandroompressure.
NOTE:Keeptheairhosesasshortandfreeofcurvesaspossible
toavoidconstrictions.
7
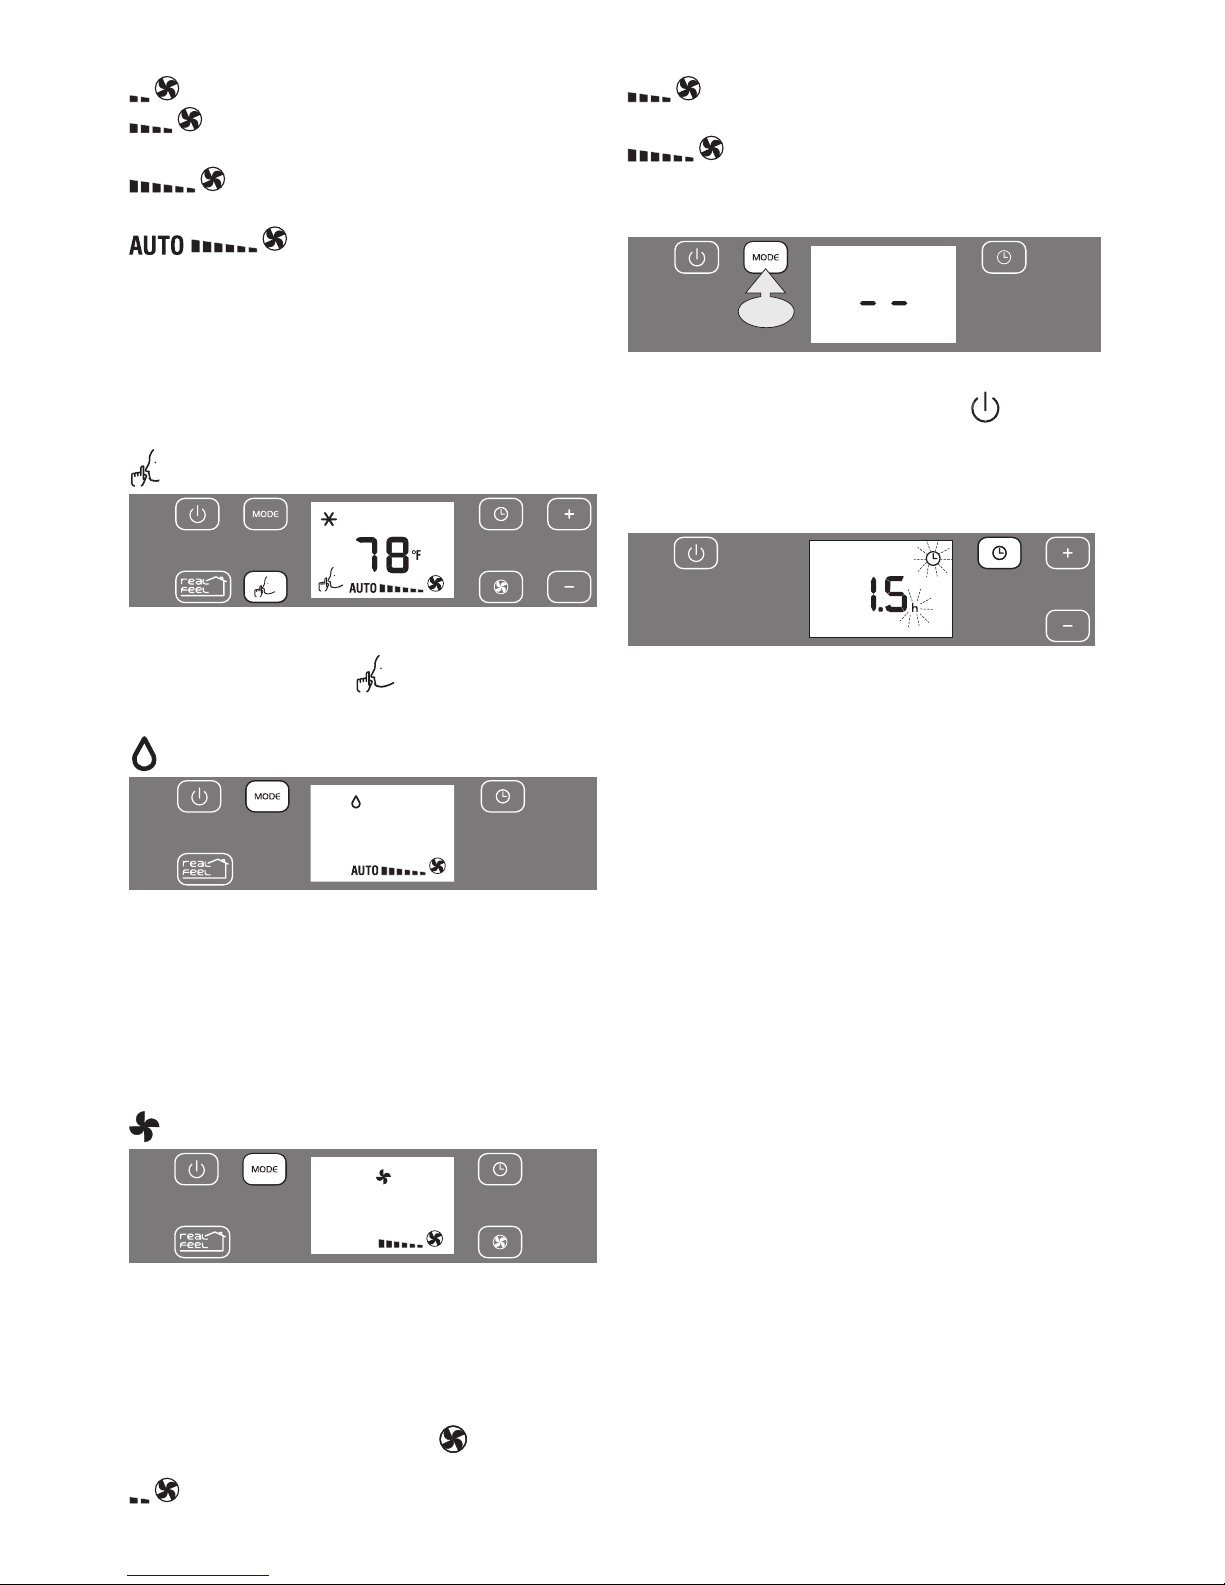
DESCRIPTION OF THE CONTROL PANEL (C)
C1 ON/STAND-BYbutton
C2MODE selectionbutton(conditioning,dehumidifying,fan)
C3 Timerbutton
C4 Increasetemperature/programmedoperationtimebutton
C5 Decreasetemperature/programmedoperationtimebutton
C6 Fanspeedselectionbutton(LOW/MED/HIGH/AUTO)
C7 WHISPERCOOLselectionbutton
C8 REALFEELselectionbutton
C9 REALFEELlight
C10 Air-conditioningsymbol
C11 Dehumidifyingsymbol
C12 Fansymbol
C13 Timersymbol
C14 Alarmsymbol
C15REALFEELsymbol
C16WHISPERCOOLsymbol
C17 Temperaturevalueset,programmeddelayedON/OFFtime
C18 Fanspeedindicator
C19 Timerindicator
C20 Temperatureselectedscaleindicator
Note: The panel buttons are backlit but only the buttons
relevanttotheactivefunctionwillbeon.
Afterfewsecondsofthecontrolpanelinactivity,itsbrightness
willbeautomaticallyreducedandinthenextfewminutesitwill
befurtherreduced.
C1 C10
C2 C11 C12 C13 C14 C3 C4
C8C9 C6C19C15C7 C5C16
C17
C18 C20
C
CONTROL PANEL

8
OPERATING FROM THE CONTROL PANEL
TURNING THE APPLIANCE ON/OFF
Before plugging the appliance check the caps on back of
the unit are correctly inserted on drainage hose A10.
Plugtheapplianceintoelectricalreceptacle.Twolinesappearon
thedisplayindicatingthattheapplianceisinstand-byandthe
buttons and lighton.
Touch button(C1)toswitchtheapplianceon.
Whenturnedon,theairconditionerstartsoperatinginthesame
modeaswhenitwasturnedo.
Note
:Ifyoudon’tswitchontheappliance,afterafewminutes,the
and buttonsswitchoandthedisplayfadestoreduceen-
ergyconsuption.
Toturnotheappliance,touchthe button,thenunplug
theappliance.
Note
:
Neverswitchotheappliancebyunpluggingit:always
usethe button,waitafewminutesandthenunplug.Doing
so,theappliancewillrunacheckoftheoperatingconditions.
REAL FEEL FUNCTION
REALFEELis the innovativeDe’Longhitechnologythatworks
simultaneouslyontemperaturereductionandhumiditycontrol,
securingbestcomfortlevel.
Withtraditionalsystems,duringworkingtime,optimalcomfort
conditionsmaybereachedbutnotsecuredovertime.WithREAL
FEEL,onceoptimalcomfortisreached,PACautomaticallymodu-
latescompressoractionandfanspeed,tokeepitovertime.
Toactivatethefunction,touch button.
Perfect!Perfect!
REALFEELlight(C9)changescolorwhenapproachingthebest
comfortlevel(seefollowingdiagram).
HIGH
°C/°F
%
LOW
LOW HIGH
Perfect!
Perfect!
• The well-being feeling is a subjective condition: for this
reason, dierent people may judge dierently the same
environmentalconditions.
• Inparticularlysevereenvironmentalconditions(largesize
oftheenvironment,hightemperatureorhumidityoutside,
poorinsulationoftheroom,toomanyofpeopleorstrong
heatloadintheroom,strongexposuretothesun...)this
devicemaynotbeabletoreachthebestcomfortlevel.
AIR CONDITIONING MODE
Idealforhotmuggyweatherwhenyouneedtocoolanddehu-
midifytheroom.Tosetthismode:
• TouchrepeatedlytheMODE buttonuntiltheconditioning
symbol is displayed: the display shows the desired
temperature.
• Press+(C4)or-(C5)buttonstoadjustthedesiredtem-
perature.
• Selectthefanspeedbypressingthe button(C6).
Youcanchoose:
ORANGE LIGHT: Room conditions far
fromoptimallevel.
GREEN LIGHT: Most people feel good
roomconditions,nearoptimallevel.
BLUE LIGHT: Bestcomfortlevel.
HUMIDITY
TEMPERATURE
HIGH
MEDIUM
LOW
HIGH
MEDIUM
LOW
Operating curve
9
Perfect!Perfect!
REALFEELlight(C9)changescolorwhenapproachingthebest
comfortlevel(seefollowingdiagram).
HIGH
°C/°F
%
LOW
LOW HIGH
Perfect!
Perfect!
• The well-being feeling is a subjective condition: for this
reason, dierent people may judge dierently the same
environmentalconditions.
• Inparticularlysevereenvironmentalconditions(largesize
oftheenvironment,hightemperatureorhumidityoutside,
poorinsulationoftheroom,toomanyofpeopleorstrong
heatloadintheroom,strongexposuretothesun...)this
devicemaynotbeabletoreachthebestcomfortlevel.
AIR CONDITIONING MODE
Idealforhotmuggyweatherwhenyouneedtocoolanddehu-
midifytheroom.Tosetthismode:
• TouchrepeatedlytheMODE buttonuntiltheconditioning
symbol is displayed: the display shows the desired
temperature.
• Press+(C4)or-(C5)buttonstoadjustthedesiredtem-
perature.
• Selectthefanspeedbypressingthe button(C6).
Youcanchoose:
Minimum speed:forsilentoperation.
Medium speed: reducesnoiselevelswhile main-
tainingacomfortabletemperature.
Maximum speed:toachievethetargettempera-
tureasrapidlyaspossible.
the appliance automatically selects the
mostsuitablefanspeedinrelationtothetemperaturesetonthe
digitaldisplayandcurrentroomtemperature.
The most suitable indoor temperature for the room during the
summer varies from 75°F to 81°F (24 to 27°C). You are recom-
mended, however, not to set a temperature much below the out-
door temperature.
WHISPER COOL (available in conditioning mode only)
By activating this function, the operating noise is further re-
duced.Toactivateit,touchthe (C7)button.
Thedisplayshowstherelativesymbol(C16).
DEHUMIDIFYING MODE
Ideal to reduce room humidity (spring and autumn, damp
rooms,rainyperiods, etc). Indehumidifying mode,the appli-
ance MUSTbeset-upinthesamewayasforairconditioning,
withtheairexhausthose(B2)attachedtoenablethemoisture
tobedischargedoutside.Tosetthismode:
• TouchrepeatedlytheMODE buttonuntilthedehumidify-
ingsymbolisdisplayed.
FAN MODE
Whenusing the appliancein this mode,theair exhausthose
(B2)doesnotneedtobeconnected.
Tosetthismode:
• TouchrepeatedlytheMODE buttonuntilthefansymbolis
displayed.
• Selectthefanspeedbypressingthe button(C6).
Youcanchoose:
Minimum speed:forsilentoperation.
Medium speed:reducesnoiselevelsbutstillmain-
tainsagoodfanpower.
Maximum speed:formaximumfanpower.
CHANGING TEMPERATURE SCALE
x20”
Thetemperaturecanbedisplayedin°For°C.Tochangethetem-
peraturescale,turnotheunitbytouchingthe button,then
keeptouchedtheMODEbuttonforapproximately20seconds.
Theapplianceemitsabeeptoconrm.
SETTING THE TIMER
Thetimercanbeusedtodelayappliancestartuporshutdown.
Thisavoidswastingelectricitybynotoperatingtheappliance
whenitisnotneeded.
How to program delayed start up
• Plugtheapplianceintoanelectricalreceptacleandturnthe
unittostandby.
• Touchthetimerbutton(C3):thetimersymbol(C13)and
thenumberofhourscomeon.
• Usethe+(C4)or- (C5)buttonstosetthenumberofhours
delaybeforetheappliancecomeson.
• Theapplianceworksusingthemodepreviouslyset.
Theappliancecan beset tocomeonwithin thenext24
hours.
• Afewsecondafterset,thesettingismemorised,thetimer
symbolislitandthedisplayshowsthattheapplianceisin
standby.
Todeletethesetting,touchtwotimesthetimerbutton(C3).The
timersymbol(C13)switcheso.
How to program delayed shutdown
• Withtheairconditioningon,ineverymode,itispossibleto
setthedelayedshutdown.
• TouchtheTimer(C3)button:thetimersymbol(C13)and
thehoursswitchon.
• Usethe+(C4)or- (C5)buttonstosetthenumberofhours
delaybeforetheapplianceturnso.
Afewsecondafterset,thesettingismemorised,thetimersym-
bolislitandthedisplayshowsthecurrentmode.
Attheendofthesettimetheapplianceautomaticallyturnsin
standbymode.Todeletethesetting,touchtwotimesthetimer
button(C3).Thetimersymbol(C13)switcheso.
10
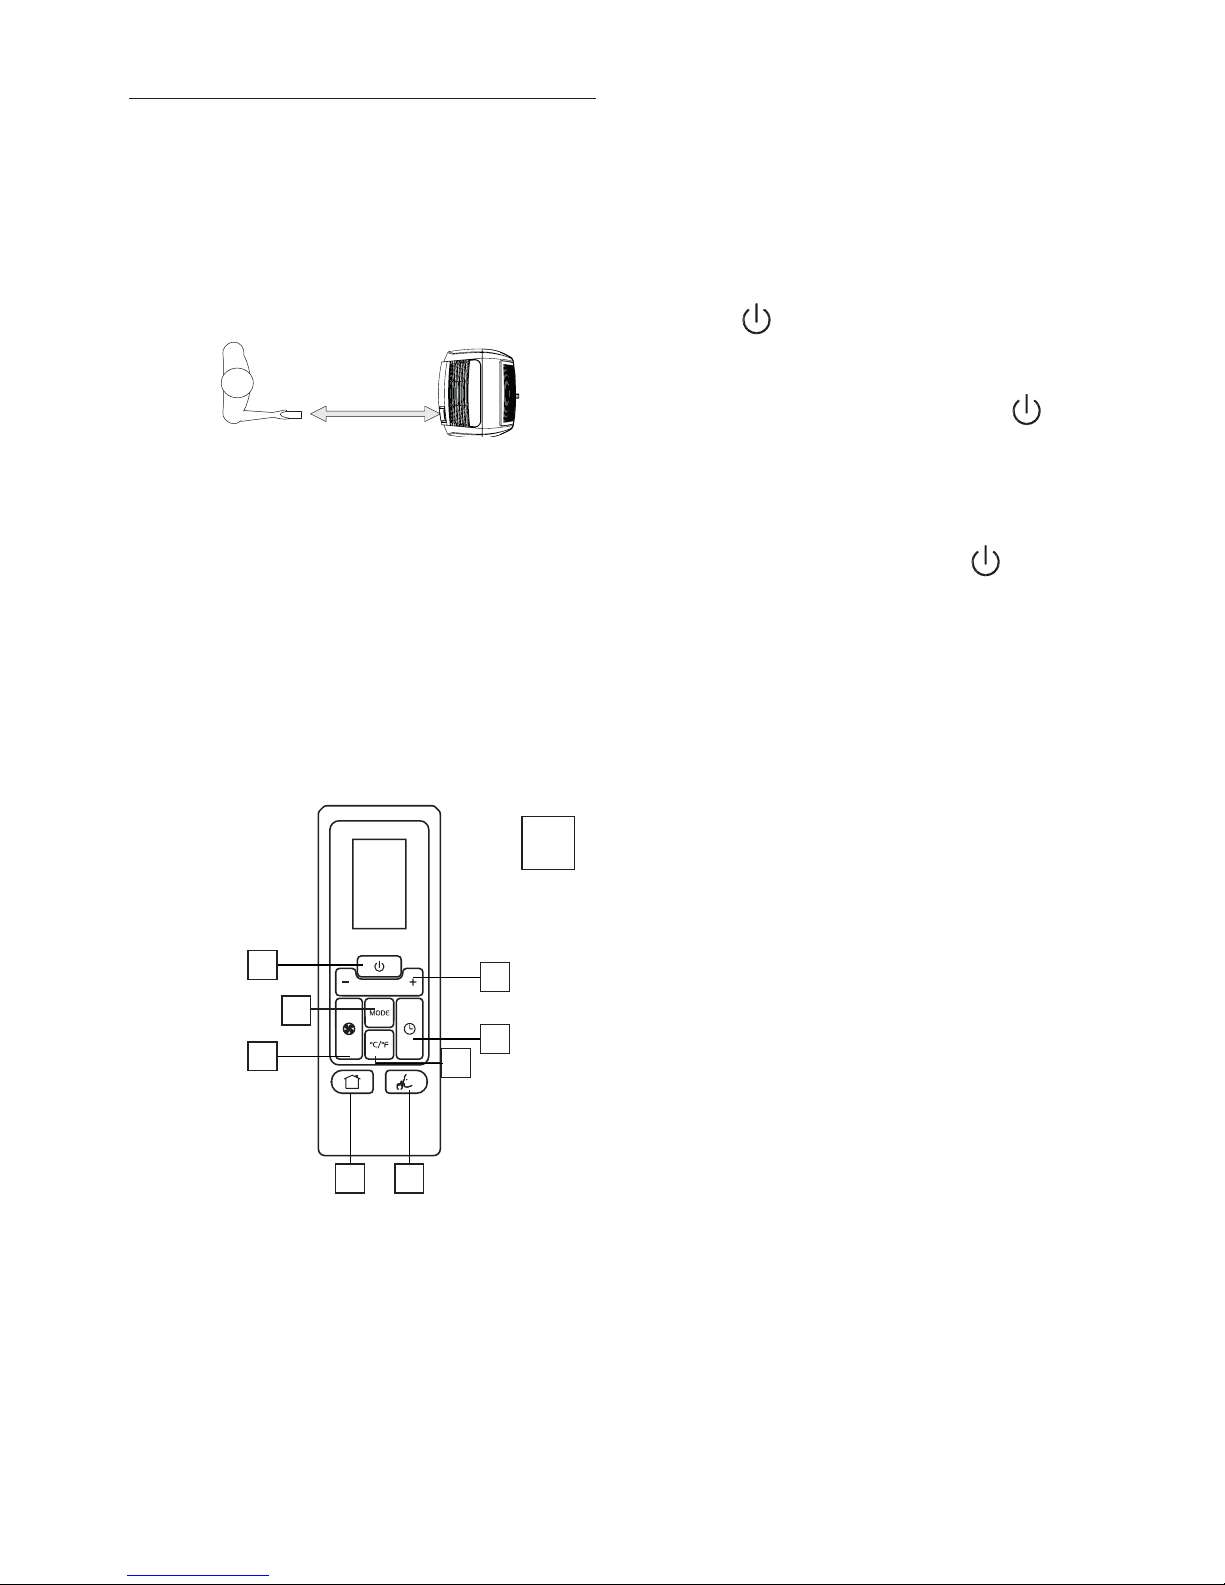
OPERATING FROM THE REMOTE CONTROL
USING THE REMOTE CONTROL
• Pointtheremotecontrolatthe receiver(A11)on the air
conditioner.Theremotecontrolmustbenomorethan16
ft(5meters)awayfromtheappliance(withoutobstacles
betweentheremotecontrolandthereceiver).
• Theremotecontrolmustbehandledwithextremecare.Do
notdropitorexposeittodirectsunlightorsourcesofheat.
NOTE: Theremotecontrolcanbesafelystoredintheappropiate
compartmentA12(seegure).
DESCRIPTION OF THE REMOTE CONTROL D
D1) ON/STAND-BYbutton
D2) Increase/decreasetemperature/programmedoperation
D3) “MODE”selectionbutton
D4) Fanspeedselectionbutton
D5) REAL FEEL selectionbutton
D6) WHISPER COOL selectionbutton
D7) Switchbutton°C/°F
D8) TIMER button
INSERTING OR REPLACING THE BATTERIES
• Removethecoverontherearoftheremotecontrol;
• ReplacetheoldbatterieswithtwonewR03“AAA”1.5Vbat-
teries,insertingthemcorrectly(seetheinstructionsinside
thebatterycompartment);
• Replacethecover.
If the remote control unit is replaced or discarded, the batteries
must be removed and disposed of in accordance with current
legislation as they are harmful to the environment. Do not mix
old and new batteries.
Do not mix alkaline, standard (carbon-zinc) or rechargeable
(nickel-cadmium) batteries. Do not dispose of batteries in re.
Batteries may explode or leak. If the remote control is not be
used for a certain length of time, remove the batteries.
TURNING THE APPLIANCE ON
• Plugintotheelectricalreceptacle..
• Pressthe button(D1)(whenturnedon,theaircon-
ditionerstartsoperatinginthesamemodeaswhenitwas
turnedo).
• Toswitchtheapplianceo,pressbutton(D1) ,then
removetheplug.
NOTE: Neverswitchthe applianceo byremovingtheplug.
Alwaysswitchitobypushingonthe buttonand
waitingfewminutesbeforeremovingtheplug.Onlyinthis
waytheappliancewillperformthestandardcheckings.
FUNCTIONS SELECTION
Thecontrolsontheremotecontrolarethesameasthoseonthe
controlpaneloftheappliance(C).Youshouldthereforereferto
the instructions in the chapter“OPERATING FROMTHE CON-
TROLPANEL”toselectthedesiredfunctions.PressbuttonD7,
toswitchthetemperaturedisplayfrom°Cto°Fandviceversa.
Note:
• Thisequipmenthasbeentestedandfoundtocomplywith
thelimitsforaClassBdigitaldevice,pursuanttopart15of
theFCCRules.Theselimitsaredesignedtoprovidereason-
ableprotectionagainstharmfulinterferenceinaresiden-
tialinstallation.
• Thisequipmentgenerates,usesandcanradiateradiofre-
quencyenergyand,ifnotinstalledandusedinaccordance
withthe instructions,may causeharmfulinterference to
radio communications. However, there is no guarantee
thatinterferencewillnotoccurinaparticularinstallation.
Ifthisequipmentdoescauseharmfulinterferencetoradio
ortelevisionreception,whichcanbedeterminedbyturn-
ingtheequipmentoandon,theuserisencouragedtotry
tocorrecttheinterferencebyoneormoreofthefollowing
measures:
-Reorientorrelocatethereceivingantenna.
- Increase the separation between the equipment and
receiver.
- Connecttheequipmentintoanoutletonacircuitdier-
entfromthattowhichthereceiverisconnected.
- Consultthedealeroranexperiencedradio/TVtechnician
MAX 16 ft
MAX 5 meters
D
D1
D4
D2
D8
D6D5
D3
D7
11
forhelp.
Changes or modications not expressly approved by the
partyresponsibleforcompliancecouldvoidtheuser’sau-
thoritytooperatetheequipment.
• ThisdevicecomplieswithPart15oftheFCCRules.Opera-
tionissubjecttothefollowingtwoconditions:(1)thisde-
vicemaynotcauseharmfulinterference,and(2)thisdevice
mustacceptanyinterferencereceived,includinginterfer-
encethatmaycauseundesiredoperation.
• ThisClassBdigitalapparatuscomplieswithCanadianCAN
ICES-3(B)/NMB-3(B).
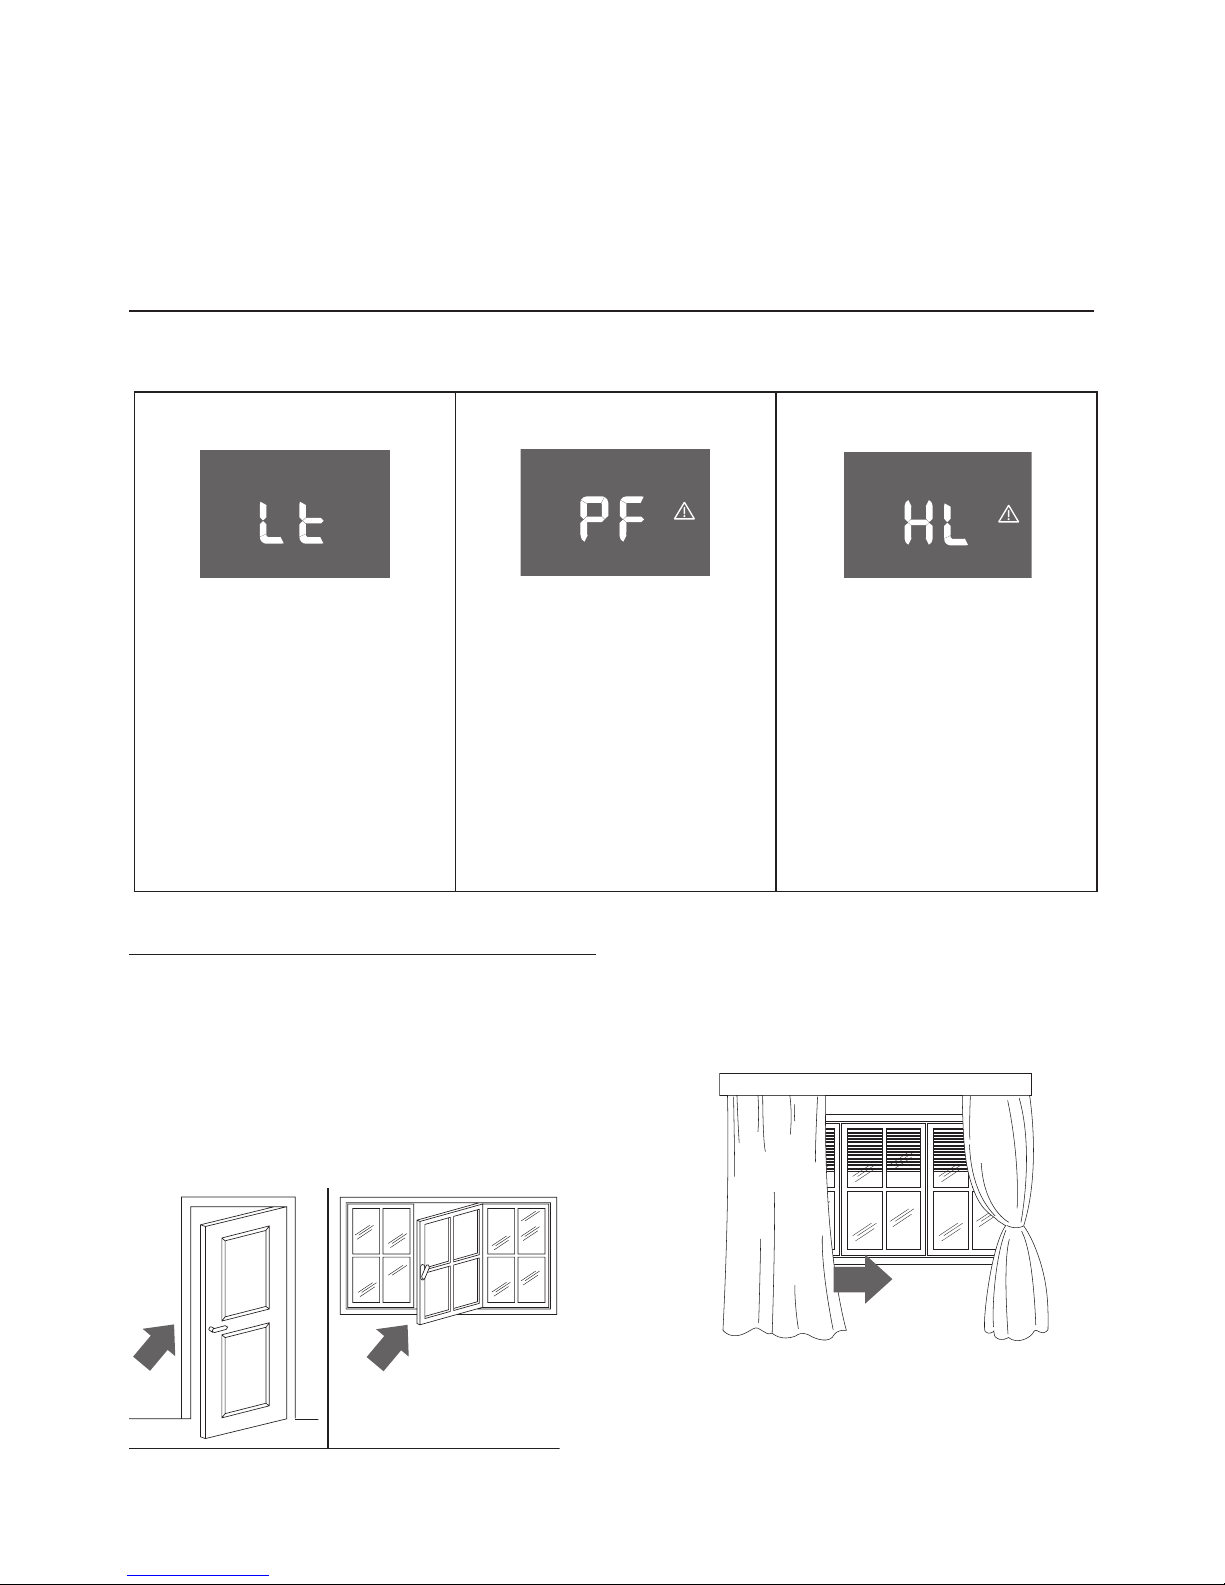
IF ... IS DISPLAYED,
“LowTemperature”
(frostprevention)
..WHAT SHOULD I DO?
Theapplianceisttedwithafrostprotec-
tiondevicetoavoidexcessiveformationof
ice. The appliance starts up again auto-
matically when the defrosting process is
completed.
IF ... IS DISPLAYED,
ProbeFailure
(Probedamaged)
..WHAT SHOULD I DO?
Ifthisisdisplayed,contactyourlocalau-
thorizedservicecenter.
IF ... IS DISPLAYED,
“HighLevel”
(Internaltrayfull)
..WHAT SHOULD I DO?
Empty theinternalsafety tankfollowing
the instructions in the section “End of
season operations”. If HL alarm reoccurs
frequentely,contactyourlocalauthorized
servicecenter.
SELFDIAGNOSIS
Theappliancehasaselfdiagnosissystemtoidentifyanumberofmalfunctions.
Errormessagesaredisplayedontheappliancedisplay.
TIPS FOR CORRECT USE
Toensureoptimalresultsfromyourairconditioner,followthese
recommendations:
• closethewindowsanddoorsintheroomtobeaircondi-
tioned When installing the air conditioner semi-perma-
nently,youshouldleaveadoorslightlyopen(aslittleas
1/2”(1cm)toguaranteeproperventilation.
Closedoorsandwindows
• Neverusetheapplianceinverydamprooms(laundriesfor
example).
• Protecttheroomfromdirectexposuretothesunbypar-
tiallyclosingcurtainsand/orblindstomaketheappliance
muchmoreeconomicaltorun.
Closeblindsorcurtains
• Neverusetheapplianceoutdoors.
•
Makesuretherearenoheatsourcesintheroom.
• makesuretheairconditionerisstandingonalevelsurface.

12
8
9
donotcovertheappliance
• Neverrestobjectsofanykindontheairconditioner.
• Neverobstructtheairintakeoroutletgrilles.
CLEANING
Before cleaning or maintenance, turn the appliance o by
touchingthe button,thenunplugfromtheelectricalre-
ceptacle.
CLEANING THE CABINET
Youshouldcleantheappliancewithaslightlydampcloththen
drywithadrycloth.Forsafetyreasons,neverwashtheaircon-
ditionerwithwater.
Precautions
Never use petrol, alcohol or solvents to clean the appliance.
Neversprayinsecticideliquidsorsimilar.
CLEANING THE BIO SILVER AIR FILTER
Ifthelterisdirty,aircirculationiscompromisedandthee-
ciencyoftheappliancedecreases.
Itisthereforegoodpracticetocleanthelteratregularinter-
vals.Thefrequencydependsonthedurationandconditionsof
operation.
Iftheunitisusedconstantlyorsystematically,youarerecom-
mendedtocleanthelteronceaweek.
Thelterishousedintheintakegrille.
Tocleanthelter,extractasshowning.8
Useavacuumcleanertoremovethedustcollectedonthelter.
Ifitisverydirty,immerseinwarmwaterandrinseanumber
oftimes.Thewatershouldneverbehotterthan104°F(40°C).
After washing the lter, allow it to dry completely before
repositioningit.
TheBioSilverlterhelpscapturedustandpollenandhelpsre-
ducethegrowthofbacteriaandmoldonthelter.
START OF SEASON CHECKS
Makesurethepowercableandplugareundamagedandthe
groundconnectionisecient.
Followtheinstallationinstructionsprecisely.
END OF SEASON OPERATIONS
Todrainallwaterfromthecircuit,removetheexternalcapby
unscrewingit intheanticlockwisedirection then, removethe
internalcapfromthedrainageonthebackoftheapplianceand
allowthewatertodrainoutintoabasin(g.9).
Inordertoproperlystoragetheapplianceattheendofthesea-
son,wesuggestyoucoveritwiththesuppliedendof season
dustcover B9andyouputtheaccessoriesintherelevant
endofseasonaccessoriesbagB10.
Whentheapplianceisempty,replacethecaps.
Cleanthelteranddrythoroughlybeforeputtingback.

13
TECHNICAL SPECIFICATIONS
Powersupplyvoltage seeratinglabel
Max.absorbedpower
duringairconditioning “
Refrigerant “
Coolingcapacity “
LIMIT CONDITIONS
Roomtemperaturefor
airconditioning 64÷104°F18÷40°C
Transport, lling, cleaning, recovery and disposal of
refrigerant should be performed by a technical service
centre appointed by the manufacturer only.
The appliance should be disposed of by a specialist centre
appointed by the manufacturer only.
TO AVOID DAMAGE TO THE UNIT:
NEVERTRANSPORTORTURNTHEAPPLIANCEUPSIDEDOWNOR
ONITSSIDE.IFTHISOCCURS,WAIT6HOURSBEFORETURNING
THEAPPLIANCEON,24HOURSISRECOMMENDED.Aftertheunit
hasbeenonitsside,oilneedstoreturntothecompressortoen-
sureproperfunction.Withoutallowingtheunitthistime(6-24
hours)theunitmayfunctionforonlyashorttime,andthenthe
compressorwillbreakdownfromlackofoil.
ELECTRICAL CONNECTION
Thisapplianceisequippedwitha3pronggroundedplug.The
plugmustbeconnectedintoanoutletthatisproperlyinstalled
andgroundedintheaccordancewithalllocalcodesandordi-
nances. Do not modify the plug provided with the appliance.
Ifitwill not ttheoutlet,haveaproperoutletinstalledbya
qualiedelectricianorrelocatetheunittoaproperoutlet.Ifthe
householdelectricalsupplydoesnotmeettheabovespecica-
tions,orifyouarenotsureyourhomehasaneectiveelectrical
ground,haveaqualiedelectricianoryourlocalelectricalutility
companycheckitandcorrectanyproblems.
SAFETY PLUG
Theapplianceisttedwithasafetyplugtoprotectthepower
cable.
Ifpoweriscuto,unplugfromtheoutletandmakesurethe
powercableisundamaged.
Ifthecableisdamaged,calltheservicecenterimmediately.
Ifpowercutsofrequentlyandthepowercableisundamaged,
contactaqualiedelectrician.
OPERATION OF THE SAFETY PLUG
Ifthesafetydeviceincorporatedintheplugtripsandcutso
thepowersupply,checkthatthepowercableandplugarenot
damaged.
Ifthepowercableisundamaged,torestoreoperationpressthe
"RESET"button.
Toverifycorrectoperationoftheplug,pressthe"TEST"button
periodicallyandmakesuretheappliancedisconnects.Ifthisis
notthecase,contacttheservicecenter.
Torestoreoperation,pressthe"RESET"button.

14
TROUBLESHOOTING
PROBLEM CAUSE SOLUTION
Theairconditionerdoesnotcomeon itisnotpluggedintothetheelectrical
receptacle plugintotheelectricalreceptacle
thereisnocurrent wait
theinternalsafetydevicehastripped calltheServiceCenter
Theairconditionerworksforashort
timeonly
therearebendsorkinksintheair
exhausthose
positiontheairhosecorrectly,keepingit
asshortandfreeofcurvesaspossibleto
avoidbottlenecks
somethingispreventingtheairfrom
beingdischarged
checkandremoveanyobstacles
obstructingairdischarge
Theairconditionerworks,butdoesnot
cooltheroom
windows,doorsand/orcurtainsopened closedoors,windowsandcurtains,
bearinginmindthe“TIPSFORCORRECT
USE”givenpreviously
thereareheatsourcesintheroom(oven,
hairdryer,etc.)
eliminatetheheatsources
theairexhausthoseisdetachedfrom
theappliance
ttheairexhausthoseinthehousingat
thebackoftheappliance(g.1).
dustlterclogged cleanorreplacethelterasdescribed
previously
thetechnicalspecicationofthe
applianceisnotadequatefortheroom
inwhichitislocated.
Duringoperation,thereisanunpleasant
smellintheroom
lterclogged cleanthelterasdescribedpreviously
Theairconditionerdoesnotoperatefor
aboutthreeminutesafterrestartingit
preventstheappliancefrombeing
restarteduntilthreeminuteshave
elapsedsinceitwaslastturnedo
wait.Thisdelayispartofnormal
operation.
Thesymbol andoneofthe
followingmessages:HL/PF
theappliancehasaselfdiagnosissystem
toidentifyanumberofmalfunctions.
seetheSELF-DIAGNOSISchapter

15
De’LonghiisthedistributorofKenwoodhomeappliances.
This warranty applies to all home appliances with De’Longhi or Kenwood brand names
LIMITED WARRANTY
WewarranteachDe’LonghiAIRCONDITIONERtobefreefromdefectsinmaterialandworkmanship.Fromthepurchasedate,our
obligationunderthiswarrantyistoprovidetwo(2)yearfreepartsandlaborontheentireAIRCONDITIONER,withanadditionalfour
(4)yearsfreeonanypartofthesealedsystemconsistingofthecompressor,evaporator,condenserandfactoryconnectedrefrigerant
tubing.Laborandallotherpartsduringtheadditionalfour(4)yearwarrantyaretobepaidbytheowner.AllAIRCONDITIONERSin
needofrepairaretobeshippedtoanauthorizedDe’Longhiservicecenterattheowner’sexpense,andDe’Longhiwillthenincurthe
returnshippingcosts.Aftertherstsix(6)yearsofownership,allexpenses(allparts,laborandshipping)aretobepaidbytheowner
oftheunit.ThiswarrantyshallapplyonlyiftheAIRCONDITIONERisusedinaccordancewiththefactorydirectionsthataccompanyit,
andonanAlternatingCurrent(AC)circuit.Thiswarrantyisinlieuofallotherwarrantiesandrepresentations,expressedorimplied,
andallotherobligationsorliabilitiesonourpart.Wedonotauthorizeanyotherpersonorcompanytoassumeforusanyliabilityin
connectionwiththesaleoruseofourAIRCONDITIONER.ThiswarrantyshallnotapplytoanyAIRCONDITIONERthathasbeenrepaired
oralteredoutsideourfactorynorshallitapplytoanyAIRCONDITIONERthathasbeensubjectedtomisuse,negligenceoraccidents.
Ifrepairsbecomenecessary,seecontactinformationbelow:
U.S. Residents:
Pleasecontactourtollfreehotlineat 1-800-322-3848
orlogontoourwebsiteatwww.delonghi.com
CANADA Residents:
Pleasecontactourtollfreehotlineat1-888-335-6644
orlogontoourwebsiteatwww.delonghi.com
MEXICO Residents:
Pleasecontactourtollfreehotlineat01-800-711-8805
orlogontoourwebsiteatwww.delonghi.com
Theabovewarrantyisinlieuofallotherexpresswarrantiesandrepresentations.Allimplied
warrantiesarelimitedtotheapplicablewarrantyperiodsetforthabove.Thislimitationdoesnotapplyifyouenterintoanextended
warranty with De’Longhi. Some states/countries do not allow limitations on how long an implied warranty lasts, so the above
exclusionsmaynotapplytoyou.De’Longhidoesnotauthorizeanyotherpersonorcompanytoassumeforitanyliabilityin
connectionwiththesaleoruseofitsappliance.
How does country law apply?
Thiswarrantygivesyouspeciclegalrights,andyoumayalsohaveotherrights,whichvaryfromstatetostate/countrytocountry.
Table of contents
Other DèLonghi Air Conditioner manuals


Popular Air Conditioner manuals by other brands


Samsung
Samsung AQV12J Series user manual

Kenmore
Kenmore 405.84086 Use & care manual

Lennox
Lennox FLEXY FX 025 Application guide

Mitsubishi Electric
Mitsubishi Electric Mr.Slim MS-GK36VA operating instructions

Bard
Bard THE WALL-MOUNT WA3S3-A installation instructions

Panasonic
Panasonic CS-BE25TKE-1 operating instructions