DèLonghi MW30FSR Manual

19
SAFETY WARNINGS
Read this entire Instruction for Use ca-
refully before using the appliance.
Keep the Instruction for Use.
Please note:
This symbol identies important advice or information for the
user.
• This microwave oven is intended for heating food and
beverages only. Drying of food or clothing and heating of
warming pads, slippers, sponges, damp cloth and similar
may lead to risk of injury, ignition or re. It must never
be used for other purposes, modied or tampered with in
any way. This microwave oven is not designed for use in a
kitchen unit or ush mounted.
• Beforeusingtheoven,makesuretheutensilsandcontai-
ners chosen are suitable for microwave oven use (see the
section on“Ovenware”) .
• Donotuseabrasivecleaningproductsormetalscrapersto
clean the glass door of the oven as this could damage the
surface and cause breakage.
• Allmicrowavesaretestedandapprovedinaccordancewith
current electromagnetic safety and compatibility regula-
tions and standards.
As a precautionary measure, pacemaker manufacturers
recommend wearers to keep a minimum distance of 20-30
cm between an operating microwave oven and the pace-
maker in order to avoid possible interference with the pa-
cemaker. If you suspect there may be interference, turn the
microwave o immediately and contact the manufacturer
of the pacemaker.
• Iftheovenoverheats(prolongeduse,useempty,etc.),the
safety thermostat could turn the oven o.
Aftercoolingdown,theovenwilloperateasnormal.
• This is an household appliance only. It is
not intended to be used in: sta kitchen
areas in shops, oces and other working
environments; farm houses; by clients in
hotels, motels and other residential type
environments; bed and breakfast type
environments.
• This appliance must not be operated by
a timer or a separate remote control sy-
stem.
• Theappliancemustbeplacedandoperatedwiththeback
next to the wall.
• Whentheovenisusedforthersttime,a“new”smelland
a small amount of smoke may be produced for the rst 10
minutes or so. This is normal and due to the protective sub-
stances applied to the grill element.
Important!
Failure to observe the warnings may result in life threatening
injury or damage to the appliance
• Important! If the door or door seals are
damaged, do not use the appliance until
it has been repaired by a qualied servi-
ce engineer (trained by the manufactu-
rer or by the dealer’s Customer Services).
• Important! It is hazardous for anyone
other than a qualied service engineer
to carry out any service or repair ope-
ration involving the removal of a cover
which gives protection against exposure
to microwave energy.
• Important! This appliance can be used
by children aged from 8 years and abo-
ve and persons with reduced physical,
sensory or mental capabilities or lack of
experience and knowledge if they have
been given supervision or instruction
concerning use of the appliance in a safe
way and understand the hazards invol-
ved. Children should be supervised to
ensure that they do not play with the ap-
pliance. Cleaning and user maintenance
shall not be made by children, unless
they are more than eight years old and
under constant supervision. Keep the
appliance and power cable away from
children under eight years of age.
• Donotoperatetheovenifobjectsofanykindbecomelod-

20
ged between the front panel of the oven and the door.
Always keeptheinsideofthedoor clean, using adamp
cloth and non-abrasive cleaning products. Do not allow
dirt or remains of food to accumulate between the front
panel of the oven and the door.
• Neverplacetheturntableinwaterafterithasbeenheated
for a long time. The resulting thermal shock would break
the turntable.
• Whencookingin“MICROWAVEONLY”and“COMBIMICRO-
WAVE” modes, you must never preheat the oven when
empty.Neveroperateitwhen emptyassparks couldbe
produced.
• Failuretocleantheovencouldleadtodeteriorationofthe
surface. This may shorten the working life of the appliance
and create risk situations.
• Metalliccontainersforfoodandbeveragesarenotallowed
during microwave cooking except for the steamer or pizza
plate provided with the product.
• Neverusethesteamaccessorytocookeggsintheirshells.
Danger of burns!
Failure to observe the warnings could result
in scalds or burns.
• Important! When operating in combi
mode, the oven becomes extremely hot.
Do not allow children to use it without
adult supervision.
• When operating in combi mode, the oven becomes ex-
tremely hot. Do not allow children to use it without adult
supervision.
• Useutensilssuitableformicrowaveovensonly.Inorderto
avoid overheating and the consequent risk of re, it is advi-
sable to check the oven when cooking food in disposable
containers made of plastic, cardboard or other inamma-
ble materials, and when heating small quantities of food.
• Important! Liquids and other foods
must not be heated in sealed containers
astheymayexplode.Eggsintheirshell
and whole hard-boiled eggs should not
be heated in microwave ovens since they
may explode even after microwave hea-
ting has ended.
• Important! The appliance becomes hot
wheninoperation.Neverrestanything
ontopofthe ovenwhileinuse.Never
touch the grill elements inside the oven.
• Whenheatingliquids(water,coee,milk,etc.),adelayed
action may cause the contents to boil over unexpectedly
with a risk of scalds. To avoid this, you should place a pla-
stic spoon or a glass rod in the container before starting to
heatliquids.Alwaystakeextremecarewhenhandlingthe
container.
• Donotheatspiritswith a highalcoholcontent,orlarge
quantitiesofoil.Bothtypesofliquidareammable!
• Thecontentsoffeedingbottlesandbabyfoodjarsshould
be stirred or shaken and the temperature checked before
consumption,inordertoavoidburns.Youshouldstirormix
thefoodtoguaranteeaneventemperature.Whenusing
commercialbottlesterilisers,ALWAYSmakesurethecon-
tainer is lled with the quantity of water specied by the
manufacturer before starting heating.
• Important! The door and other oven
surfaces may become very hot when the
oven is in use.
• During cooking, veryhot steamis produced.When ope-
ning the oven and steam accessory door, take care to avoid
burns caused by pus of steam.
Danger!
Failure to observe the warnings may result in life threatening
injury by electric shock.
• Donotoperatetheovenifthepowercableorplugisdama-
ged as there is a risk of electric shock.
• If the power cable is damaged, it must
be replaced by the manufacturer, the
manufacturer’s Customer Services or a
similarly qualied person in order to eli-
minate all risk.

21
TECHNICAL DATA
MW42FSR
Externaldimensions(LxHxD):550x530x360mm
Internaldimensions(LxHxD):400x385x265mm40-42L
Diameterturntable:36cm
weight:20.5Kg
MW30FSR / MW30F
Externaldimensions(LxHxD):520x520x320mm
Internaldimensions(LxHxD):335x245x350mm28-30L
Diameterturntable:31.5cm
weight:18.5Kg
For further information, see the rating plate on the appliance.
Power output
ThepoweroutputofyouroveninWATTSisgivenontherating
plateofyourapplianceundertheheadingMICROOUTPUT.
When you consult tables, always refer to the output of your
oven!
It is also useful when consulting microwave recipe books.
On some models, the microwave output po-
werinWATTSisalso giveninthissymbol,
reproduced on the control panel.
ThisappliancecomplieswithECdirective2004/108/EC
onelectromagneticcompatibilityandEuropeanregulationno.
1935/2004of27/10/2004onfoodcontactmaterials.
TheproductisclassiedasaGroup2,ClassB,ISMappliance.
Group2includesallISM(Industrial,ScienticorMedical)ap-
pliances in which radio frequencies are generated intentionally
and/orusedintheformof electromagneticradiationtotreat
materials, together with electroerosion equipment.
ClassBincludesequipmentfordomesticuseoronpremisesdi-
rectly connected to low voltage electricity supply for supplying
buildings for residential use.
DISPOSAL
In compliance with European directive 2002/96/EC,
the appliance must not be disposed of with hou-
sehold waste, but taken to an authorised waste sepa-
ration and recycling centre
DESCRIPTION OF OVEN AND CONTROL PANEL
A Grillelement
B Supportforrotatingspitroast(certainmodelsonly)
C Microwaveoutletcover
D Hotairoutlet
E Insideofdoor
F High/lowdualfunctionwirerack
G Turntable
H Turntablesupport
I Turntable spindle
L Steamaccessory(certainmodelsonly)
M Grill/pizzaplate(certainmodelsonly)
N Spitroast(certainmodelsonly)
O Spit roast support (certain models only)
P Spitroastextractionhandle(certainmodelsonly)
Q Oven light
1. Time and functions display:
microwave
breakfast clock spit roast pizza steam
defrost grill fan child safety
2. FUNCTIONbutton:selectsthefunction
3. TEMP.°Cbutton:regulatesthetemperatureinfanmodee
4. : button: dedicated programmable function button
5. STARTbutton:startscookingandquickheating
6. POWERLEVELbutton:selectsmicrowavepowerlevel
(MW42FRS) (MW30FSRMW30F)
P20= 200W 180W
P25= 250W 225W
P30= 300W 270W
P50= 500W 450W
P70= 700W 630W
P80= 800W 720W
P100= 1000W 900W
7. button:selectscookingwiththegrill/pizzaplate
or steam accessory
8. STOPbutton:stopscookingandclearssettings
9. TIMEADJUSTdial:setsthetimeofdayandcookingtime
22
INSTALLATION AND ELECTRICAL CONNECTION
• Unpack the oven and remove the protective packaging
containingtheturntable(G),turntablesupport(H/I)and
allaccessories.Checkthatthesupport(H/I)iscorrectlyin-
serted in the centre of the turntable.
• Cleantheinsideoftheovenwithasoft,dampcloth.
• Checkthattheovenhasnotbeendamagedduringtran-
sport. Check in particular that the door opens and closes
properly.
• Placetheovenonaat,stablesurfaceata heightofat
least85cmandoutofreachofchildrenasthedoormay
become very hot during cooking.
• Whenpositioningtheovenontheworktop,takecareto
maintainagapofapprox.5cmbetweentheovenandthe
walls to its rear and sides and a gap of at least 30 cm above
the oven.
• Donotblocktheairintakevents.
In particular, never place anything on top of the oven and
make sure the air and steam outlet vents (on the top, bot-
tom and rear of the appliance) are always free.
• Placetheturntablesupport(H/I)inthecentreofthecircu-
lar housing and rest the turntable (G) on top.
Thesupport(H/I)mustbeinsertedinthehousinginthe
centre of the turntable.
Please note: never place the oven on or near heat
sources (for example, on top of a refrigerator).
• Connecttheappliancetosocketswithaminimumcurrent
ratingof16Aonly.Makesurethehouseholdmainswitch
has a minimum rating of 16A to avoid it tripping unex-
pectedly during operation of the oven.
• Positiontheoveninsuchawaythatthepowerplugand
socket are easily accessible.
• Beforeyouswitchontheoven,checkthatthemainsvol-
tage corresponds to that specied on the oven rating plate
and that the power socket is properly earthed. The manu-
facturer declines all responsibility for failure to observe this
safety precaution.
• Themajorityof modern electronicappliances (TV,radio,
stereosystemsetc.)areshieldedfromradiofrequency(RF)
signals.However,certainelectronicappliancescannotbe
shielded from radio frequency signals coming from a mi-
crowaveoven.Youshouldthereforekeeptheseappliances
at least 1-2 metres away from a microwave in operation.
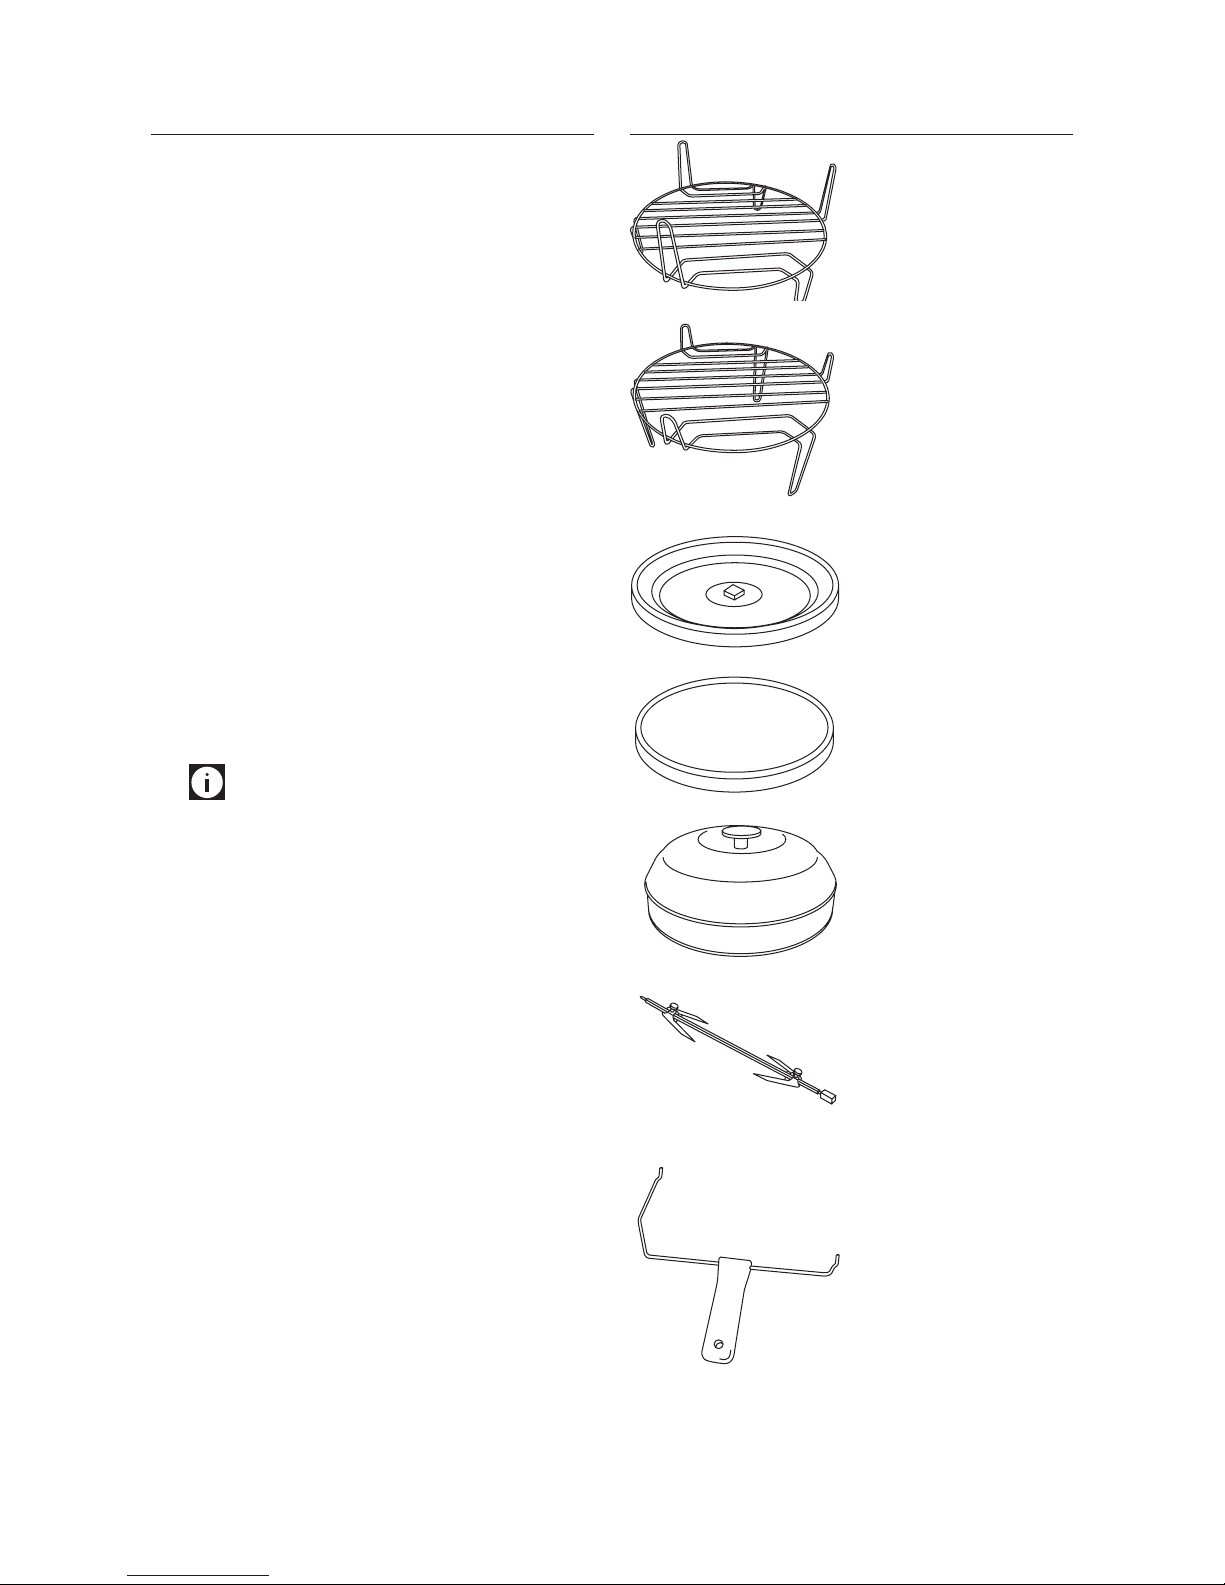
STANDARD ACCESSORIES
High/low dual function
wire rack (F)
Wire rack in low position:
UsewiththeFanfunctionfor
all types of traditional cooking
and in particular to cook cakes
and desserts.
Wire rack in high position:
UseintheGrillfunctionto
quick cook meat.
Turntable (G)
Usetheturntableinall
functions.
Grill/pizza plate (M)
(certain models only)
UsetheplateinthePizza
function.
Steam accessory (L)
(certain models only)
UseintheSteamfunction.
Spit roast (N)
(certain models only)
Allowsthespittorotateauto-
matically during cooking
Spit roast extraction
handle (P)
(certain models only)
Allowsthespittobeextracted
easily and safely after cooking
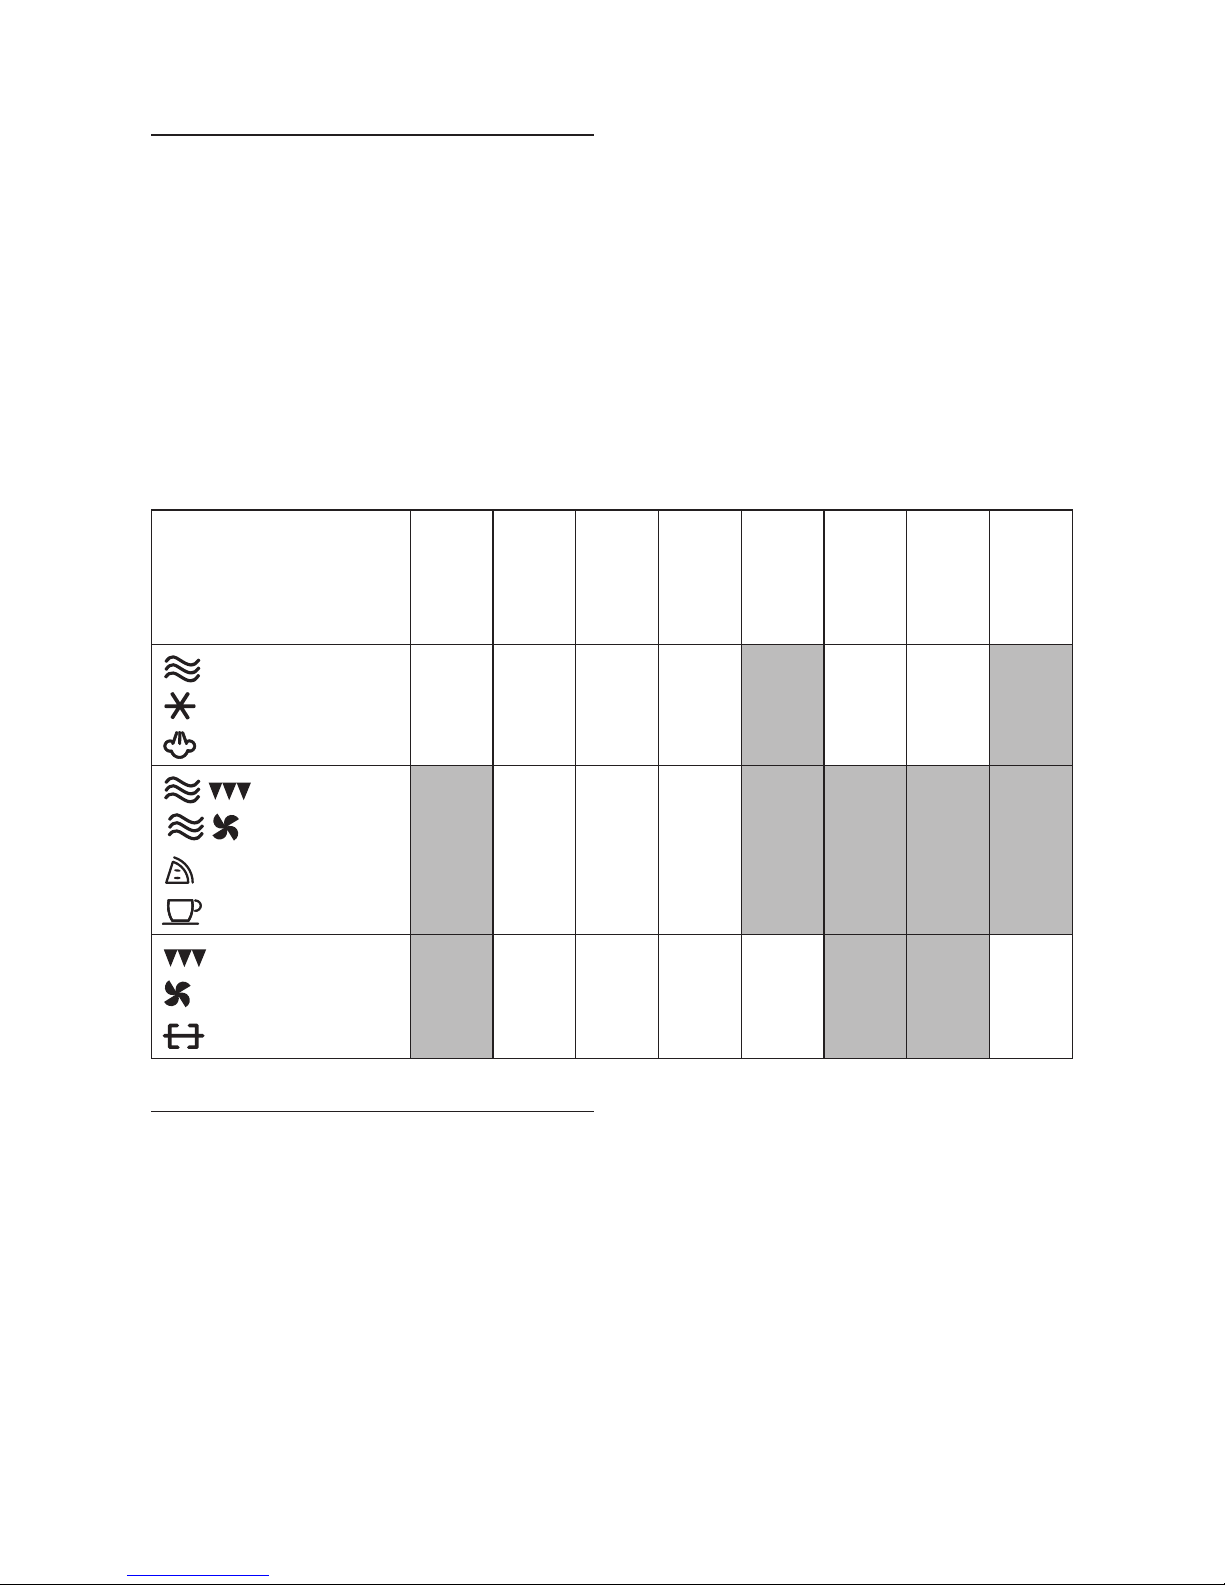
23
Function
Glass
Pyrex
Pyroceram
Terracotta
Aluminium
foil
Plastic
Paper or
cardboard
Metal
containers
Microwave
Defrost
Steam (certain models only)
YES YES YES YES NO YES YES NO
Microwave+Grill
Microwave+Fan
Pizza
Breakfast
NO YES YES YES NO NO NO NO
Grill
Fan
Spit roast
(certain models only)
NO YES YES YES YES NO NO YES
RULES AND TIPS FOR USING THE OVEN
Microwavesareaformofelectromagneticradiation.Theyoccur
in nature in the form of light waves (e.g. sunlight). In the oven,
these waves penetrate food from all directions to heat water, fat
and sugar molecules.
Heatisquicklygeneratedinthefooditself,whilethecontainer
warms up as a result of heat spreading from the food only.
Inmicrowavecooking,fooddoesnotsticktothedish.Youcan
therefore use very little fat and in some cases no fat at all.
Asmicrowavecookingislow fat,microwavepreparedfood is
considered to be very healthy.
Microwavecookingalsoinvolveslowertemperaturesthantradi-
tional cooking. It therefore dehydrates foods less, destroys less
of their nutritional value and retains more original avour.
Fundamental rules for correct microwave cooking
• Cookingtimedependsdirectlyonthesizeandevennessof
thefood.Acasserolewillcookfasterthanaroastbecauseit
consistsofsmallerregular-sizedpieces.Whenyoureferto
the cooking tables later in this manual, remember that you
must increase or reduce cooking time to match the volume
of food you are cooking.
Alwaysrespectstandingtime,inotherwords,thelengthof
time you must leave food to“rest” after cooking. Standing
time ensures that food is served at an even temperature
throughout.
The temperature of meat, for example, can rise between
5°Cand8°Cduringstandingtime.
Food can be left to stand inside or outside the oven.
OVENWARE
In the Microwave Only and Combi with Microwave functions,
any glass (preferably Pyrex), ceramic, china or terracotta
ovenware may be used provided it has no metal decorations or
parts (e.g. gold decorations, metal handles, feet etc.).
Heatresistantplasticplatescanalsobeused,butonlyfor“Mi-
crowave Only”cooking.
If you are in doubt as to the suitability of a particular container,
carry out this simple test - place the empty container in the oven
for60secondsatmaximumpower(“MicrowaveOnly”function).
If the container remains cold or heats up only slightly, it is suita-
ble for microwave cooking. If it becomes very hot (or sparks are
produced), the container is not suitable.
When heating up for brief periods, paper napkins, cardboard
trays or disposable plastic plates can be used as a base.
The size and shape of containers must allow them to rotate ea-
sily inside the oven.
Metal,wood,caneandcrystalglasscontainersarenotsuitable
for microwave cooking.
Rememberthatthemicrowavesheatthefoodnottheovenwa-
re. Food can therefore be cooked directly on the serving plate,
thus avoiding using and cleaning saucepans.
Alwaysuseovenmittsastheveryhotfoodmaytransmitheat
to the plate.
IftheovenissettoGrill,FanorSpitRoast,alltypesofovenware
can be used.
The following table provides useful guidelines for choosing
ovenware:

24
• Alwaysmixorstirfoodseveraltimesduringcooking.This
not only ensures even temperature distribution but also
reduces cooking time.
• Turnfoodoverduringcooking.Thisisespeciallyimportant
for meat, whether in large pieces (roasts, whole chickens,
etc.) or small pieces (chicken breasts, casseroles, etc.).
• Pierce foods with skins, shells or peel (e.g. apples, po-
tatoes, tomatoes, frankfurters, sh, etc.) with a fork at
several points to allow steam to escape from inside. This
prevents these foods from exploding inside the oven.
• Ifyouarecookinganumberofportionsofthesametypeof
food (e.g. boiled potatoes), arrange the portions in a ring
around the outside of an ovenproof dish to ensure they
cook evenly.
• Thelowerthetemperatureatwhichfoodisplacedinthe
oven, the longer the cooking time required.
Food placed in the oven at room temperature will cook
sooner than food coming directly from the refrigerator.
• Alwaysplacedishes andcontainersinthe middleof the
turntable.
• Itisperfectlynormalforcondensationtoforminsidethe
oven and near the air outlet vents.
To reduce this, cover the food with clear lm, greaseproof
paper, glass covers or simply an upturned plate.
Foods with a high water content (e.g. greens and vegeta-
bles) cook better when covered.
Covering food also helps keep the inside of the oven clean.
Useclearlmsuitableformicrowavecooking.
• Donotmicrowavecookeggsintheirshells.Pressurewill
build up inside and can cause the egg to explode, even af-
ter cooking has nished.
Do not heat precooked eggs unless scrambled.
• Alwaysopenair-tightorsealedcontainersbeforeplacing
them in the oven, otherwise pressure will build up inside
and may cause them to swell and explode even after cook-
ing has nished.
SETTING THE CLOCK
The rst time the appliance is connected to the mains electricity
supply or after it has been without power for some time, the
“delo”welcome message is displayed for 2-3 seconds, followed
by four dashes (--:--).
To set the time, proceed as follows:
• PresstheFUNCTIONbutton(2)untilthe icon lights up
on the display.
The hours ash on the display.
• Setthehour(example13)byturningtheTIMEADJUSTdial
(9)(g.4).
• PresstheSTARTbutton(5).
Theminutesashonthedisplay(g.6).
• Settheminutes(g.7)byturningtheTIMEADJUSTdial(9)
(g. 3).
• PresstheSTARTbutton(5)(g.5).Thesettimeisdisplayed
(g. 8).
If you want to change the time later, repeat the setting
procedure described above.
PROGRAMMING COOKING
• Press the FUNCTION button (2) and choose the required
function. The corresponding icons light up on the display.
The following functions are available:
Microwave
Defrost
Grill
Fan
Microwave+Grill
Microwave+Fan
Spit roast (certain models only)
• SetthecookingtimebyturningtheTIMEADJUSTdial(9).
Alwaysconsultthecookingtablestoestablishthecorrect
cooking time.
Please note: ou can also change the time set during
cookingbyjustpressingtheSTOPbutton(8)(g.9)onceor
opening the oven door to briey pause cooking.
• InMicrowaveOnly,CombiMicrowave+ Grill and Combi
Microwave+Fanfunctions,selectthemicrowavepower
levelbypressingthePOWERLEVELbutton(6)(g.10)re-
peatedly until the required power expressed as a percent-
age ashes in the centre of the display (g. 11).
Alwaysconsultthecookingtablestoestablishthecorrect
power.
Please note: you do not need to select the power
level in the automatic defrost function.
Please note: you can also change the microwave
power level during cooking by just pressing the POWER
LEVELbutton(6)(g.10).Pressingthebuttononcedis-
plays the current power level, pressing it again changes
the power.
• IntheFanandCombiMicrowave+Fanfunctions,choose
therequiredtemperaturebypressingtheTEMP.°Cbutton
(3) repeatedly (g. 12).
Alwaysconsultthecookingtablestoestablishthecorrect
temperature.

25
Please note: once the cooking time has been select-
ed, you can change the cooking temperature by just press-
ingtheTEMP.°Cbutton(3)(g.12).Pressingthebutton
once displays the current temperature set, pressing it again
changes the temperature.
• Press the START button (5) to begin cooking (g. 5). A
countdown of time to the end of cooking appears on the
display.
Please note: if for any reason cooking is not started
within 2 minutes, the settings are automatically cancelled.
Please note: in Fan and Combi Microwave + Fan
functions only, while the oven is preheating, the set tem-
perature is displayed: Once the oven is at temperature, a
countdown of the time left until the end of cooking is dis-
played.
• Theendofcookingisindicatedby3beepsand“End”(g.
14)isdisplayed.Openthedoorandremovethefood.
ThetimeofdayisdisplayedwhentheSTOPbutton(8)(g.
9) is pressed or 3 minutes after cooking has ended.
Please note:Pleasenote:youcanopenthedoorto
check on cooking at any time.
Microwaveemissionandoperationoftheovenceaseand
willstartagainwhenthedoorisclosedandtheSTARTbut-
tonispressed(5)(g.5).
Please note: If you need to stop cooking for any rea-
sonwithoutopeningthedoor,justpresstheSTOPbutton
(8) (g. 9).
Please note: to nish cooking, proceed as follows:
Iftheovendoorisopen,presstheSTOPbuttononce(8)
(g. 9). If the oven door is closed and cooking is in progress,
presstheSTOPbutton(8)twice.
The time of day is displayed again (g. 9).
Please note:duringFanOnlyandMicrowave+Fan
cooking, you can check the temperature set previously by
pressingtheTEMP.°Cbutton(3)(g.12).After2seconds,
the time left until the end of cooking is displayed again.
Turntable block
In the Grill and Fan functions, to use rectangular pans unable
to rotate inside the oven you can block rotation of the turntable
(G).
Proceedasfollows:
• UsetheFUNCTIONbutton(2)tochoosetheFanfunction
(g. 1).
• PressandholdtheSTOPbutton(8)(g.9)for2-3seconds.
Theturntableblocksymbol(g.15)appearsonthedisplay
and the appliance emits a beep.
• Finish programming the cooking settings and start the
processbypressingtheSTARTbutton(5)(g.5).Theturn-
table does not rotate.
Please note: during cooking, the oven light (Q) re-
mains o.
To check cooking progress, open the oven door.
QUICK HEAT
This function is perfect for heating small quantities of food and
drink.
PresstheSTARTbutton(5)(g.5)twice.
The oven will operate at maximum power for 2 minutes.
This function is also useful to complete unnished cooking.
CHILD SAFETY
The oven is tted with a safety device to prevent children from
turning it on unintentionally.
To enable the safety device:
• PressandholdtheSTOPbutton(8)(g.9)for3seconds.
• Theapplianceemitsashortbeepandtheiconlights up
on the display. The oven cannot be turned on.
• Todisablethesafetydevice,pressandholdtheSTOPbut-
ton (8) (g. 9 ) for 3 seconds.
ENERGY SAVING FUNCTION
Eachyear,technologicalprogressrequirestheproductionofever
more electricity.
The result is ever greater environmental impact due to the
increase in pollutants (CO2, sulphur, etc.) and exploitation of
non-renewable natural resources (carbon, gas, oil).
Byreducingthewasteofelectricity(e.g.byreducingthecon-
sumption of the appliance in standby), energy saving is a con-
siderable source of “virtual” renewable energy, immediate and
accessible to all.
To reduce the energy consumption of the oven when not in
operation:
• PressandholdthePOWERLEVELbutton(6)(g.10)for2-3
seconds.The appliance emits a beep.
• Ifnobuttonispressed,thedisplaywillgooautomatically
after 10 minutes (the clock settings will be maintained).
Ascrolling“-”isdisplayed.
• Ifthedoorisleftopenformorethan10minutes,theoven
light (Q) goes o automatically.
• Toturnthedisplaybackon,pressanybutton.
• To disable energy saving and to display the time again,
pressandholdthePOWERLEVELbutton(6)(g.10)for
2-3 seconds; the appliance emits a beep.

26
DEFROST
• Frozenfoodsinplasticbags,lm,orovenreadycontainers
can be placed directly in the oven. Check rst that there are
no metal objects like staples or ties.
• Certaintypesoffoodsuchasgreenvegetablesandshdo
not require defrosting completely before cooking.
• Foodsinmeatandothersaucesdefrostquickerandmore
evenlyiftheyarestirred, turnedand/orseparatedocca-
sionally.
• Meat,shandfruitallloseliquidsduringdefrosting.Al-
ways place these foods in a bowl to defrost them.
• Youarerecommendedtodividemeatandplaceindividual
pieces in separate bags when freezing.
This will save you valuable time during preparation.
• Always respect standing times between defrosting and
cooking. Standing time is the time for which you must
leave food to “rest” before cooking. Standing time ensures
that food has an even temperature throughout when cook-
ing starts.
HEATING
Yourmicrowaveovenisatitsmostusefulandecientwhen
heating up food.
Compared to traditional methods, microwaves save both time
and electricity.
• Youarerecommendedtoheatfood(particularlyiffrozen)
toatemperatureofatleast70°C(itmustbepipinghot!).
Youwillnotbeabletoeatthefoodatonceasitwillbetoo
hot, but complete sterilisation will be guaranteed.
• Toheatprecookedorfrozenfood,alwaysobservethefol-
lowing rules:
- remove the food from metal containers;
- cover with clear lm (for microwave use) or greaseproof
paper. This will retain all the natural avour and keep the
ovenclean.Youcanalsocoverwithanupturnedplate;
- if possible, mix or turn frequently to make the heating pro-
cess quicker and more even.
- use extreme caution when following times indicated on
packaging. Remember that in certain conditions, these
times may have to be increased;
• Frozenfoodmustbedefrostedbeforeheatingstarts.
The lower the initial temperature of the food, the longer it
will take to heat.
COOKING HORS D’OEUVRES AND FIRST COURSES
Soups in general can be made with less water because very little
water is lost through evaporation in microwave ovens.
Addsaltattheendofcookingorduringstandingtimebecause
salt has a dehydrating eect.
Notethatthetimerequiredtocookrice(orpasta)inamicro-
wave oven is more or less the same as required to cook it tradi-
tionally on the stove.
The advantage of preparing a risotto in a microwave lies in the
fact that it does not require continual stirring (two to three
times is enough).
COOKING MEAT
Cooking time depends directly on the size and homogeneity of
the food. Kebabs cook quicker than a joint because the pieces
are smaller and of the same size.
Tokeeproasts,chickenandkebabstender,add1/2cupofwater
when you start cooking.
COOKING SIDE DISHES AND VEGETABLES
Compared to traditional cooking methods, vegetables retain
more of their natural colour and nutritional goodness when
cooked in a microwave oven.
Beforecooking,washandcleanthevegetables.
Cut larger vegetables into evenly sized pieces.
Add5spoons ofwaterfor every500gofvegetables(brous
vegetablesneedmorewater).VegetablescookedusingtheMi-
crowave Only function must always be covered with clear lm.
Mixatleastoncehalfwaythroughcookingandaddalittlesalt
at the end only.
Please note: The cooking times in the table are purely
indicative and depend on weight, the temperature of the food
before cooking and the size and texture of the vegetables.
COOK FISH
Fish cooks fast and with excellent results.
It can be avoured with a little butter or oil (or not at all).
Cover with clear lm. Cut skin before cooking. Arrange llets
evenly. Do not cook sh breaded with egg.
COOKING CAKES, PASTRIES AND FRUIT
Alwayscookcakeswithfanfunction,puttingthemonthewire
rack in low position.
If cooked with the peel, fruit should be pierced and kept covered.
Itisimportanttoobservethestandingtime(3-5minutes).
COOKING USING THE STEAM FUNCTION NOT ALL
MODELS
This function can be used to steam cook all types of food such as
vegetables, sh etc.
Important!alwaysplacethesteamaccessory(L)onthe
glassturntable(G).Makesuretheaccessoryiscentredprecisely
on the turntable to avoid it touching the inside walls of the oven
27
during cooking. Failure to observe these simple rules could dam-
age the accessory or produce sparks.
• Pour500ccofwaterintotheplasticcontainerthenrestit
onthemetalsteamaccessorybase(g.16).
• Placethefoodinthe steamaccessoryandrestiton the
metalbase(g.17).Closetheaccessorywiththemetallid,
making sure it is correctly positioned.
• Pressthe button(7)twice(g.18).
The icon lights up on the display
• SetthecookingtimebyturningtheTIMEADJUSTdial(9)
(g. 3).
Alwaysconsultthecookingtablestoestablishthecorrect
cooking time.
Please note: you can also change the time set dur-
ingcookingbyjust pressingtheSTOPbutton(8) (g.9)
once or opening the oven door to briey pause cooking.
• PresstheSTARTbutton(5)tobegincooking(g.5).
• QTheendofcookingisindicatedby3beepsand“End”is
displayed(g.14).Openthedoorandremovethefood.
ThetimeofdayisdisplayedwhentheSTOPbutton(8)(g.
9) is pressed or 3 minutes after cooking has ended.
Danger of burns! during cooking, very hot steam
isproducedinsidetheaccessory.Whenliftingthelid,take
caretoavoidburnscausedbypusofsteam.Holdtheac-
cessory by the plastic base only and lift the lid by the top
handle, avoiding contact with metal parts of the accessory
(g. 19).
Cooking with steam
The steam accessory cooks food using the moist heat of boiling
water, but without direct contact between the food and the wa-
ter which would lead to a loss of nutrient salts.
The steam accessory has a metal lid which blocks passage of the
microwaves. The microwaves heat the water in the plastic part
only, the water generates steam and this cooks the food.
Important! neverusetheaccessorywithlessthan500cc
of water in the container (empty) to avoid damage or electrical
discharges within the steam accessory.
If the water evaporates completely before the end of cooking,
addafurther500ccofwatertothecontainer.
Important! do not use the accessory if visibly damaged,
brokenorwarped.Nevercookwithoutusingthemetalbaseand
lid.
The times indicated in the table are an average and must be ad-
justed to take account of these simple fundamental rules.
• cookingtimesdependonthesizeofthefood.
Vegetablescutinpieceswillcookfasterthanwholevege-
tables.
• foodatroomtemperaturewillcookbeforefoodtakendi-
rectly from the refrigerator.
• theresultsofthecookingwillalwaysdependonthequali-
ty and freshness of the ingredients.
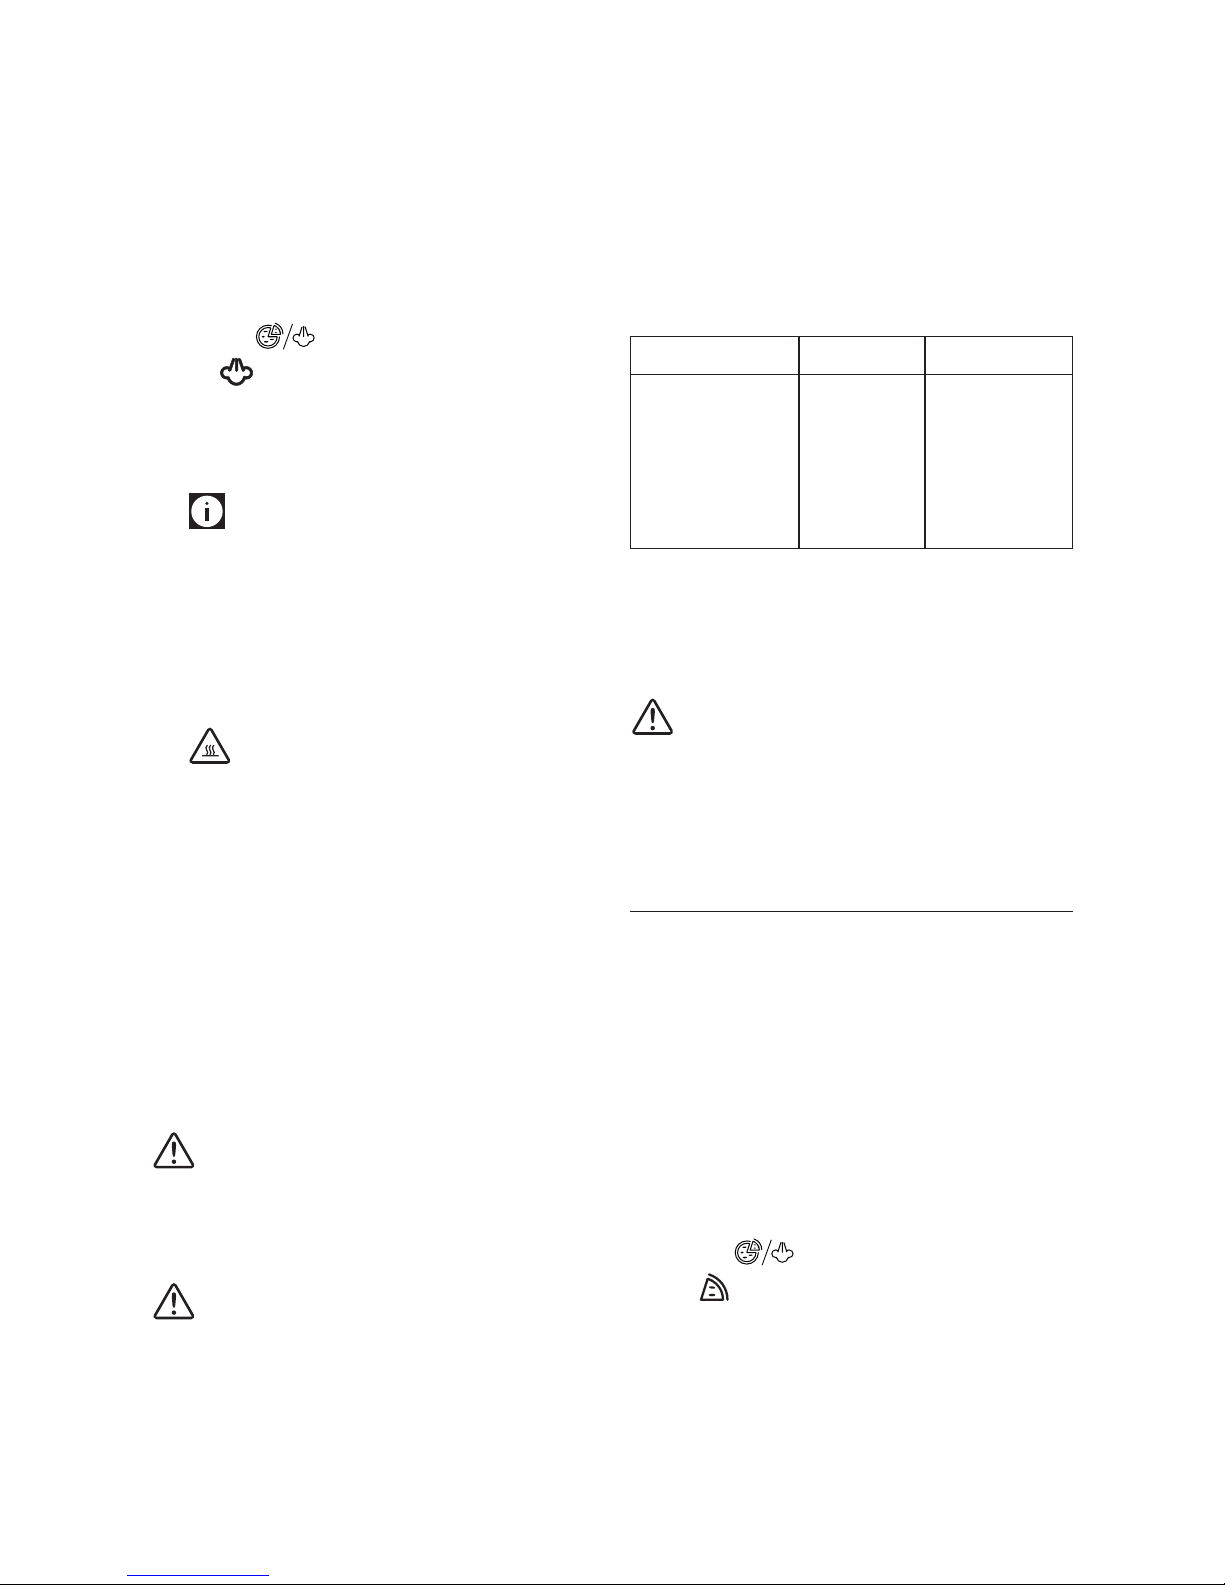
Table of cooking times
Food Quantity Cooking time
Carrots
Courgettes
Cauliower
Potatoes
Slice of salmon
Chicken breasts
400gr
400gr
450gr
500gr
350gr
300 gr
20 minutes
12 minutes
23 minutes
20 minutes
13 minutes
13 minutes
The metal base has a rubber gasket around the edge (g. 20).
Thegasketcanbeeasilyremovedtocleantheaccessory.After
cleaning, it must obligatorily be replaced in the original posi-
tion.
Important! never use the accessory without the rubber
gasket correctly inserted around the edge of the metal base (its
absence could damage the accessory or result in the production
of sparks during use).
COOKING USING THE PIZZA FUNCTION NOT ALL
MODELS
Thiscanbeusedtocook/heatallcommercialfrozenproductsin
the“snack”category such as bread, savoury snacks, mini-pizzas,
quiches, avoured hamburgers, duchesse potatoes, pastries,
croissants, etc.
Forbestresults,rememberthesesimplegeneralrules/tips:
• Thespecialgrill/pizzaplate(M)mustbepreheatedeach
time you use it. The oven does this automatically when the
programmeissetandtheSTARTbutton(5)ispressed(g.
5).
• Beforeusingtheoven,ALWAYSconsultthetable(onnext
page) to check the category of the food you are cooking.
Proceedasfollows:
• Pressthe button(7)once(g.18).
The icon lights up on the display
• SetthecookingtimebyturningtheTIMEADJUSTdial(9)
(g.3).Alwaysconsultthecookingtablestoestablishthe
correct cooking time.
• Place the grill/pizza plate (M) (oiled if you wish) in the
oven directly on the turntable (G). Close the door and press
theSTARTbutton(5)(g.5).Theovenwillautomatically
28
heat the plate for 3 minutes.
The countdown till the end of preheating is displayed.
Please note: the turntable preheating time cannot
be changed.
• Attheendofpreheating,theapplianceemits2beeps.Re-
movethegrill/pizzaplate(M)fromtheovenusingoven
mitts(takecare,itisveryhot!)(g.21)andplacethefood
tobecooked/heatedontheplate.
• Putthegrill/pizzaplate(M)backintheovenandpressthe
STARTbutton(5)(g.5)again(ifthebuttonisnotpressed
within 1 minute, cooking will resume automatically). The
set time appears on the display.
Please note: you can also change the time set dur-
ingcookingbyjust pressingtheSTOPbutton(8) (g.9)
once or opening the oven door to briey pause cooking.
• Theendofcookingisindicatedby3beepsand“End”isdis-
played(g.14).Openthedoorandremovethefood.
ThetimeofdayisdisplayedwhentheSTOPbutton(8)(g.
9) is pressed or 3 minutes after cooking has ended.
Danger of burns!whilecooking/heatingthefood,
the oven functions in Combi with Grill mode. Take great
carewhentakingthefoodoutoftheovenasboththegrill/
pizzaplate(M)andtheelement(A)atthetopoftheoven
become very hot.
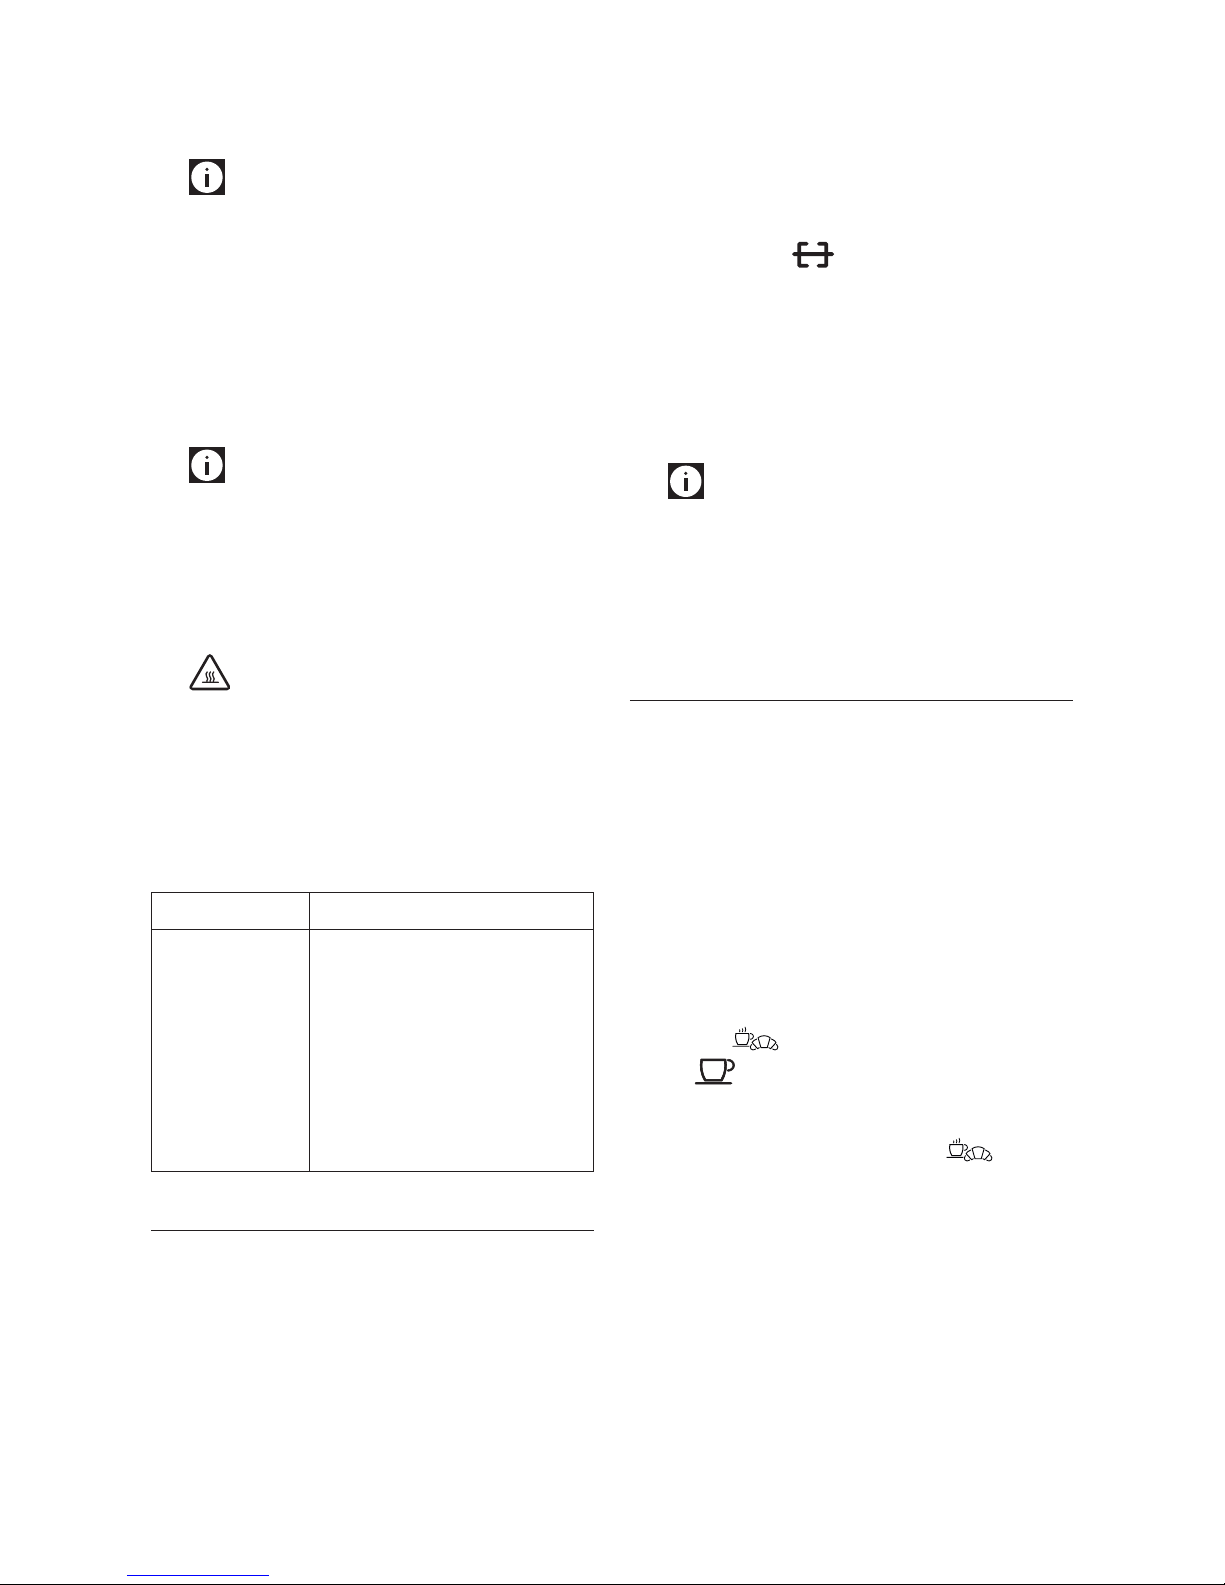
Belowaresometipsforgettingthebestfromthisfunctionand
obtaining optimum results:
Food Notes
Frozen pizza
Frozen cordon bleu
Frozen sh ngers
• Place the pizza on the plate and
cookfor16-18minutes.
• Placethecordonbleuontheplate
and cook for 7-9 minutes. Do not
turn during cooking.
• Place the sh ngers on the plate
and cook for 6-8 minutes. Do not
turn during cooking.
COOKING USING THE SPIT ROAST FUNCTION
This function can be used to spit roast chicken, pork and veal.
Proceedasfollows:
• Insert the spit roast (N) in the chicken and block it in
place with the two forks (g. 22). For best results, tie the
extremities of the chicken with kitchen string to prevent
them from interfering with the inside of the oven during
rotation.
• Placethespitroastwiththechickenintheoven(g.23).
• Insertthesquareendofthespitroastintherotatingsup-
port(B)intheovenontheright(g.24).
• Insertthepointedendofthespitroastinthesupport(O)
ontheleft(g.25).
• PresstheFUNCTIONbutton(2)(g.1)untiltheiconlights
up on the display .
• SetthecookingtimebyturningtheTIMEADJUSTdial(9)
(g. 3) .
Alwaysconsultthecookingtablestoestablishthecorrect
cooking time.
• Press the START button (5) (g. 5) to begin cooking. A
countdown of time to the end of cooking appears on the
display.
Please note: if for any reason cooking is not started
within 2 minutes, the settings are automatically cancelled.
• Theendofcookingisindicatedby3beepsand“End”isdis-
played(g.14).
• Openthedoorandtakeoutthespitroastusingthehandle
(P)supplied(g.26).
“BREAKFAST”FUNCTION
The breakfast function can be used to quickly and easily heat
the classic breakfast components - a cup of coee/milk/tea
andfresh(notfrozen)croissants/briochesorslicesofbreadto
be toasted. During the rst phase, the contents of the cup are
heated.
Thanks to the high temperature reached, your drink stays warm
for a long time.
In the second phase, the food is heated by the traditional grill
elements. This makes the surface of the brioches crispy and
toasts the bread.
Proceedasfollows:
• Pressthe button(4)(g.27).
The icon lights up and“1”is displayed (g. 28).
Youcanheatthequantitiesneededforasinglebreakfast
(e.g. one cup of milk and one croissant).
If you want larger quantities, press the button(4)
(g.27)againtochoosethesecondprogramme(“2”isdis-
played) (g. 29).
• Restthecupcontainingthedrinkintheovenontheturn-
table (G) (g. 30).
PresstheSTARTbutton(5)(g.5)tobegincooking.
Acountdownofthetimelefttotheendofcookingisdis-
played.
• Attheendoftherstphase,theovenstopsautomatically
and emits two short beeps. The cooking time for the sec-
ond phase ashes. Open the door and remove the cup.
Nowplacethecroissantsorslicesofbreaddirectlyonthe

29
turntable(G).Werecommendusingthewirerack(F)inthe
high position (g. 31).
• Startthe“Breakfast”functionbypressingtheSTARTbutton
(5)(g.5)again.Ifyoudonotrestarttheovenwithin1
minutebypressingtheSTARTbutton,cookingwillresume
automatically.
• Attheendofthesecondphase,theovenstopsdenitively
and“End”isdisplayed(g.14).
• Openthedoorandremovethefood.
ThetimeofdayisdisplayedwhentheSTOPbutton(8)(g.
9) is pressed or 3 minutes after cooking has ended.
Danger of burns! while cooking/heating during
the second phase, the oven operates in Grill and/or Fan
mode. Take great care when taking the food out of the
oven as both the element at the top and the inside walls
become very hot.
Programming with the Breakfast”button
Youcanalsousethe button(4)toprogrammeanyother
type of two-phase cooking you want.
The two cooking processes will be performed in sequence and
the oven will pause for 1 minute between the two phases to give
you time to check cooking progress. The new programme will
taketheplaceofthedefaultBreakfastfunction.
Proceedasfollows:
• Pressandholdthe button(4)(g.27)foratleast3
seconds.The appliance emits a short beep and“Fct1”ash-
es on the display (g. 32).
• SettherstfunctionwiththeFUNCTIONbutton(2)(g.1)
andconrmwiththeSTARTbutton(5)(g.5).
• Whentherstfunctionhasbeenconrmed,“Fct2”ashes
on the display.
Please note: if you do not wish to programme a sec-
ondphase,presstheSTARTbuttondirectly(5)(g.5).
• Set the second function with the FUNCTION button (2)
(g.1)andconrmwiththeSTARTbutton(5)(g.5).The
oven emits a short beep and local time is displayed again.
The“Breakfast” buttonisnowassociatedwithyournew
cooking process and you can run it quickly by pressing the
button(4)(g.27).
Please note: in the event of power failure, or if the
oven is unplugged from the mains, when the electricity
comes back on, the oven will automatically reset the origi-
naldefault“Breakfast”function.
CLEANING AND MAINTENANCE
Danger! before cleaning or maintenance, always unplug
the appliance from the mains and wait until cold.
Important! do not use abrasives, steel wool or sharp
metal utensils.
Whencleaningtheoutsideoftheoven,donotallowwateror
liquid detergent to penetrate the air and steam outlet vents on
the top of the appliance.
Youshouldnot use alcohol,abrasivedetergents,or ammonia
based detergents to clean the surface of the door.
Do not use steam cleaners to clean the inside of the oven.
To keep your appliance in the best possible condition, clean the
door and inside and outside of the oven with a damp cloth and
neutral soap or washing up liquid.
Alwayskeepthemicrowaveoutletcover(C)freefromgreaseor
splashes of fat.
To ensure perfect closure, always keep the inside of the door
clean. Do not allow dirt or remains of food to accumulate be-
tween the front panel of the oven and the door.
Clean the air intake vents at the back of the oven regularly to
keep them free of dust and dirt.
Fromtimetotime,removetheturntable(G)andsupport(H/I)
forcleaning.Alsocleanthebottomoftheoven.
Washtheturntableandsupportwithwaterandneutralsoap
(they can be washed in a dishwasher).
The turntable motor is sealed.
Whencleaningthebottomoftheoven,youshouldinanycase
takecaretoavoidwaterenteringunderthesupport(H/I).
Please note: Never plunge the hot turntable into cold
water. The sudden change in temperature could cause it to crack.
30
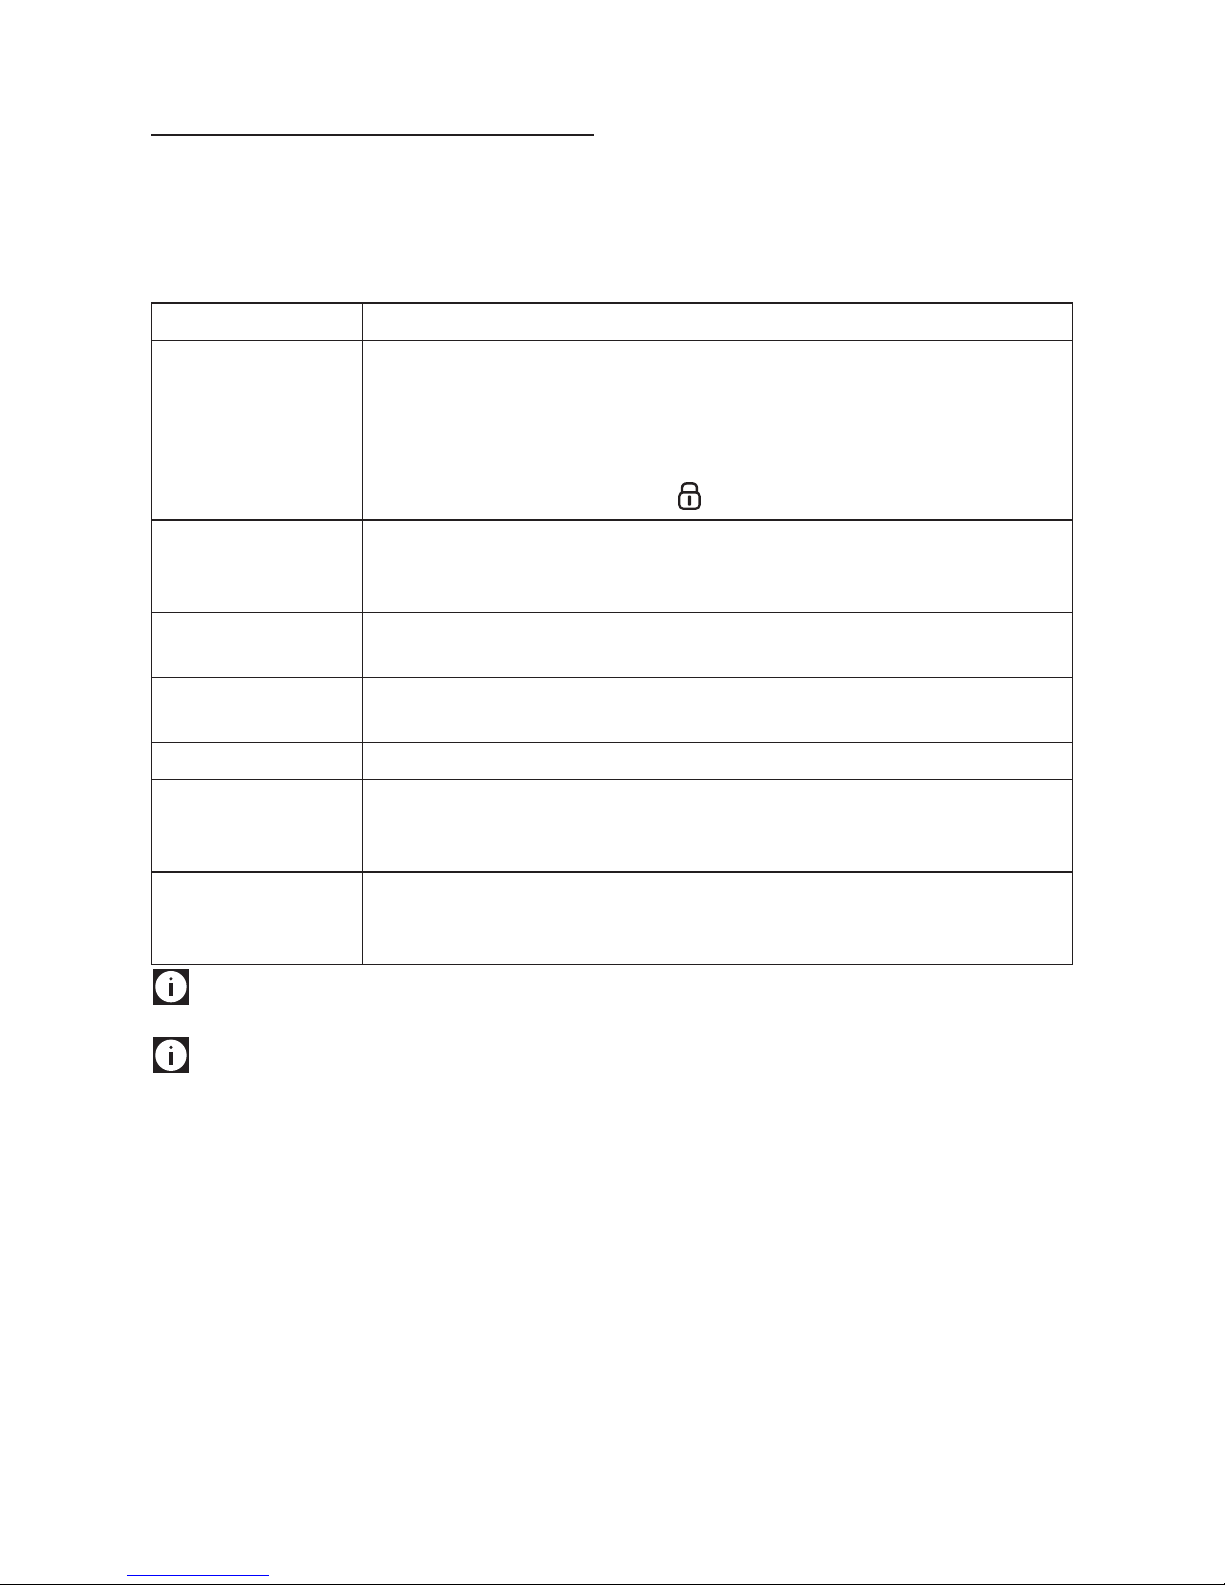
TROUBLESHOOTING
In the case of malfunction or defective operation, contact the
manufacturer’s authorised Customer Services.
Beforecontactingus,however,itisworthcarryingoutthefol-
lowing simple controls.
Problem Cause/solution
The appliance does not
work
• Resettheelectroniccontrolbyunpluggingtheappliancefromthemainsforatleast1-2minutes.
•Theenergysavingfunctionmayhavebeenenabled(displayo).Pressanybutton.
•Thedoorisnotcorrectlyclosed
•Theplugisnotcorrectlyinsertedinthesocket
•Nocurrentfromsocket(checkthehouseholdfuse).
•Thechildsafetydevicehasbeenenabled( symbol displayed).
Condensation on the surface
the oven rests on, inside the
oven or around the door
• Whencookingfoodcontainingwater,itiscompletelynormalforsteamgeneratedinsidetheoven
to be given o and condense inside the oven, on the surface the oven rests on or around the door.
Sparks inside the oven •NeverturntheovenonwithoutfoodwhenusingMicrowaveorCombifunctions.
•Whenusingtheabovefunctions,donotusemetalcontainersorbagsorpackswithmetalstaples.
The food does not heat or
cook properly
•Selectthecorrectfunctionorincreasecookingtime
•Thefoodwasnotcompletelydefrostedbeforecooking.
The food burns • Selectthecorrectfunctionorreducecookingtime.
The food does not cook
evenly
•Stirthefoodduringcooking.
Rememberthatfoodcooksbetterifcookedinevenlysizedpieces.
•Theturntableisstillblocked.
“FAIL”isdisplayed •Theovendoesnotregulatetheinternaltemperaturecorrectly.Youcancontinueusingtheovenin
MicrowaveandDefrostfunction.Makesurethetemperatureintheroomoroftheovenisnottoo
low(e.g.lessthan10°C).OtherwisecontactCustomerServices.
Please note: Pleasenote:iftheovenlight(Q)burnsout,youcancontinuetousetheappliancewithoutproblem.Toreplacethe
light, contact the manufacturer’s authorised Customer Services.
Please note: Pleasenote:whentheturntableblockisactivated,theovenlightremainsoduringcooking.Thisisperfectly
normal.
Table of contents
Other DèLonghi Microwave Oven manuals


Popular Microwave Oven manuals by other brands


Heinner
Heinner HMW-M2535BK instruction manual

Goldstar
Goldstar MAL783W Owner's manual & cooking guide

Lebensstil Kollektion
Lebensstil Kollektion LKMW-2301SS instruction manual

Tricity Bendix
Tricity Bendix im900 Operating and installation instructions

Samsung
Samsung MG23K3513 Series user manual

Bosch
Bosch HMV5051U use and care manual