8
Gracias por comprar nuestro instrumento de medición de distancia láser portátil.
Lea detenidamente los términos de seguridad y las instrucciones antes de utilizar este producto
1. REGLAS DE SEGURIDAD
• Lea el manual completo antes de comenzar a usar el dispositivo.
• Haga todo lo posible para no mirar directamente al rayo láser, independientemente de qué tan
baja sea la potencia del láser. Adoptar tal hábito le permitirá evitar consecuencias potencialmente
negativas en el futuro.
• El rayo láser debe apuntar solo en un plano horizontal, a un nivel mucho más bajo que la altura del
usuario para evitar la exposición accidental a los ojos. Además, el usuario no debe inclinarse hacia
adelante cuando trate de ver el rayo. Y el rayo debe rastrearse en una superficie mate con un coefi-
ciente de reflexión apropiadamente bajo.
• El rayo láser no debe ser obstruido por ningún objeto reflector al azar. Nota: los reflejos de las
superficies de relojes, anillos y otras piezas de joyería pueden ser igualmente peligrosos.
• No intente ninguna forma de cambiar el rendimiento del láser, ya que podría ocasionar el peligro
de la exposición al mismo. Encienda el láser solo cuando necesite usar el producto. Además, no
mire directamente a la luz láser. El medidor de distancia láser necesita protección en caso de que
sea utilizado por personal irrelevante.
• Mirar a través de binoculares u otro instrumento óptico a un rayo láser reflejado desde superficies
que actúan como un espejo (prismas, líquidos, superficies metálicas) puede dañar sus ojos.
• Los dispositivos láser no deben dejarse desatendidos cuando están encendidos. Si debe alejarse
de un dispositivo láser, una solución conveniente puede ser oscurecer el haz.
• Es difícil prever todo lo que podría pasar. Debe recordar que muchas personas perdieron la vista
debido a su negligencia y, en ocasiones, solo por pura casualidad. Lo más importante es ser cons-
ciente de las posibles consecuencias y usar el sentido común.
• Jugar con rayos láser colocando un punto de luz sobre personas o sobre materiales peligrosos
(por ejemplo, inflamables o reactivos) está prohibido.
• Para evitar el riesgo de incendio o electrocución, siga las reglas básicas de seguridad cuando use
aparatos y dispositivos eléctricos, particularmente en presencia de niños.
• No utilice el producto para otros fines que no sean los previstos.
• No use los electrodomésticos cuando tome un baño o una ducha.
• No irradies deliberadamente a nadie en la oscuridad.
• No use el dispositivo cerca de fuentes de calor (fuego de radiadores)
• No irradie sobre el objeto con alta superficie reflectante.
• No lo coloque en un lugar donde un niño pueda alcanzarlo.
• No repare los dispositivos sin autorización. Si está dañado, contáctese con los distribuidores
locales.
• No use los dispositivos en un ambiente inflamable y explosivo.
• No use los dispositivos cerca de instrumentos médicos, No use los dispositivos en un avión
• Desenchufe siempre el dispositivo (retire las pilas) cuando vaya a dejarlo desatendido o antes de
limpiarlo.
• No limpie el dispositivo con el uso de agentes de limpieza corrosivos.
• El dispositivo no es un juguete, no permita que los niños jueguen con el dispositivo.
• Proteja el dispositivo contra la penetración de agua u otros líquidos.
• ¡ADVERTENCIA! No mire los LED cuando la linterna está encendida. La luz emitida por los LED
puede dañar o irritar los ojos. No mire directamente a una fuente de luz con el uso de ningún dispo-
sitivo óptico que enfoque el haz de luz.
• Conserve el manual de instrucciones y el embalaje, si es posible
La medición de Pitágoras se realizará automáticamente y el resultado se mostrará en el área de
visualización principal.
2, Presione hasta que aparezca en la pantalla. Presione brevemente para obtener la
primera medición del borde del bisel, Y presione nuevamente para obtener la segunda medida,
Y presione para obtener la tercera medida, La medición de Pitágoras se realizará automática-
mente y el resultado se mostrará en el área de visualización principal.
3, Presione hasta que aparezca en pantalla. Presione brevemente para obtener la
primera medición del borde del bisel, Presione nuevamente y obtendrá la segunda medida, Y
presione para obtener la tercera medida del borde, La medición de Pitágoras se realizará
automáticamente y el resultado se mostrará en el área de visualización principal.
Aviso:
• Al medir bajo el patrón de Pitágoras, la longitud del borde del bisel debe ser más larga que el
borde del ángulo derecho, o el dispositivo mostrará un error.
Memoria de datos / almacenamiento de datos
Presione 2 segundos para entrar en la función de almacenamiento de datos, y aparecerá en
la pantalla. Puede consultar circularmente los 20 últimos datos. Presione el botón o presione
verifica los 20 datos uno por uno.
7. CONSEJOS DE CÓDIGOS Y FUNCIÓN
Durante el uso del instrumento, pueden aparecer las indicaciones siguientes:
Cómo configurar la máquina.
Presione el botón 3 segundos, Encontrará parpadeando, Presione el botón puede abrir
o cerrar el haz de luz. Continúe presionando para seleccionar.
CAL. Ajusta el valor de error. De -7 mm a 7 mm
BP. Encender o apagar el timbre
BL. Encender o apagar la retroalimentación
Od. Encender o apagar el tipo de aire libre.
Cómo establecer el borde de referencia
Presione el botón para elegir la posición desde la que se tomará la medida desde la parte
inferior o desde la parte superior del dispositivo.
Cómo configurar la unidad (mm / pulgada / pie)
Presione 3 segundos para cambiar la unidad de mm / pulgada / pie. El dispositivo recordará
la última unidad mostrada.
Símbolo de estado de la batería
Cuando se muestran todos los códigos de tres segmentos en las cajas de la batería, esto
indica que el nivel de la batería está relativamente lleno.
Los pocos códigos de segmento muestran el nivel más bajo de la batería. Cuando las cajas
están vacías, la batería debe ser reemplazada.
Función de borrado
Presione el botón para borrar el resultado de medición de una sola medición (área o volumen)
con la misma función para pasar a la siguiente medición.
Cómo configurar la retroalimentación
Presione el botón en 2 segundos, se encenderá o apagará la luz de fondo de la pantalla..
Símbolo de fuerza de la señal
Cuando las cinco señales simbolizan toda la pantalla, significa que la intensidad de la señal
de medición es alta. El menor número de señal significa la fuerza de la señal de medición más débil.
5. MEDIDA
Medición de señal
Cuando la luz del láser está apagada, presione el botón para encender la luz del láser. Entonces
el dispositivo estará funcionando. Presione otra vez, podrá obtener la medida. El dispositivo
guardará automáticamente el resultado de medición normal.
Medida continúa
Presione el botón para encender la luz láser. Y presione el botón 3 segundos, el dispositivo
comenzará la medición continua. Si desea detener la medición continua, deje de presionar el botón.
Durante la medición continua, el valor de medición en tiempo real se muestra en el área de visuali-
zación principal. Y el valor máximo (MAX) y el valor mínimo (MIN) se muestran en el área de visuali-
zación secundaria.
Cuando se realiza una medición continua en un patrón de medición general, el área de visualización
secundaria muestra el valor mínimo; cuando la medición continua en el patrón de medición funcio-
nal, las áreas de visualización secundarias muestran el valor predeterminado máximo de la medi-
ción de hipotenusa, y muestra el mínimo predeterminado de medición horizontal.
Presione el botón en 3 segundos, encontrará la memoria del valor máximo y el valor mínimo.
6. FUNCIÓN
Suma/Resta
La medición de la distancia, el área y el volumen individuales se puede medir a través de acumulati-
vo, regresivo mediante la suma / resta. Presione el botón y puede elegir la suma o la resta. El
símbolo operacional se mostrará en el área de visualización principal.
Cuando se elige el método de operación, el resultado de la medición se operará automáticamente
en el patrón de medición de distancia. El resultado se mostrará en el área de visualización principal,
y el último resultado de medición se mostrará en el área de visualización secundaria; en el patrón
de medición de área y volumen, presione el botón para obtener la medición. El resultado se
mostrará en el área de visualización principal y el último resultado de medición se mostrará en el
área de visualización secundaria.
Medición de área
Presione brevemente el botón hasta que se muestre en la pantalla. Presione para
obtener la primera medición, y luego presione para obtener la segunda medición. A continua-
ción, el dispositivo calculará el área automáticamente y el resultado se mostrará en el área de
visualización principal.
Medida de volumen
Presione brevemente el botón hasta que se muestre en la pantalla. Presione para
obtener la primer medida, y luego presione para obtener la segunda medida. Presione
para obtener la tercera medida. A continuación, el dispositivo calculará el cubo automáticamente y
el resultado se mostrará en el área de visualización principal.
Medición pitagórica
La medición pitagórica se usa para medir la distancia objetivo que no puede ser dirigida directa-
mente utilizando el teorema de Pitágoras.
1, Presione hasta a que aparezca en la pantalla. Presione brevemente para obtener la
primera medición del borde del bisel, Presione nuevamente para obtener la segunda medida.
2. DESCRIPCIÓN GENERAL
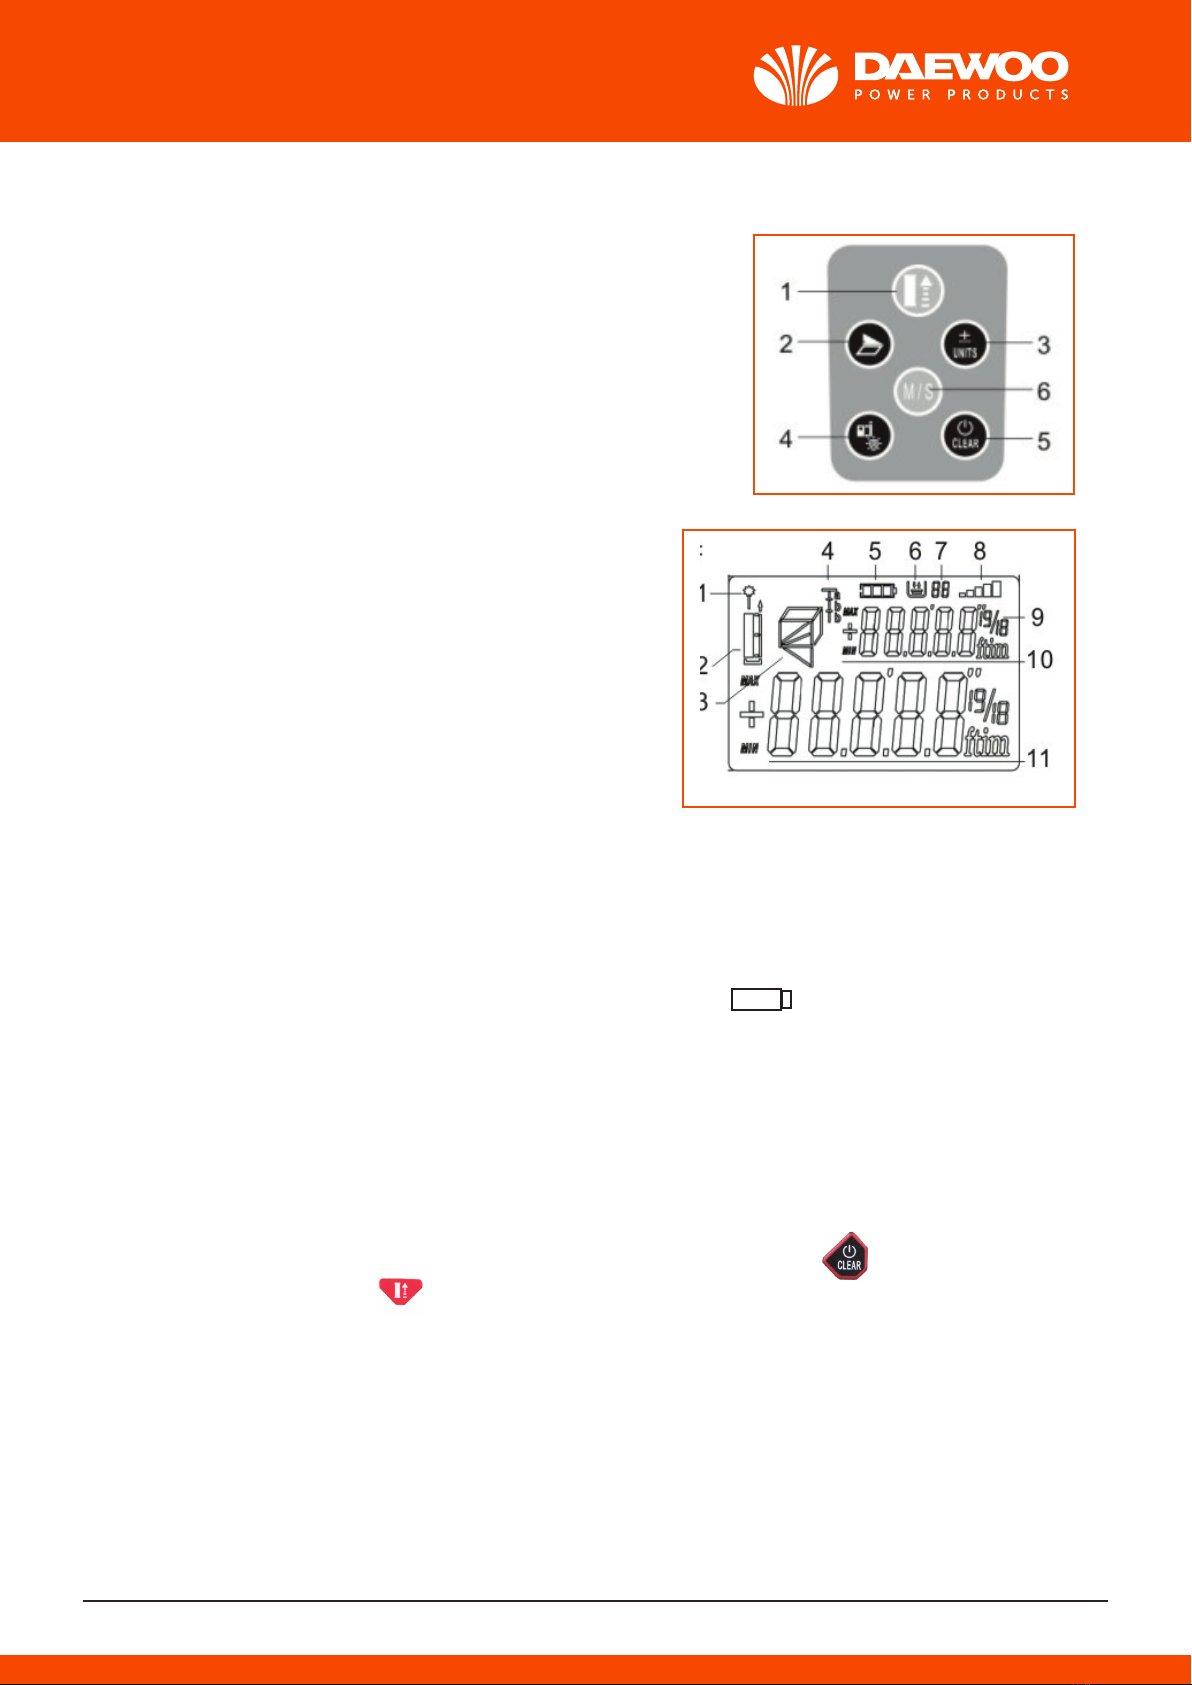
Teclado (ver la figura de la derecha)
1. Tecla de puesta en marcha / mediciones
2. Tecla de función desactivada de Área/volumen/tendido
3. Llave de suma y resta de la unidad
4. Llave Borde de referencia / pantalla LCD retro iluminada
5. Llave de borrado/apagado
6. Llave de selección de función de almacenamiento
Pantalla de visualización (ver la figura de la derecha)
1. Indicador láser encendido
2. Indicador de medición del borde de referencia
3. Indicador de despido de Área / volumen /
Piernas de un triángulo
4. Colocando indicador de función
5. Indicador de nivel de batería
6. Indicador de almacenamiento de datos
7. Indicador de fecha de almacenamiento
8. Indicador de fuerza de la señal
9. Indicador de unidad (incluida la potencia y el cubo)
10. Área de visualización secundaria
11. Área de visualización principal
3. POTENCIA
Instalar / reemplazar la batería
Abra la tapa de la batería y coloque la batería en el compartimento de la batería correctamente,
luego cierre la tapa.
Cuando el nivel de la batería es demasiado bajo, el indicador del nivel de la batería aparecerá en la
pantalla. Reemplace la batería nueva lo antes posible en este momento.
- Se sugiere usar una batería alcalina. De esta manera, la medida de la batería alcalina se reducirá
relativamente
- Cuando el medidor estará fuera de uso por un período prolongado, saque la batería.
4. OPERACIÓN
Encender o apagar la máquina
Cuando la batería está instalada el medidor se encenderá. Si presiona de manera prolongada
la máquina se apagará. Presione el botón cuando el medidor esté apagado y la máquina se
encenderá. La luz del láser y la retroiluminación se apagarán automáticamente en 60 segundos y
durante 6 minutos la máquina se apagará.
Thank you purchasing our Hand-held laser distance measuring instrument.
Please read the safety terms and instruction carefully before you use this products.
1. SAFETY RULES
• Please read the entire manual book before you start using the device.
• Make every effort not to look directly into the laser beam, irrespective of how low the laser power
is. Adopting such a habit will enable you to avoid potentially negative consequences in the future.
• The laser beam should point only on a horizontal plane, at a level much lower than the user’s
height. So as to avoid accidental eye exposure. Moreover, The user should not bend forward when
trying to see the beam. And the beam should be tracked on a matte surface with an appropriately
low reflection coefficient.
• The laser beam should not be obstructed by any random reflective objects. Note: reflections from
the surfaces of watches, rings and other pieces of jewellery may be equally dangerous.
• Don’t try any ways to change the performance of the laser, which would cause the danger arisen
by laser exposure. Turn on the laser only when you need to use the product. Besides, don’t look
straight at the laser light. The Laser Distance Meter needs safe keeping in case used by irrelevant
personnel.
• Looking through binoculars or another optical instrument at a laser beam reflected from surfaces
that act like a mirror(prisms, liquids, metallic surfaces)May harm your eyes.
• Laser devices should not be left unattended when they are on. If you must walk away from a laser
device, a convenient solution may be obscuring the beam.
• It is difficult to foresee everything that could happen. You need to remember that many people
have lost their sight because of their negligence, and sometimes just by pure chance. The most
important thing is to be aware of the possible consequences and to use common sense.
• Playing with laser beams by placing a dot of light on people or on dangerous(for example, flam-
mable or reactive) materials is prohibited.
• To avoid the risk of fire or electrocution, follow basic safety rules when using electric appliances
and devices, particularly in the presence of children.
• Do not use the product for purposes other than its intended use.
• Do not use the electrical appliances when taking a bath or a shower.
• Don’t irradiate anyone in darkness deliberately.
• Do not use the device near sources of heat(radiators fire)
• Don’t irradiate onto the object with high reflective surface.
• Don’t put it in the place where a child can reach it.
• Don’t repair the devices without authorization. If it is damaged, please contact with local dealers.
• Don’t use the devices in flammable and explosive environment.
• Don’t use the devices near medical instruments, Don’t use the devices a plane
• Always unplug the device (remove the batteries) when you are going to leave it unattended or
before cleaning.
• Do not clean the device with the use of corrosive cleaning agents.
• The device is not a toy, do not allow children to play with the device.
• Protect the device against penetration of water or other liquids.
• Warning! Do not look at the LEDs when the flashlight is on. The light emitted by the LEDs may
damage or irritate your eyes. Do not look directly at a source of light with the use of any optical
devices that focus the light beam.
• Retain the instruction manual and the packaging, if possible
2. OVERVIEW
Keyboard (see the right figure)
1. Starting up/ measurements key
2. Area/volume/Pythagorean/laying off function key
3. Addition/Subtraction /Unit key
4. Reference edge/ LCD Backlight Display Key
5. Clear/shutdown Key
6. Date storage/ function set key
Display screen (see the right figure)
1. Laser on indicator
2. Reference edge measuring indicator
3. Area/volume/ Legs of a triangle laying off indicator
4. Laying off function indicator
5. Battery Level indicator
6. Date storage indicator
7. Date storage number indicator
8. Signal strength indicator
9. Unit indicator (including power and cube)
10. Secondary display area
11. Main display area
3. POWER
Install / replace battery
Open the cover of the battery and put the battery into the battery compartment correctly, then close
the cover.
When the battery level is too low, the indicator for battery level will appear on the display.
Please replace new battery as soon as possible at this time.
• Alkaline battery is suggested being used. In this way, the measure of the alkaline battery will relati-
vely be reduced
• When the meter will be out of use for a long period, please take out the battery.
4. OPERATION
Turn on or Turn off the machine
When the battery is installed, the meter will be turn on. If you long press the machine will be
power off. Press the button when the meter is power off, and the machine will be turn on.
The laser light and the backlight will turn off automatically within 60 seconds and 6 minutes the
machine will be power off.
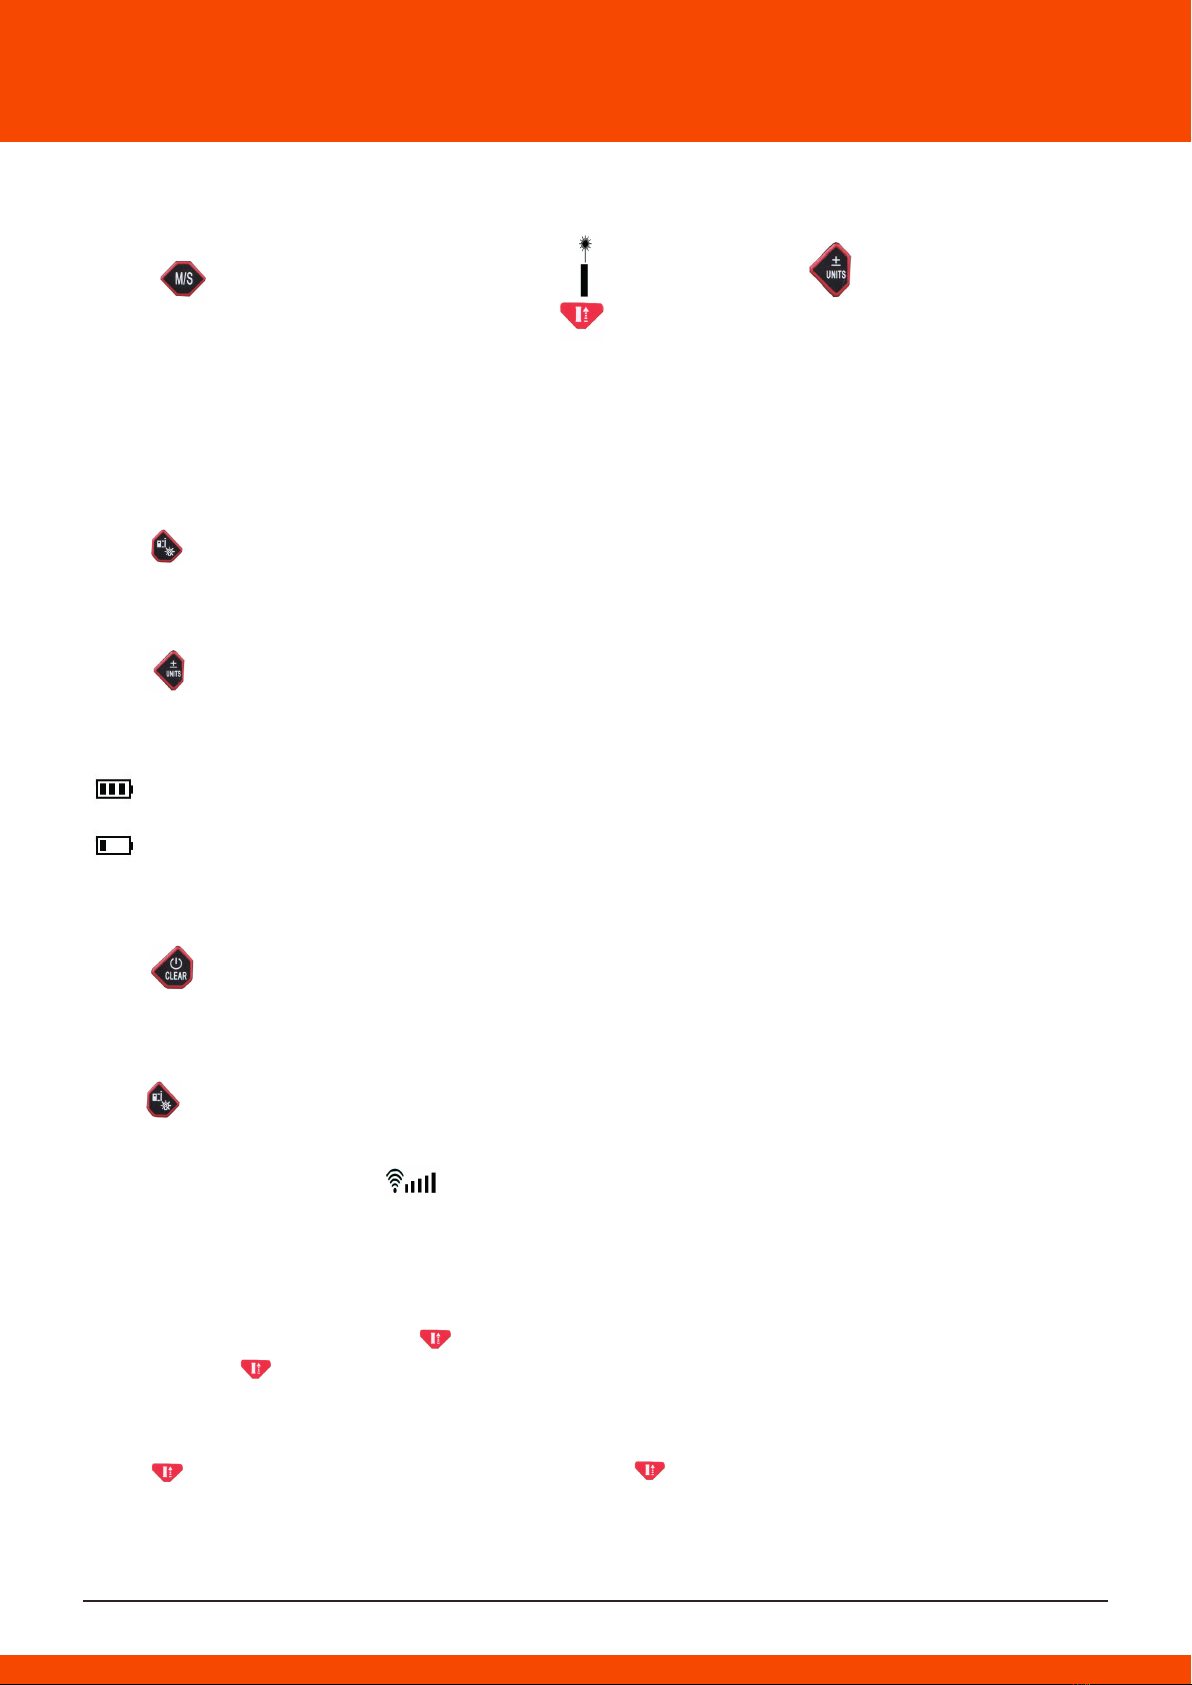
How to Set the machine.
Press button in 3 second, You will found is flickering, Press button you can set
open or close the Beam light. Continue Press button you choice to set the following function.
CAL. Adjust the error value. From -7mm to 7mm
BP. On or off the buzzer
BL. On or off the backlight
Od. On or off the outdoor type.
How to set the Reference edge
Press button to choose the position from which measurement is to be taken from the bottom or
from the top of the device.
How to set the Unit (mm/inch/ft)
Press 3 second you can change the unit from
mm / inch/ ft , The device will remember the last displayed unit.
Battery status symbol
When the three segment codes in the battery boxes all display, it indicates that the battery
level is relatively full.
The fewer segment codes displayed the lower battery level. When the boxes are empty, the
battery should be replaced.
Clear function
Press button it will be clear the measuring result of a single measurement (area or volume)
with same function in order to go to the next measurement.
How to set the backlight
Press button in 2 second, You will turn on or turn off the backlight of display.
Signal strength symbol
When the five signals symbol all displays, it means that the measuring signal strength is high.
The fewer signal symbol means the weaker measuring signal strength.
5. MEASUREMENT
Signal measurement
When the laser light is off, Press button will be turn on the laser light. Then the device will be
working. Press again you can got the measure. The device will save the normal measuring result
automatically.
Continuous measurement
Press button to turn on the laser light. And press button in 3 second, The device will be
start continuous measurement. If you want to stop continuous measurement, stop pressing the
button. During continuous measurement, the real time measurement value is shown in the main
display area. And the maximum value (MAX) and the minimum value (MIN) are displayed in the
secondary display area.
When continuous measurement in general measuring pattern, the secondary display area shows the
minimum value; when continuous measurement in functional measuring pattern, the secondary
display areas displays the maximum default of the hypotenuse measurement, and displays the
minimum default of horizontal measurement.
Press button in 3 second, You will found the memory of maximum value and the minimum value.
6. FUNCTION
Addition/Subtraction
The measurement of the single distance, area and the volume can be measured through cumulative,
regressive by the addition/subtraction. Press button you can choice addition and subtraction.
Operational symbol will be displayed in the main display area.
When the operation method is chosen, the measuring result will be operated automatically
In distance measuring pattern. The result will be shown in the main display area, and the latest
measuring result will be shown in the secondary display area; in area and volume measuring
pattern, press button to got the measurement. The result will be shown in the main display
area and the latest measuring result will be shown in the secondary display area.
Area measurement
Shortly press button until is show in the display. Press to got the first measurement,
and then press to got the second measurement. Then the device will be calculated the area
automatically and the result will be display in the main display area.
Volume measurement
Shortly press button until is show in the display. Press to got the first measurement,
and then press to got the second measurement. Press got the third measurement. Then the
device will be calculated the cube automatically and the result will be display in the main display
area.
Pythagorean measurement
Pythagorean measurement is used to measure the target distance that cannot be targeted directly
by using the Pythagorean theorem.
1. Press until is show in the display. Shortly press to got the first measurement of
bevel edge, And press again to got the second measurement of edge. The Pythagorean measu-
rement will be done automatically and the result will be display in the main display area.
2. Press until is show in the display. Shortly press got the first measurement of bevel
edge, and press again to got the second measurement of edge, And press to got the third
measurement of edge, The Pythagorean measurement will be done automatically and the result will
be display in the main display area.
3. Press until is show in the display. Shortly press to got the first measurement of
bevel edge, and press again to got the second measurement of edge, and press to got the
third measurement of edge, The Pythagorean measurement will be done automatically and the
result will be display in the main display area.
NOTICE:
• When measuring under the Pythagorean pattern, the length of bevel edge should be longer than
the right angle edge, Or the device will show an error.
Data Memory /Data Storage
Press in 2 second to enter into data storage function, and will show in the display. You can
circularly check the 20 latest data . Press button or Press button you check the 20 data
one by one.
7. TIPS CODE AND SOLUTION
During the use of the instrument, the instrument may appear the prompts as followed:
8. TECHNICAL SPECIFICATIONS
Max measuring distance: 60 m
Precision: +/- 2 mm
Min/Max measuring range: 0.03- 100 m
Batteries type: 2 AAA alkaline
Measuring time: 0.1-3 s
9. MAINTENANCE
Immersing the instrument into the water is forbidden. You can use wet and soft cloth to wipe dust
off. Don’t use erosive lotion. Clean the surface of the optical component (including the laser light
radiating window and the signal received lens) in accordance with the way used in cleaning the
glasses and the lens of cameral.
10. SERVICE
To better serve our customers, a warranty card is attached. Please keep it properly in order to enjoy
the service we deserved.
1. The product, if it is used properly without overhaul, enjoys 1- year after sales service since the
day purchased.
2. The products in the following condition can’t enjoy the warranty range:
A. The variation of network voltage is so great that the instrument is damaged.
B. The instrument is damaged by the overused or artificial reason.
C. The instrument is damaged by the vibration during transportation.
3. The user without warranty cards will be charged according to the circumstance.
4. When the user needs warranty service, he should fulfill the warranty card carefully and send to
the company.
11. STORAGE AND TRANSPORTATION
The appliance must be cleaned as described and left until it is completely dry.
It is recommended that the device be stored in its original packaging.
Protect the device against vibration and shock during transport.
12. DISPOSAL
All the packaging materials are recyclable and labeled as such. Dispose of the packaging in accor-
dance with local regulations.
The packaging materials should be kept away from children, as these materials could pose a
hazard.
Correct disposal of the appliance.
1. According to the WEEE Directive(2012/19/UE), the crossed-out wheelie bin symbol(shown on the
left)is used to label all electric and electronic devices requiring segregation.
2. Do not dispose of the spent product with domestic waste: hand it over to an electric and electro-
nic device collection and recycling centre. The crossed-out wheelie bin symbol placed on product,
instruction manual or package communicates this requirement.
3. Plastics contained in the device can be recycled in accordance with the specific marking. By
recycling materials and spent equipment you will help to protect the environment.
4. Information on electric and electronic devices collection centre is available from local government
agencies or from the dealer.
5. Worn out and dead batteries must be discarded in specially marked containers, delivered to
special waste collection points or to electronic equipment vendors.
13. CE DECLARATION OF CONFORMITY
The device has been designed, manufactured and marketed in compliance with the EMC
Directive(2014/30/EU). Therefore, the product bears the “CE” mark and has a declaration of confor-
mity, which is available to market supervision agencies for inspection.