Daewoo BM090 User manual

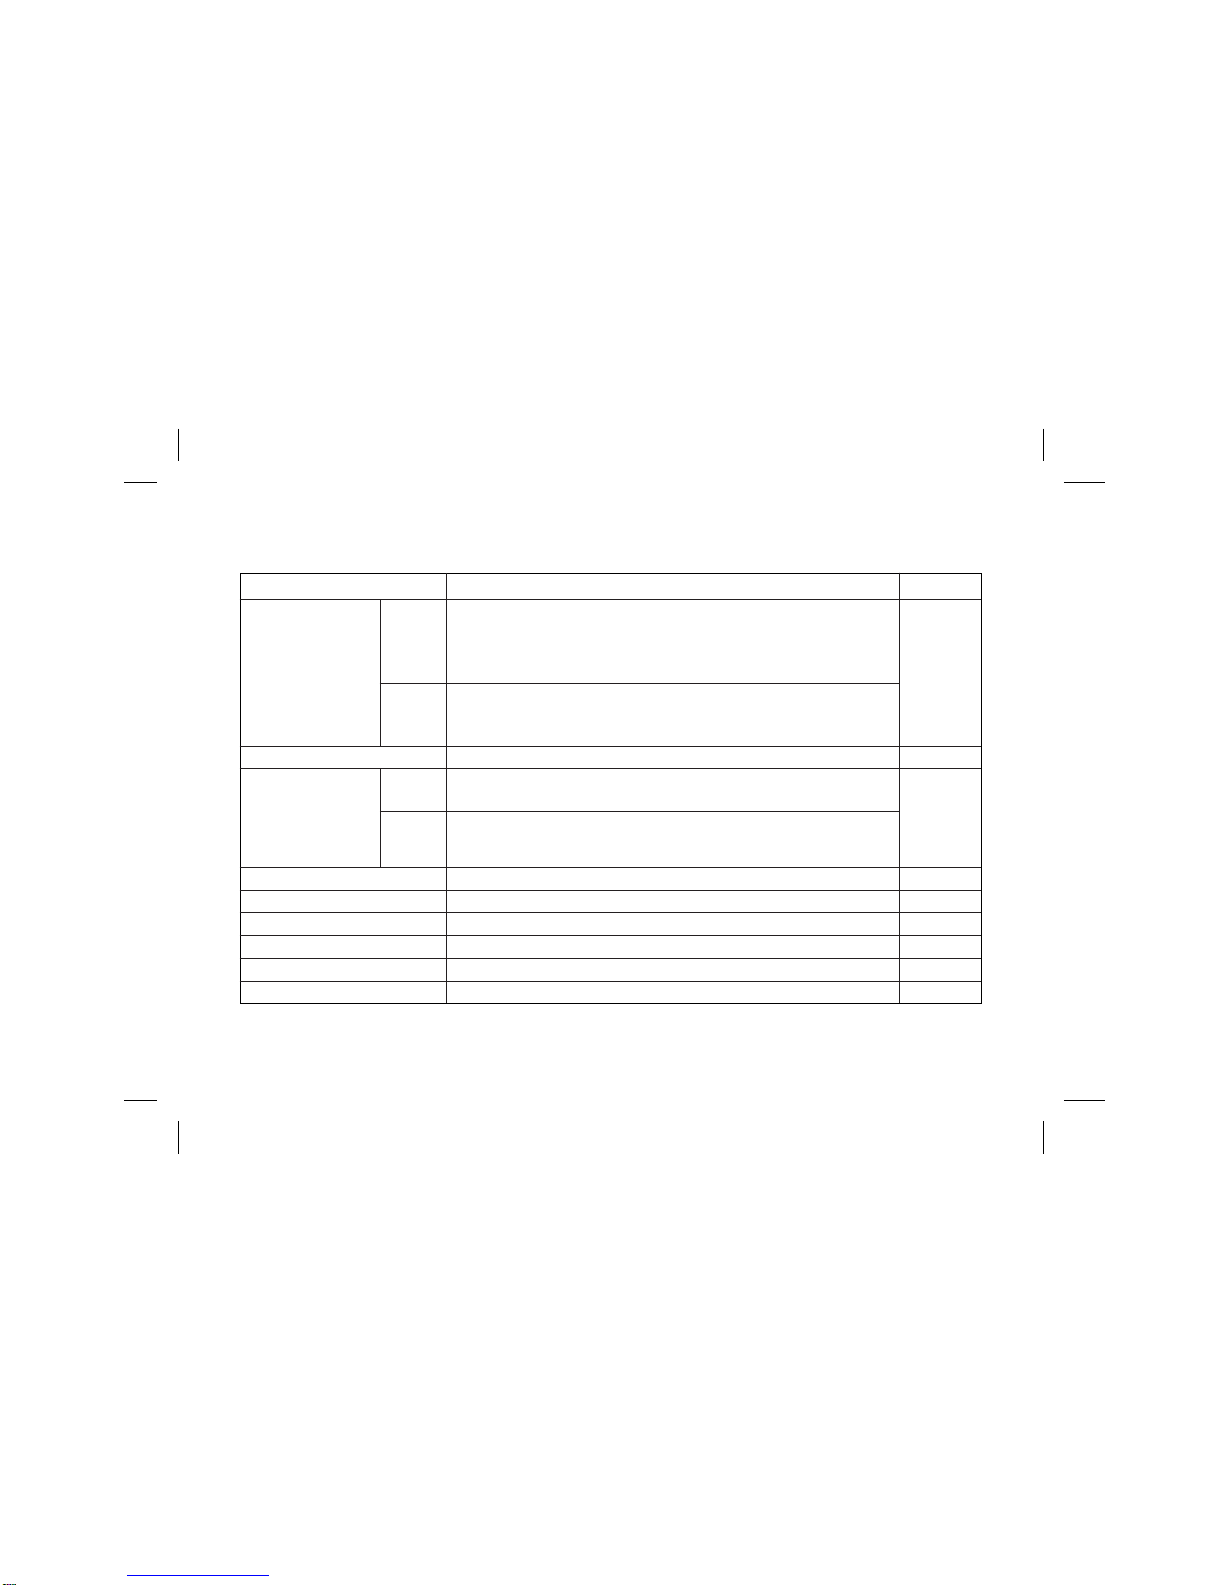
D1146 Primary filter:clean at every 5,000km,change at every 15,000km there
Change at every 20,000km. 166Page
Valve clearance Adjust at end of first 1,000km and every 20,000km there after. 171 Page
Air cleaner Clean at every 4,000km, change at every 12,000km there after. 176 Page
Transmission oil Change at end of first 5,000km and every 20,000km there after. 178 Page
Rear axle oil Change at end of first 5,000km and every 20,000km there after. 179 Page
Power steering oil Change at end of first 1,000km and every 24,000km there after. 180 Page
Power steering filter Change at end of first 1,000km and every 24,000km there after. 182 Page
IMPORTANT SERVICE ACTIVITIES
ҧAny failure resulting from a lack of normal maintenance as the maintenance service chart in this manual is not covered
by warranty.
CHECK ITEMS CHECK AND SERVICE INTERVALS PAGE
Engine oil 163 Page
Change : At end of first 1,000km,
long distance : every 30,000km
short distance : every 20,000km
D1146Ti
DE08TiS
DE12/T/Ti/TiS
Fuel filter
D1146
D1146Ti
DE12
DE12T
DE12Ti
Primary filter : clean at every 5,000km,
change at every 15,000km there after.
secondary filter : change at every 5,000km.
Engine oil filter Change with engine oil 164Page
DE08TiS
DE12TiS
Change : At end of first 1,000km,
High-speed, long distance : every 15,000km
In city, short distance : every 10,000km

This manual has been prepared to acquaint you with the operation and maintenance of your DAEWOO
BUSES and the provide important safety information. We urge you to read it carefully and follow the
recommendations to help assure the most enjoyable, safe and troublefree operation of your vehicle.
When it comes to service, remember that your DAEWOO dealer knows your vehicle best and is
interested in your complete satisfaction.
We would like to take this opportunity to thank you for choosing a DAEWOO product and assure
you of our continuing interest in your motoring pleasure and satisfaction.
This manual should be considered as a permanent part of your vehicle, and must remain with the
vehicle at the time of resale.
All information, illustrations and specifications contained in this manual are based on the latest product
information available at time of publication.
The right is reserved to make changes at any time without notice.
FOREWORD

1
1. IMPORTANT INFORMATIONŋŋŋŋŋŋŋŋŋŋŋŋŋŋŋŋŋŋŋŋŋŋŋŋŋŋŋŋŋŋŋŋŋŋŋŋŋŋŋŋŋŋŋŋŋŋŋŋŋŋŋŋŋŋŋŋŋŋŋŋŋŋŋŋŋŋŋŋŋŋŋŋŋŋŋŋŋŋŋŋŋŋŋŋŋŋŋ 2
2. OPERATION AND CARE OF NEW VEHICLEŋŋŋŋŋŋŋŋŋŋŋŋŋŋŋŋŋŋŋŋŋŋŋŋŋŋŋŋŋŋŋŋŋŋŋŋŋŋŋŋŋŋŋŋŋŋŋŋŋŋŋŋŋŋŋŋŋŋŋŋŋŋŋŋŋŋ 4
3. GETTING ON AND OFF, DRIVER’S SEAT AND BELT ŋŋŋŋŋŋŋŋŋŋŋŋŋŋŋŋŋŋŋŋŋŋŋŋŋŋŋŋŋŋŋŋŋŋŋŋŋŋŋŋŋŋŋŋŋŋŋŋŋŋŋŋŋŋ 6
4. INSTRUMENT, SWITCHES AND CONTROLSŋŋŋŋŋŋŋŋŋŋŋŋŋŋŋŋŋŋŋŋŋŋŋŋŋŋŋŋŋŋŋŋŋŋŋŋŋŋŋŋŋŋŋŋŋŋŋŋŋŋŋŋŋŋŋŋŋŋŋŋŋŋŋŋŋ 14
5. DRIVINGŋŋŋŋŋŋŋŋŋŋŋŋŋŋŋŋŋŋŋŋŋŋŋŋŋŋŋŋŋŋŋŋŋŋŋŋŋŋŋŋŋŋŋŋŋŋŋŋŋŋŋŋŋŋŋŋŋŋŋŋŋŋŋŋŋŋŋŋŋŋŋŋŋŋŋŋŋŋŋŋŋŋŋŋŋŋŋŋŋŋŋŋŋŋŋŋŋŋŋŋŋŋŋŋŋŋŋŋ 135
6. INSPECTION AND MAINTENANCEŋŋŋŋŋŋŋŋŋŋŋŋŋŋŋŋŋŋŋŋŋŋŋŋŋŋŋŋŋŋŋŋŋŋŋŋŋŋŋŋŋŋŋŋŋŋŋŋŋŋŋŋŋŋŋŋŋŋŋŋŋŋŋŋŋŋŋŋŋŋŋŋŋŋŋŋ 162
7. LUBRICATION ŋŋŋŋŋŋŋŋŋŋŋŋŋŋŋŋŋŋŋŋŋŋŋŋŋŋŋŋŋŋŋŋŋŋŋŋŋŋŋŋŋŋŋŋŋŋŋŋŋŋŋŋŋŋŋŋŋŋŋŋŋŋŋŋŋŋŋŋŋŋŋŋŋŋŋŋŋŋŋŋŋŋŋŋŋŋŋŋŋŋŋŋŋŋŋŋŋŋŋŋŋ 213
8. SCHEDULED MAINTENANCE SERVICEŋŋŋŋŋŋŋŋŋŋŋŋŋŋŋŋŋŋŋŋŋŋŋŋŋŋŋŋŋŋŋŋŋŋŋŋŋŋŋŋŋŋŋŋŋŋŋŋŋŋŋŋŋŋŋŋŋŋŋŋŋŋŋŋŋŋŋŋŋŋ 221
9. TROUBLESHOOTINGŋŋŋŋŋŋŋŋŋŋŋŋŋŋŋŋŋŋŋŋŋŋŋŋŋŋŋŋŋŋŋŋŋŋŋŋŋŋŋŋŋŋŋŋŋŋŋŋŋŋŋŋŋŋŋŋŋŋŋŋŋŋŋŋŋŋŋŋŋŋŋŋŋŋŋŋŋŋŋŋŋŋŋŋŋŋŋŋŋŋŋŋŋ 225
10. MAIN DATA AND SPECIFICATIONŋŋŋŋŋŋŋŋŋŋŋŋŋŋŋŋŋŋŋŋŋŋŋŋŋŋŋŋŋŋŋŋŋŋŋŋŋŋŋŋŋŋŋŋŋŋŋŋŋŋŋŋŋŋŋŋŋŋŋŋŋŋŋŋŋŋŋŋŋŋŋŋŋŋŋŋ 234
11. BODY DIMENSION ŋŋŋŋŋŋŋŋŋŋŋŋŋŋŋŋŋŋŋŋŋŋŋŋŋŋŋŋŋŋŋŋŋŋŋŋŋŋŋŋŋŋŋŋŋŋŋŋŋŋŋŋŋŋŋŋŋŋŋŋŋŋŋŋŋŋŋŋŋŋŋŋŋŋŋŋŋŋŋŋŋŋŋŋŋŋŋŋŋŋŋŋŋŋŋ 253
TABLE OF CONTENTS

2
IMPORTANT INFORMATION
LOCATION OF ENGINE NUMBER AND CHASSIS NUMBER
It is advisable to keep note of the engine number and chassis number as they are required when contacting your deal-
er for repair services and parts order.
V.I.N plate
V.I.N(Vehicle identification Number)
plate is attached to the inner panel
above the front door.
Type A : Applicable for vehicles in
all countries except GCC
members.
V.I.N plate
V.I.N(Vehicle identification Number)
plate is attached to the inner panel
above the front door.
Type B : Applicable for vehicles in
GCC members.
Chassis number
The chassis number is stamped on
the upper face of the chassis frame
within the engine compartment.

3
Engine number Key
There are three types of key for the
bus ;
• Engine starting
• Mechanical locking for entrance
door (OPTION)
• Doors
– Entrance door operating
– Luggage doors (OPTION)
– Rear engine door (OPTION)
– Side engine doors (OPTION)
– Battery inspection door (OPTION)
–
Fuel tank inspection door (OPTION)
– Fuel inlet flap door (OPTION)
The keys are not interchangeable, but
door lock keys are interchangeable.
The code number of each key is
stamped on the key.
Record the key number and keep it
in a safe place.
In the event that the original key is
lost, duplicating can be done using
the key code information.
Engine No.
1378

4
OPERATION AND CARE OF NEW VEHICLE
It is important to observe the follow-
ing precautions as operation and care
of the vehicle, particularly during the
break–in period have a strong influ-
ence over the performance and ser-
vice life of the vehicle.
1. Start and let the engine idle until
it becomes thoroughly warmed up
and coolant temperature increases
beyond 50°C (or 125°F) before
starting off.
2. Avoid racing the engine, abrupt
starts and hard stops.
3. Avoid over loading the vehicle dur-
ing and after the break–in period.
Over loading
Over loading not only shortens the
service life of your vehicle but also
create serious potential safety haz-
ards.
The weight of payload must be limit-
ed within the GVW rating and distrib-
uted over the front and rear axles so
as not to exceed the axle capacities.
Refer to “MAIN DATA AND SPECIFI-
CATION” for GVW and Axle capaci-
ty.
Maintenance
In order to maintain safe and depend-
able vehicle operation, inspection and
adjustment should be performed as
outlined in “INSPECTION AND MAIN-
TENANCE”.
Your DAEWOO dealer is willing to
perform regular maintenance opera-
tion on your vehicle.

5
Engine oil change
Change engine oil filter catridge to new one at the
same time with engine oil.
Maximum engine speed
During the initial milage(Break–in period : 2,000km),
confine engine speed to 70% of the maximum and
scan the tachometer as you drive to prevent engine
over–running.
After the break–in period, increase the engine speed
gradually to complete running–in of the vital parts.
Engine Model Change Interval
D1146 At end of first 1,000km
D1146Ti High–speed, long distance :
DE12Ti every 15,000km
DE12TiIn city, short distance :
DE12Ti every 10,000km
DE08TiS At end of first 1,000Km
Long distance : every 30,000km
DE12TiS short distance : every 20,000km

6
GETTING ON AND OFF, DRIVER’S SEAT AND BELT
DOOR OPENING AND CLOSING
(Applicable for vehicles in all
entrance door with mechanical key)
When opening the front door to get
in, first unlock the mechanical key on
the entrance door and operate the
entrance key on the right side of the
front middle panel.
When closing the front door to get
off, open the front door by operating
the door control switch and get off.
In the outside of bus, close the door
with the key and look the mechanical
key on the entrance door not to be
opened in case of air leaking.
(Applicable for vehicles in all
entrance door except mechanical key)
When opening the front door to get
in, operate the entrance key on the
right side of the froot middle panel.
When closing the front door to get
off, open the front door by operating
the door control switch and get off.
In the outside of bus, close the door
with the key.
I
D
L
I
N
G
H
.
.
L
Before operating entrance key, unlock
mechanical key on door frame.
NOTICE
When opening front entrance door for a long time, setting emergency valve
at manual position and put control switch in close position. When returning
to automatic condition, putting control switch and door in same condition
and set emergency valve at automatic position.
CAUTION
(Type A : Toggle switch) (Type B : One touch switch)

7
MANUAL OPENING AND
CLOSING
Type A : Select type
As setting the “Auto–Manual” change
lever installed right, lower inner side
of front panel(beside of driver’s right
leg), the door can be opened and
closed by hands.
Type B :
Push/Pull or rotary type (OPTION)
As setting the "Auto-Manual" change
knobs are installed two types. One of
the types installed inner upper panel
the entrance door operated by air.
Other installed outer mid panel on left
side of door operated by electric push
button. the door can be opened and
closed by hands.
I
D
L
I
N
G
H
.
.
L
(Push/Pull type) (Rotary type)

8
Adjustment of Fixed type (S-104H) (BM090, BS090)
1. Back angle adjustment
To adjust the seat back, turn No. 1 handle, and lean
backwards and foreward until desired angle is
achieved.
2. Slide adjustment
To move the seat forward and backward.
Pull No. 2 lever, forward and slide the seat.
3. Height (Tilting) adjustment
Desired the seal height can be achieved by puling
No. 3 lever upward and downward.
2
1
2
3
1
DRIVER’S SEAT AND BELT

9
How to use non suspension seat
Semi suspension seat can be infinitly adjusted to suit the weight of the driver.
Height Adjustment Back Angle
Slide Adjustment

10
Adjustment of Air suspension type driver’s
seat (S-110A) (BS106, BH113/115/120E, BV120)
1. Slide adjustment
To move the seat forward or rearward, pull No. 1 lever
upwards and the slide the seat.
2. Back angle adjustment
To adjust the seat back, pull No. 2 lever and lean
backwards or forewards until the desired angle is
achieved.
3. Height and slope adjustment
Desired seat height can be achieved by pulling No. 3
lever.
4. Upper lumbar support air cushion adjustment.
4. Lower button is for inflation, upper button is for defl-
4. ation
5. Lower lumbar support air cushion adjustment.
Push the lumbar support air cushion adjustment but-
ton to suit seating position.
4. Lower button is for inflation, upper button is for defl-
4. ation
6. Air suspension stroke support air undercushion adjust-
ment
ř
Do not adjust the driver’s seat while driving.
Ś
2
2
4
4
5
33
6
1
5
4
1
Adjustment of Air suspension type driver’s seat (S-110A)
(BH090, BS106, BH115E, BH120E) (BM090/BS090 : OPTION)

11
How to use air suspension seat
Air suspension seat can be infinitly adjusted to suit the weight of the driver.
Height Adjustment Tilt Adjustment(RR) Tilt Adjustment(FRT) Back Angle
Lumbar Support(Lower)Lumbar Support(Upper)Slide Adjustment

12
The vehicle is equipped with three point type(driver’s)
and reel type(passenger’s)
Every person who drives or rides in this vehicle
should wear a seat belt at all time.
The buzzer will sound, if the driver’s seat belt is not
fastened when the ignition switch is turned to the
“ON” position.
1) Pull the belt evenly out of the retractor and guide
it across the body making certain that it is not
twisted.
The seatback should not be in a reclining position
anymore than needed for comfort.
2) Insert the metal latch plate ڹinto the buckle ں.
3) To remove the belt, depress the red push button
on the buckle.
And the belt wil roll up automatically.
4) When the driver’s seat belt is not in use, adjust
the latch plate ڹwithin 10
cm
from the seat loop.
The belt must not be twisted when fitted.
Do not wear the shoulder belt across the neck or
under your outer arm.
Seat Belts
1
2

13
Seat belt warning lamp
The seat belt warning lamp comes on
when the ignition switch is placed in
the “ON” position unless the driver’s
seat belt is securely fastened.
Pilot indicator lamps
1. Never use the belt for more
than one person at a time.
2. Never wear the belts twisted.
3. Make sure seat belts or their
attachments not to be thrusted
in metal parts of the seat or
the door.
4. Seat belts should be adjusted
as firmly as possible.
5. Do not wear seat belts low
under your shoulder.
6. If you replace your seat belts
incorrectly, you may by injured
by hardware of the belts at
sudden stops.
7. Do not wear your seat belts
with hard or breakable objects
such as glasses, pens, etc. put
into the pocket of your upper
garment.
NOTICE
1. Periodically inspect all parts of
the belts and replace any dam-
aged parts.
2. Make sure that the belts are
not to be damaged by sharp
edged objects.
3. The belts should be changed if
webbing has become frayed or
damaged.
4. Check if fixing bolts have been
firmly installed to the floor.
5. Always keep the seat belts
clean and dry.
6. Clean only with tepid soapy
water.
7. Do not bleach or dye seat
belts.
CAUTION

14
INSTRUMENTS, SWITCHES AND CONTROLS
11
18
202223
24
27
26
30
29
25 56
798 21 13 17 10
1
2
3
4
14
19
15
32
12
31
28

15
ҧThe quantities or locations of switches could be different from the figure, because the switches could be added or
omitted, or locations could be changed by the requirements of customers.
LEGEND OF INSTRUMENT PANEL AND OTHER DEVICES
No. Description No. Description No. Description
1Voltage meter
2
Engine coolant temperature gauge
3Fuel gauge–Engine
4Engine oil pressure
5Air pressure gauge
6Upper pilot lamps
7Engine RPM gauge
8Lower pilot lamps
9Tachograph (OPTION)
Speedometer (OPTION)
10 Door opening switch (FRT)
11 Door opening switch(MID) (OPT)
12 Microphone stand
13 Radio & Cassette player
14 Switches
15 Door opening switch(RR) (OPT)
17 Defroster controller
18 Engine idling knob
19 Shift lever
(Except auto transmission)
20 Accelerator pedal
21 Wiper control and exhaust
brake lever
22 Brake pedal
23 Horn switch
24 Bulb check
25 Steering wheel
26 Head & Direction lamp lever
27 Clutch pedal
28 Valve–cab control
29 Clutch oil reservoir
30 Control panel (OPTION)
31 Door controller
32 Cup holder (BM090, BS106)

16
ATTACHMENTS OF STEERING COLUMN
Steering wheel and horn button
The steering wheel should not be
turned while the vehicle is stationary
as it adversely affects the tires and
steering system.
Horn button is equipped on the mid-
dle of steering wheel.
Steering wheel adjustment
Type A : Tilt & Telescopic
(BH115E,BH120E)
(BM090/BS090/BS106 : OPTION)
Adjust the steering wheel to the
desired position after pulling lock
lever.
Adjusting angle : 8°
Travel : 40mm
Type B : Fixed (BM090, BS106)
Starter switch
Starter switch operates in the 4
stages as follows :
ҮLOCK :The key can be inserted or
removed only when the switch is in
this position.
ҮACC :This position turns on the
radio, digital clock, cigarette lighter
and consent.
unlock
3°
5°
lock
20mm
20mm

17
ҮON :This position turns on the
electrical equipment. During the
vehicle operation, hold the key in
this position.
ҧWhen the key is in “ON” position,
the engine is automatically pre-
heated according to outdoor tem-
perature. Pre–heater warning
lamp blinks for 0.3 second at a
higher temperature(coolant temp. :
above 25°
C
) and for 18 seconds
at a lower temperature(coolant
temp.: below 25°
C
), during
which the engine is preheated for
20 seconds.
ҮSTART :Once the engine is start-
ed, it is preheated automatically
according to outdoor temperature
(until coolant temperature becomes
25°
C
or up to 6 minutes). This
improves the engine condition.
Turn signal switch
Move this combination switch lever in
the desired direction so that the cor-
responding turn signal lamp operates
and causes the turn signal indicator
lamp on the instrument panel to flash.
The switch lever returns automatical-
ly to the neutral position when the
steering wheel is returned to the
reverse direction. When head lamp
switch is in 2nd stage simultaneously
with turn signal lamp “ON”, cornering
lamp also comes on.
LOCK
ACC ON START
Pilot indicator lamps
Ү
Once the engine started,
release the key immediately.
Ү
Do not exceed 10 seconds for
the operation of starter.
Ү
Gearshift lever should be in
neutral position when attempting
to start the engine.
CAUTION

18
High beam switch
When the head lamps are on, pulling
the lever down lights up not only the
head lamps with high beam but also
the high beam indicator lamp. When
pulling it up, head lamps with low
beam are on.
Passing lamp switch
To light up passing lamps at any
time, pull up the lever towards the
steering wheel.
The lever will return to the OFF posi-
tion when released.
Lamp switch(turn type)
Lamp switch operates in two stages
as follows :
1st stage : tail lamp, license plate
lamp, instrument panel
lamp, clearance lamp
2nd stage : tail lamp, license plate
lamp, instrument panel
lamp, clearance lamp,
head lamp, cornering
lamp(simultaneously with
turn signal lamp “ON”)
Windshield wiper switch
The windshield wiper switch has 3
positions to control the windshield
wiper.
1. OFF ˞Off
2. INT ˞Intermittent wipe
3. LO ˞Continuous wipe, slow speed
4. HI ˞Continuous wipe, fast speed
high beam
(passing)
high beam
low beam
2nd stage
1st stage
OFF 1
2
3
4
Do not operate the wipers when the
windshield remains dry. They may
scratch the windshield glass. Do not
operate the wipers if they are cov-
ered with snow or ice as this may
damage the wiper system.
NOTICE
This manual suits for next models
5
Table of contents
Other Daewoo Other manuals