Dalxo EB-67ERCD9-11BC54T User manual

1
Electric Wall Oven
Model: EB-67ERCD9-11BC54T
Dalxo User Manual
Please read the instruction carefully before usage. If you have any problems,
please do not hesitate to contact our service team: support@dalxo.com

Table of Contents
Introduction..........................................................................................................................1
Important Safety Tips..........................................................................................................3
Parts List...............................................................................................................................6
Installation Electric Wall Oven...........................................................................................7
Using the Electric Wall Oven.............................................................................................13
Cleaning & Maintenance....................................................................................................20
Troubleshooting...................................................................................................................22
Warranty..............................................................................................................................23

1
Electric Wall Oven
Model: EB-67ERCD9-11BC54T
Introduction
Congratulations on Your Purchase of the Dalxo’s Single Wall Oven
24” electric ovens are made with stainless steel finishes and triple-layer tempered glass
doors. The large capacity of 2.6 cubic feet meet your needs for cooking multiple foods
simultaneously. 11 practical functions are provided. In convection mode, it cooks
evenly and heats up faster than normal ovens. Use our rotating forks to help you 360°
roast a golden crispy turkey, practical and efficient on Thanksgiving. Plus, there are
over-temperature protectors to ensure your safety and a 24hrs timer reminds you to
turn it off when the time comes to prevent the food from scorching.
Hope that you will enjoy the use of Dalxo's oven for many years to come. Perfect for
kitchens, islands and mobile homes, useful for children family with a safety lock.
Moreover, if you have an apartment to rent, our stylish built-in ovens complement the
kitchen perfectly to attract more tenants.
We take great pride in providing you with the highest quality products and superior
service and support.
Parameter Specifications
Dimensions
Cut Out
Voltage/
Frequency
Material
Capacity
Rated
Power
Max
Temp
Timer
23.4’’L*23.4”
W’’*21.5’’H
22.05’’L*23.19
W’’*21.65’’H
220V/60Hz
Stainless Steel
finish+Tempered
Gass door
2.6 cu. ft
2700-
3220W
440℉
24 Hrs
User Manual

2
The single-phase alternating current of the oven is 220-240V 50Hz. In any event, you should
always check the nameplate specifications affixed to the machine before installing the
equipment.
Power of the Heating Tube & Light
Lower Heating El.
1200W
Circle Heating El.
2100W
Total Upper Heating El.
1000W+1900W
Upper Inside Heating El.
1900W
Upper Outside Heating El.
1000W
Oven Light
15W
/
Power of the Heating Motor
Synchromotor
4W
Shaded Pole
25W
Exhaust Blower
15W

3
Important Safety Tips
Please read and understand the following safety tips prior to using your product.
Recommend asking a professional electrician to install the single wall oven.
The oven heats up when it is running. For your child's safety, do not approach the
glass door.
Be careful not to leave packing materials within the reach of children as a safety hazard, such as
plastic sheeting, expanded polystyrene.
Important: Do not use the oven door handle as a moving tool, e.g to remove it from its
packaging.
When the oven is turned on for the first time, acrid smoke may appear. This is due to the
heating of the adhesive used on the insulation boards around the oven. It is normal phenomenon.
If this happens, just be patient and wait until the smoke is gone before placing the food in the
oven. Never roast or bake on the oven base.
Good Habits of Safety Awareness
This device is designed for non-professional home use, and its functions
should not be changed at will.
The electrical system of this equipment can only be used safely if it is
properly connected to a standard grounding.
The manufacturer is not responsible for any damage caused by incorrect
installation or unreasonable use of the equipment.

4
A qualified person must be contacted in the following cases:
The following items are potentially dangerous and appropriate measures must be taken to
keep children and the disabled out of the reach:
Controls and general appliances;
Package, such as bags, polystyrene, nails, etc;
Electrical appliances when they are no longer in use, especially potentially hazardous
parts.
Warning: Accessible parts become hot during use. To avoid burns and scalds,
keep children away.The product will become hot in use, attention should be
taken to avoid touching the heating elements in the oven.
Avoid the Following Situations:
The wet body comes into contact with the appliance.
Using the appliance when barefoot.
Pull the appliance or power cord to unplug it from the power outlet.
Block ventilation or cooling slots.
Allow power supply cords of small appliances to contact with the hot parts of the unit.
Exposing the appliance to atmospheric agents , like rain or sun.
Use the oven as storage.
Use flammable liquids near the appliance.
Using adaptors, multiple sockets or extension cords;
Attempt to install or repair equipment without the assistance of qualified personnel.
Important: Do not use harsh abrasive cleaners or sharp metal scrapers to
clean glass door, as they will scratch the surface to shatter.

5
A qualified person must be contacted in the following cases:
Install according to the instructions;
When in doubt about operating the equipment;
When the power socket is not compatible with the electrical plug, the power socket
needs to be replaced, when it is not compatible with the electrical plug.
Service Center authorized by the manufacturer must be contacted in the following:
If there is doubt about the integrity of the device after it has been removed from the
packaging;
If the power cord is damaged or needs to be replaced;
If the equipment occurs to malfunctions or unnormal function, you need to ask for original
spare parts.
It is a good idea to do the following:
Only use the appliance to cook food instead other;
Check the condition of the appliance after it has been unpacked;
Before cleaning or performing maintenance, if the device is not working properly, unplug it
from the power source;
Unplug the appliance and turn off the gas cock when the appliance is not in use for a long
time;
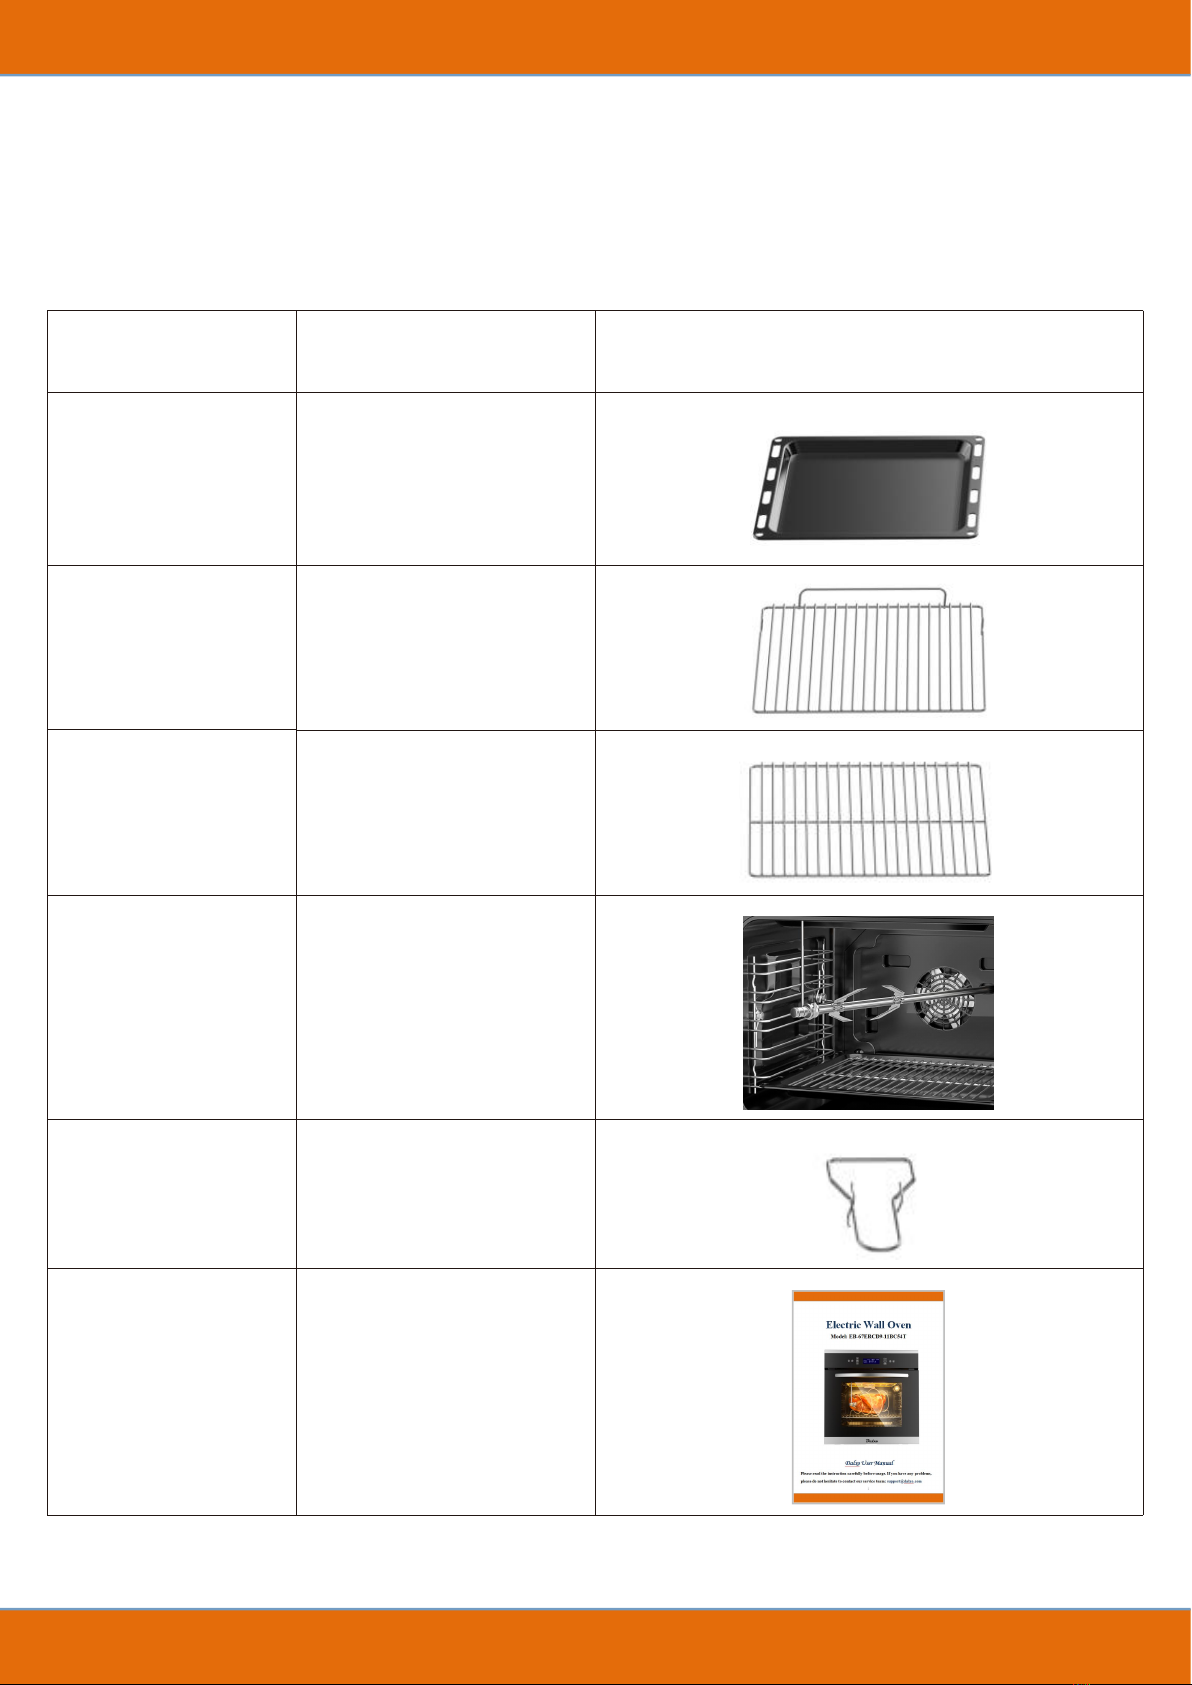
Remove the cookware from the oven using the cooking pull handle or gloves;
Always grasp the oven door in the centre because the ends may be hot due to the escape of
hot air;
Make sure the control knob is at the "o" setting when the device is not in use;
Unplug the appliance when you decide not to use it any longer.

6
Parts List
Parts
Number
Diagram
Tray
1pcs
Large Grill
1pcs
Small Grill
1pcs
Rotisserie Fork
1pcs
Pull Handle
1pcs
Manual
1pcs

7
Installation Electric Wall Oven
IMPORTANT: Unplug your oven before performing installation or maintenance.
Installation should be carried out by qualified personnel according to the instructions. The
manufacturer is not responsible for any damage to persons, animals or objects caused by
incorrect installation.
Opening Dimensions (General tolerance)
Width: 22.05 +/- 0.05”
Height: 23.19 +0-0.09”
NOTE: If the oven is to be paired with a stovetop, you must follow the instructions in the booklet
provided with the other appliance. For efficient air circulation, the oven should be installed
according to the dimensions (Fig. 1).

8
There are 2 holes in the door frame to mount the oven to other surroundings (under the bench or
above other machines) by screwing and inserting the plastic cover (Fig. 3).
The rear panel of the machine must be removed to allow free circulation of air. There should be
at least 2.76” (70 mm) of clearance behind the panel where the oven is installed (Fig.4-5).
For a built-in oven to work properly, the cabinets must be the correct type.
The panels of adjacent furniture should be heat resistant. Especially when they are wood
veneers, the adhesive should withstand 250°F (120°C), or it will deform or fall off.
For your safety, do not touch electrical components once the device is installed.
All protective parts provided cannot be fixed in a non-removable way.
Ensure that the appliance is switched off before replacing the lamp to avoid the
possibility of electric shock.

9
Connection to the Mains Supply
Devices must be connected according to current rules. It is recommended to be wired by a
professional electrician.
Check that the rated power of power and outlet match the max wattage indicated on the
nameplate.
The correct connection is to insert the plug into a socket with a third contact point to the
ground.
If the device has a power cord installed but no plug, wire it as follows:
The “yellow/green” grounded wire, which must be connected to the terminal should be
0.39" (10mm) longer than others.
The “blue” neutral line has to be connected to the terminal marked with letter “N”.
The “Black, Brown or Red” live wires have to be connected to terminal “L”.
Mains connection can also be made by fitting a double pole switch with a min gap between
the contacts of 0.12 inches ( 3mm ), proportionate to the load.
The yellow/green earth wire should not be controlled by the switch.
Once the appliance is in place, the plug or two-pole switch for the mains connection should
be handy.
IMPORTANT
The power cord should be placed 120°F (50°C) below the ambient temperature.
Safety can only be ensured if it is properly connected to a valid grounded power source in
accordance with electrical safety regulations.
The manufacturer is not responsible for any damage to persons or objects due to lack of a
ground connection.
This equipment must be grounded.
If a gas stove needs to be installed above the wall
oven, the distance between them should be >
1.58”.

10
Removable Glass Door
The oven door is made of 3 layers of glass, the top and bottom of each layer are flow-through.
When the oven is running, air circulates through the door to keep the outer pane cool. If
condensation is working between the glass panes, the door can be removed to clean between
them.
Follow the instructions above to remove the door and place it on a protective surface (such as a
tablecloth) to prevent it from being scratched.
The door handle should line up with the edge of the table. Make sure the glass lies flat to avoid
breakage of glass in cleaning.
1.Press the button on left and right side of door, then take out top rail. (Fig.7)
2.Take out inner glass slowly (Fig.8)
3.Loose clips. (Fig.9)
4.Take out middle glass. (Fig.10)
Clean glass and other parts with a damp microfiber cloth, a clean sponge, or a hot water
solution containing a small amount of detergent, then dry with a soft cloth.

11
Disassemble/Assemble the Oven Door
To make it easier to clean the inside oven, the oven door can be removed by proceeding as
follows:
Open the door completely and lift the 2 levers “B” (Fig.11);
Shut the door slightly, you can lift it out by pulling out the hooks “A” to reassemble the
door. (Fig.12)
Door in a vertical position, insert the two hooks “A” into the slots;
Ensure that seat “D” is hooked perfectly onto the edge of the slot (Move the oven door
backwards and forward slightly);
Keep the oven door open fully, unhook the 2 levers “B” downwards and then shut the
door again.

12
Use the Rotisserie
In the icon " " of the function panel, the rotisserie can be used in combination with the
rack. After fitting the food on to the spit “S”, block it with the two forks “F”. then proceed as
follows:
The common oven installation method is as shown below, but this product is suitable for
Fig.13; And Fig.14 is just for extra reference.
Fit the end of the spit into the motor “M” at the back of the oven (Fig. 13).
Fit the support into the circular groove in the spit.
Unscrew and remove handle “A”.
Number “2” hooks the oven, “1” in the circle, as shown in the middle picture.
Place the oven tray with a little water on the lowest shelf of the oven.
Turn the knob to position to rotisserie icon .
Partially close the oven door.
When the cooking time is up, screw the handle on the spit and remove everything from
the oven. If necessary, use an oven glove to avoid any burn.

13
Using the Electric Wall Oven

14
Operation
1.Power Switch
To turn on/off the display panel. Show current time when turn on the display.
2.Function Switch
Press it to switch to a different function. When you switch to a new function, the current
function will stop and the cooking time must be reset.
Touch Button Description
14 Power
15 Function
16 Timer
17 Temperature
18 Light
19 Plus/Minus
20 OK
21 Rapid Heat-up
22 Start / Pause
Display Description
1Function
2Time
3Actual Temperature/Time
4Set Temperature
5Current Time
6Safety Lock
7Rapid Heat-up
8Cooking Duration Time
9Rotisserie
10 Alarm
11 Heating Indicator
12 Light
13 Cooking End Time

15
Cook Food with 11 Versatile Options
Recognition the Icon
Note: the inverted triangle represents the inside heating tube in the top

16
Defrost
The air at ambient temperature is distributed inside the oven for defrosting food more quickly
and without proteins adulteration.
Bake/Broil+Rotisserie
Upper inside heating element or ( Rotisserie ).
It is indicated for bake or broil, such as baked biscuits.
This function must always be used with half-open door and control protection.
Broil+Rotisserie
It is indicated for grilling and gratinating small quantities of traditional food. This function can
be used for very short times around 5-10 min. For a longer time, this function must always be
used with a half-open door and control protection. Perfect for broil steak.
Convection Broil
All grill components and fan work. In this setting, the central heating elements(upper inside
heating element) of the top work. This combination of features increased the heat radiation effect
to penetrate the internal food and avoid charred food.
Roast+Rotisserie
This setting allows you to better cook the bottom of food. Idea for roast potato and chicken with
rotisserie. This function must always be used with half-open door and control protection.
Convection Bake
The oven is heated by the top and bottom elements and the fan mounted in the back helps to
distribute heat throughout the oven. Suitable for perfect pastry, baked cake or bread.
3D True Convection Heat
Both the fan and the circular heating element work together. The hot air adjusts at 120℉(50℃)
to the max temp for evenly distributed inside the oven. Ideal for cooking several types of food
simultaneously without affecting taste and smell. Indicated for chicken and delicate pastries.
Bake+Rotisserie
A conventional oven works by the heat rising. The top is hotter than the bottom. Perfect for
cooking different sides of the meat simultaneously.

17
Pizza
The air heated by the lower heating element is circulated by the fan, thus helping to distribute the
heat between 122- 392°F (50-200°C). This function can be used for pizza.
Convection Broil
Ideal for dishes that require top heat, such as rice pudding or cauliflower cheese because the heat
is not as fierce as a grill.
True Convection+Hot Air Economy
This feature allows you to use the whole grill or just part of them for economical grilling in small
quantities.
3.Start/Pause Switch
When you switch to a new function, press it to start cooking.
In the activated state, the display shows the current oven temperature as shown below,
During pause status, the display shows current time.

18
4.Time Switch
Press switch for 3S to set current time. Adjust time number by pressing .
Press to confirm setting.
Alarm setting: Press switch until keep flashing. Display will show”0:00”.
Adjust time number by pressing , then press to confirm setting. Set time
back to “0:00” to cancel alarm.
Set the cooking time: Press switch until display show “ Duration” and “ END ”.
Adjust time number by pressing , then press to confirm setting.
Start working time = End time – Duration time
5. Safety Children Lock : Press for 5S to enter or cancel safety lock.
6.Temperature Setting: After selected function, press to set temperature.
Adjust temperature number by pressing , then press to confirm setting.
7.Rapid Heat-up
It is mainly used to preheat the oven. When the set temperature is above 212℉(100°C), the
selected mode allows quick heating functions, including convection bake, 3D true convection
and bake+Rotisserie. Display will show .
8.Light : It will be off if no operation in 3 minutes.
Table of contents
Other Dalxo Oven manuals
Popular Oven manuals by other brands

Kaiser
Kaiser EHK 80.060 Series Installation - use - maintenance

Electrolux
Electrolux CombiSteam Deluxe EOB8857AA user manual

Bakers Pride
Bakers Pride Cyclone SERIES Installation and operating instructions

VERDER
VERDER CARBOLITE GERO HTCR 5/28 Installation, operation and maintenance instructions

Frigidaire
Frigidaire CFEF210CS7 Control Control guide

Ariston
Ariston FK 62C X operating instructions