Daniela DAN6BSC User manual

Appliance User Manual
90CM CANOPY RANGEHOOD
DAN9BSC
danielaappliances.com.au

PAGE 2
Daniela Appliances started in 1988. Formally known as Italnova,
the company began operating by selling other major leading brands.
Since then, Daniela Appliances has it’s own range, continuously
evolving, striving on delivering leading-edge quality products at
very competitive prices.
From an Italian heritage our brand Daniela was then established in
2005 from a father’s love to a daughter and naming it after Daniela, now
the new proprietor. Daniela has worked closely with her father for many
years learning from his decades of industry experience. Daniela with her
extensive knowledge and understanding of appliances, now continues
her father’s legacy with a modern flare.
Our products are extensively tested and come with ISO certification
certificates prior to importation. Daniela Appliances continuously
designs and sources the best parts, to bring you an elegant feel that will
last the test of time and for a third of the cost from a major brand.
Daniela Appliances is dedicated to oering our customers exceptional
products with exceptional service. Our commitment is to provide our
valuable customers the very best in technology with the very best in
safety that combines both the values that brings us market success.

PAGE 3
DAN9BSC
90CM CANOPY RANGEHOOD
MODEL DAN6BSC / DAN9BSC
Rated Voltage 230V
Rated Power Frequency 50Hz
Light Power 2 x 1W Max / 3 x 1W Max
Motor Power 230W
Total Power 232W /233W
Motor 1
Diameter of Outlet Adapter 150mm
Dimension (mm) W600 / 900 x D500 x H980

PAGE 4
RECOMMENDATIONS AND SUGGESTIONS
• Daniela Appliances Pty Ltd will not be held liable for any damages resulting from incorrect
or improper installation.
• Please read this instruction manual before installing and using this range hood. Please keep
this instruction manual in a safe place for future reference.
• Only a qualified and trained service technician can undertake the work of installation and
servicing.
• Check that the main voltage corresponds to the one indicated on the rating plate fixed
inside the hood.
• If the hood is used in conjunction with non-electrical appliances (e. g. gas burning
appliances), a sucient degree of ventilation must be guaranteed in the room in order to
prevent the backflow of exhaust gas. The kitchen must have an opening directly with the
open air in order to guarantee the entry of clean air.
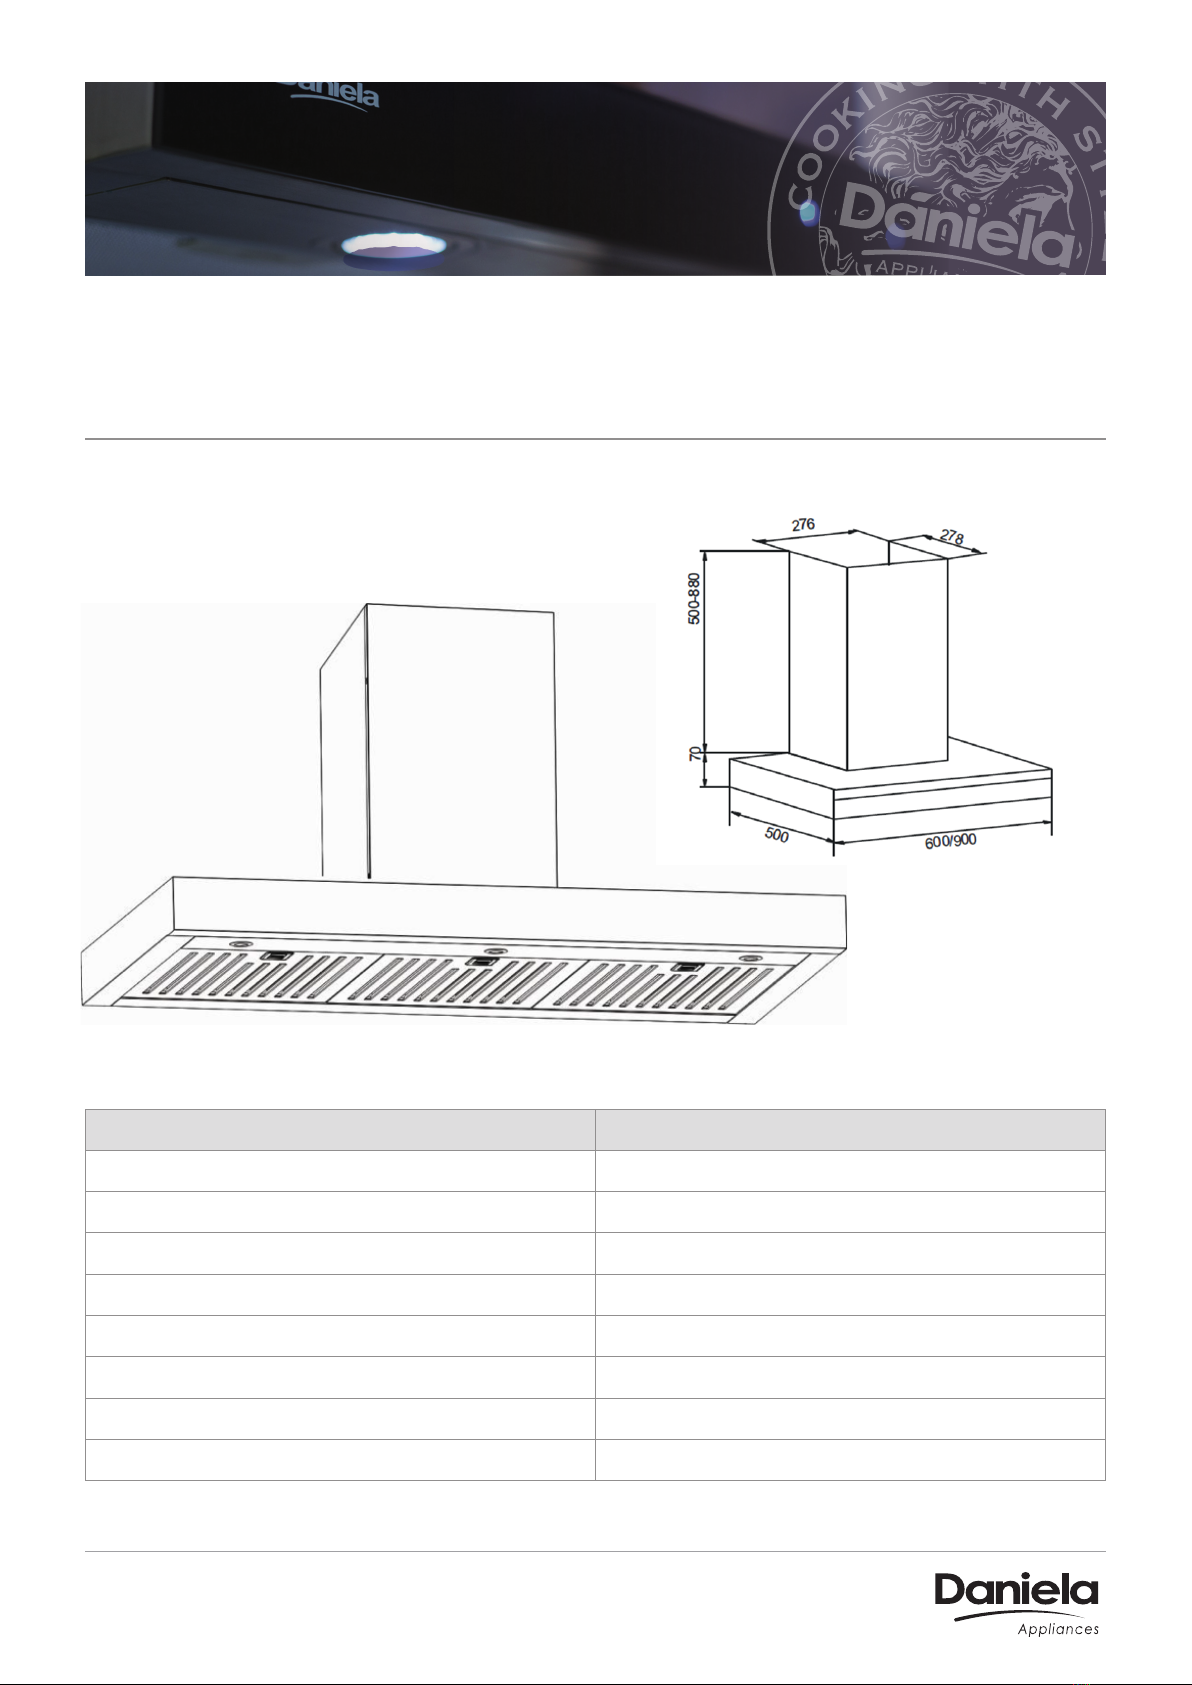
• The minimum distance is 750mm from the range hood to a gas hob, and is 650mm to an
electric hob. If the installation instructions for gas hobs specify a greater distance, this must
be taken into account.
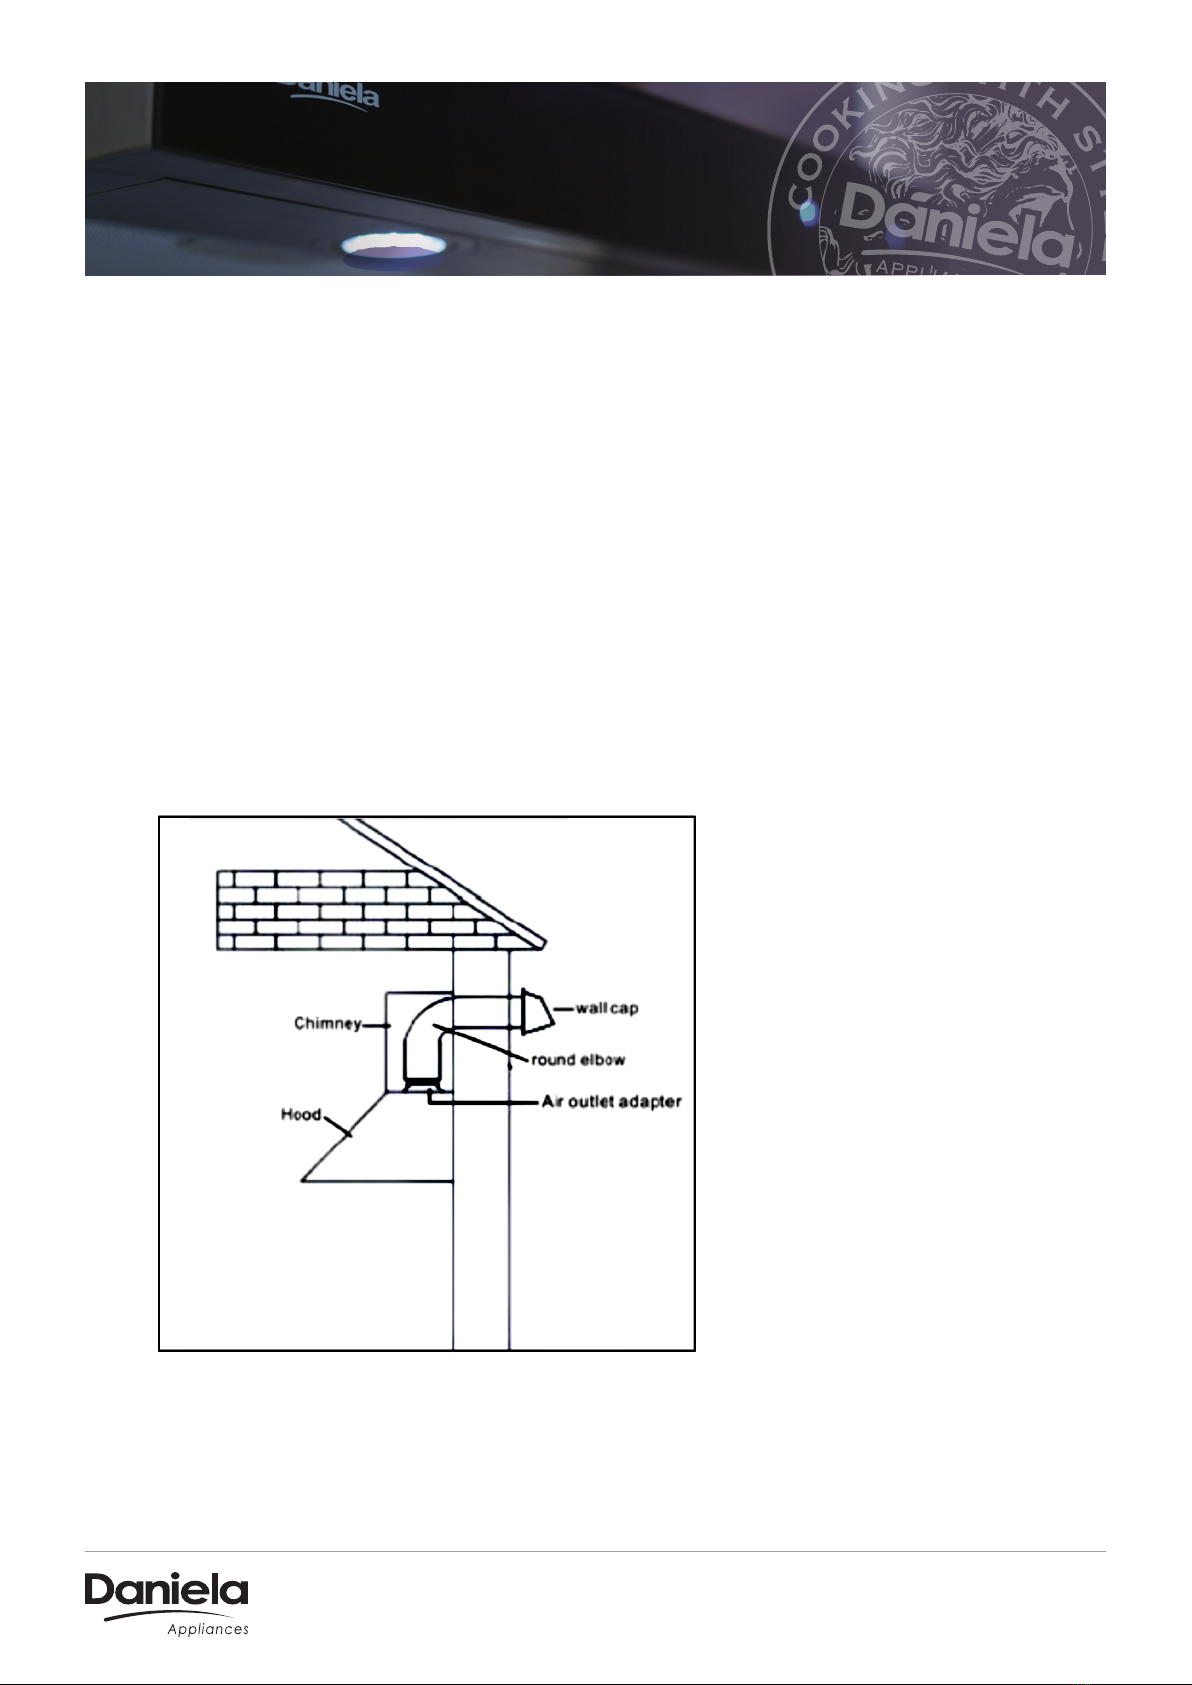
NOTE: Ducting kit not included.
NOTE: Please be aware for every bend in duct at time of installation, you will lose 100m3of suction.
SAVE THIS INSTRUCTION IN A SAFE PLACE FOR FUTURE REFERENCE
Thank you for choosing Daniela appliances!
Please read all instructions before using this appliance. This book contains valuable
information about operation, care and service. Keep it in a safe place for future
reference. Should the appliance be sold or transferred to another owner, or should
you move house and leave the appliance, always ensure that the book is supplied
with the appliance in order that new owner can be acquainted with the functioning of
the appliance and relevant warnings.
The manufacturer cannot be held responsible for any inaccuracies due to printing or
transcription errors that may be found in this handbook.
N.B.: the pictures shown in the figures in this handbook are purely indicative.

PAGE 5
WARNING!
Under certain circumstances electrical appliances may be a dangerous hazard.
• Do not check the status of the filters while the cooker hood is operating
• Do not touch the light bulbs after appliance use
• Do not disconnect the appliance with wet hands.
• To reduce the risk of fire or electric shock, do not use this fan with any solid-state.
• Avoid free flame, as it can do damage to the filters from a fire hazard.
• Constantly check food frying to avoid that the overheated oil may become a fire hazard
• Disconnect the electrical plug prior to any maintenance or servicing.
WARNING
TWO OR MORE PEOPLE ARE REQUIRED TO INSTALL OR MOVE THIS APPLIANCE. FAILURE IN
DOING SO CAN CAUSE PHYSICAL HARM OR INJURIES.
• The range hood has been designed only for domestic use to eliminate kitchen fumes.
• Never use the hood for purposes other than what it has been designed for.
• Never leave high naked flames under the hood when it is in operation.
• Adjust the flame intensity to direct it onto the bottom of the pan only; making sure that it
does not engulf the pan sides.
• Deep fat fryers must be continuously monitored during use: overheated oil can burst
into flames.
• The hood should not be used by children or persons not instructed in its correct use.
MAINTENANCE
• Proper maintenance of the range hood will assure proper performance of the unit.
• Disconnect the hood from the main supply before carrying out any maintenance work.
• Clean and/or replace aluminium grease filters and activated charcoal filters after specified
period of time.
• Clean the hood using a damp cloth and a neutral liquid detergent.

PAGE 6
WARNING!
• Children don’t recognize the risks of electrical appliances. Therefore, use or keep the
appliance only under supervision of adults and out of the reach from children.
• Do not use this product outdoors.
• This appliance is not intended for use by persons (including children) with reduced
physical, sensory or mental capabilities, or lack of experience and knowledge, unless they
have been given supervision or instruction, concerning use of the appliance by a person
responsible for their safety. Children should be supervised to ensure that they do not play
with the appliance.
• There should be adequate ventilation of the room when the range hood is used at the
same time as appliances burning gas or other fuels.
• There is a fire risk if cleaning is not carried out in accordance with instructions.
• The exhaust air must not be discharged into a flue which is used for exhausting fumes
from appliances burning gas or other fuels.
ELECTRICAL SHOCK HAZARD AND FIRE
TO REDUCE THE RISK OF FIRE, ELECTRIC SHOCK, OR INJURY TO PERSONS,
OBSERVE THE FOLLOWING:
A. Installation work and electrical wiring must be done by qualified person(s) in accordance
with all applicable codes and standards, including fire-rated construction.
B. Sucient air is needed for proper combustion and exhausting of gases through the flue
(chimney) of fuel burning equipment to prevent back drafting.
C. When cutting or drilling into wall or ceiling, do not damage electrical wiring and other
hidden utilities.
D. Ducted fans must always be vented to the outdoors.

PAGE 7
INSTALLATION & USE
OPERATION OF CONTROLS
• The hood is operated using the touch control.
• The on/o switch turns the hood on and o.
• The light switch turns the lamps on and o.
The blower switch turns the blower on to three speed settings:
1. Low speed
2. Medium speed
3. High speed
GREASE FILTERS
The grease filters should be cleaned frequently. Use a warm detergent solution.
The stainless-steel filters are washable.
INSTALLATION OF THE DUCT WORK
NOTE: Please ensure that these filters are completely dry before using.
CAUTION:
To reduce the risk of noise or fire, use metal ductwork is preferred.
1. Decide where the ductwork will run between the hood and the outside.
2. A straight, short duct run will allow the hood to perform most eciently.
3. Long duct runs, elbows, and transitions will reduce the performance of the hood. Use as few
of them as possible. Larger ducting may be required for best performance with longer duct
runs. You will lose 100m3of suction for every elbow in your ducting.
4. The air must not be discharge into a flue that is used for exhausting fumes from appliances
burning gas or other fuels” “Regulations concerning the discharge of air have to be fulfilled.
5. Install wall cap. Connect round metal ductwork to cap and work back towards
hood location. Use duct tape to seal the joints between duct work sections.
low mid high light on/o

PAGE 8
INSTALLATION OF THE DUCT WORK
CAUTION:
To reduce the risk of noise or fire, use metal ductwork is preferred.
1. Decide where the ductwork will run between the hood and the outside.
2. A straight, short duct run will allow the hood to perform most eciently.
3. Long duct runs, elbows, and transitions will reduce the performance of the hood. Use as few
of them as possible. Larger ducting may be required for best performance with longer duct
runs. You will lose 100m3of suction for every elbow in your ducting.
4. The air must not be discharge into a flue that is used for exhausting fumes from appliances
burning gas or other fuels” “Regulations concerning the discharge of air have to be fulfilled.
5. Install wall cap. Connect round metal ductwork to cap and work back towards
hood location. Use duct tape to seal the joints between duct work sections.

PAGE 9
INSTALLATION OF ELECTRICAL
Electrical wiring must be done by a qualified person(s) in accordance with all applicable codes
and standards. This range hood must be properly grounded. Turn o electrical power at service
entrance before wiring. If the supply cord is damaged, it must be replaced by the manufacturer,
its service agent or similarly qualified persons in order to avoid a hazard.
INSTALLATION OF THE HOOD
NOTE: On stainless steel hoods, carefully remove the plastic protective film from all exterior
surfaces of the hood and chimney prior to final installation.
NOTE: At least two people will be required to mount the hood.
• Minimum hood distance above the cooker must not be less than 650mm for electric hobs
and 700mm for gas hobs. A distance of 750mm above the cooker is highly recommended
for best capture of cooking impurities.
• Distance over 750mm above the cooker are at the installer’s and user’s discretion -
providing that ceiling height and flue length permit.
1. Secure the hood mounting bracket to the wall using (2) ST 5 x 50mm mounting screws and
dry wall anchors. Align the hood body with the hood mounting bracket. Gently lower the
hood until it securely engages the bracket.
2. Fix the discharge collar into the air outlet adapter.
3. Attach an adequate length of the 150mm round duct to the air outlet adapter.
4. Carefully slide the decorative chimney top down inside the decorative chimney bottom.
Carefully place the decorative chimney bottom into the recessed area of the hood body top.
5. Secure the chimney mounting bracket to the wall using (2) ST 5 x 50mm mounting screws
and dry wall anchors.
6. Raise the decorative chimney top until it’s holes align with the holes in the chimney
mounting bracket (located on the wall).
7. Level the hood and secure the chimney with 2x chimney bracket screws.
8. Fix the decorative chimney bottom with 3 x decorative chimney bottom screws
from inside the body.

PAGE 11
INSTALLATION OF THE FILTERS
1. To remove the grease filter, push in the metal
latch tab. This will disengage the filter from
the hood. Tilt the filter downwards
and remove.
2. To install the grease filter, align the rear
filter tabs with slots in the hood. Push in the
metal latch tab, push the filter into position
and release. Make sure the filter is securely
engaged after assembly.
3. To install the charcoal filter (for recirculating/
optional) and lock it into place as shown in
the diagram bottom right.
4. Install the grease filter after the charcoal filter
has been installed.
When you unpack the appliance, make sure that it has not been damaged in any way. If you have
any doubts at all DO NOT INSTALL OR USE THE APPLIANCE. In this instance please contact your
retailer or Daniela Appliances direct. Keep packing material such as plastic bags, polystyrene,
nails or screws out of the reach of children, as they are a choking hazard.
This symbol on the product or in the instruction manual means that your electrical and electronic
equipment should be disposed at the end of its life separately from your household waste. There
are separate collection systems for recycling in the EU. For more information, please contact your
local authority or the retailer where you purchased the appliance.

PAGE 12
FURTHER INFORMATION
It is a warranty requirement that proof of purchase must be provided when booking a service call.
Please be advised that without this proof of purchase, your warranty may not be honoured.
All warranty will be voided, if not installed by a licensed technician or tradesman.
Please record their details below for future reference:
TECHNICAN / TRADESMAN WHO INSTALLED: ..............................................................................................
.......................................................................................................................................................................................
LICENSE NUMBER: ..................................................................................................................................................
DATE OF INSTALLATION:.......................................................................................................................................
INSTALLATION RECEIPT NUMBER:.....................................................................................................................
If you require more information, service, warranty or spare parts enquiries
please contact customer care.
DANIELA APPLIANCES PTY LTD
(02) 9604 1226 (9am – 5pm EST, Monday – Friday)
NOTE: Model number and details are to be recorded below for future reference.
Please have the following information ready before calling our customer care team.
Model number:..........................................................................................................................................................
Serial number:...........................................................................................................................................................
Place of purchase:....................................................................................................................................................
Date of purchase (NOT Installation): ...................................................................................................................
Receipt or Invoice Number:...................................................................................................................................

PAGE 13
TERMS AND CONDITIONS
TERMS OF WARRANTY
Daniela appliances warrants to the original purchaser of appliance providing the product is installed specifically
for their intended use, under proper care, domestic/residential use and maintenance of the products supplied by
Daniela appliances, will be free from defects in workmanship and materials subject to the terms and conditions
to follow.
Daniela Appliances warranty only applies to the original owner and is not transferable.
Our warranty covers rectification free of charge for any faults arising from defective materials or components and
faulty workmanship. The product will be repaired or replaced at the discretion of Daniela Appliances.
NOTE: All costs of installation, stone benchtop replacement, cabinetry replacement or repair, sink/tapware
removal, un-installation, cartage, freight, travelling expenses and insurance are to be paid by the customer.
RETURN POLICY
Kindly inspect your goods at time of delivery.
If you notice any damage to your goods please notify our delivery team at the time of delivery. Recommend you
thoroughly inspect your goods at this time. If you notice any damage to your goods please call with in 24 hours
of receiving delivery, please notify Daniela Appliances Pty Ltd immediately. Evidence of damage will be required.
If for any reason you need to return an item please call Daniela Appliances Pty Ltd on (02 )9604-1226, within
48 hours of receiving the goods or appliances.
If your goods remain boxed and in an unopened condition, they may be returned with in 30 days of the invoice
date for a full refund. A collection fee of $50 will be charged should you require Daniela Appliances Pty Ltd to
collect the stock.
If your goods have been unboxed but otherwise are in as new condition (Have not been used or connected) a
20% restocking fee (20% of the purchase price) will apply.
Daniela Appliances Pty Ltd DOES NOT DEAL WITH FACTORY SECONDS, DAMAGES OR OPENED GOODS, and
charges restocking fees to cover the return costs. A collection fee of $50 or the delivery charge if greater than
the $50 will apply.
Please note that if you request connection of your appliance, Daniela Appliances Pty Ltd will unbox the product at
the time of delivery. We recommend you inspect your goods thoroughly at time of delivery, as to avoid extra charges.
Return of goods are to be covered by the customer, or alternatively can be returned in person to Daniela
Appliances Pty Ltd, at no extra charge. Please note that a collection fee of $50 or greater will be charged should
you wish Daniela Appliances Pty Ltd, to collect the stock on your behalf.
You as a customer have a duty of care for the product whilst in your possession. If products are damaged by you,
and subsequently returned, a charge will be made to repair the product to its original condition. Please be aware
that where repair is economically viable, no refund will be given.
All refunds will be issued when goods arrive back to Daniela Appliances warehouse and have been inspected by
a sta member of our team. Refunds will be made by the same method used for purchase.
We are unable to accept returns of any goods that you have attempted to install or have used.
If there are any further queries, please don’t hesitate to contact Daniela Appliances Pty Ltd on (02) 9604-1226.
THANK YOU.

P I 02 9604 1226 E I sales@danielaappliances.com.au W | danielaappliances.com.au
PAGE 14
Cooking
Style
with

PAGE 15
..........................................................................................................................................................................................
..........................................................................................................................................................................................
..........................................................................................................................................................................................
..........................................................................................................................................................................................
..........................................................................................................................................................................................
..........................................................................................................................................................................................
..........................................................................................................................................................................................
..........................................................................................................................................................................................
..........................................................................................................................................................................................
..........................................................................................................................................................................................
..........................................................................................................................................................................................
..........................................................................................................................................................................................
..........................................................................................................................................................................................
..........................................................................................................................................................................................
..........................................................................................................................................................................................
..........................................................................................................................................................................................
NOTES
Cooking

danielaappliances.com.au
P I02 9604 1226 E I[email protected] A I8/10 Hume Road, Smithfield NSW 2164P I02 9604 1226 E I[email protected] A I8/10 Hume Road, Smithfield NSW 2164
This manual suits for next models
3
Table of contents
Other Daniela Ventilation Hood manuals
Popular Ventilation Hood manuals by other brands

Omega National Products
Omega National Products Contempora manual

Baumatic
Baumatic BAH9008G user manual

Thermador
Thermador VCH-3 Service manual

Atag
Atag WU7011AM Instructions for use and installation

Thermador
Thermador HMCB36FS/02 installation manual

Prima
Prima PRCH026 Manual for installation, use and maintenance