DAPAudio DVMP-150 User manual

DVMP-150
ORDERCODE D1132
Highlite International B.V.
Vestastraat 2
6468 EX Kerkrade
The Netherlands

1
Congratulations!
You have bought a great, innovative product from DAP Audio.
The DAP Audio DVMP-150 brings excitement to any venue. Whether you want simple plug-&-play action
or a sophisticated show, this product provides the effect you need.
You can rely on DAP Audio, for more excellent audio products.
We design and manufacture professional audio equipment for the entertainment industry.
New products are being launched regularly. We work hard to keep you, our customer, satisfied.
For more information: iwant@dap-audio.info
You can get some of the best quality, best priced products on the market from DAP Audio.
So next time, turn to DAP Audio for more great audio equipment.
Always get the best -- with DAP Audio !
Thank you!

2
Dap Audio
DAP Audio DVMP-150™ Product Guide
Warning...................................................................................................................................................................................................3
Unpacking Instructions ....................................................................................................................................................................3
Return Procedure .............................................................................................................................................................................3
Safety Instructions.............................................................................................................................................................................4
Operating Determinations..............................................................................................................................................................5
Description of the device ....................................................................................................................................................................6
Overview............................................................................................................................................................................................6
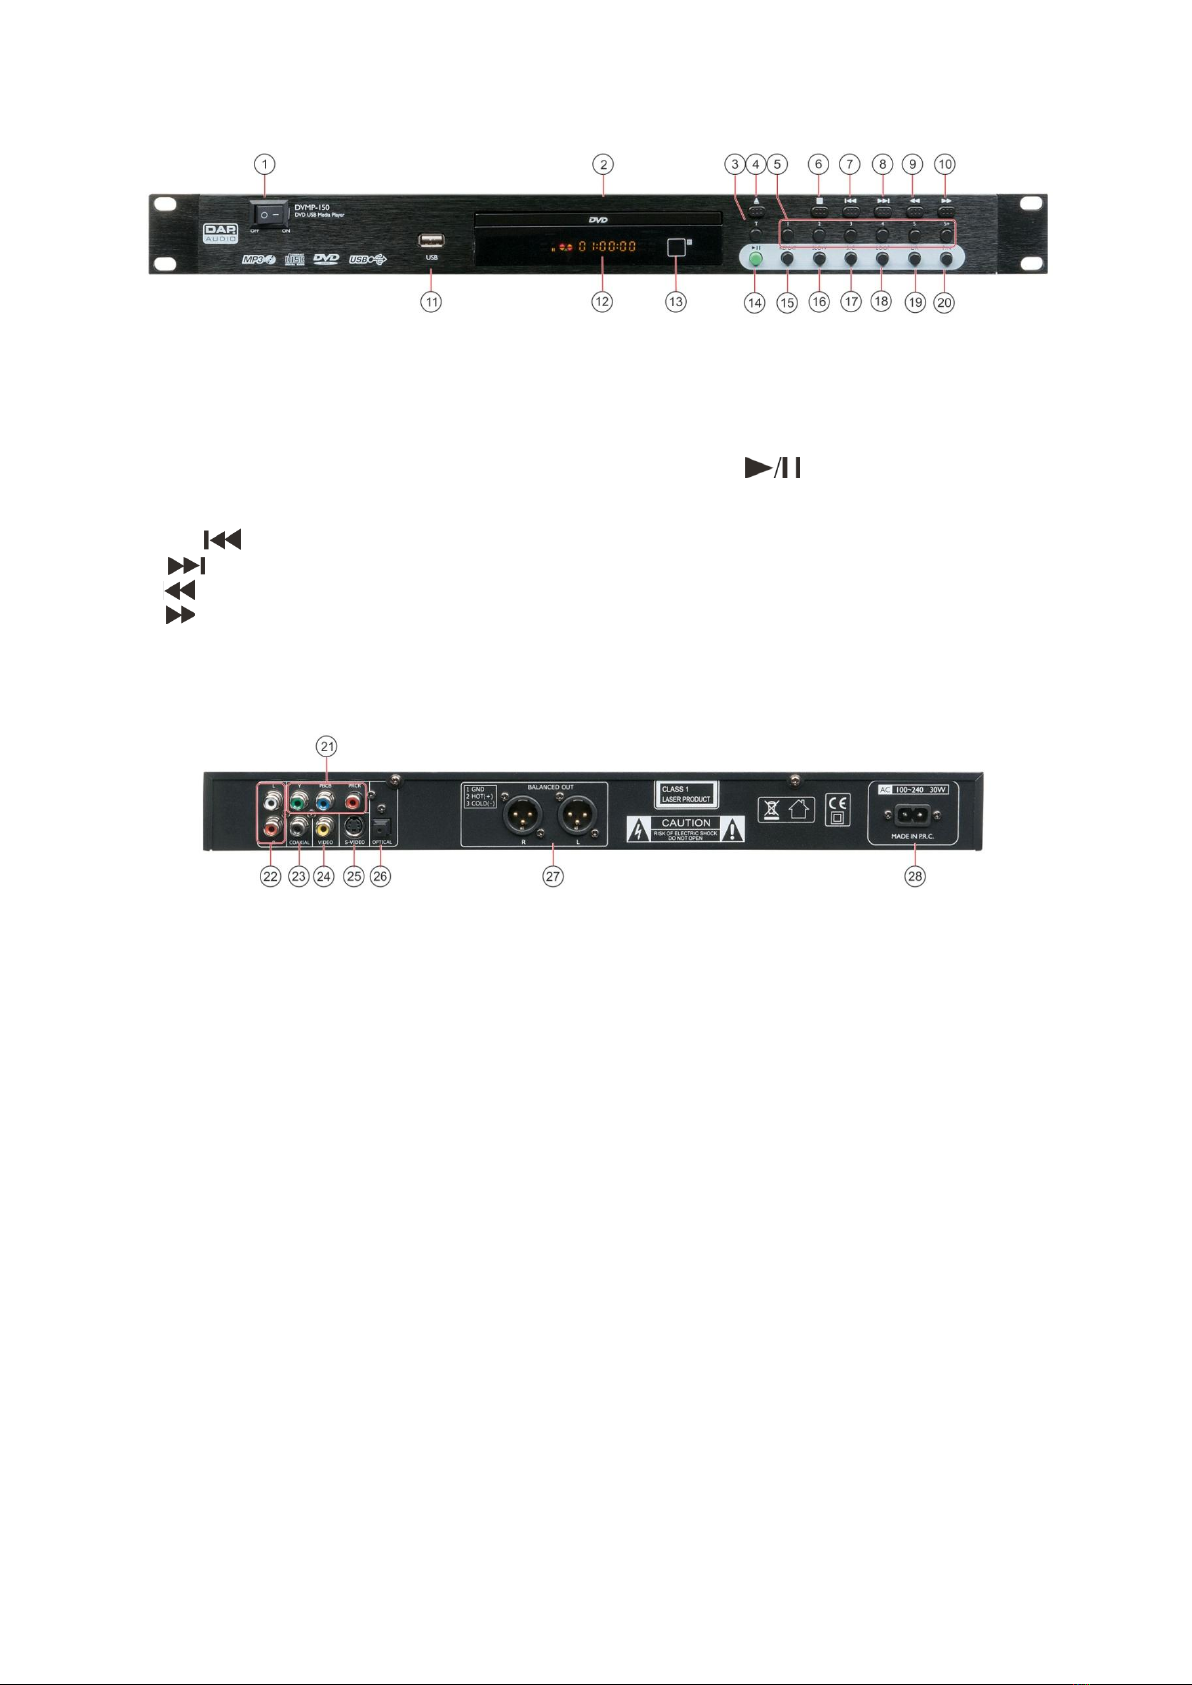
Frontview ...........................................................................................................................................................................................7
Rearview ............................................................................................................................................................................................7
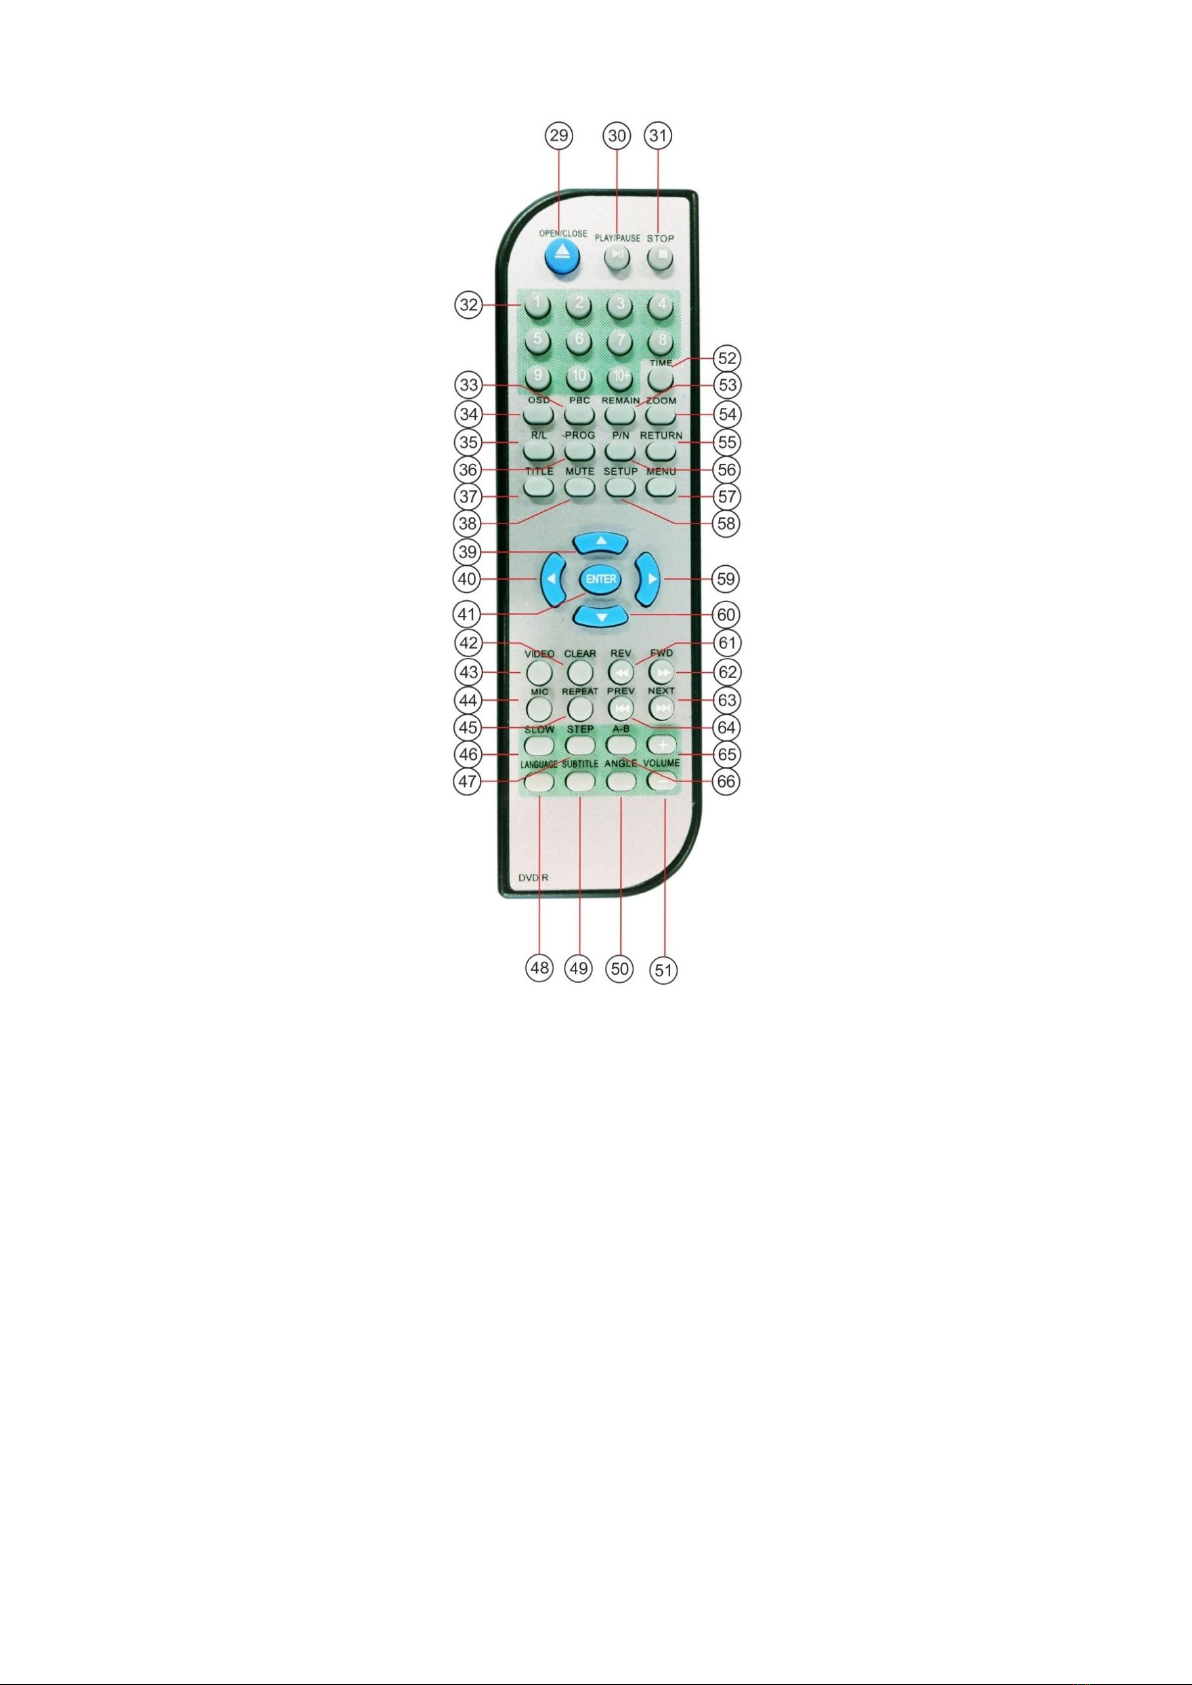
Remote Control ................................................................................................................................................................................8
Names and functions ...........................................................................................................................................................................9
Installation ........................................................................................................................................................................................... 11
Set Up and Operation........................................................................................................................................................................ 11
Operations........................................................................................................................................................................................... 12
1. Preparation.............................................................................................................................................................................. 12
2. Normal Playback.................................................................................................................................................................... 12
3. Pause ........................................................................................................................................................................................ 12
4. Stop........................................................................................................................................................................................... 12
5. Previous and next................................................................................................................................................................... 12
6. Fast Forward/ reverse ............................................................................................................................................................ 12
7. Video Mode ............................................................................................................................................................................ 12
8. OSD (On Screen Display) ...................................................................................................................................................... 12
9. Subtitle...................................................................................................................................................................................... 12
10. Step........................................................................................................................................................................................... 12
11. Repeat ..................................................................................................................................................................................... 13
12. Loop play................................................................................................................................................................................. 13
13. Slow........................................................................................................................................................................................... 13
14. Program ................................................................................................................................................................................... 13
15. Zoom......................................................................................................................................................................................... 13
16. Volume and Mute .................................................................................................................................................................. 13
17. Menu......................................................................................................................................................................................... 13
18. Title ............................................................................................................................................................................................ 13
19. Angle ........................................................................................................................................................................................ 13
20. Language selection............................................................................................................................................................... 13
Before switching off the power ........................................................................................................................................................ 14
System Setup....................................................................................................................................................................................... 15
A. General Setup......................................................................................................................................................................... 15
B. Language setup ..................................................................................................................................................................... 18
C. Audio Setup............................................................................................................................................................................. 19
D. Video Setup............................................................................................................................................................................. 20
E. Downmix .................................................................................................................................................................................. 21
F. Stereo setup ............................................................................................................................................................................ 21
Setup examples.................................................................................................................................................................................. 22
Connection of a television set .................................................................................................................................................... 22
Connection of a television set using an A/V- cable............................................................................................................... 22
Connection to an audio system and TV-set using the component outputs...................................................................... 23
Connection to an amplifier with digital audio input and TV-set .......................................................................................... 23
Product Specifications....................................................................................................................................................................... 24

3
Warning
Unpacking Instructions
Immediately upon receiving this product, carefully unpack the carton and check the contents to ensure
that all parts are present, and have been received in good condition. Notify the dealer immediately and
retain packing material for inspection if any parts appear damaged from shipping or the carton itself
shows signs of mishandling. Save the carton and all packing materials. In the event that a fixture must be
returned to the factory, it is important that the fixture be returned in the original factory box and packing.
Your shipment includes:
• DAP DVMP-150
• User manual
Return Procedure
Returned merchandise must be sent prepaid and in the original packing, call tags will not be issued.
Package must be clearly labeled with a Return Authorization Number (RMA number). Products returned
without an RMA number will be refused. Highlite will not accept the returned goods or any responsibility.
Call Highlite 0031-455667723 or mail aftersales@highlite.nl and request an RMA prior to shipping the fixture.
Be prepared to provide the model number, serial number and a brief description of the cause for the
return. Be sure to properly pack fixture, any shipping damage resulting from inadequate packaging is the
customer’s responsibility. Highlite reserves the right to use its own discretion to repair or replace
product(s). As a suggestion, proper UPS packing or double-boxing is always a safe method to use.
Note: If you are given an RMA number, please include the following information on a piece of paper
inside the box:
1) Your name
2) Your address
3) Your phone number
4) A brief description of the symptoms
Claims
The client has the obligation to check the delivered goods immediately upon delivery for any short-
comings and/or visible defects, or perform this check after our announcement that the goods are at their
disposal. Damage incurred in shipping is the responsibility of the shipper; therefore the damage must be
reported to the carrier upon receipt of merchandise.
It is the customer's responsibility to notify and submit claims with the shipper in the event that a fixture is
damaged due to shipping. Transportation damage has to be reported to us within one day after receipt
of the delivery.
Any return shipment has to be made post-paid at all times. Return shipments must be accompanied with
a letter defining the reason for return shipment. Non-prepaid return shipments will be refused, unless
otherwise agreed in writing.
Complaints against us must be made known in writing or by fax within 10 working days after receipt of the
invoice. After this period complaints will not be handled anymore.
Complaints will only then be considered if the client has so far complied with all parts of the agreement,
regardless of the agreement of which the obligation is resulting.
FOR YOUR OWN SAFETY, PLEASE READ THIS USER MANUAL CAREFULLY
BEFORE YOUR INITIAL START-UP!

4
Safety Instructions
Every person involved with the installation, operation and maintenance of this system has to:
-be qualified
-follow the instructions of this manual
Before you initial start-up, please make sure that there is no damage caused by transportation. Should
there be any, consult your dealer and do not use the system.
To maintain perfect condition and to ensure a safe operation, it is absolutely necessary for the user to
follow the safety instructions and warning notes written in this manual.
Please consider that damages caused by manual modifications to the system are not subject to
warranty.
This system contains no user-serviceable parts. Refer servicing to qualified technicians only.
IMPORTANT:
The manufacturer will not accept liability for any resulting damages caused by the non-
observance of this manual or any unauthorized modification to the system.
Never let the power-cord come into contact with other cables! Handle the power-cord and all
connections with the mains with particular caution!
Never remove warning or informative labels from the unit.
Never use anything to cover the ground contact.
Never leave any cables lying around.
Do not insert objects into air vents.
Do not connect this system to a dimmerpack.
Do not switch the system on and off in short intervals, as this would reduce the system’s life.
Do not open the device and do not modify the device.
Do not drive the inputs with a signal level bigger, than required to drive the equipment to full
output.
Only use system indoor, avoid contact with water or other liquids.
Avoid flames and do not put close to flammable liquids or gases.
Always disconnect power from the mains, when system is not used. Only handle the power-cord
by the plug. Never pull out the plug by tugging the power-cord.
Make sure you don’t use the wrong kind of cables or defective cables.
Make sure that the available voltage is not higher than stated on the rear panel.
Make sure that the power-cord is never crimped or damaged. Check the system and the power-
cord from time to time.
Please turn off the power switch, when changing the power cord or signal cable, or select the
input mode switch.
Avoid ground loops! Always be sure to connect the power amps and the mixing console to the
same electrical circuit to ensure the same phase!
CAUTION!
Keep this system away from rain and moisture!
CAUTION! Be careful with your operations.
With a dangerous voltage you can suffer
a dangerous electric shock when touching the wires!

5
If system is dropped or struck, disconnect mains power supply immediately. Have a qualified
engineer inspect for safety before operating.
If the system has been exposed to drastic temperature fluctuation (e.g. after transportation), do
not switch it on immediately. The arising condensation water might damage your system. Leave
the system switched off until it has reached room temperature.
If your Dap Audio device fails to work properly, discontinue use immediately. Pack the unit
securely (preferably in the original packing material), and return it to your Dap Audio dealer for
service.
Repairs, servicing and electric connection must be carried out by a qualified technician.
For replacement use fuses of same type and rating only.
WARRANTY: Till one year after date of purchase.
Operating Determinations
This system is not designed for permanent operation. Consistent operation breaks will ensure that the
system will serve you for a long time without defects.
If this system is operated in any other way, than the one described in this manual, the product may suffer
damages and the warranty becomes void.
Any other operation may lead to dangers like short-circuit, burns, electric shock, etc.
You endanger your own safety and the safety of others!
Improper installation can cause serious damage to people and property !
Connection with the mains
Connect the device to the mains with the power-plug.
Always pay attention, that the right color cable is connected to the right place.
International
EU (including UK)
From April 2004
North America
Pin
L
Brown
Black
Phase
N
Blue
White
Neutral
Green/Yellow
Green
Protective Earth
Make sure that the device is always connected properly to the earth!

6
Description of the device
Features
The DAP-audio DVMP-150 is a 1 U Karaoke DVD player
• Plays all common audio/video formats
• Balanced XLR audio outputs
• 19” Rack mounts included
• IR Remote control included
Overview
Fig. 1

7
Frontview
Fig. 2
1. Power button 11. USB connector
2. Disk holder 12. Display
3. T button 13. Remote Sensor
4. Eject button 14. Play/pause button
5. Direct access buttons 15. Repeat button
6. Stop button 16. Slow button
7. Previous button 17. S/C button
8. Next button 18. Loop button
9. Fast reverse button 19. L/R button
10. Fast forward button 20. P/N button
Rearview
Fig. 3
21. Component Video Out 25. S-Video out
22. Audio stereo unbalanced out 26. Optical out
23. Coaxial out 27. Audio stereo XLR balanced out
24. Composite Video Out 28. 230Vac Inlet

8
Remote Control
Fig. 4
29. Open/close button 48. Language button
30. Play button 49. Subtitle button
31. Stop button 50. Angle button
32. Direct access buttons 51. Vol - button
33. PBC button 52. Time button
34. OSD button 53. Remain button
35. R/L button 54. Zoom button
36. Prog button 55. Return button
37. Title button 56. P/N button
38. Mute button 57. Menu button
39. Cursor up button 58. Setup button
40. Cursor left button 59. Cursor right button
41. Enter button 60. Cursor down button
42. Clear button 61. Fast reverse button
43. Video button 62. Fast forward button
44. Mic button 63. Next button
45. Repeat button 64. Previous button
46. Slow button 65. Vol + button
47. Step button 66. A-B button

9
Names and functions
Below is a description of the functions of the controls.
1. Power switch
This is the main power switch. Push to turn the device on.
2. Disc Holder
Place the disc in the holder. Push the open/close (45) button to open and close the disc holder.
3. T button
Use this button to switch the TIME indication in the LCD display (13) between the elapsed time and
remaining time. The selected mode is indicated by ELAPSED or REMAIN.
4/29. Eject button
Push this button to open and close the disc holder (2).
5/32. Direct access buttons
Use these buttons to select a track directly. Use the +10/5+ buttons to move up 10/5 tracks. E.g. if your
actual track is 5, pushing the +10 button will select track 15.
6/31. Stop button
Push this button to stop playback.
7/64. Previous button
Use this button to go back to the beginning of the current track or select a previous track for playing.
8/63. Next button
Use this button to skip to the next track.
9/61. Fast reverse button
Push and hold this button to play a track fast reverse.
10/62. Fast forward button
Push and hold this button to play a track fast forward.
11. USB port
Use this port to connect a USB stick.
12. Display
13. Remote sensor
14/30. Play/Pause button
This button allows you to toggle between pause mode and playback mode.
15/45. Repeat button
Use this button to repeat one track or all tracks of the medium. See the section Repeat on page 13.
16/46. Slow button
Allows you to play a track at a lower speed.
17. S/C button
Use this button to switch between the single play mode and continuous play mode.
The selected mode is indicated by Single or Cont. in the LCD display (4).
In single play mode, the unit stops playing after each track.
In continuous play mode, the unit plays all tracks and then stops.
18/66. Loop/A-B button
Push once to set the start point (Repeat A will appear on screen). Push again to set the endpoint of the
loop (Repeat B will appear on screen). As soon as the endpoint is set, loop play will start. Push a third time
to exit loop play.
19/35. L/R button
This button allows you to assign the DVD/MP3 player’s left channel, right channel or both (stereo)
channels to the main mix.
20/56. P/N button
Use this button to select your TV system: PAL/NTSC
21. Component video out
Connect the component video input of your TV-set to this output.
22. Audio stereo unbalanced out
Connect an unbalanced line input of your mixer/ amplifier to this output.
23. Coaxial out
Connect the coax video input of your TV-set to this output.
24. Composite video out
Connect the composite video input of your TV-set to this output.

10
25. S-Video out
Connect the S-video input of your TV-set to this output.
26. Optical out
Connect an optical audio input of your mixer/amplifier to this output.
27. Audio stereo XLR balanced out
Connect a balanced line input of your mixer/ amplifier to this output.
28. 230Vac inlet
This connector is meant for the connection of the supplied powercord. Connect one end of the
powercord to the connector, the other end to the mains, and turn on the power (1) switch to operate
the unit.
33. PBC button
This playback control button allows you to switch PBC on or off. While playing VCDs or SVCDs, PBC allows
the user to have interactive control over the content of these discs via a remote control.
34. OSD button
Opens a bar in the top off the screen which gives you track information, clock etc.
36. Prog button
Stop playback and push the PGM button, the player will enter the program mode. For more information,
see the section Program play on page 14.
37. Title button
Pushing this button will show the DVD title menu
38. Mute button
Pushing this button allows you to mute the audio outputs.
39/40/59/60. Arrow buttons
Use these buttons to navigate through the onscreen menu
41. Enter button
Confirm your selection in the onscreen menu by pushing this button.
42. Clear button
Use this button to clear the numbers you just entered by using the direct access (5/33) buttons.
43. Video button
Push this button to select between Interlace-YUV, TV-RGB, PC-VGA or S-Video
44. Mic button
Not functional in the DVMP-150.
47. Step button
Pushing this button allows you to step through your frames one frame at a time.
48. Language button
Push this button to change the audio language or channel
49. Subtitle button
Push this button to change the subtitle language or switch subtitles off.
50. Angle button
Push this button to change the camera angle. This button is only functional if a DVD has this option.
51. Volume –button
Pushing this button allows you to decrease the volume level of the audio outputs.
52. Time button
Pushing this button opens the OSD bar in which a clock is displayed.
53. Remain button
Pushing this button allows you to switch between remaining time and clock.
54. Zoom button
Pushing this button allows you to change the zoom factor.
55. Return button
Push this button to return to the previous menu
57. Menu button
Push this button to open the DVD menu
58. Setup button
Push this button to open the onscreen setup menu
65. Volume + button
Pushing this button allows you to increase the volume level of the audio outputs.

11
Installation
Remove all packing materials from the device. Check that all foam and plastic padding is removed.
Connect all cables.
Always disconnect from electric mains power supply before cleaning or servicing.
Damages caused by non-observance are not subject to warranty.
Set Up and Operation
Before plugging the unit in, always make sure that the power supply matches the product specification
voltage. The power supply is printed on the back of the device.
Do not attempt to operate a 120V specification product on 230V power, or vice versa.
Connections
1. Turn off the Power (1) switch.
2. Connect the DVMP-150 to your amplifier using the proper cables.
CAUTION: Be sure that the power is off, when connecting the cables.
Installing batteries
1. Remove the cover (67).
2. Insert batteries. Make sure that the terminals correspond to the symbols shown in the drawing below.
3. Replace the cover.
Note:
The batteries must be placed correctly.
Do not recharge, heat, open or short circuit the batteries. Do not throw the batteries into open fire.
Do not mix different types or old and new batteries.
If the remote control does not work properly, or if the range is reduced, all batteries should be
replaced.

12
Operations
1. Preparation
•When you want to watch a DVD film, switch the TV-set on and select the video input connected to
the DVD player.
•If you want to listen to audio via your audio installation, switch the audio system on and select the
DVD player input.
2. Normal Playback
•Push the power (1) at the front panel to switch the DVD player on. The start logo appears on the TV
screen. If the disc drive already contains a disc, the playback will start as soon as the DVD player is
switched on.
•Push the open/close (4/29) button to open the disc holder and insert a disc.
•Push the open/close (4/29) button to close the disc holder. Playback will start.
•Push the play/pause (14/30) button if the playback does not start automatically.
•Some discs will start by presenting a menu. Use the cursor (39/40/59/60) buttons to choose between
the different options, then push the enter (41) button. Alternatively, you can select a function directly
by using the direct access (5/32) buttons and confirm by pushing the enter (41) button.
3. Pause
•Push the play/pause (14/30)to enter pause mode (still picture). The sound will be muted while in
pause mode.
•Push the play/pause (14/30) to resume in playback mode.
4. Stop
•Push the stop (6/31)button on the remote control to stop playback. The start logo will appear on
the TV screen. Some discs offer the possibility of resuming from the same spot, e.g. DVD’s and music
CD’s.
•Push Play/pause (14/30)resume playback from where the playback was stopped or from the
beginning, depending on the DVD.
•Push the stop (6/31)button twice to stop the playback completely.
5. Previous and next
•During playback, push previous (7/64) to return to the start of the track. Push previous (7/64)
again to go back to the previous track.
•Each time you push the next (8/63)button you will skip to the next track.
6. Fast Forward/ reverse
•Push F.FW (10/62)to play a DVD at a faster speed. The speed changes every time F.FWD (10/62)
is pushed.
•Push play/pause (14/30) to return to normal playback speed.
•Push F.REV (9/61)play a DVD at a slower speed. The speed changes every time F.REV (9/61) is
pushed.
•Push play/pause (14/30) to return to normal playback speed.
7. Video Mode
•Push the video (43)button to select: YUV, RGB, YPBPR, S-video.
8. OSD (On Screen Display)
•Push OSD (34) to open the OSD bar (top of the screen) which displays:
The current track, mute status, PBC status and repeat status (X=off, 1= repeat 1 track, A=repeat all).
9. Subtitle
•Pushing the subtitle (49) button allows you to select the desired language, or switch subtitles off.
10.Step
•Push the step (47) button to step a single frame/picture forward during playback. Push step (47)
several times to step several frames/ pictures forward. Push the play/pause (14/30) button to
resume playback.

13
11.Repeat
•Push the repeat (15/45) button to select between: “repeat off”, “repeat 1 track”, “repeat all”(the
complete DVD/CD).
12.Loop play
•Push the loop/A-B (18/66) button to set up the starting point of your loop.
•Push the loop/A-B (18/66) button again to set the stop point to complete the setup.
•The section between A and B will be repeated.
•Push the button a third time to cancel lop play.
13.Slow
•Push the slow (16/46) button to play a disc slowly forwards or backwards.
•The speed changes every time you push the slow (16/46) button.
•You are able to select: 1/2, 1/3, 1/4, 1/5, 1/6, 1/7 or normal speed.
14.Program
•Push prog (36) to open the on screen program menu.
•The DVMP-150 allows you program up to 16 tracks/chapters.
•Use the cursor (39/40/59/69) buttons to navigate through the menu.
•Use the direct access (5) buttons to insert the desired track/chapter in the selected program number.
•When finished, move to the on screen play button using the cursor (39/40/59/69) buttons and confirm
by pushing the enter (41) button.
•Use the on screen clear button to erase the complete program.
•Abort program play by pushing the Stop (6/31) button twice (pre stop and stop).
15.Zoom
•Push the zoom (54)button to zoom the picture in/out. The size of the picture changes every time the
button is pushed. You are able to select: Off, 2, 3, 4, 1/2, 1/3, or 1/4.
16.Volume and Mute
•Push the vol + (65) button to increase the volume level and the vol –(51) button to decrease the
volume level.
•Pushing the mute (38)button will mute the audio signal. Push again to cancel the mute function.
17.Menu
•Push this button to open the DVD’s main menu and navigate using the cursor (39/40/59/60) and enter
(41) buttons.
18.Title
•On some DVD’s the title menu will appear when pushing the title (37) button. Choose the desired
tracks using the cursor (39/40/59/60) or the direct access (5/32) buttons. Confirm by pushing the enter
(41) button.
19.Angle
•Pushing the angle (50) button allows you to choose between different camera angles. This function
only applies to DVD’s which are recorded this way.
20.Language selection
•Pushing the language (48) button allows you select different types of sound reproduction such as:
Audio: 1/2: AC3 2 CH English, Audio: 2/2: AC3 5.1 CH English.

14
Before switching off the power
When you have finished using the DVD player, before switching off the power, be sure that the disc
holder (2)has been closed with the open/close (14/51) button.
CAUTION:
•Do not forcibly close the disc holder when the power is off.
•Do not switch off the power, when the disc holder (2)is open.
•Switch off the power after the disc holder (2)has been closed with the open/close (4/29) button.
CD/DVD’s
1. Precautions on handling CD/DVD’s
• Do not allow fingerprints, oil or dust to get on the surface of the disc. If the disc is dirty, wipe it off with a
soft dry cloth.
• Do not use thinner, water, record spray, electrostatic-proof chemicals, or silicone-treated cloths to
clean discs.
• Always handle discs carefully to prevent damaging the surface; in particular when removing a disc
from its case or returning it.
• Do not bend the disc.
• Do not put the DVD near heating sources.
• Do not enlarge the hole in the center of the disc.
• Do not write on the label (printed side) with a hard-tipped implement such as a pencil or ball point
pen.
• Condensation will form if a disc is brought into a warm area from a colder one, such as outdoors in
winter. Do not attempt to dry the disc with a hair dryer, etc.
2. Precaution on storage
•After playing a disc, always unload it from the player.
•Always store the disc in the jewel case to protect from dirt or damage.
•Do not place discs in the following areas:
1. Areas exposed to face sunlight for a considerable time.
2. Areas subject to accumulation of dust or high humidity.
3. Areas that are affected by heat from indoor heaters, etc.

15
System Setup
When you push the Setup (57) button, the setup menu will be displayed. You can select five tabs:
A. General
B. Audio
C. Video
D. Password
E. Exit
When you have entered the setup menu you can use the cursor (39, 40, 59, 60) buttons to navigate and
select the desired item. When you have selected an item, push the enter (47) button to confirm the entry.
A. General Setup
This menu is used for setting up the TV screen format, video functions and DVD functions and includes:
1. TV Display
Use the Cursor (30/40/59/60) buttons to select the format of the TV to which the DVD is connected. You
can choose between:
NTSC
PAL60
PAL
Auto
2. Screen Saver
If the unit is not used for more than 2 minutes, the screen saver will be activated. This will prolong the
service life of the connected TV set. The screen server is factory set to ON. Use the Cursor (30/40/59/60)
buttons to switch the screen saver on or off.

16
3. Video
Use the Cursor (30/40/59/60) buttons to select:
Interlace-YUV
TV-RGB
PC-VGA
S-Video
4. TV-Type
Use the Cursor (30/40/59/60) buttons to select the format of the TV to which the DVD is connected. You
have three options:
4:3PS: Pan & Scan for a normal TV.
4:3LB: Letterbox for a normal TV.
16-9: Wide screen for a widescreen TV
Note: Available aspect ratio’s will be printed on the back of the DVD packaging. Some DVD’s are
recorded in the cinema widescreen format (16:9) and others in the standard format (4:3). Some DVD’s
are recorded in both formats and may thus feature the Pan Scan function. If available, the Pan Scan
function will allow the 4:3 format to fill out the entire screen. However a part of the picture will be cut off
on both sides.
5. Password
Use the Cursor (30/40/59/60) buttons and the direct access (5/32) button to set up a number password.

17
6. Rating
Use the cursor (39, 40, 59, 60) buttons to set up a filter to block certain DVD’s.
7. Default
Use the cursor (39, 40, 59, 60) buttons to select restore. Confirm your selection by pushing the enter (41)
button. Now the DVMP-150’s default settings will be restored.
8. Resume Power
Select the next page using the Cursor (30/40/59/60) buttons and confirm by pushing the enter (41)
button. Now you are able to open the Power Resume menu.
Use the Cursor (30/40/59/60) buttons to switch the power resume function on or off. Confirm your
selection by pushing the enter (41) button.

18
B. Language setup
Includes:
1. OSD Language
This function allows you to allow you to select a language for the setup menu and for the screen display.
You can choose between English, Chinese, German, Spanish, French and Portuguese in this software
version. Select the language of your preference using the cursor (30/40/59/60) buttons and confirm by
pushing the enter (41) button.
2. Audio Language
This menu item is not functional in this software version. Use the language (49) button.
3. Subtitle Language
This menu item is not functional in this software version. Use the subtitle (50)button.
4. Menu Language
This function allows you to allow you to select a language for the setup menu.
You can choose between Chinese, English, Japanese, French, Spanish, Portuguese and Latin in this
version. Select the language of your preference using the cursor (30/40/59/60) buttons and confirm by
pushing the enter (41) button.

19
C. Audio Setup
Includes:
1. Audio Out
In the Audio Out menu you can set up the digital sound format that comes from the coaxial or optical
output on the rear panel. This signal is used when the unit is connected to a digital surround receiver.
SPDIF/OFF: Closes the digital outputs.
SPDIFF/RAW: Opens for the pure, non modulated digital signal.
SPDIF/PCM: Stands for Pulse Code Modulation. It may be necessary to activate this function if the digital
surround receiver can’t recognize the sound format. Select the sound format of your preference using
the cursor (30/40/59/60) buttons and confirm by pushing the enter (41) button.
2. Mic Setup
This menu item is not functional in the DVMP-150
3. Prologic II
This function, allows you to transform your ordinary DVD/CD into surround sound. You can chose between
two modes, or switch prologic OFF. Select the prologic mode your prefer using the cursor (30/40/59/60)
buttons and confirm by pushing the enter (41) button.
4. Key
Not functional in the DVMP-150
5. Echo
Not functional in the DVMP-150
6. Mic Volume
Not functional in the DVMP-150
Other manuals for DVMP-150
1
Table of contents