DarwinFitness TM 40 User manual

DARWIN TM 40
Art.-No. DF-TM40
Assembly and
operating instructions
D
A
R
W
I
N
F
I
T
N
E
S
S
G
E
R
M
A
N
Y
DFTM40.01.02

2
TM 40

3
TM 40
Dear Customer,
Thank you for deciding for a high-quality training equipment of the brand DARWIN, the brand that
makes athlete‘s hearts beat faster. DARWIN oers a wide r ange of home tness equipment like ellip-
tical cross trainers, ergometers, treadmills and rowing machines. DARWIN equipment is the optimal
equipment for all those who want to train at home independent of goals and tness level. For further
information please visit www.sport-tiedje.com.
SAFETY NOTICE
Please read all of the instructions carefully before assembly and rst use. These inst-
ructions are intended to ensure speedy assembly and explain safe usage. Make sure
that all people exercising with the equipment (in particular children and persons
with limited physical, sensory, mental or motor capabilities) are informed about
these instructions and its content in advance. In case of doubt, a responsible person
must supervise the use of the equipment.
This equipment has been manufactured according to the latest safety knowledge. As far as possible,
potential safety hazards which could cause injury have been eliminated. Make sure to follow the
instructions carefully and that all parts are securely in place. If required, read through the instructions
again to correct any mistakes.
Please pay close attention to the safety and maintenance instructions given here. The contract part-
ner cannot be held liable for damage to health, accidents or damage to the equipment when it is not
used in accordance with these instructions.
The equipment is only suitable for use at home. The equipment is not suitable for semi-professional
(e. g., hospitals, clubs, hotels, schools, etc.) and commercial or professional use (e. g., health clubs).
Retain these instructions in a safe place for future reference, maintenance or when ordering repla-
cement parts.

4
TM 40
CONTENTS
1GENERAL INFORMATION 5
1.1 Technical data 5
1.2 Personal safety 6
1.3 Electrical safety 7
1.4 Set-up place 7
2 ASSEMBLY INSTRUCTIONS; MAINTENANCE AND CARE 8
2.1 General instructions 8
2.2 Errors and error diagnosis 9
2.3 Care and maintenance 10
2.4 Maintenance and service calendar 12
3 ASSEMBLY 13
3.1 Package contents 13
3.2 Assembly instructions 14
4 OPERATING INSTRUCTIONS 21
4.1 Console display 21
4.2 Button functions 23
4.3 24
4.4 Programmes 25
4.4.1 Manual programme 25
4.4.2 Pre-set programmes 26
4.4.3 User-dened programmes 30
4.4.4 Heart rate-controlled programme 31
4.4.5 Heart rate measuring 32
4.4.6 Body fat test 34
4.4.7 Training programme 34
5WARRANTY INFORMATION 35
6 DISPOSAL 37
7 ORDERING ACCESSORIES 37
8 ORDERING SPARE PARTS 38
8.1 Service hotline 38
8.2 Serial number and model name 38
8.3 Parts list 39
8.4 Exploded drawing 43

5
TM 40
1 GENERAL INFORMATION
1.1 Technical data
LCD display of:
+time
+speed
+distance
+calories
+ incline
+heart rate
Motor output: 2 HP continuous output (DC motor)
Speed range: 1 - 16 km/h (0.1 km/h steps)
Speed quick keys: 6
Incline range: 1 - 10 % (in 0.5 % steps)
Incline quick keys: 6
Total number of training programmes: 32
Manual programmes: 1
Pre-set programmes: 24
User-dened programmes: 4
Heart rate-controlled programmes: 3
Running surface size (L x W): 1300 mm x 460 mm
Weight and dimensons:
Article weight (gross, including packaging): 82 kg
Article weight (net, without packaging): 74 kg
Packaging dimensions (L x W x H): 180 cm x 75 cm x 29 cm
Set-up dimensions (L x W x H): 172,50 cm x 80 cm x 131 cm
Folded dimensions (L x W x H): 106 cm x 80 cm x 150 cm
Maximum user weight: 130 kg

6
TM 40
1.2 Personal safety
+Before you start using the equipment, you should consult your physician that this type of exercise is
suitable for you from a health perspective. Particularly aected are persons who: have a hereditary di-
sposition to high blood pressure or heart disease, are over the age of 45, smoke, have high cholesterol
values, are overweight and/or have not exercised regularly in the past year.
+Please note that working out excessively can seriously damage your health. Please also be aware that
heart rate monitoring systems might be imprecise.
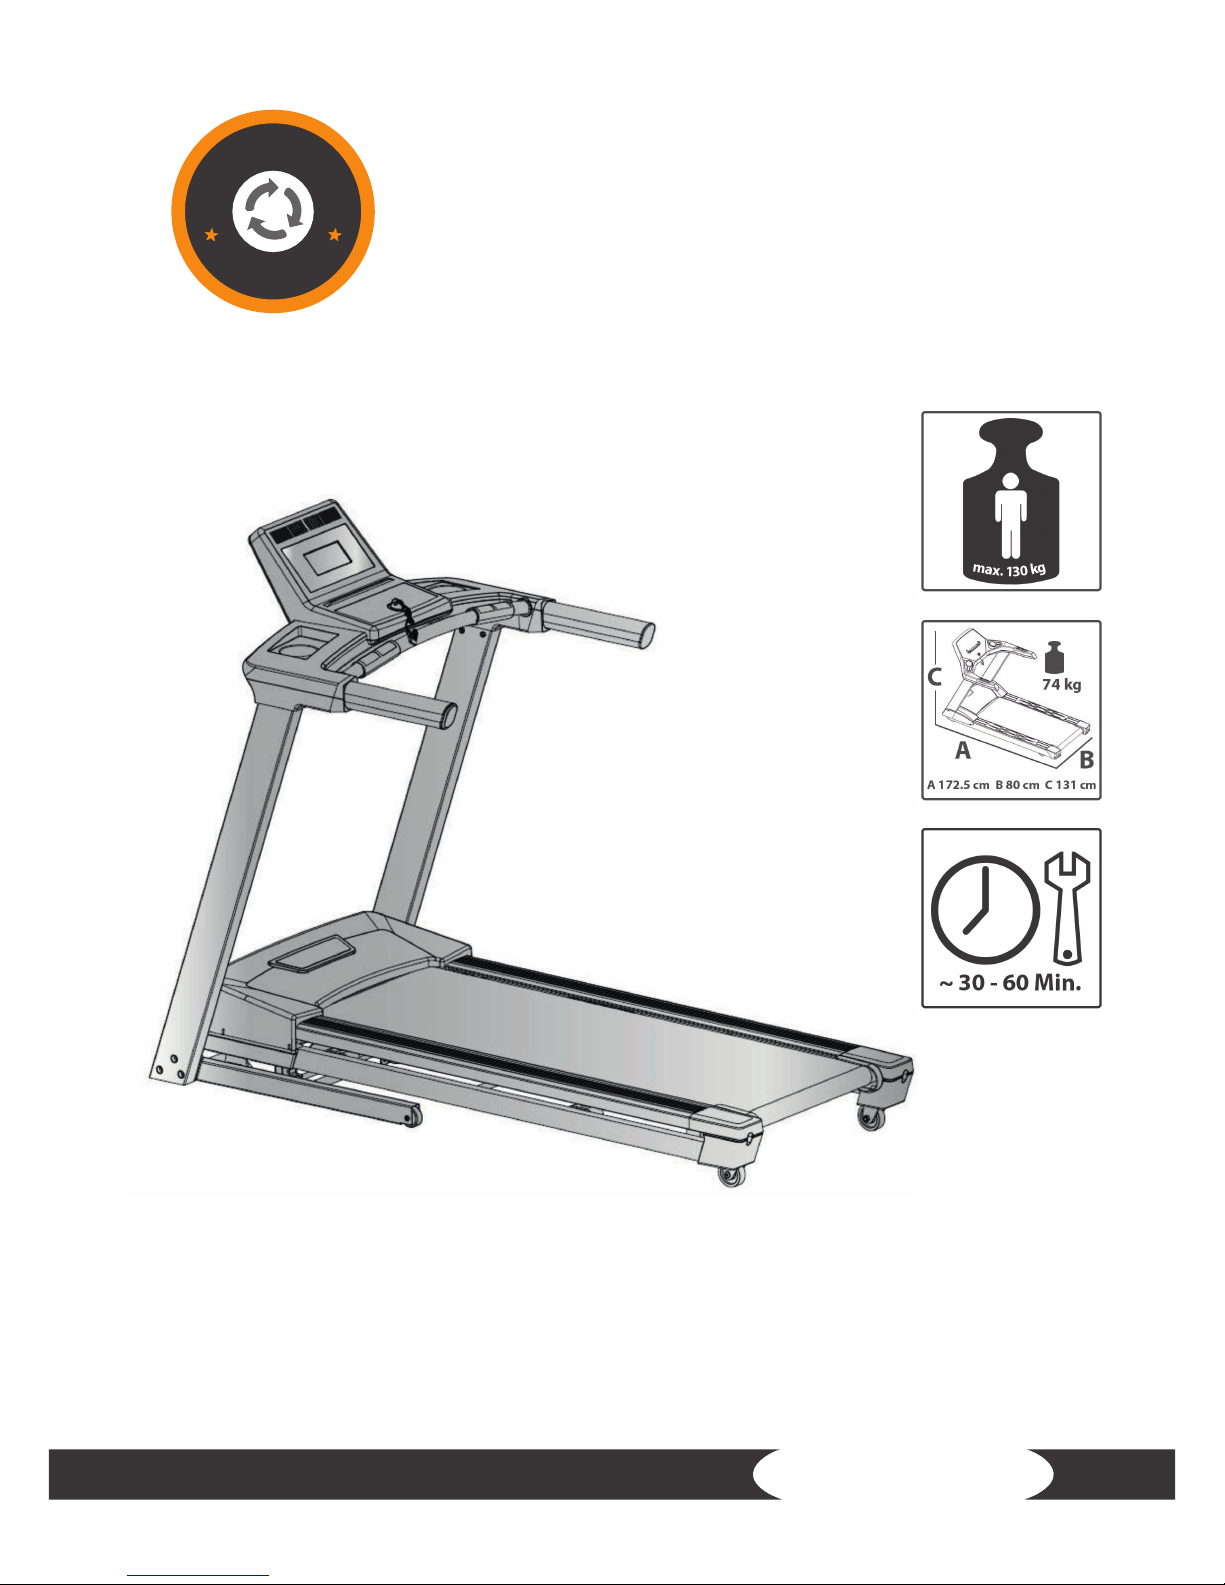
+The equipment may only be used for its intended purpose; that means for running training by adults.
+Any other usage is prohibited and potentially dangerous. The contract partner cannot be held liable for
damage resulting from improper use.
+ The equipment is strictly for use by one person at a time.
+Children should not be allowed unsupervised access to the equipment.
+Before starting your training, make yourself familiar with all of the equipment‘s functions and setting
options. Have an expert explain the correct usage of the product to you.
+ Make sure that nobody is in the range of motion of the equipment while exercising.
+Keep your hands, feet and other body parts, hair, clothing, jewelry and other objects well clear of mo-
ving parts.
+ During use, wear suitable sports clothing rather than loose or baggy clothing. When selecting sports
shoes, think about the suitability of the sole – preferably this should be made of rubber or other non-
slip materials. Shoes with heels, leather soles, studs or spikes are not suitable. Never work out in bare
feet.
+ At the rst signs of weakness, nausea, dizziness, pain, diculty in breathing or other abnormal symp-
toms, stop your workout immediately and, if necessary, consult your physician.
+ Without prior agreement from your authorized contract partner, opening the equipment is prohibited.
+ The equipment has stable steps on the sides that you can stand on in case of an emergency and leave
the equipment.
+The safety key should be inserted during all training.
+The safety key and the power cable should be removed when you are not present in order to rule out
improper usage by third parties.
Safety Key
+The equipment has an EMERGENCY STOP mechanism for your safety. The equipment may only be ope-
rated when the safety key is properly attached to the contact point of the cockpit. The equipment will
automatically stop immediately if the safety key is no longer on the contact point. That is why you
should attach the safety key string with the clip to your clothing before training. Remove the safety key
from the cockpit with the help of the string if you would like to quickly stop the treadmill, you can no
longer handle the speed or an emergency occurs.
+In order for the safety key to be released from the cockpit contact point in the event of a fall, the clip of
the safety key must be attached (xed) to your clothing!
+An uncontrolled usage of the equipment by third parties can be avoided by removing and storing the
safety key.
+Prevent children from having access to the safety key.

7
TM 40
1.4 Set-up place
+The equipment should only be used indoors, in a suciently heated and dry area (ambient tempe-
rature between 10°C and 35°C). The equipment should not be used outdoors or in rooms with high
humidity (over 70%) like swimming pools. The equipment should only be stored in surroundings with
an ambient temperature between 5°C and 45°C.
+The training room should be well ventilated during training and not be exposed to any draughts.
+Choose a location in which to place the equipment such that there is enough free space/clearance
to the front, the rear and to the sides of the equipment (at least 1.50 m). Furthermore, the equipment
should not be set up in main entrances or on escape routes.
+Always keep the power cable away from hot surfaces and grounds and make sure that the cable is not
stuck somewhere or becomes a„trip hazard“.
+No objects of any type should be inserted into the openings of the equipment.
+The equipment should be placed on a level and solid surface, any unevenness in the oor should be
leveled out.
+A oor protective mat / equipment underlay can help to protect high-quality oor coverings (parquet,
laminate, cork, carpets) from dents and sweat and can help to level out slight unevenness.2
1.3 Electrical safety
+The equipment requires a 220 - 230V / 50 Hertz mains power supply.
+The equipment should be connected directly to a grounded plug socket only by means of the power
cable supplied. The use of multi-socket adapters or similar is not recommended. Extension leads must
comply with local electrical safety guidelines. Always fully unwind the power cable.
+The outlet should be secured with a fuse with a minimum value of„16 amperes, slow“.
+When plugged in, do not leave the equipment unattended at any time. To avoid use by anyone unfami-
liar with the operation instructions, the power cable should be removed when the equipment is not in
use.
+ Keep the power cable away from heat, oil and sharp edges. Do not route the power cable underneath
the equipment or under a carpet or rug, and do not place any objects on top of it.
+In order to reduce the risk of an electric shock, always unplug the equipment from the mains socket
immediately after your workout, before assembly or dismantling, and before maintenance or cleaning.
Do not pull on the cable.
+Make no modications to either the power cable or the mains plug.
+ If the power cable or the plug are damaged or defective, contact your authorized contract partner. Do
not use the equipment in the meantime.
+Do not keep electrical devices (e. g., mobile phones) in close proximity to the console or the control
electronics, otherwise display values (e. g., pulse measuring) could be inaccurate.

8
TM 40
2 ASSEMBLY INSTRUCTIONS, MAINTENANCE AND CARE
2.1 General instructions
+Please check if all parts and tools belonging to the equipment are included in the delivery and if
there is any transport damage. If there are any complaints, please contact your contract partner
directly.
+Some of the nuts and bolts to be used in assembly are already pre-mounted in order to make
set-up as easy as possible.
+The equipment must be assembled by adults. In case of doubt, ask for assistance from another
person with technical skills.
+Keep children away from the equipment during assembly, because small parts are included in
the delivery and may be swallowed.
+ Make sure that you have enough space (at least 1.50 m) in every direction during assembly.
+Do not leave any tools and packaging materials like plastic sheeting laying around to avoid dan-
ger of suocation for children.
+Assemble the equipment on an underlay mat or on the cardboard packaging in order to avoid
damage to the equipment and to the oor (scratches).
+ Before starting assembly, all individual parts should be placed on the oor next to each other.
+Read the assembly instructions carefully and assemble the equipment according to the illustra-
tions. Proceed carefully and cautiously.
+First loosen all parts and check for their correct tting. Then tighten the screws using a tool.
+Modications to the design or improper repairs may pose a hazard to the user and should not be
carried out. The product warranty may be void as a result.
+Only authorized service technicians are permitted to carry out all servicing and/or repairs – it
excludes maintenance and care.
+Damaged or worn components may impair your safety and the lifespan of the equipment. You
should therefore immediately replace damaged or worn components. Please contact your con-
tract partner in such a case. The equipment should no longer be used until it has been repaired.
When needed, only use original DARWIN spare parts.
+Check the tightness of all screw connections once a month.

9
TM 40
2.2 Errors and error diagnosis
Error Cause Solution
Console only shows
lines
Safety key missing Check if the safety key is inserted and
place it in
Running belt tilted Running belt not aligned Laufmatte gemäß Anleitung zentrieren
Running belt slips
through/stops
Belt tension/lubrication not
ok
Check belt tension/lubrication in accor-
dance with the instructions
Scraping noises Running belt scrapes, becau-
se it is not aligned
Align running belt in accordance with
the instructions
Display does not show
anything
Check plug connections
(cables)
Mains switch on “on”, make sure that the
safety key is inserted
No pulse display
Sources of interference in
the room
With chest strap
Unsuitable chest strap
Position of the chest strap
incorrect
Batteries empty
Remove sources of interference (e. g.
mobile phones, speakers, WLAN, mo-
wers, robot vacuum etc.)
Use suitable chest strap (see
recommended accessories)
Reposition chest strap and/or moisten
electrodes
Change batteries

10
TM 40
2.3 Care and maintenance
The most important maintenance measure is taking care of the running belt. This includes the
adjustment, tensioning and lubrication of the running belt. Damage caused due to a lack of care or
negligence will not be covered by the warranty. Thus, check for maintenance in regular intervals. Be
extremely careful when adjusting and tightening the belt, because a strong over or under tension
may lead to damage. The running mat is set properly in the factory before delivery. However, the
running mat may get out of place during transport.
Adjustment of the running mat
+During training, the running belt should run as centered and straight as possible. The alignment
of the running belt may change depending on the stress and load. Another reason can be the
positioning of the equipment on an uneven surface.
+While adjusting the belt, let the equipment run with a speed of approximately 5km/h. Nobody
may be on the equipment during this process.
+If the running belt drifts o to the left, turn the left setting screw on the rear end of the equipment
at most 1/4 rotation clockwise and the right setting screw at most 1/4 rotation counterclockwise
(g. C).
+If the running belt drifts o to the right, turn the right setting screw on the rear end of the
equipment at most 1/4 rotation clockwise and the left setting screw at most 1/4 rotation
counterclockwise (g. D).
+Then watch how the belt runs for approximately 30 seconds, because the change will not be
visible immediately.
+Repeat the process until the running belt runs straight again. If the running mat cannot be
adjusted, please contact the contract partner.
+If the running mat (belt) cannot be adjusted, please contact Sport-Tiedje.
Move the belt to the right Move the belt to the left

11
TM 40
Tensioning the running belt again
+If the running belt slips over the rollers during operation (if this is the case, a noticeable jerking
will be noticed while running), the running belt must be tensioned again. In most cases, the
cause for the slipping is a straining of the belt through usage. This is completely normal.
+It can be tightened through the same setting screws that were used during adjustment.
+While tightening the belt, let the equipment run at a speed of 5km/h.
+Turn the left and right setting screws directly after each other a max. 1/4 clockwise rotation.
+Then check if the running belt is still slipping. If this is the case, you must repeat the described
process.
Lubrication of the running belt
+If the running belt is inadequately lubricated, the friction will increase signicantly and this leads
to strong wear of the endless belt, running panel, motor and circuit board.
+If you feel an increase in friction from the running belt, this is an indicator that you should lubri-
cate the belt (however, a lubrication should be done at least every 3 months).
+In order to be able to optimally lubricate the treadmill, the running belt must be lifted slightly.
Then apply lubricating oil on the entire running deck. It is easiest to lubricate when the treadmill
is folded up. Apply three drops of lubricating oil between the belt and the running deck.
+Continue to rotate the belt by hand so that
the entire area between the endless belt and
running deck is lubricated. Wipe o the excess
lubricant.
+This maintenance must also be done after the
equipment has not been used for a longer peri-
od of time.
Note:
The lubricating oil is included in delivery.
Alternatively you can use silicone spray instead of
the lubricating oil.

12
TM 40
2.4 Maintenance and service calendar
The cockpit, casing, handrails and entire frame must be cleaned after every training session with a
moist towel (no solvent!) in order to avoid damage caused by sweat. We recommend you to give your
treadmill a thorough cleaning every 150 operating hours and to check all the components.
The following routine work must be done in the specied time intervals:
Part Weekly Monthly 2x annually Annually
Display Computer C I
Belt tension I
Belt lubrication I
Plastic covers C I
Screws & cable connections I
Legends: C = cleaning; I = inspect

13
TM 40
3 ASSEMBLY
3.1 Package contents
The package contains the parts represented in the illustration, including a power cable with
mains plug. If one of the illustrated parts is missing or damaged, please contact your contract
partner.
Main frame
Computer
Handle bar post
(right)
Handle bar post
(left)
Safety key
Handle bar set
Electric cable
Tools
Audio cabel

14
TM 40
3.2 Assembly instructions
Before assembly, take an exact look at the individual illustrated assembly steps and execute the
assembly following the specied order.
Step 1: Assembly of the left and right handle bar post
1.1 Connect the middle computer cable (82) and the lower computer cable (83).
Note:
Please be careful not to jam the cables. This can result in damage to your treadmill.
1.2 Mount the left and the right handle bar post (2 and 3) on the main frame (1) with six allen screws
(10) using the supplied allen wrench.

15
TM 40
Step 2: Assembly of the handle bar set
2.1 Connect the upper computer cable (81) and the middle computer cable (82).
Note:
Please be careful not to jam the cables. This can result in damage to your treadmill.
2.2 Put the handle bar set (4) on the left and the right handle bar post (2 and 3).
2.3 Mount the handle bar set (4) on the left and the right handle bar post (2 and 3) with four hex bolts
(7), four spring washers (8) and four at washers (9) using the supplied wrench.

16
TM 40
Step 3: Assembly of the computer (1/2)
3.1 Connect the upper computer cable (81) and the two handle pulse cables (63) with their counter-
parts (see gure).
Note:
Please be careful not to jam the cables. This can result in damage to your treadmill.
3.2 Put the computer (78) on the handle bar set (4).
3.3 Mount the computer (78) on the handle bar set (4) with four bolts (56) using the supllied allen
wrench.

17
TM 40
Step 4: Assembly of the computer (2/2)
4.1 Finally, mount the remaining two screws (20) with the supllied allen wrench.

18
TM 40
Step 5: Sfety key
5.1 Put the safety key (80) into the computer (78).
Note:
Please note that the treadmill can not be started without the safety key. Be sure to attach the clip
on your clothes before you start your training. In case the safety key is removed during your trai-
ning, the treadmill will stop immediately to ensure your safety.
Safety key

19
TM 40
Transport and storage
The treadmill is foldable and thus saves space when it is stored. It also makes it easier to transport.
Folding up the treadmill
1. Turn the treadmill o and remove the plug from the outlet.
2. Make sure that nothing is on or next to the equipment that can be spilled or knocked over or that
makes it impossible to fold up the treadmill.
3. (a.) Use both hands to grab the supportive bar directly under the rear part of the running mat so
that you have a stable lifting point.
(b.) Tilt the treadmill forward and make
sure that the hydraulic brake is correctly
locked.
Warning:
Observe the safety measures & lifting
techniques while lifting. Bend your knees
& elbows, keep your back straight and lift
up both arms.
(c.) Make sure that the locking mechanism
is secure by pulling the equipment
backwards and it does not move. Make
sure that you are standing safely if the lock
has not been engaged.
Warning:
• Do not lift the treadmill from the running belt or the rear transport wheels. These parts do not lock
and are dicult to grab. This may cause personal injury or damage to the equipment.
• Do not lean on the equipment when it is folded and do not place anything on top of it that may
make the equipment unstable or fall down. This may result in personal injury.
• Do not connect the equipment to the power supply when it is folded up. Try not to operate the
equipment when it is folded up.

20
TM 40
Unfolding the treadmill
Note:
Make sure there is enough space to set up the treadmill:
at least 1 m on both sides and to the front and at least 2
m behind the equipment for safety reasons. If the user
starts to fall, there is enough space to leave the treadmill.
Note:
Make sure that nothing is standing next to or on top of
the treadmill that can be spilled or thrown or that makes
it impossible to unfold the treadmill.
1. Stand behind the treadmill. Press the equipment
slightly forward towards the display and slightly press
the upper part of the hydraulic brake forward with your
foot until the lock releases and the treadmill can be
pulled backward.
2. The hydraulic brake will slowly lower independently.
You should still hold on to the treadmill until it has
lowered 2/3 of the way. Pay attention to an appropriate lifting technique, bend your knees and keep
your back straight.
Fixing an uneven ground
If the ground should be uneven you can x that by using the adjusting wheels at the mainframe under
the motor.
1. Lift the treadmill at the front and turn the ad-
justing wheels.
2. Turn the adjusting wheels clockwise to lift the
treadmill.
3. Turn the adjusting wheels counter clockwise to
lower the treadmill.
Down Up
Table of contents
Other DarwinFitness Treadmill manuals
Popular Treadmill manuals by other brands

NordicTrack
NordicTrack A2105 NTL06907.0 user manual

Weslo
Weslo Cadence 21.5 Treadmill manual

Paradigm Health & Wellness
Paradigm Health & Wellness 1010 owner's manual

NordicTrack
NordicTrack NTL07707.2 user manual

Christopeit Sport
Christopeit Sport RPT 6200 Assembly and exercise instructions

HOMCOM
HOMCOM B1-0095 Assembly instruction