Dash Everyday User manual

# DIC700
everyday
ice cream maker
Instruction Manual |Recipe Guide
r
e
c
i
p
e
s
i
n
s
i
d
e
!

2 ∙ page title
Important Safeguards....................................................................4-7
Parts & Features..............................................................................8-9
Using Your Everyday Ice Cream Maker .................................. 10-15
Cleaning & Maintenance ............................................................... 16
Troubleshooting.............................................................................. 17
Recipes....................................................................................... 18-35
Customer Support .......................................................................... 38
Warranty........................................................................................... 39
everyday
Ice cream maker
t
h
e
d
a
s
h
t
e
a
m
!

∙ 4 ∙
important safeguards
• Read all instructions before use.
• Remove all bags and packaging from appliance
before use.
• Never leave appliance unattended when in use.
• Make sure the appliance is cleaned thoroughly
before using.
• Do not use appliance for other than intended use.
For household use only. Do not use outdoors.
• Only use the appliance on a stable, dry surface.
• Do not place appliance on or near a hot gas burner,
hot electric burner, or in a heated oven.
• This appliance can be used by persons with
reduced physical, sensory, or mental capabilities or
lack of experience of knowledge, if they have been
given supervision or instruction concerning use
of the appliance in a safe way and understand the
hazards involved.
• This appliance is not a toy. Do not let children use
this appliance. Close supervision is necessary when
any kitchen appliance is used by or near children.
• Do not attempt to circumvent any safety
mechanisms of the Ice Cream Maker.
• Avoid contact with moving parts.
• Do not use sharp objects or utensils inside the
cooling containers. A rubber spatula or wooden
spoon may be used when the appliance is in the off
position. The button will be fully released.
• To prevent the risk of re, electric shock, or personal
injury, do not put cord, plug, or appliance in or near
water or other liquids. The motor is NOT dishwasher
safe.
• Never wash the Cooling Bowl in the dishwasher.
• Do not let the cord touch hot surfaces or hang over
the edge of tables or counters.
• Refrain from using attachments that are not
recommended by the appliance manufacturer, as
this may result in re, electric shock, or personal
injury.
• Do not heat the Ice Cream Maker on the stove or in
the microwave or oven.
• Remove the Cooling Bowl from the Motor before
storing in the freezer. Do not put other parts in the
freezer or refrigerator.
• Never handle the freezer container with wet hands.
• Ensure that hands are protected when handling the
Cooling Bowl to prevent freezer burn.
• The maximum operation time is 40 minutes.
• The maximum amount of liquid mixture that can be
poured into the appliance is 3 cups.
• Never refreeze any ice cream that has been fully or
partially defrosted.
IMPORTANT SAFEGUARDS IMPORTANT SAFEGUARDS
IMPORTANT SAFEGUARDS: PLEASE READ AND
SAVE THIS INSTRUCTION AND CARE MANUAL.
IMPORTANT SAFEGUARDS: PLEASE READ AND
SAVE THIS INSTRUCTION AND CARE MANUAL.
When using electrical appliances, basic safety precautions should always be followed, including:
• Any ice cream or sorbet containing raw ingredients
should be consumed within one week.
• Ice cream or sorbet containing raw or partially
cooked eggs should not be given to young
children, pregnant women, the elderly or unwell
people.
• Unplug the appliance prior to assembly/
disassembly, moving, cleaning, storage, and when
not in use. To unplug, grasp the plug and pull from
the outlet. Never pull from the power cord.
• Never wipe the plastic parts of the Ice Cream Maker
with cleaning solvents.
• After using, wash the freezer containers with a
sponge or soft cloth with warm water and mild
detergent. Rinse completely. Allow the cylinder to
dry completely before storing.
• Store in a dry place.
• Do not operate this appliance with a damaged cord,
damaged plug, after the appliance malfunctions,
is dropped, or damaged in any manner. Return
appliance to the nearest authorized service facility
for examination, repair, or adjustment.
• Check the Cooling Bowl for cracks every time
before use. If cracks or damage are found, please
do not use the Ice Cream Maker.
• If freezing solution (which is nontoxic) appears to be
leaking from the bowl, discontinue use.
• Do not puncture or heat the Cooling Bowls.
• For maintenance other than cleaning, please
contact StoreBound directly at 1-800-898-6970
from 9AM – 9PM EST Monday – Friday or by email at
• StoreBound shall not accept liability for damages
caused by improper use of the appliance.
• Improper use of the appliance can result in property
damage or even in personal injury.
• This appliance has a polarized plug (one blade is
wider than the other). To reduce the risk of electric
shock, this plug will t in a polarized outlet only
one way. If the plug does not completely t in the
outlet, reverse the plug. If it still does not t, contact
a qualied electrician. Do not attempt to modify the
plug in any way.
• A short power supply cord is to be provided to
reduce the risk resulting from becoming entangled
in or tripping over a longer cord. An extension
cord may be used if care is exercised in its use. If
an extension cord is used, the marked electrical
rating of the extension cord should be at least as
great as the electrical rating of the appliance. If the
appliance is of the grounded type, the extension
cord should be a grounding 3-wire cord. The
extension cord should be arranged so that it will
not drape over the countertop or tabletop where
it can be pulled on by children or tripped over
unintentionally.
∙ 5 ∙

important safeguards
• Lisez toutes les instructions avant utilisation.
• Retirez tout sac ou emballage de l’appareil avant
utilization.
• Ne laissez jamais l’appareil sans surveillance
pendant son utilization.
• Assurez-vous que l’appareil est minutieusement
nettoyé avant utilization.
• N’utilisez pas l’appareil en dehors de son utilisation
prévue. Pour usage ménager uniquement. Ne
l’utilisez pas à l’extérieur.
• N’utilisez l’appareil que sur une surface stable et
sèche.
• Ne placez pas l’appareil sur ou à proximité d’un
brûleur à gaz ou électrique, ou d’un four chaud.
• Cet appareil peut être utilisé par des personnes
dont les capacités physiques, sensorielles
ou mentales sont réduites ou qui manquent
d’expérience et de connaissances, à condition
qu’elles aient reçu une supervision ou des
instructions concernant l’utilisation de l’appareil en
toute sécurité et qu’elles comprennent les risques
encourus.
• Cet appareil n’est pas un jouet. Ne laissez
pas d’enfants utiliser cet appareil. Une étroite
surveillance est nécessaire lorsqu’un appareil est
utilisé par ou à proximité d’enfants.
• N’essayez pas de contourner les mécanismes de
sécurité de la machine à crème glacée.
• Évitez tout contact avec les pièces en movement.
• N’utilisez pas d’objets ou d’ustensiles tranchants à
l’intérieur des récipients réfrigérants. Une spatule
en caoutchouc ou une cuillère en bois peut être
utilisée lorsque l’appareil est en position d’arrêt. Le
bouton sera complètement relâché.
• An d’éviter les risques de feux, d’électrocution, ou
de dommages corporels, ne mettez pas le cordon,
la prise ou l’appareil dans ou à proximité de l’eau
ou d’autres liquides. Le moteur n’est PAS lavable en
machine.
• Ne lavez jamais le Bol réfrigérant au lave-vaisselle.
• Ne laissez pas le cordon toucher des surfaces
chaudes ou pendre au niveau des bords de tables
ou de comptoirs.
• Évitez d’utiliser des accessoires qui ne sont pas
recommandés par le fabricant de l’appareil, car ils
pourraient entraîner un feu, une électrocution ou un
dommage corporel.
• Ne faites pas chauffer la Sorbetière sur une
cuisinière, au micro-ondes ou au four.
• Retirez le Bol réfrigérant du Moteur avant de le
mettre au congélateur. Ne mettez pas d’autres
pièces dans le congélateur ou réfrigérateur.
• Ne manipulez jamais le Bol réfrigérant avec les
mains mouillées.
• Assurez-vous que vos mains sont protégées lorsque
vous manipulez le bol de refroidissement pour
éviter les brûlures de congélation.
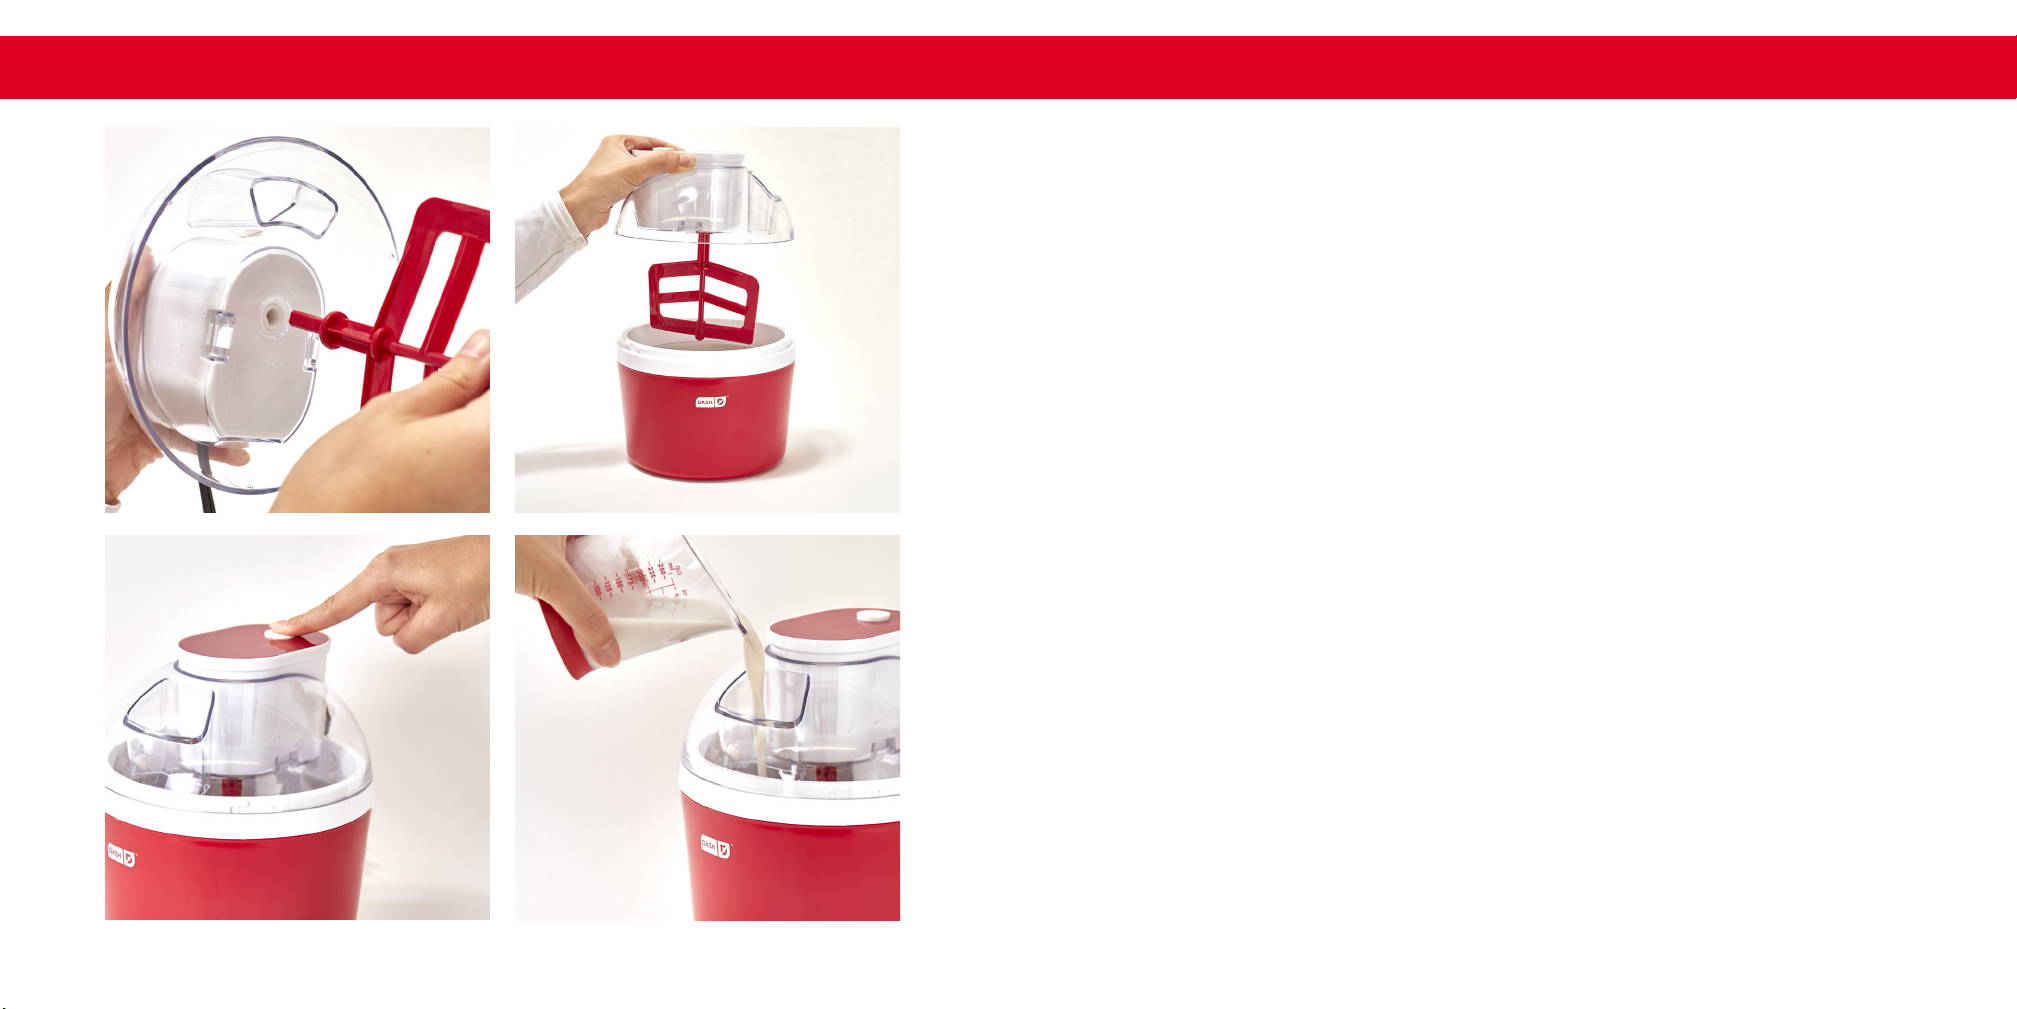
• La durée maximale de fonctionnement est de 40
minutes.
• Le maximum de mélange liquide pouvant être
versée dans l’appareil est de 3 tasses.
• Ne recongelez jamais de crème glacée totalement
ou partiellement décongelée.
• Toute crème glacée ou sorbet contenant des
ingrédients crus doit être consommé dans la
semaine.
• La crème glacée ou le sorbet contenant des
œufs crus ou partiellement cuits ne doit pas
être administré aux jeunes enfants, aux femmes
enceintes, aux personnes âgées ou aux personnes
malades.
• Débrancher l’appareil avant montage/démontage,
déplacement, nettoyage ou entreposage. Pour
débrancher, saisissez la che et retirez-la de la prise.
Ne tirez jamais sur le cordon d’alimentation.
• N’essuyez jamais les pièces en plastique de la
Sorbetière avec des solvants de nettoyage.
• Après utilisation, lavez les récipients de
réfrigération avec une éponge ou un chiffon
doux avec de l’eau chaude et un détergent doux.
Rincez complètement. Laissez le cylindre sécher
complètement avant de le ranger.
• Entreposer dans un endroit sec.
• N’utilisez pas cet appareil avec un cordon
endommagé, une prise endommagée, ou
si l’appareil est défaillant, s’il est tombé ou
endommagé de quelque façon. Pour toute
inspection, réparation ou ajustement, ramenez
l’appareil au détaillant agréé le plus proche.
• Vériez que le bol réfrigérante n’ait aucune ssure
avant chaque utilisation. Si vous détectez des
ssures ou des dommages, veuillez ne pas utiliser la
Sorbetière.
• Si la solution de congélation (non toxique) semble
fuir du bol, cessez l’utilisation.
• Ne perforez pas et ne chauffez pas les bols de
refroidissement.
• Pour toute question liée à l’entretien autre que
le nettoyage, veuillez contacter StoreBound
directement au 1-800-898-6970 de 9h à 21h HNE
du lundi au vendredi, ou par courriel à
• StoreBound n’est nullement responsable des
dommages causés par une mauvaise utilisation de
l’appareil.
• Une mauvaise utilisation de l’appareil peut entraîner
des dommages matériels ou même des blessures
corporelles.
• Cet appareil a une che polarisée (un des brins
est plus large que l’autre). An de réduire le risque
d’électrocution, cette che ne s’insère dans la
prise électrique que d’une façon. Si la che ne
s’insère pas complètement dans la prise, inversez
la che. Si elle ne s’insère toujours pas, contactez
un électricien qualié. N’essayez pas de modier la
che de quelque façon que ce soit.
• Un cordon d’alimentation court doit être fourni
an d’éviter le risque d’emmêlement ou de
trébuchement lié aux cordons plus longs. Une
rallonge peut être utilisée à condition de faire
attention. Si une rallonge est utilisée, la puissance
électrique indiquée sur la rallonge doit être au
moins aussi grande que celle de l’appareil. Si
l’appareil est connecté à la terre, la rallonge doit
être un cordon tripolaire avec prise de terre. La
rallonge doit être disposée de manière à ne pas
reposer sur le comptoir ou sur la table où elle peut
être tirée par un enfant ou source de trébuchement
involontaire.
garanties importantes garanties importantes
GARANTIES IMPORTANTES: VEUILLEZ LIRE ET
CONSERVER CE MODE D’EMPLOI ET D’ENTRETIEN
GARANTIES IMPORTANTES: VEUILLEZ LIRE ET
CONSERVER CE MODE D’EMPLOI ET D’ENTRETIEN
Lors de l’utilisation d’appareils électriques, il faut toujours respecter les précautions de sécurité de base,
notamment:
∙ 6 ∙ ∙ 7 ∙

PARTS &FEATURESPARTS &FEATURES
On/Off
Motor Unit
Ingredient Chute
Splash Guard
Cooling Bowl
Popsicle Sticks
Popsicle Sticks
Paddle
Motor Unit Splash Guard
Popsicle Mold
Popsicle Mold
Popsicle Container
Popsicle Container
∙ 8 ∙ ∙ 9 ∙

USING YOUR EVERYDAY ICE CREAM MAKER USING YOUR EVERYDAY ICE CREAM MAKER
• Remove all packaging materials.
• Check that your Ice Cream Maker has no visible damage and that no parts are missing.
• Before using the appliance for the first time or before using it after prolonged storage,
wash and dry the appliance and any accompanying accessories. See “Cleaning
& Maintenance” for instructions.
• If you chill your ingredients for your ice cream before using the appliance, the appliance
will work faster.
Freeze the bowl. Before starting, make sure the Cooling Bowl has been inside your freezer for
at least 8-12 hours. Shake the Bowl - if you hear liquid moving inside, return the Bowl to the
freezer until it has frozen solid.
Start. Flip the Power Switch to the ON position to start the Paddle turning. Do not pour
anything into the Everyday Ice Cream Maker before switching it ON.
Pour it in. While the Everyday Ice Cream Maker is ON, slowly pour the ice cream mixture
through the Funnel and into the Cooling Bowl.
Let it churn. Allow the Everyday Ice Cream Maker to churn the mixture until frozen or when desired
consistency is reached. Depending on your recipe, this process can take 30 minutes or more.
Make sure to let the appliance churn nonstop throughout the entire process or the ice cream will
instantly freeze to the inside of the Cooling Bowl and the motor will not be able to churn it.
It’s finished. Switch the Everyday Ice Cream Maker OFF and wait until the Paddle has
finished turning before removing the Splash Guard. Your ice cream is now ready to eat!
Caution: To prevent damage to the unit, do not use any metal utensils to scrape ice
cream from the Cooling Bowl.
1
2
3
4
5
BEFORE USING YOUR ICE CREAM MAKER
QUICK START
∙ 10 ∙ ∙ 11 ∙

Freeze the Cooling Bowl overnight. The Cooling Bowl must be in an upright position.
The freezer temperature must be 0℉ or lower for the Cooling Bowl to freeze properly.
Prepare your ice cream mixture and chill in the refrigerator. We recommend chilling
your mixture for an hour or two. The Dash Everyday Ice Cream Maker can hold up to
3 cups of liquid mixture. Do not exceed 3 cups when preparing your mixture.
When sufciently cold, place your Cooling Bowl on a stable surface.
Attach the Motor Unit to the Splash Guard by aligning the tabs on the Motor Unit with
the holes on the Splash Guard. Attach the Paddle to the Motor Unit. The Paddle will
click into place. It does not need to be screwed in. (Photo A)
Lower the Motor Unit with Paddle and Splash Guard into the Cooling Bowl (Photo B)
Press the Power Switch to turn the Motor Unit on. The Paddle will begin to turn.
(Photo C)
SLOWLY pour your chilled ice cream mixture into the Cooling Bowl through the
Ingredient Chute. (Photo D)
When the mixture is fully frozen and rises to ll the Cooling Bowl, the ice cream is
ready to serve. It is recommended to use a rubber or wooden spatula or spoon to
serve your ice cream in order to prevent damage to the inside of the Cooling Bowl. The
Dash Everyday Ice Cream Maker prepares up to 4 cups of fresh, homemade
ice cream.
1
2
3
4
USING YOUR DASh Everyday ice cream maker USING YOUR DASh Everyday ice cream maker
A B
C D 5
6
7
8
making ICE CREAM
∙ 12 ∙ ∙ 13 ∙

USING YOUR DASh Everyday ice cream maker
making popsicles A B
C
Pour your popsicle mixture into the Popsicle Mold, leaving room in the popsicle slots
so that your popsicles do not overflow when the sticks are inserted. (Photo A)
Place Popsicle Sticks into popsicle slots. Then, freeze your popsicles until solid. The
minimum recommended freezing time is 5 hours, but this time may vary based on
your recipe. (Photo B)
Remove the Popsicle Mold from the Popsicle Container and run the Popsicle Mold.
under warm water to loosen the popsicles. Remove your popsicles and enjoy!
(Photo C)
1
2
3
∙ 14 ∙ ∙ 15 ∙
USING YOUR DASh Everyday ice cream maker

• IMPORTANT: Allow the Cooling Bowl to reach room temperature before cleaning.
• Use warm, soapy water to wash the Paddle, Splash Guard, Popsicle Container, Popsicle Mold,
Popsicle Sticks and Cooling Bowl. Dry thoroughly.
• Do not submerge the Cooling Bowl in water or other liquids.
• Wipe the Motor Base with a damp cloth and dry thoroughly.
• Never use any abrasive cleaning agents on the appliance as they may damage the Everyday
Ice Cream Maker.
TO DISASSEMBLE YOUR ICE CREAM MAKER
TO DISASSEMBLE YOUR POPSICLE MAKER
TO CLEAN
TIPS & TRICKS
1. Switch your Everyday Ice Cream Maker OFF and unplug the appliance before removing any parts.
2. Make sure the Paddle has come to a complete stop. Separate the Paddle by gently pulling it off the
Motor Base.
3. Squeeze the two clips at the bottom of the Motor Base until the Splash Guard is released.
1. Remove Popsicle Sticks
2. Separate Popsicle Container from Popsicle Mold.
CLEANING &MAINTENANCE
ISSUE SOLUTION
The ice cream is not freezing.
The Cooling Bowl was not cold enough. Make sure the Cooling
Bowl has been in the freezer for at least 8 - 10 hours. Do not remove
the bowl from the freezer until ready to use.
The Cooling Bowl may have a leak. Check to make sure the Cooling
Bowl is not damaged or punctured.
The paddle is jammed or
will not spin.
The Everyday Ice Cream Maker must be in operation with the
Paddle spinning BEFORE adding any ice cream mixture to the
Cooling Bowl. The motor must be set in motion while the Bowl is
empty. Then, the ice cream mixture should be poured through the
Ingredient Chute.
Ice cream may have frozen to the sides of the Cooling Bowl
causing the Paddle to get stuck or stop moving. If this occurs, turn
off the appliance, remove the Splash Guard and use a plastic or
wooden utensil to scrape the frozen mixture off the sides. Manually
mix the frozen areas into the rest of the mix then continue churning
once again.
The Everyday Ice Cream Maker is equipped with a safety feature
that automatically shuts off the machine if the motor overheats. This
may occur if the mixture becomes too thick causing the motor to
run for a long period of time. In the event of an automatic shut-off,
simply switch the appliance off, unplug and allow it to cool. You
may continue using the Everyday Ice Cream Maker once the ice
cream mixture has thinned.
After each use, the Everyday Ice Cream Maker should be cleaned properly. Before moving
or cleaning the unit, make sure the appliance is unplugged.
NOTE: This appliance is NOT dishwasher safe. Do not submerge Cooling Bowl or Power
Unit in any liquid. Do not put the Cooling Bowl in the freezer if wet.
TROUBLESHOOTING
• The nished dessert will be a soft texture but if you wish for a rmer result, store the
ingredients in a separate container inside the freezer for an hour.
• For faster results, refrigerate or freeze your ingredients prior to making your mixture.
∙ 16 ∙ ∙ 17 ∙

RECIPE
GUIDE
Follow us!
@bydash | recipes, videos, & inspiration
@unprocessyourfood | veg & vegan-friendly meals

1 cup heavy cream
½ cup milk
¾ cup sugar
1 tbsp vanilla extract
INGREDIENTS:
CLASSIC VANILLA
ice cream
DIRECTIONS:
Prepare the ice cream mixture: In a bowl, stir together the cream and milk.
Add the sugar and whisk until the sugar is dissolved, 3 to 4 minutes. Test for
graininess by tasting a small amount of the liquid; it should feel smooth on the
tongue and there should be no sugar visible on the bottom of the bowl when
it is stirred or spooned out. Continue whisking, if necessary, to ensure that the
texture of the nished ice cream will be smooth. Stir in the vanilla.
Chill the mixture in the refrigerator until you are ready to make your ice cream.
Turn on your Everyday Ice Cream Maker, then while the machine is churning,
pour in your ice cream mixture through the funnel at the top.
∙ 20 ∙

1 cup heavy cream
½ cup milk
¾ cup sugar
1 tbsp vanilla extract
⅓ cup unsweetened
cocoa powder
INGREDIENTS:
CHOCOLATE
ice cream
DIRECTIONS:
In a bowl, stir together the cream and milk. Add the sugar and whisk until the
sugar is dissolved, 3 to 4 minutes. Continue whisking, if necessary, to ensure
that the texture of the nished ice cream will be smooth. Stir in the vanilla and
cocoa powder.
Chill the mixture in the refrigerator until you are ready to make your ice cream.
Turn on your Everyday Ice Cream Maker, then while the machine is churning,
pour in your ice cream mixture through the funnel at the top.
∙ 22 ∙

1 cup heavy cream
½ cup milk
¾ cup sugar
1 tbsp vanilla extract
6 tbsp water
1 tbsp sugar
⅔ cup fresh mint leaves,
packed
INGREDIENTS:
DIRECTIONS:
In a bowl, stir together the cream and milk. Add the sugar and whisk until the sugar is
dissolved, 3 to 4 minutes. Continue whisking, if necessary, to ensure that the texture of
the nished ice cream will be smooth.
In a food processor, combine the mint leaves, water, and sugar, then pulse until mixture is
as puréed as possible. Next, strain through a ne mesh sieve, then skim the foam off the
top of the strained liquid so that you are left with the mint juices. Lastly, whisk the liquid
mint into the ice cream mixture, combining well.
Chill the mixture in the refrigerator until you are ready to make your ice cream. Turn on
your Everyday Ice Cream Maker, then while the machine is churning, pour in your ice
cream mixture through the funnel at the top.
MINT CHOCOLATE CHIP
ice cream
∙ 24 ∙

Graham Cracker Ice Cream Base
1 package graham crackers
(9 crackers total)
1 ¼ cup whole milk
1 ¼ cup heavy cream
4 egg yolks
¼ cup white sugar
½ tsp kosher salt
S’mores Ice Cream
½ cup milk chocolate chips, melted
1 cup mini marshmallows
INGREDIENTS:
DIRECTIONS:
Crumble graham crackers into a ne powder with hands or food processor. Combine
graham cracker with milk and heavy cream. Let sit in refrigerator 8 hours or overnight.
Strain graham crackers from milk mixture through cheesecloth, coffee lter or ne mesh
strainer. Whisk together egg yolks and sugar until well combined. Heat graham cracker
milk in a suitably sized pot over low heat until the mixture begins to bubble lightly. Ladle
warm milk into yolk mixture slowly, whisking continuously, to combine.
Transfer mixture back into pot and continue heating on low heat, whisking continuously,
until the mixture thickens to the consistency of pancake batter. Remove from heat and
whisk in salt. Transfer to airtight container. Chill the mixture in the refrigerator until
you are ready to make your ice cream. Turn on your Everyday Ice Cream Maker, then
while the machine is churning, pour in the graham cracker ice cream base through the
funnel at the top. While ice cream maker is spinning, pour in melted chocolate and mini
marshmallows into the base. Transfer ice cream from ice cream maker to an airtight
container and freeze another 2 hours to rm up completely.
s’mores
ice cream
∙ 26 ∙

2 cups honeydew melon,
seeded, chopped
¼ cup mint, leaves only
½ cup simple syrup*
½ lemon, juiced
¼ tsp kosher salt
INGREDIENTS:
DIRECTIONS:
Combine honeydew, mint, simple syrup, lemon juice and salt in a blender.
Puree until smooth. Chill the mixture in the refrigerator until you are ready
to make your sorbet. Turn on your Everyday Ice Cream Maker, then while
the machine is churning, pour in your sorbet mixture through the funnel at
the top.
*Simple syrup is equal parts white sugar (by weight) and water (by volume),
dissolved over low heat to make a syrup.
PRO TIP: Fresh basil is also a great substitute for mint in this recipe!
honeydew mint
sorbet
8-10 yellow peaches, skin
on, pitted
1 cup simple syrup*
¼ tsp kosher salt
½ lemon, juiced
INGREDIENTS:
DIRECTIONS:
Combine peaches, simple syrup, salt and lemon juice in a blender. Puree
until smooth. Chill the mixture in the refrigerator until you are ready to
make your sorbet. Turn on your Everyday Ice Cream Maker, then while the
machine is churning, pour in your sorbet mixture through the funnel at the
top.
*Simple syrup is equal parts white sugar (by weight) and water (by volume),
dissolved over low heat to make a syrup.
PRO TIP: Infuse simple syrup with rosemary for an easy herbaceous twist
on this sorbet!
peach
sorbet
∙ 28 ∙ ∙ 29 ∙

1 cup blueberries
2 tbsp simple syrup or honey (optional)
1 cup nonfat Greek yogurt
Puree blueberries and simple syrup in blender. Add yogurt and either mix
by hand (to produce swirls) or puree together until combined. Pour into
popsicle molds and freeze 8 hours or overnight.
Let popsicles thaw 1-2 minutes or run under hot water for easy removal
from molds.
greek yogurt &
blueberry popsicles
3 cups seedless watermelon, cubed
¼ cup simple syrup*
1 tbsp mint, minced
Puree watermelon with simple syrup until smooth. Stir in mint. Pour into
popsicle molds and freeze 8 hours or overnight.
Let popsicles thaw 1-2 minutes or run under hot water for easy removal
from molds.
*Simple syrup is equal parts white sugar (by weight) and water (by volume),
dissolved over low heat to make a syrup.
watermelon mint
popsicles
∙ 30 ∙ ∙ 31 ∙
Ingredients: Ingredients:
Directions: Directions:

1 cup fresh strawberries
2 tbsp agave nectar or honey
½ cup plain yogurt
1 tbsp fresh lemon juice
Directions
In a food processor, blend all the ingredients until
smooth. Chill. Turn on your Everyday Ice Cream Maker,
then while the machine is turning, pour in your frozen
yogurt mixture through the funnel at the top.
33
½ cup strawberries, hulled
½ cup blueberries
½ cup raspberries or blackberries
¼ cup simple syrup
½ cup coconut water
Combine strawberries, blueberries, raspberries, simple syrup and coconut
water in blender. Puree together until smooth.
Pour into popsicle molds and freeze 8 hours or overnight. Let popsicles
thaw 1-2 minutes or run under hot water for easy removal from molds.
mixed berry
popsicles
∙ 32 ∙
Ingredients:
Directions:

1 cup strawberries, hulled
½ cup plain yogurt
¼ cup simple syrup
½ cup fresh orange juice
Ice Cream Base
1 cup whole milk
1 packet gelatin (1 ¼ tsp)
¼ cup white sugar
¼ tsp kosher salt
2/3 cup semisweet chocolate chips
Whisk together milk and gelatin to dissolve any lumps. Let bloom 5 minutes.
Transfer to suitably sized pot and bring to a simmer.
Add sugar and salt. Add chocolate chips and continue to stir until melted and
smooth*. Let boil 1 minute and remove from heat.
Pour into popsicle molds and freeze 8 hours or overnight. Let popsicles thaw 1-2
minutes or run under hot water for easy removal from molds.
*Chocolate will rst seize when melting, but will eventually melt down and
incorporate into milk.
For magic shell, microwave chocolate chips until melted, approximately 1 minute,
in 15-second bursts. Melt coconut oil in microwave until melted, approximately 30
seconds. Mix together until smooth.
When still warm, dip popsicles into magic shell and quickly dip again in desired
toppings before chocolate in magic shell hardens.
PRO TIP: For a vegan chocolate pudding, substitute milk for coconut milk.
PRO TIP: Magic shell can be saved in the refrigerator and melted again for reuse.
chocolate pudding
popsicles
Magic Shell
1 cup semisweet chocolate chips
3 tbsp rened (not virgin) coconut
oil, measured when solid
Combine strawberries, yogurt, simple syrup and orange juice in blender.
Puree together until smooth. Pour into popsicle molds and freeze 8 hours
or overnight.
Let popsicles thaw 1-2 minutes or run under hot water for easy removal
from molds.
Strawberry Orange
creamsicle
∙ 34 ∙ ∙ 35 ∙
Ingredients:
Directions:
Ingredients:
Directions:

NotesNOTES NOTES
∙ 36 ∙ ∙ 37 ∙

STOREBOUND, LLC – 1 YEAR LIMITED WARRANTY
Your StoreBound product is warranted to be free from defects in material and workmanship for a period of
one (1) year from the date of the original purchase when utilized for normal and intended household use.
Should any defect covered by the terms of the limited warranty be discovered within one (1) year, StoreBound,
LLC will repair or replace the defective part. To process a warranty claim, contact Customer Support at
1-800-898-6970 for further assistance and instruction. A Customer Support agent will assist you by troubleshooting
minor problems. If troubleshooting fails to x the problem, a return authorization will be issued. Proof of purchase
indicating the date and place of purchase is required and should accompany the return. You must also include
your full name, shipping address, and telephone number. We are unable to ship returns to a PO box. StoreBound
will not be responsible for delays or unprocessed claims resulting from a purchaser’s failure to provide any or all
of the necessary information. Freight costs must be prepaid by the purchaser.
Send all inquiries to support@storebound.com.
There are no express warranties except as listed above.
REPAIR OR REPLACEMENT AS PROVIDED UNDER THIS WARRANTY IS THE EXCLUSIVE REMEDY OF THE
CUSTOMER. STOREBOUND SHALL NOT BE LIABLE FOR ANY INCIDENTAL OR CONSEQUENTIAL DAMAGES
OR FOR BREACH OF ANY EXPRESS OR IMPLIED WARRANTY ON THIS PRODUCT EXCEPT TO THE EXTENT
REQUIRED BY APPLICABLE LAW. ANY IMPLIED WARRANTY OF MERCHANTABILITY OR FITNESS FOR A
PARTICULAR PURPOSE ON THIS PRODUCT IS LIMITED IN DURATION TO THE DURATION OF THIS WARRANTY.
Some states do not allow the exclusion or limitation of incidental or consequential damages, or limitations on
how long an implied warranty lasts. Therefore, the above exclusions or limitations may not apply to you. This
warranty gives you specic legal rights and you may also have other rights, which vary from state to state.
REPAIRS
DANGER! Risk of electric shock! The Dash Everyday Ice Cream Maker is an electrical appliance.
Do not attempt to repair the appliance yourself under any circumstances.
Contact Customer Support regarding repairs to the appliance.
TECHNICAL SPECIFICATIONS
Voltage 120V ~ 60Hz
Power Rating 12W
Stock#: DIC700_20181128_V7
warrantyCUSTOMER SUPPORT warranty
6am –
6pm
Our US-based customer support team is at your service
Monday - Friday during the times below.
Dash values quality and workmanship and stands behind this
product with our Feel Good Guarantee™. To learn more about our
commitment to quality, visit bydash.com/feelgood.
7am –
7pm 8am –
8pm
9am –
9pm
Hey Hawaii! You can reach our customer service team from 3AM to 3PM.
And also, Alaska, feel free to reach out from 5AM - 5PM.
feel good
guarantee™
∙ 38 ∙ ∙ 39 ∙
Other manuals for Everyday
1
This manual suits for next models
1
Table of contents
Other Dash Ice Cream Maker manuals
Popular Ice Cream Maker manuals by other brands

Kooper
Kooper Frozen 2415779 User instructions

GEL MATIC
GEL MATIC BC EASY 1 PM Use and instruction manual

Nostalgia
Nostalgia SSIC320 Instructions and recipes

Cuisinart
Cuisinart ICE-100XA Series Instruction/recipe booklet

Wilfa
Wilfa VANILLA ICMS-C15 instruction manual

Viatek
Viatek DUOtreat DT01 Directions for use