98
INSTRUCTIONS GENERALES DE SECURITE
Pendant l'utilisation des appareils électriques, il est indispensable de respecter scrupuleusement quelques
règles de sécurité fondamentales, en particulier:
Lire attentivement le mode d'emploi avant d'installer et utiliser l'appareil.
Ne pas plonger le corps principal de l'appareil dans l'eau ou autres liquides: danger de chocs électriques.
Faire très attention quand l'appareil est utilisé par ou en présence d'enfants.
Débrancher l'appareil de la prise de courant quand il n'est pas utilisé et avant de le démonter ou de le nettoyer.
Ne pas toucher les parties en mouvement.
Ne pas utiliser l'appareil si le cordon d'alimentation ou la fiche sont abîmés, ou après un fonctionnement
anormal de l'appareil, ou si l'appareil est tombé par terre ou s'il a été endommagé de quelque façon que ce
soit. Dans ces cas, il est recommandé de s'adresser au Service Après-vente agrée pour les réparations.
Emploi d'accessoires qui n'ont pas été recomandés ou vendus par le constructeur de cet appareil pourrait
entraîner des risques d'incendie ou des chocs électriques ou des lésions à l’utilisateur.
Ne pas utiliser l'appareil à l'extérieur.
Eviter que le cordon d'alimentation puisse pendre le long du bord de la table ou du plan de travail ou touches
des surfaces chaudes.
CONSERVER CES INSTRUCTIONS
ATTENTION
Toute réparation ne devra être exécutée que par des centres d'assistance technique ou de personnel agrées.
Après avoir sorti l'appareil de l'emballage, s'assurer qu'il soit intact. En cas de doute, ne pas utiliser l'appareil
et s'adresser à un centre d'assistance technique agrée.
Les sachets en plastique, le polystyrène, les clous etc., étant des sources potentielles de danger, ne doivent
pas être laissés à la portée des enfants.
Cet appareil est destiné exclusivement à l'emploi pour lequel il a été conçu. Le constructeur et le vendeur de
l'appareil déclinent toute responsabilité en cas de non-respect des indications contenues dans ce manuel
d'utilisation.
S'assurer que la tension de réseau correspond à celle qui est indiquée sur l'appareil avant d'insérer la fiche
dans la prise de courant.
Ne pas utiliser d’objets ou d'outiles coupants à l’intérieur du bol. Ceux-ci risquent en effet de griffer ou
abîmer la cuve. Une spatule en caoutchouc ou une cuillère plastique peuvent être utilisées lorsque l'appareil
est éteint en position “0” ou “OFF”.
Ne jamais nettoyer l’appareil avec des utensiles abrasives.
Ne pas utiliser l’appareil sur surfaces chaudes ou près de flammes.
Ne pas nettoyer aucune partie de la machine dans le lave vaisselles.
N’arrêter jamais la machine en retirant la fiche de la prise de courant.
L'appareil doit obligatoirement être relié au secteur et avoir une prise de courant avec une portée minimum de
16A, avec contact de mise à la terre efficace. Le constructeur n'est pas responsable des dommages
éventuels causés par l'absence de la mise à terre dans l'installation.
Avant d'effectuer n'importe quelle opération d'entretien ou de nettoyage, vérifier que l'appareil ait été
débranché du secteur en retirant la fiche de la prise de courant.
Ne jamais laver l'appareil avec des jets d'eau, ne jamais l'immerger dans l'eau!
IMPORTANT:
Laisser la machine reposer sur un plan horizontal pendant au moins 12 h avant de l'utiliser pour la
première fois. Les agents réfrigérants pourraient en effet être dispersés, au cas où la machine aurait été
renversée pendant le transport et ils doivent avoir le temps de revenir dans la bonne position. Suivre la
même procédure par la suite aussi, toutes les fois que la machine aura été mise en position non
horizontale pour quelque motif que ce soit. Placer la machine de façon à ce qu'il y ait suffisamment
d'espace autour (au moins 20 cm), pour ne pas obstruer les prises d'air latérales.
•
•
•
•
•
•
•
•
•
•
•
•
•
•
•
•
•
•
•
•
•
•
Français
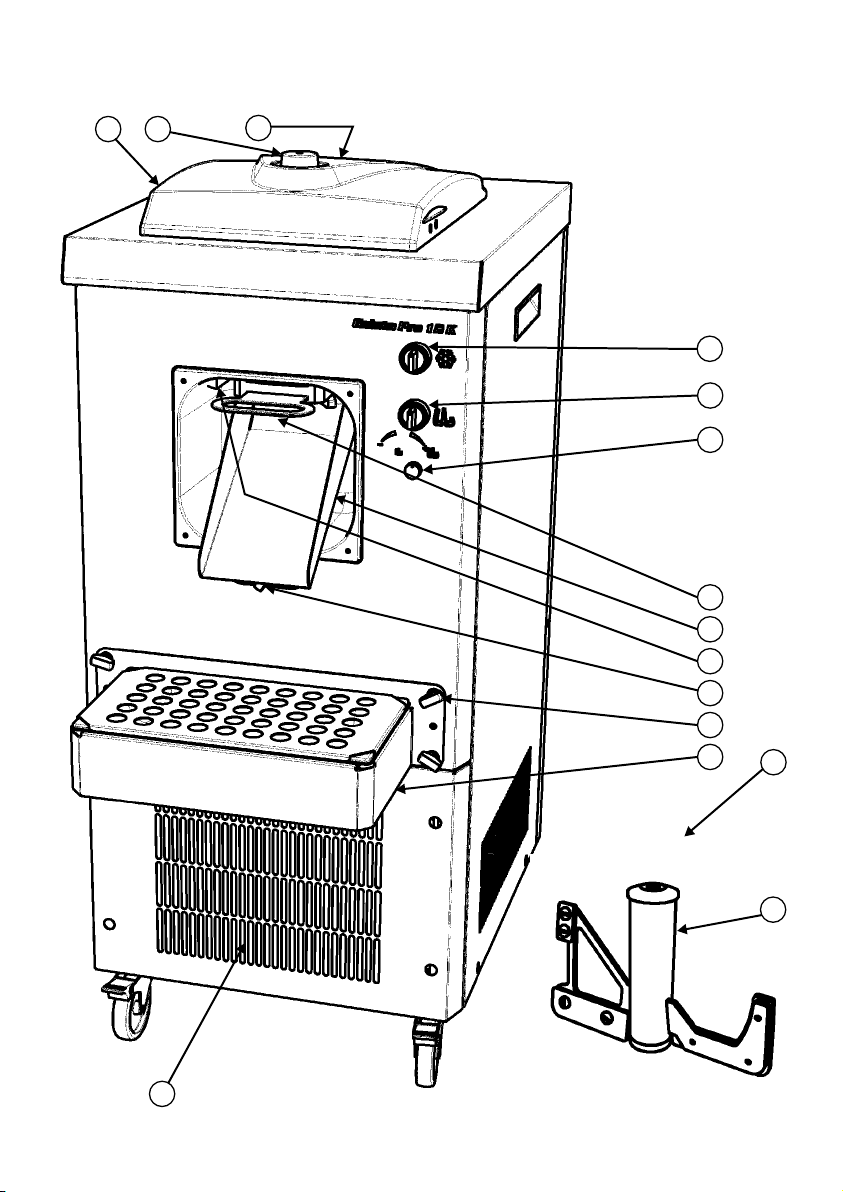
GELATO PRO 12K
(6)
.
12
.
,
.
.
.
,
(, , ,
).
(14).
(12).
,
.
, , .
:
•
, - .
•
.
.
• 2,5 .
.
• , ,
,
.
•
(10).
• (5)
.
• (4).
• (9).
•
.
• (1)
.
:
«»,
.
,
.
• (3).
• ,
(2)
.
(7).
,
, (
) .
:
.
.
•
,
10/15 .
• (3)
.
• ,
- ,
.
• (8).
•
(1).
• , (9).
• (2).
.
• ,
(7).
• ,
(2),
(3)
. .
• ,
(9).
!
. “”
.
, ,
.
,
,
.
•
;
.
• ,
, (1), 5
.
•
,
( 2.5
).
GELATO PRO 12
.
,
!
GELATO PRO 12
.
• ,
2
.
• .
.
•
3- , (11).
`Ìi`ÊÜÌÊÌiÊ`iÊÛiÀÃÊvÊ
vÝÊ*ÀÊ*Ê`ÌÀÊ
/ÊÀiÛiÊÌÃÊÌVi]ÊÛÃÌ\Ê
ÜÜÜ°Vi°VÉÕV°Ì