davicia DAVIVENDY MA07-02/B User manual

USER’S MANUAL
MA07-02/B
15/09/2011
www.davicia.com

USER’S MANUAL
MA07-02/B
1
INDEX
Page
1.
1.1.
1. DESCRIPTI N
DESCRIPTI NDESCRIPTI N
DESCRIPTI N
2
2.
2.2.
2. INSTALLATI N
INSTALLATI NINSTALLATI N
INSTALLATI N
2.1. Location and setting
2.2. Startup
3
3
3
3.
3.3.
3. PERATI N
PERATI NPERATI N
PERATI N
3.1. Advertising and prices
3.1.1. Using smart cards
3.2. Weight and height
3.2.1. Using the baby scale accessory
3.3. Blood pressure
3.4. Body fat
3.5. Printed results
4
4
4
5
5
6
6
8
4.
4.4.
4. SETUP
SETUPSETUP
SETUP
4.1. Accounting
4.2. Programming
4.2.1. Clock setting
4.2.2. Price programming
4.2.3. Programming advertising
4.2.4. Programming the ticket
4.2.5. Programming the logo
4.2.6. Smart card programming
9
9
9
9
10
10
11
12
12
5.
5.5.
5. MAINTENANCE AND CLEANING
MAINTENANCE AND CLEANINGMAINTENANCE AND CLEANING
MAINTENANCE AND CLEANING
5.1. Cleaning the blood pressure cuff
5.2. Paper roll change
5.3. Equipment disposal
14
14
14
15
6.
6.6.
6. TR UBLESH TING
TR UBLESH TINGTR UBLESH TING
TR UBLESH TING
16
7.
7.7.
7. TECHNICAL SPECIFICATI NS
TECHNICAL SPECIFICATI NSTECHNICAL SPECIFICATI NS
TECHNICAL SPECIFICATI NS
18
8.
8.8.
8. WARRANTY CERTIFICATE
WARRANTY CERTIFICATEWARRANTY CERTIFICATE
WARRANTY CERTIFICATE
20
9.
9.9.
9. CE DECLARATI N F C NF RMITY
CE DECLARATI N F C NF RMITYCE DECLARATI N F C NF RMITY
CE DECLARATI N F C NF RMITY
21
USER’S MANUAL
MA07-02/B
2
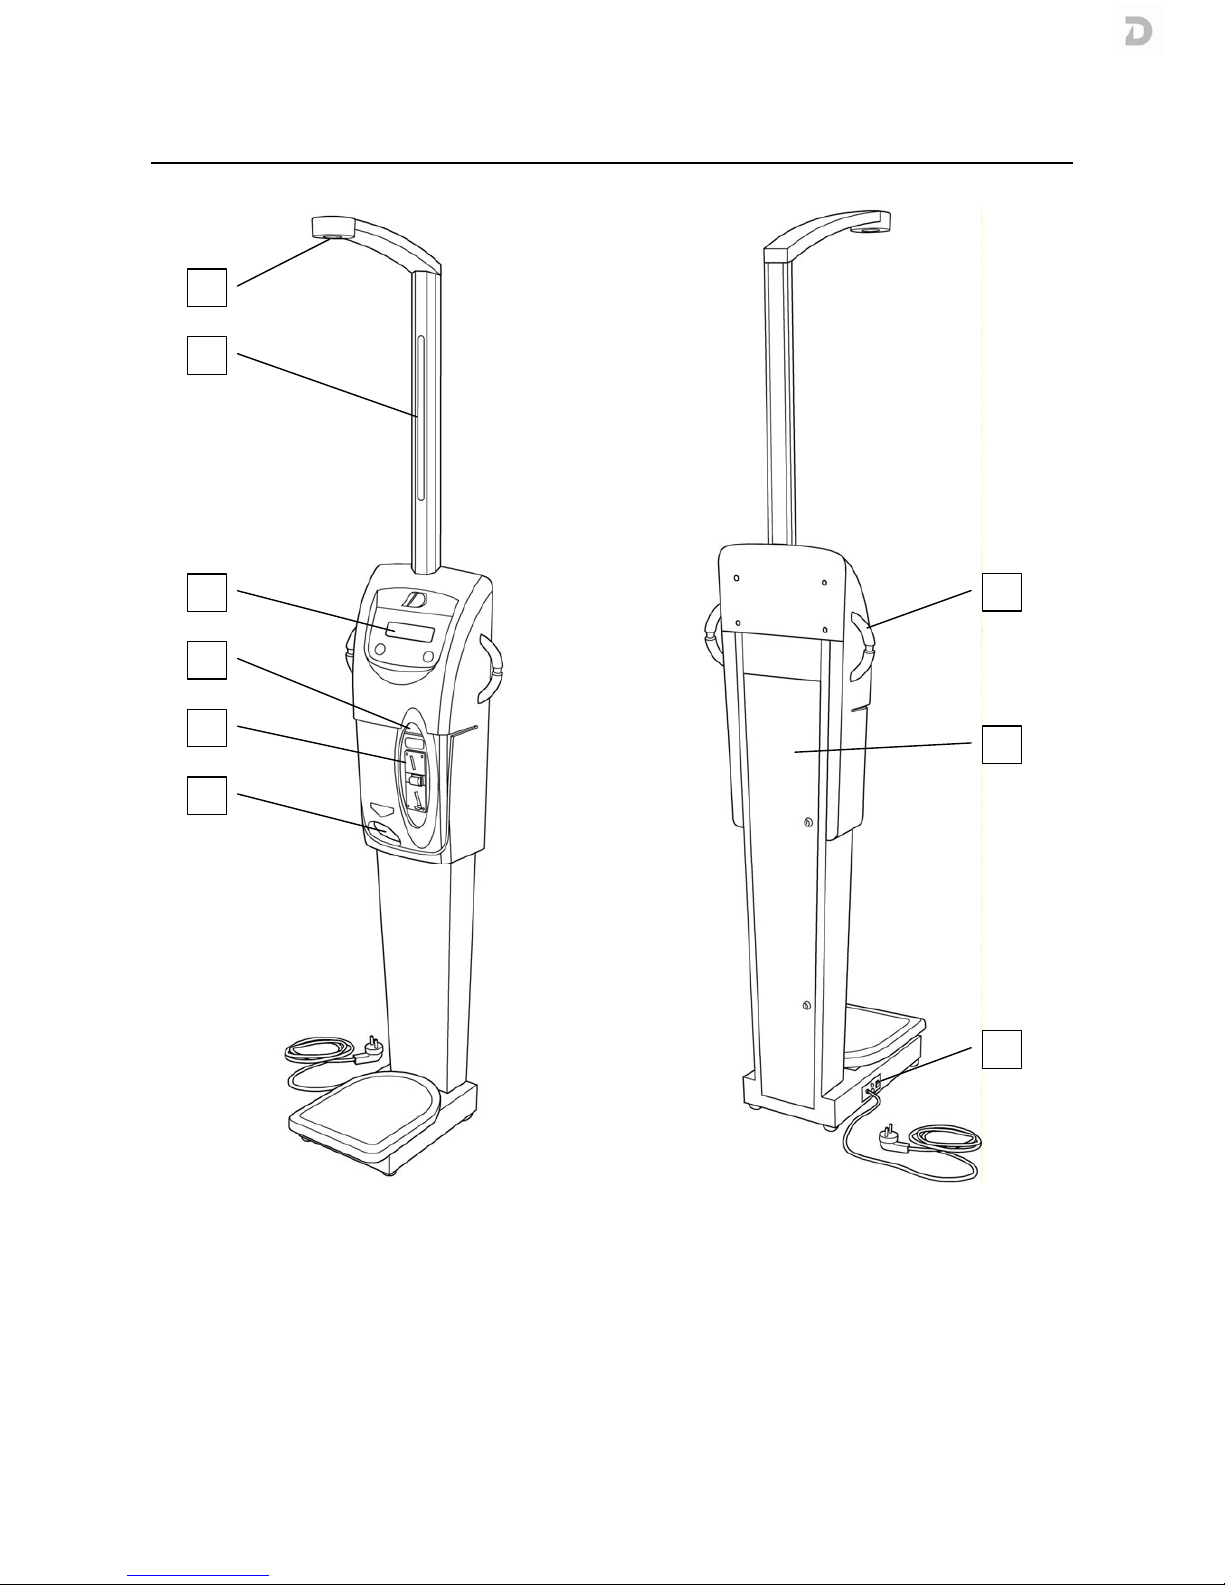
1. DESCRIPTION
(1) Height meter sensor
(2) Height meter arm and leds
(3) LCD Display
(4) Chip card reader
(5) Coin slot
(6) Ticket tray
(7) Body fat sensors
(8) Access door for paper roll change
(9) Power switch, fuses, cable
1
2
3
4
5
6
7
8
9

USER’S MANUAL
MA07-02/B
3
2. INSTALLATION
DAVIVENDY multifunction scale comes factory configured according to the voltage of each country and is ready
for operation immediately after unpacking.
Connect the device to the power supply via the power supply cable. It is necessary that the outlet is provided with
grounding. Adapters should not be used without grounding.
2.1. L CATI N AND SETT
2.1. L CATI N AND SETT2.1. L CATI N AND SETT
2.1. L CATI N AND SETTING
INGING
ING
Set the equipment in a place flat and level, where it is perfectly supported. This last point is of vital importance to
proper operation.
Make sure that within a radius of 70 cm around the equipment there is no interference that might affect the
measurement of height.
2.2. STARTUP
2.2. STARTUP2.2. STARTUP
2.2. STARTUP
o Connect the equipment to the power supply.
o Check that no objects are placed on the platform of the equipment.
o Actuate the switch on the bottom.
o At this point the equipment will perform the process of self-test.
o Step away from the equipment to not interfere in the process of auto-zero of the systems of weight and
height.
o If the process of self-test completes successfully, the screen displays the price of the service and the current
time.

USER’S MANUAL
MA07-02/B
4
3. OPERATION
After the equipment startup appears the home screen. This means that the scale has done the calibration
This means that the scale has done the calibration This means that the scale has done the calibration
This means that the scale has done the calibration
successfully and is ready for use.
successfully and is ready for use.successfully and is ready for use.
successfully and is ready for use.
DAVI&CIA
24/01/06 14:08:52
Home screen
3.1.
3.1. 3.1.
3.1. ADVERTISING AND PRICES
ADVERTISING AND PRICESADVERTISING AND PRICES
ADVERTISING AND PRICES
While the scale is not in use, on the home screen appear - alternatively to the date and time – the advertising
messages that have been programmed (see 4.2.3. Programming advertising).
If the user gets on the platform before introducing any amount, the individual prices for each service appear on
screen. The equipment can operate with 1, 2 or 3 different prices, depending on programming.
INSERT COINS
WEIGHT, HEIGHT = 0,10€
+ BODY FAT = 0,20€
+ BLOOD PRESS RE = 0,30€
When you insert coins, the amount is deducted from the programmed price. If your equipment runs with 3 prices,
on reaching the value of the first price appears:
INSERT COINS
WEIGHT, HEIGHT > START
+ BODY FAT = 0,10€
+ BLOOD PRESS RE = 0,20€
o By pressing <START> it begins the process for Weight and Height
o If you introduce the remaining amount up to the second price, it is automatically activated.
When the equipment operates with a single price, by reaching the programmed amount the service is activated
automatically without pressing any key.
3.1.1. Using
3.1.1. Using 3.1.1. Using
3.1.1. Using smart
smartsmart
smart cards
cards cards
cards
The main use of the smart card is as prepayment system and storage of the results from the measurements that
the user performs on the equipment. In one part of the smart card’s memory is stored the credit
creditcredit
credit and number of
number of number of
number of
the equipment where the card b
the equipment where the card bthe equipment where the card b
the equipment where the card belong
elongelong
elongs and on another part is stored the last 10 measurements
last 10 measurementslast 10 measurements
last 10 measurements of weight and
blood pressure with the date on which they were made.
The card is for personal and individual use, since it stores data from the last 10 measurements of weight and blood
pressure. When the card runs out of memory space for the 10 measurements, it deletes the first, so you always
have the most recent 10.
peration
By introducing the smart card, appears a screen indicating its credit.
If the card credit is higher than the price of the programmed options, you can select the one you want to perform,
following the indications.

USER’S MANUAL
MA07-02/B
5
SMART CARD
1> WEIGHT, HEIGHT 0,10€
2> + BODY FAT 0,20€
3> BLOOD PRESS RE 0,30€
n this screen, select the service you want.
The header shows the current credit of the smart card (in the example € 5.00) and using the keys you can select
the desired service, its price indicated next to it.
When you select either option DAVIVENDY subtracts the amount of the service into the smart card and starts the
measurement process automatically.
Buy credit
If your credit is less than the minimum price of the service, the following screen appears to us to buy more credit.
SMART CARD
¿WO LD YO LIKE TO RECHARGE?
YES > PRESS START
NO > PRESS STOP
By confirming the charge we can introduce the coins to increase our credit. The accumulated amount is displayed.
SMART CARD
YO HAVE: 5,00 €
INSERT COINS
TO CONFIRM PRESS <START>
To finish, push the <START> button. The new credit is automatically recorded on the smart card and we can
remove it from the equipment.
3.2. WEIGHT AND HEIGHT
3.2. WEIGHT AND HEIGHT3.2. WEIGHT AND HEIGHT
3.2. WEIGHT AND HEIGHT
Before starting the measurement, appear on-screen instructions for the correct posture we must take (step up
to the platform, stand straight). After a few seconds, the measurement is carried out automatically.
IMP RTANT: By failure to follow directions, the measurement result could be altered.
At the end of the measurement, the result values are displayed, in addition to the calculation of the Body Mass
Index (BMI)
VALUES OBTAINED
WEIGHT = 86.250 kg
HEIGHT = 1.86 m
B.M.I. = 25.2
3.2.1.
3.2.1. 3.2.1.
3.2.1. Using the baby scale accessory
Using the baby scale accessoryUsing the baby scale accessory
Using the baby scale accessory
Preparation and precautions
o Raise the cradle of the baby scale
o Before placing the baby in the cradle, press it with your hand to ensure that it has been blocked
o While weighing the baby, watch his movements to prevent him falling from the cradle

USER’S MANUAL
MA07-02/B
6
Measurement
To weigh the baby, use the measurement option "Weight and height" as you would with an adult. The equipment
detects that it is a weight below 15 kg, understands that we are weighing a baby then:
o The divisions are 10 g
o nly measures the weight, does not measure the height
o verrides the process of measuring the body fat
o Gives us a baby scale ticket
The baby scale ticket contains a table of weights according to age and complexions ranging from 0 to 24 months
old and is divided into 3 sizes: small, medium and large. It is divided by sex and always shows the 3 months which
correspond to the weight of our baby.
3.3. BL D PRESSURE
3.3. BL D PRESSURE3.3. BL D PRESSURE
3.3. BL D PRESSURE
To measure the blood pressure we must introduce the wrist without a watch in the cuff of the equipment, as
indicated in the figure.
To start the measurement press the START button.
You hear a beep and the cuff inflating process begins. The cuff is inflated to get to 250 mmHg, then the pressure
starts to drop automatically at a speed of 3 mmHg / sec. Simultaneously with the detection of each pulse, the
screen draws a heart and you hear a beep that accompanies it.
DAVI&CIA
250 mmHg
Upon completion of the measurement, the values obtained appear on the screen.
VALUES OBTAINED
P.SYSTOLIC = 147 mmHg
P.DIASTOLIC = 89 mmHg
HEART RATE = 83 ppm
WARNING: Do not self-medicate based on measurements made with the equipment.
3.4. B DY FAT
3.4. B DY FAT3.4. B DY FAT
3.4. B DY FAT
Limitations o f use
People affected by the following situations may have a degree of water content and bone density below average,
which can cause inaccurate calculation of the percentage of body fat. In these cases the equipment can not
provide accurate indication of the percentage of body fat.
o Children
o Elderly and postmenopausal women
o Bodybuilders and professional athletes
o People who developed a cold or fever
o People with edema

USER’S MANUAL
MA07-02/B
7
o People with osteoporosis or low bone density
o Pregnant
o Patients on dialysis
Furthermore, due to varying water content in certain circumstances, avoid the use of Body Fat Index:
o Immediately after making energetic exercise
o After a sauna
o After the bath
o After drinking alcoholic beverages
o After drinking lots of water or after eating (it is advisable to wait 1 or 2
hours)
o During the menstrual cycle
Precautions
Although there are no known side effects, Body Fat Index should not be used in the following cases:
o During an acute contagious disease
o In people with medical implants (eg a pacemaker)
o
In people with abnormal blood pressure or any heart disease
Input data
To calculate your body fat you need to enter some input, which must be within the following ranges:
o Weight: 45.0 kg to 225.0 kg
o Height: 140 cm to 205 cm
o Age: 10 to 80 years
therwise, the computer ignores the process of calculating the body fat.
Holding and correct posture for measurement
To ensure that the measurement is accurate you should hold the device correctly as it appears:
It is VERY IMP RTANT:
o The palms make the greatest possible contact with the electrodes of the equipment.
o Press electrodes firmly with the palm of your hands.
Electrod
e
s
USER’S MANUAL
MA07-02/B
8
The equipment does a measurement of the resistance of our body through the 4 electrodes. If contact with the
electrodes is not right or the hands are wrongly placed on the sensors, the resistance value will not be correct
which may lead to an inaccurate calculation of the percentage of body fat.
The resistance value must be between 390 and 1200 hms.
Measurement
The measurement of body fat index is optional. If the user steps off the platform, the equipment will override the
measurement of body fat index.
IMP RTANT: People with implants, pacemakers or other electronic device for medical use should not use the
measurement of body fat index.
To measure the body fat index, hold the lateral sensors with bare hands, clean and slightly moist, as it appears on
the screen indications.
The display indicates when the measurement is complete and you can take your hands off the sensors.
The equipment takes into account the following user data to output the result values:
o Age
o Sex
o Complexion (optional, depending on configuration)
If not using a smart card, you must enter the data using the computer keypad. Follow the instructions on each
screen to correctly enter each of the requested data.
If you use a smart card, your data should be already stored in the memory of the card, in which case you only shall
be asked to confirm it, using the equipment keypad.
Finally, the display shows the values obtained according to the measurement and data entered by the user.
VALUES OBTAINED
FAT INDEX = 28.2%
FAT MASS = 26.
7kg
MASS WITHO T FAT = 67.1kg
3.5. PRINTED RESULTS
3.5. PRINTED RESULTS3.5. PRINTED RESULTS
3.5. PRINTED RESULTS
Upon completion of the selected measurements, the equipment automatically prints a receipt with the obtained
results including the recommended values for each measurement performed.
DAVI&CIA
COLLECT YO R TICKET

USER’S MANUAL
MA07-02/B
9
4. SETUP
4.1.
4.1. 4.1.
4.1. ACC UNTING
ACC UNTINGACC UNTING
ACC UNTING
To issue an accounting ticket for the equipment:
o Access the maintenance door used for the paper roll change (see 1. Description – # 11)
o Press the black button that is located among the internal wiring of the equipment
o When you press the button, the printer will issue three copies of a ticket with the accounting of the
equipment
4.2. PR GRAMMING
4.2. PR GRAMMING4.2. PR GRAMMING
4.2. PR GRAMMING
When starting up the equipment, it will begin with an autotest sequence. After about 5 seconds the equipment
starts to emit 4 "beeps". Right then, press the code "1111" (corresponding to the user menu) using the keypad.
USER MENU
1>CLOCK 2>PRICES 3>ADVERT
4>TICKET 5>LOGOS 6>CARD
The options that are accessed through the user menu are:
CLOCK Clock setting
PRICES Price programming
ADVERTISING Programming advertising
TICKET Programming the ticket
LOGOS Programming the logos
CARD Smart card programming
Keypad operation
Programming is done using the main keypad, whose keys have multiple functions, numbers and letters.
Pressing more than once a number key, makes appear the various programmed characters (press the key once
displays the first character, for the following characters press more times until the desired character appears).
4.2.1. Clock setting
4.2.1. Clock setting4.2.1. Clock setting
4.2.1. Clock setting
If you select the CL CK
CL CKCL CK
CL CK option, the display shows the following message:
ADJUST CLOCK
1>DATE 2>TIME
STOP>EXIT
Date setting
Select <1> to set the date, the display shows the following message:
ADJUST CLOCK
DD/MM/YY
Where DD/MM/YY tells us in which format we must enter the new date. Introduce the data using the
alphanumeric keypad: day, month and year in that order with two digits for each input. If we want to enter March
23, 2007, type out 230307.

USER’S MANUAL
MA07-02/B
10
Time setting
Select <2> to set the time, the display shows the following message:
ADJUST CLOCK
HH:MM
Where HH:MM indicates the format in which we must enter the new time. Introduce the data using the
alphanumeric keypad, first hour and then the minutes, in 24-hour format. If we want to enter the 3:35 pm, type
out 1535.
4.2.2. Price programming
4.2.2. Price programming4.2.2. Price programming
4.2.2. Price programming
If you select the PRICES
PRICESPRICES
PRICES option, the display shows the following message:
1>PRICE 1
2>PRICE 2
3>PRICE 3
4>FREE
To enter the prices, select the button for the service you want to program.
PRICE 1 Price for Weight and Height measurement
PRICE 2 Price for Body Fat measurement
PRICE 3 Price for Blood Pressure measurement
FREE All measurements free
If for example we selected <1> (Weight, Height), the display shows the following message:
PROGRAM PRICES
PRICE 1 = --.-- €
Using the keypad enter the amount desired for Price1.
We can set different prices for the different services that are configured. Depending on the value of the service
we can have one or more prices.
For example, if programmed:
Price 1 (Weight, Height) = 0.50 €
Price 2 (Body fat) = 1.00 €
In this example we have 2 different prices, one for each service.
If we program:
Price 1 (Weight, Height) = 0.50 €
Price 2 (Body fat) = 0.50 €
n the screen will appear:
Weight, Height and Bfat = 0.50 €
4.
4.4.
4.2.3. Programming advertising
2.3. Programming advertising2.3. Programming advertising
2.3. Programming advertising
If you select the ADVERTISING
ADVERTISINGADVERTISING
ADVERTISING option, the display shows the following message:

USER’S MANUAL
MA07-02/B
11
ADVERTISING
1>PROGRAM 5>EXIT
Press <1> to start. With this option you can program a text, which appears in the display distributed in 4 lines. We
can program a total of 19 characters per line, considering that the blanks are also considered as a character. It is
not necessary to center the text, the equipment will center the text automatically.
ADVERTISING
LINE (1-4)= _
First enter the line number and press <START> to confirm, the display shows the following message:
ADVERTISING
LINE=1 COL MN=8
1ABCabcÀÁÂÄÅÆβÇàáâäåæç
PHARM_
We introduce the data that will appear in the selected line with the alphanumeric keypad. When finished, press
<START> to confirm the data.
The screen displays the information of: Line number, column and character set for the pressed key.
N TE: To enter a blank line is necessary to program at least one character of the line as "space". To delete a line
simply enter the line and press <START> without programming any character.
IMP RTANT: It is very important that LINE 1 is always programmed as it always appears on the screen header.
4.2.4. Programming of the ticket
4.2.4. Programming of the ticket4.2.4. Programming of the ticket
4.2.4. Programming of the ticket
If you select the TICKET
TICKETTICKET
TICKET option, the display shows the following message:
PROGRAM TICKET
1>TICKET CLASS 2>PROGRAM
The options that are accessible through the menu are:
TICKET CLASS We can select the type of ticket that we want to print.
o Standard
o Reduced: For each measurement, shows the ideal value according to the
result, but omits the complete tables of values and theirexplanation.
PROGRAM Programming the ticket lines
Programming the ticket lines
Press <2> to start:
PROGRAM TICKET
LINE (1-30)= _
CHARACTER TYPE (1-8)= _
USER’S MANUAL
MA07-02/B
12
We have 30 ticket lines to program, 5 in the header and 25 on the bottom. We have 4 possible character types as
the following:
Code
CodeCode
Code
Sample
SampleSample
Sample
Character Type
Character TypeCharacter Type
Character Type
Text alignment
Text alignmentText alignment
Text alignment
1
Normal Centered
2
Vertically expanded Centered
3
Horizontally expanded Centered
4
Doubly expanded Centered
5
Normal Left
6
Vertically expanded Left
7
Horizontally expanded Left
8
Doubly expanded Left
To program a line of text, on the screen enter:
o first, the line number and press <START> to confirm
o second, the character type and press <START> to confirm
The display shows the following message:
PROGRAM TICKET
LINE=1 COL MN=8
1ABCabcÀÁÂÄÅÆβÇàáâäåæç
PHARM_
We introduce the data that will appear in the selected line with the alphanumeric keypad. When finished, press
<START> to confirm the data.
The screen displays the information of: Line number, column and character set for the pressed key.
N TE: To enter a blank line is necessary to program at least one character of the line as "space". To delete a line
simply enter the line and press <START> without programming any character.
4.2.5. P
4.2.5. P4.2.5. P
4.2.5. Programming the logos
rogramming the logosrogramming the logos
rogramming the logos
If you select the L G S
L G SL G S
L G S option, the display shows the following message:
SELECT LOGO
1> P 5>DOWN
START>ENTER
STOP>EXIT
Press the UP or D WN to display the available logo options. Press START to confirm.
The selected logo will appear on the home screen as well as in the header of the ticket printed.
4.2.
4.2.4.2.
4.2.6
66
6.
. .
. Smart card programming
Smart card programmingSmart card programming
Smart card programming
If you select the CARD
CARDCARD
CARD option, the display shows the following message:

USER’S MANUAL
MA07-02/B
13
SMART CARD PROGRAMMING
1> CREATE 2> CHARGE
3> DISCO NT
IMP RTANT: To access the cards program menu a card must be inserted in the reader.
Create a new smart card
Press <1> to start:
SMART CARD PROGRAMMING
Creating smart card…
The equipment will create a new card with which we have inserted then in the reader. When the setting screen
disappears and returns to the programming menu means that the card has been successfully created.
Add credit
Using the programming menu, is possible to add credit to the smart card. Press <2> to start:
SMART CARD PROGRAMMING
CREDIT : 00,00€
VAL E : --,--€
Enter the value to charge in the card using the keypad. Press START to confirm.
The entered value is added to the card credit.
Setup a discount
You can apply a discount to all operations performed by a particular card. To configure the discount press <3>:
SMART CARD PROGRAMMING
DISCO NT (%): --
Enter the desired value using the keypad, then press START to confirm. Press ST P to exit without saving.

USER’S MANUAL
MA07-02/B
14
5. MAINTENANCE AND CLEANING
The only maintenance that can be performed by unqualified personnel is the change of paper roll.
Do not perform repairs on your own. In case of breakdown contact the Technical Support Service.
If the power cable is damaged, it must be replaced by the Technical Support Service or qualified personnel in order
to avoid dangerous malfunctioning.
To ensure accurate results, the equipment
To ensure accurate results, the equipment To ensure accurate results, the equipment
To ensure accurate results, the equipment DAVIVENDY requires an annual maintenance check that only
requires an annual maintenance check that only requires an annual maintenance check that only
requires an annual maintenance check that only
authorized personnel
authorized personnel authorized personnel
authorized personnel from the Davi & Cia Technical Support Service
from the Davi & Cia Technical Support Servicefrom the Davi & Cia Technical Support Service
from the Davi & Cia Technical Support Service can perform.
can perform. can perform.
can perform.
Clean the unit using only a soft cloth. Do not use gasoline or any similar solvent.
5.1. CLEANING THE BL D PRESSURE CUFF
5.1. CLEANING THE BL D PRESSURE CUFF5.1. CLEANING THE BL D PRESSURE CUFF
5.1. CLEANING THE BL D PRESSURE CUFF
Clean with a cloth soaked in a mixture of water and detergent. To dry, use a dry cloth.
5.2. PAPER R LL CHANGE
5.2. PAPER R LL CHANGE5.2. PAPER R LL CHANGE
5.2. PAPER R LL CHANGE
When the DAVIVENDY runs out of paper, it stops working and the following message is displayed:
ERROR
PRINTER
To change the paper roll:
o Switch off the equipment
o pen the door to access the printer (see 1. Description - #11), the printer is inside at the top.
1. Place the paper roll 2. Lift the cutter cover
3. Raise the lever
USER’S MANUAL
MA07-02/B
15
4. Insert the paper through the roller
according to Figure
5. Make sure the paper is straight and in the centre
6. Lower the lever
7. Insert the paper through the cutter as in
the Figure
8. Close the cover
9. Cut off the piece of paper sticking out
10. Switch on the equipment
5.3.
5.3. 5.3.
5.3. EQUIPMENT DISP SAL
EQUIPMENT DISP SALEQUIPMENT DISP SAL
EQUIPMENT DISP SAL
All electrical and electronic products should be disposed of separately from the
municipal waste stream via designated collection facilities appointed by the
government or the local authorities.
This crossed-out wheeled bin symbol on the product means the product is covered
by the European Directive 2002/96/EC.
The correct disposal and separate collection of the equipment will help prevent
potential negative consequences for the environment and human health. It is a
precondition for reuse and recycling of used electrical and electronic equipment.

USER’S MANUAL
MA07-02/B
16
6. TROUBLESHOOTING
Error Indicator
Error IndicatorError Indicator
Error Indicator
Cause
CauseCause
Cause
Correction
CorrectionCorrection
Correction
WEIGHT ERR R
C DE 01
Error weight reading - Failure in load cell
- Failure in A/D
- Failure in load cell wires
VERFL W
C DE 02
Weight over 225 kg - Failure in load cell
- Failure in A/D
- Failure in load cell wires
UNDERFL W
C DE 03
Weight under 0 kg - Failure in load cell
- Failure in A/D
- Failure in load cell wires
- Failure in load cell mounting
ZER WEIGHT ERR R
C DE 04
Error in Zero reading at
machine start.
- Failure in load cell
- Failure in A/D
- Failure in load cell wires
- Failure in load cell mounting
- Knocks in load cell
HEIGHT ERR R
C DE 05
Height reading error. - Failure in height cell.
- Failure in height circuit.
- Failure in height wires.
- Failure in power supply +12V
PNEUMATIC ERR R
C DE 10
Error on the E2Prom
memory.
- Check if the
Pressure
electronic board is
well inserted.
- Replace the
Pressure
electronic board.
PNEUMATIC ERR R
C DE 11
Cuff over-inflated. More than
300 mmHg.
- Failure in air pressure.
- Failure in pressure measuring.
PNEUMATIC ERR R
C DE 12
The inflating process time
has exceeded.
- Failure in air pressure circuit.
- Failure in pressure measuring.
PNEUMATIC ERR R
C DE 13
Problem caused by abnormal
function during the detection
process.
- Failure in air pressure circuit.
- Failure in pressure measuring.
PNEUMATIC ERR R
C DE 14
Problem caused by abnormal
memory function.
- Failure en la E2PR M de la PressV3.
- Failure in I2C circuit.
PNEUMATIC ERR R
C DE 15
The process has been
cancelled by ST P button.
- User push ST P keypad to abort
pressure measurement.
PNEUMATIC ERR R
C DE 16
The measuring process time
has exceeded.
- Failure in air pressure circuit.
- Failure in pressure measuring.
PNEUMATIC ERR R
C DE 17
No weight detection on the
platform.
- To measure the blood pressure you
must stand on the platform.
PNEUMATIC ERR R
C DE 18
Blood pressure measuring
error.
- Data type very difficult to analyze : low
signal, abnormal pressure with
arrythmics, etc
B DYFAT ERR R
C DE 20
Reading error in Bodyfat - Comms error in I2C
- Reset failure in Bodyfat PCB
- Power supply in +5V Bodyfat
E2PR M BASE
C DE 30
Error data in E2PR M BASE - Error in E2PR M BASE
E2PR M PRESSV3
C DE 31
Error data in E2PR M
PRESSV3
- Error in E2PR M PRESSV3
E2PR M BASE & PRESSV3
C DE 32
Error data in E2PR M BASE
and PRESSV3
- Error in E2PR M BASE Y PRESSV3
ERR R PRINTER
C DE 40
Failure in PRN - Comms error in PRN
- Power failure in PRN

USER’S MANUAL
MA07-02/B
17
N PAPER
C DE 41
Paper feed failure - Paper finished
- Paper feed failure
- Paper detector failure
CARD ERR R
C DE 50
Smart card failure in R/W - Bus I2C failure
- Card reader failure
- Card failure
UNKN W CARD
C DE 51
Card not recognized - Card code unknown.
UNKN WN ERR R
C DE 99
Unknown error

USER’S MANUAL
MA07-02/B
18
7. TECHNICAL SPECIFICATIONS
Model: DAVIVENDY
Manufacturer: DAVI & CIA
C/Murcia 35 nave G
E08830 Sant Boi de Llobregat
Barcelona – SPAIN
Display: LCD Graphic
240 x 64 pixels - 127 x 34 mm
Weight: 59 kg (aprox.)
Maximum external
dimensions:
62 x45 x 234 cm
Measurement range:
Weight:
Weight (baby scale):
Height:
Blood pressure:
Heart rate:
Body fat index:
2.5 to 225 kg in div.100 g
2.5 to 15 kg in div. 10 g
0 to 202 cm in div. 1 cm
40 to 300 mmHg in div. 1 mmHg
40 to 200 bpm
2 to 60 % in div. 0,1 %
Measurement methods:
Weight:
Height:
Blood pressure:
Body fat index:
300 kg load cell
Ultrasound
scillometric method
Bioelectric Impedance Measurement (B.I.A.)
Measurement accuracy:
Weight:
Height:
Static pressure:
Body fat:
Non metrological : +/- 100 g , n=3000
Metrological : Class accuracy C, n=3000 (*)
+/- 1 cm
+/- 3 mmHg
+/- 2%
Power supply:
230V~ , 50/60 Hz
115V~, 50/60 Hz
Consumption: In operation, max. 50 VA
In operation:
Body fat index:
Temperature:
Humidity:
ther parameters:
Temperature:
Humidity:
+15 ºC to +40 ºC
30 % to 75 %
0 ºC to +40 ºC
30 % to 75 %
Printer:
Thermal printhead
8 dots/mm.
384 dots/line, 32 characters per line.
Speed = 40 mm/s.
Paper end detection using a photoelectric cell.
Paper width: 57 mm (57 x 192 x 17.5 mm)
e:
d:
Min:
Max.
Class:
100 g / 0.2 lb
100 g / 0.2 lb
2.5 kg / 5.5 lb
225 kg / 500 lb
III
Fuses primary circuit:
Power supply 230V:
Power supply 115V:
Fuses secondary circuit:
( n board):
2 x 0.400 A 5 x 20 mm, type T
2 x 0.750 A 5 x 20 mm, type T
1 x 2.0 A 5 x 20 mm, type M
Classification according to Continuous operation.

USER’S MANUAL
MA07-02/B
19
EN 60601-1
Bioelectric Impedance Analyser: Type BF
Protection against electrical overload: Class I.
Protection against entry of water: rdinary
Equipment unsuitable for use in the presence of anaesthetic mixtures
inflammable with air, oxygen or nitrous oxide.
Classification according to
Measuring Instrument
standards and applicable EC
Directive
Scale, Stadiometer and Bioelectric Impedance Analyser:
Electromagnetic Compatibility Directive 2004/108/CE
Sphygmomanometer:
Directive 93/42/CE Class IIa
Applicable Standards:
SEGURIDAD ELÉCTRICA / Electrical Security
UNE EN 60601-1 (1990) + A1 (1993) + A11 (1993) + A12 (1993) + A2 (1995) + A13
(1996)
EN 60601-1-2 (2001):
EMISIÓN ELECTR MAGNÉTICA / EM Emission.
-EN 55011 (1998) / A1 (1999) / A2 (2002): Radiada / Radiated
-EN 55011 (1998) / A1 (1999) / A2 (2002): Conducida / Conducted
INMUNIDAD ELECTR MAGNÉTICA / EM Immunity.
-EN 61000-4-2 (1995) / A1 (1998) / A2 (2001): Descarga electrostática / ESD;
-EN 61000-4-3 (1996) / A1 (1998) / A2 (2001): Campo radiado EM de RF / EM
radiated field of RF;
-EN 61000-4-4 (1995) / A1 (2001) / A2 (2001): Ráfagas de transitorios rápidos /
EFT burst;
UNE EN 45501: Sólo equipos metrológicos / nly metrological equipment
This manual suits for next models
1
Table of contents


