davoline BO6131 User manual

�
�
�
�
�
�
�
�
�
�
�
�
�
� �
�
���������
�
�
�
�
�
�
�
�
�
�
�
�
�
� �
�
���������
MULTI FUNCTION
ELECTRICAL OVEN
MODEL BO6131
�
�
�
�
�
�
�
�
�
�
�
�

-3-
�
�
�
�
�
�
�
�
�
�
�
�
�
� �
�
���������
�
�
�
�
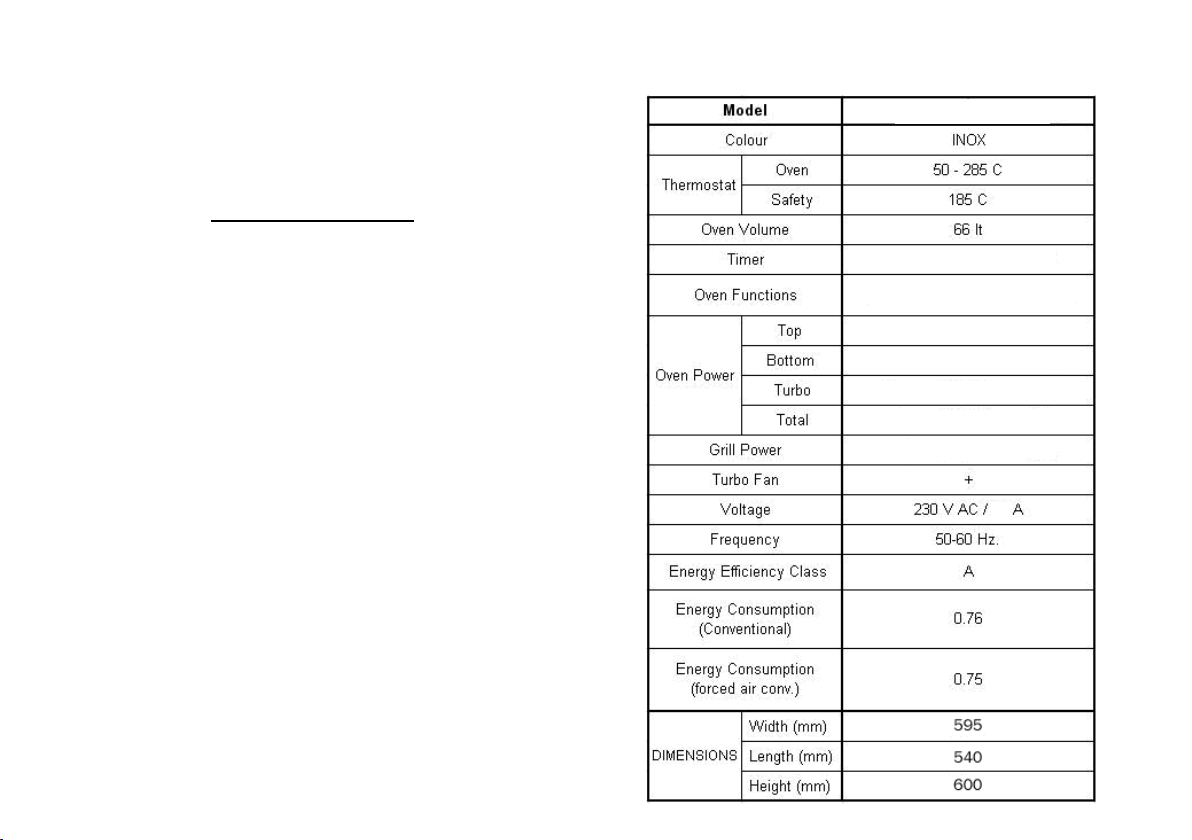
BO6131
Digital
Multifunction
1.2 kW
1.3 kW
2.5 kW
2.0 kW
2.0 kW
10
DAVOLINE BO6131
-3-

-4-
�
�
�
�
�
�
�
�
�
�
�
�
�
�
�
�
�
�
�
Figure
Figure
-4-
-5-
�
�
�
�
�
�
�
�
�
�
�
�
�
�
�
�
�
�
�
�
�
�
�
�
�
��
�
�
�
�
�
�
�
�
�
�
�
�
�
�
�
�
�
�
�
�
�
� �
�
�
�
�
�
�
�
�
�
�
�
�
�
�
�
�
�
�
�
�
�
�
�
�
�
�
�
�
�
�
�
�
�
-5-
�
�
�
�
�
�
�
�
�
�
��
�
�
�
�
�
�
�
�
�
�
�
�
�
�
�
�
�
�
�
�
�
� �
�
�
�
�
�
�
�
�
�
�
�
�
�
�
�
�
�
�
�
�
�
�
�
�
�
�
�
�
�
�
�
�
�
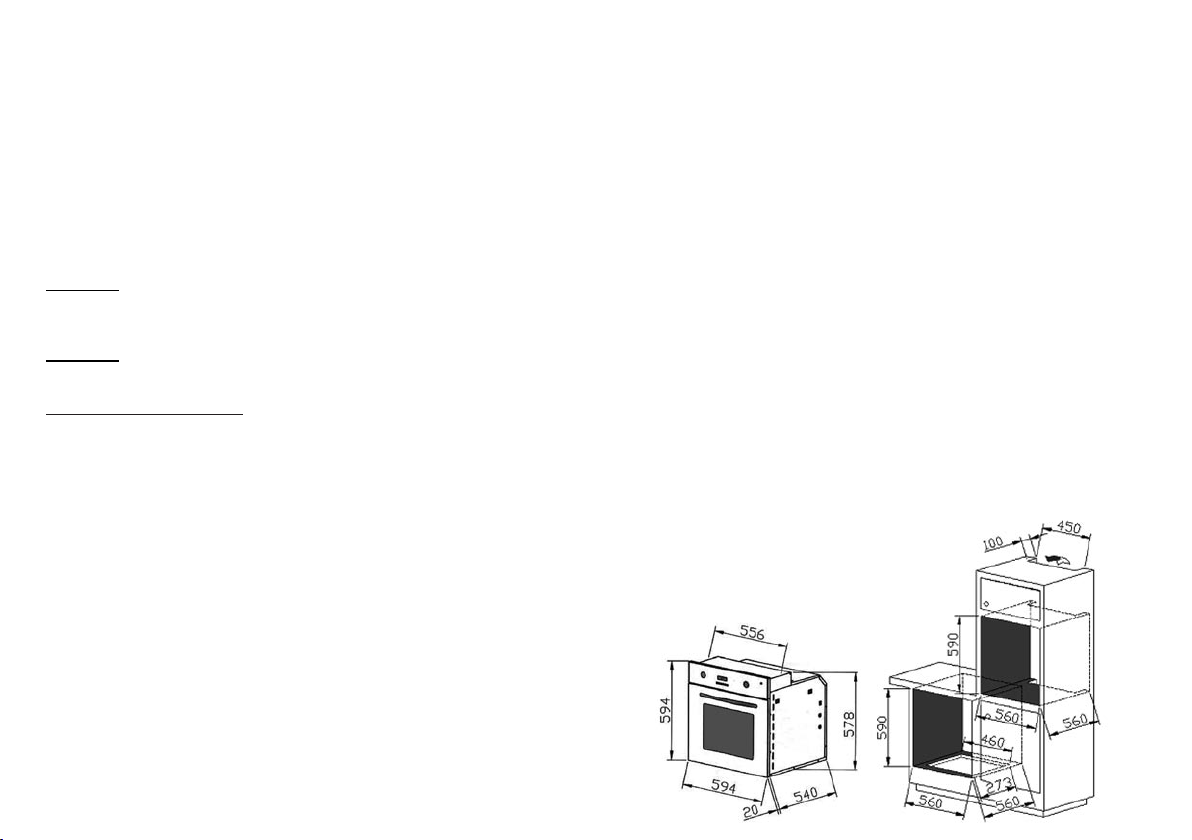
Figure.4 Cabinet Dimensions
Figure.3 Oven Dimensions
-6-
�
�
�
�
�
�
�
�
�
�
��
�
�
�
�
�
�
�
�
�
�
�
�
�
�
�
�
�
�
�
�
�
� �
�
�
�
�
�
�
�
�
�
�
�
�
�
�
�
�
�
�
�
�
�
�
�
�
�
�
�
�
�
�
�
�
�
�
�
�
�
�
�
�
�
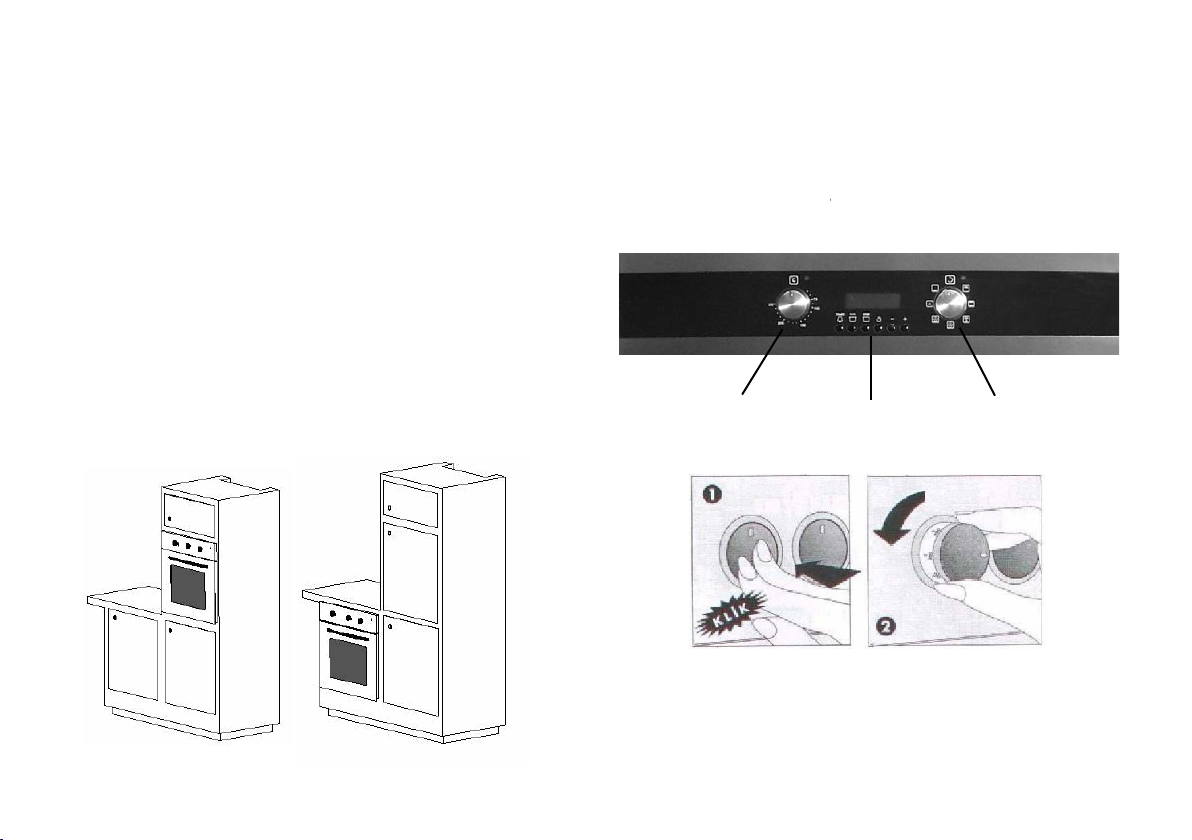
Multifunctions
1 2 3
1-Thermostat control, 2-Digital Timer, 3-Functions
-6-
refrigerator
-7-
�
�
�
�
�
�
�
�
-7-
�
�
SECTION 4 INTRODUCTION of CONTROL PANEL
You can find control buttons in Figure.7 With these control buttons power of
each heating element can be adjustable. Buttons can turn clockwise or
opposite to clockwise directions. Please bring the control button to required
cooking position and do not forget big numbers on button print means high
heat outlet. For first cooking, it recommended to use highest cooking
position.
Figure 7. Front Panels for Ovens with 4&7 Functions
SECTION 5 USAGE of OVEN
Control Switches of Oven
Indicator lamp will be on together with thermostat switch. When the heat
inside the oven reaches the set value, thermostat cuts the circuit and the
lamp is off. When the heat is below set value, thermostat is on again and
indicator lamp is lit.
Usage of Oven
During initial operation of your oven, a smell arising from insulation
materials and heating elements will be generated. To avoid it, operate your
oven at 250 C for 45 minutes without putting any trays before use.
1. The meals that can be cooked
2. Positions of trays
3. Thermostat positions
4. Recommended cooking times are given in cooking table.
5. Turn the “oven heating control” switch clockwise to adjust cooking time
for the meal you desire to cook, refer to cooking table.
6. Before cooking, pre-heat the oven for 10 minutes. The front cover of the
oven should be open. Put the dish in the oven after pre-heating.
OVEN FUNCTIONS :
- 4 FUNCTIONS
- 7 FUNCTIONS
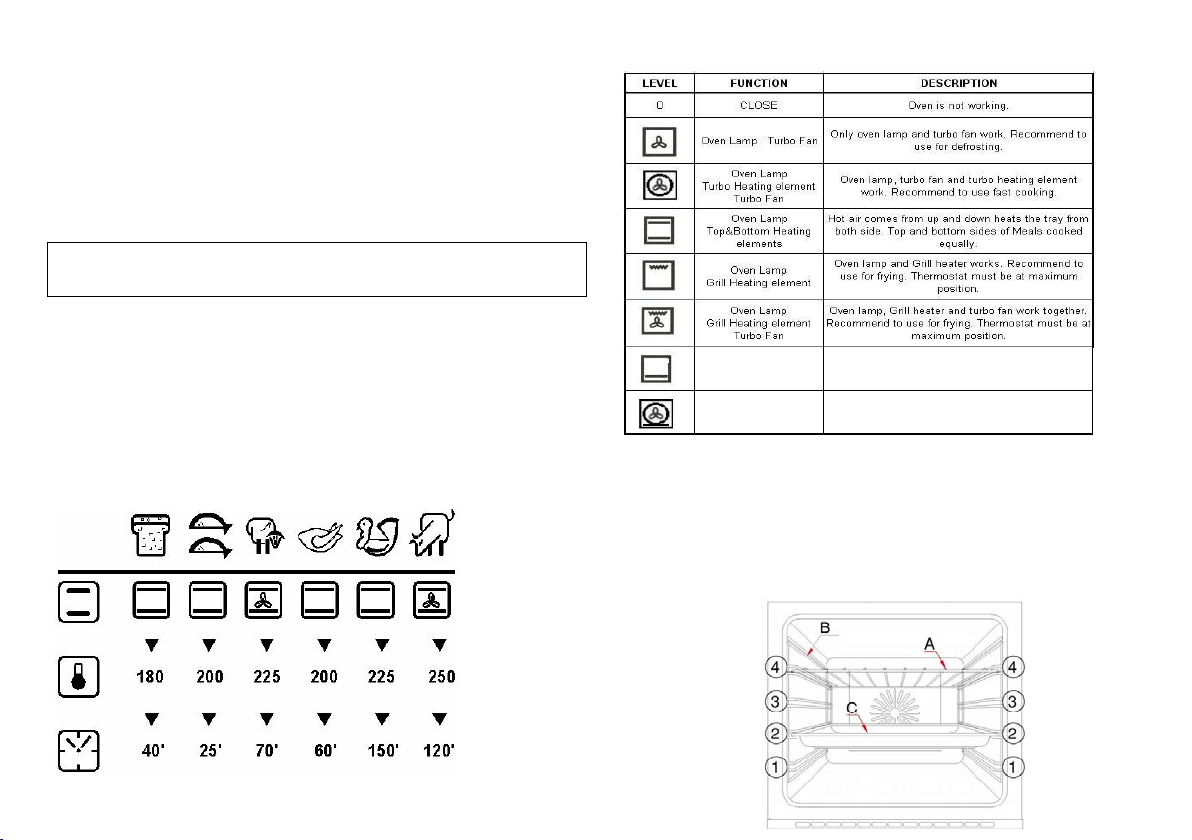
Oven Lamp
Turbo Heating Element
Turbo Fan, Bottom
Heating Element
Oven Lamp, turbo heating element,turbo fan and bottom
heating element work together.
Recommed to use for pizza.
Bottom
Heating Element
Bottom heating element,
Recommed to use cake and bread.

-8-
�
�
�
�
�

-9-
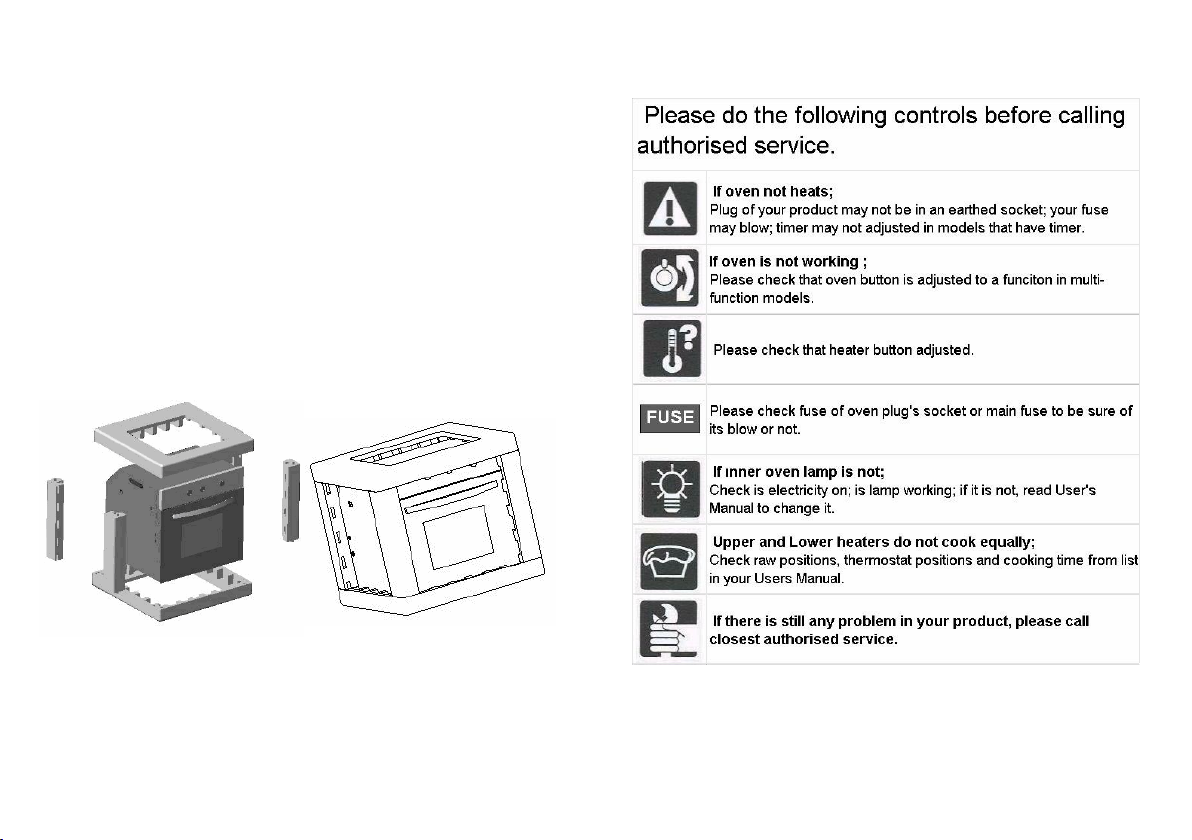
ADJUSTING THE BUZZER ALARM
With this feature, you can program after how much elapsed time you should be warned
by a buzzer sound.
1) Switch into buzzer alarm 2) Give in the period of 3) After a few seconds screen
mode. time to be counted down will return to clock mode
Note: Once programmed, the remaining time can be seen by pressing the button
once
CANCELLING THE BUZZER SOUND
1) Buzzer will sound after the programmed 2) Press the button to cancel.
amount of time elapses.
AUTOMATIC COOKING PROGRAM
If you want to start cooking immediately, you just have to give in the cooking time.
Example: We placed our food into the oven and want it to be cooked for 2 hours and 15
minutes.
1) Current time is 18:30. 2) Switch into cooking time 3) Adjust the cooking time using
mode. the + or – buttons.
-2-
SECTION 7 ADJUSTMENT of TIMER
SETTING ELECTRONIC TIME
� You must set timer before using your oven. Otherwise, your oven
will not operate.
� Power is supplied to the heating elements through the programmer
clock. In order to turn the heating elements on, the clock must be
programmed.
� The clock/timer of the oven functions in the same way as a normal
clock. In case of electricity failures, the clock is reset. If the mains supply
frequency is under 50 Hz, the clock will be slower. It is not a failure of the
clock. In such cases, readjust the clock.
BY USING THE CLOCK/PROGRAMMER IT IS POSSIBLE TO:
1. Set cooking time between 0-12 hours.
2. Use it as alarm clock between 0-12 hours.
3. Program full automatic, semi automatic or manual cooking.
You can see cooking time by pressing button and cooking end time
by pressing stop switch. Day real time will be displayed again 5 seconds
after pressing it.
AUTO: Shines steadily when the oven is programmed.
: Shines steadily when the oven is running.
: Shines steadily when the alarm is programmed
1. Set day time while pressing STOP and and
pressing “-“ or “+”.
You can increase number one by one by pressing “-“, “+”
as well as you can increase the number fast by hold it
pressed.
2. When you release the button, the clock/timer and your
oven starts functioning manually.
If you do not want the oven to function, “Oven control”
switches should be off. If full or semi-automatic
programming has been made before, clock/timer can not
be set without deactivating the program.(see clock / timer
reset).
OT-3000-LCD OVEN TIMER USER MANUAL
GENERAL OVERVIEW
OT-3000-LCD is an electronic timer, which enables your oven to get the food ready to
serve at the desired time. The only thing to be done is to program the cooking time and
ready time. It can also be used as an alarm clock, where you just give in the amount of
time after which it should remind you by a buzzer tone.
TIME OF DAY ADJUSTMENT
You can adjust the displayed time only if no automatic cooking program is in progress
(there is just the time and the hand icon on the screen). Press the button, a small
triangle between the hours and minutes will start to flash, use the or buttons for
adjustment. Long presses of those buttons will enable fast adjustments.
1) Switch into time 2) Adjust the time using 3) Screen will be
adjustment mode. the + or – buttons. stabilized in 5 seconds.
-1-

-10-
Now, you have programmed your
oven to cook the food for 2 hours
and 15 minutes. Please do not
forget to bring the function and/or
temperature knobs of your oven to
appropriate positions.
4) After a few seconds, the screen
will indicate that cooking has
started and show the current time
Note: You may cancel the automatic cooking mode any time by pressing the button.
In the above example, cooking immediately started after giving in the cooking period. By
pressing the button, you can see the ready time, ie. the time when the food will be
ready to serve, and if you want, you can also change it. In the example below, the ready
time will be changed to 21:30.
1) Displayed is the ready 2) Set it to the desired time 3) In a few seconds, screen
time 18:30+2:15=20:45. by using the + or – buttons. switches to clock mode.
We now have programmed our oven to get the food ready at 21:30. Since the cooking
time was preprogrammed as 2 hours 15 minutes, your oven will start cooking at 19:15, so
that the food is ready at 21:30.
Screen just when cooking starts Screen just when cooking ends
-3-
When automatic cooking is completed, a buzzer alarm is heared and will sound, if not
stopped, for 7 minutes.
1) Switch your oven OFF 2) Reset the timer.
Note: Your oven will be inoperative until you reset the timer.
In the example shown, cooking time has been programmed first, the ready time was
calculated automatically and was editted by us. It is also possible first to program the
ready time, in that case the cooking time will be calculated automatically and should be
editted thereafter.
During the automatic cooking program, the backlight color of the screen will be green
before and red during cooking.
IN CASE MAINS POWER LOSS
Mains power interrupts will switch your oven into OFF mode. In that case the hand icon
on the screen will flash and 12:00 will be displayed. Any cooking program will also be
cancelled. Press the button to get your oven operative, press once again to the
button switch to adjust the clock (See TIME OF DAY ADJUSTMENT)
Note: If you will not use your oven right now, be sure that it is in OFF position.
FLASHING HAND ICON INDICATES THAT YOUR OVEN IS INOPERATIVE AND YOU
SHOULD PRESS THE BUTTON TO RESET
BUZZER VOLUME ADJUSTMENT
1) Long press the button 2) Using the + or – buttons, 3) Save your selection by
for 5 sec, you will hear the you may adjust the volume pressing the button.
current tone. (3 steps available).
-4-

-11--11-
�
�
�
�
OT-3000-LCD PROGRAMMABLE OPTIONS
BUZZER TONE ADJUSTMENT
Press the button for 5 seconds ( till you see ‘pr 1’ on the screen).
Press the button to decrease buzzer volume
Press the button to increase buzzer volume (default is already high)
Press the button to record the last heard tone.
CREATING YOUR BACKLIGHT COLOUR
Press the button for 5 seconds (till display indicates 'r xx' , where xx is a number between
00 and 100 indicating the red content)
Press the or button to change the red colour content on the display between 00 and 100
You may press button to switch to green and blue and make the same colour content
adjustment via or as in red.
When desired colour is obtained, press the button for 5 seconds to record it.
Note: To exit without recording press the button .
AUTO BACKLIGHT COLOUR CHANGE in AUTO MODE ON/OFF
Press the button for 5 seconds ( till display indicates ON or OFF). Backlight colour change
option toggles from ON to OFF or vice versa.
If this option is ON, backlight colour is red during cooking, green as waiting the cooking time
in auto mode. If this option is OFF, backlight colour doesn't change at auto mode.
BACKLIGHT ON/OFF
Press the button 5 second (till display indicates ON or OFF). Backlight option toggles from
ON to OFF or vice versa.
If this option is ON, backlight is always ON. If this option is OFF, backlight is OFF at manual
status. Backlight will be turned on for 15 seconds when a valid button is pressed.
CLICK ON/OFF
Press the button for 5 seconds (till display indicates ON or OFF). Click option toggles from
ON to OFF or vice versa.
If this option is ON, click is heard when a button is pressed. If this option is OFF, no click tone
is produced.
RETURN to DEFAULT SETTINGS
Press the button for 10 seconds (until ‘pr d’ appears on the display ).
Defaults :
Buzzer : high tone
Backlight colour : 0% red, 50% green, 100% blue ( light blue tone )
Backlight colour changing at auto mode : ON
Backlight : ON
Click tone : ON
-5-
-12-
�
�
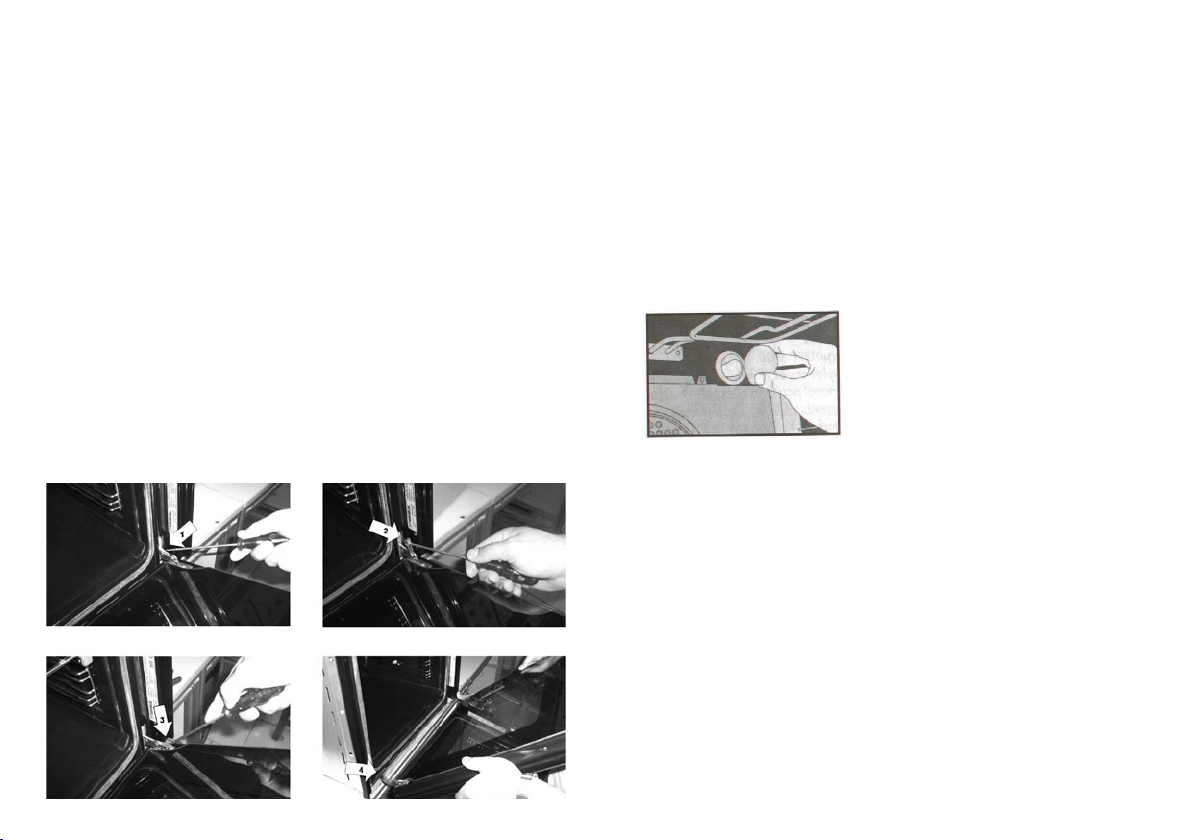
Removal oven door for easy cleaning
Before cleaning the oven door, we advise you to follow below steps to
seperate oven door from the oven body:
1. Open the door completely. Dismount the locking part on the hinge by
lifting with screwdriver.
2. Push the locking part in the direction of the glass door to the hinge body.
3. Open the glass door to the back slightly and insert the locking part
to it’s place on hinge. Make sure that this is done on both for left and
right hinges.
4. Lift the door slightly and pull the door with your two hands to
seperate from the oven.
Inserting the oven door
After cleaning, for inserting oven door to oven body it is recommended
to apply below steps:
1. Hold the door in open position and insert the hinge to hinge counter part.
2. Open the glass door to the back slightly for getting the locking part
and then push ahead and lock with screwdriver.
3. Open and close the door to make sure that it has been fitted
correctly.
-13-


St. No. 31460
Table of contents
Other davoline Oven manuals


