davoline BO 6341 R User manual

-3-
ANKASTRE FIRIN
KULLANMA KILAVUZU
Ürününüzü kolayca ve daha iyi kullanmak için lütfen kullanma
klavuzunu okuyunuz. Daha sonra yararlanmak üzere güvenli, bir yerde
muhafaza ediniz.
2.nci bölümde emniyetle ilgili bilgileri bulabilirsiniz. Lütfen
ürününüzde herhangi bir arza veya eksiklik olup olmadn kontrol ediniz.
Nakliyattan ileri gelen herhangi bir arza tespit etmeniz durumunda,
lütfen ürünü aldnz satubesi ile veya ürünü size gönderen büyük
maaza ile temasa geçiniz. Frnnz iyi günlerde kullanmanz dileriz.
��NDEK�LER:
Bölüm 1
Teknik Özellikler & Frnn Bölümleri
Bölüm 2
Önemli Güvenlik Uyarlar
Bölüm 3
Frnn Yerleimi
Bölüm 4
Kontrol Panelinin Tantm
Bölüm 5
Frnlarn Kullanm
Bölüm 6
Frnda Izgara
Bölüm 7
Zaman Saati Ayar (Opsiyonel)
Bölüm 8
Bakm ve Temizlik
Bölüm 9
Nakliyelelgili Bilgiler
Bölüm 10
Sorun Giderme
-3-
BÖLÜM 1 FIRININ TEKN�K ÖZELL�KLER�
FIRININ BÖLÜMLER�
1 – Frn Kulbu
2 – Frn Cam Kapak
3 – Trivet Izgara
4 – Tepsi
5 – Tel zgara
6 – Frn Contas
7 – Kumanda Panel Sac
8 – Kontrol dümeleri
9 – Dijital Zaman Saati
10 – D Gövde
11 – ç Gövde
12 – Alt Rezistans
13 – Üst Rezistans
14 – ç Aydnlatma
Lambas
BÖLÜM 1 FIRININ TEKN�K ÖZELL�KLER�
FIRININ BÖLÜMLER�
1 – Frn Kulbu
2 – Frn Cam Kapak
3 – Trivet Izgara
4 – Tepsi
5 – Tel zgara
6 – Frn Contas
7 – Kumanda Panel Sac
8 – Kontrol dümeleri
9 – Dijital Zaman Saati
10 – D Gövde
11 – ç Gövde
12 – Alt Rezistans
13 – Üst Rezistans
14 – ç Aydnlatma
Lambas
BÖLÜM 1 FIRININ TEKN�K ÖZELL�KLER�
FIRININ BÖLÜMLER�
1 – Frn Kulbu
2 – Frn Cam Kapak
3 – Trivet Izgara
4 – Tepsi
5 – Tel zgara
6 – Frn Contas
7 – Kumanda Panel Sac
8 – Kontrol dümeleri
9 – Dijital Zaman Saati
10 – D Gövde
11 – ç Gövde
12 – Alt Rezistans
13 – Üst Rezistans
14 – ç Aydnlatma
Lambas
ALBA-D
ALBA SERİSİ
OW13-DM8
58
58
58 58
58 58 58
58
OW15-K5M-N
BÖLÜM 1 FIRININ TEKN�K ÖZELL�KLER�
FIRININ BÖLÜMLER�
1 – Frn Kulbu
2 – Frn Cam Kapak
3 – Trivet Izgara
4 – Tepsi
5 – Tel zgara
6 – Frn Contas
7 – Kumanda Panel Sac
8 – Kontrol dümeleri
9 – Dijital Zaman Saati
10 – D Gövde
11 – ç Gövde
12 – Alt Rezistans
13 – Üst Rezistans
14 – ç Aydnlatma
Lambas
ANİMA-C
OW17-APD8-T
BÖLÜM 1 FIRININ TEKN�K ÖZELL�KLER�
FIRININ BÖLÜMLER�
1 – Frn Kulbu
2 – Frn Cam Kapak
3 – Trivet Izgara
4 – Tepsi
5 – Tel zgara
6 – Frn Contas
7 – Kumanda Panel Sac
8 – Kontrol dümeleri
9 – Dijital Zaman Saati
10 – D Gövde
11 – ç Gövde
12 – Alt Rezistans
13 – Üst Rezistans
14 – ç Aydnlatma
Lambas
ANİMA-A
OW17 -AD6
58
58
1200
BUILT-IN OVEN USER’S MANUAL
BO 6341 R
BO 6352 WH/BL
BO 6361
Please read these instructions carefully before attempting to install or use this
product. It is advisable to keep these instructions in a safe place for future reference.
BUILT-IN OVEN USER’S MANUAL
BO 6341 R
BO 6352 WH/BL
BO 6361
Please read these instructions carefully before attempting to install or use this
product. It is advisable to keep these instructions in a safe place for future reference.


BUILT-IN ELECTRICAL OVEN
USER’S MANUAL
Dear Client,
Thank you very much about buying our product. You can trust our products.
This is a detailed User’s Manual which you can read it to use your product easier
and better. It is advisable to keep these instructions in a safe place for future
reference.
You can find safety information in section 2. Please check your product that
it has got any failure or lacking. If you find a damage sourced by transportation,
please contact with sales department that you bought product or region store that
sent product to you.
We hope you use your oven in good days.
TABLE of CONTENTS
SECTION 1
Technical Features & Sectons of Oven
SECTION 2
Important Safety Notices
SECTION 3
Installation of Built-In Oven
SECTION 4
Introducton of Control Panel
SECTION 5
Usage of Oven
SECTION 6
Grill Function of Oven
SECTION 7
Adjustment of Timer (Optional)
SECTION 8
Maintenance & Cleaning
SECTION 9
Information on Transportation
SECTION 10
Things To Do Before Calling Authorised Service
SECTION 1
TECHNICAL FEATURES of OVEN
SECTIONS of OVEN
13250 / -i
13270 / -i
1 – Control Panel
2 – Side Handle
3 – Door Handle
4 – Oven Door
5 – Trays
6 – Wire Grate
7 – Trivet Grate
8 – Drawers
9 – Command Buttons
10 – Digital Timer
11 – Oven Lamp
12 – Inner Body
13 – Upper Resistance
14 – Inner Lamp
15 – Lower Resistance
16 – Oven Gasket
Fi
g
ure.1
Fi
g
ure.2
SECTION 1
TECHNICAL FEATURES of OVEN
MODEL
ASTRO
A OW15-
K5M
ASTRO
B
(OW15-
D7)
ASTRO
C (OW15-
DM8-T )
ALBA A
OW13-
M5
ALBA B
OW13-
D7
Thermostat (C)
50 - 285 50 - 285 50 - 285
50 – 285 50 – 285
Timer
Oven Volume {It)
66 66 66
66 66
Max Oven
Power (W)
2500 2500 2500
2500 2500
Grili Power (W) 2000 2000 2000
2000 2000
Voltage (Volt)
)220 – 16
220 – 16
220 – 16
220 –
16
220 –
16
Frequency (Hz.)
50 - 60 50 - 60 50 - 60
50 – 60 50 – 60
Fan - + + - +
Energy
Efficiency Class
Energy
Consumption
(Conventional)
(Kilowatt-hour)
0,76 0,76 0,76
0,76 0,76
Energy
Consumption
(forced air
conv.)(Kilowatt-
hour}
0,75 0,75 0,75
0,75 0,75
Weight (Kg) 40 40 40 40 40
Wit"
,
imrni
594 594 594
594 594
Length
(mm)
560 560 560
560 560
DIMEN
SIONS
Height
(mm)
594 594 594 594 594
SECTIONS of OVEN
13250 / -i
13270 / -i
1 – Control Panel
2 – Side Handle
3 – Door Handle
4 – Oven Door
5 – Trays
6 – Wire Grate
7 – Trivet Grate
8 – Drawers
9 – Command Buttons
10 – Digital Timer
11 – Oven Lamp
12 – Inner Body
13 – Upper Resistance
14 – Inner Lamp
15 – Lower Resistance
16 – Oven Gasket Fi
g
ure.1
Fi
g
ure.2
SECTION 1
TECHNICAL FEATURES of OVEN
MODEL
ASTRO
A OW15-
K5M
ASTRO
B
(OW15-
D7)
ASTRO
C (OW15-
DM8-T )
ALBA A
OW13-
M5
ALBA B
OW13-
D7
Thermostat (C) 50 - 285 50 - 285 50 - 285 50 – 285 50 – 285
Timer
Oven Volume {It)
66 66 66
66 66
Max Oven
Power (W)
2500 2500 2500
2500 2500
Grili Power (W)
2000 2000 2000 2000 2000
Voltage (Volt))220 – 16
220 – 16
220 – 16 220 –
16
220 –
16
Frequency (Hz.) 50 - 60 50 - 60 50 - 60 50 – 60 50 – 60
Fan
- + +
- +
Energy
Efficiency Class
Energy
Consumption
(Conventional)
(Kilowatt-hour)
0,76 0,76 0,76
0,76 0,76
Energy
Consumption
(forced air
conv.)(Kilowatt-
hour}
0,75 0,75 0,75
0,75 0,75
Weight (Kg) 40 40 40 40 40
Wit"
,
imrni
594 594 594
594 594
Length
(mm)
560 560 560
560 560
DIMEN
SIONS
Height
(mm)
594 594 594
594 594
SECTIONS of OVEN
13250 / -i
13270 / -i
1 – Control Panel
2 – Side Handle
3 – Door Handle
4 – Oven Door
5 – Trays
6 – Wire Grate
7 – Trivet Grate
8 – Drawers
9 – Command Buttons
10 – Digital Timer
11 – Oven Lamp
12 – Inner Body
13 – Upper Resistance
14 – Inner Lamp
15 – Lower Resistance
16 – Oven Gasket Fi
g
ure.1
Fi
g
ure.2
SECTION 1
TECHNICAL FEATURES of OVEN
MODEL
ASTRO
A OW15-
K5M
ASTRO
B
(OW15-
D7)
ASTRO
C (OW15-
DM8-T )
ALBA A
OW13-
M5
ALBA B
OW13-
D7
Thermostat (C)
50 - 285 50 - 285 50 - 285
50 – 285 50 – 285
Timer
Oven Volume {It)
66 66 66
66 66
Max Oven
Power (W)
2500 2500 2500
2500 2500
Grili Power (W) 2000 2000 2000
2000 2000
Voltage (Volt)
)220 – 16
220 – 16
220 – 16
220 –
16
220 –
16
Frequency (Hz.)
50 - 60 50 - 60 50 - 60
50 – 60 50 – 60
Fan
- + +
- +
Energy
Efficiency Class
Energy
Consumption
(Conventional)
(Kilowatt-hour)
0,76 0,76 0,76
0,76 0,76
Energy
Consumption
(forced air
conv.)(Kilowatt-
hour}
0,75 0,75 0,75
0,75 0,75
Weight (Kg) 40 40 40 40 40
Wit",
imrni
594 594 594
594 594
Length
(mm)
560 560 560
560 560
DIMEN
SIONS
Height
(mm)
594 594 594 594 594
SECTIONS of OVEN
13250 / -i
13270 / -i
1 – Control Panel
2 – Side Handle
3 – Door Handle
4 – Oven Door
5 – Trays
6 – Wire Grate
7 – Trivet Grate
8 – Drawers
9 – Command Buttons
10 – Digital Timer
11 – Oven Lamp
12 – Inner Body
13 – Upper Resistance
14 – Inner Lamp
15 – Lower Resistance
16 – Oven Gasket
Fi
g
ure.1
Fi
g
ure.2
ASTRO
A OW15-
K5M
ASTRO
B
(OW15-
D7)
ASTRO
C (OW15-
DM8-T )
ALBA A
OW13-
M5
ALBA B
OW13-
D7
ALBA C
OW13-
DM8-T
Thermostat (C)
50 - 285 50 - 285 50 - 285
50 – 285 50 – 285 50 – 285
Timer
Oven Volume {It)
66 66 66
66 66 66
Max Oven
Power (W)
2500 2500 2500
2500 2500 2500
Grili Power (W)
2000 2000 2000
2000 2000 2000
Voltage (Volt)
)220 – 16
220 – 16
220 – 16
220 –
16
220 –
16
220 –
16
Frequency (Hz.)
50 - 60 50 - 60 50 - 60
50 – 60 50 – 60 50 – 60
Fan
- + +
- + +
Energy
Efficiency Class
Energy
Consumption
(Conventional)
(Kilowatt-hour)
0,76 0,76 0,76
0,76 0,76 0,76
Energy
Consumption
(forced air
conv.)(Kilowatt-
hour}
0,75 0,75 0,75
0,75 0,75 0,75
Weight (Kg)
40 40 40
40 40 40
Wit",
imrni
594 594 594
594 594 594
Length
(mm)
560 560 560
560 560 560
DIMEN
SIONS
Height
(mm)
594 594 594
594 594 594
SECTIONS of OVEN
13250 / -i
13270 / -i
1 – Control Panel
2 – Side Handle
3 – Door Handle
4 – Oven Door
5 – Trays
6 – Wire Grate
7 – Trivet Grate
8 – Drawers
9 – Command Buttons
10 – Digital Timer
11 – Oven Lamp
12 – Inner Body
13 – Upper Resistance
14 – Inner Lamp
15 – Lower Resistance
16 – Oven Gasket Fi
g
ure.1
Fi
g
ure.2
SECTIONS of OVEN
13250 / -i
13270 / -i
1 – Control Panel
2 – Side Handle
3 – Door Handle
4 – Oven Door
5 – Trays
6 – Wire Grate
7 – Trivet Grate
8 – Drawers
9 – Command Buttons
10 – Digital Timer
11 – Oven Lamp
12 – Inner Body
13 – Upper Resistance
14 – Inner Lamp
15 – Lower Resistance
16 – Oven Gasket
Fi
g
ure.1
Fi
g
ure.2
SECTION 1
TECHNICAL FEATURES of OVEN
MODEL
Energy
Wit"
Length
(mm)
DIMEN
SIONS
Height
(mm)
SECTIONS of OVEN
13250 / -i
13270 / -i
1 – Control Panel
2 – Side Handle
3 – Door Handle
4 – Oven Door
5 – Trays
6 – Wire Grate
7 – Trivet Grate
8 – Drawers
9 – Command Buttons
10 – Digital Timer
11 – Oven Lamp
12 – Inner Body
13 – Upper Resistance
14 – Inner Lamp
15 – Lower Resistance
16 – Oven Gasket Fi
g
ure.1
Fi
g
ure.2
SECTION 1
TECHNICAL FEATURES of OVEN
MODEL
Energy
Wit"
Length
(mm)
DIMEN
SIONS
Height
(mm)
SECTIONS of OVEN
13250 / -i
13270 / -i
1 – Control Panel
2 – Side Handle
3 – Door Handle
4 – Oven Door
5 – Trays
6 – Wire Grate
7 – Trivet Grate
8 – Drawers
9 – Command Buttons
10 – Digital Timer
11 – Oven Lamp
12 – Inner Body
13 – Upper Resistance
14 – Inner Lamp
15 – Lower Resistance
16 – Oven Gasket
Fi
g
ure.1
Fi
g
ure.2
ASTRO
A OW15-
K5M
ASTRO
B
(OW15-
D7)
ASTRO
C (OW15-
DM8-T )
ALBA A
OW13-
M5
ALBA B
OW13-
D7
ALBA C
OW13-
DM8-T
Thermostat (C) 50 - 285 50 - 285 50 - 285 50 – 285 50 – 285 50 – 285
Timer
Oven Volume {It)
66 66 66
66 66 66
Max Oven
Power (W)
2500 2500 2500
2500 2500 2500
Grili Power (W)
2000 2000 2000
2000 2000 2000
Voltage (Volt)
)220 – 16
220 – 16
220 – 16
220 –
16
220 –
16
220 –
16
Frequency (Hz.) 50 - 60 50 - 60 50 - 60 50 – 60 50 – 60 50 – 60
Fan - + + - + +
Energy
Efficiency Class
Energy
Consumption
(Conventional)
(Kilowatt-hour)
0,76 0,76 0,76 0,76 0,76 0,76
Energy
Consumption
(forced air
conv.)(Kilowatt-
hour}
0,75 0,75 0,75 0,75 0,75 0,75
Weight (Kg) 40 40 40 40 40 40
Wit",
imrni
594 594 594 594 594 594
Length
(mm)
560 560 560 560 560 560
DIMEN
SIONS
Height
(mm)
594 594 594 594 594 594
SECTIONS of OVEN
13250 / -i
13270 / -i
1 – Control Panel
2 – Side Handle
3 – Door Handle
4 – Oven Door
5 – Trays
6 – Wire Grate
7 – Trivet Grate
8 – Drawers
9 – Command Buttons
10 – Digital Timer
11 – Oven Lamp
12 – Inner Body
13 – Upper Resistance
14 – Inner Lamp
15 – Lower Resistance
16 – Oven Gasket Fi
g
ure.1
Fi
g
ure.2
-2-
BUILT-IN ELECTRICAL OVEN
USER’S MANUAL
Dear Client,
Thank you very much about buying our product. You can trust our products.
This is a detailed User’s Manual which you can read it to use your product easier
and better. It is advisable to keep these instructions in a safe place for future
reference.
You can find safety information in section 2. Please check your product that
it has got any failure or lacking. If you find a damage sourced by transportation,
please contact with sales department that you bought product or region store that
sent product to you.
We hope you use your oven in good days.
TABLE of CONTENTS
SECTION 1
Technical Features & Sectons of Oven
SECTION 2
Important Safety Notices
SECTION 3
Installation of Built-In Oven
SECTION 4
Introducton of Control Panel
SECTION 5
Usage of Oven
SECTION 6
Grill Function of Oven
SECTION 7
Adjustment of Timer (Optional)
SECTION 8
Maintenance & Cleaning
SECTION 9
Information on Transportation
SECTION 10
Things To Do Before Calling Authorised Service
-2-
SECTION 1
TECHNICAL FEATURES of OVEN
MODEL
-3-
MODEL BO6352 WH BO6352 BL BO 6341 BO 6361
COLOUR WHITE BLACK INOX+GLASS INOX+GLASS
FUEL TYPE ELECTRICAL ELECTRICAL ELECTRICAL ELECTRICAL
TIMER TOUCH CONTROL DIGITAL TOUCH CONTROL DIGITAL 3 COLOUR DIGITAL FULL TOUCH CONTROL
COOKING FUNCTION 7 FUNCTION 7 FUNCTION 7 FUNCTION 11 FUNCTION
O EN OLUME 58 LITER 58 LITER 58 LITER 58 LITER
O EN POWER 3350 WATT 3350 WATT 3350 WATT 3350 WATT
GRILL POWER 3200 WATT 3200 WATT 3200 WATT 3200 WATT
TURBO REZISTANCE 2000 WATT 2000 WATT 2000 WATT 2000 WATT
TURBO FAN YES YES YES YES
TOTAL POWER 3350 WATT 3350 WATT 3350 WATT 3350 WATT
SIDE OPENING - - YES -
WIRE SHELF YES YES YES YES
THERMOSTAT O EN 0-285 C 0-285 C 0-285 C 0-285 C
SECURITY 160 C 160 C 160 C 160 C
OLTAGE 230 230 230 230
FREQUENCY 50-60 HZ 50-60 HZ 50-60 HZ 50-60 HZ
ENERGY CLASS A A A A
ENERGY CONSUMPTION ( CON ENSIONAL-KWH)
ENERGY CONSUMPTION – FORCED AIR- KWH
DIMENSIONS
WIDTH ( MM ) 594 594 594 594
DEPTH ( MM) 540 540 540 540
HEIGHT ( MM ) 595 595 595 595
SWITCH NO 14 14 14 FULL TOUCH CONTROL
0,84 Kwh
0,84 Kwh
0,84 Kwh
0,84 Kwh
0,79 Kwh
0,79 Kwh
0,79 Kwh
0,79 Kwh

SECTION 1
TECHNICAL FEATURES of OVEN
MODEL ASTRO
A OW15-
K5M
ASTRO
B
(OW15-
D7)
ASTRO
C (OW15-
DM8-T )
ALBA A
OW13-
M5
ALBA B
OW13-
D7
ALBA C
OW13-
DM8-T
Thermostat (C) 50 - 285 50 - 285 50 - 285 50 – 285 50 – 285 50 – 285
Timer
Oven Volume {It) 66 66 66 66 66 66
Max Oven
Power (W)
2500 2500 2500 2500 2500 2500
Grili Power (W) 2000 2000 2000 2000 2000 2000
Voltage (Volt))220 – 16
220 – 16
220 – 16 220 –
16
220 –
16
220 –
16
Frequency (Hz.) 50 - 60 50 - 60 50 - 60 50 – 60 50 – 60 50 – 60
Fan - + + - + +
Energy
Efficiency Class
Energy
Consumption
(Conventional)
(Kilowatt-hour)
0,76 0,76 0,76 0,76 0,76 0,76
Energy
Consumption
(forced air
conv.)(Kilowatt-
hour}
0,75 0,75 0,75 0,75 0,75 0,75
Weight (Kg) 40 40 40 40 40 40
Wit",
imrni
594 594 594 594 594 594
Length
(mm)
560 560 560 560 560 560
DIMEN
SIONS
Height
(mm)
594 594 594 594 594 594
SECTIONS of OVEN
13250 / -i
1 – Control Panel
2 – Side Handle
3 – Door Handle
4 – Oven Door
5 – Trays
6 – Wire Grate
7 – Trivet Grate
8 – Drawers
9 – Command Buttons
10 – Digital Timer
11 – Oven Lamp
12 – Inner Body
13 – Upper Resistance
14 – Inner Lamp
15 – Lower Resistance
16 – Oven Gasket Fi
g
ure.1
Fi
g
ure.2
SECTION 2 IMPORTANT SAFETY NOTICES
This Built-in electrical oven is manufactured for using preparation of normal
home meals. Please do not use for other purposes.
Installation
- This appliance must be installed by qualified personnel, according to the
manufacturer’s instructions and to the relevant Safety Standards.
- This appliance is heavy. Take care when moving it.
- Remove all packaging, protective films and oils From the appliance before using
for the first time.
- Ensure that the electrical supply complies with The type stated on the rating
plate.
- Do not attempt to modify the appliance in any way.
- Usage voltage of your oven is 230 Volt - 50 Hz.
Warning: This appliance must be earthed.
When you have finished cooking check that all controls are in the OFF
position.
- Please check your electrical installation to have earthed or not. �f it is not earthed,
make it earthed by a capable electrical technician .
- It must be used min 16 A Fuse for electrical connection of your oven.
- Please be sure that plug of your oven cooker is accidentally if the pulled beyond
the extent of the power cord, the Earth wire will pull out last. �f your residence did
not contain earth system the producer company does not responsible about the
damaged event.
- Connection can only be done by MJR Electronics Authorised Service company or an
expert authorised by customer relations.
- For connecting the electric cooker to its power supply, please use a cord size
3 x 2.5 mm2
- For isolation safety length of power cord must not exceed 2 meters.
- Connection sheme is being on oven’s back wall.
- Please adjust timer when electricity cut off. If timer is not adjusted, oven side will
not work.
Children Safety
- This appliance is designed to be operated by adults. Do not allow children to
play near or with the appliance.
- The appliance gets hot when it is in use. Children should be kept away until it
has cooled down.
- Children can also injure themselves by pulling pans or pots off the appliance.
-4-

SECTION 2 IMPORTANT SAFETY NOTICES
This Built-in electrical oven is manufactured for using preparation of
home meals. Please do not use for other purposes.
Installation
- This appliance must be installed by qualified personnel, according to
manufacturer’s instructions and to the relevant Safety Standards.
- This appliance is heavy. Take care when moving it.
- Remove all packaging, protective films and oils From the appliance before us
for the first time.
- Ensure that the electrical supply complies with The type stated on the ratin
plate.
- Do not attempt to modify the appliance in any way.
- Usage voltage of your oven is 230 Volt - 50 Hz.
Warning: This appliance must be earthed.
When you have finished cooking check that all controls are in the
position.
- Please check your electrical installation to have earthed or not. �f it is not earth
make it earthed by a capable electrical technician .
- It must be used min 16 A Fuse for electrical connection of your oven.
- Please be sure that plug of your oven cooker is accidentally if the pulled beyon
the extent of the power cord, the Earth wire will pull out last. �f your residence
not contain earth system the producer company does not responsible about
damaged event.
- Connection can only be done by MEKAPPA Authorised Service company or a
expert authorised by customer relations.
- For connecting the electric cooker to its power supply, please use a cord si
3 x 2.5 mm2
- For isolation safety length of power cord must not exceed 2 meters.
- Connection sheme is being on oven’s back wall.
- Please adjust timer when electricity cut off. If timer is not adjusted, oven side wil
not work.
Children Safety
- This appliance is designed to be operated by adults. Do not allow children
play near or with the appliance.
- The appliance gets hot when it is in use. Children should be kept away until i
has cooled down.
- Children can also injure themselves by pulling pans or pots off the appliance.
- Before using your product please take out packing materials on oven. Do not
forget to take out cartoons on sides of trays and wire grate and strafor that stick on
front panel. Packing material can cause a danger for children.
Attention : Burning risk is high especially for small children who are not aware of
danger. Door of oven, inner parts and steam exits are hot during usage. They can
exposed to burning or boiling. So it required to keep small children from oven in
appropriate distance. Bigger children can use oven under watch.
Attention: Burning Danger. Heating elements, oven and accesories are very hot
during usage. So please always use kitchen cloths or heat resist gloves during
holding trays and be careful on usage of trays for remove burn risk.
-Before using the appliance for the first time, remove any protective means,
wash the oven shelves and accessories in hot soapy water, to remove their
protective coating of oil, even so, when you first the oven or grill you may notice a
unpleasent smell and some smoke.
- Switch off the electricity supply before replacing the oven light bulb (if fitted).
During Use;
- Do not use this appliance if it is in contact with water. Do not attempt to use the
appliance with wet hands.
- Ensure the control knobs are in the ‘OFF’ position when not in use.
- Do not store flammable materials such as oven gloves, tea towels etc. in the
drawer.
- When cooking heavy items, eg; turkeys, do not pull the oven shelf out with the
item is still on the shelf. There might be a risk of tipping.
- Never put items directly on the base of the oven or cover the oven base with foil
as this can cause the base element to overheat.
- Never use the appliance for heating a room.
- Reachable parts of oven can be very hot when grate uses. Please keep small
children away. Please do not touch heating elements inside oven.
- Outer surfaces of oven can be hot during making grill or ordinary working of
appliance.
- Use oven gloves when removing hot food utensils from the oven or grill. The
oven /grill and utensils will be very hot when in use.
- Do not put any hot items into the drawer. Utensils used during cooking should
only be put into the drawer when cold.
- The oven door must always close properly. Keep the door seal areas clean.
- Pressing on open cover of oven with heavy matters can cause damage on cover
hinges. So please do not sit or load heavy matters on open cover of oven.
- Do not use aluminium foil to cover the grill pan, or put items wrapped in foil
under the grill as this creates a fire hazard. The high reflectivity can also damage
the elements.
- Do not use the oven with the door inner glass panel removed.
- Do not use the drop down door as a step to reach above cabinets
- After using oven please wipe vapour drops with a cloth that can be formed on
oven cover by high temperature.
- Do not block the oven vent in anyway, as this creates a fire hazard.
- When opening the appliance door, take care to avoid skin contact with any
steam that may escape from the oven.
- Perishable food, plastic items and aerosols may be affected by heat and should
not be stored above or around the appliance.
Service :
- Connection cables of appliances near oven can be damaged and shortcutted if
they contacted with hot parts of oven. Thats why, cables of other appliances must
be in enough safety distance to oven. When power cord damaged plese contact
with closest authorised service to fix new one.
- Operations and repairs on appliance that done unmethodically causes possibility
of electric shock and shortcuts. Please keep away from this kind of operations
which can destroy your appliance and cause danger of getting injured.
- This appliance should only be repaired or serviced by an authorised Service
Engineer and only genuine approved spare parts should be used.
SECTION 3 INSTALLATION of BUILT-IN OVEN
�nstallation must be done by an authorised technician. Below instructions
will guide an authorised technician to install Built-in oven according to law and
standarts to be in force.
Instructions :
- Dimensions and material of Cabin or cupboard that built-in oven will install in
must be suitable and endurable for heat increases.
- In a right installation operation, it is required to prevent any contact with
electrical parts or isolated parts due to work aim.
Isolation materials or parts that used for isolation must affix strongly to prevent
taking out by any tool.
- It is not recommend you to install your appliance near refrigator or deepfrost.
Otherwise performance of these appliances effected badly because of heat
spreaded..
-If a cooker installed on your oven, electrical cables of cooker and oven must
be seperated due to safety and to make dismantling easy if it requires.
-Install your appliance in a position that lets you to reach feeding cable.
-Do not place feeding cable close or contacted to hot surfaces. Do not tighten
the cable to oven door.
Measures of Built-in oven and board of oven are at Figure.3 & 4
Installed Built-in Oven pictures are at Figure.5 & 6
Fi
g
ure.3 Oven Measures Fi
g
ure.4 Board Measures
Fi
g
ure.6
Fi
g
ure.5
-5-

SECTION 1
Technical Features & Sectons of Oven
SECTION 2
Important Safety Notices
SECTION 3
Installation of Built-In Oven
SECTION 4
Introducton of Control Panel
SECTION 5
Usage of Oven
SECTION 6
Grill Function of Oven
SECTION 7
Adjustment of Timer (Optional)
SECTION 8
Maintenance & Cleaning
SECTION 9
Information on Transportation
SECTION 10
Things To Do Before Calling Authorised Service
- When opening the appliance door, take care to avoid skin contact with any
steam that may escape from the oven.
- Perishable food, plastic items and aerosols may be affected by heat and should
not be stored above or around the appliance.
Service :
- Connection cables of appliances near oven can be damaged and shortcutted if
they contacted with hot parts of oven. Thats why, cables of other appliances
be in enough safety distance to oven. When power cord damaged plese contact
with closest authorised service to fix new one.
- Operations and repairs on appliance that done unmethodically causes possi
of electric shock and shortcuts. Please keep away from this kind of operations
which can destroy your appliance and cause danger of getting injured.
- This appliance should only be repaired or serviced by an authorised Service
Engineer and only genuine approved spare parts should be used.
SECTION 3 INSTALLATION of BUILT-IN OVEN
�nstallation must be done by an authorised technician. Below instructions
will guide an authorised technician to install Built-in oven according to law
standarts to be in force.
Instructions :
SECTION 4 INTRODUCTION of CONTROL PANEL
Push the button to get it out..Then turn it to related level. At the end of cooking
turn the buttons to (0) position and push them to get in.
SECTION 5 USAGE of OVEN
Control Switches of Oven
Indicator lamp will be on together with thermostat switch. When the heat
inside the oven reaches the set value, thermostat cuts the circuit and the
lamp is off. When the heat is below set value, thermostat is on again and
indicator lamp is lit.
Usage of Oven
During initial operation of your oven, a smell arising from insulation materials and
heating elements will be generated. To avoid it, operate your oven at 250 C for 45
minutes without putting any trays before use.
- When opening the appliance door, take care to avoid skin contact with any
steam that may escape from the oven.
- Perishable food, plastic items and aerosols may be affected by heat and should
not be stored above or around the appliance.
Service :
- Connection cables of appliances near oven can be damaged and shortcutted if
they contacted with hot parts of oven. Thats why, cables of other appliances must
be in enough safety distance to oven. When power cord damaged plese contact
with closest authorised service to fix new one.
- Operations and repairs on appliance that done unmethodically causes possibility
of electric shock and shortcuts. Please keep away from this kind of operations
which can destroy your appliance and cause danger of getting injured.
- This appliance should only be repaired or serviced by an authorised Service
Engineer and only genuine approved spare parts should be used.
SECTION 3 INSTALLATION of BUILT-IN OVEN
�nstallation must be done by an authorised technician. Below instructions
will guide an authorised technician to install Built-in oven according to law and
standarts to be in force.
- Dimensions and material of Cabin or cupboard that built-in oven will install in
must be suitable and endurable for heat increases.
- In a right installation operation, it is required to prevent any contact with
electrical parts or isolated parts due to work aim.
Isolation materials or parts that used for isolation must affix strongly to prevent
taking out by any tool.
- It is not recommend you to install your appliance near refrigator or deepfrost.
Otherwise performance of these appliances effected badly because of heat
spreaded..
-If a cooker installed on your oven, electrical cables of cooker and oven must
be seperated due to safety and to make dismantling easy if it requires.
-Install your appliance in a position that lets you to reach feeding cable.
-Do not place feeding cable close or contacted to hot surfaces. Do not tighten
the cable to oven door.
- When opening the appliance door, take care to avoid skin contact with any
steam that may escape from the oven.
- Perishable food, plastic items and aerosols may be affected by heat and should
not be stored above or around the appliance.
Service :
- Connection cables of appliances near oven can be damaged and shortcutted if
they contacted with hot parts of oven. Thats why, cables of other appliances
be in enough safety distance to oven. When power cord damaged plese contact
with closest authorised service to fix new one.
- Operations and repairs on appliance that done unmethodically causes possi
of electric shock and shortcuts. Please keep away from this kind of operations
which can destroy your appliance and cause danger of getting injured.
- This appliance should only be repaired or serviced by an authorised Service
Engineer and only genuine approved spare parts should be used.
SECTION 3 INSTALLATION of BUILT-IN OVEN
�nstallation must be done by an authorised technician. Below instructions
will guide an authorised technician to install Built-in oven according to law
standarts to be in force.
Instructions :
- Dimensions and material of Cabin or cupboard that built-in oven will install in
must be suitable and endurable for heat increases.
- In a right installation operation, it is required to prevent any contact with
electrical parts or isolated parts due to work aim.
Isolation materials or parts that used for isolation must affix strongly to prevent
taking out by any tool.
- It is not recommend you to install your appliance near refrigator or deepfrost.
Otherwise performance of these appliances effected badly because of heat
spreaded..
-If a cooker installed on your oven, electrical cables of cooker and oven must
be seperated due to safety and to make dismantling easy if it requires.
-Install your appliance in a position that lets you to reach feeding cable.
-Do not place feeding cable close or contacted to hot surfaces. Do not tighten
the cable to oven door.
Measures of Built-in oven and board of oven are at Figure.3 & 4
Installed Built-in Oven pictures are at Figure.5 & 6
Fi
g
ure.6
Fi
g
ure.5
SECTION 4 INTRODUCTION of CONTROL PANEL
You can find control buttons in Figure.5 With these control buttons
power of each heating element can be adjustable. Buttons can turn
clockwise or opposite to clockwise directions. Please bring the control
button to required cooking position and do not forget big numbers on button
print means high heat outlet. For first cooking, it recommended to use
highest cooking position.
1 Thermostat
2 Timer
3 Selections
Push the button to get it out..Then turn it to related level. At the end of cooking
turn the buttons to (0) position and push them to get in.
SECTION 5 USAGE of OVEN
Control Switches of Oven
Indicator lamp will be on together with thermostat switch. When the heat
inside the oven reaches the set value, thermostat cuts the circuit and the
lamp is off. When the heat is below set value, thermostat is on again and
indicator lamp is lit.
Usage of Oven
During initial operation of your oven, a smell arising from insulation materials and
heating elements will be generated. To avoid it, operate your oven at 250 C for 45
minutes without putting any trays before use.
Figure 5. 13550 Control Panels (Digital&Mechanical Timer)
- When opening the appliance door, take care to avoid skin contact with any
steam that may escape from the oven.
- Perishable food, plastic items and aerosols may be affected by heat and should
not be stored above or around the appliance.
Service :
- Connection cables of appliances near oven can be damaged and shortcutted if
they contacted with hot parts of oven. Thats why, cables of other appliances must
be in enough safety distance to oven. When power cord damaged plese contact
with closest authorised service to fix new one.
- Operations and repairs on appliance that done unmethodically causes possibility
of electric shock and shortcuts. Please keep away from this kind of operations
which can destroy your appliance and cause danger of getting injured.
- This appliance should only be repaired or serviced by an authorised Service
Engineer and only genuine approved spare parts should be used.
SECTION 3 INSTALLATION of BUILT-IN OVEN
�nstallation must be done by an authorised technician. Below instructions
will guide an authorised technician to install Built-in oven according to law and
standarts to be in force.
Instructions :
- Dimensions and material of Cabin or cupboard that built-in oven will install in
must be suitable and endurable for heat increases.
- In a right installation operation, it is required to prevent any contact with
electrical parts or isolated parts due to work aim.
Isolation materials or parts that used for isolation must affix strongly to prevent
taking out by any tool.
- It is not recommend you to install your appliance near refrigator or deepfrost.
Otherwise performance of these appliances effected badly because of heat
spreaded..
-If a cooker installed on your oven, electrical cables of cooker and oven must
be seperated due to safety and to make dismantling easy if it requires.
-Install your appliance in a position that lets you to reach feeding cable.
-Do not place feeding cable close or contacted to hot surfaces. Do not tighten
the cable to oven door.
1
2
3
- When opening the appliance door, take care to avoid skin contact with
steam that may escape from the oven.
- Perishable food, plastic items and aerosols may be affected by heat and
not be stored above or around the appliance.
Service :
- Connection cables of appliances near oven can be damaged and shor
they contacted with hot parts of oven. Thats why, cables of other appliances
be in enough safety distance to oven. When power cord damaged plese co
with closest authorised service to fix new one.
- Operations and repairs on appliance that done unmethodically causes possi
of electric shock and shortcuts. Please keep away from this kind of
which can destroy your appliance and cause danger of getting injured.
- This appliance should only be repaired or serviced by an authorised Se
Engineer and only genuine approved spare parts should be used.
SECTION 3 INSTALLATION of BUILT-IN OVEN
�nstallation must be done by an authorised technician. Below instruct
will guide an authorised technician to install Built-in oven according to law
standarts to be in force.
Instructions :
- Dimensions and material of Cabin or cupboard that built-in oven will install in
must be suitable and endurable for heat increases.
- In a right installation operation, it is required to prevent any contact with
electrical parts or isolated parts due to work aim.
Isolation materials or parts that used for isolation must affix strongly to prevent
taking out by any tool.
- It is not recommend you to install your appliance near refrigator or deepfrost.
Otherwise performance of these appliances effected badly because of heat
spreaded..
-If a cooker installed on your oven, electrical cables of cooker and oven must
be seperated due to safety and to make dismantling easy if it requires.
-Install your appliance in a position that lets you to reach feeding cable.
-Do not place feeding cable close or contacted to hot surfaces. Do not tighten
the cable to oven door.
Measures of Built-in oven and board of oven are at Figure.3 & 4
Installed Built-in Oven pictures are at Figure.5 & 6
Fi
g
ure.6
Fi
g
ure.5
SECTION 4 INTRODUCTION of CONTROL PANEL
You can find control buttons in Figure.5 With these control buttons
power of each heating element can be adjustable. Buttons can turn
clockwise or opposite to clockwise directions. Please bring the control
button to required cooking position and do not forget big numbers on button
print means high heat outlet. For first cooking, it recommended to use
highest cooking position.
1 Thermostat
2 Timer
3 Selections
Push the button to get it out..Then turn it to related level. At the end of cooking
turn the buttons to (0) position and push them to get in.
SECTION 5 USAGE of OVEN
Control Switches of Oven
Indicator lamp will be on together with thermostat switch. When the heat
inside the oven reaches the set value, thermostat cuts the circuit and the
lamp is off. When the heat is below set value, thermostat is on again and
indicator lamp is lit.
Usage of Oven
During initial operation of your oven, a smell arising from insulation materials and
heating elements will be generated. To avoid it, operate your oven at 250 C for 45
minutes without putting any trays before use.
Figure 5. 13550 Control Panels (Digital&Mechanical Timer)
- When opening the appliance door, take care to avoid skin contact with any
steam that may escape from the oven.
- Perishable food, plastic items and aerosols may be affected by heat and should
not be stored above or around the appliance.
Service :
- Connection cables of appliances near oven can be damaged and shortcutted if
they contacted with hot parts of oven. Thats why, cables of other appliances must
be in enough safety distance to oven. When power cord damaged plese contact
with closest authorised service to fix new one.
- Operations and repairs on appliance that done unmethodically causes possibility
of electric shock and shortcuts. Please keep away from this kind of operations
which can destroy your appliance and cause danger of getting injured.
- This appliance should only be repaired or serviced by an authorised Service
Engineer and only genuine approved spare parts should be used.
SECTION 3 INSTALLATION of BUILT-IN OVEN
�nstallation must be done by an authorised technician. Below instructions
will guide an authorised technician to install Built-in oven according to law and
standarts to be in force.
Instructions :
- Dimensions and material of Cabin or cupboard that built-in oven will install in
must be suitable and endurable for heat increases.
- In a right installation operation, it is required to prevent any contact with
electrical parts or isolated parts due to work aim.
Isolation materials or parts that used for isolation must affix strongly to prevent
taking out by any tool.
- It is not recommend you to install your appliance near refrigator or deepfrost.
Otherwise performance of these appliances effected badly because of heat
spreaded..
-If a cooker installed on your oven, electrical cables of cooker and oven must
be seperated due to safety and to make dismantling easy if it requires.
-Install your appliance in a position that lets you to reach feeding cable.
-Do not place feeding cable close or contacted to hot surfaces. Do not tighten
the cable to oven door.
-6-
-6-
1
2
3
SECTION 4 INTRODUCTION of CONTROL PANEL
You can find control buttons in Figure.5 With these control buttons
power of each heating element can be adjustable. Buttons can turn
clockwise or opposite to clockwise directions. Please bring the control
button to required cooking position and do not forget big numbers on button
print means high heat outlet. For first cooking, it recommended to use
highest cooking position.
1 Thermostat
2 Timer
3 Selections
Push the button to get it out..Then turn it to related level. At the end of cooking
turn the buttons to (0) position and push them to get in.
SECTION 5 USAGE of OVEN
Control Switches of Oven
Indicator lamp will be on together with thermostat switch. When the heat
inside the oven reaches the set value, thermostat cuts the circuit and the
lamp is off. When the heat is below set value, thermostat is on again and
indicator lamp is lit.
Usage of Oven
During initial operation of your oven, a smell arising from insulation materials and
heating elements will be generated. To avoid it, operate your oven at 250 C for 45
minutes without putting any trays before use.
1. The meals that can be cooked
2. Positions of trays
3. Thermostat positions
4. Recommended cooking times are given in cooking table.
5. Turn the “oven heating control” switch clockwise to adjust cooking time for the
meal you desire to cook, refer to cooking table.
6. Before cooking, pre-heat the oven for 10 minutes. The front cover of the oven
should be open. Put the dish in the oven after pre-heating.
Figure 5. 13550 Control Panels (Digital&Mechanical Timer)
123
123
PLATE OPEN DOOR
CAUTION : The oven door has to be open with using plate open door as shown in
figure. Keep children away while duration of functioning grill.
SECTION 6 Grill Function of Oven
Turn the oven temperature button to position
� We advise you to use grill wire that put into the tray when you are grilling.
By the way leaped or flowed oil can not make your oven dirty.
� If you use grill wire that placed on shelf, put a tray into one of lower shelves
for collecting oils. For cleaning it easily, please put some water in it.
� Cover at half closeed position do preheating for 5-10 minutes.
� Please oil the grill to prevent your grilling food from sticking on grill.
ATTENTION :
For preventing command buttons on control panel from heating, please set
its sheet centered between front cover and oven body without have blank. Our
company is not responsible for damage made by not using this sheet.
GRILL
Shelf Time (min.)
Lamb Meat 4-5 15
Lamb
Chops 4-5 15
Calf Chops 4-5 15-25
Sheep
Chops 4-5 15-25
SECTION 4 INTRODUCTION of CONTROL PANEL
You can find control buttons in Figure.5 With these control buttons
power of each heating element can be adjustable. Buttons can turn
clockwise or opposite to clockwise directions. Please bring the control
button to required cooking position and do not forget big numbers on button
print means high heat outlet. For first cooking, it recommended to use
highest cooking position.
1 Thermostat
2 Timer
3 Selections
Figure 5. 13550 Control Panels (Digital&Mechanical Timer)
123
123
PLATE OPEN DOOR
CAUTION : The oven door has to be open with using plate open door as shown in
figure. Keep children away while duration of functioning grill.
SECTION 6 Grill Function of Oven
Turn the oven temperature button to position
� We advise you to use grill wire that put into the tray when you are grilling.
By the way leaped or flowed oil can not make your oven dirty.
� If you use grill wire that placed on shelf, put a tray into one of lower shelves
for collecting oils. For cleaning it easily, please put some water in it.
� Cover at half closeed position do preheating for 5-10 minutes.
� Please oil the grill to prevent your grilling food from sticking on grill.
ATTENTION :
For preventing command buttons on control panel from heating, please set
its sheet centered between front cover and oven body without have blank. Our
company is not responsible for damage made by not using this sheet.
GRILL
Shelf Time (min.)
Lamb Meat 4-5 15
Lamb
Chops 4-5 15
Calf Chops 4-5 15-25
Sheep
Chops 4-5 15-25
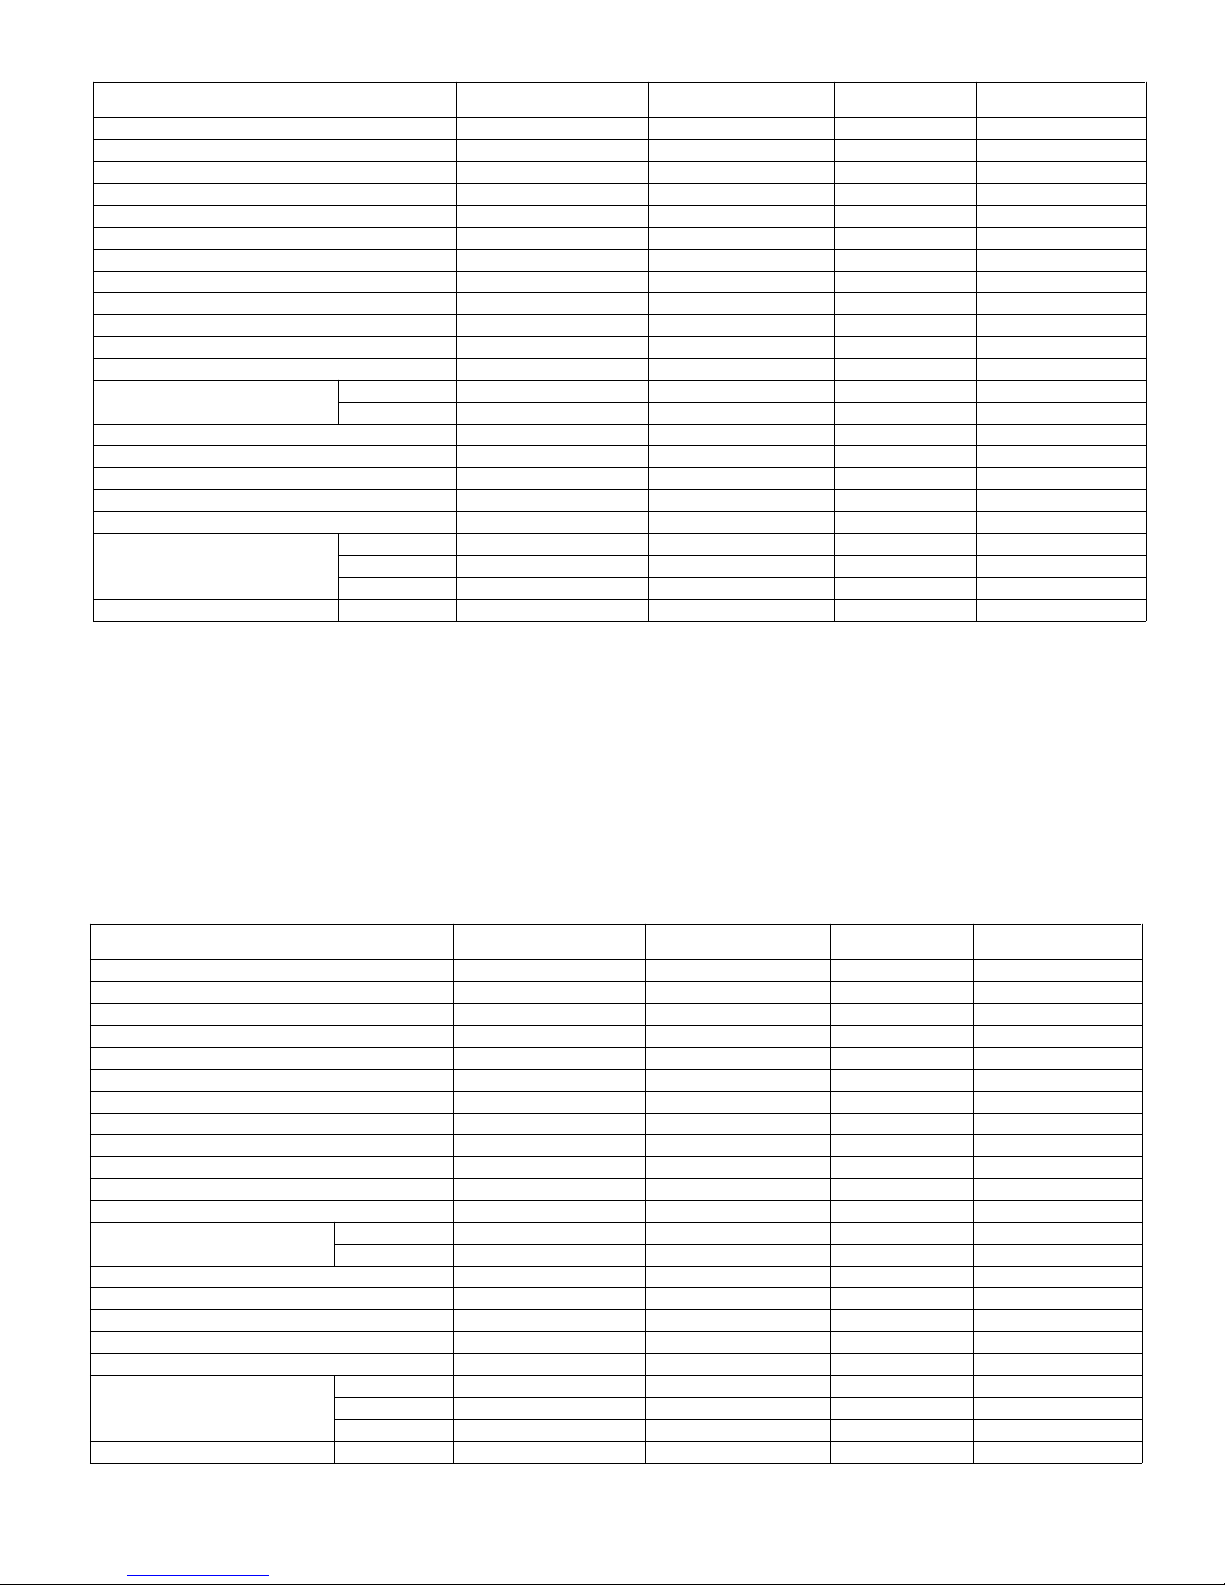
LEVEL FUNCTION DESCRIPTION
O Close Oven is not working
Oven Lamp
Double Grill
Outer Heating Element and Grill Heating
Element works together.Recommends to use
for big and powerfull grill.
Oven Lamp
Grill Heating Element
Oven Lamp and Grill heater works.
Recommend to use for frying.Thermostat must
be at maximum position.
Oven Lamp
Top&Bottom Heating
Elements
Hot air comes from up and down heats the tray
from both side. Top and bottom sides of meals
cooked equally.
Oven Lamp
Grill Heating Element
Turbo Fan
Oven Lamp, Grill heater and Turbo Fan work
together. Recommend to use for frying.
Thermostat must be at maximum position.
Oven Lamp
Double Grill
Turbo Fan
Oven Lamp, Double Grill and Turbo Fan work
together. Recommend to use for frying.
Thermostat must be at maximum position.
Oven Lamp
Turbo Heating Element
Turbo Fan
Oven Lamp, Turbo Fan and Turbo Heating
Element work.Recommend to use fast cooking.
Oven Lamp
Turbo Heating Element
Turbo Fan, Bottom
Heating Element
Oven Lamp, turbo heating element,
turbo fan and bottom
heating element work together.
Recommed to use for pizza.
Oven Lamp
Turbo Fan
Only Oven Lamp and Turbo Fan work.
Recommend to use for defrosting.
Bottom
Heating Element
Bottom heating element,
Recommed to use cake and bread.
Top
Heating Element
Top Heating Element for keeping cooked food
warm or gently reheating.
Oven Lamp
Top&Bottom Heating
Elements
Turbo Fan
Hot air comes from up and down heats the tray
from both side. Top and bottom sides of meals
cooked equally with Turbo Fan.
OVEN FUNCTIONS:
SECTION 4 INTRODUCTION of CONTROL PANEL
You can find control buttons in Figure.5 With these control buttons
power of each heating element can be adjustable. Buttons can turn
clockwise or opposite to clockwise directions. Please bring the control
button to required cooking position and do not forget big numbers on button
print means high heat outlet. For first cooking, it recommended to use
highest cooking position.
1 Thermostat
2 Timer
3 Selections
Push the button to get it out..Then turn it to related level. At the end of cooking
turn the buttons to (0) position and push them to get in.
SECTION 5 USAGE of OVEN
Control Switches of Oven
Indicator lamp will be on together with thermostat switch. When the heat
inside the oven reaches the set value, thermostat cuts the circuit and the
lamp is off. When the heat is below set value, thermostat is on again and
indicator lamp is lit.
Usage of Oven
During initial operation of your oven, a smell arising from insulation materials and
heating elements will be generated. To avoid it, operate your oven at 250 C for 45
minutes without putting any trays before use.
1. The meals that can be cooked
2. Positions of trays
3. Thermostat positions
4. Recommended cooking times are given in cooking table.
5. Turn the “oven heating control” switch clockwise to adjust cooking time for the
meal you desire to cook, refer to cooking table.
6. Before cooking, pre-heat the oven for 10 minutes. The front cover of the oven
should be open. Put the dish in the oven after pre-heating.
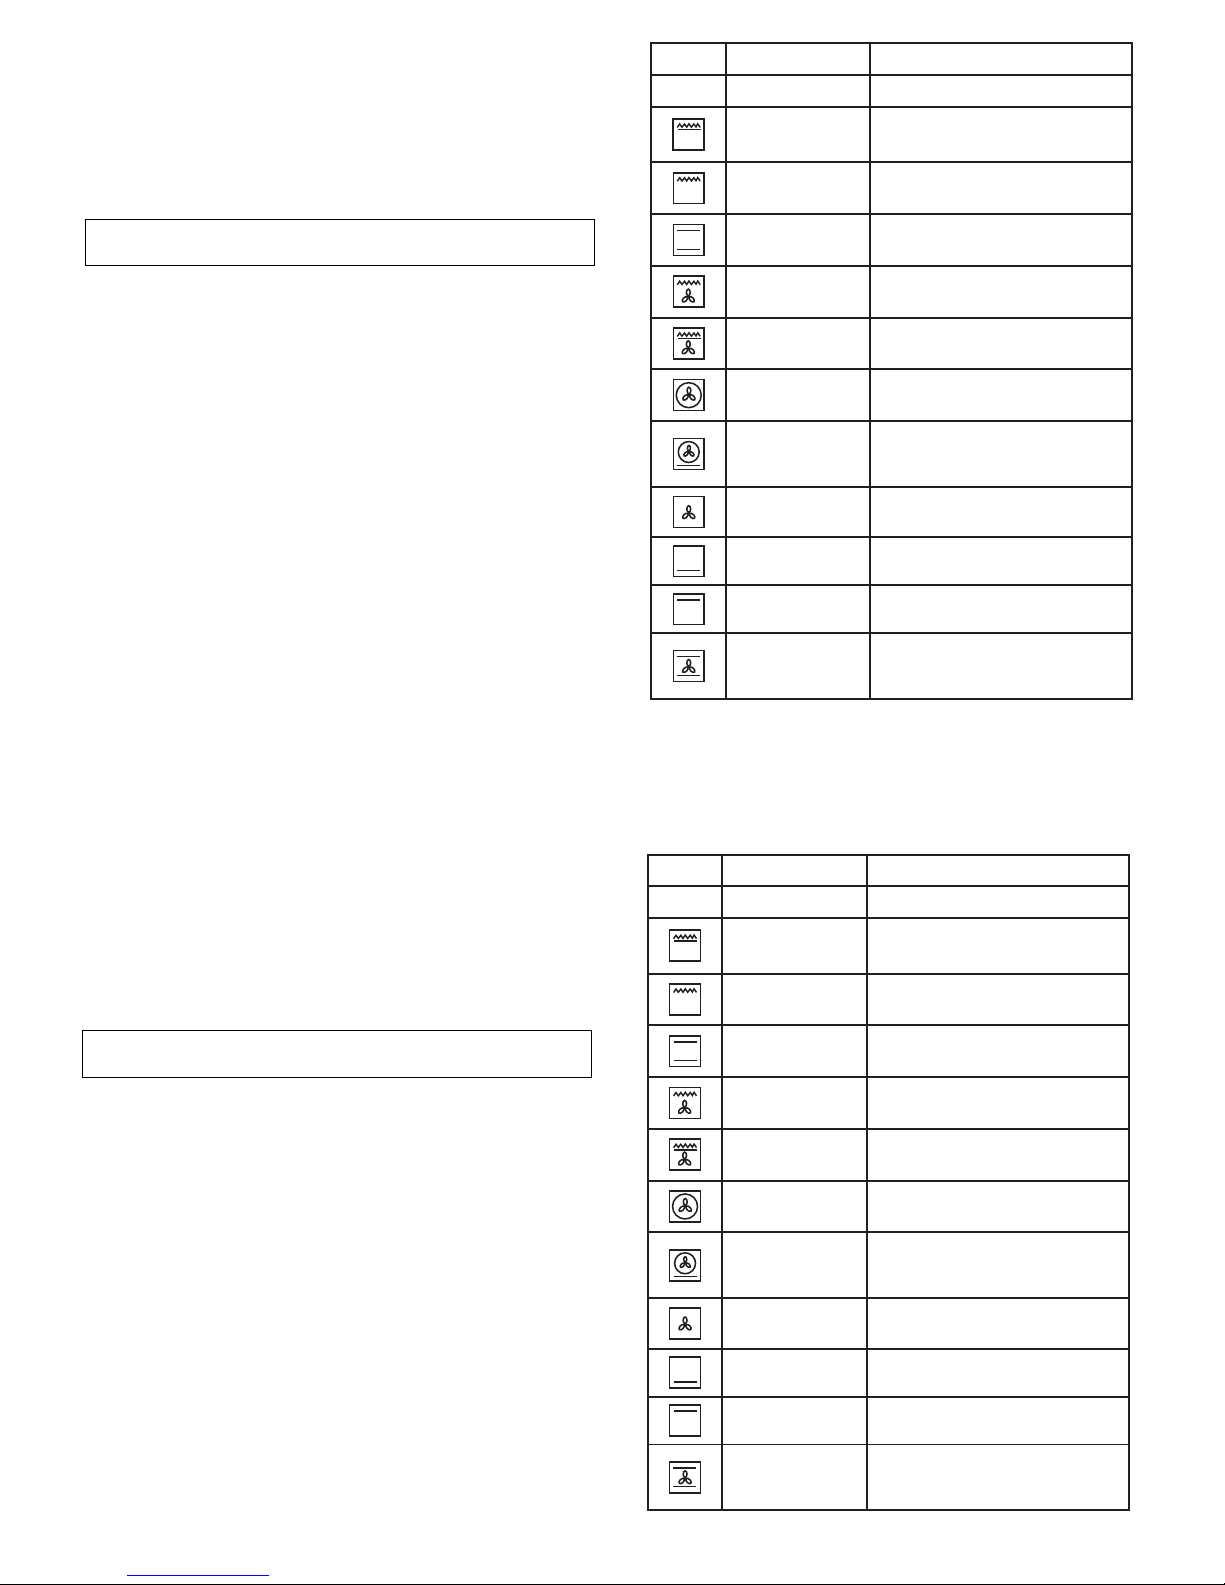
LEVEL FUNCTION DESCRIPTION
O Close Oven is not working
Oven Lamp
Double Grill
Outer Heating Element and Grill Heating
Element works together.Recommends to use
for big and powerfull grill.
Oven Lamp
Grill Heating Element
Oven Lamp and Grill heater works.
Recommend to use for frying.Thermostat must
be at maximum position.
Oven Lamp
Top&Bottom Heating
Elements
Hot air comes from up and down heats the tray
from both side. Top and bottom sides of meals
cooked equally.
Oven Lamp
Grill Heating Element
Turbo Fan
Oven Lamp, Grill heater and Turbo Fan work
together. Recommend to use for frying.
Thermostat must be at maximum position.
Oven Lamp
Double Grill
Turbo Fan
Oven Lamp, Double Grill and Turbo Fan work
together. Recommend to use for frying.
Thermostat must be at maximum position.
Oven Lamp
Turbo Heating Element
Turbo Fan
Oven Lamp, Turbo Fan and Turbo Heating
Element work.Recommend to use fast cooking.
Oven Lamp
Turbo Heating Element
Turbo Fan, Bottom
Heating Element
Oven Lamp, turbo heating element,
turbo fan and bottom
heating element work together.
Recommed to use for pizza.
Oven Lamp
Turbo Fan
Only Oven Lamp and Turbo Fan work.
Recommend to use for defrosting.
Bottom
Heating Element
Bottom heating element,
Recommed to use cake and bread.
Top
Heating Element
Top Heating Element for keeping cooked food
warm or gently reheating.
Oven Lamp
Top&Bottom Heating
Elements
Turbo Fan
Hot air comes from up and down heats the tray
from both side. Top and bottom sides of meals
cooked equally with Turbo Fan.
OVEN FUNCTIONS:
-7-
-7-

Traditional Oven Cooking
By turning the thermostat knob, a desired temperature of 50CC to 2503C
can be selected. The yellow light will go off when the oven has reached the desired
temperature. It is recommended that the oven is pre-heated before introducing the
food.
Central Grill Element
By turning the thermostat knob, a desired temperature of 50°C to
250°C can be selected, keeping the door closed.
Recommended use: for grilling smaller items of food.
Double Grill Element
By turning the thermostat knob, a desired temperature of 50°C to 250°C
can be selected, keeping the door half-open or closed. In the latter case the
use of the grill deflector is not necessary. Recommended use: for grilling larger
area of food.
Semi Forced air Convection
The thermostat has to be set at the desired temperature between 50°C and
2505C. The fan and the grill clement allow a fast and deep cooking for particular
food. It is recommended that the oven be pre-heated for a few minutes.
Upper + lower heater + Fan
Termostat , signal lamp,fan, upper heater and lower heater start
working.
Turbo Fan + Rezistans
The fan and the circular element come on. The heat is diffused bv the fan
to give an even temperature in the oven by adjusting the thermostat, a desired
temperature of 50'C to 250°C can be obtained. It is not necessary to pre-heat the
oven before introducing the food.
Bottom Elemet + Fan.
Termostat signal lamps ,fan and lower heater start working.
Oven Lamp
PLATE OPEN DOOR
CAUTION : The oven door has to be open with using plate open door as shown in
figure. Keep children away while duration of functioning grill.
SECTION 6 Grill Function of Oven
Turn the oven temperature button to position
� We advise you to use grill wire that put into the tray when you are grilling.
By the way leaped or flowed oil can not make your oven dirty.
� If you use grill wire that placed on shelf, put a tray into one of lower shelves
for collecting oils. For cleaning it easily, please put some water in it.
� Cover at half closeed position do preheating for 5-10 minutes.
� Please oil the grill to prevent your grilling food from sticking on grill.
ATTENTION :
For preventing command buttons on control panel from heating, please set
its sheet centered between front cover and oven body without have blank. Our
company is not responsible for damage made by not using this sheet.
GRILL
Shelf Time (min.)
Lamb Meat 4-5 15
Lamb
Chops 4-5 15
Calf Chops 4-5 15-25
Sheep
Chops 4-5 15-25
NOTE: The values given in the table are the values obtained in our
laboratories. You can obtain various tastes satisfying your tastes depending
on your cooking and use habits. Cooking times depend on quantity of
ingredients. Using cake forms gives better results for making cakes
SECTION 7 ADJUSTMENT of TIMER (Optional)
A) Adjustment of Mechanical Timer :
Mechanical Timer can be adjusted by its button on front panel. T�mer must
be adjusted to start the oven cooking. Cooking time can be adjusted between 5 to
90 minutes with mechanical timer. You should position the button to ‘ON’ manually
if cooking time will exceed 90 minutes.
B) Adjustment of QT- 3000 Digital Timer :
OT- 3000 Programmable Options
BUZZER TONE ADJUSTMENT
� Press the
button for 5 seconds ( till you see ‘pr 1’ on the
screen).
� Press the button to decrease buzzer volume
� Press the button to increase buzzer volume (default is already
high)
� Press the button to record the last heard tone.
CREATING YOUR BACKLIGHT COLOUR
� Press the button for 5 seconds (till display indicates 'r xx' ,
where xx is a number between 00 and 100 indicating the red
content)
� Press the or button to change the red colour content on
the display between 00 and 100
� You may press button to switch to green and blue and make
the same colour content adjustment via or as in red.
Raw Positions For 2 Trays : 4-6 For 1 Tray : 4
Traditional Oven Cooking
By turning the thermostat knob, a desired temperature of 50CC to 2503C
can be selected. The yellow light will go off when the oven has reached the desired
temperature. It is recommended that the oven is pre-heated before introducing the
food.
Central Grill Element
By turning the thermostat knob, a desired temperature of 50°C to
250°C can be selected, keeping the door closed.
Recommended use: for grilling smaller items of food.
Double Grill Element
By turning the thermostat knob, a desired temperature of 50°C to 250°C
can be selected, keeping the door half-open or closed. In the latter case the
use of the grill deflector is not necessary. Recommended use: for grilling larger
area of food.
Semi Forced air Convection
The thermostat has to be set at the desired temperature between 50°C and
2505C. The fan and the grill clement allow a fast and deep cooking for particular
food. It is recommended that the oven be pre-heated for a few minutes.
Upper + lower heater + Fan
Termostat , signal lamp,fan, upper heater and lower heater start
working.
Turbo Fan + Rezistans
The fan and the circular element come on. The heat is diffused bv the fan
to give an even temperature in the oven by adjusting the thermostat, a desired
temperature of 50'C to 250°C can be obtained. It is not necessary to pre-heat the
button for 5 seconds ( till you see ‘pr 1’ on the
screen).
� Press the button to decrease buzzer volume
� Press the button to increase buzzer volume (default is already
high)
� Press the button to record the last heard tone.
CREATING YOUR BACKLIGHT COLOUR
� Press the button for 5 seconds (till display indicates 'r xx' ,
where xx is a number between 00 and 100 indicating the red
content)
� Press the or button to change the red colour content on
the display between 00 and 100
� You may press button to switch to green and blue and make
the same colour content adjustment via or as in red.
oven before introducing the food.
Bottom Elemet + Fan.
Termostat signal lamps ,fan and lower heater start working.
Oven Lamp
SECTION 7 ADJUSTMENT of TIMER (Optional)
A) Adjustment of Mechanical Timer :
Mechanical Timer can be adjusted by its button on front panel. T�mer must
be adjusted to start the oven cooking. Cooking time can be adjusted between 5 to
90 minutes with mechanical timer. You should position the button to ‘ON’ manually
if cooking time will exceed 90 minutes.
B) Adjustment of QT- 3000 Digital Timer :
OT- 3000 Programmable Options
BUZZER TONE ADJUSTMENT
� Press the
-8-
oven before introducing the food.
Bottom Elemet + Fan.
Termostat signal lamps ,fan and lower heater start working.
Oven Lamp
PLATE OPEN DOOR
CAUTION : The oven door has to be open with using plate open door as shown in
figure. Keep children away while duration of functioning grill.
SECTION 6 Grill Function of Oven
Turn the oven temperature button to position
� We advise you to use grill wire that put into the tray when you are grilling.
By the way leaped or flowed oil can not make your oven dirty.
� If you use grill wire that placed on shelf, put a tray into one of lower shelves
for collecting oils. For cleaning it easily, please put some water in it.
� Cover at half closeed position do preheating for 5-10 minutes.
� Please oil the grill to prevent your grilling food from sticking on grill.
ATTENTION :
For preventing command buttons on control panel from heating, please set
its sheet centered between front cover and oven body without have blank. Our
company is not responsible for damage made by not using this sheet.
GRILL
Shelf Time (min.)
Lamb Meat 4-5 15
Lamb
Chops 4-5 15
Calf Chops 4-5 15-25
Sheep
Chops 4-5 15-25
NOTE: The values given in the table are the values obtained in our
laboratories. You can obtain various tastes satisfying your tastes depending
on your cooking and use habits. Cooking times depend on quantity of
ingredients. Using cake forms gives better results for making cakes
SECTION 7 ADJUSTMENT of TIMER (Optional)
A) Adjustment of Mechanical Timer :
Mechanical Timer can be adjusted by its button on front panel. T�mer must
be adjusted to start the oven cooking. Cooking time can be adjusted between 5 to
90 minutes with mechanical timer. You should position the button to ‘ON’ manually
if cooking time will exceed 90 minutes.
B) Adjustment of QT- 3000 Digital Timer :
OT- 3000 Programmable Options
BUZZER TONE ADJUSTMENT
� Press the
Raw Positions For 2 Trays : 4-6 For 1 Tray : 4
-8-

button once.
CANCELLING THE BUZZER SOUND
Raw Positions For 2 Trays : 4-6 For 1 Tray : 4
� When desired colour is obtained, press the button for 5
seconds to record it.
NOTE : To exit without recording press the button .
AUTO BACKLIGHT COLOUR CHANGE in AUTO MODE ON/OFF
� Press the button for 5 seconds ( till display indicates ON or
OFF). Backlight colour change option toggles from ON to OFF or
vice versa.
If this option is ON, backlight colour is red during cooking, green as
waiting the cooking time in auto mode. If this option is OFF, backlight colour
doesn't change at auto mode.
BACKLIGHT ON/OFF
� Press the button 5 second (till display indicates ON or OFF).
Backlight option toggles from ON to OFF or vice versa.
If this option is ON, backlight is always ON. If this option is OFF,
backlight is OFF at manual status. Backlight will be turned on for 15
seconds when a valid button is pressed.
CLICK ON/OFF
� Press the
button for 5 seconds (till display indicates ON or
OFF). Click option toggles from ON to OFF or vice versa.
If this option is ON, click is heard when a button is pressed. If this
option is OFF, no click tone is produced.
RETURN to DEFAULT SETTINGS
� Press the button for 10 seconds (until ‘pr d’ appears
on the display ).
Defaults :
Buzzer : high tone
Backlight colour : 0% red, 50% green, 100% blue ( light blue tone )
Backlight colour changing at auto mode : ON
Backlight : ON
Click tone ON
QT-3000 is an electornic timer, which enables your oven to get food ready to serve
at the desired time.The only thing to be done is to program the cooking time and
ready time.It can also be used as an alarm clock. Where you just give in the
amount of time after which it should remind you by a buzzer tone.
TIME OF DAY ADJUSTMENT
You can adjust the displayed time only if no automatic cooking program is in
progress ( there is just the time and the hand icon on the screen). Press the
button , a small triangle between the hours and minutes will start to flash, use the +
or - buttons for adjustment. Long presses of those buttons will enable fast
adjustments.
ADJUSTING THE BUZZER ALARM
With this feature , you can program after how much elapsed time you should be
warned by a buzzer sound.
Note: Once programmed , the remaining time can be seen by pressing the
button once.
CANCELLING THE BUZZER SOUND
SECTION 7 ADJUSTMENT of TIMER (Optional)
BUZZER TONE ADJUSTMENT
� Press the button for 5 seconds ( till you see ‘pr 1’ on the
screen).
� Press the button to decrease buzzer volume
� Press the button to increase buzzer volume (default is already
high)
� Press the button to record the last heard tone.
CREATING YOUR BACKLIGHT COLOUR
� Press the button for 5 seconds (till display indicates 'r xx' ,
where xx is a number between 00 and 100 indicating the red
content)
� Press the or button to change the red colour content on
the display between 00 and 100
� You may press button to switch to green and blue and make
the same colour content adjustment via or as in red.
Raw Positions For 2 Trays : 4-6 For 1 Tray : 4
A ) BO 6341 R - Programmable Options
QT-3000 is an electornic timer, which enables your oven to get food ready to serve
at the desired time.The only thing to be done is to program the cooking time and
ready time.It can also be used as an alarm clock. Where you just give in the
amount of time after which it should remind you by a buzzer tone.
TIME OF DAY ADJUSTMENT
You can adjust the displayed time only if no automatic cooking program is in
progress ( there is just the time and the hand icon on the screen). Press the
button , a small triangle between the hours and minutes will start to flash, use the +
or - buttons for adjustment. Long presses of those buttons will enable fast
adjustments.
ADJUSTING THE BUZZER ALARM
With this feature , you can program after how much elapsed time you should be
warned by a buzzer sound.
Note: Once programmed , the remaining time can be seen by pressing the
-9-
� When desired colour is obtained, press the button for 5
seconds to record it.
NOTE : To exit without recording press the button .
AUTO BACKLIGHT COLOUR CHANGE in AUTO MODE ON/OFF
� Press the button for 5 seconds ( till display indicates ON or
OFF). Backlight colour change option toggles from ON to OFF or
vice versa.
If this option is ON, backlight colour is red during cooking, green as
waiting the cooking time in auto mode. If this option is OFF, backlight colour
doesn't change at auto mode.
BACKLIGHT ON/OFF
� Press the button 5 second (till display indicates ON or OFF).
Backlight option toggles from ON to OFF or vice versa.
If this option is ON, backlight is always ON. If this option is OFF,
backlight is OFF at manual status. Backlight will be turned on for 15
seconds when a valid button is pressed.
CLICK ON/OFF
� Press the
button for 5 seconds (till display indicates ON or
OFF). Click option toggles from ON to OFF or vice versa.
If this option is ON, click is heard when a button is pressed. If this
option is OFF, no click tone is produced.
RETURN to DEFAULT SETTINGS
� Press the button for 10 seconds (until ‘pr d’ appears
on the display ).
Defaults :
Buzzer : high tone
Backlight colour : 0% red, 50% green, 100% blue ( light blue tone )
Backlight colour changing at auto mode : ON
Backlight : ON
Click tone ON
QT-3000 is an electornic timer, which enables your oven to get food ready to serve
at the desired time.The only thing to be done is to program the cooking time and
ready time.It can also be used as an alarm clock. Where you just give in the
amount of time after which it should remind you by a buzzer tone.
TIME OF DAY ADJUSTMENT
You can adjust the displayed time only if no automatic cooking program is in
progress ( there is just the time and the hand icon on the screen). Press the
button , a small triangle between the hours and minutes will start to flash, use the +
or - buttons for adjustment. Long presses of those buttons will enable fast
adjustments.
ADJUSTING THE BUZZER ALARM
With this feature , you can program after how much elapsed time you should be
warned by a buzzer sound.
Note: Once programmed , the remaining time can be seen by pressing the
SECTION 7 ADJUSTMENT of TIMER (Optional)
BUZZER TONE ADJUSTMENT
� Press the button for 5 seconds ( till you see ‘pr 1’ on the
screen).
� Press the button to decrease buzzer volume
� Press the button to increase buzzer volume (default is already
high)
� Press the button to record the last heard tone.
CREATING YOUR BACKLIGHT COLOUR
� Press the button for 5 seconds (till display indicates 'r xx' ,
where xx is a number between 00 and 100 indicating the red
content)
� Press the or button to change the red colour content on
the display between 00 and 100
� You may press button to switch to green and blue and make
the same colour content adjustment via or as in red.
A ) BO 6341 R - Programmable Options
-9-

AUTOMATIC COOKING PROGRAM
If you want to start cooking immediately , you just have to give in the
cooking time.
Example: We placed our food into the oven and want it to be cooked for 2
hours and 15 minutes.
4) After a few seconds, the screen
will indicate that cooking has started
and show the current time.
Now , you have programmed you oven to cook the food for 2 hours and 15
minutes. Please do not forget to bring the function and / or temperature
knobs of your oven to appropriate positions.
Note: You may cancel the automatic cooking mode any time by pressing the button.
In the above example, cooking immediately started after giving in the
cooking period. By pressing the button, you can see the ready time, ie.
The time when the food will be ready to serve, and if you want, you can also
change it. In the example below, the ready time will be changed to 21:30.
We now have programmed our oven to get the food ready at 21:30. Since
the cooking time was preprogrammed as 2 hours 15 minutes,your oven will
start cooking at 19:15 , so that the food is ready at 21:30.
When automatic cooking is completed , a buzzer alarm is heared and will
sound , if not stopped for 7 minutes.
In the example shown, cooking time has been programmed first, the ready
time was calculated automatically and was edited by us. It is also possible
first to program the ready time, in that case the cooking time will be
calculated automatically and should be edited thereafter.
During the automatic cooking program, the backlight color of the screen will
be green before and red during cooking.
IN CASE MAINS POWER LOSS
Mains power interrupts will switch your oven into OFF mode. In that case
the hand icon on the screen will flash and 12:00 will be displayed. Any
cooking program will also be cancelled. Press the button to get your
oven operative, press once again to the button switch to adjust the clock
( See TIME OF DAY ADJUSTMENT)
Note: If you will not use your oven right now, be sure that it is in OFF position.
Flashing hand icon indicates that your oven is inoperative and you should press the
button to reset.
BUZZER VOLUME ADJUSTMENT
� When desired colour is obtained, press the button for 5
seconds to record it.
NOTE : To exit without recording press the button .
AUTO BACKLIGHT COLOUR CHANGE in AUTO MODE ON/OFF
� Press the button for 5 seconds ( till display indicates ON or
OFF). Backlight colour change option toggles from ON to OFF or
vice versa.
If this option is ON, backlight colour is red during cooking, green as
waiting the cooking time in auto mode. If this option is OFF, backlight colour
doesn't change at auto mode.
BACKLIGHT ON/OFF
� Press the button 5 second (till display indicates ON or OFF).
Backlight option toggles from ON to OFF or vice versa.
If this option is ON, backlight is always ON. If this option is OFF,
backlight is OFF at manual status. Backlight will be turned on for 15
seconds when a valid button is pressed.
CLICK ON/OFF
� Press the button for 5 seconds (till display indicates ON or
OFF). Click option toggles from ON to OFF or vice versa.
If this option is ON, click is heard when a button is pressed. If this
option is OFF, no click tone is produced.
RETURN to DEFAULT SETTINGS
� Press the button for 10 seconds (until ‘pr d’ appears
on the display ).
Defaults :
Buzzer : high tone
Backlight colour : 0% red, 50% green, 100% blue ( light blue tone )
Backlight colour changing at auto mode : ON
Backlight : ON
Click tone ON
QT-3000 is an electornic timer, which enables your oven to get food ready to serve
at the desired time.The only thing to be done is to program the cooking time and
ready time.It can also be used as an alarm clock. Where you just give in the
amount of time after which it should remind you by a buzzer tone.
TIME OF DAY ADJUSTMENT
You can adjust the displayed time only if no automatic cooking program is in
progress ( there is just the time and the hand icon on the screen). Press the
button , a small triangle between the hours and minutes will start to flash, use the +
or - buttons for adjustment. Long presses of those buttons will enable fast
adjustments.
ADJUSTING THE BUZZER ALARM
With this feature , you can program after how much elapsed time you should be
warned by a buzzer sound.
Note: Once programmed , the remaining time can be seen by pressing the
button once.
CANCELLING THE BUZZER SOUND
-10-
-10-

AUTOMATIC COOKING PROGRAM
If you want to start cooking immediately , you just have to give in the
cooking time.
Example: We placed our food into the oven and want it to be cooked for 2
hours and 15 minutes.
4) After a few seconds, the screen
will indicate that cooking has started
and show the current time.
Now , you have programmed you oven to cook the food for 2 hours and 15
minutes. Please do not forget to bring the function and / or temperature
knobs of your oven to appropriate positions.
Note: You may cancel the automatic cooking mode any time by pressing the button.
In the above example, cooking immediately started after giving in the
cooking period. By pressing the button, you can see the ready time, ie.
The time when the food will be ready to serve, and if you want, you can also
change it. In the example below, the ready time will be changed to 21:30.
We now have programmed our oven to get the food ready at 21:30. Since
the cooking time was preprogrammed as 2 hours 15 minutes,your oven will
start cooking at 19:15 , so that the food is ready at 21:30.
When automatic cooking is completed , a buzzer alarm is heared and will
sound , if not stopped for 7 minutes.
In the example shown, cooking time has been programmed first, the ready
time was calculated automatically and was edited by us. It is also possible
first to program the ready time, in that case the cooking time will be
calculated automatically and should be edited thereafter.
During the automatic cooking program, the backlight color of the screen will
be green before and red during cooking.
IN CASE MAINS POWER LOSS
Mains power interrupts will switch your oven into OFF mode. In that case
the hand icon on the screen will flash and 12:00 will be displayed. Any
cooking program will also be cancelled. Press the button to get your
oven operative, press once again to the button switch to adjust the clock
( See TIME OF DAY ADJUSTMENT)
Note: If you will not use your oven right now, be sure that it is in OFF position.
Flashing hand icon indicates that your oven is inoperative and you should press the
button to reset.
BUZZER VOLUME ADJUSTMENT
CHANGING OVEN LAMP
Removing the oven door - fig 9
To aid cleaning and make Access to the oven
interior easier , the oven door can be simply
removed. To facilitate cleaning of the oven ,
the door can be removed via the hinges as
follows:
Hinges with movable bolt
The hinges A are provived with two movable bolts B
When bolt B is raised, the hinge is released from its
housing .
Having done this, the door must be lifted upwards
and removed , sliding it towards the outside;
grip the sides of the door near the hinges when
performing these operations.
To refit the door firstly slide the hinges into their slots.
Before closing the door remember to rotate the two movable bolts B used to hook
the two hinges.
Changing Oven Lamp
1. Pull the plug out of socket.
2. Turn the lamp fixing glass counter-clockwise direction to seperate it.
3. To seperate lamp from body turn it to counter-clockwise direction.
4. Fix new lamp that you gain from authorised service in place of old lamp.
AUTOMATIC COOKING PROGRAM
If you want to start cooking immediately , you just have to give in the
cooking time.
Example: We placed our food into the oven and want it to be cooked for
hours and 15 minutes.
4) After a few seconds, the screen
will indicate that cooking has started
and show the current time.
Now , you have programmed you oven to cook the food for 2 hours and 1
minutes. Please do not forget to bring the function and / or temperature
knobs of your oven to appropriate positions.
Note: You may cancel the automatic cooking mode any time by pressing the button.
In the above example, cooking immediately started after giving in the
cooking period. By pressing the button, you can see the ready time, i
The time when the food will be ready to serve, and if you want, you can al
change it. In the example below, the ready time will be changed to 21:30.
BUZZER VOLUME ADJUSTMENT
AUTOMATIC COOKING PROGRAM
If you want to start cooking immediately , you just have to give in the
cooking time.
Example: We placed our food into the oven and want it to be cooked for 2
hours and 15 minutes.
4) After a few seconds, the screen
will indicate that cooking has started
and show the current time.
Now , you have programmed you oven to cook the food for 2 hours and 15
minutes. Please do not forget to bring the function and / or temperature
knobs of your oven to appropriate positions.
Note: You may cancel the automatic cooking mode any time by pressing the button.
In the above example, cooking immediately started after giving in the
cooking period. By pressing the button, you can see the ready time, ie.
The time when the food will be ready to serve, and if you want, you can also
change it. In the example below, the ready time will be changed to 21:30.
We now have programmed our oven to get the food ready at 21:30. Since
the cooking time was preprogrammed as 2 hours 15 minutes,your oven will
start cooking at 19:15 , so that the food is ready at 21:30.
When automatic cooking is completed , a buzzer alarm is heared and will
sound , if not stopped for 7 minutes.
In the example shown, cooking time has been programmed first, the ready
time was calculated automatically and was edited by us. It is also possible
first to program the ready time, in that case the cooking time will be
calculated automatically and should be edited thereafter.
During the automatic cooking program, the backlight color of the screen will
be green before and red during cooking.
IN CASE MAINS POWER LOSS
Mains power interrupts will switch your oven into OFF mode. In that case
the hand icon on the screen will flash and 12:00 will be displayed. Any
cooking program will also be cancelled. Press the button to get your
oven operative, press once again to the button switch to adjust the clock
( See TIME OF DAY ADJUSTMENT)
Note: If you will not use your oven right now, be sure that it is in OFF position.
Flashing hand icon indicates that your oven is inoperative and you should press the
button to reset.
CHANGING OVEN LAMP
Removing the oven door - fig 9
To aid cleaning and make Access to the oven
interior easier , the oven door can be simply
removed. To facilitate cleaning of the oven ,
the door can be removed via the hinges as
follows:
Hinges with movable bolt
The hinges A are provived with two movable bolts B
When bolt B is raised, the hinge is released from its
housing .
Having done this, the door must be lifted upwards
and removed , sliding it towards the outside;
grip the sides of the door near the hinges when
performing these operations.
To refit the door firstly slide the hinges into their slots.
Before closing the door remember to rotate the two movable bolts B used to hook
the two hinges.
Changing Oven Lamp
1. Pull the plug out of socket.
2. Turn the lamp fixing glass counter-clockwise direction to seperate it.
3. To seperate lamp from body turn it to counter-clockwise direction.
4. Fix new lamp that you gain from authorised service in place of old lamp.
TOUCH CONTROL OVEN TIMER
OVERVIEW:
OT-4000-LED, is an electronic timer, which enables your oven to get the food ready to
serve at the desired time. The only thing to be done is to program the cooking time and
ready time. It can also be used as an alarm clock, where you just give in the amount of
time after which it should remind you by a buzzer tone.
POWER UP:
Upon power up, flashing digits and AUTO icon, the oven is inoperative. Press M to
return to manual mode and adjust the time of day using up and down buttons.
MANUAL MODE
Touching & at the same time, manual m ode is
entered. Any previous cooking program will be cancelled.
ADJUSTING TIME OF DAY
Time of day adjustment is onl y allowed, when no c ooking program is in progress. First
enter manual mode as descr ibed above. The point bet ween the hours and minutes
display flashes.
1) Switch into time 2) Adjust the time using 3) After a few seconds,
adjustment mode. the or buttons. screen will stabilize.
B
)
BO 6352
AUTOMATIC COOKING PROGRAM
If you want to start cooking immediately , you just have to give in the
cooking time.
Example: We placed our food into the oven and want it to be cooked for
hours and 15 minutes.
4) After a few seconds, the screen
will indicate that cooking has started
and show the current time.
Now , you have programmed you oven to cook the food for 2 hours and 1
minutes. Please do not forget to bring the function and / or temperature
knobs of your oven to appropriate positions.
Note: You may cancel the automatic cooking mode any time by pressing the button.
In the above example, cooking immediately started after giving in the
cooking period. By pressing the button, you can see the ready time, i
The time when the food will be ready to serve, and if you want, you can al
change it. In the example below, the ready time will be changed to 21:30.
BUZZER VOLUME ADJUSTMENT
AUTOMATIC COOKING PROGRAM
If you want to start cooking immediately , you just have to give in the
cooking time.
Example: We placed our food into the oven and want it to be cooked for 2
hours and 15 minutes.
4) After a few seconds, the screen
will indicate that cooking has started
and show the current time.
Now , you have programmed you oven to cook the food for 2 hours and 15
minutes. Please do not forget to bring the function and / or temperature
knobs of your oven to appropriate positions.
Note: You may cancel the automatic cooking mode any time by pressing the button.
In the above example, cooking immediately started after giving in the
cooking period. By pressing the button, you can see the ready time, ie.
The time when the food will be ready to serve, and if you want, you can also
change it. In the example below, the ready time will be changed to 21:30.
We now have programmed our oven to get the food ready at 21:30. Since
the cooking time was preprogrammed as 2 hours 15 minutes,your oven will
start cooking at 19:15 , so that the food is ready at 21:30.
When automatic cooking is completed , a buzzer alarm is heared and will
sound , if not stopped for 7 minutes.
In the example shown, cooking time has been programmed first, the ready
time was calculated automatically and was edited by us. It is also possible
first to program the ready time, in that case the cooking time will be
calculated automatically and should be edited thereafter.
During the automatic cooking program, the backlight color of the screen will
be green before and red during cooking.
IN CASE MAINS POWER LOSS
Mains power interrupts will switch your oven into OFF mode. In that case
the hand icon on the screen will flash and 12:00 will be displayed. Any
cooking program will also be cancelled. Press the button to get your
oven operative, press once again to the button switch to adjust the clock
( See TIME OF DAY ADJUSTMENT)
Note: If you will not use your oven right now, be sure that it is in OFF position.
Flashing hand icon indicates that your oven is inoperative and you should press the
button to reset.
-11-
AUTOMATIC COOKING PROGRAM
If you want to start cooking immediately , you just have to give in the
cooking time.
Example: We placed our food into the oven and want it to be cooked for 2
hours and 15 minutes.
4) After a few seconds, the screen
will indicate that cooking has started
and show the current time.
Now , you have programmed you oven to cook the food for 2 hours and 15
minutes. Please do not forget to bring the function and / or temperature
knobs of your oven to appropriate positions.
Note: You may cancel the automatic cooking mode any time by pressing the button.
In the above example, cooking immediately started after giving in the
cooking period. By pressing the button, you can see the ready time, ie.
The time when the food will be ready to serve, and if you want, you can also
change it. In the example below, the ready time will be changed to 21:30.
We now have programmed our oven to get the food ready at 21:30. Since
the cooking time was preprogrammed as 2 hours 15 minutes,your oven will
start cooking at 19:15 , so that the food is ready at 21:30.
When automatic cooking is completed , a buzzer alarm is heared and will
sound , if not stopped for 7 minutes.
In the example shown, cooking time has been programmed first, the ready
time was calculated automatically and was edited by us. It is also possible
first to program the ready time, in that case the cooking time will be
calculated automatically and should be edited thereafter.
During the automatic cooking program, the backlight color of the screen will
be green before and red during cooking.
IN CASE MAINS POWER LOSS
Mains power interrupts will switch your oven into OFF mode. In that case
the hand icon on the screen will flash and 12:00 will be displayed. Any
cooking program will also be cancelled. Press the button to get your
oven operative, press once again to the button switch to adjust the clock
( See TIME OF DAY ADJUSTMENT)
Note: If you will not use your oven right now, be sure that it is in OFF position.
Flashing hand icon indicates that your oven is inoperative and you should press the
button to reset.
BUZZER VOLUME ADJUSTMENT
AUTOMATIC COOKING PROGRAM
If you want to start cooking immediately , you just have to give in the
cooking time.
Example: We placed our food into the oven and want it to be cooked for 2
hours and 15 minutes.
4) After a few seconds, the screen
will indicate that cooking has started
and show the current time.
Now , you have programmed you oven to cook the food for 2 hours and 15
minutes. Please do not forget to bring the function and / or temperature
knobs of your oven to appropriate positions.
Note: You may cancel the automatic cooking mode any time by pressing the button.
In the above example, cooking immediately started after giving in the
cooking period. By pressing the button, you can see the ready time, ie.
The time when the food will be ready to serve, and if you want, you can also
change it. In the example below, the ready time will be changed to 21:30.
We now have programmed our oven to get the food ready at 21:30. Since
the cooking time was preprogrammed as 2 hours 15 minutes,your oven will
start cooking at 19:15 , so that the food is ready at 21:30.
When automatic cooking is completed , a buzzer alarm is heared and will
sound , if not stopped for 7 minutes.
In the example shown, cooking time has been programmed first, the ready
time was calculated automatically and was edited by us. It is also possible
first to program the ready time, in that case the cooking time will be
calculated automatically and should be edited thereafter.
During the automatic cooking program, the backlight color of the screen will
be green before and red during cooking.
IN CASE MAINS POWER LOSS
Mains power interrupts will switch your oven into OFF mode. In that case
the hand icon on the screen will flash and 12:00 will be displayed. Any
cooking program will also be cancelled. Press the button to get your
oven operative, press once again to the button switch to adjust the clock
( See TIME OF DAY ADJUSTMENT)
Note: If you will not use your oven right now, be sure that it is in OFF position.
Flashing hand icon indicates that your oven is inoperative and you should press the
button to reset.
BUZZER VOLUME ADJUSTMENT
TOUCH CONTROL OVEN TIMER
OVERVIEW:
OT-4000-LED, is an electronic timer, which enables your oven to get the food ready to
serve at the desired time. The only thing to be done is to program the cooking time and
ready time. It can also be used as an alarm clock, where you just give in the amount of
time after which it should remind you by a buzzer tone.
POWER UP:
Upon power up, flashing digits and AUTO icon, the oven is inoperative. Press M to
return to manual mode and adjust the time of day using up and down buttons.
MANUAL MODE
Touching & at the same time, manual m ode is
entered. Any previous cooking program will be cancelled.
ADJUSTING TIME OF DAY
Time of day adjustment is onl y allowed, when no c ooking program is in progress. First
enter manual mode as descr ibed above. The point bet ween the hours and minutes
display flashes.
1) Switch into time 2) Adjust the time using 3) After a few seconds,
adjustment mode. the or buttons. screen will stabilize.
B
)
BO 6352
-11-

BUZZER ALARM:
With this feature, you can program after how much elapsed time you should be warned
by a buzzer sound.
1) Touching twice, 2) Using or give in the 3)After a few seconds,
enter buzzer alarm mode duration in minutes screen will return to clock
mode
CANCELLING THE BUZZER SOUND
After the programmed duration is elapsed, buzzer will
sound. Any button touch will cancel the buzzer.
AUTOMATIC COOKING PROGRAM
If you want to start cooking immediately, you just have to give in the cooking time.
Example: We placed our food into the oven and want it to be cooked for 2 hours and
15 minutes
1) Current time is 18:30. 2) Switch into cooking time 3) Adjust the cooking time
mode. using the or buttons.
Now, you have programmed your oven to
cook the food for 2 hours and 15 minutes.
Please do not forget to bring the function
and/or temperature knobs of your oven to
appropriate position .
4) After a few seconds, the screen
will indicate that cooking has
started and show the current time
Note: You may cancel the automatic cooking mode any time by go manuel mode
In the above example, cooking immediately started after giving in the cooking period. By
pressing the button, you can see the r eady time, ie. The time when the food will
be ready t o serve, and if you want, you can also change it. In t he example below, the
ready time will be changed to 21:30.
1) Displayed is the ready 2) Set it to the desired time 3) In a few seconds, screen
time 18:30+2:15=20:45. by using the + or – buttons. switches to clock mode.
We now have programmed our oven to get the food ready at 21:30. Since the cooking
time was preprogrammed as 2 hours 15 minutes, your oven will start cooking at 19:15,
so that the food is ready at 21:30.
Screen just when cooking starts Screen just when cooking ends
When automatic cooking is completed, a buzzer alarm is heared and will sound, if not
stopped, for 7 minutes.
1) Switch your oven OFF 2) Reset the timer
Note: Your oven will be inoperative until you reset the timer.
In the example shown, cooking time has been progr ammed first the ready time was
calculated automatically and was edited by us. It is also possible first to program the
ready time, in that case the cooking time will be calcula ted automatically and should b e
edited thereafter.
-12-
-12-

CHILD LOCK:
When activated in manual mode, your oven and the timer keys are blocked.
When activated as a cooking program is in progress, just the keys are blocked.
1) Touch and at the same time 2) The key symbol appears on the
for 1 seconds until 2 beep tones heard. screen, child lock is active.
To deactivate the child lock, touch and until key symbol disappears.
Exception: A buzzer tone during child lock can be cancelled touching any button.
USER PROGRAMMABLE OPTIONS:
1- Time of day display 12h / 24h
Factory setting is 24 h display. Touching for 5 seconds, a double beep tone
will be heard, the display mode toggles to 12 h mode (am / pm indication) Doing
this again will toggle back to 24 h
2- Touch tones
As a factory setting, touching buttons are accompanied by beep tones. Touching
the button for 5 seconds, a double beep tone will be heard and nt , which
stays for no tone, will appear on the screen. Now, no touch tones will be produced
any more. Doing the same until bt appears on the screen, which stays for button
tone, brings you back to touch tones.
3- Screen Brightness Adjustment:
Touching button for 1 second, until you hear a double beep tone, brings you
into the display brightness mode. Display shows br 0x (x = 1 to 8). Now every
consecutive touch of the same button will reduce the brightness. There are 8
levels, thereafter the brightness starts to increase upon every touch. The same
effect is also seen by holding this button touched. In 5 seconds after releasing the
button, the brightness level is stored. Factory setting is maximum brightness.
4- Buzzer Tone Selection:
Touch button for 1 second, until you hear a double beep tone. Upon
every touch of this button within 5 seconds, you will hear a different tone.
There are 3 different tones available. The tone last heard will be stored in
5 seconds.
Note: Programmed options are nonvolatile. They will not be erased upon a
power interrupt.
ALARM DURATION SETTING
With this function you can get your alarm clock beep after a period
set by you.
1) Select alarm setting 2) Enter time with + or – keys 3) Time will be displayed mode.
(eg:5 minutes) after a few seconds.
When the set period ends the alarm starts beeping. You can stop
the alarm by pushing any button.
ALARM VOLUME SETTING
You can select the 3-level volume of your oven by pressing the
button. Alarm volume is changed with every push on the key.
Note: By factory default, volume is set to the highest. In the event
of power failure, the volume setting will be reset to the factory
default, if changed.
DISPLAY BRIGHTNESS SETTING
You can select the 3-level display brightness setting by pressing
the button. The display brightness setting will change with
every push on the key.
Note: By factory default, the brightness is set to the highest. In the
event of power failure, the brightness setting will be reset to the
factory default, if changed.
IN THE EVENT OF POWER FAILURE
In the event of power failure your oven will be switched off for
safety reasons. This is indicated by the flashing of the hand icon
on the display. All current cooking programmes will be deleted.
Display shows 12:00 and the clock should be set. First switch on
the oven by pressing the button (see Clock setting).
ETTING THE REAL TIME OF THE DAY
ime setting can only be done when there is no active cooking
rogramme. Press the button. Two dots between the hour
nd minute start flashing; you can set the clock forward by + and
ackward by -. Longer pressing on these keys will change the
lock faster.
1) Select clock setting
mode 2) Set the time with + or –
keys 3) Display will be fixed
after 5 seconds.
DISPLAY AND TOUCH KEYS OVERVIEW
Display :
Time of day – shows the time of day;
Combination Display-indicates the selected cooking function
Temperature Display –indicates the adjusted oven temperature
Timer / Meat probe Display – shows timer or food temperature status
Status symbol- shows the oven status
Pause – indicates that the cooking with the parameters on screen, is paused by user
Key lock indicator
Touch keys :
1. ON/OFF- switches the device ON or OFF
2. – Stops any program;
3. - Temperature adjustment;
4. Timer Menu/Meat probe functions;
5. - Minus;
6. - Plus;
7. - Function adjustment-down;
8. - Function adjustment-up;
9. - Rapid Heat Up;
10. - Activates or deactivates the keylock;
11. - Lamp ON or OFF;
12. Start Cooking Key;
6
5
31
42
Timer/Meat probe
Display Temperature
Display Function
Display
Time of Day
Display
Status Display PAUSE
Key lock 12
11
97
108
C- BO 6361
-13-
-13-

COOKING WITHOUT A PROGRAM (MANUAL)
It means that you start and finish
cooking without making any
programming. If there is any
programme in the memory you need
to reset the programme. Press the
button to reset.
1. If there is a programme in the memory, it will be reset when the
button is pressed and manual cooking will be started.
2. After putting in the oven the food that you want to cook set the
oven control button to the concerned position shown in the
cooking table.
3. Your oven works manually. Check your food with certain
intervals and finish cooking by switching the oven control button
to off (zero) position (since there is no programme).
Now you finished cooking. Your food is ready for servicing.
SEMI AUTOMATIC PROGRAMMING
It is the instant start of cooking and stopping after a
predetermined period. In this programme, you need to enter the
cooking time.
1) The time is 18:30 2) Switch to the cooking 3) Enter the time length.
time setting mode by + or - keys.
1. Switch the oven selector switch and thermostat button to the
positions indicated on the cooking table.
2. Enter the cooking time by pressing the (+) button in 5 seconds
after pressing the button. You can reduce the time by the (-)
button. During setting icon starts flashing and after 5
seconds the display is fixed showing the time.
THE FLASHING HAND ICON INDICATES THAT THE OVEN IS SWITCHED OFF
AND THAT YOU NEED TO PRESS THE BUTTON TO SWITCH TO THE
NORMAL POSITION. 3. As an example you can enter the desired period as 2 hours 15
minutes. Cooking starts. After 5 seconds clock setting will appear
on the display. You can view the remaining time by pressing the
button any time during cooking.
Page 2/ 7
1. General Overview:
Resistance and fan combinations in the menu can be selected using touch
keys in the user interface. Cooking time, end time ( if meat probe is used end
temperature ) , cooking temperature are adjustable. Additionally keep warm, heat
up, real time display, stopwatch, and key lock functions are available.
SWITCHING THE CONTROL ON or OFF:
key activates or deactivates the control (independently from child lock). When
the control is OFF, the screen is completely blank. Pressing key for 1 second,
activates the control. The current time of day appears on the display.
Note: In case of any occurred power interrupt, the current time of day will not be
correct any more. A flashing 0:00 will appear on the time of day display. It is
impossible to use any features of the control without setting the time of day. The
correct time can be adjusted using the and keys.
Pressing for 1 second as control is ON, sets the control in the OFF state.
ADJUSTING TIME OF DAY:
Touch and hold both and buttons until time of day digits start flashing. Using
or keys, set the correct time. Wait for 7 seconds, flashing will stop, adjustment
is completed.
SELECTING A COOKING FUNCTION :
Using either of or keys, you may scroll through the function menu.
The current function will flash on the Function Display for 7 seconds and the default
cooking temperature assigned to this function will appear on the temperature display
(Note: For some functions, a temperature control is not possible and the temperature
display is blank).
The is steady on the status display, whereas is flashing, indicating that
you are ready to cook but not started yet.
CHANGING THE ASSIGNED DEFAULT OVEN TEMPERATURE:
The Temperature Setting on the Temperature Display might be changed by touching
the button- the Temperature Display starts flashing- and setting the desired
value using or in 5 degree intervals.
(!)Note: If you want to replace the default temperature setting for this function with
this adjusted temperature permanently, touch for approximately 5 seconds, until
a buzzer tone is heard. The factory set default temperature for this function is now
permanently changed.
MANUAL COOKING:
Once a function is selected, touching the key, initiates cooking with a
temperature setting on the temperature display (if any). disapears , and the
time passed in cooking starts to be displayed on the timer/meat probe display.
Cooking will continue until it is ended by the user manually ( see: to pause,edit or
end cooking) or the maximum allowed cooking time, depending on the selected
cooking temperature, has passed, as listed below:
050-120 C 10h
121-200 C 6h
201-250 C 3h
In half and full automatic cooking, as described later, cooking is ended automatically
depending on the parameters entered by the user before initiating cooking (by
touching )
TO PAUSE, EDIT or END COOKING:
Touching during cooking, interrupts the cooking progress and
starts flashing, whereas other portions of the display remain the same. All oven
heating elements and turbo fan are disabled temporarily. Cooking is paused.
To end cooking, touch once again, all cooking related indications on the display
disappear. The temperature display will indicate the residual heat ,if any ( see:
Residual Heat Indication ).
-14-
-14-

TIMER SETTING
Your digital timer is an electronic timing module that makes the
food in the oven ready for servicing when you want. All you need
to do is to program the cooking duration and the time when you
want your food to be ready.
When the timer is first powered up 12.00 appears on the display.
icon flashes. In this case the oven will not work as the contacts
of the clock relay are open.
The electricity current is transmitted to the heating elements
through the alarm clock. Press to manually operate the oven.
Oven clock / timer works the same way as the normal clock. In the
event of power failure the clock is reset. If the electricity current is
less than 50 Hz the clock will be slow. This is not a defect of the
clock. In such cases set the clock again.
Note: You don’t have to set the real time of the day for manual and
semi automatic cooking with your oven. For full automatic
programming you should set the real time of the day.
With the clock of your oven
1. You can set the cooking time from 0 to 10 hours.
2. You can set the alarm time between 00:00 and 23:59 hours.
3. You can set the oven to full automatic, semi-automatic or
manual cooking.
4. You can use it for warning purposes
ALARM DURATION SETTING
With this function you can get your alarm clock beep after a period
set by you.
1) Select alarm setting 2) Enter time with + or – keys 3) Time will be displayed mode.
(eg:5 minutes) after a few seconds.
When the set period ends the alarm starts beeping. You can stop
the alarm by pushing any button.
ALARM VOLUME SETTING
You can select the 3-level volume of your oven by pressing the
button. Alarm volume is changed with every push on the key.
Note: By factory default, volume is set to the highest. In the event
of power failure, the volume setting will be reset to the factory
default, if changed.
DISPLAY BRIGHTNESS SETTING
You can select the 3-level display brightness setting by pressing
the button. The display brightness setting will change with
every push on the key.
Note: By factory default, the brightness is set to the highest. In the
event of power failure, the brightness setting will be reset to the
factory default, if changed.
IN THE EVENT OF POWER FAILURE
In the event of power failure your oven will be switched off for
safety reasons. This is indicated by the flashing of the hand icon
on the display. All current cooking programmes will be deleted.
Display shows 12:00 and the clock should be set. First switch on
the oven by pressing the button (see Clock setting).
SETTING THE REAL TIME OF THE DAY
Time setting can only be done when there is no active cooking
programme. Press the button. Two dots between the hour
and minute start flashing; you can set the clock forward by + and
backward by -. Longer pressing on these keys will change the
clock faster.
1) Select clock setting
mode
2) Set the time with + or –
keys
3) Display will be fixed
after 5 seconds.
After 1:00 hour power will be switched off and the oven stops.
Alarm starts beeping.
The display to be shown when the
cooking starts
The display to be shown when the
cooking finishes
When the cooking programme is completed, audible warning is on and will remain
on for 7 minutes if not switched off before.
7. When the 1 hour cooking finishes, alarm starts beeping at the
preset level. Alarm can be stopped by pressing any button.
8. sign is shown.
9. If you wish to restart the oven press the button. The oven
starts working manually.
NOTE: If your press the button during semi automatic and full
automatic programming the programmes in the memory will be
cancelled and your oven operates manually.
10. Cooking will end by bringing the oven control button to off (0)
position.
You have finished the semi automatic cooking. Your food is ready
for servicing.
Your oven is in standby mode and the display shows
as the current time of the day and standby signs. The
oven will not work. It starts working at 19:45 and the icon is
displayed with the current time. The oven works for 1:00 hour and
stops at 20:45. The sign appears with the end hour.
1. Prepare the food that you want to cook and put it in the oven.
Bring the oven selector switch and the thermostat button to the
position shown in the cooking table.
2. Press the button. Enter the end time of cooking by pressing
the button In 5 seconds. Let’s enter the end time as 20:45.
While entering the time, auto sign and the flashing sign
appear with the time. After 5 seconds sign and the word
“auto” appear on the display. The oven is in operation.
3. Enter the cooking time by pressing first the button and then
the (-) button. The display is automatically set for 2:15 hours
cooking time. Let’s say that we want to set the cooking time as
1:00 hour. We can change the time as 1:00 instead of 2:15 hours
by pressing the (-) button. In 5 seconds after making the setting,
the current time of the day (18:30), the word “auto” and the
sign appear. The oven will switch to the standby mode and it will
not work.
4. When the oven is in standby mode, you can view the end time
of cooking by pressing the button and the cooking time by
pressing the button.
5. The oven starts working after 1 hour and 15 minutes, that is at
19:45. While the oven is in operation the 19:45 auto is
displayed. The oven works for 1 hour as the entered time is 1
hour.
NOTE: The cooking time entered should be less than the
difference between the current time of the day and the end time
of cooking. Otherwise the oven will not switch to standby mode
and it will work until the end of cooking time.
6. By pressing the button, the remaining time can be viewed.
After 5 seconds the display switches to the clock mode and the
current time of the day is displayed. The end of cooking time will
appear on the display by pressing the button.
Changing the cooking time after programming.
You can change the cooking time and the end of cooking time
while your oven is in operation.
To change the end time of cooking:
The new value is entered by pressing
the button and using the (+) and (-)
keys.
To change cooking time:
The cooking time is displayed while the
button is pressed. Press the “+” or
“-“ keys to set the new cooking time..
Note: After cooking has ended, touching brings the previous function and
temperature settings on the screen, by a second touch, cooking may be initiated
again.
To edit the cooking parameters (Fuction, Temperature, etc), use the appropriate
buttons as described in this document. Touching will restart cooking with the
edited parameters.
AUTOMATIC COOKING:
Automatic cooking means, that cooking will end automatically according to the
parameters you tell the control after selecting the cooking function and temperature
but before touching .
Half Automatic Cooking:
This method is used when NO meat probe is used and you want to start cooking
immediately, entering the desired cooking duration.
1) Select the desired function and adjust (if needed) the temperature as
described before in this document.
2) Touch key. will flash on the timer screen.
3) Adjust the required cooking duration using and keys. appears on
the status display.
( If duration is brought to 0:00, two warning beeps occur)
4) Touch key, disappears, cooking starts. The cooking end time is
displayed on the timer display, together with symbol .
Full Automatic Cooking:
This method is used when NO meat probe is used and you want the food to be ready
at a certain time in future. Therefore, this method is also called ‘Delayed Cooking’
1) Go through steps 1 to 3 of half automatic cooking (setting the cooking
duration)
2) Touch key again, flashes on the timer screen together with the
current cooking end time.
3) Adjust the desired end time using and keys. on the status display
may disappear whereas is still there, indicating that a delayed cooking
is programmed and cooking will not start immediately.
4) Touch key, disappears, cooking starts. The cooking end time is
displayed on the timer display, together with symbol .
Cooking with Meat Probe:
Meat probe is a sensor, connected to plug inside the oven and inserted into the meat
to be cooked. Using the meat probe, cooking is automatically ended when the meat
reaches the desired temperature.
1) Select the desired function and adjust (if needed) the temperature as
described before in this document.
2) Touch key. The default value of the meat probe temperature will flash on
the right two digits of the timer/meat probe display. will appear on the
screen.
3) Adjust the desired meat temperature at cooking end in the range 20-99 C
using and keys.
4) Touch , disappears, cooking starts. The actual meat temperature is
displayed on the left , the adjusted end temperature on the right portion of
the timer/meat probe display.
During Cooking:
The 5 bars on the temperature display give an indication about the actual
oven temperature. Each bar is assigned to 1/5 th of the adjusted value. The up-
arrow near the bars flashes, when the heating elements are currently active.
AUTOMATIC END OF COOKING:
After cooking ends automatically, the temperature display will indicate the
residual heat ,if any ( see: Residual Heat Indication ), will be flashing and
buzzer will sound for 7 minutes. Touching will cancel the latter.
Residual Heat Indication:
After cooking has ended manually or automatically, if the internal oven
temperature is above 60 °C, ‘down arrow’ on the right side of heat bars flashes
every 2 second and also “hot” is displayed on the temperature display. Each one of
the 5 heat bars symbolize now 60 °C. This indication goes on until the oven
temperature falls below 60 °C.
SPECIAL FEATURES:
Lamp ON/OFF: The lamp inside the oven will be ON, whenever a function is being
or is adjusted. It will get OFF, after cooking and residual heat indication ends.
However, it can be switched ON or OFF touching , except using the defrost
function.
-15-
-15-

4. After entering this value the clock will switch off the power and
the alarm will beep. HAND icon will start flashing. You can silence
the alarm beep by pressing any button. Current time of the day,
sign and a flashing sign will appear on the display.
If you wish to restart the oven press the button and then the
oven will start working manually.
6. Cooking will end by bringing the oven control button to off (0)
position.
The display to be shown when the
cooking starts
The display to be shown when the
cooking finishes
When the cooking programme is completed, audible warning is on and will remain
on for 7 minutes if not switched off before.
You have finished the semi automatic cooking. Your food is ready
for servicing.
AUTOMATIC PROGRAMMING
With this programme, cooking duration and the time to finish
cooking are programmed beforehand. Current time of the day
must be set before starting programming.
1) The time is 18:30 2) You want the food
to be ready at 20:45.
You can set the finish
time by pressing the
and buttons.
3) You can set the
cooking time by
pressing the and
buttons. Let’s
enter the cooking time
as 1:00 hour.
4. After entering this value the clock will switch off the power and
the alarm will beep. HAND icon will start flashing. You can silence
the alarm beep by pressing any button. Current time of the day,
sign and a flashing sign will appear on the display.
If you wish to restart the oven press the button and then
oven will start working manually.
6. Cooking will end by bringing the oven control button to off (0)
position.
The display to be shown when the
cooking starts
The display to be shown when the
cooking finishes
When the cooking programme is completed, audible warning is on and will remain
on for 7 minutes if not switched off before.
You have finished the semi automatic cooking. Your food is ready
for servicing.
AUTOMATIC PROGRAMMING
With this programme, cooking duration and the time to finish
cooking are programmed beforehand. Current time of the da
must be set before starting programming.
1) The time is 18:30 2) You want the food
to be ready at 20:45.
You can set the finish
time by pressing the
and buttons.
3) You can set the
cooking time by
pressing the and
buttons. Let’s
enter the cooking time
as 1:00 hour.
After 1:00 hour power will be switched off and the oven stops.
Alarm starts beeping.
The display to be shown when the
cooking starts
The display to be shown when the
cooking finishes
When the cooking programme is completed, audible warning is on and will remain
on for 7 minutes if not switched off before.
7. When the 1 hour cooking finishes, alarm starts beeping at the
preset level. Alarm can be stopped by pressing any button.
8. sign is shown.
9. If you wish to restart the oven press the button. The oven
starts working manually.
NOTE: If your press the button during semi automatic and full
automatic programming the programmes in the memory will be
cancelled and your oven operates manually.
10. Cooking will end by bringing the oven control button to off (0)
position.
You have finished the semi automatic cooking. Your food is ready
for servicing.
Heat Up Rapidly: Sometimes it is desired to bring the oven temperature rapidly to
the adjusted value. Touching will energize the circular resistance and/or turbo fan
temporarily to achieve a rapid heat up. symbol will be visible on the screen, after
reaching the adjusted oven temperature, it will vanish and a buzzer tone is heard.
Note: Rapid heat up is not allowed for some functions (grill) or when the actual
temperature is less than 50C away from the adjusted one or the adjusted
temperature is below 100 C.
Child Lock:
Child lock can be activated or deactivated via touching the key for 1
second, until the symbol appears on the screen. When child lock is activated, no
key except , is accepted.
Minute Minder Alarm:
Touch and release key until appears in a flashing manner. Give in the
time in minutes, using the or keys. Flashing will stop after 7 seconds, a buzzer
alarm lasting 7 minutes will be produced after the adjusted time has elapsed. This
alarm can be stopped touching any of or keys.
Alarm Clock:
Touch and release key until appears in a flashing manner. Give in the
alarm time , using the or keys. Flashing will stop after 7 seconds, a buzzer
alarm will be produced when the adjusted time has come. This alarm can be stopped
touching any of or keys.
ERROR INDICATIONS:
When situations which prevent normal operation occur, the device enters error
mode. Device is in the standby status but an error code is displayed on Time of Day
Display. Even if the error recovers, this code will remain on the display until key
is touched. A total number of 8 error codes exist:
Err1: Communication error
Err2: PT1000 open circuit
Err3: PT1000 short circuit
Err4: Temperature exceed in user interface
Err5: Temperature exceed in the power module.
Err6: Temperature sensor failure in the user interface.
Err7: Temperature sensor failure in the power module.
Err8: Main power error. There is no warm up detected although heating
elements seem to be activated.
Programmable Options
Buzzer Tone: There are three buzzer tones to select.
Touch the key 5 seconds long, time of day display will show the currently valid
tone as “tn 1” (high) or “tn 2 (medium)” or “tn 3 (low)". The valid tone can be
changed by a key touch within 7 seconds after the last one. Default tone is “tn
1”.
Key Sound: There are three key sound options to select.
Touch the key key 5 seconds long, time of day display will show the currently
valid key tone as “bt” (beep tone) or“c” (click tone) or “nt" (no tone). The valid key
sound can be changed by a key touch within 7 seconds after the last one.
Default key sound is “bt”.
Time of Day Mode 24h/12h: Default mode is 24 hours. If 12h am/pm
mode is desired, touch both and keys 5 secons long. Mode changes and a beep
tone occurs. Do the same for vice versa.
Auto Power Save (APS): APS is an option not set as factory setting. If set,
the control will be switched OFF automatically, whenever there is nothing other than
the time of day to be displayed. Touching 5 seconds long in idle mode (no
cooking related operation present) activates this option, Time of day digits will show
PS ON for a few seconds accompanied with a beep tone. Cancelling this option is
done in the same way, PS OF will be shown on the screen.
4. After entering this value the clock will switch off the power and
the alarm will beep. HAND icon will start flashing. You can silence
the alarm beep by pressing any button. Current time of the day,
sign and a flashing sign will appear on the display.
If you wish to restart the oven press the button and then the
oven will start working manually.
6. Cooking will end by bringing the oven control button to off (0)
position.
The display to be shown when the
cooking starts
The display to be shown when the
cooking finishes
When the cooking programme is completed, audible warning is on and will remain
on for 7 minutes if not switched off before.
You have finished the semi automatic cooking. Your food is ready
for servicing.
AUTOMATIC PROGRAMMING
With this programme, cooking duration and the time to finish
cooking are programmed beforehand. Current time of the day
must be set before starting programming.
1) The time is 18:30 2) You want the food
to be ready at 20:45.
You can set the finish
time by pressing the
and buttons.
3) You can set the
cooking time by
pressing the and
buttons. Let’s
enter the cooking time
as 1:00 hour.
Heat Up Rapidly: Sometimes it is desired to bring the oven temperature rapidly to
the adjusted value. Touching will energize the circular resistance and/or turbo fan
temporarily to achieve a rapid heat up. symbol will be visible on the screen, after
reaching the adjusted oven temperature, it will vanish and a buzzer tone is heard.
Note: Rapid heat up is not allowed for some functions (grill) or when the actual
temperature is less than 50C away from the adjusted one or the adjusted
temperature is below 100 C.
Child Lock:
Child lock can be activated or deactivated via touching the key for 1
second, until the symbol appears on the screen. When child lock is activated, no
key except , is accepted.
Minute Minder Alarm:
Touch and release key until appears in a flashing manner. Give in the
time in minutes, using the or keys. Flashing will stop after 7 seconds, a buzzer
alarm lasting 7 minutes will be produced after the adjusted time has elapsed. This
alarm can be stopped touching any of or keys.
Alarm Clock:
Touch and release key until appears in a flashing manner. Give in the
alarm time , using the or keys. Flashing will stop after 7 seconds, a buzzer
alarm will be produced when the adjusted time has come. This alarm can be stopped
touching any of or keys.
ERROR INDICATIONS:
When situations which prevent normal operation occur, the device enters error
mode. Device is in the standby status but an error code is displayed on Time of Day
Display. Even if the error recovers, this code will remain on the display until key
is touched. A total number of 8 error codes exist:
Err1: Communication error
Err2: PT1000 open circuit
Err3: PT1000 short circuit
Err4: Temperature exceed in user interface
Err5: Temperature exceed in the power module.
Err6: Temperature sensor failure in the user interface.
Err7: Temperature sensor failure in the power module.
Err8: Main power error. There is no warm up detected although heating
elements seem to be activated.
Programmable Options
Buzzer Tone: There are three buzzer tones to select.
Touch the key 5 seconds long, time of day display will show the currently valid
tone as “tn 1” (high) or “tn 2 (medium)” or “tn 3 (low)". The valid tone can be
changed by a key touch within 7 seconds after the last one. Default tone is “tn
1”.
Key Sound: There are three key sound options to select.
Touch the key key 5 seconds long, time of day display will show the currently
valid key tone as “bt” (beep tone) or“c” (click tone) or “nt" (no tone). The valid key
sound can be changed by a key touch within 7 seconds after the last one.
Default key sound is “bt”.
Time of Day Mode 24h/12h: Default mode is 24 hours. If 12h am/pm
mode is desired, touch both and keys 5 secons long. Mode changes and a beep
tone occurs. Do the same for vice versa.
Auto Power Save (APS): APS is an option not set as factory setting. If set,
the control will be switched OFF automatically, whenever there is nothing other than
the time of day to be displayed. Touching 5 seconds long in idle mode (no
cooking related operation present) activates this option, Time of day digits will show
PS ON for a few seconds accompanied with a beep tone. Cancelling this option is
done in the same way, PS OF will be shown on the screen.
-16-
-16-
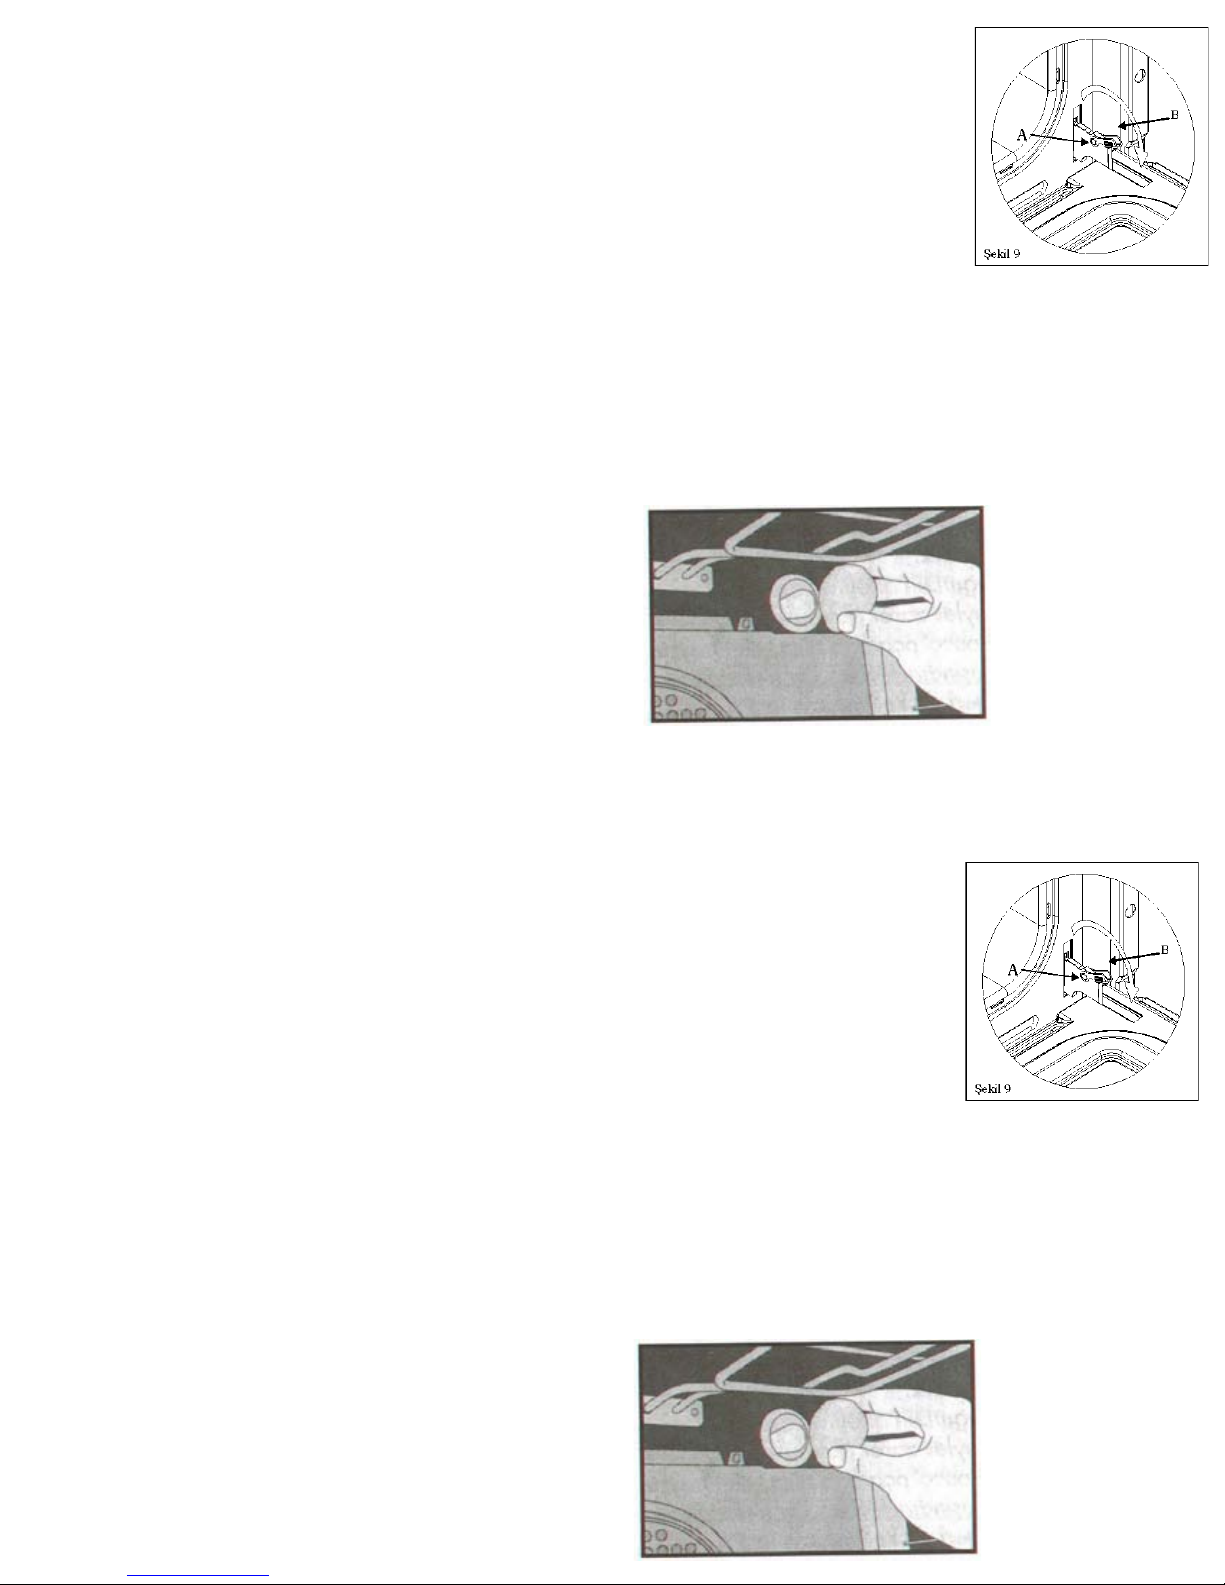
SECTION 8 MAINTENANCE & CLEANING
Cleaning your Oven
1. Before starting cleaning, pull the power-supply plug out of the socket. If
the oven is hot, wait for cooling off.
2. Do not use the agents scratching enamel or painted surfaces. Use
creams or liquid cleaning agents not containing hard agents.
3. The liquid spilling on the cooker may cause damage to enamel surfaces
when they burn. Promptly clean spilling liquids.
4. Do not use corrosive cleaning agents when cleaning control panel.
5. Never drip water on and touch the glass when the oven is hot.
6. Remove covers of the oven. Wash and rinse with soapy water.
Cleaning the Interior Part of Your Oven
� Pull the power-supply plug out of the socket before starting cleaning.
Remove trays and grill. Wipe the interior parts with soap soaked cloth.
Clean it with dampened cloth again and wipe dry.
� Do not use dry and powder cleaning agents. Clean the glass surfaces with
glass cleaning agents.
� Do not use hard brushes, steel wood or sharp instruments such as a knife
when cleaning the interior part of the oven.
� Remove the glass front lid by unscrewing the fixing parts by use of a
screwdriver, and remove the inside glass, clean and rinse it. After drying it
place the seal properly and re-install the glass
CHANGING OVEN LAMP
Removing the oven door - fig 9
To aid cleaning and make Access to the oven
interior easier , the oven door can be simply
removed. To facilitate cleaning of the oven ,
the door can be removed via the hinges as
follows:
Hinges with movable bolt
The hinges A are provived with two movable bolts B
When bolt B is raised, the hinge is released from its
housing .
Having done this, the door must be lifted upwards
and removed , sliding it towards the outside;
grip the sides of the door near the hinges when
performing these operations.
To refit the door firstly slide the hinges into their slots.
Before closing the door remember to rotate the two movable bolts B used to hook
the two hinges.
Changing Oven Lamp
1. Pull the plug out of socket.
2. Turn the lamp fixing glass counter-clockwise direction to seperate it.
3. To seperate lamp from body turn it to counter-clockwise direction.
4. Fix new lamp that you gain from authorised service in place of old lamp.
-17-
-17-
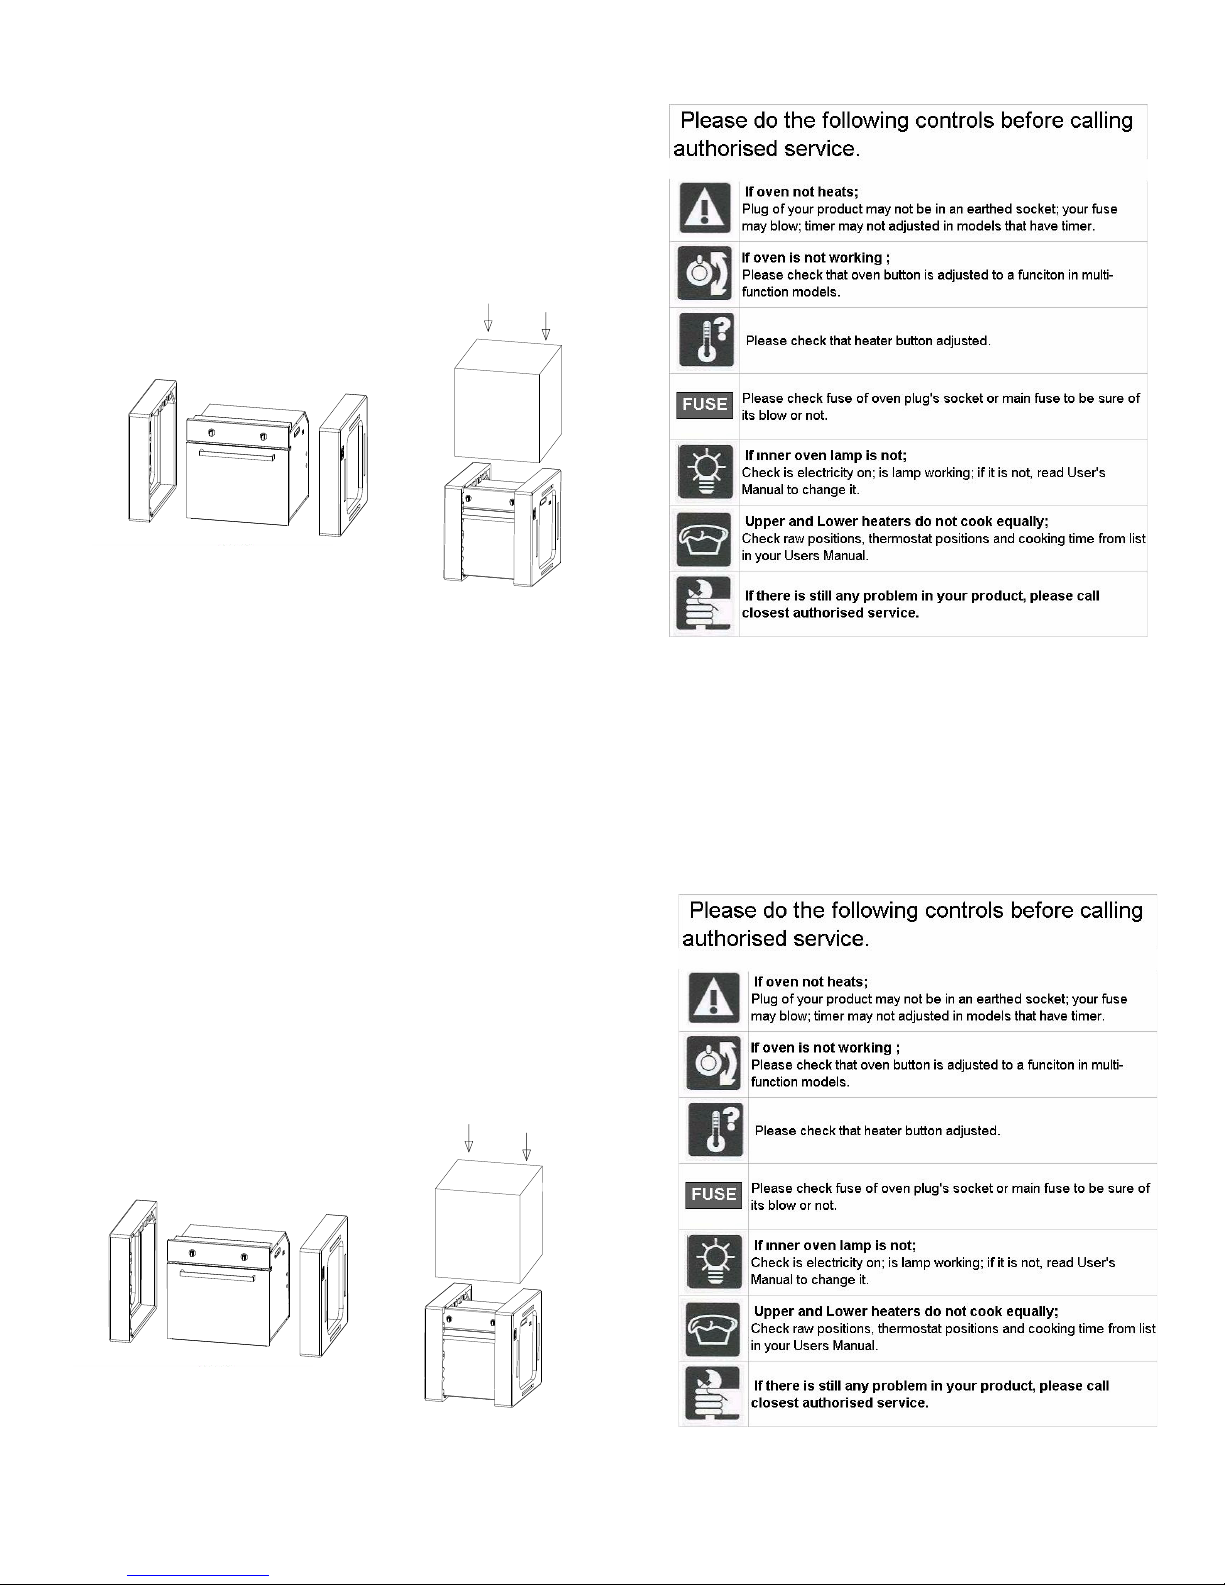
SECTION 8 MAINTENANCE & CLEANING
Cleaning your Oven
1. Before starting cleaning, pull the power-supply plug out of the socket. If
the oven is hot, wait for cooling off.
2. Do not use the agents scratching enamel or painted surfaces. Use
creams or liquid cleaning agents not containing hard agents.
3. The liquid spilling on the cooker may cause damage to enamel surfaces
when they burn. Promptly clean spilling liquids.
4. Do not use corrosive cleaning agents when cleaning control panel.
5. Never drip water on and touch the glass when the oven is hot.
6. Remove covers of the oven. Wash and rinse with soapy water.
Cleaning the Interior Part of Your Oven
� Pull the power-supply plug out of the socket before starting cleaning.
Remove trays and grill. Wipe the interior parts with soap soaked cloth.
Clean it with dampened cloth again and wipe dry.
� Do not use dry and powder cleaning agents. Clean the glass surfaces with
glass cleaning agents.
� Do not use hard brushes, steel wood or sharp instruments such as a knife
when cleaning the interior part of the oven.
� Remove the glass front lid by unscrewing the fixing parts by use of a
screwdriver, and remove the inside glass, clean and rinse it. After drying it
place the seal properly and re-install the glass
SECTION 9 INFORMATION ABOUT TRANSPORTATION
In case of transport hold your oven vertically and do not put anything
on it.
At transportation;
Please Keep your ovens original box.
Carry your oven with original box. Obey carrying signs on box.
To keep your oven door from damage that may occur during
transportation by wire grate and trays, stick 1-1,5 cm thin cardboard or
paper on oven front door inner glass with sticky tape at level of trays.
Stick oven door to side walls with sticky tape.
To place packaging materials look at figures below.
If your oven haven’t got an original box ;
Take precautions about damage possiblity of oven outer walls,
glass, painted, enamelled or stainless steel surfaces.
SECTION 10 Things To Do Before Calling Authorised Service
SECTION 9 INFORMATION ABOUT TRANSPORTATION
In case of transport hold your oven vertically and do not put anythin
on it.
At transportation;
Please Keep your ovens original box.
Carry your oven with original box. Obey carrying signs on box.
To keep your oven door from damage that may occur durin
transportation by wire grate and trays, stick 1-1,5 cm thin cardboard o
paper on oven front door inner glass with sticky tape at level of trays
Stick oven door to side walls with sticky tape.
To place packaging materials look at figures below.
If your oven haven’t got an original box ;
Take precautions about damage possiblity of oven outer walls
glass, painted, enamelled or stainless steel surfaces.
SECTION 10 Things To Do Before Calling Authorised Service
-18-
-18-

This manual suits for next models
3
Table of contents
Other davoline Oven manuals


Popular Oven manuals by other brands


emerio
emerio AF-121914.1 instruction manual

Middleby Marshall
Middleby Marshall RED LOBSTER PS200-R68 Series OPERATING AND INSTALLATION Manual

Hamilton Beach
Hamilton Beach 31300 manual

Glen
Glen GL 662 Gas user guide

Whirlpool
Whirlpool OAS KN8V1 IX manual

Whirlpool
Whirlpool 30 " Eye-Level Gas Range installation instructions