Dawlance DCB9630B User manual

Cooker Hood
DCB9630B

Ths product has been manufactured n envronmental frendly modern plants wthout gvng any harm to the nature.
Ths applance conforms to the
WEEE regulaton.
Please read this manual first!
Dear Customers!
Thank you for preferring a Dawlance product. We hope that you get the best results
from your product which has been manufactured with high quality and state-of-
the-art technology. Therefore, please read this entire user manual and all other
accompanying documents carefully before using the product and keep it as a
reference for future use. If you handover the product to someone else, give the user
manual as well. Follow all warnings and information in the user manual.
Remember that this user manual is also applicable for several other models. Differences
between the models are explicitly described in the manual.
Meanings of the Symbols
Following symbols are used in the various section of this manual:
C
Important information and useful hints about
usage.
AWARNING:
Warnings for dangerous situa-
tions concerning the safety of life and property.
B
Warning for electric shock.
Warning for hot surfaces.

3 / 14 EN
Cooker Hood / User Manual
CONTENTS
1 Important safety and
envronmental nstructons 4
1.1 General safety . . . . . . . . . . . . . . . . . . . . . . . . . . . . . . 4
1.1.1 Electrcal safety. . . . . . . . . . . . . . . . . . . . . . . . . . . 4
1.1.2 Product safety. . . . . . . . . . . . . . . . . . . . . . . . . . . . 5
1.1.3 Chldren's safety . . . . . . . . . . . . . . . . . . . . . . . . . . 6
1.2 Intended use . . . . . . . . . . . . . . . . . . . . . . . . . . . . . . . 6
1.3 Complance wth WEEE Drectve and dspo-
sng of the waste product. . . . . . . . . . . . . . . . . . . . . . .7
1.4 Package nformaton . . . . . . . . . . . . . . . . . . . . . . . .7
2 Techncal specfıcatons of your
applance 8
2.1 Controls and parts . . . . . . . . . . . . . . . . . . . . . . . . . . 8
2.2 Techncal data. . . . . . . . . . . . . . . . . . . . . . . . . . . . . . 8
3 Installng your applance 9
3.1 Wall drllng and bracket fxng . . . . . . . . . . . . . 9
3.1.1 Wall mountng . . . . . . . . . . . . . . . . . . . . . . . . . . . . 9
3.2 Mountng the hood body . . . . . . . . . . . . . . . . . . 10
3.3 Connecton . . . . . . . . . . . . . . . . . . . . . . . . . . . . . . . . 10
3.3.1 Ducted mode ar exhaust system . . . . . . . 10
3.3.2 Recrculaton mode ar outlet . . . . . . . . . . . 10
3.4 Chmney assembly . . . . . . . . . . . . . . . . . . . . . . . . 11
3.4.1 Upper chmney . . . . . . . . . . . . . . . . . . . . . . . . . . 11
3.4.2 Lower chmney. . . . . . . . . . . . . . . . . . . . . . . . . . 11
3.5 Ducted vs. Recrculaton mode . . . . . . . . . . . . 11
3.6 Installaton of the ol collector . . . . . . . . . . . . 12
4 Operatng your applance 13
5 Cleanng and mantenance 14
5.1 Surfaces . . . . . . . . . . . . . . . . . . . . . . . . . . . . . . . . . . . 14
5.2 Alumnum flters . . . . . . . . . . . . . . . . . . . . . . . . . 14
5.3 Charcoal flters (Recrculaton verson). . . . 14
6 Troubleshootng 15

4 / 14 EN
Cooker Hood / User Manual
1 Important safety and environmental
instructions
This section contains safety in-
structions that will help protect
from risk of personal injury or prop-
erty damage. Failure to follow these
instructions invalidates the granted
warranty.
1.1 General safety
•Always have the installation and
repairing procedures carried out
by the Authorized Service Agent.
Manufacturing firm shall not be
held responsible for damages that
may be caused by unauthorized
persons.
•This appliance is not intended for
use by persons (including chil-
dren) with reduced physical, sen-
sory or mental capabilities, or lack
of experience and knowledge.
Children should be supervised to
ensure that they do not play with
the appliance.
1.1.1 Electrical safety
•Always unplug the appliance from
the mains supply during installa-
tion, maintenance, cleaning and
repair operations.
•If the power cable is faulty, it
should be replaced by a qualified
person certified by the manufac-
turer, after-sales service or similar
(preferably an electrician) or a per-
son described by the importer.
•Operating voltage is 220 to 240
volts.
•If the appliance has a failure, it
should not be operated unless it is
repaired by the Authorized Service
Agent. There is the risk of electric
shock!
•Do not route power cable close to
hobs. Otherwise power cable may
cause fire since it melts down eas-
ily.
•Never plug the hood before instal-
lation is completed.
•In order to obtain the best perfor-
mance, external conductor must
not be longer than 4 m. It must not
contain more than 2 perpendicular
(90°) angles and its diameter must
be min. ø120 mm.
•Disconnect the appliance from
mains before any intervention to
the internal parts of the appliance.
•Use the appliance with a grounded
outlet only.

5 / 14 EN
Cooker Hood / User Manual
1 Important safety and environmental
instructions
1.1.2 Product safety
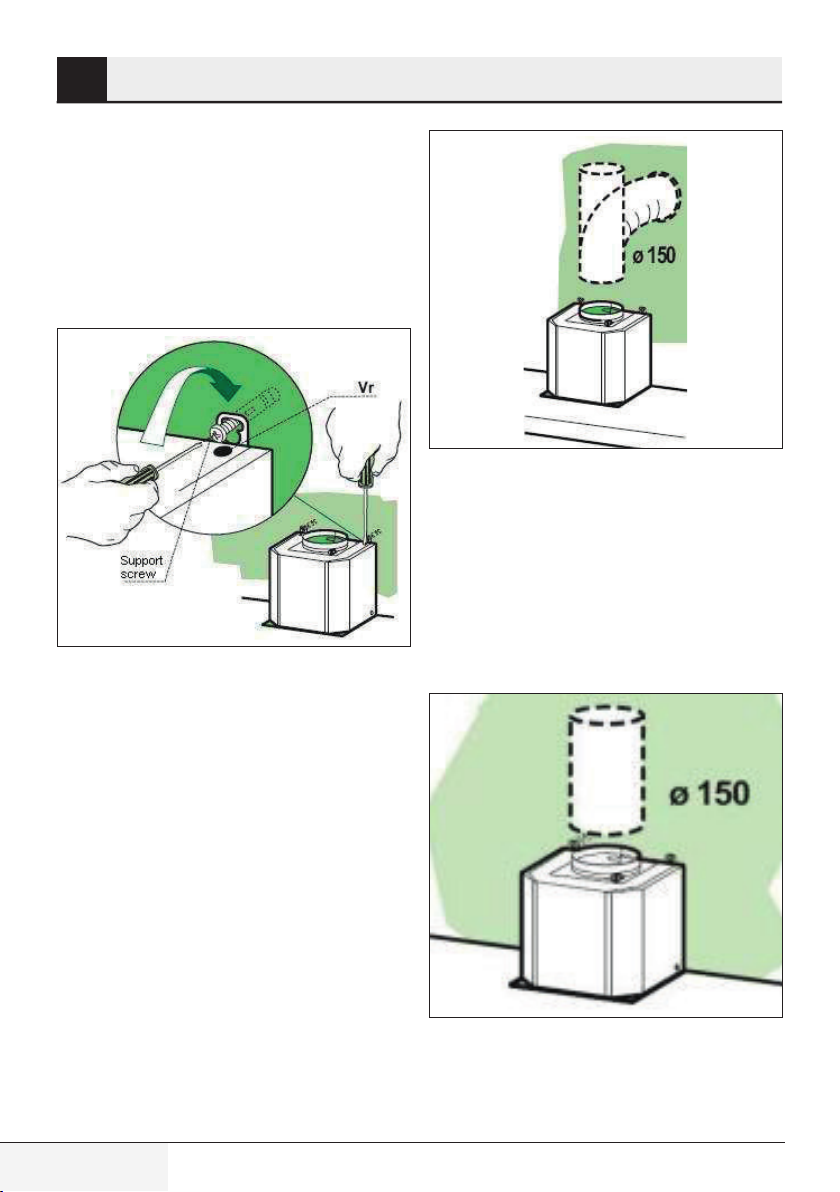
•You can use a pipe with a diameter
of 120 mm or 150 mm on the flue
connection of the hood.
•Do not make connections to the
flues connected with stoves, ex-
haust shafts or flues with rising
flames. Observe the rules set by
authorities on the discharge of
exhaust air.
•Do not operate the hood without
aluminum filters and do not re-
move the filters while it is oper-
ated.
•Never touch the hood's lamps
after they are operated for a long
time. Hot lamps may burn your
hand.
•Avoid large flames beneath the
product. Otherwise, particles on
oil filter may ignite and lead to a
fire.
•Turn on the hobs after placing
pans or pots on it. Otherwise, ris-
ing heat may deform certain parts
of your product.
•Turn off the hobs before taking
away pans or pots.
•Avoid inflammable materials under
the hood.
•Oil may ignite while frying foods.
Therefore, be careful about cloths
and curtains.
•Never leave the cooker unat-
tended when frying foods; other-
wise hot oil may cause fire.
•There is the risk of fire if your hood
is not cleaned in the specified pe-
riods.
•Be extremely careful and wear
gloves when cleaning the hood.
•We advise you to operate the
appliance a few minutes before
starting to cook in order to in-
crease the suction power. Thus,
you shall have a continuous and
stable suction power when the
vapors arise.
•Operate your hood for 15 minutes
more after the end of cooking or
frying in order to remove the smell
and cooking vapor in the kitchen.
•When the hood is in use, especially
together with gas cookers, make
sure that environment is venti-
lated with clean air.
•Pay attention not to connect
the appliance to the flues used
by non-electrical devices. (E.g.:
Heater flue).

6 / 14 EN
Cooker Hood / User Manual
•Simultaneous and smooth op-
eration of the hood and another
device that require air is only pos-
sible when a low pressure of 4 Pa
(0.04 mbar) is reached, and thus
the reabsorption of the gas is
avoided. This can only be achieved
by means of air coming from un-
covered openings (door, window,
ventilation openings or other
technical measures). Pay utmost
attention to provide sufficient
air flow. A flue that provides air
ingress/egress is not enough for
this purpose.
1.1.3 Children's safety
•Packaging materials are danger-
ous to children. Keep packaging
materials in a safe place out of
reach of children.
•Electrical appliances are danger-
ous to children. Keep children
away from the product. Do not
allow children play with the appli-
ance.
•This appliance can be used by the
children who are at the age of 8 or
over and by the people who have
limited physical, sensory or men-
tal capacity or who do not have
knowledge and experience, as
long as they are supervised with
regard to safe use of the product
or they are instructed accordingly
and understand the risks of using
the product. Children should not
play with the appliance.
•
CAUTION:
Accessible parts may
heat up when used with a cooking
device.
1.2 Intended use
•This appliance is intended for do-
mestic use. It is not suitable for
commercial use and it must not be
used out of its intended use.
•The manufacturer shall not be lia-
ble for any damage caused by im-
proper use or handling.
•Service life of your appliance is 10
years. This is the period required
for availability of spare parts for
proper functioning of the product.
•
WARNING:
Failure to fix the
screws in concordance with the
instructions provided in the man-
ual may lead to electrical hazards.
1 Important safety and environmental
instructions

7 / 14 EN
Cooker Hood / User Manual
1.3 Compliance with WEEE
Directive and disposing of the
waste product
This product complies with EU WEEE
Directive (2012/19/EU). This product
bears a classification symbol for waste
electrical and electronic equipment
(WEEE).
This product has been manufactured with high
quality parts and materials which can be reused
and are suitable for recycling. Do not dispose of
the waste product with normal domestic and oth-
er wastes at the end of its service life. Take it to
the collection center for the recycling of electrical
and electronic equipment. Please consult your
local authorities to learn about these collection
centers.
1.4 Package information
Package of the product is made of recy-
clable materials in accordance with our
National Legislation. Do not dispose of
the packaging materials together with the do-
mestic or other wastes. Take them to the packag-
ing material collection points designated by the
local authorities.
1 Important safety and environmental
instructions

8 / 14 EN
Cooker Hood / User Manual
Markings on the product or the values stated in other documents supplied with the product are values obtained
under laboratory conditions as per relevant standards. These values may vary depending on operational and
environmental conditions of the product.
2 Technical specifıcations of your appliance
1
2
3
4
5
6
2.1 Controls and parts
1. Chimney Mounting Bracket
2. Upper Chimney Cover
3. Lower Chimney Cover
4. Motor Housing
5. Canopy Section
6. Aluminum Filters
2.2 Technical data
Power con-
sumption
220-240V ~50Hz
Absorption
400 W

9 / 14 EN
Cooker Hood / User Manual
3.1 Wall drilling and bracket
fixing
85 85
X
Y
min. 750 mm
3.1.1 Wall mounting
•Draw a vertical line on the supporting wall up to
the ceiling, or as high as practical, at the center
of the area in which the hood will be installed.
•Draw a horizontal line at 750 mm above the hob.
•Place bracket on the wall as shown about 1-2
mm from the ceiling or upper limit aligning the
center with the vertical reference line.
•Mark the wall at the center of the holes in the
bracket.
•Place bracket on the wall as shown at X mm
below the first bracket ( X = height of the upper
chimney section supplied).
•Aligning the center of the bracket with the
vertical line.
•Mark the wall at the center of the holes in the
bracket.
3 Installing your appliance
•Mark a reference point as indicated at 116 mm
from the vertical reference line and Y mm above
the horizontal reference line.
•Repeat this step on the other side.
•Drill Ø 8mm holes at all the center points marked.
•Insert the wall plugs in the wall.
•Fix the upper and lower bracket using the
screws (ST 5 X 30) supplied.
•Insert 2 screws (ST 5 X 30) supplied in the hood
body fixing holes, leaving a gap of 5-6 mm
between the wall and the head of the screw.
Dimensions
Models X
303 mm

10 / 14 EN
Cooker Hood / User Manual
3 Installing your appliance
3.2 Mounting the hood body
•Before attaching the hood body, tighten the two
screws Vr located on the hood body mounting
points.
•Hook the hood body onto the support screws.
•Fully tighten the support screws.
•Adjust screws Vr to level the hood body.
3.3 Connection
3.3.1 Ducted mode air exhaust
system
•When installing the ducted mode, connect the
hood to the chimney using either a flexible or
rigid pipe with ø 150 mm.
•Fix the pipe in position using sufficient pipe
clamps (not supplied).
•Remove any activated charcoal filters.
3.3.2 Recirculation mode air
outlet
•Insert the connection extension pieces laterally
in air outlet connection.
•Make sure that the outlet of the extension
pieces is horizontally and vertically aligned with
the chimney outlets.
•Ensure that the activated charcoal filters have
been inserted.

11 / 14 EN
Cooker Hood / User Manual
3 Installing your appliance
3.4 Chimney assembly
3.4.1 Upper chimney
•Slightly widen the two sides of the upper
chimney and hood them behind the mounting
brackets, ensuring that they are well seated.
•Secure the sides of the brackets using 4 screws
(M3 X 12).
3.4.2 Lower chimney
•Slightly widen the two sides of the chimney and
hook them between the upper chimney and the
wall, ensuring that they are well seated.
•Fix the lower parts laterally to the hood body
using 2 screws (ST4 X 8).
3.5 Ducted vs. Recirculation
mode
You can choose to install the hood as a ducted or
recirculation mode
•Ducted mode (Vented mode)
In the ducted mode, air is drawn into the hood, fat
are trapped by aluminum filters. Odors, fumes and
condensation are then expelled to the outside. In
this mode, only the aluminum filters are installed.
•Recirculation mode
In the recirculation mode, air is drawn into the
hood, fats are trapped by the filters, the air then
passes through charcoal filters to remove cooking
odors, the purified air is then passed back into the
kitchen. In this mode, both the aluminum filters
and the charcoal filters must be installed.

12 / 14 EN
Cooker Hood / User Manual
3 Installing your appliance
3.6 Installation of the oil
collector

13 / 14 EN
Cooker Hood / User Manual
4 Operating your appliance
The hood is equipped with electronic touch con-
trol that is located on the front edge of the range
hood canopy.
OFF mode
Have symbol appears on the panel. The grey color
symbol is on the left side of the panel.
ON mode
Use your finger touch at the symbol for 2 seconds,
the control panel symbols will light up.
+ / — Symbols
Touch at the symbols the extractor motor will
start to operate at desired speeds to 4 or 0 (stop).
1
Low speed
2
Medium speed
3
High speed
4
Extra high speed
0
Off
Light symbol
To switch ON the light, touch at the symbol, the
light bulb is on and the symbol light will change to
red light.
Delay timer
Touch the delay timer symbol once to activate the
short period delay timer, the cooker hood will op-
erate for 3 minutes and switch off.
After activated the short period delay timer func-
tion, the light of the symbol will turn to red and will
be flushing.
Touch the delay timer symbol twice to to activate
the long period delay timer, the cooker hood will
operate for 7 minutes and switch off.
After activated the long period delay timer func-
tion, the light of the symbol will turn to red and will
light up continously.

14 / 14 EN
Cooker Hood / User Manual
5 Cleaning and maintenance
5.1 Surfaces
Wash with warm soapy water and a soft sponge.
Never use abrasive detergent, scouring pads, steel
wool or solvents on any part of this appliance as
this will cause irreparable damage. Dry the kitchen
hood using a cloth that does not produce fluff.
5.2 Aluminium filters
Wash in the dishwasher, it is advisable to stack
them vertically to avoid food residue sticking to
them. Or soak it in a degreasing agent until grease
dissolve and rinsing them under the tap, then
rinse off.
5.3 Charcoal filters
(Recirculation version)
The charcoal filter should be replaced when it is
noticeably dirty or discolored (usually after 6 to
12 months, depending on hood usage). It is not
washable and cannot be regenerated, must be re-
placed with appropriate types. To ensure this ap-
pliance functions effectively, regular maintenance
is a must. Clogged filters restrict airflow and may
cause the motor to overheat.

15 / 14 EN
Cooker Hood / User Manual
6 Troubleshooting
Symptoms Possible Cause Action
Motor does not working No electrical supply Ensure the plug is connected properly.
Reset circuit breaker.
Poor airflow Aluminum filters clogged Clean the filters and replace when dry
Charcoal filters clogged Replace charcoal the new filters charcoal with new
filterssets
Motor running but no airflow Butterfly valve jammed Contact technician
Motor cuts after a few minutes High temperature safety
device activated.
The kitchen is not sufficiently ventilated.
The hood is installed too
near the cooking stove.
The hood must be at least 65 cm from stove.
Oil dripping onto stove Aluminum filter saturated. Wash the aluminum filters.
Whirring sound Foreign object in contact
with fan blade.
Contact technician.
Lamps do not light up Lamps are burnt out. Change the lamps.
Lamps are loose. Tighten the lamps.

Table of contents
Other Dawlance Ventilation Hood manuals
Popular Ventilation Hood manuals by other brands

FALMEC
FALMEC Mercurio FPMEU24B3SS Instruction booklet

Nederman
Nederman Pneumatic Track System instruction manual

Kenmore
Kenmore ELITE 233.50363200 Use & care / installation manual

Solatube
Solatube Brighten Up 160 DS installation guide

Electrolux
Electrolux LFI769X user manual

Zanussi
Zanussi Professional Export 642013 Specifications

Sirius Satellite Radio
Sirius Satellite Radio SU1 installation instructions

Inalto
Inalto ARC60BS quick start guide

Victory
Victory Jupiter Installation guide and user's manual

Broan
Broan QB130SS instructions

BLAUBERG Ventilatoren
BLAUBERG Ventilatoren AH-5 160 Duo Installation instruction

Electrolux
Electrolux 7332543810222 installation instructions