Days Casa Med Classic FS User manual

NURSING BEDS
OPERATING MANUAL
Doc.-No.: E1-04-143-001
Casa Med Classic FS
with DEWERT®drive systems


CasaMedClassicFS 3
Issued:25.07.2007
NURSING BEDS
All Days Healthcare nursing bedsaremanufacturedusing themost
modern technical facilities to ensure the highest lying and operating
comfort possible.Furthermore, the construction has been designed
placinggreat value on simple handlingand operation.
The nursing beds described in this manual are constructed to the
followingstandards:
DINEN 1970 - 2000 (standard for nursing beds)
and
DINEN 60601-2-38 (standard for hospitalbeds) in addition.
Since the nursing bed motor system has a control system with a clock
frequency of > 9 kHz, and is mainly driven by motor for short periods,
EN 55014-1 applies in this case in accordance with EN 60601-1-2
36.201.1.4.
A large variety of useful accessories rounds off our range
of nursing beds.
This operating manual will help you get to know the function of our
nursing beds and, in addition, describes
• assembling the nursing bed
• operating the adjustment controls
• care and maintenance of the nursing bed
The manual has been drawn up using information available at the time
of printing with regard to construction and operation of the nursing bed.
We reserve the right to make changes due to technical improvements.
If you have any other questions about this nursing bed, please contact
yoursupplier.
Introduction

Casa MedClassicFS
4
Issued:25.07.2007
NURSING BEDS
Contents
1.0 Safetyinstructions .............................................................................7
1.1 Symbols used..............................................................................7
1.2 Properuse ...................................................................................7
1.3 Generalinformation......................................................................7
1.4 Notes on electrical fittings ...........................................................8
1.5 Notes for nursing personnel, attendantsandoperator ..................9
1.6 Notes on setting up the nursing beds......................................... 10
1.7 Noteson maintenance andinspection........................................ 11
2.0 Nursing bed model .......................................................................... 12
3.0 Extent ofdelivery ............................................................................. 12
4.0 Components ..................................................................................... 15
5.0 Fittings: bed frame ........................................................................... 15
5.1 Bed rails .................................................................................... 15
5.2 Mattresssupport .......................................................................16
5.3 Angleadjustment foot section (Rastomat) ................................. 16
5.4 Bed ends ................................................................................... 16
6.0 Fittings:Electrics ............................................................................. 17
6.1 Lift motor ................................................................................... 17
6.2 Handset ....................................................................................17
6.2.1 Hand set locking function ...............................................17
6.3 Mattress support motor ............................................................. 18
6.4 Controlunit ................................................................................ 18
7.0 Setting up the nursing bed.............................................................. 19
7.1 Location selection and space requirements ...............................19
7.2 Preparation- only when suppliedwith transportand
storage system.......................................................................... 20
7.3 Connecting the mattress support head and foot section ............ 20
7.4 Fixing the bed ends ...................................................................21
7.5 Connecting the lift motor, hand set, mattress support motor
andAccumulator box .................................................................22
7.6 Inserting the mattress support motor with control unit ...............24
7.7 Assembly of accumulator box to the nursing bed
(onlynursingbedswithTrendelenburg’sposition) .......................25
7.8 Inserting the mattress support motor for foot section adjustment 26
7.9 Routing and fixing the control unit mains cable .......................... 27
7.10 Routing the electricalelement cables.........................................28
7.11 Routingthe hand set cable ........................................................29
7.12 Carrying outa performance test .................................................29
7.13 Installing the bed rails ................................................................ 30
7.14 Installing the patient pole ........................................................... 31

CasaMedClassicFS 5
Issued:25.07.2007
NURSING BEDS
Contents
8.0 Safetydevices .................................................................................. 32
8.1 Controlunit ................................................................................ 32
8.2 Accumulatorbox
(onlynursingbedswithTrendelenburg’sposition) .......................33
8.2.1 Generalinformation.........................................................33
8.2.2 Chargingtheaccumulatorbox ........................................33
8.2.3 Storage of the accumulator box ......................................33
8.3 Headrest adjustment emergency unlocking................................34
9.0 Operating the nursing bed .............................................................. 35
9.1 General notesonoperation ........................................................36
9.2 Plugging in the mains cable .......................................................36
9.3 Raisingor lowering thebed rails.................................................37
9.4 Locking the function keys for the nursing bed adjustments ........ 38
9.4.1 Magnetically locking/unlocking the hand set function keys
(handset withoutTrendelenburg) .....................................40
9.4.2 Magnetically locking/unlocking the hand set function keys
(handset withTrendelenburg).......................................... 41
9.4.3 Mechanically locking/unlocking the hand set function keys
(handset withoutTrendelenburg) .....................................42
9.4.4 Mechanically locking/unlocking the hand set function keys
(handset withTrendelenburg).......................................... 43
9.4.5 Mechanically locking/unlocking the hand set function keys
(programmable handsetwithoutandwithTrendelenburg) .. 44
9.4.6 Programmingthe function keys ......................................45
9.5 Operating thenursing bedadjustments ......................................46
9.5.1 Handset.........................................................................46
9.5.2 HandsetwithTrendelenburg’s position ............................47
9.6 Adjusting the foot section (Rastomat) ........................................ 48
9.7 Operating the brakes.................................................................. 49
9.8 Pushingthe nursing bed and patient transport ........................... 49
9.9 Adjusting the slatted frame springiness .....................................50
10.0 Patient-related safety measures and adjustments made by
nursing personnel ........................................................................... 51
10.1 Limits of use..............................................................................51
10.2 Gapdimensions and bedrailspacing.........................................51
10.3 Locking the nursing bed adjustments at the hand set ................52
11.0 Cleaning ........................................................................................... 52
12.0 Testing plan for nursing beds ......................................................... 53
12.1 Daily checks..............................................................................52
12.2 6-monthly inspection - check control unit ...................................55

Casa MedClassicFS
6
Issued:25.07.2007
NURSING BEDS
Contents
12.3 Testingintervals......................................................................... 54
12.4 Inspection of mechanicalcomponents ....................................... 55
12.5 Inspection of electrical components........................................... 57
12.6 Measurements ...........................................................................58
13.0 Troubleshooting............................................................................... 59
14.0 Storage of the nursing bed with the transport and storage system
(TLSU) ............................................................................................... 60
14.1 Dismantling the nursingbed.......................................................60
14.2 Placing the components in the transport and storage system ....64
15.0 Disposal............................................................................................ 65
16.0 Appendix .......................................................................................... 66
16.1 Specifications: nursing bed ........................................................66
16.2 Specifications: Drive system .....................................................67
16.3 Nursingbedlabelling..................................................................67
16.3.1 Nameplate ......................................................................67
16.3.2 Patientpolecomponent sign ........................................... 68
16.4 Accessories...............................................................................68
16.5 Spare parts................................................................................ 68
17.0 Warranty............................................................................................ 69

CasaMedClassicFS 7
Issued:25.07.2007
NURSING BEDS
1.3 General information
Before assembling or using the nursing bed, please read this
operating manual carefully through!
Ensure that:
• the complete operating manual is read by all persons entrusted
with the setting up, operation or maintenance of the nursing bed.
• all persons entrusted with the setting up, operation or maintenance
of the nursing bed have access to this operating manual at all
times.
Anydamages resultingfrom nonobservanceof this operating manual
areexcluded from theguarantee.
1.0 Safety instructions
Safety information
1.2 Proper use
Days Healthcare nursingbeds are intendedfor continuous use
instead of household beds.They are intended for use in alleviation or
compensation of a handicap or inability and for making the working
conditionsof nursing personneleasier.
Days Healthcare
nursing beds are only approved for use by
persons of over 12 years of age due to their complexity.
The nursing beds are intended for use in:
• homenursing
• nursinghome and rehabilitation institutions
1.1 Symbols used
This instruction manual contains the following symbols which are
used to highlight special hazards in dealing with the nursing bed or
information for simplifying handling of the nursing bed.
NOTE
You will also find information about dealing with the
product under this symbol.
Caution!
This symbol identifies safety information which notifies
youof hazards whendealing with the product

Casa MedClassicFS
8
Issued:25.07.2007
NURSING BEDS
Risk of short-circuit and fire!
• Always ensure that the mains cable cannot be run over
when moving the nursing bed or bedside tables, or by
cleaning and lifting equipment such as hoists.
• Always check the cabling for correct positioning before use,
jamming or kinking of the cable must be avoided.
• Alwaysremovethemainsplugbeforelongperiodsofnon-use.
1.4 Notes on electrical fittings
Limitations of use!
• Patientstallerthan195cm(6´-5´´)shouldnotusethisnursingbed.
N.b.An extended bed frame to suit patients up to 219 cm
(7´-1´´)isavailablefrom
Days Healthcare.
Safety information
Accident hazard!
• Always check that the cabling is in perfect working order and
that the tension protection is functioning before use.
• Only use the nursing bed for its proper intended use.
• Maximum safe working load = see technical spezification
• Only use this nursing bed when it is in perfect working order.
• Always lower the nursing bed to its lowest height when not
undersupervision.
• It is imperative that you always rectify any faults which could
influence the function and safety of the nursing bed
immediately.
• Always secure the nursing bed against rolling by engaging the
wheelbrakeswhenunattended!
• Always use all of the wheel brakes on the nursing bed.
• Onlyuse accessories approved by Days Healthcare
.
CasaMedClassicFS 9
Issued:25.07.2007
NURSING BEDS
Possible danger through altering patient’s position!
• Always lock all hand set adjustment functions on the hand set
which could cause danger to the patient’s health if adjusted
(consultdoctor).
• Always take into account the patient’s condition before locking
theadjustment options
Safety information
1.5 Notes for nursing personnel, attendants and operator
Accident hazard!
• Do not use electrical medical appliances on patients in
thesenursing beds.
• Do not use the nursing bed in the vicinity of strong electro-
magneticfields (forexample majormedical equipment).
• Always plug the nursing bed mains plug into a separate
wall socket.
• Route the mains cable to the power supply socket so that no
mechanical tension results, and so that it cannot be crushed,
bentor run over.
• Pleaseobservetheappropriate equipment operatingand
installation instructions with regard to any additional safety
risks that may arise when combining the nursing care bed
withotherequipment.
Should you have any questions in this respect, please contact
your orthopaedic and sanitary supplieror Days Healthcare
directly.
Danger to life and injury hazard through crushing!
• When carrying out adjustments, observe the patient in the
bedandthe bed’ssurroundings.
• If the patient is underweight, ensure that the patient cannot slip
downbetween themattress and bed rails.
• If the patient is underweight, always use the bed rail protectors
suppliedbyDays Healthcare
.
• Always ensure that the bed rails are locked in properly.
Accident hazard due to falling out!
• Always move the nursing bed to the lowest height when
unsupervisedor forentering or exiting the bed.

Casa MedClassicFS
10
Issued:25.07.2007
NURSING BEDS
Always carry out a performance test after any
assembly work!
Trapping hazard!
There is a possible danger of trapping at all joints on the nursing
bed and at support points for the mattress support.All hazard
points on the nursing bed are identified by this symbol.
• If the mattress support has been folded up, secure it against
unintentionalunfolding by suitablemethods.
Safety information
1.6 Notes on setting up the nursing beds
Injury hazard due to improper assembly!
• Ensure that all components in the nursing bed have been
correctlyassembled.
• Check that all adjustment options are in perfect working
order after assembly.
Accident hazard!
• Only carry out assembly work using suitable tools.
• Only carry out assembly work if you are a competend
person who is used to working with the tools required.
Risk of short-circuit and fire!
• Beforemoving the nursing bed, unplug the mains cable and
ensure that the mains cable cannot be run over.
• The nursing bed may not be used in surroundings in which it is
possible that flammable gases or vapours
(e.g.from anaesthetics) arepresent.
Danger due to actuator motor overheating!
• Before adjusting the bed height, ensure that nothing is blocking
the full adjustment movement.
• Avoid using the actuator motors for more than two minutes.
Maximumcontinuous operationof actuator motors = 2 minutes.
Minimum pause after 2 minutes operation = 18 minutes.
• Never use more than two actuator motors simultaneously.

CasaMedClassicFS 11
Issued:25.07.2007
NURSING BEDS
Hazards due to electrical and mechanical faults!
• Alwaysremove faulty nursing beds from operation and secure
themagainst unauthorised use (remove mainsplug).
• Onlyuse original spareparts suppliedbyDays Healthcare.
• Always carry out the prescribed maintenance work at the
intervals stated.
• Do not carry out any alterations to the electrical or mechanical
fittings supplied with the bed unless authorised to do so by the
manufacturer.Anymanufacturer’s guaranteeliabilityis voided
byunauthorisedalterations.
• Onlycarry out maintenanceand repair workwith suitable tools.
• Donot openelectrical components.
Safety information
1.7 Notes on maintenance and inspection
Always carry out a performance test after
maintenance work and inspections!
• Whenoperating theadjustment motors,ensure thatthe nursing
bedcabling cannotbe crushedor overstretched.
All inspection work must only be carried out by competent engineers,
capable of evaluating the condition status and recognising any possible
effects and hazards, due to their specialist training, knowledge and
experiencein addition to knowledge of all relevant regulations.
Alwaysread therelevant chapters thoroughly before carrying out
maintenance work.
Any damages resulting from nonobservance of this manual are excluded
from any guarantee of liability.

Casa MedClassicFS
12
Issued:25.07.2007
NURSING BEDS
Casa Med Classic FS
Mattresssupport Mattress support
Contents: 1 x (1) Mattress support,
headsection
1 x (2) Mattress support,
foot section
4-partseparation
Version: 4-part separation of mattress
support
Before commencing assembly of the nur-
sing bed, check the package contents
against the list supplied.
Small parts and fixings are included in the
deliverydepending on the nursingbed
version and are not shown in detail.
If any faults are apparent or components are
missing, please contact Days Healthcare or
yoursupplier.
3.0 Extent of delivery
Transport and storage
system(TLSU)
2.0 Nursing bed model
Nursing bed models
All components are packed in cartons in
accordance with your order, and packed as
a group on a transport pallet or bound up
using transport and storage systems to
form one transport unit.

CasaMedClassicFS 13
Issued:25.07.2007
NURSING BEDS
Electrical elements
1 x (1) Mattress support motor with
control unit and mains cable
2 x (2) Dummyplugsfornon-used
jack sockets
1 x (3) Tension protection for control unit
socket strip
1 x (4) mattress support motor
Electrical elements
Bed rails
Bed end
2 x model Casa Med Classic FS Bed end
Extent of delivery
bed rails*
8 x(1) plastic cap for bed rails
4 x (2) bedrail panels
4 x(3) slider for bed rails

Casa MedClassicFS
14
Issued:25.07.2007
NURSING BEDS
Patient
pole
Patient pole
1 x patient pole with strap and
handhold
only for nursing beds withTrendelenburg’s
position:
1 x rechargeablebattery (Accumulatorbox)
with metal support and fixing screw
Accumulatorbox
Extent of delivery
HandsetDepending on nursing bed version:
1 x (5) Hand set, without pushbutton for
Trendelenburg’sposition
1 x (6) Hand set,with pushbutton for
Trendelenburg’sposition
For electrically lockable hand set:
1 x(7) Magnetic key
For mechanically lockable hand set:
(canbe recognised from rotary knob (a)
on rear of hand set)
1 x(8) Rotary key

CasaMedClassicFS 15
Issued:25.07.2007
NURSING BEDS
Assembling the nursing beds
5.1 Bed rails
The bed rails (1) are fixed to the head end
and foot end on the bed using plastic
sliders.
Both the upper lock for lowering and the
lower lock for removing the bed rails can
be unlocked using the fastening knob (2).
5.0 Fittings: bed frame bed rails
Bed rails
Handset
Patient pole
Bed rails Mattresssupport
4.0 Components
Bedend
(head section)
Bedend
(foot section)

Casa MedClassicFS
16
Issued:25.07.2007
NURSING BEDS
Bed end
5.4 Bed ends
The bed ends are fitted with a lift motor (1)
and two castors (2).
Thecastors areprovided with brakes.
The brakes lock both rolling and swiveling
movements.
Rastomat
5.3 Angle adjustment foot section
(Rastomat)
The automatic catch (1) mounted at the foot
end of the mattress support enables
incrementaladjustment ofthe lower leg
adjustment (3) of the 4-part mattress
support.
5.2 Mattress support
The mattress support is separated into 4
parts.The wooden slats can be wiped clean,
and are fixed to the frame with plastic fixings.
The mattress is fixed securely to the mattress
support using four mattress fixings (3).
4-part separation of mattress support:
The head section (2) can be electrically
adjusted up to 70°, the foot section (3)
up to 20°.
Mattresssupport
Fittings: bed frame

CasaMedClassicFS 17
Issued:25.07.2007
NURSING BEDS
Lift motor
6.0 Fittings: Electrics
Fittings: Electrics
6.2 Hand set
The hand set is used to operate all nursing
bedactuator motors. Operation takes place
using the keypad on the front side of the
handset.
The fixing bracket on the rear of the hand
set can be used to hold it in an easily
reachableposition on the nursing bed.
6.2.1 Hand set locking function
Depending on the version, the hand set is
fitted with an electrical or mechanical
pushbuttonlocking device.
The locking device secures the nursing bed
againstunauthoriseduse.
The electrical locking device is switched on
and off using the magnetic key supplied.
The mechanical locking device is switched
using the rotary switch on the rear of the
hand set (a).
Handset
6.1 Lift motor
The lift motor (1) is mounted directly on the
nursing bed head section or foot section.
The motor lift movement is 40 cm.This
enables the nursing bed lying area to be
raised from 40 cm to 80 cm.
Magnetickey
Rotaryswitch

Casa MedClassicFS
18
Issued:25.07.2007
NURSING BEDS
Fittings: Electrics
Mattresssupportmotor
with control unit
Mattresssupportmotor
6.3 Mattress support motor
The nursing bed with 4-part mattress
support is fitted with two mattress support
motors.They are fitted under the mattress
support.One of the motors is used for
adjusting the head section, and one for
adjusting the foot section of the mattress
support.
6.4 Control unit
Thecontrol unit (1) mounted under the
mattress support is fitted with a first-error-
proof electronics unit.This prevents
undesirablefunctional sequences dueto
first component defects.
This is implemented as a splashproofed
housing.
The mains cable in its strengthened version
is fitted with a push-on anti-kink device and
tensionprotection.
CasaMedClassicFS 19
Issued:25.07.2007
NURSING BEDS
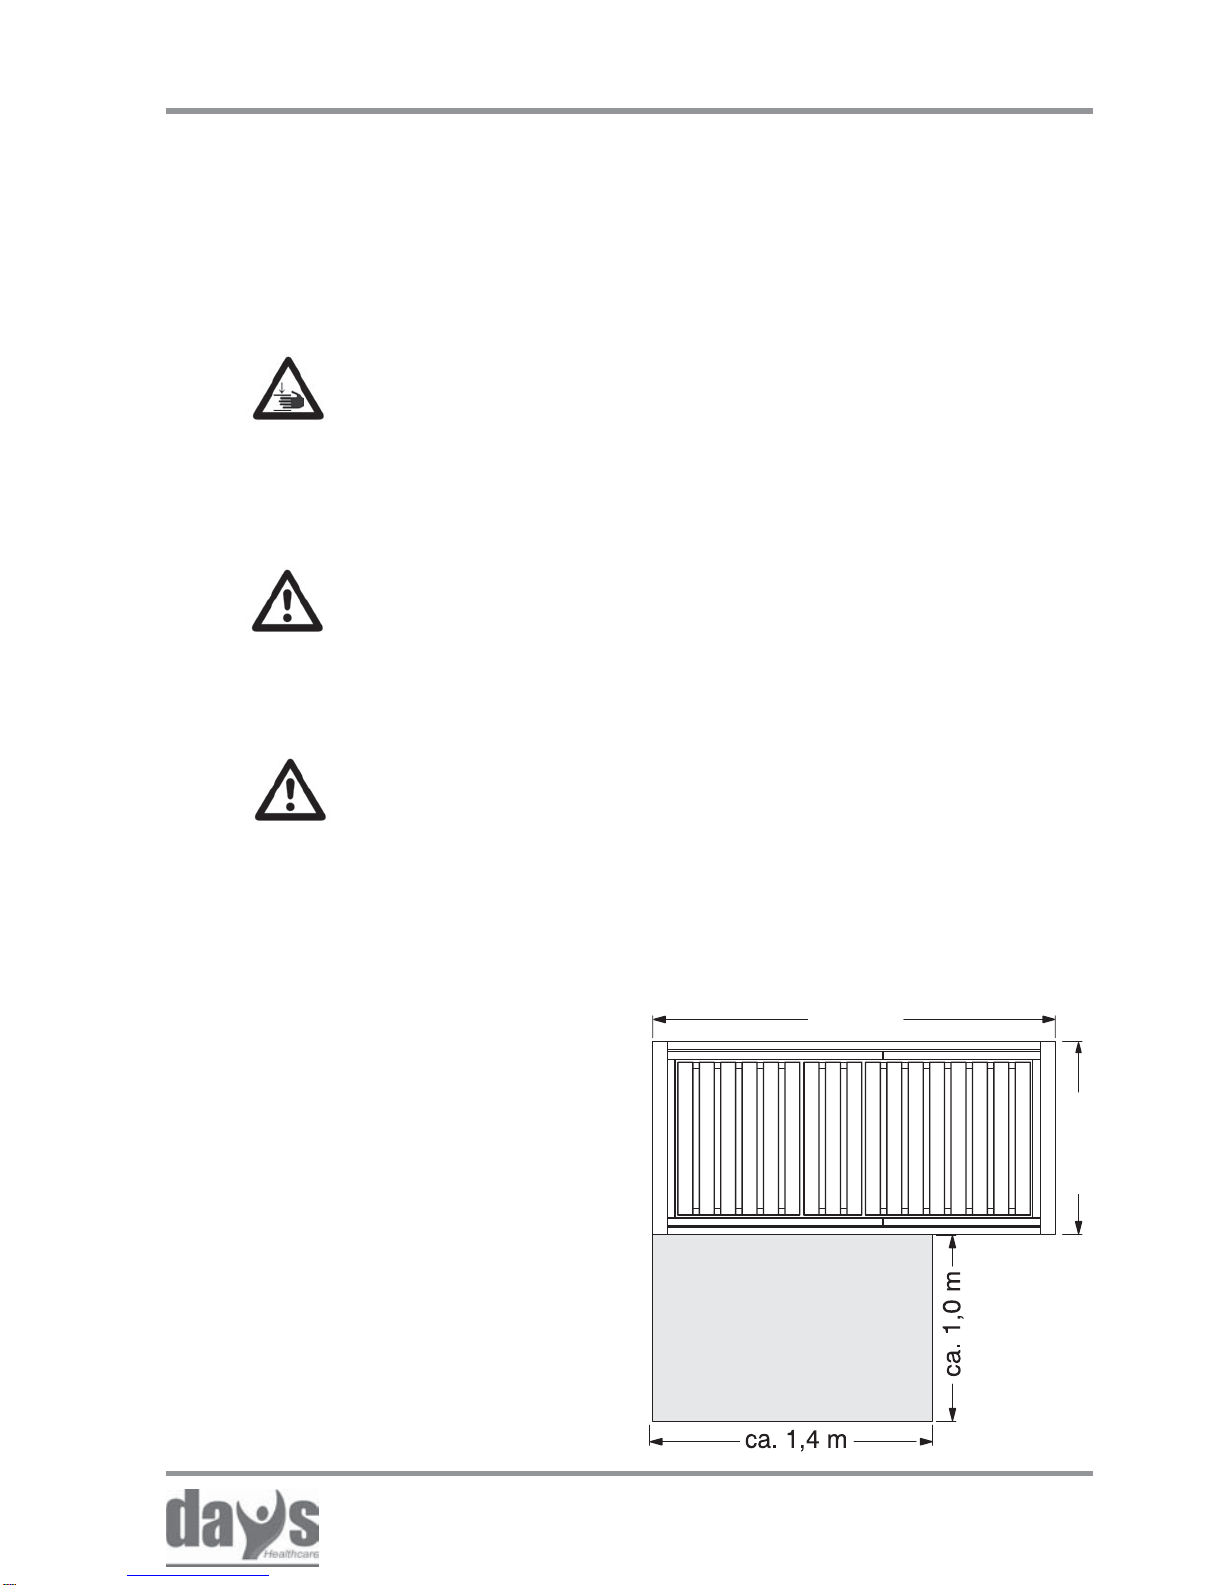
2,06 m
1,01 m
7.1 Location selection and space requirements
Accident hazard!
• Only carry out assembly work using suitable tools.
• Only carry out assembly work if you are used to working with
thetoolsrequired.
Whenselecting the bed’s
location, ensure that:
• there is enough space to nurse
the patient in the bed on at
least one of the bed’s sides.
• there must be a mains socket
near the location in an easily
reachableposition.
The illustration shows you the
requireddimensions for setting
up the nursing bed and the
space around it.
space to nurse
thepatient
Trapping hazard!
There is a possible danger of trapping at all joints on the nursing
bed and at support points for the mattress support.
• If the mattress support has been folded up, secure it against
unintentionalunfolding by suitablemethods.
7.0 Setting up the nursing bed
Before commencing assembly of the nursing bed, check the package
contents against chapter 3.0 „Extent of delivery“.
If any faults are apparent or components are missing, please contact
Days Healthcare or yoursupplier.
Injury hazard due to improper assembly!
• Ensure that all components in the nursing bed have been
correctlyassembled.
• Check that all adjustment options are in perfect working
order after assembly.
Setting up the nursing bed

Casa MedClassicFS
20
Issued:25.07.2007
NURSING BEDS
Setting up the nursing bed
Loosen all safety screws (a) and remove
both bed sections (2) from the transport
and storage system.
➨
Connectingthe mattress
support
Push the foot section (1) with the
guides into the head section frame
(2) as far as the stop.
➨
Pull the patient pole out of the
mounting tube (1) in the transport and
storage system.
➨
Remove all cartons from the transport
and storage system.
➨
NOTE
You should retain all cartons if
possible for storage of the nursing
bed at a later date.
7.2 Preparation - only when supplied
with transport and storage system
7.3 Connecting the mattress support
head and foot section
Secure the mattress support tube
connections by screwing in and
tighteningthe handlevers (3).
➨
Table of contents
Other Days Indoor Furnishing manuals

Popular Indoor Furnishing manuals by other brands

Regency
Regency LWMS3015 Assembly instructions

Furniture of America
Furniture of America CM7751C Assembly instructions

Safavieh Furniture
Safavieh Furniture Estella CNS5731 manual

PLACES OF STYLE
PLACES OF STYLE Ovalfuss Assembly instruction

Trasman
Trasman 1138 Bo1 Assembly manual

Costway
Costway JV10856 manual


